Pioneer A-A9MK2-K: инструкция
Раздел: Бытовая, кухонная техника, электроника и оборудование
Тип: Домашний кинотеатр
Инструкция к Домашнему кинотеатру Pioneer A-A9MK2-K
Оглавление
-
- Содержание
- Глава 1: Перед началом работы Характеристики Комплектация
- Установка батареek Установка усилителя
- Глава 2: Подключение Подключение кабелей Подключение аудио компонентов
- Подключение акустической системы
- Подключение к сети
- Глава 3: Органы управления и индикаторы Передняя панель Дисплей
- Пульт дистанционного управления
- Глава 4: Воспроизведение Использование режима прямого воспроизведения Использование функции Sound Retriever Воспроизведение других источников Использование органов управления балансом и тембром
- Запись аудио сигнала (на внешнее записывающее устройство)
- Глава 5: Подключение других устройств Использование интерфейса USB
- Подключение дополнительного усилителя
- Управление другими компонентами Pioneer с помощью сенсора этого усилителя
- Глава 6: Дополнительная информация Проблема Возможные действия
- Технические характеристики
- Чистка устройства

A-A9MK2-
K
A9
Integrated Amplifier | Amplificateur Intégré |
Eingebauter Verstärker | Geïntegreerde versterker |
Amplificatore Integrato | Amplificador integrado
BZ02
Discover the benefits of registering your product online at
http://www.pioneer.co.uk
(or http://www.pioneer.eu).
Découvrez les nombreux avantages offerts en enregistrant votre produit en ligne
maintenant sur
http://www.pioneer.fr
(ou http://www.pioneer.eu).
Bitte nutzen Sie die Möglichkeit zur Registrierung Ihres Produktes
unter
http://www.pioneer.de
(oder http://www.pioneer.eu)
Ontdek nu de voordelen van online registratie! Registreer uw Pioneer product via
http://www.pioneer.nl - http://www.pioneer.be
(of http://www.pioneer.eu).
Registra il tuo prodotto su
http://www.pioneer.it
(o http://www.pioneer.eu) e
scopri subito quali vantaggi puoi ottenere!
Registre su producto en
http://www.pioneer.es
(o en http://www.pioneer.eu) Descubra los beneficios de registrarse on-line:
Зарегистрируйте Baшe изделие на
http://www.pioneer-rus.ru
(или
http://www.pioneer.eu). Oзнакомьтесь с преимуществами регистрации в Интернет
Operating Instructions | Mode d’emploi | Bedienungsanleitung |
Handleiding | Istruzioni per I’uso | Manual de instrucciones |
Инструкции по эксплуатации
A9MK2_SYXCN5.book 1 ページ 2009年4月3日 金曜日 午後7時10分
IMPORTANT
CAUTION
RISK OF ELECTRIC SHOCK
DO NOT OPEN
The lightning flash with arrowhead symbol,
CAUTION:
The exclamation point within an equilateral
within an equilateral triangle, is intended to
TO PREVENT THE RISK OF ELECTRIC
triangle is intended to alert the user to the
alert the user to the presence of uninsulated
SHOCK, DO NOT REMOVE COVER (OR
presence of important operating and
“dangerous voltage” within the product’s
BACK). NO USER-SERVICEABLE PARTS
maintenance (servicing) instructions in the
enclosure that may be of sufficient
INSIDE. REFER SERVICING TO QUALIFIED
literature accompanying the appliance.
magnitude to constitute a risk of electric
SERVICE PERSONNEL.
D3-4-2-1-1_A1_En
shock to persons.
VENTILATION CAUTION
&$(# !'&!"'*'%#%"""#%)!'%
When installing this unit, make sure to leave space
"%&"-%"!"'#!,"!'!%
around the unit for ventilation to improve heat
*'$(!%'&$(# !'&(&)&"%
radiation (at least 60 cm at top, 10 cm at rear, and
"*%#"'"%+#"&''"%##!&#&!%!
30 cm at each side).
"% "&'(%
!
WARNING
Slots and openings in the cabinet are provided for
ventilation to ensure reliable operation of the
product, and to protect it from overheating. To
"#%)!'%+%"!"'#!*!
prevent fire hazard, the openings should never be
&"(%&&(&'!"!'
blocked or covered with items (such as newspapers,
$(# !'
!
table-cloths, curtains) or by operating the
equipment on thick carpet or a bed.
D3-4-2-1-7b_A_En
Operating Environment
Operating environment temperature and humidity:
+5 °C to +35 °C (+41 °F to +95 °F); less than 85 %RH
(cooling vents not blocked)
Do not install this unit in a poorly ventilated area, or in
locations exposed to high humidity or direct sunlight (or
strong artificial light)
D3-4-2-1-7c*_A1_En
WARNING
Before plugging in for the first time, read the following
section carefully.
The voltage of the available power supply differs
according to country or region. Be sure that the
power supply voltage of the area where this unit
If the AC plug of this unit does not match the AC
will be used meets the required voltage (e.g., 230 V
outlet you want to use, the plug must be removed
or 120 V) written on the rear panel.
D3-4-2-1-4_A_En
and appropriate one fitted. Replacement and
mounting of an AC plug on the power supply cord of
this unit should be performed only by qualified
service personnel. If connected to an AC outlet, the
cut-off plug can cause severe electrical shock. Make
sure it is properly disposed of after removal.
The equipment should be disconnected by removing
the mains plug from the wall socket when left unused
for a long period of time (for example, when on
vacation).
D3-4-2-2-1a_A1_En
POWER
STANDBY
ONOFF
PHONES
DIRECT
INPUT SELECTOR
VOLUME
A9
A9MK2_SYXCN5_cover_anki.fm 2 ページ 2009年4月7日 火曜日 午後2時7分
A9MK2_SYXCN5.book 3 ページ 2009年4月3日 金曜日 午後7時10分
CAUTION
POWER-CORD CAUTION
The POWER switch on this unit will not completely
Handle the power cord by the plug. Do not pull out the
shut off all power from the AC outlet. Since the
plug by tugging the cord and never touch the power
power cord serves as the main disconnect device for
cord when your hands are wet as this could cause a
the unit, you will need to unplug it from the AC outlet
short circuit or electric shock. Do not place the unit, a
to shut down all power. Therefore, make sure the
piece of furniture, etc., on the power cord, or pinch the
unit has been installed so that the power cord can
cord. Never make a knot in the cord or tie it with other
be easily unplugged from the AC outlet in case of an
cords. The power cords should be routed such that they
accident. To avoid fire hazard, the power cord should
are not likely to be stepped on. A damaged power cord
also be unplugged from the AC outlet when left
can cause a fire or give you an electrical shock. Check
unused for a long period of time (for example, when
the power cord once in a while. When you find it
on vacation).
D3-4-2-2-2a_A_En
damaged, ask your nearest PIONEER authorized
service center or your dealer for a replacement.
S002*_En
Information for users on collection and disposal of old equipment and used batteries
Symbol for
These symbols on the products, packaging, and/or accompanying documents mean
equipment
that used electrical and electronic products and batteries should not be mixed with
general household waste.
For proper treatment, recovery and recycling of old products and used batteries,
please take them to applicable collection points in accordance with your national
legislation.
By disposing of these products and batteries correctly, you will help to save valuable
Symbol examples
resources and prevent any potential negative effects on human health and the
for batteries
environment which could otherwise arise from inappropriate waste handling.
For more information about collection and recycling of old products and batteries,
please contact your local municipality, your waste disposal service or the point of sale
where you purchased the items.
These symbols are only valid in the European Union.
For countries outside the European Union:
If you wish to discard these items, please contact your local authorities or dealer and
ask for the correct method of disposal.
Pb
K058a_A1_En
Replacement and mounting of an AC plug on the power supply cord of this unit should be performed only by qualified
service personnel.
IMPORTANT: THE MOULDED PLUG
This appliance is supplied with a moulded three pin mains plug for your safety and convenience. A 10 amp fuse is fitted in this plug. Should
the fuse need to be replaced, please ensure that the replacement fuse has a rating of 10 amps and that it is approved by ASTA or BSI to
BS1362.
Check for the ASTA mark or the BSI mark on the body of the fuse.
If the plug contains a removable fuse cover, you must ensure that it is refitted when the fuse is replaced. If you lose the fuse cover the plug
must not be used until a replacement cover is obtained. A replacement fuse cover can be obtained from your local dealer.
If the fitted moulded plug is unsuitable for your socket outlet, then the fuse shall be removed and the plug cut off and disposed of
safely. There is a danger of severe electrical shock if the cut off plug is inserted into any 13 amp socket.
If a new plug is to be fitted, please observe the wiring code as shown below. If in any doubt, please consult a qualified electrician.
IMPORTANT: The wires in this mains lead are coloured in accordance with the following code:
Blue : Neutral Brown : Live
As the colours of the wires in the mains lead of this appliance may not correspond with the coloured markings identifying the terminals in
your plug, proceed as follows ;
The wire which is coloured BLUE must be connected to the terminal which is marked with the
letter N or coloured BLACK.
The wire which is coloured BROWN must be connected to the terminal which is marked with the
letter L or coloured RED.
How to replace the fuse: Open the fuse compartment with a screwdriver and replace the fuse.
D3-4-2-1-2-2_B_En

A9MK2_SYXCN5.book 4 ページ 2009年4月3日 金曜日 午後7時10分
Thank you for buying this Pioneer product.
Please read through these operating instructions so that you will know how to operate your model
properly. After you have finished reading the instructions, put them in a safe place for future
reference.
Contents
01 Before you start
04 Listening to your system
Features . . . . . . . . . . . . . . . . . . . . . . . . . . . . . 5
Using Direct listening . . . . . . . . . . . . . . . . . . 12
What’s in the box . . . . . . . . . . . . . . . . . . . . . . 5
Using the Sound Retriever . . . . . . . . . . . . . . 12
Inserting the battery . . . . . . . . . . . . . . . . . . . . 6
Using the balance and tone controls. . . . . . . 12
Installing the amplifier . . . . . . . . . . . . . . . . . . 6
Playing other sources . . . . . . . . . . . . . . . . . . 12
Making an audio recording . . . . . . . . . . . . . . 13
02 Connecting up
Making cable connections . . . . . . . . . . . . . . . 7
05 Other connections
Connecting audio components. . . . . . . . . . . . 7
Using the USB interface . . . . . . . . . . . . . . . . 14
Connecting the speakers . . . . . . . . . . . . . . . . 8
Connecting an additional amplifier . . . . . . . . 15
Plugging in . . . . . . . . . . . . . . . . . . . . . . . . . . . 9
Operating other Pioneer components with
this unit’s sensor. . . . . . . . . . . . . . . . . . . . . . 16
03 Controls and displays
Front panel . . . . . . . . . . . . . . . . . . . . . . . . . . 10
06 Additional information
Display . . . . . . . . . . . . . . . . . . . . . . . . . . . . . 10
Troubleshooting . . . . . . . . . . . . . . . . . . . . . . 17
Remote control . . . . . . . . . . . . . . . . . . . . . . . 11
Specifications . . . . . . . . . . . . . . . . . . . . . . . . 18
Using the remote control . . . . . . . . . . . . . . 11
Cleaning the unit . . . . . . . . . . . . . . . . . . . . 19
4
En

A9MK2_SYXCN5.book 5 ページ 2009年4月3日 金曜日 午後7時10分
Before you start 01
Chapter 1:
English
Before you start
• Fine-tuned to world-class standards
With the cooperation of the world-class studio
Features
engineers at AIR Studios, this amplifier has
• Quick response power supply circuit
been AIR Studios certified:
The superior power supply circuit adopted by
this unit achieves vastly improved response by
employing ‘no feedback’ circuitry, toriodal
FrançaisDeutsch
transformers and low impedence parallel main
capacitors characteristicly used in
professional audio monitoring.
What’s in the box
• Twin-mono symmetrical construction
Please confirm that the following accessories
This amplifier offers a new advancement in
Italiano Español
are in the box when you open it.
stereo imaging with the completely
independent construction of left/right power
• Remote control
amplification units and twin transformers.
• AAA/IEC R03 dry cell batteries x2
• Direct construction
•Power cord
In addition to the improved symmetrical
Nederlands
• Operating instructions (This document)
design, the signal path of each block is
• Warranty card
designed for shortest signal path for minimum
deterioration of signal clarity.
• Wide-Range Linear Circuit
Through this proprietary feedback circuit, an
output signal of low impedance offering a flat,
even response over the widest possible
frequency range is delivered to your speakers.
• Sound Retriever
The analog Sound Retriever feature employs
new technology that helps remove the adverse
effects of compression on audio files by
restoring bandwidth and smoothing jagged
artifacts left over after they have been
compressed, resulting in a wider sound stage.
• USB interface
The USB interface allows you to listen to two-
channel audio from a PC connected to this
amplifier.
5
En
01_before_you_start.fm 6 ページ 2009年4月7日 火曜日 午後1時26分
Before you start01
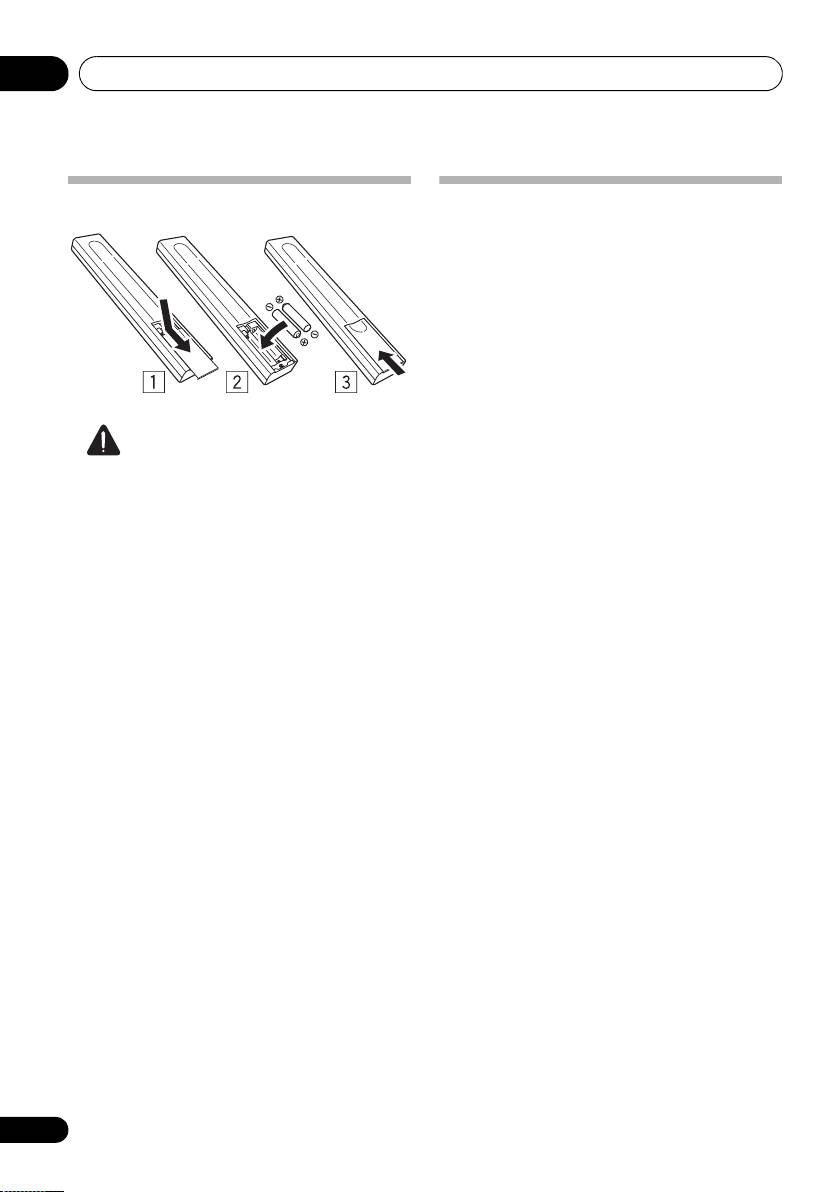
Inserting the battery
Installing the amplifier
• When installing this unit, make sure to put
it on a level and stable surface.
Don’t install it on the following places:
– on a color TV (the screen may distort)
– near a cassette deck (or close to a device that
gives off a magnetic field). This may interfere
with the sound.
– in direct sunlight
– in damp or wet areas
– in extremely hot or cold areas
– in places where there is vibration or other
Caution
movement
Incorrect use of batteries may result in such
– in places that are very dusty
hazards as leakage and bursting. Observe the
– in places that have hot fumes or oils (such as
following precautions:
a kitchen)
• Never use new and old batteries together.
• Insert the plus and minus sides of the
batteries properly according to the marks
in the battery case.
• Batteries with the same shape may have
different voltages. Do not use different
batteries together.
• When disposing of used batteries, please
comply with governmental regulations or
environmental public institution’s rules
that apply in your country or area.
• WARNING
Do not use or store batteries in direct
sunlight or other excessively hot place,
such as inside a car or near a heater. This
can cause batteries to leak, overheat,
explode or catch fire. It can also reduce the
life or performance of batteries.
6
En
Connecting up 02
Chapter 2:
English
Connecting up
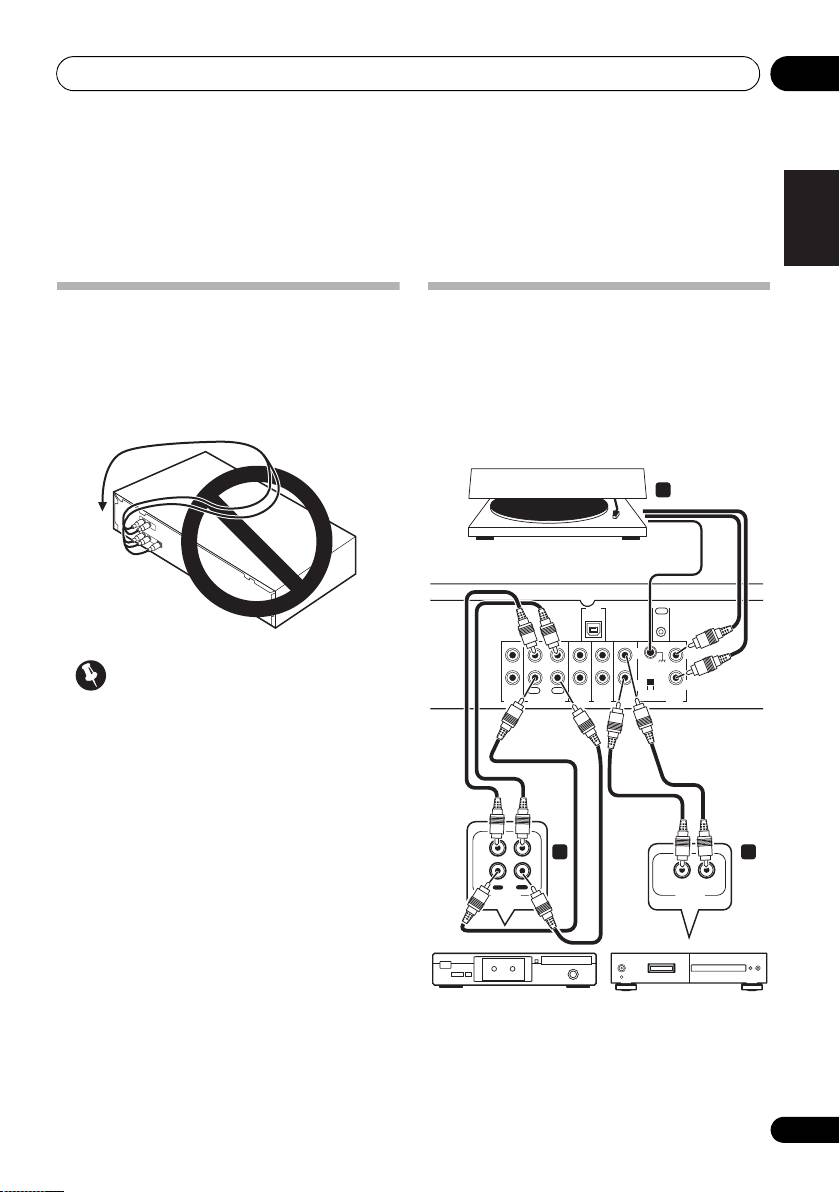
Making cable connections
Connecting audio components
Make sure not to bend the cables over the top
The number and kind of connections depends
of this unit (as shown in the illustration). If this
on the kind of component you’re connecting.
happens, the magnetic field produced by the
Follow the steps below to connect a CD player,
transformers in this unit may cause a
tape recorder, turntable or other audio
FrançaisDeutsch
humming noise from the speakers.
component.
Italiano Español
CONTROL
USB
AUDIO IN
OUT
Nederlands
SIGNAL
GND
L
L
Important
R
R
REC
PLAY
OUT
IN
MM/MC
PRE
OUT
TAP E
TUNER
AUX
CD PHONO
• Before making or changing any
connections, switch off the power and
disconnect the power cord from the AC
outlet.
7
En
3
Turntable
This amplifier
L
12
R
OUT
IN
OUT
REC
PLAY
R
L
AUDIO IN/OUT
AUDIO OUT
D6
Tape deck, etc.
CD player, etc.
A9MK2_SYXCN5.book 7 ページ 2009年4月3日 金曜日 午後7時10分
Connecting up02
1 Connect the analog audio outputs of your
CD player (or other component) to the CD
inputs on this amplifier.
Use a stereo RCA phono cable as shown.
• Connect any other components (such as
1
an iPod
dock or a portable audio player) to
the AUX and TUNER inputs in the same
way.
2 Connect the analog outputs of your tape
deck (or other recorder) to the TAPE inputs
(IN) on this amplifier. Then connect the audio
inputs on the tape deck to the TAPE outputs
(OUT) on this amplifier.
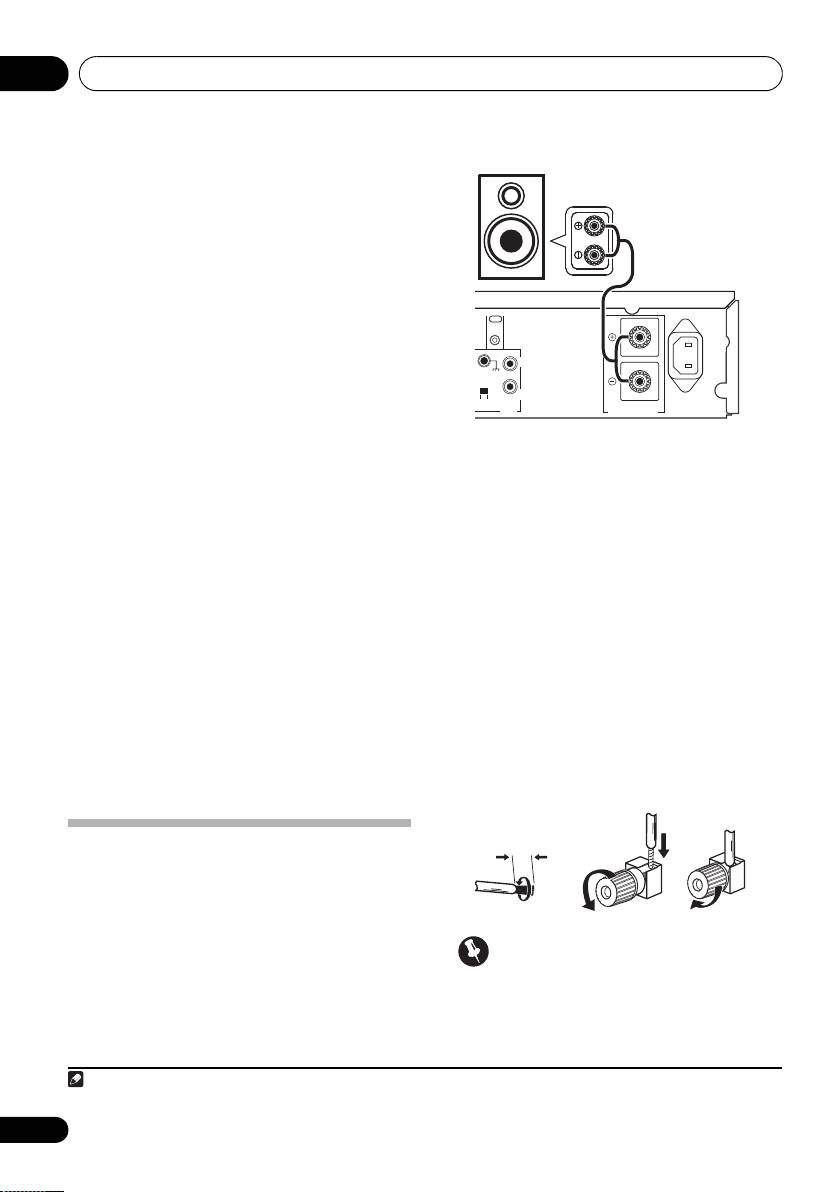
• Connect the speakers to the speaker
This will allow you to make recordings from the
terminals as shown above.
components connected to this amplifier. Use
Connections for the left speaker are shown.
stereo RCA phono cables as shown.
Connect the right speaker in the same way. You
3
Turntables only:
Connect the audio
can use either bare wire connections to do this
outputs of your turntable to the PHONO
(see below).
inputs on this amplifier.
• If your turntable has a grounding wire,
Bare wire connections
secure it to the ground terminal on this
Make sure that the speaker cable you’re going
amplifier.
to use is properly prepared with about 10 mm
of insulator stripped from each wire, and the
• If your turntable has line-level outputs (i.e.,
exposed wire strands twisted together (fig. A).
it has a built-in phono pre-amp), connect it
to the AUX inputs instead.
To connect a terminal, unscrew the terminal a
few turns until there is enough space to insert
• Make sure the MM/MC switch is in the
the exposed wire (fig. B). Once the wire is in
proper position. If the sound of the
position, tighten the terminal until the wire is
turntable seems loud and distorted, or
firmly clamped (fig. C).
overly soft, try switching the setting.
Connecting the speakers
Make sure you connect the speaker on the
right to the right terminal and the speaker on
the left to the left terminal. Also make sure the
positive and negative (+/–) terminals on the
amplifier match those on the speakers. You
Important
can use speakers with a nominal impedance
• Please refer to the manual that came with
between 4 Ω to 16 Ω.
your speakers for details on how to connect
Be sure to complete all connections before
the other end of the speaker cables to your
connecting this unit to the AC power source.
speakers.
8
En
Note
A9MK2_SYXCN5.book 8 ページ 2009年4月3日 金曜日 午後7時10分
Left speaker
CONTROL
OUT
SIGNAL
GND
AC IN
L
R
MM/MC
PHONO
SPEAKER L
fig. A fig. B fig. C
10 mm
1 iPod is a trademark of Apple Inc., registered in the U.S. and other countries.

A9MK2_SYXCN5.book 9 ページ 2009年4月3日 金曜日 午後7時10分
Connecting up 02
English
Caution
• These speaker terminals carry
HAZARDOUS live voltage. To prevent the
risk of electric shock when connecting or
disconnecting the speaker cables,
disconnect the power cord before touching
any uninsulated parts.
• Make sure no exposed speaker wire is
touching the rear panel, this may cause the
amplifier to turn off automatically.
FrançaisDeutsch
Plugging in
Make sure to complete all connections before
connecting to an AC outlet.
Italiano Español
• Connect the AC power cord to the AC IN
inlet on the rear panel of the amplifier, then
plug into an AC outlet.
Nederlands
9
En
Controls and displays03
Chapter 3:
Controls and displays
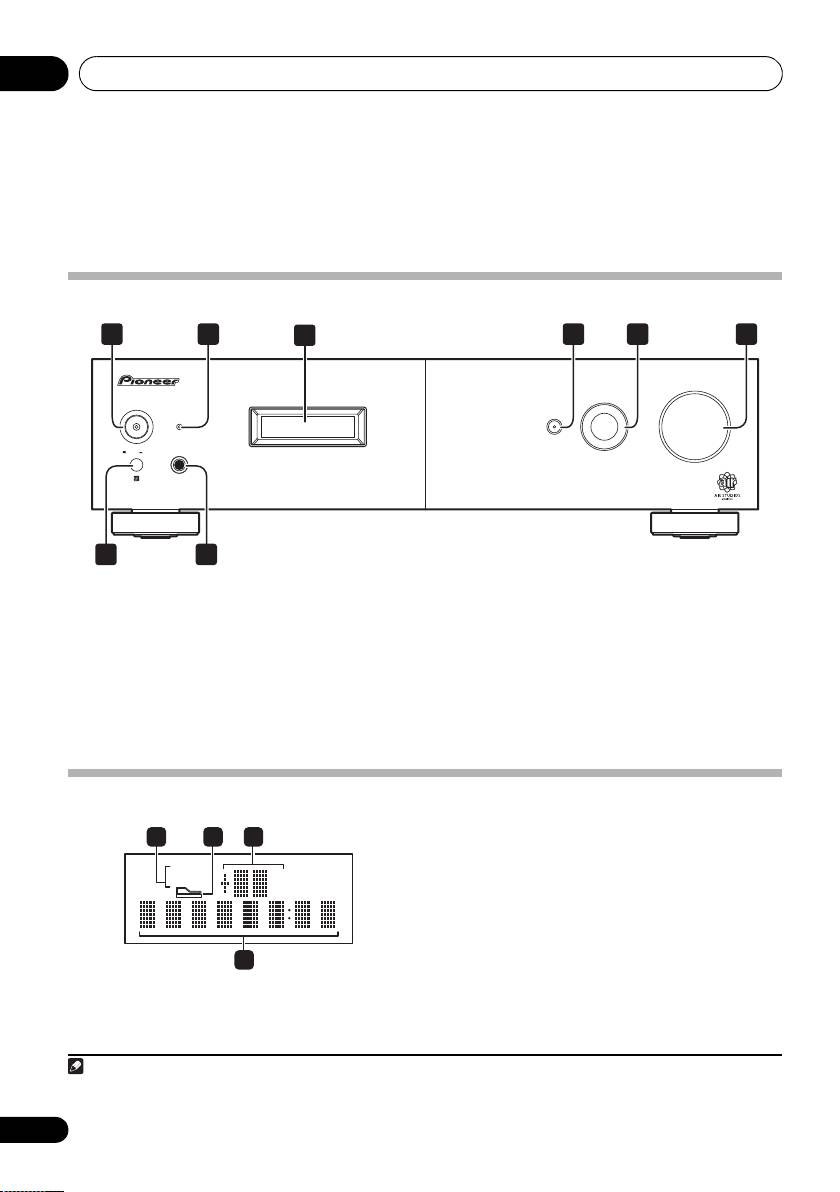
Front panel
1
5
INPUT SELECTOR
dial
1
POWER
OFF
ON
Selects an input source.
2 STANDBY indicator
6
VOLUME
3Display
(below)
7 Remote sensor
4
DIRECT
8
PHONES
jack
Press to switch the Direct listening feature on
Use to connect headphones (when connected,
or off (page 12).
there is no sound output from the speakers).
Display
BASS – Lights when low-range tone
adjustment is applied.
2 Sound Retriever indicator
Lights when the Sound Retriever function is
enabled.
3 Master volume level
4 Character display
1 Tone control indicators
Displays various system information.
TREBLE – Lights when high-range tone
adjustment is applied.
10
En
1
2 5 64
3
A
9
VOLUME
INPUT SELECTOR
POWER
STANDBY
DIRECT
ONOFF
PHONES
7
8
Note
A9MK2_SYXCN5.book 10 ページ 2009年4月3日 金曜日 午後7時10分
1 2
3
TREBLETREBLE
BASSBASS
dBdB
4
1 When the unit is in the standby mode, if the power is turned off by pressing the main unit’s POWER button, the power will not
turn on if the button is pressed again. To turn on the power in this case, press either the remote control unit’s AMP button or
the DIRECT button on the main unit for about five seconds.
A9MK2_SYXCN5.book 11 ページ 2009年4月3日 金曜日 午後7時10分
Controls and displays 03
4
TONE/BAL
controls
English
Use to adjust the tone and balance (page 12).
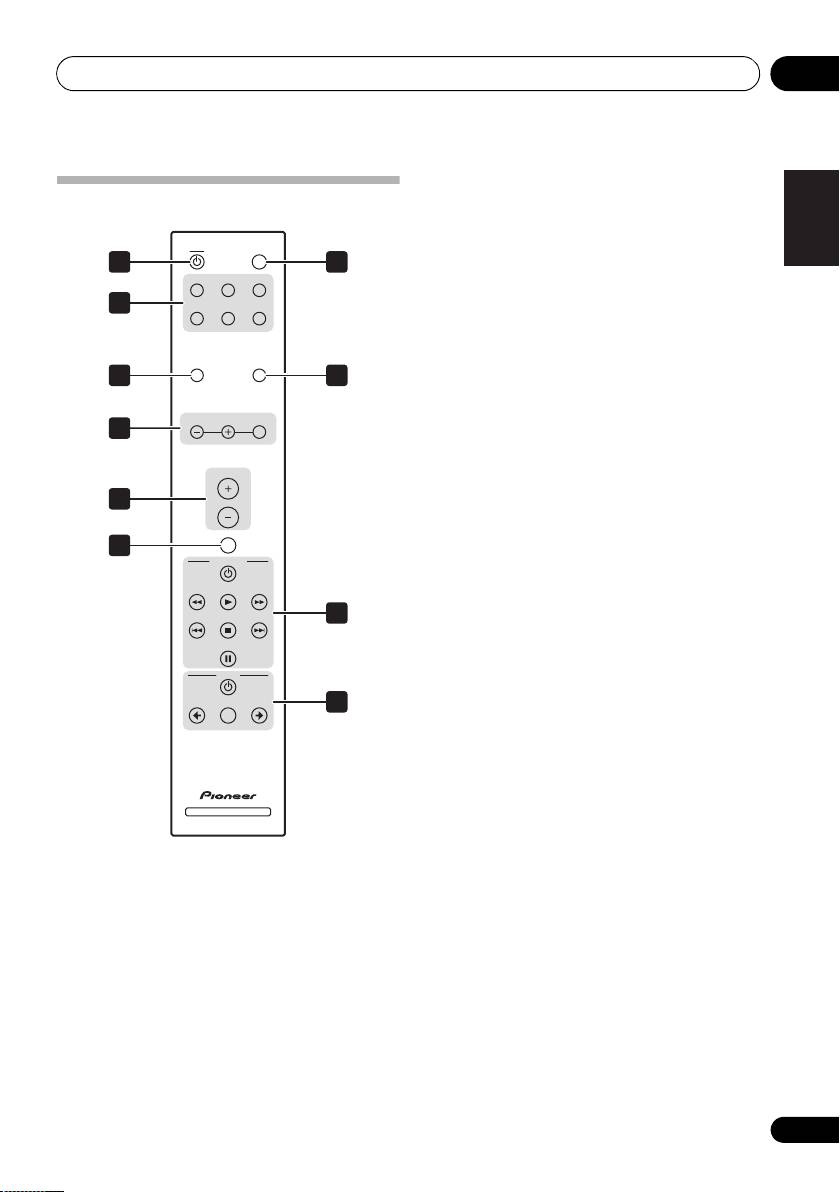
Remote control
5
VOLUME +/–
AMP
DIMMER
Use to set the listening volume.
1
7
CD TAPE PHONO
6
MUTE
Mutes/unmutes the sound.
2
TUNER AUX
USB
7
DIMMER
Dims or brightens the display (or switches the
SOUND
RETRIEVER
DIRECT
backlight off).
3
8
8
DIRECT
FrançaisDeutsch
LR
TONE/BAL
Press to access Direct listening (page 12).
4
9 CD PLAYER control buttons
Use to control Pioneer CD player.
VOLUME
10 TUNER control buttons
5
Use to control Pioneer tuner.
Italiano Español
MUTE
6
CD PLAYER
Using the remote control
Keep in mind the following when using the
remote control:
9
Nederlands
• Make sure that there are no obstacles
between the remote and the remote sensor
on the unit.
TUNER
• The remote has a range of about 7 m at an
BAND PRESETPRESET
10
angle of about 30º from the remote sensor.
• Remote operation may become unreliable
if strong sunlight or fluorescent light is
shining on the unit’s remote sensor.
• Remote controllers for different devices
INTEGRATED AMPLIFIER
can interfere with each other. Avoid using
remotes for other equipment located close
1
AMP
to this unit.
Switches the amplifier between standby and
• Replace the batteries when you notice a fall
on.
off in the operating range of the remote.
2 Input selector buttons
Press to select an input source. These select
the component connected to the
corresponding input on the rear panel.
3
SOUND RETRIEVER
Press to switch the Sound Retriever on/off
(page 12).
11
En
Listening to your system04
Chapter 4:
Listening to your system
• Press
TONE/BAL
to select the option you
want, then use the L/– and R/+ buttons to
Using Direct listening
adjust as necessary.
Use the Direct listening feature when you want
• BASS – Adjust the amount of bass from
to hear the truest possible reproduction of a
–10 to +10.
1
source. All unnecessary signal processing
is
• TRE – Adjust the amount of treble from
bypassed, and you’re left with the pure sound
–10 to +10.
source.
• BAL – Adjust the amount of left/right
• While listening to a source, press
DIRECT
balance as you like. FLAT indicates a
to switch Direct listening on or off.
centered balance.
Wait about five seconds for your changes to be
input automatically. The BASS and TREBLE
Using the Sound Retriever
indicators light in the front panel when the
When audio data is removed during the
corresponding tone control is active.
compression process, sound quality often
• To return to the flat setting (tone control
suffers from an uneven sound image. The
off), press
L/–
and
R/+
at the same time.
analog Sound Retriever feature employs new
technology that helps remove the adverse
effects of compressing 2-channel audio files by
Playing other sources
restoring bandwidth and smoothing jagged
artifacts left over after they have been
1 Turn on the power of the playback
compressed, resulting in a wider sound stage.
component.
•Press
SOUND RETRIEVER to switch the
2 Turn on the power of the amplifier.
Sound Retriever on or off.
3 Select the source you want to playback.
The indicator in the front display lights to
Use the input select buttons (or INPUT
indicate the Sound Retriever is on.
SELECTOR dial).
4 Start playback of the component you
Using the balance and tone
selected in step 1.
controls
Depending on what you are listening to, you
may want to adjust the bass, treble or left/right
balance using the remote control.
12
En
Note
04_listening_to_your_system.fm 12 ページ 2009年4月3日 金曜日 午後7時12分
1 The Sound Retriever, balance and tone controls are disabled, and the front panel display switches off.

Listening to your system 04
English
Making an audio recording
You can make an audio recording from any
audio source connected to the amplifier.
1 Select the source you want to record.
Use the input select buttons (INPUT
SELECTOR).
2 Prepare the source you want to record.
Tune to the radio station, load the CD, set up
the turntable, etc.
FrançaisDeutsch
3 Prepare the recorder.
Insert a blank tape, MD, etc. into the recording
1
device and set the recording levels.
Refer to the instructions that came with the
recorder if you are unsure how to do this.
Italiano Español
4 Start recording, then start playback of the
source component.
Nederlands
13
En
Note
A9MK2_SYXCN5.book 13 ページ 2009年4月3日 金曜日 午後7時10分
1 The amplifier’s volume, balance and tone controls have no effect on the recorded signal.
Other connections05
Chapter 5:
Other connections
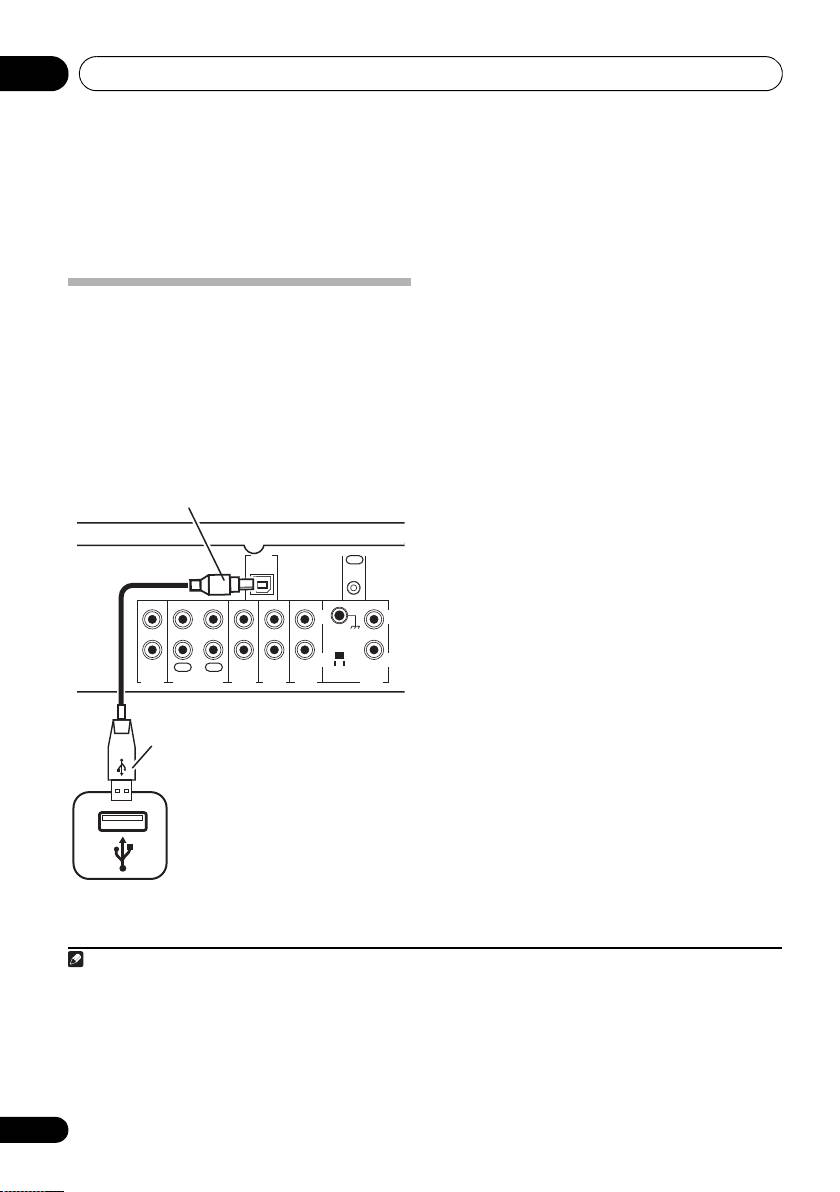
1 Connect your computer’s USB terminal to
the USB terminal on the rear panel of this
Using the USB interface
amplifier.
It is possible to listen to two channels of audio
from your computer by connecting to the USB
2 Switch on your computer and this
interface on the rear of this amplifier.
amplifier.
Depending on your model of computer and the
3 If you’re connecting for the first time,
software installed, you can listen to the stereo
wait for the USB driver installation to finish.
audio source through the speaker setup you’ve
The installation may take a minute or two to
1
connected to this amplifier.
complete. Make sure you leave the USB cable
connected until the dialog box indicates that
the USB setup is finished. Note that some
older operating systems may require a disc for
2
installation.
4 Press USB to select the USB input.
You can also use the INPUT SELECTOR dial on
the front panel.
5 Make any necessary settings required to
select the USB interface as your computer
audio output.
You will need to make sure the correct speaker
setting is selected with the audio software
you’re using. Please refer to the manual that
came with the software to make these settings.
6 Turn up the volume control on your
computer and this amplifier.
You may want to start with a fairly low volume
on this amplifier and turn it up as necessary
after you’ve checked your levels.
7 Start playback of a source on your
computer.
14
En
Note
05_Other_connections.fm 14 ページ 2009年4月3日 金曜日 午後7時18分
B-type USB
connector
CONTROL
USB
OUT
AUDIO IN
SIGNAL
GND
L
L
R
R
REC
PLAY
MM/MC
OUT
IN
PRE
TAPE
TUNER
AUX
CD PHONO
OUT
This amplifier
A-type USB
connector
®
®
®
®
®
1• Microsoft
Windows
Vista Home Basic/Home Premium/Business/Ultimate,Windows
XP, Windows
2000, Windows
®
Millennium Edition and Windows
98 Second Edition operating systems have been tested for compatibility, but depending on
your computer setup, you may find that your system is not compatible.
• Make sure your USB cable connects from an A-type connector (from your PC) to a 4-pin B-type connector (to this unit).
• The USB specification is version 1.1 compatible, and the USB Audio Class specification is version 1.0 compatible.
• Computer alert sounds will also be heard through the speakers unless you disable them from the computer’s control panel.
• You won’t be able to hear the audio from the USB connection through the digital outputs of this unit.
• Note that using hubs or extensions may cause connection problems.
2 If your PC doesn’t recognize this unit, try reconnecting the USB cable. If it is still unrecognized, restart the computer.
Other connections 05
English
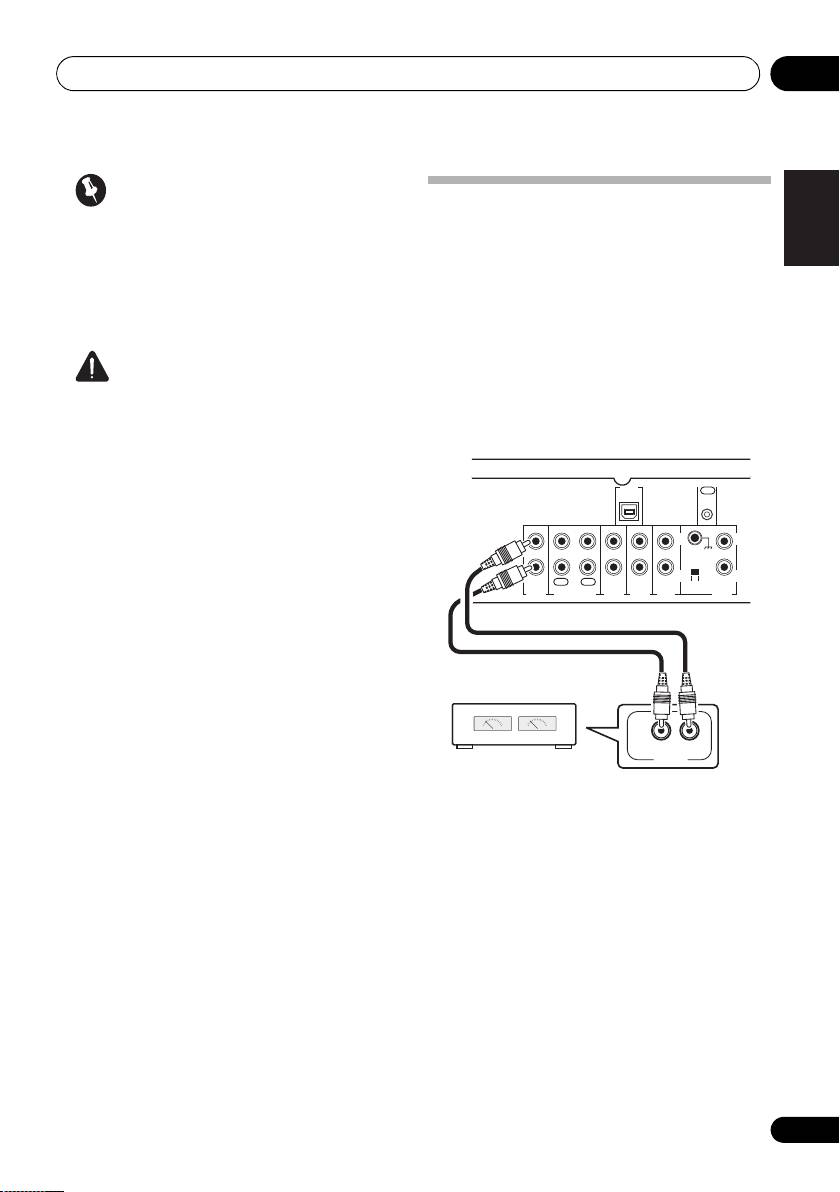
Important
Connecting an additional
If you have followed the steps above, and still
amplifier
can’t hear any audio output, try the following:
This amplifier has more than enough power for
• Switch the amplifier off, then on again.
any home use, but it’s possible to add an
• Selecting another input source (like CD or
additional amplifier using the pre-outs. Make
TAPE), then back to USB.
the connections shown below to add an
amplifier to power your speakers.
• Before making or changing the
Caution
connections, switch off the power and
• Make sure you don’t switch off the
disconnect the power cord from the AC
FrançaisDeutsch
computer or unplug the USB cable during
outlet.
playback.
• To prevent noise being output, don’t use
other software on your computer during
CONTROL
USB
OUT
AUDIO IN
playback.
Italiano Español
SIGNAL
• Pioneer is not responsible for computer
GND
L
L
system damage, software crashes or
failures, or any other possible computer
R
R
REC
PLAY
OUT
MM/MC
IN
problems due to this configuration.
PRE
TUNER
AUX
CD PHONO
OUT
TAPE
®
®
®
®
Microsoft
, Windows
Vista, Windows
XP, Windows
Nederlands
®
®
2000, Windows
Millennium Edition and Windows
98
Second Edition are either registered trademarks or
trademarks of Microsoft Corporation in the United States
and/or other countries.
15
En
This amplifier
INPUT
RL
ANALOG
Stereo amplifier
A9MK2_SYXCN5.book 15 ページ 2009年4月3日 金曜日 午後7時10分
Other connections05
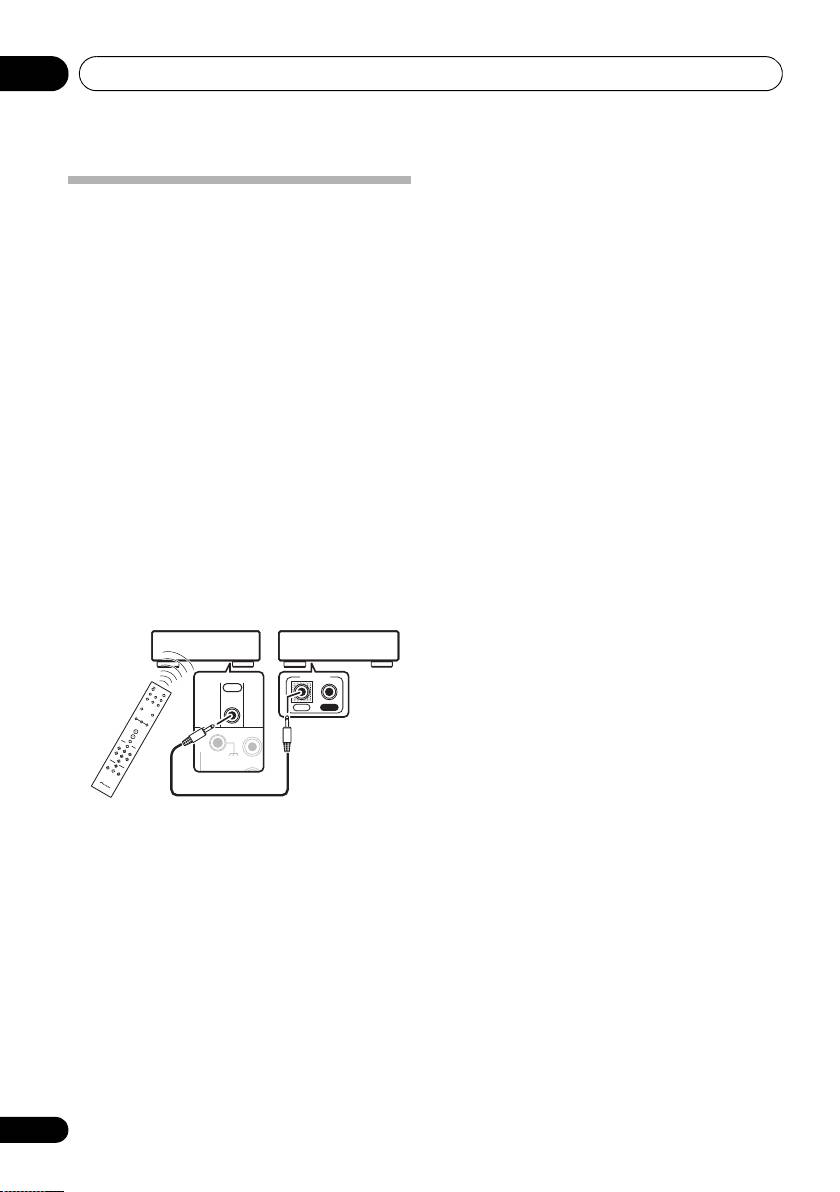
Operating other Pioneer
components with this unit’s
sensor
Many Pioneer components have SR CONTROL
jacks which can be used to link components
together so that you can use just the remote
sensor of one component. When you use a
remote control, the control signal is passed
along the chain to the appropriate component.
• Note that if you use this feature, make sure
that you also have at least one set of analog
audio jacks connected to another
component for grounding purposes.
1 Connect the
CONTROL OUT
jack of this
amplifier to the
CONTROL IN
jack of another
Pioneer component.
Use a cable with a mono mini-plug on each
end for the connection.
2 If the Pioneer component also has a
CONTROL OUT
jack, you can continue the
chain in the same way for as many
components as you have.
16
En
SIGNAL
GND
L
A9MK2_SYXCN5.book 16 ページ 2009年4月3日 金曜日 午後7時10分
This amplifier
Pioneer component
Pioneer
CONTROL
CONTROL
component
OUT
remote
IN
OUT
control

A9MK2_SYXCN5.book 17 ページ 2009年4月3日 金曜日 午後7時10分
Additional information 06
Chapter 6:
English
Additional information
Troubleshooting
Incorrect operations are often mistaken for trouble and malfunctions. If you think that there is
something wrong with this component, check the points below. Sometimes the trouble may lie in
another component. Investigate the other components and electrical appliances being used. If the
trouble cannot be rectified even after exercising the checks listed below, ask your nearest Pioneer
FrançaisDeutsch
authorized service center or your dealer to carry out repair work.
• If the unit does not operate normally due to external effects such as static electricity
disconnect the power plug from the outlet and insert again to return to normal operating
conditions.
Problem Remedy
Italiano Español
The power does not turn on. • Disconnect the power plug from the outlet, and insert again.
• Make sure there are no loose strands of speaker wire touching the rear
panel. This could cause the amplifier to shut off automatically.
• If you’re trying to switch on using the remote control, make sure the
front panel POWER button is switched on first.
Nederlands
• If the power shuts off automatically, take the unit to your nearest
Pioneer authorized service center or your dealer for servicing.
No sound is output when a
• Make sure the component is connected correctly (refer to Connecting
function is selected.
up on page 7).
• Press MUTE on the remote control to turn muting off.
Noise during playback of a
• Move the cassette deck further from your amplifier, until the noise
cassette deck.
disappears.
Turntable seems noisy and
• Make sure the MM/MC switch on the rear of the amplifier (near the
distorted, or low in volume.
PHONO input) is in the proper position for your turntable.
Can’t operate the remote
• Replace the battery (refer to page 6).
control.
• Operate within 7 m, 30° of the remote sensor on the front panel (refer to
page 11).
• Remove the obstacle or operate from another position.
• Avoid exposing the remote sensor on the front panel to direct light.
The display is dark or off. • Press DIMMER on the remote control repeatedly to return to the default.
17
En

A9MK2_SYXCN5.book 18 ページ 2009年4月3日 金曜日 午後7時10分
Additional information06
• Signal-to-Noise Ratio (IHF SHORTED,
A-NETWORK)
Specifications
CD, TAPE, TUNER, AUX (200 mV input) . .103 dB
PHONO (MM, 2.8 mV input) . . . . . . . . . . . . .80 dB
Amplifier section
PHONO (MC, 0.2 mV input) . . . . . . . . . . . . .70 dB
Power output specification is for when power
supply is 230 V.
Miscellaneous
Power requirements
• Continuous power output (both channels
. . . . . . . . . . . . . . . .AC 220 V to 230 V, 50 Hz/60 Hz
driven at 20 Hz to 20 kHz)**
Power consumption . . . . . . . . . . . . . . . . . . 200 W
THD 0.2 %, 4 Ω . . . . . . . . . . . . . . . . . 70 W + 70 W
In standby. . . . . . . . . . . . . . . . . . . . . . . . . .0.8 W
THD 0.2 %, 8
Ω . . . . . . . . . . . . . . . . . 55 W + 55 W
Dimensions
• Continuous power output (both channels
. . . . . . . 420 mm (W) x 113 mm (H) x 369 mm (D)
driven at 1 kHz)
Weight (without package). . . . . . . . . . . . . .11.5 kg
THD 0.7 %, 4 Ω . . . . . . . . . . . . . . . . . 73 W + 73 W
Accessories
THD 0.7 %, 8
Ω . . . . . . . . . . . . . . . . . 58 W + 58 W
Remote control . . . . . . . . . . . . . . . . . . . . . . . . . . .1
• Total harmonic distortion**
AAA/IEC R03 dry cell batteries . . . . . . . . . . . . .2
20 Hz to 20 kHz, 25 W, 8 Ω. . . . . . . . . . . . 0.05 %*
Power cord . . . . . . . . . . . . . . . . . . . . . . . . . . . . . . .1
Warranty card . . . . . . . . . . . . . . . . . . . . . . . . . . . .1
* Measured with DIRECT button switched on.
Operating instructions (This document)
** Measured by Audio Spectrum Analyzer
Note
Audio section
• Specifications and the design are subject
• Input (Sensitivity/Impedance)
to possible modifications without notice,
CD, TAPE, TUNER, AUX . . . . . . . . . 200 mV/22 kΩ
due to improvements.
PHONO (MM) . . . . . . . . . . . . . . . . . .2.8 mV/47 kΩ
PHONO (MC). . . . . . . . . . . . . . . . . . .0.3 mV/100 Ω
• Frequency response
CD, TAPE, TUNER, AUX
. . . . . . . . . . . . . . . . . . . . . . . 5 Hz to 100 kHz dB
PHONO (MM) . . . . . . . . 20 Hz to 20 kHz ±0.2 dB
PHONO (MC). . . . . . . . . 20 Hz to 20 kHz ±0.3 dB
• PHONO (MM) overload level
1 kHz, THD 0.2 %. . . . . . . . . . . . . . . . . . . . . .60 mV
• PHONO (MC) overload level
1 kHz, THD 0.2 %. . . . . . . . . . . . . . . . . . . . . . .6 mV
• Output (Level/Impedance)
TAPE REC . . . . . . . . . . . . . . . . . . . . . 200 mV/1 kΩ
• Tone control
Bass . . . . . . . . . . . . . . . . . . . . . . .± 10 dB (100 Hz)
Treble . . . . . . . . . . . . . . . . . . . . . .± 10 dB (10 kHz)
18
En

A9MK2_SYXCN5.book 19 ページ 2009年4月3日 金曜日 午後7時10分
Additional information 06
Cleaning the unit
English
• Use a polishing cloth or dry cloth to wipe
off dust and dirt.
• When the surface is dirty, wipe with a soft
cloth dipped in some neutral cleanser
diluted five or six times with water, and
wrung out well, and then wipe again with a
dry cloth. Do not use furniture wax or
cleansers.
• Never use thinners, benzine, insecticide
sprays or other chemicals on or near this
FrançaisDeutsch
unit, since these will corrode the surface.
Published by Pioneer Corporation.
Copyright © 2009 Pioneer Corporation.
Italiano Español
All rights reserved.
Nederlands
19
En
A9MK2_SYXCN5.book Page 2 Friday, April 17, 2009 3:57 PM
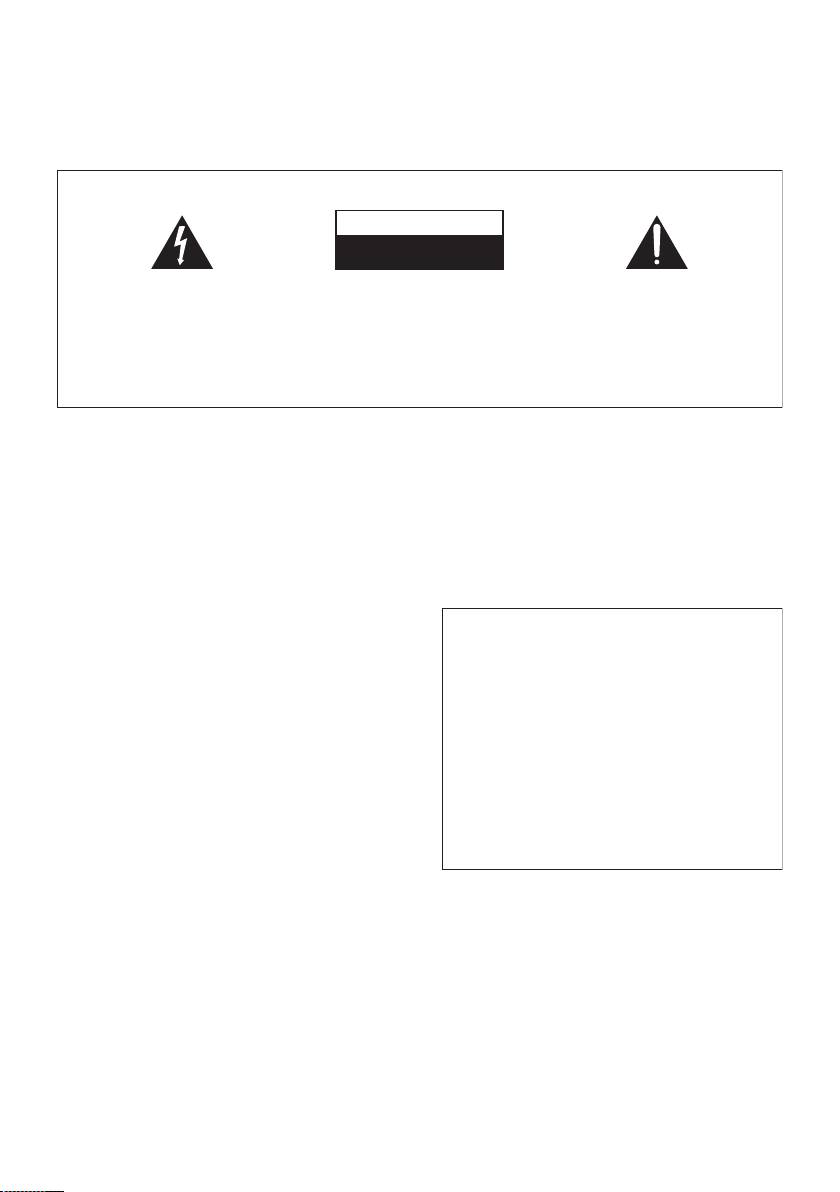
IMPORTANT
ATTENTION
DANGER D´ELECTROCUTION
NE PAS OUVRIR
Ce symbole de l’éclair, placé dans un
ATTENTION :
Ce point d’exclamation, placé dans un
triangle équilatéral, a pour but d’attirer
POUR ÉVITER TOUT RISQUE
triangle équilatéral, a pour but d’attirer
l’attention de l’utilisateur sur la présence, à
D’ÉLECTROCUTION, NE PAS ENLEVER LE
l’attention de l’utilisateur sur la présence,
l’intérieur du coffret de l’appareil, de
COUVERCLE (NI LE PANNEAU ARRIÈRE).
dans les documents qui accompagnent
“tensions dangereuses” non isolées d’une
AUCUNE PIÈCE RÉPARABLE PAR
l’appareil, d’explications importantes du
grandeur suffisante pour représenter un
L’UTILISATEUR NE SE TROUVE À
point de vue de l’exploitation ou de
risque d’électrocution pour les êtres
L’INTÉRIEUR. CONFIER TOUT ENTRETIEN À
l’entretien.
humains.
UN PERSONNEL QUALIFIÉ UNIQUEMENT.
D3-4-2-1-1_A1_Fr
AVERTISSEMENT
)%%' !#()%(.)#$*'.+ )'!(
Avant de brancher l’appareil pour la première, lisez
attentivement la section suivante.
' (&*( ## ).'.!)' &*#
%!-%'0(!* *#'. % #)'"%! *)!
La tension de l’alimentation électrique disponible
&**#+($**#%$)!*'()#!,%$(-%(
varie selon le pays ou la région. Assurez-vous que
2($*))(*(.!$*((*'(!%!*
la tension du secteur de la région où l’appareil sera
$*!*" ).
'
utilisé correspond à la tension requise (par ex. 230
V ou 120 V), indiquée sur le panneau arrière.
D3-4-2-1-4_A_Fr
AVERTISSEMENT
Pour éviter les risques d’incendie, ne placez aucune
flamme nue (telle qu’une bougie allumée) sur
Si la fiche d’alimentation secteur de cet appareil ne
l’appareil.
D3-4-2-1-7a_A_Fr
convient pas à la prise secteur à utiliser, la fiche doit
être remplacée par une appropriée. Ce
remplacement et la fixation d’une fiche secteur sur le
Milieu de fonctionnement
cordon d’alimentation de cet appareil doivent être
Température et humidité du milieu de fonctionnement :
effectués par un personnel de service qualifié. En cas
De +5 °C à +35 °C (de +41 °F à +95 °F) ; Humidité
de branchement sur une prise secteur, la fiche de
relative inférieure à 85 % (orifices de ventilation non
coupure peut provoquer une sérieuse décharge
obstrués)
électrique. Assurez-vous qu’elle est éliminée
N’installez pas l’appareil dans un endroit mal ventilé ou
correctement après sa dépose.
un lieu soumis à une forte humidité ou en plein soleil
L’appareil doit être déconnecté en débranchant sa
(ou à une forte lumière artificielle).
fiche secteur au niveau de la prise murale si vous
D3-4-2-1-7c*_A1_Fr
prévoyez une période prolongée de non utilisation
(par exemple avant un départ en vacances).
D3-4-2-2-1a_A1_Fr
