Vitek VT-1111: Гарантийный талон
Гарантийный талон: Vitek VT-1111
Оглавление
- ИНСТРУКЦИЯ ПО ЭКСПЛУАТАЦИИ
- Гарантийный талон
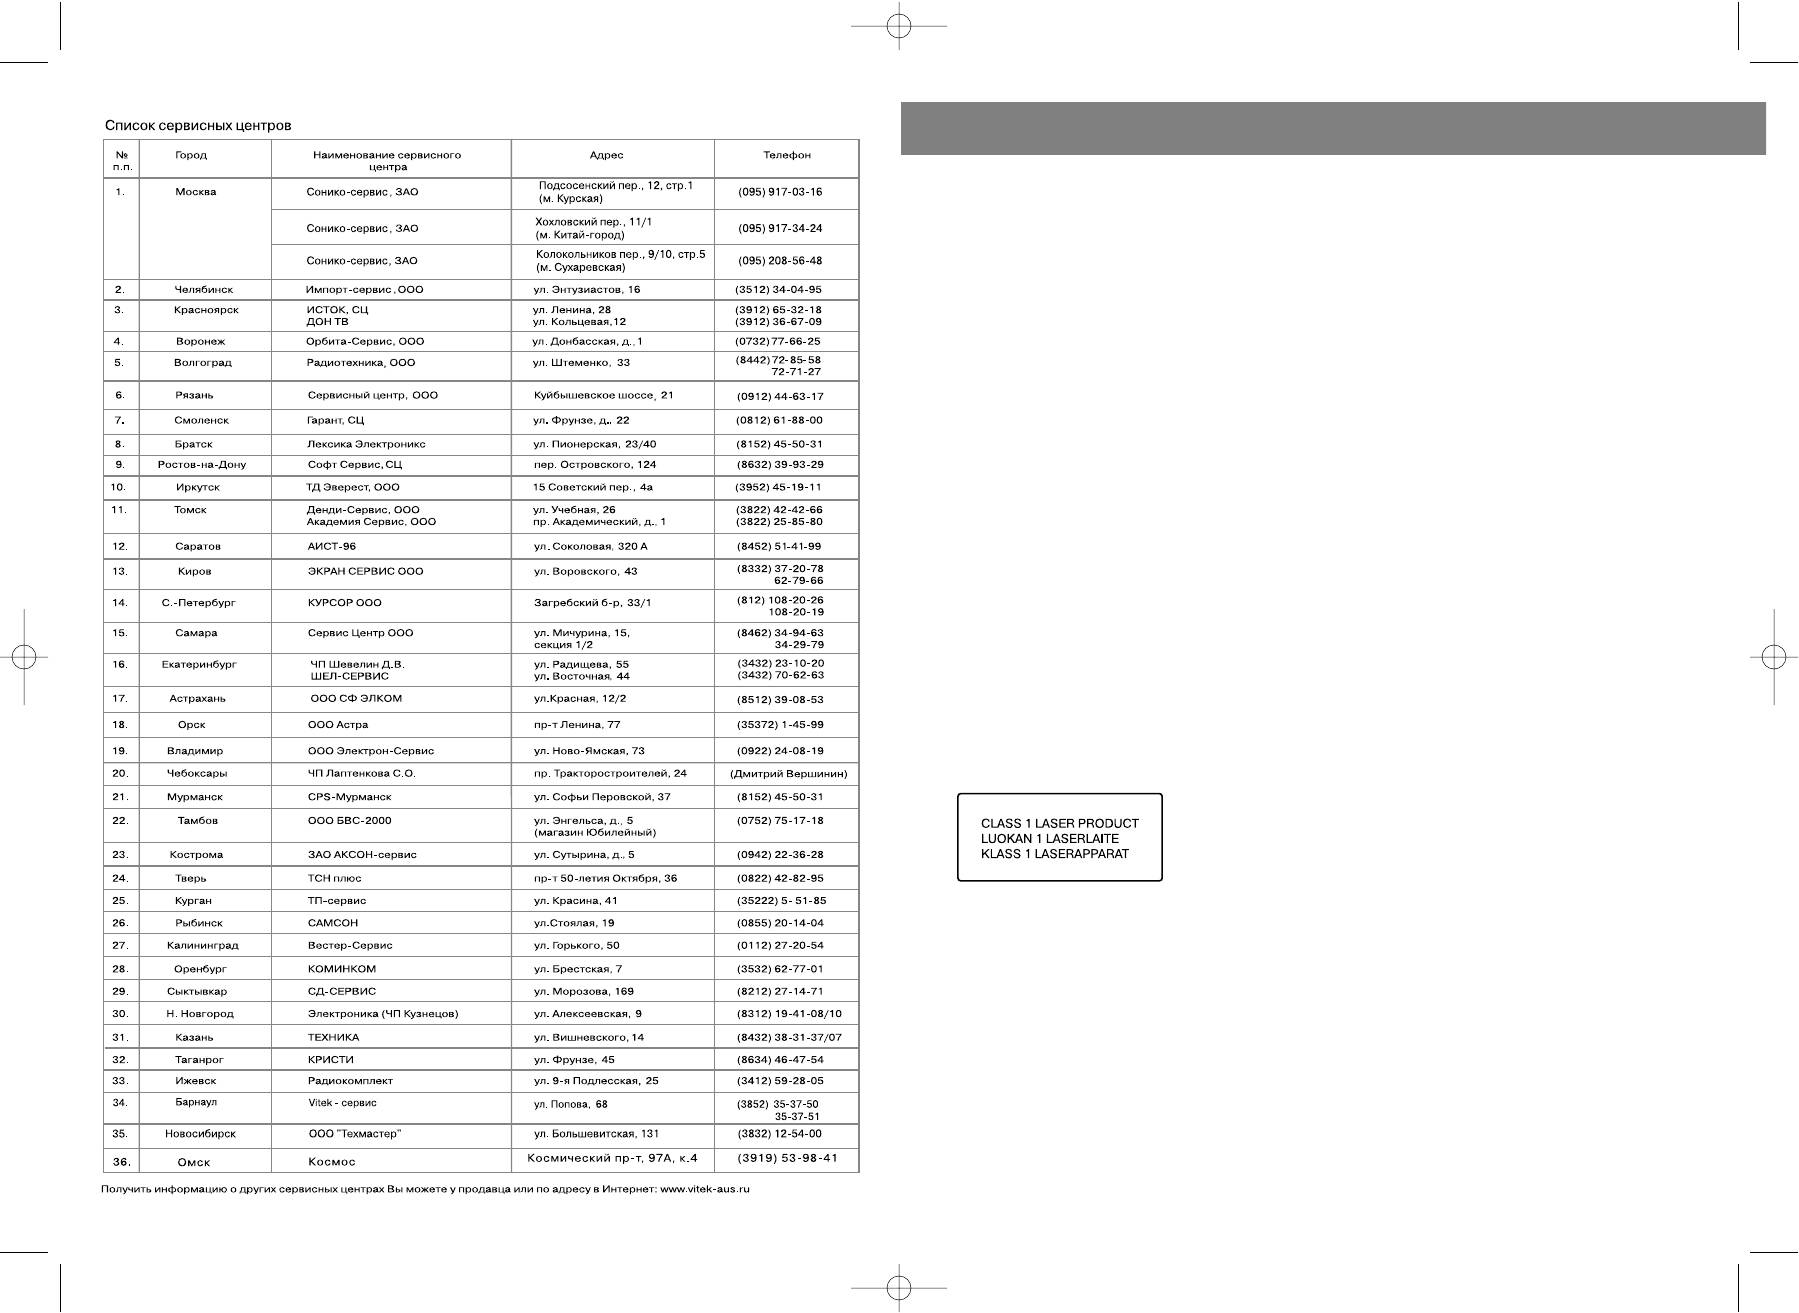
- ТЕХНИЧЕСКОЕ ОБСЛУЖИВАНИЕ КОМПАКТДИСК КАССЕТНАЯ ЛЕНТА СПЕЦИФИКАЦИЯ СРОК СЛУЖБЫ МАГНИТОЛЫ НЕ МЕНЕЕ 5ТИ ЛЕТ
- ПОИСК ТРЕКА ПО НАЗВАНИЮ ПЕСНИ АНТИШОК ГРАФИЧЕСКИЕ ЭКВАЛАЙЗЕРЫ ПРОСЛУШИВАНИЕ ЧЕРЕЗ НАУШНИКИ
- ПРОИГРЫВАНИЕ В РЕЖИМЕ “INTRO” ВОСПРОИЗВЕДЕНИЕ ДОРОЖЕК В ПРОИЗВОЛЬНОМ ПОРЯДКЕ ВОСПРОИЗВЕДЕНИЕ ВЫБРАННЫХ ТРЕКОВ ПРОГРАММИРОВАННОЕ ВОСПРОИЗВЕДЕНИЕ
- ПРОГРАММИРОВАННОЕ ВОСПРОИЗВЕДЕНИЕ MP3ДИСК ПОВТОР ОДНОЙ ДОРОЖКИ ПОВТОР ОДНОГО АЛЬБОМА ПОВТОР ВСЕГО ДИСКА
- РЕЖИМ "ПАУЗА" СИСТЕМА "АВТОСТОП" КОМПАКТДИСК ПОИСК ЖЕЛАЕМОГО ТРЕКА ПОВТОРНОЕ ВОСПРОИЗВЕДЕНИЕ
- РАДИОПРИЕМНИК МАГНИТОФОН ВОСПРОИЗВЕДЕНИЕ КАССЕТЫ ЗАПИСЬ С РАДИОПРИЕМНИКА ЗАПИСЬ С КОМПАКТДИСКА ЗАПИСЬ СО ВСТРОЕННОГО МИКРОФОНА (19)
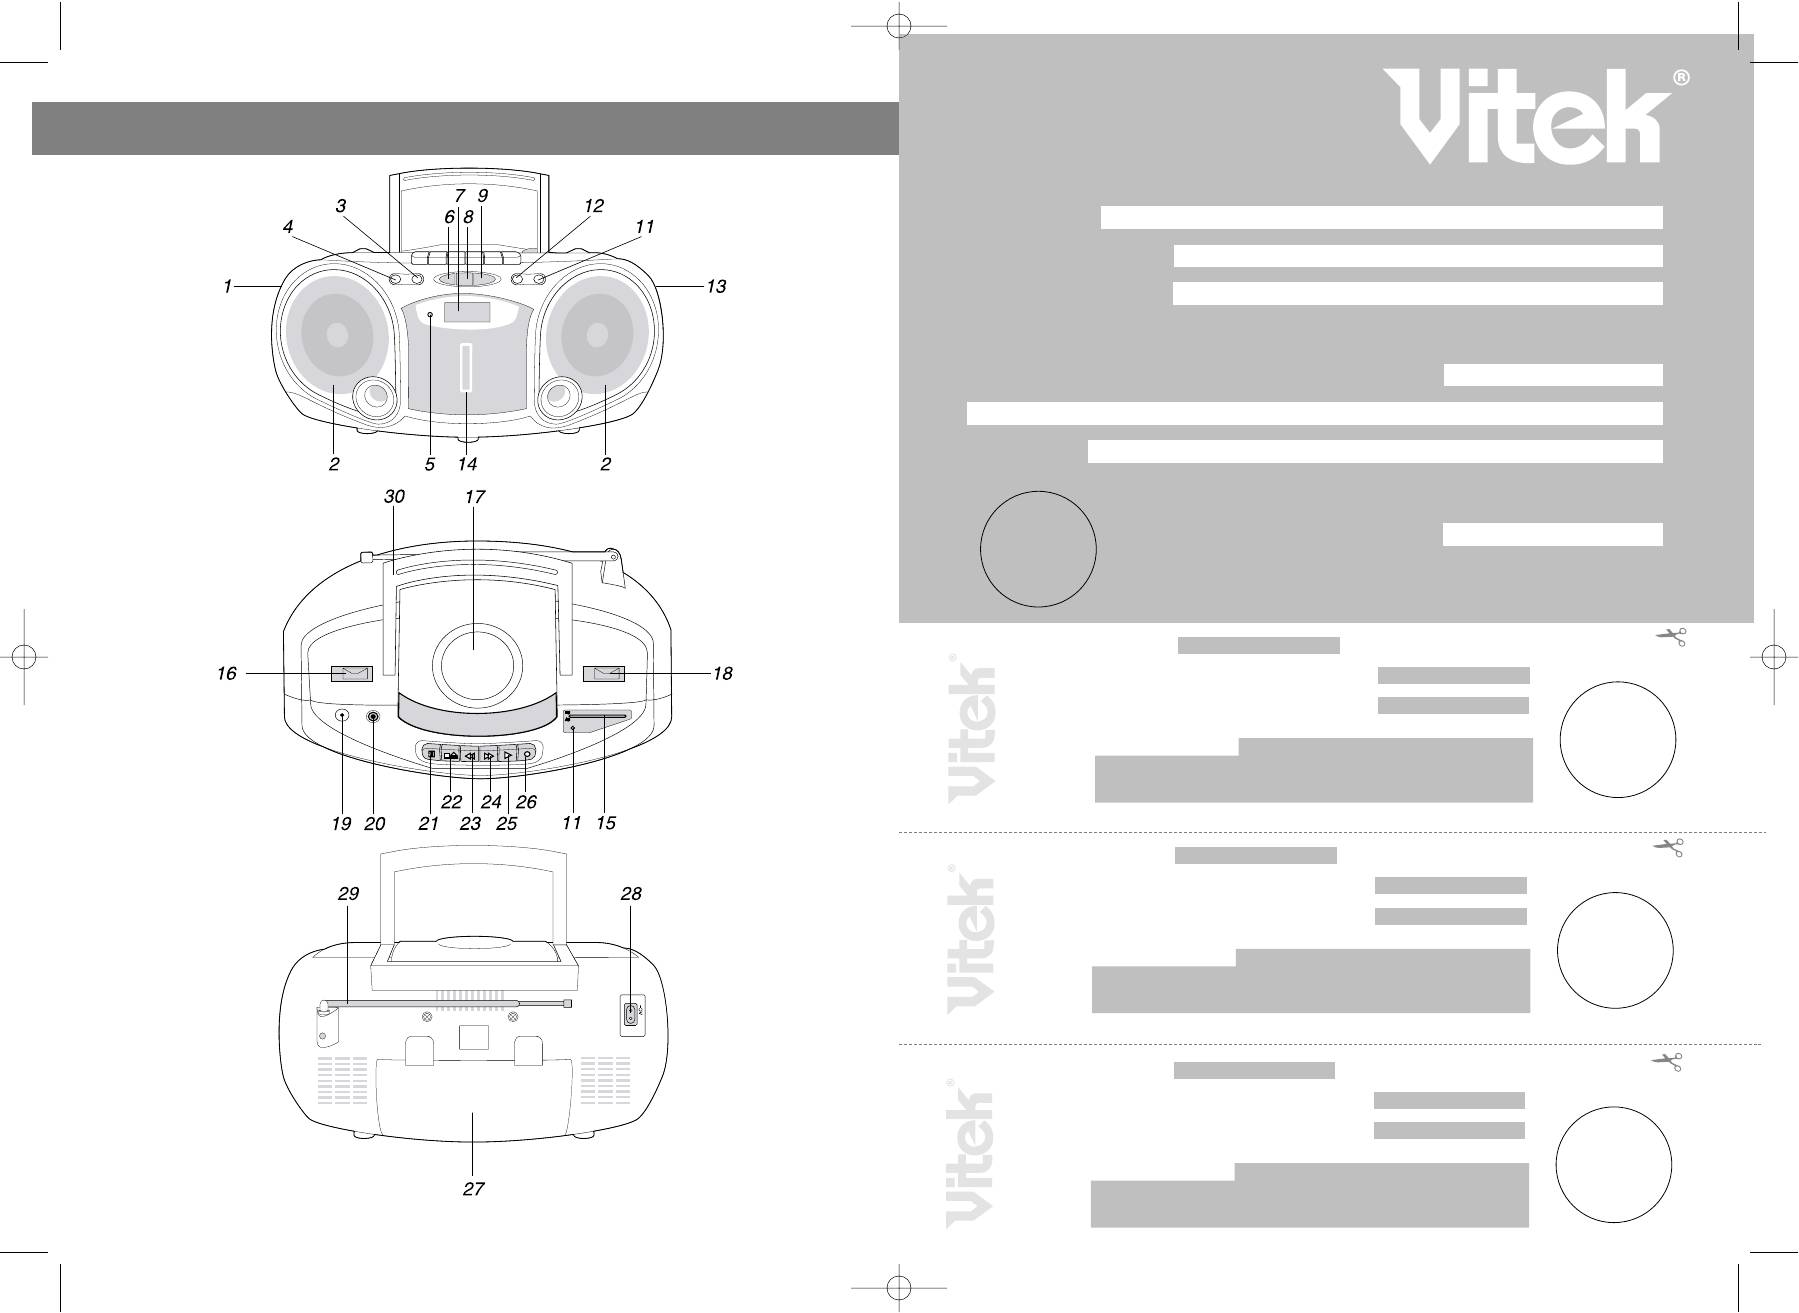
- Расположение элементов управления ПИТАНИЕ ОТ СЕТИ ПИТАНИЕ ОТ БАТАРЕЕК
- ENGLISHРУССКИЙ
- УВАЖАЕМЫЙ ПОКУПАТЕЛЬ!
Гарантийный талон
ENGLISH
Сведения о покупке
Модель:
Серийный №:
MS 345000000
Дата покупки:
Сведения о продавце
Название и адрес продающей организации
Телефон:
Подтверждаю получение исправного изделия, с условиями гарантии ознакомлен
П
одпись покупателя
М.П.
Внимание!
Гарантийный талон действителен только при наличии печати
продающей организации
Модель: Серийный №:
MS 345000000
Дата поступления в ремонт:
Дата выполнения ремонта:
Вид ремонта:
М.П.
Купон №3
Модель: Серийный №:
MS 345000000
Дата поступления в ремонт:
Дата выполнения ремонта:
Вид ремонта:
М.П.
Купон №2
Модель: Серийный №:
MS 345000000
Дата поступления в ремонт:
Дата выполнения ремонта:
Вид ремонта:
М.П.
Купон №1
2
VT-3450.qxd 27.06.03 16:54 Page 4
ENGLISH
INTRODUCTION
Thank you for buying this product.
Please read through these operating instructions so you will know how to operate your equipment prop
erly. After you have finished reading the instruction, put them away in a safe place for future reference.
WARNING
To prevent fire or shock hazard, do not expose this appliance to rain or moisture. To avoid electrical
shock, do not open the cabinet, refer servicing to qualified personnel only.
CAUTION
Use of controls or adjustments or performance of procedures other than those specified herein may
result in hazardous radiation exposure.
DANGER
Invisible laser radiation when open and interlock failed or defeated. Avoid direct exposure to beam.
This compact disc player is classified as a CLASS 1 LASER PRODUCT.
THE CLASS 1 LASER PRODUCT label is located on the rear exterior.
NOTE: The manufacturer is not responsible for any radio or TV interfer
ence caused by unauthorized modifications to this equipment. Such
modifications could void the user's authority to operate the equipment.
POWER SUPPLY
BATTERY OPERATION
1. Remove the Battery Compartment Cover by gently pushing the clips downward and outwards.
2. Install 6 x 'C' size batteries (UM2 or equivalent) and take care that the correct polarities are observed.
3. Replace the battery compartment cover (27).
NOTE:
• The AC line cord must be removed for battery operation.
• To avoid damage which may result from leaking batteries, remove the batteries when they become
exhausted or when the unit is not to be used for a long period of time.
AC MAINS OPERATION
1. Before making any connections, check that the voltage marked on the rating plate of the unit corre
sponds with your household supply.
2. Insert the AC line cord plug into the AC INPUT SOCKET (28) of the unit and plug the other end of the
cord into a standard household supply outlet.
22
3
1. VOLUME CONTROL
16. FUNCTION SWITCH
2. SPEAKERS
17. CD DOOR
3. MODE BUTTON
18. BAND SWITCH
4. EQ/PROGRAM BUTTON
19. BUILTIN MICROPHONE
5. POWER INDICATOR
20. HEADPHONE JACK
6. CD STOP BUTTON
21. PAUSE BUTTON
7. LCD DISPLAY
22. STOP/EJECT BUTTON
8. CD ESP/10 + BUTTON
23. FAST FORWARD BUTTON
9. CD PLAY/PAUSE BUTTON
24. REWIND BUTTON
10. FORWARD SKIP/SEARCH BUTTON
25. PLAY BUTTON
11. FM STEREO INDICATOR
26. RECORD BUTTON
12. BACKWARD SKIP/SEARCH BUTTON
27. BATTERY COMPARTMENT COVER
13. TUNING CONTROL
28. AC INPUT SOCKET
14. CASSETTE DOOR
29. TELESCOPIC ANTENNA
15. DIAL SCALE
30. HANDLE
VT-3450.qxd 27.06.03 16:54 Page 6


