AEG BMG 5612: English
English: AEG BMG 5612
86
English
The monitor, the batteries and the cuff, must be disposed of according to local
regulations at the end of their usage.
2. CLOCK AND DATE ADJUSTMENT
a. Once you install the battery or turn off the monitor, the unit will enter Clock Mode
and the display will display the time and the date.
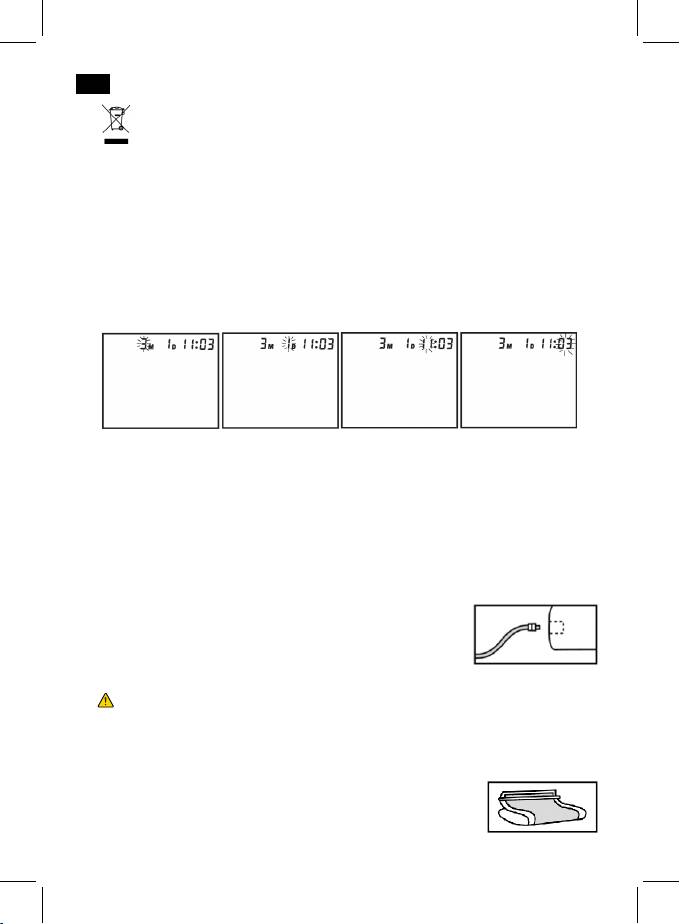
b. When the unit is in Clock Mode, press the “START” button and the “MEM” button
simultaneously for 2 seconds; the month will flash first. Press the button “START”
repeatedly; the day, the hour and the minute will flash in turn. See Fig. 2 to 2-3.
While a number is flashing, press the button “MEM” to increase the number. Hold
the button “MEM” depressed, the number will increase rapidly.
Fig. 2 Fig. 2-1 Fig. 2-2 Fig. 2-3
c. You can turn off the monitor by pressing the “START” button when the minutes are
flashing, then the time and the date are confirmed.
d. The monitor will turn off automatically after 1 minute of no operation; with the time
and date unchanged.
e. After replacing the batteries, you should set the time and the date again.
3. CONNECTING THE CUFF TO THE MONITOR
Insert the cuff tubing connector into the socket in the left side
of the monitor. Make certain that the connector is completely
inserted to avoid air leakage during blood pressure
measurements.
Avoid compression or restriction of the connection tubing during measurement, as
this may cause an inflation error or harmful injury due to continuous cuff pressure.
4. APPLYING THE CUFF
a. If required, pull the cuff end through the medal loop
(the cuff is packaged like this already).
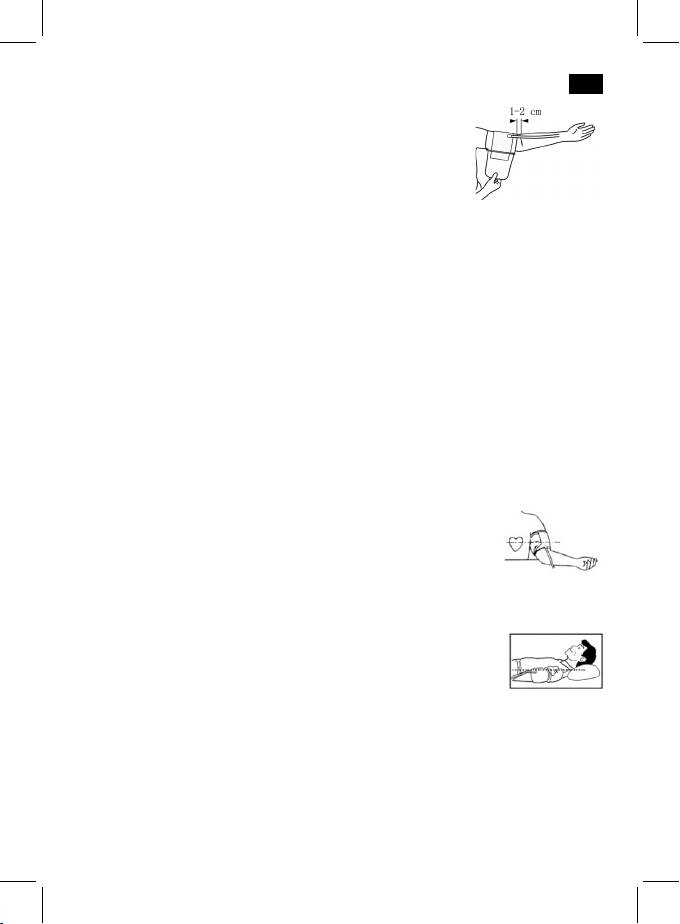
b. Place the cuff around a bare arm 1 to 2 cm above the
elbow joint.
87
English
c. While sitting, place your hand with the palm facing up
onto a flat surface like a table or similar. Position the air
tube in the middle of your arm in line with your middle
finger
d. Tighten the cuff and close the Velcro fastener. The cuff
should fit comfortably, yet snugly around your arm. You should be able to insert
one finger between your arm and the cuff.
Note:
1. Please refer to the cuff circumference range in “SPECIFICATIONS” to make sure
that the appropriate cuff is used.
2. Measuring on same arm each time.
3. Do not move your arm, body, or the monitor and do not move the rubber tube
during measurement.
4. Stay quiet, calm for 5 minutes before blood pressure measurement.
5. Please keep the cuff clean. If the cuff becomes dirty, remove it from the monitor
and clear it by hand in a mild detergent, then rinse it thoroughly in cold water.
Never dry the cuff in clothes dryer or iron it. Clean the cuff after the usage of every
200 times is recommended.
5. BODY POSTURE DURING MEASUREMENT
Sitting Comfortably Measurement
a. Be seated with your feet flat on the floor, and don’t cross
your legs.
b. Place palm upside in front of you on a flat surface such as
table.
c. The middle of the cuff should be at the level of the right atrium of the heart.
Lying Down Measurement
a. Lie on your back.
b. Place your arm straight along your side with your palm
upside.
c. The cuff should be placed at the same level as your heart.
6. TAKING YOUR BLOOD PRESSURE READING
a. After applying the cuff and with your body in a comfortable position, press the
“START” button. A beep is heard and all display characters are shown for self-
test.. You can check the LCD display according to Fig. 6. Please contact the
service center if a segment is missing.

88
English
b. Then the current memory bank (U1, U2, or U3) is displayed. See Fig. 6-1. Press the
“MEM” button to change to the other bank. Confirm your selection by pressing
the “START” button. The current bank will also be confirmed automatically after
5 seconds with no operation.
Fig. 6
Fig. 6-1
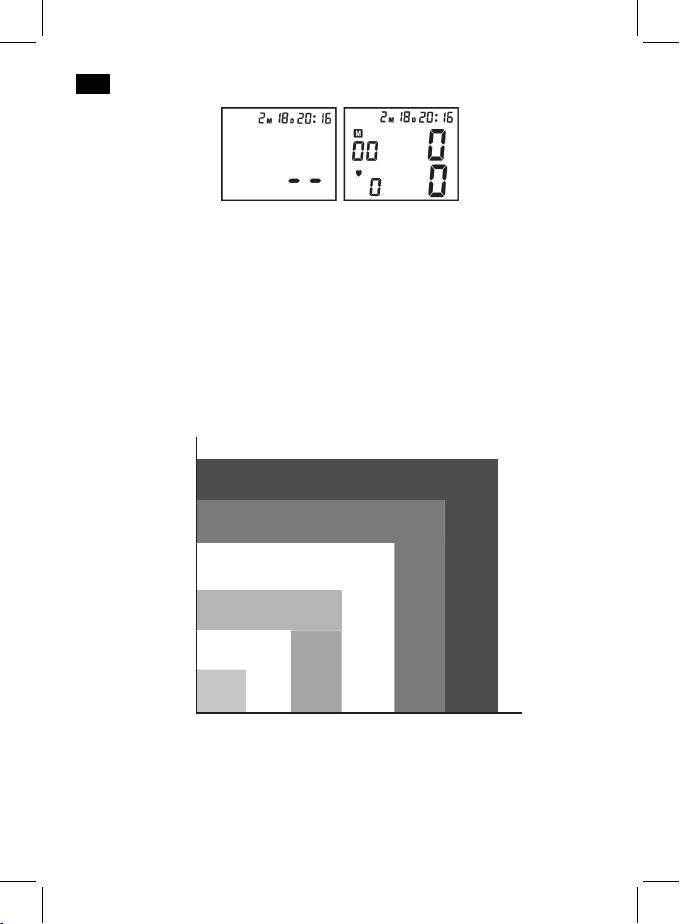
c. When the current memory bank has stored results, the display momentarily
displays the newest one. If no result was stored, a zero appears in the display.
See Fig. 6-2 & 6-3.
d. The monitor inflates the cuff until sufficient pressure has built up for a measure-
ment. Then the monitor slowly releases air from the cuff and carries out the
measurement. Finally the blood pressure and pulse rate will be calculated and
displayed on the LCD screen separately. The blood pressure classification indica-
tion and (possibly) the “arrhythmia” symbol will flash on the display. See Fig. 6-4.
The result will be automatically stored in the current memory bank.
Fig. 6-2 Fig. 6-3 Fig. 6-4
e. After measurement, the monitor will turn off automatically after 1 minute of no
operation. You can also press the “START” button to turn off the monitor manu-
ally.
f. During measurement, you can press the “START” button to turn off the monitor
manually.
Note:
Please consult a health care professional for interpretation of pressure measure-
ments.

89
English
7. DISPLAYING STORED RESULTS
a) In Clock Mode, press “MEM” button to display the stored results. The memory
bank and the amount of results in this bank will be displayed. Press “START”
button to change over to other bank. Confirm your selection by pressing “MEM”
button. The current bank can also be confirmed automatically after 5 seconds
with no operation. See Fig. 7.
b) After selecting the memory bank, the average of the last three measurements is
displayed on the LCD. The symbol of “A” (Average) appears. See Fig. 7-1.
Fig. 7 Fig. 7-1
c) Press “MEM” button, the last result will be displayed with date and time. Irregular
heartbeat symbol (if any) and the indicator of blood pressure classification will
blink at the same time. See Fig. 7-2. Press “MEM” button repeatedly to review
the results measured previously. See Fig. 7-3.
Fig. 7-2 Fig. 7-3
d) When displaying the stored results, the monitor will turn off automatically after 2
minutes of no operation. You can also press the button “START” to turn off the
monitor manually.
8. DELETING MEASUREMENTS FROM THE MEMORY
When any result (except average reading of the last three results) is displayed and
you keeping pressing the “MEM” button for three seconds, all results in the current
memory bank will be deleted after three “beeps”. See Fig. 8 and Fig. 8-1. The unit is
switched off when you press the “MEM” or the “START” button.
90
English
Fig. 8 Fig. 8-1
9. ASSESSING HIGH BLOOD PRESSURE FOR ADULTS
The following guidelines for assessing high blood pressure (without regard to age or
gender) have been established by the World Health Organization (WHO). Please note
that other factors (e.g. diabetes, obesity, smoking, etc.) also must be taken into consid-
eration. Consult with your physician for accurate assessment, and never change your
treatment by yourself.
Blood pressure classification for adults
Systolic (mm HG)
180 Severe hypertension (level 3)
160 Hypertension (level 2)
140 Light hypertension (level 1)
Slightly increased
130
blood pressure
120 Normal
80 85 90 100 110
Diastolic (mm HG)
91
English
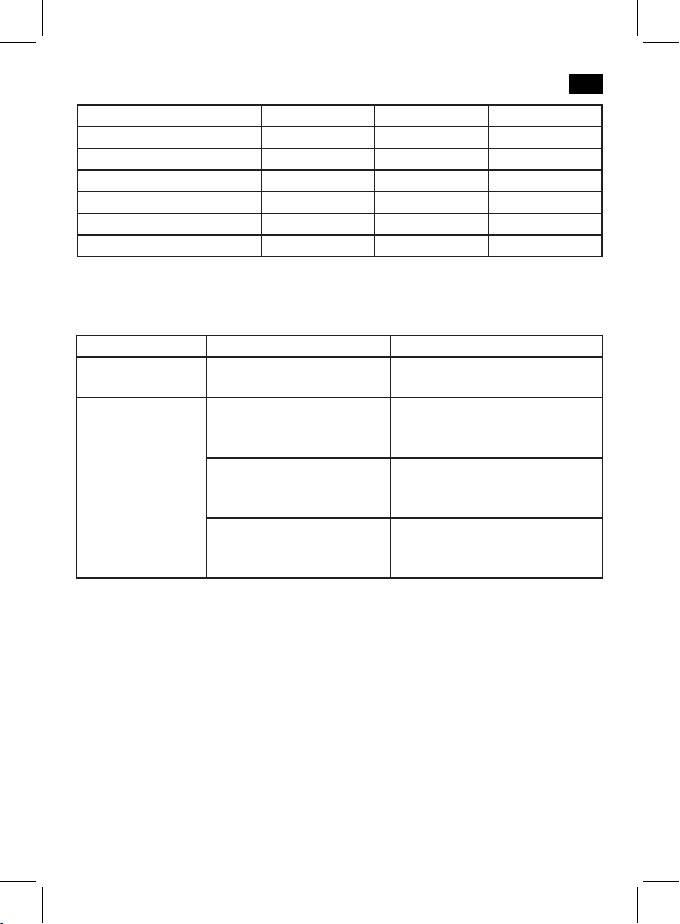
Blood pressure classification SYS (mm HG) DIA (mm HG) Colour indication
Optimal <120 <80 Green
Normal 120 - 129 80 - 84 Green
high - normal 130 - 139 85 – 89 Green
Hypertension level 1 140 - 159 90 – 99 Yellow
Hypertension level 2 160 - 179 100 – 109 Orange
Hypertension level 3 ≥180 ≥110 Red
Definition and classification of the blood pressure values according to WHO/ISH
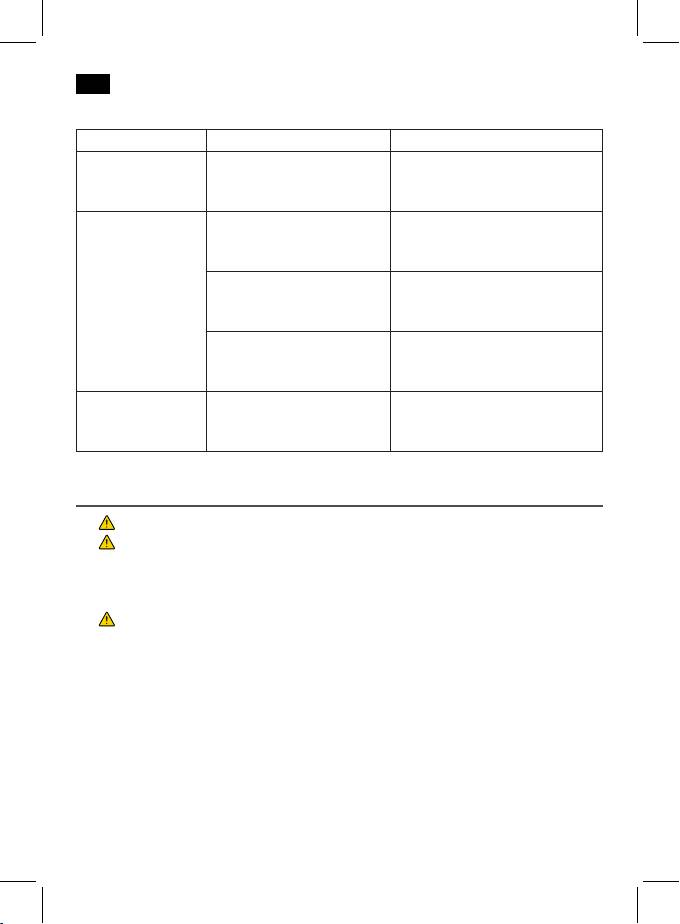
10. TROUBLESHOOTING (1)
PROBLEM POSSIBLE CAUSE SOLUTION
LCD Display shows
Low Battery Change all the batteries
battery symbol
Re-test taking care to not move
Arm or blood pressure moni-
your arm or the blood pressure
tor was moved during testing
monitor
The cuff does not inflate prop-
Make certain the rubber tube is
LCD Display shows
erly or pressure falls quickly
fully inserted into the blood pres-
“EE”
during testing
sure monitor
It is inappropriate for people with
Irregular heartbeat (arrhyth-
serious arrhythmia to use this blood
mia)
pressure monitor.
92
English
11. TROUBLESHOOTING (2)
PROBLEM POSSIBLE CAUSE SOLUTION
The cuff was not properly ap-
Review the cuff applying and test-
LCD Display shows
plied or the rubber tube was
ing sections of the instructions and
“EE”
bent or pressed.
re-test.
The cuff position was not
Apply the cuff correctly and try
correct or it was not properly
again
tightened
Review the body posture and
LCD Display shows
Body posture was not correct
testing sections of the instructions
abnormal result
during testing
and re-test.
Speaking, arm or body
Re-test when calm and without
movement, angry, excited or
speaking or moving during the test
nervous during testing
No response when
Incorrect operation, or strong
Take out batteries for five minutes,
you press button or
electromagnetic interference
and then reinstall all batteries.
load battery
MAINTENANCE
1. Do not drop this monitor nor subject it to strong impacts.
2.
Avoid high temperatures and direct sunlight. Do not immerse the monitor in water
as this will result in damage to the monitor.
3. If this monitor was stored at a temperature near the freezing point, allow it to come to
room temperature before use.
4.
Do not attempt to disassemble this monitor.
5. If you do not use the monitor for a long time, please remove the batteries.
6. It is recommended the performance should be checked every 2 years or after repair.
Please contact the service center.
7. Clean the monitor with a dry, soft cloth or a soft cloth squeezed well after moistened
with water, diluted disinfectant alcohol, or diluted soapsuds.
8. No component in the monitor can be serviced by the user. The circuit diagrams,
component part lists, descriptions, calibration instructions, or other information which
will assist the user’s appropriately qualified technical personnel to repair those parts of
equipment which are designated repairably can be supplied.
9. The monitor can maintain the safety and performance characteristics for a minimum
Оглавление
- BMG 5612
- Inhalt
- Deutsch
- Deutsch
- Deutsch
- Deutsch
- Deutsch
- Deutsch
- Deutsch
- Deutsch
- Nederlands
- Nederlands
- Nederlands
- Nederlands
- Nederlands
- Nederlands
- Nederlands
- Français
- Français
- Français
- Français
- Français
- Français
- Français
- Español
- Español
- Español
- Español
- Español
- Español
- Español
- Italiano
- Italiano
- Italiano
- Italiano
- Italiano
- Italiano
- Italiano
- English
- English
- English
- English
- English
- English
- English
- Język polski
- Język polski
- Język polski
- Język polski
- Język polski
- Język polski
- Język polski
- Magyarul
- Magyarul
- Magyarul
- Magyarul
- Magyarul
- Magyarul
- Magyarul
- Українська
- Українська
- Українська
- Українська
- Українська
- Українська
- Українська
- Русский
- Русский
- Русский
- Русский
- Русский
- Русский
- Русский
-
-
-
-
-
-
-
