AEG 419390 WS 9-125: инструкция
Раздел: Инструмент, электроинструмент, силовая техника
Тип: Угловая Шлифмашина


Характеристики, спецификации
Инструкция к Угловой Шлифмашиной AEG 419390 WS 9-125

WS 9-100, WS 9-115, WS 9-125,
WS 11-115, WS 11-125, WS 12-125 XE
13
Please read and save
English
these instructions!
Bitte lesen und
Deutsch
aufbewahren!
Prière de lire et de
Français
conserver!
Si prega di leggere le
Italiano
istruzioni e di conservarle!
Lea y conserve estas
Español
instrucciones por favor!
Por favor leia e conserve em
Português
seu poder!
Lees en let goed op
Nederlands
deze adviezen!
Vær venlig at læse og
Dansk
opbevare!
Norsk
Svenska
Suomi
Türkçe
Česky
Slovensky
Polski
Magyar
Slovensko
Hvratski
Latviski
Lietuvi
š
kai
Eesti
Òåõíè÷åñêèå äàííå, Ðåêîìåíäàöèè ïî òåõíèêå áåçîïàñíîñòè,
Èñïîëçî- âàíèå, Ïîäêëþ÷åíèå ê ëåêòðîñåòè, Îáñëóæèâàíèå, Ñèìâîë
Òåõíè÷åñêè äàííè, Ñïåöèàëíè óêàçàíèÿ çà áåçîïàñíîñò, Èçïîëçâàíå ïî
ïðåäíàçíà÷åíèå, Ñ-Äåêëàðàöèÿ çà ñúîòâåòñòâèå, Ñâúðçâàíå êúì
БЪЛГАРСКИ
ìðåæàòà, Ïîääðúæêà, Ñèìâîëè
109 113
Òåõíè÷êè Ïîäàòîöè, ïàòñòâî Çà ïîòðåáà, Ñïåöèôèöèðàíè ñëîâè Íà
ïîòðåáà, ó-äåêëàðàöè¼à Çà Ñîîáðàçíîñò, Ãëàâíè Âðñêè, Îäðæóâàå, Ñèìáîëè
Мake
ä
ohc
êè
Romănia
117105101979389858177736965615749 534541373329252117
中文
II
IV
VII
TIP
I III
V
VI
WS ...-... ...E
VIII
řílšentí
IX
Äîïîëíèòåë
配件
I
2
1.
II
2.
For cutting-o
Pro řezací práce!
operations!
Pre rezacie práce!
Für Trennarbeiten!
Do robót związanych z
Pour les travaux de
rozcinaniem!
tronçonnage!
Vágási munkálatokhoz!
Per lavori di separazione!
Za razdvajalna dela!
¡Para trabajos de
Za odvajačke radove!
tronzado!
3.
Griešanai!
Para trabalhos de corte!
Pjovimo darbams!
Voor
doorslijpwerkzaamheden!
Lõiketöödeks!
1
Til skærearbejder!
Для работ по
разделению!
For kutting!
2
За рязане (разделяне)!
För kapningsarbeten!
Pentru lucr
ri de retezare!
Katkaisutöihin!
За работи со делење!
Για εργασίες κοπής!
为了切割工作!
Ayırma işleri için!
3
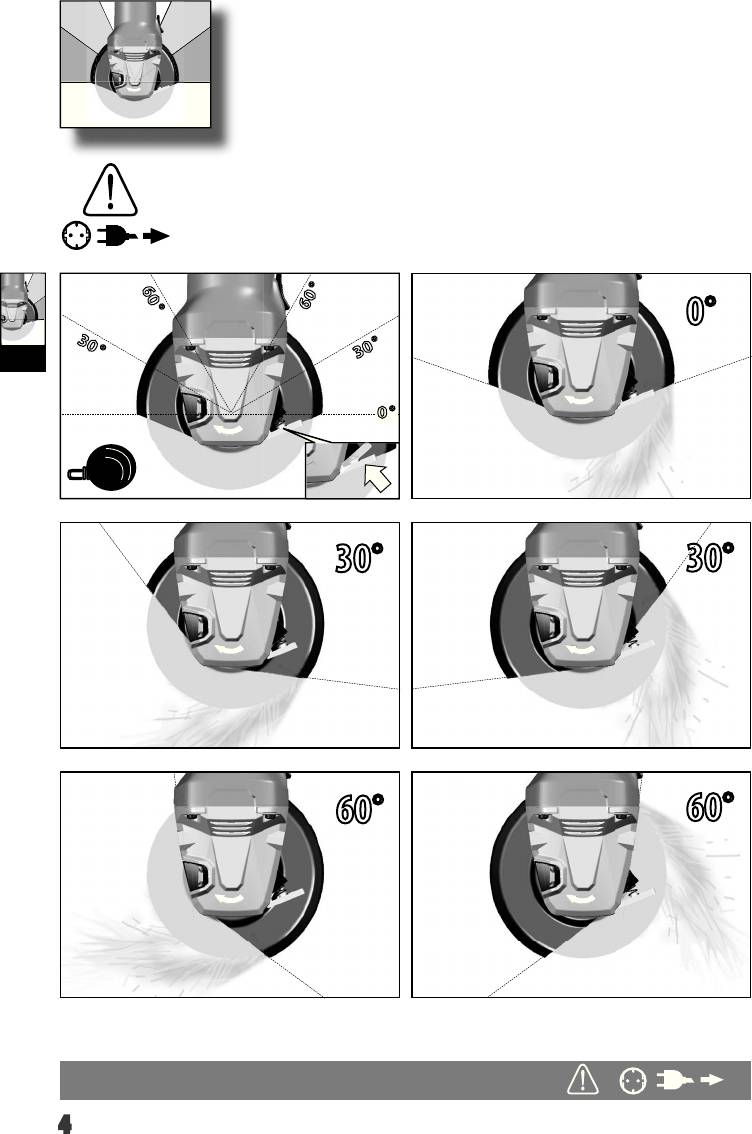
60
°
°
60
0°
30
°
°
30
III
0
°
click
30°
30°
60°
60°
4
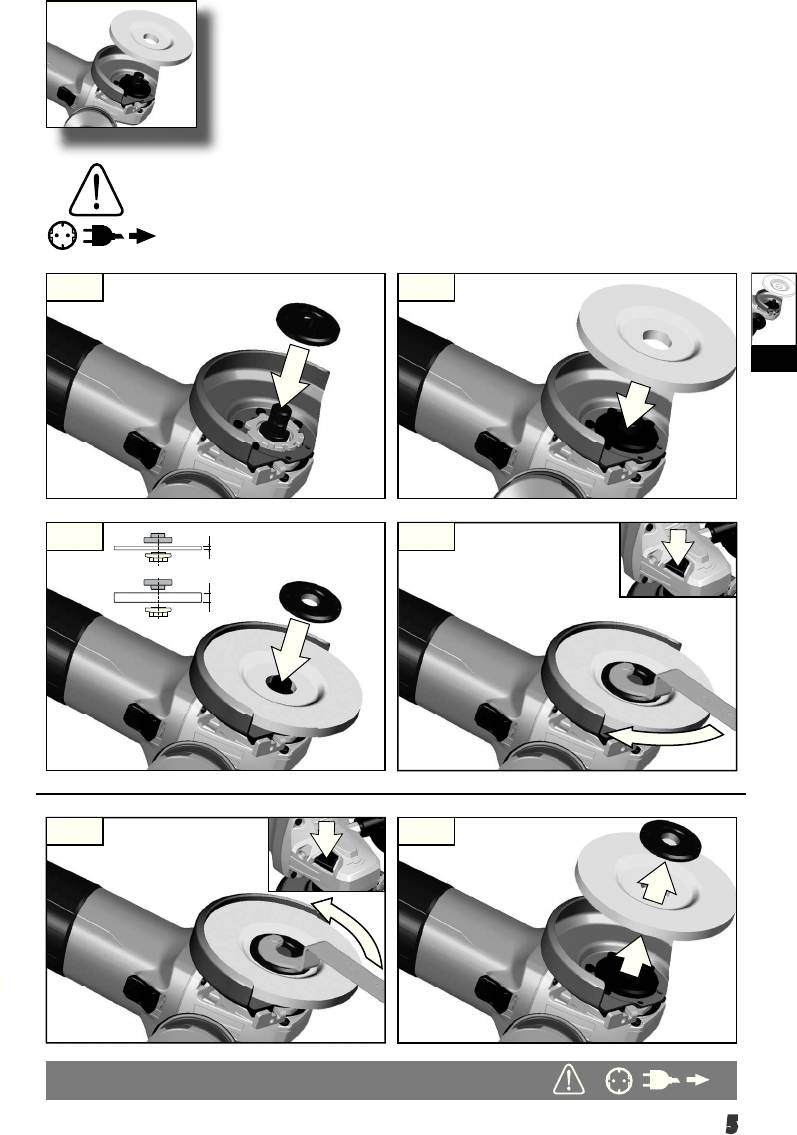
1. 2.
IV
3. 4.
< 6 mm
> 6 mm
1. 2.
5
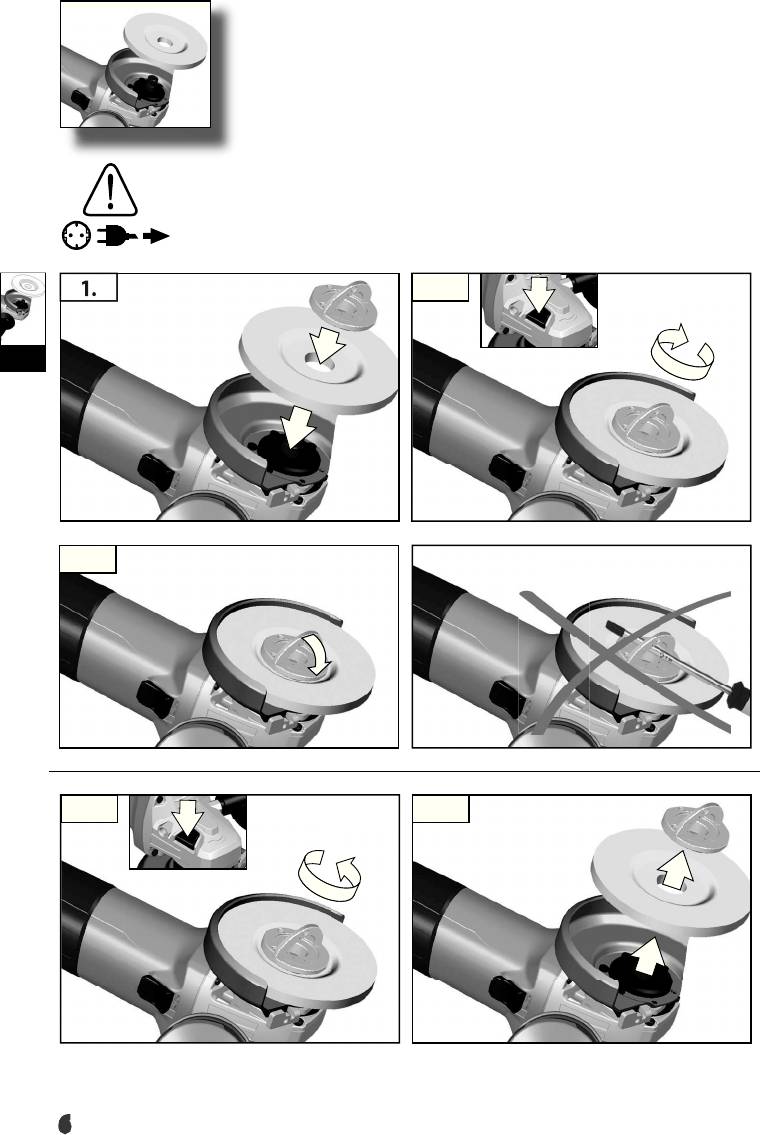
WS ...-... X...
1. 2.
IV
3.
1. 2.
6
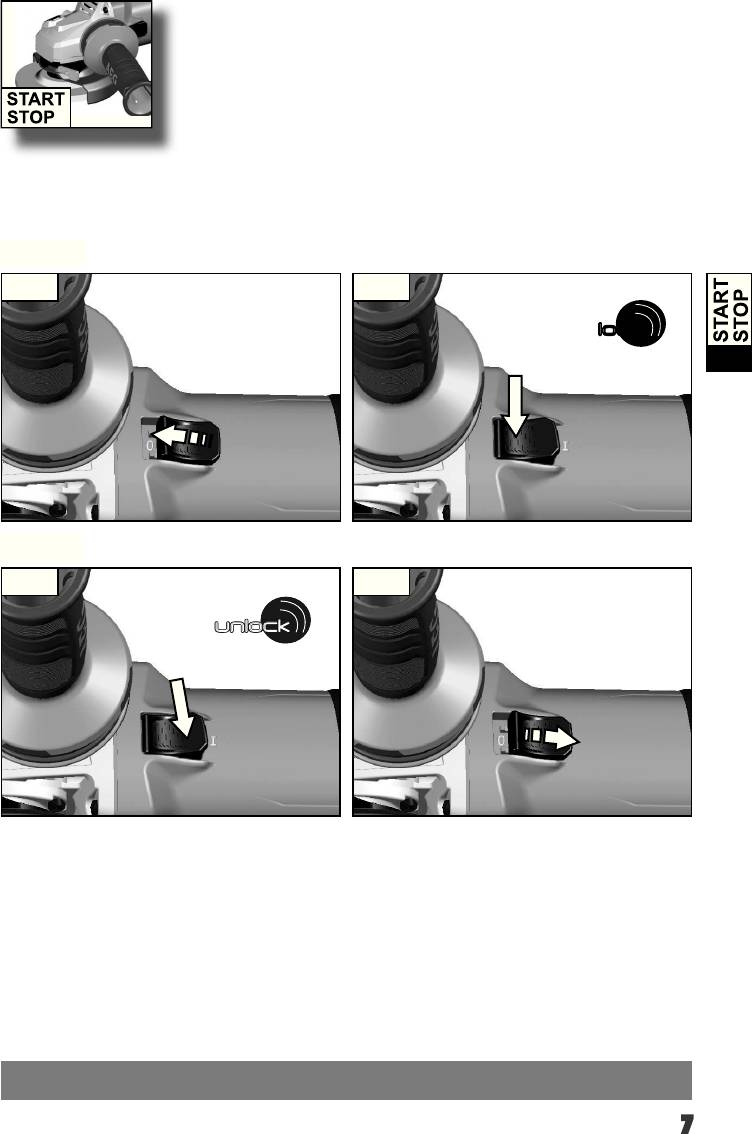
Start
1. 2.
lock
V
Stop
1. 2.
unlock
7
WS ...-... ...E
VI
8
TIP
TIP
TIP
VII
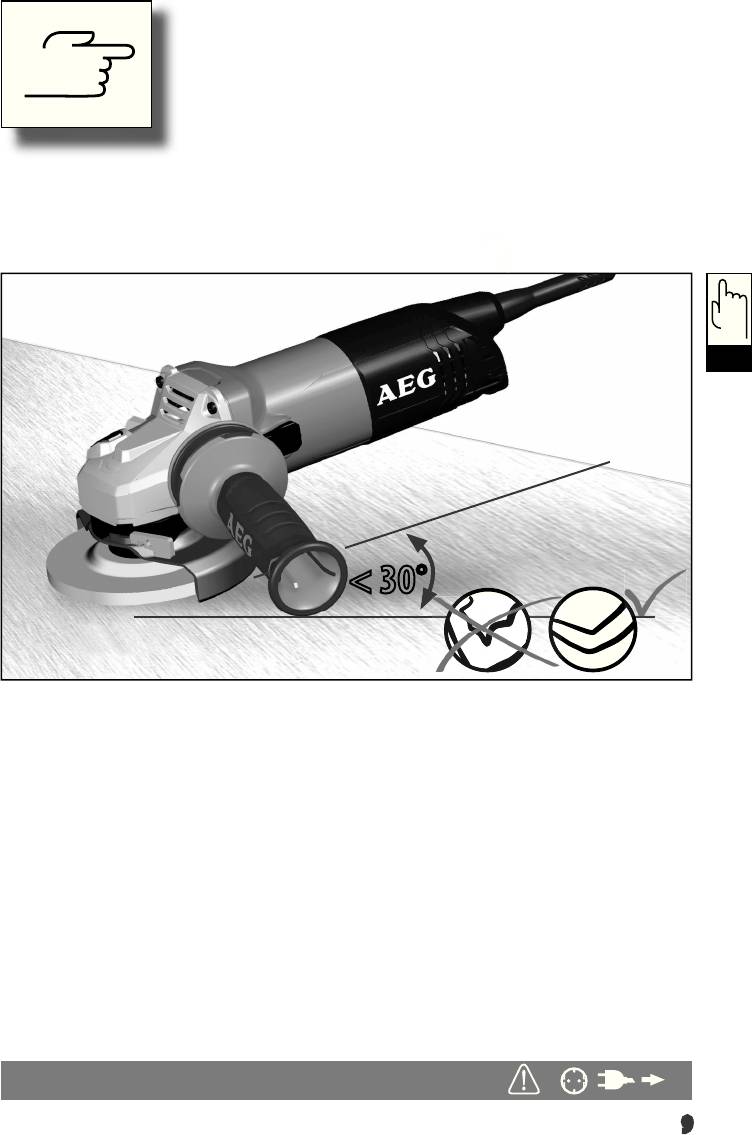
< 30°
9
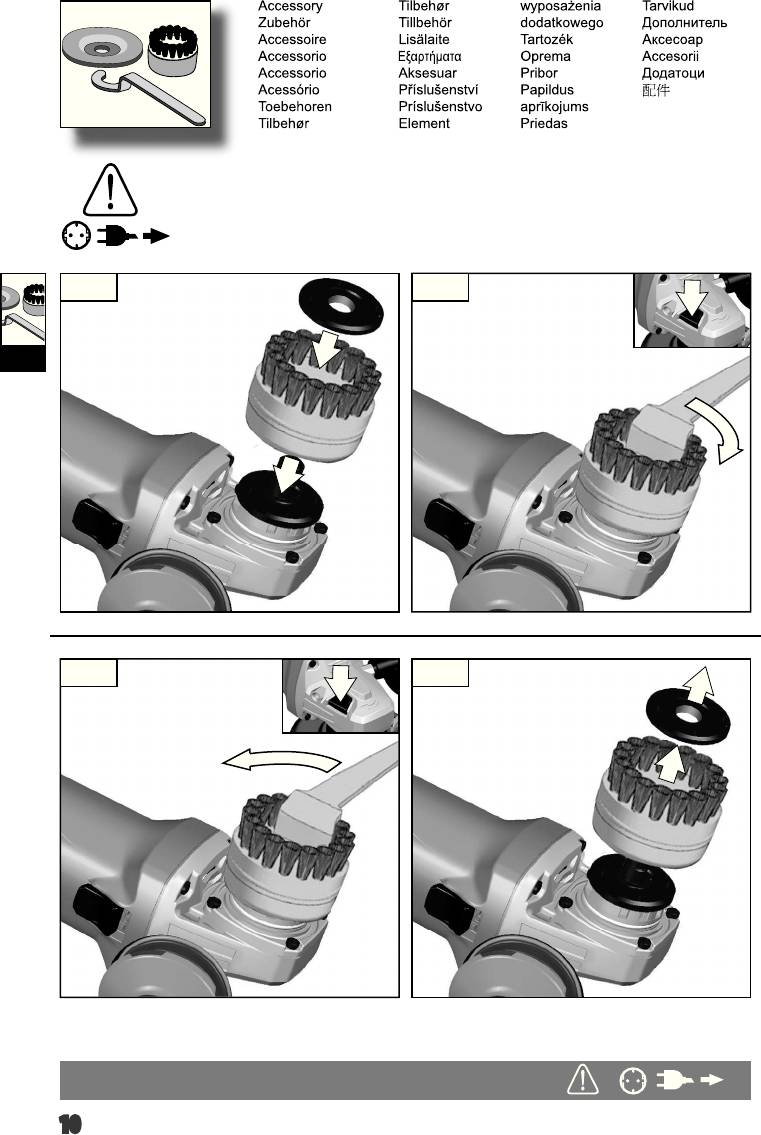
1. 2.
VIII
1. 2.
10
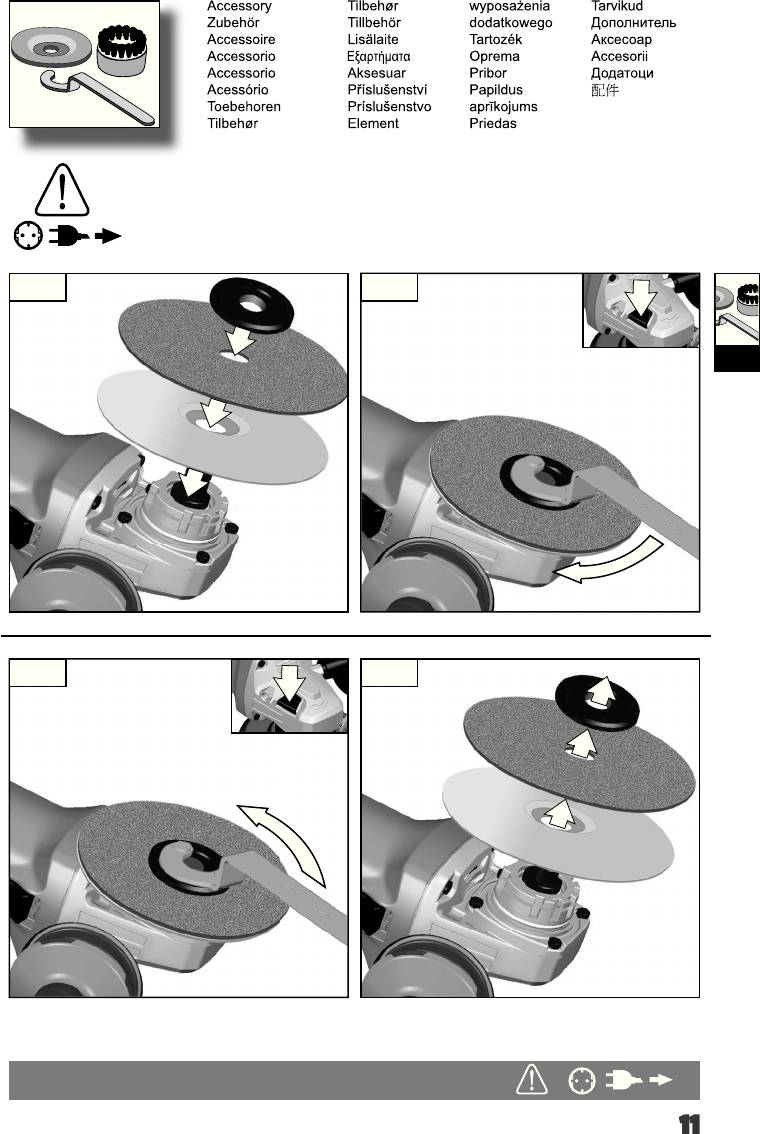
1. 2.
VIII
1. 2.
11

TECHNICAL DATA Angle Grinder
WS 9-100 WS 9-115 WS 9-125
220 - 240 V 110 V
Rated input .............................................................................. 900 W ......................... 900 W .............900 W ........................900 W
-1
-1
-1
-1
Rated speed ........................................................................ 11000 min
............... 11000 min
...11000
min
..............11000 min
Grinding disk diameter............................................................. 100 mm ...................... 115 mm ..........115 mm .....................125 mm
Thread of work spindle ............................................................... M 10 .......................... M 14 ...............M 14 ......................... M 14
Weight according EPTA-Procedure 01/2003 .............................. 2,0 kg ......................... 2,0 kg .............2,0 kg .........................2,0 kg
Noise/Vibration Information
Measured values determined according to EN 60 745.
Typically, the A-weighted noise levels of the tool are:
Sound pressure level (K=3 dB(A)) ........................................... 90,5 dB (A).................. 90,5 dB (A) ..... 89,0 dB (A) .................90,5 dB (A)
Sound power level(K=3 dB(A)) ............................................. 101,5 dB (A)................ 101,5 dB (A) ...100,0 dB (A) ...............101,5 dB (A)
Wear ear protectors!
Total vibration values (vector sum in the three axes) determined according to EN 60745.
2
2
2
2
Surface grinding: vibration emission value a
........................... 5,8 m/s
...................... 5,8 m/s
..........5,6 m/s
.....................5,8 m/s
h
2
2
2
2
Uncertainty K ............................................................................ 1,5 m/s
...................... 1,5 m/s
..........1,5 m/s
.....................1,5 m/s
2
2
2
2
Disk sanding: vibration emission level a
................................... 1,9 m/s
...................... 1,9 m/s
..........2,9 m/s
.....................1,9 m/s
h
2
2
2
2
Uncertainty K ............................................................................ 1,5 m/s
...................... 1,5 m/s
..........1,5 m/s
.....................1,5 m/s
GB
WS 11-115 WS 11-125 WS 12-125 XE
Rated input ............................................................................ 1100 W .....................................1100 W ..................................1200 W
-1
-1
-1
Rated speed ........................................................................ 11000 min
..............................11000 min
...............2800 - 11000 min
Grinding disk diameter............................................................. 115 mm ....................................125 mm .................................125 mm
Thread of work spindle ............................................................... M 14 ......................................... M 14 ..................................... M 14
Weight according EPTA-Procedure 01/2003 .............................. 2,3 kg ........................................2,3 kg .....................................2,4 kg
Noise/Vibration Information
Measured values determined according to EN 60 745.
Typically, the A-weighted noise levels of the tool are:
Sound pressure level (K=3 dB(A)) ........................................... 90,5 dB (A) ................................90,5 dB (A) .............................90,0 dB (A)
Sound power level(K=3 dB(A)) ............................................. 101,5 dB (A) ..............................101,5 dB (A) ...........................101,0 dB (A)
Wear ear protectors!
Total vibration values (vector sum in the three axes) determined according to EN 60745.
2
2
2
Surface grinding: vibration emission value a
........................... 5,8 m/s
....................................5,8 m/s
.................................6,4 m/s
h
2
2
2
Uncertainty K ............................................................................ 1,5 m/s
....................................1,5 m/s
.................................1,5 m/s
2
2
2
Disk sanding: vibration emission level a
................................... 1,9 m/s
....................................1,9 m/s
.................................1,9 m/s
h
2
2
2
Uncertainty K ............................................................................ 1,5 m/s
....................................1,5 m/s
.................................1,5 m/s
For other applications, e.g. Abrasive Cutting-O Operations or Wire Brushing other vibration values could occur.
WARNING
The vibration emission level given in this information sheet has been measured in accordance with a standardised test given in EN 60745 and
may be used to compare one tool with another. It may be used for a preliminary assessment of exposure.
The declared vibration emission level represents the main applications of the tool. However if the tool is used for dierent applications, with
dierent accessories or poorly maintained, the vibration emission may dier. This may signicantly increase the exposure level over the total
working period.
An estimation of the level of exposure to vibration should also take into account the times when the tool is switched o or when it is running
but not actually doing the job. This may signicantly reduce the exposure level over the total working period.
Identify additional safety measures to protect the operator from the eects of vibration such as: maintain the tool and the accessories, keep
the hands warm, organisation of work patterns.
English
13

WARNING!
i) Keep bystanders a safe distance away from work area.
Read all safety warnings and all instructions, including
Anyone entering the work area must wear personal
those given in the accompanying brochure. Failure to follow
protective equipment. Fragments of workpiece or of a broken
the warnings and instructions may result in electric shock, re and/
accessory may y away and cause injury beyond immediate area of
or serious injury.
operation.
Save all warnings and instructions for future reference.
j) Hold power tool by insulated gripping surfaces, when
performing an operation where the cutting accessory may
SAFETY INSTRUCTIONS
contact hidden wiring or its own cord. Cutting accessory
contacting a „live“ wire may make exposed metal parts of the power
Safety Warnings Common for Grinding, Sanding, Wire
tool „live“ and could give the operator an electric shock.
Brushing or Abrasive Cutting-O Operations:
k) Position the cord clear of the spinning accessory. If you lose
a) This power tool is intended to function as a grinder,
control, the cord may be cut or snagged and your hand or arm may be
sander, wire brush, or cut-o tool. Read all safety warnings,
pulled into the spinning accessory.
instructions, illustrations and specications provided with
this power tool. Failure to follow all instructions listed below may
l) Never lay the power tool down until the accessory has come
result in electric shock, re and/or serious injury.
to a complete stop. The spinning accessory may grab the surface
and pull the power tool out of your control.
b) Operations such as polishing are not recommended to be
performed with this power tool. Operations for which the power
m) Do not run the power tool while carrying it at your side.
tool was not designed may create a hazard and cause personal injury.
Accidental contact with the spinning accessory could snag your
GB
clothing, pulling the accessory into your body.
c) Do not use accessories which are not specically designed
and recommended by the tool manufacturer. Just because the
n) Regularly clean the power tool’s air vents. The motor’s fan
accessory can be attached to your power tool, it does not assure safe
will draw the dust inside the housing and excessive accumulation of
operation.
powdered metal may cause electrical hazards.
d )The rated speed of the accessory must be at least equal to
o) Do not operate the power tool near ammable materials.
the maximum speed marked on the power tool. Accessories
Sparks could ignite these materials.
running faster than their rated speed can break and y apart.
p) Do not use accessories that require liquid coolants. Using
e) The outside diameter and the thickness of your accessory
water or other liquid coolants may result in electrocution or shock.
must be within the capacity rating of your power tool.
Incorrectly sized accessories cannot be adequately guarded or
Kickback and related warnings
controlled.
Kickback is a sudden reaction to a pinched or snagged rotating wheel.
f) The arbour size of wheels, anges, backing pads or any
Pinching or snagging causes rapid stalling of the rotating wheel
other accessory must properly t the spindle of the power
which in turn causes the uncontrolled power tool to be forced in the
tool. Accessories with arbour holes that do not match the mounting
direction opposite of the wheel‘s rotation at the point of the binding.
hardware of the power tool will run out of balance, vibrate excessively
For example, if an abrasive wheel is snagged or pinched by the
and may cause loss of control.
workpiece, the edge of the wheel that is entering into the pinch point
g) Do not use a damaged accessory. Before each use inspect
can dig into the surface of the material causing the wheel to climb
the accessory such as abrasive wheels for chips and cracks,
out or kick out. The wheel may either jump toward or away from
backing pad for cracks, tear or excess wear, wire brush for
the operator, depending on direction of the wheel’s movement at
loose or cracked wires. If power tool or accessory is dropped,
the point of pinching. Abrasive wheels may also break under these
inspect for damage or install an undamaged accessory. After
conditions.
inspecting and installing an accessory, position yourself and
Kickback is the result of saw misuse and/or incorrect operating
bystanders away from the plane of the rotating accessory
procedures or conditions and can be avoided by taking proper
and run the power tool at maximum noload speed for one
precautions as given below.
minute. Damaged accessories will normally break apart during this
test time.
a) Maintain a rm grip on the power tool and position your
body and arm to allow you to resist kickback forces. Always
h) Wear personal protective equipment. Depending on
use auxiliary handle, if provided, for maximum control over
application, use face shield, safety goggles or safety glasses.
kickback or torque reaction during start-up. The operator can
As appropriate, wear dust mask, hearing protectors, gloves
control torque reactions or kickback forces, if proper precautions are
and shop apron capable of stopping small abrasive or
taken.
workpiece fragments. The eye protection must be capable of
stopping ying debris generated by various operations. The dust
b) Never place your hand near the rotating accessory.
mask or respirator must be capable of ltrating particles generated
Accessory may kickback over your hand.
by your operation. Prolonged exposure to high intensity noise may
c) Do not position your body in the area where power tool will
cause hearing loss.
move if kickback occurs. Kickback will propel the tool in direction
opposite to the wheel’s movement at the point of snagging.
English
14

d) Use special care when working corners, sharp edges, etc.
e) Support panels or any oversized workpiece to minimize
Avoid bouncing and snagging the accessory. Corners, sharp
the risk of wheel pinching and kickback. Large workpieces tend
edges or bouncing have a tendency to snag the rotating accessory
to sag under their own weight. Supports must be placed under the
and cause loss of control or kickback.
workpiece near the line of cut and near the edge of the workpiece on
both sides of the wheel.
e) Do not attach a saw chain, woodcarving blade or toothed
saw blade. Such blades create frequent kickback and loss of control.
f) Use extra caution when making a “pocket cut” into existing
walls or other blind areas. The protruding wheel may cut gas or
water pipes, electrical wiring or objects that can cause kickback.
Safety Warnings Specic for Grinding and Abrasive Cutting-
O Operations:
a) Use only wheel types that are recommended for your
Safety Warnings Specic for Sanding Operations:
power tool and the specic guard designed for the selected
a) Do not use excessively oversized sanding disc paper. Follow
wheel. Wheels for which the power tool was not designed cannot be
manufacturers recommendations, when selecting sanding
adequately guarded and are unsafe.
paper. Larger sanding paper extending beyond the sanding pad
b) The guard must be securely attached to the power tool
presents a laceration hazard and may cause snagging, tearing of the
and positioned for maximum safety, so the least amount
disc or kickback.
of wheel is exposed towards the operator. The guard helps to
protect operator from broken wheel fragments and accidental contact
Safety Warnings Specic for Wire Brushing Operations:
with wheel.
a) Be aware that wire bristles are thrown by the brush even
c) Wheels must be used only for recommended applications.
GB
during ordinary operation. Do not overstress the wires by
For example: do not grind with the side of cut-o wheel.
applying excessive load to the brush. The wire bristles can easily
Abrasive cut-o wheels are intended for peripheral grinding, side
penetrate light clothing and/or skin.
forces applied to these wheels may cause them to shatter.
b) If the use of a guard is recommended for wire brushing, do
d) Always use undamaged wheel anges that are of correct
not allow any interference of the wire wheel or brush with
size and shape for your selected wheel. Proper wheel anges
the guard. Wire wheel or brush may expand in diameter due to
support the wheel thus reducing the possibility of wheel breakage.
work load and centrifugal forces.
Flanges for cut-o wheels may be dierent from grinding wheel
anges.
Appliances used at many dierent locations including open air should
e) Do not use worn down wheels from larger power tools.
be connected via a residual current device (FI, RCD, PRCD) of 30mA
Wheel intended for larger power tool is not suitable for the higher
or less.
speed of a smaller tool and may burst.
Sawdust and splinters must not be removed while the machine is
running.
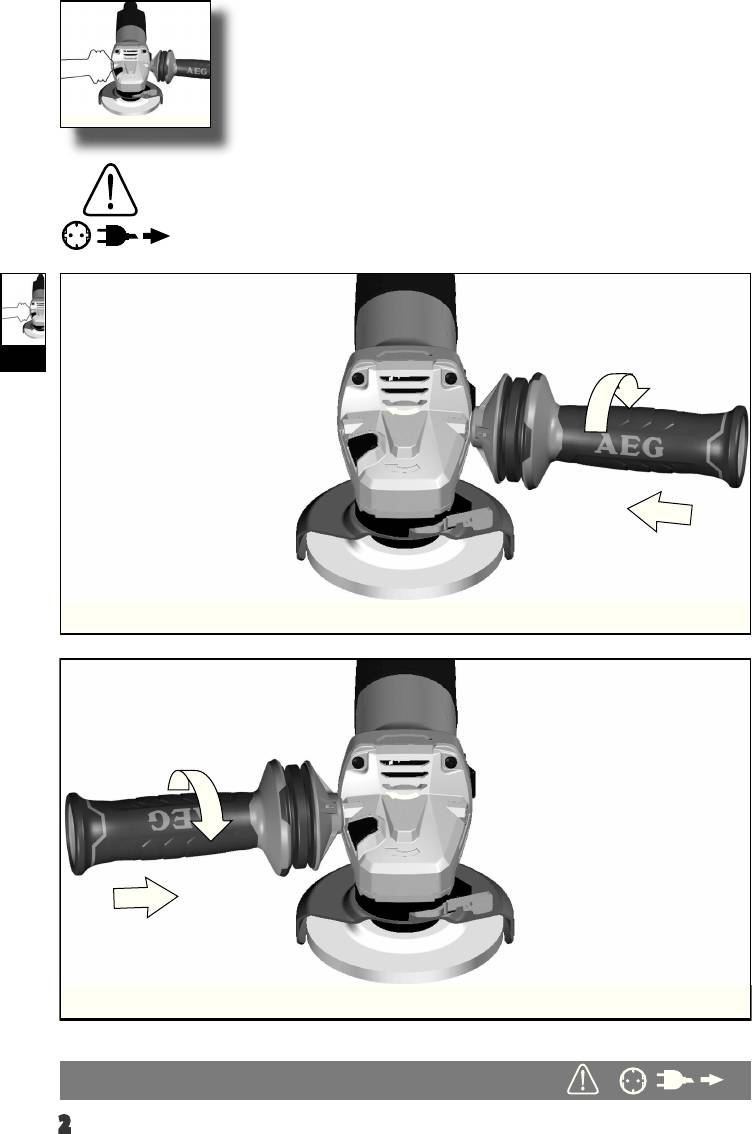
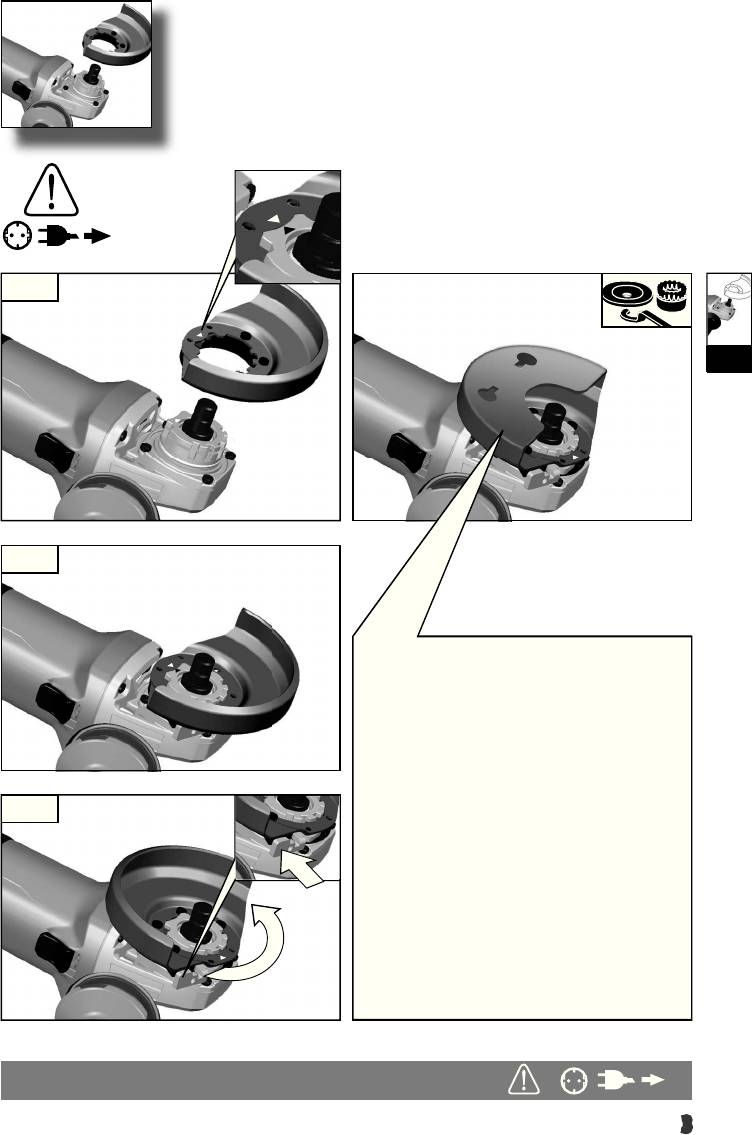
Only plug-in when machine is switched o.
Additional Safety Warnings Specic for Abrasive Cutting-O
Operations:
Never reach into the danger area of the plane when it is running.
a) Do not “jam” the cut-o wheel or apply excessive
Always use the auxiliary handle.
pressure. Do not attempt to make an excessive depth of cut.
Always use the protecting cap when roughing-down and separating.
Overstressing the wheel increases the loading and susceptibility
Immediately switch o the machine in case of considerable vibrations
to twisting or binding of the wheel in the cut and the possibility of
or if other malfunctions occur. Check the machine in order to nd out
kickback or wheel breakage.
the cause.
b) Do not position your body in line with and behind the
Always use and store the grinding disks according to the
rotating wheel. When the wheel, at the point of operation, is
manufacturer’s instructions.
moving away from your body, the possible kickback may propel the
When grinding metal, ying sparks are produced. Take care that
spinning wheel and the power tool directly at you.
no persons are endangered. Because of the danger of re, no
c) When wheel is binding or when interrupting a cut for any
combustible materials should be located in the vicinity (spark ight
reason, switch o the power tool and hold the power tool
zone). Do not use dust extraction.
motionless until the wheel comes to a complete stop. Never
Due care should be taken that no sparks or sanding dust ying from
attempt to remove the cut-o wheel from the cut while the
the workpiece come into contact with you.
wheel is in motion otherwise kickback may occur. Investigate
and take corrective action to eliminate the cause of wheel binding.
When separating stone the guide shoe must be used!
d) Do not restart the cutting operation in the workpiece. Let
The adjusting nut must be tightened before starting to work with
the wheel reach full speed and carefully reenter the cut. The
the machine.
wheel may bind, walk up or kickback if the power tool is restarted in
The workpiece must be xed if it is not heavy enough to be steady.
the workpiece.
English
15
Never lead the workpiece to the grinding disk with your hand.
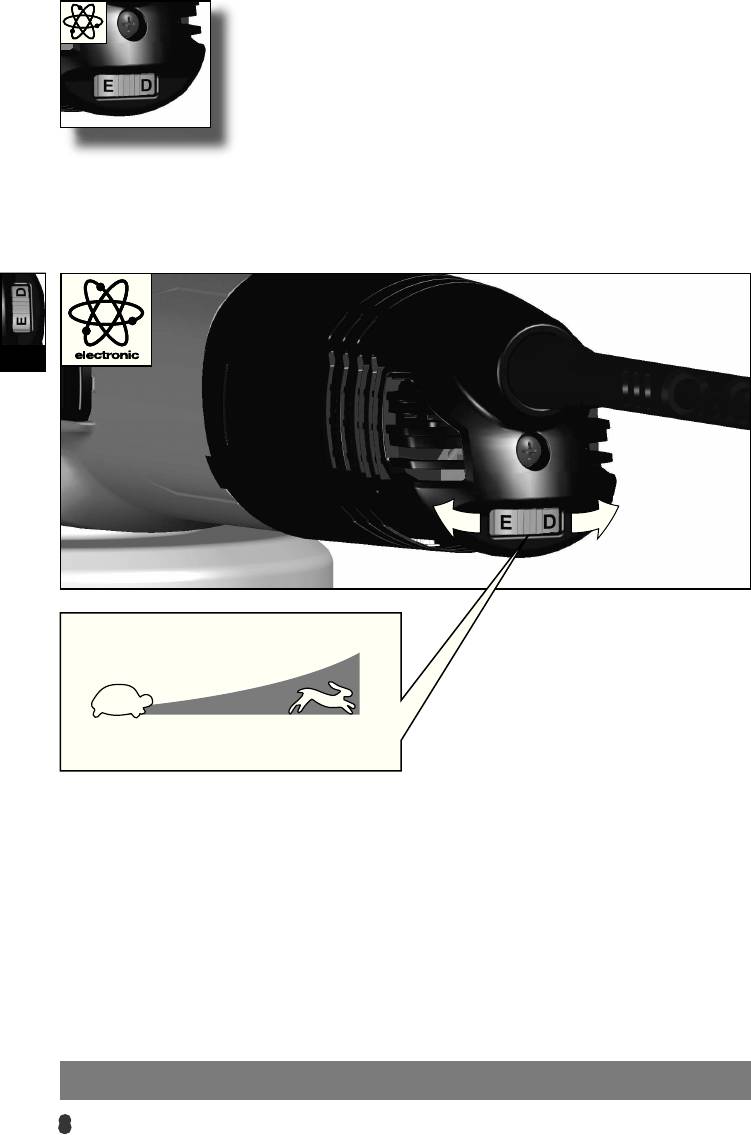
The built-in electronic will keep a constant speed even under
increased load.
Under extreme conditions (e.g. smooth-grinding metals with the arbour
Should the machine be overloaded, the rotational speed is being
and vulcanized bre grinding wheel), signi cant contamination can build
reduced to standstill.
up on the inside of the angle grinder. For safety reasons, in such conditions
the inside should be cleaned thoroughly of metal deposits and a residual
SYMBOLS
current device (FI, RCD, PRCD) must be connected in series. If the residual
current device responds, the machine must be sent for repair.
Please read the instructions carefully before
For accessories intended to be tted with threaded hole wheel,
starting the machine.
ensure that the thread in the wheel is long enough to accept the
spindle length.
CAUTION! WARNING! DANGER!
When cutting-o material, use the closed safety guard from the
accessories range.
Always wear goggles when using the machine.
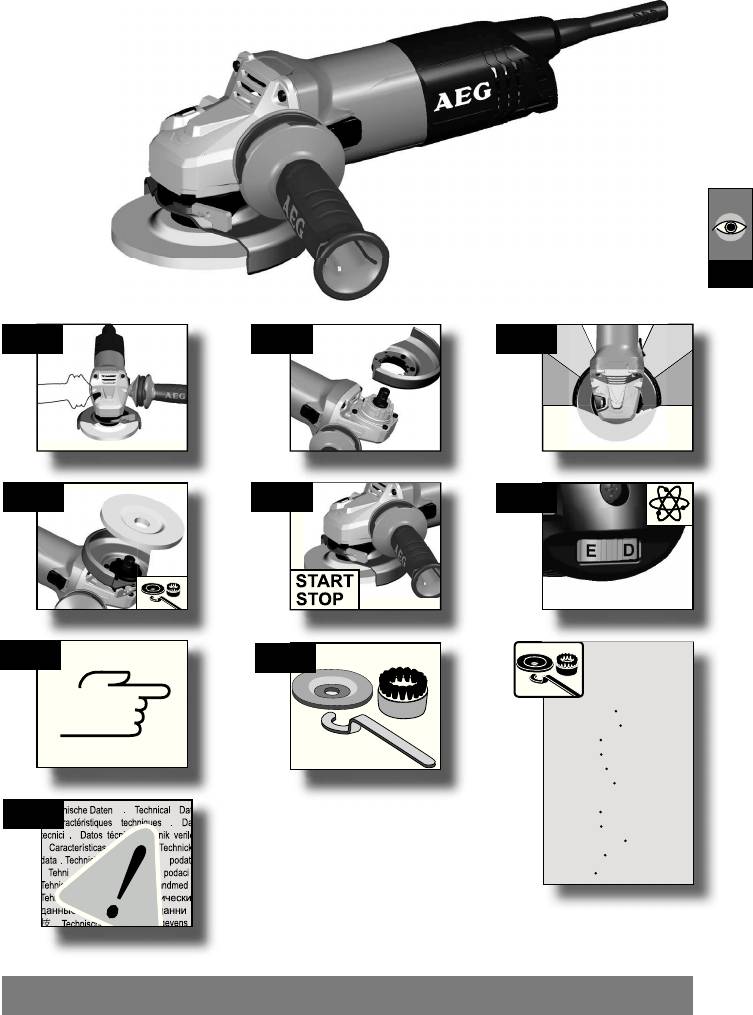
SPECIFIED CONDITIONS OF USE
The angle grinder may be used for cutting, grinding, sanding and
wire brushing a wide range of materials, such as metal or stone. If
Always disconnect the plug from the socket before
you have any doubts, please refer to the instructions supplied by the
carrying out any work on the machine.
accessory manufacturer.
GB
Do not use this product in any other way as stated for normal use.
Accessory - Not included in standard equipment,
available as an accessory.
MAINS CONNECTION
Connect only to single-phase AC current and only to the system
Do not dispose of electric tools together with
voltage indicated on the rating plate. It is also possible to connect
household waste material! In observance of
to sockets without an earthing contact as the design conforms to
European Directive 2002/96/EC on waste electrical
safety class II.
and electronic equipment and its implementation
in accordance with national law, electric tools that
ECDECLARATION OF CONFORMITY
have reached the end of their life must be collected
We declare under our sole responsibility that this product is in
separately and returned to an environmentally
conformity with the following standards or standardized documents.
compatible recycling facility.
EN 60745, EN 55014-1, EN 55014-2, EN 61000-3-2, EN 61000-3-3, in
accordance with the regulations 2006/42/EC, 2004/108/EC
Rainer Kumpf
Winnenden, 2010-12-09
Manager Product Development
Authorized to compile the technical le
MAINTENANCE
The ventilation slots of the machine must be kept clear at all times.
Do not let any metal parts enter the airing slots - danger of short
circuit!
Use only AEG accessories and spare parts. Should components need to
be replaced which have not been described, please contact one of our
AEG service agents (see our list of guarantee/service addresses).
If needed, an exploded view of the tool can be ordered. Please state
the Article No. as well as the machine type printed on the label
and order the drawing at your local service agents or directly at:
AEG Elektrowerkzeuge, Max-Eyth-Straße10, D-71364Winnenden,
Germany.
ELECTRONICS WS 12125 XE
English
16

TECHNISCHE DATEN Winkelschleifer
WS 9-100 WS 9-115 WS 9-125
220 - 240 V 110 V
Nennaufnahmeleistung ........................................................... 900 W ......................... 900 W .............900 W .......................900 W
-1
-1
-1
-1
Nenndrehzahl ...................................................................... 11000 min
............... 11000 min
...11000
min
............. 11000 min
Schleifscheiben-ø..................................................................... 100 mm ...................... 115 mm ..........115 mm .................... 125 mm
Spindelgewinde ......................................................................... M 10 .......................... M 14 ...............M 14 ........................ M 14
Gewicht nach EPTA-Prozedur 01/2003 ...................................... 2,0 kg ......................... 2,0 kg .............2,0 kg ........................ 2,0 kg
Geräusch/Vibrationsinformation
Messwerte ermittelt entsprechend EN 60 745.
Der A-bewertete Geräuschpegel des Gerätes beträgt typischerweise:
Schalldruckpegel (K=3 dB(A)) ................................................ 90,5 dB (A).................. 90,5 dB (A) .....89,0 dB (A) ................ 90,5 dB (A)
Schallleistungspegel(K=3 dB(A)).......................................... 101,5 dB (A)................ 101,5 dB (A) ... 100,0 dB (A) .............. 101,5 dB (A)
Gehörschutz tragen!
Schwingungsgesamtwerte (Vektorsumme dreier Richtungen) ermittelt entsprechend EN 60745.
2
2
2
2
Schruppschleifen: Schwingungsemissionswert a
..................... 5,8 m/s
...................... 5,8 m/s
..........5,6 m/s
....................5,8 m/s
h
2
2
2
2
Unsicherheit K ........................................................................... 1,5 m/s
...................... 1,5 m/s
..........1,5 m/s
....................1,5 m/s
2
2
2
2
Sandpapierschleifen: Schwingungsemissionswert a
................ 1,9 m/s
...................... 1,9 m/s
..........2,9 m/s
....................1,9 m/s
h
2
2
2
2
Unsicherheit K ........................................................................... 1,5 m/s
...................... 1,5 m/s
..........1,5 m/s
....................1,5 m/s
D
WS 11-115 WS 11-125 WS 12-125 XE
Nennaufnahmeleistung ......................................................... 1100 W .....................................1100 W .................................1200 W
-1
-1
-1
Nenndrehzahl ...................................................................... 11000 min
..............................11000 min
..............2800 - 11000 min
Schleifscheiben-ø..................................................................... 115 mm ....................................125 mm ................................125 mm
Spindelgewinde ......................................................................... M 14 ......................................... M 14 .................................... M 14
Gewicht nach EPTA-Prozedur 01/2003 ...................................... 2,3 kg ........................................2,3 kg ....................................2,4 kg
Geräusch/Vibrationsinformation
Messwerte ermittelt entsprechend EN 60 745.
Der A-bewertete Geräuschpegel des Gerätes beträgt typischerweise:
Schalldruckpegel (K=3 dB(A)) ................................................ 90,5 dB (A) ................................90,5 dB (A) ............................90,0 dB (A)
Schallleistungspegel(K=3 dB(A)).......................................... 101,5 dB (A) ..............................101,5 dB (A) ..........................101,0 dB (A)
Gehörschutz tragen!
Schwingungsgesamtwerte (Vektorsumme dreier Richtungen) ermittelt entsprechend EN 60745.
2
2
2
Schruppschleifen: Schwingungsemissionswert a
..................... 5,8 m/s
....................................5,8 m/s
................................6,4 m/s
h
2
2
2
Unsicherheit K ........................................................................... 1,5 m/s
....................................1,5 m/s
................................1,5 m/s
2
2
2
Sandpapierschleifen: Schwingungsemissionswert a
................ 1,9 m/s
....................................1,9 m/s
................................1,9 m/s
h
2
2
2
Unsicherheit K ........................................................................... 1,5 m/s
....................................1,5 m/s
................................1,5 m/s
Bei anderen Anwendungen, wie z.B. Trennschleifen oder Schleifen mit der Stahldrahtbürste können sich andere Vibrationswerte ergeben!
WARNUNG
Der in diesen Anweisungen angegebene Schwingungspegel ist entsprechend einem in EN 60745 genormten Messverfahren gemessen
worden und kann für den Vergleich von Elektrowerkzeugen miteinander verwendet werden. Er eignet sich auch für eine vorläuge
Einschätzung der Schwingungsbelastung.
Der angegebene Schwingungspegel repräsentiert die hauptsächlichen Anwendungen des Elektrowerkzeugs. Wenn allerdings das
Elektrowerkzeug für andere Anwendungen, mit abweichenden Einsatzwerkzeugen oder ungenügender Wartung eingesetzt wird, kann der
Schwingungspegel abweichen. Dies kann die Schwingungsbelastung über den gesamten Arbeitszeitraum deutlich erhöhen.
Für eine genaue Abschätzung der Schwingungsbelastung sollten auch die Zeiten berücksichtigt werden, in denen das Gerät abgeschaltet
ist oder zwar läuft, aber nicht tatsächlich im Einsatz ist. Dies kann die Schwingungsbelastung über den gesamten Arbeitszeitraum deutlich
reduzieren.
Legen Sie zusätzliche Sicherheitsmaßnahmen zum Schutz des Bedieners vor der Wirkung von Schwingungen fest wie zum Beispiel: Wartung
von Elektrowerkzeug und Einsatzwerkzeugen, Warmhalten der Hände, Organisation der Arbeitsabläufe.
Deutsch
17

WARNUNG!
je nach Anwendung Vollgesichtsschutz, Augenschutz oder
Lesen Sie alle Sicherheitshinweise und Anweisungen,
Schutzbrille. Soweit angemessen, tragen Sie Staubmaske,
auch die in der beiliegenden Broschüre.Versäumnisse bei
Gehörschutz, Schutzhandschuhe oder Spezialschürze, die
der Einhaltung der Sicherheitshinweise und Anweisungen können
kleine Schleif und Materialpartikel von Ihnen fernhält.
elektrischen Schlag, Brand und/oder schwere Verletzungen
Die Augen sollen vor herumiegenden Fremdkörpern geschützt
verursachen.
werden, die bei verschiedenen Anwendungen entstehen. Staub oder
Bewahren Sie alle Sicherheitshinweise und Anweisungen für
Atemschutzmaske müssen den bei der Anwendung entstehenden
die Zukunft auf.
Staub ltern. Wenn Sie lange lautem Lärm ausgesetzt sind, können Sie
einen Hörverlust erleiden.
SPEZIELLE SICHERHEITSHINWEISE
i) Achten Sie bei anderen Personen auf sicheren Abstand zu
Gemeinsame Sicherheitshinweise zum Schleifen,
Ihrem Arbeitsbereich. Jeder, der den Arbeitsbereich betritt,
Sandpapierschleifen, Arbeiten mit Drahtbürsten und
muss persönliche Schutzausrüstung tragen. Bruchstücke des
Trennschleifen
Werkstücks oder gebrochener Einsatzwerkzeuge können wegiegen
und Verletzungen auch außerhalb des direkten Arbeitsbereichs
a) Dieses Elektrowerkzeug ist zu verwenden als Schleifer,
verursachen.
Sandpapierschleifer, Drahtbürste und Trennschleifmaschine.
Beachten Sie alle Sicherheitshinweise, Anweisungen,
j) Halten Sie das Gerät nur an den isolierten Griächen,
Darstellungen und Daten, die Sie mit dem Elektrowerkzeug
wenn Sie Arbeiten ausführen, bei denen das Einsatzwerkzeug
erhalten. Wenn Sie die folgenden Anweisungen nicht beachten,
verborgene Stromleitungen oder das eigene Kabel
kann es zu elektrischem Schlag, Feuer und/oder schweren
treen kann. Der Kontakt des Schneidwerkzeugs mit einer
D
Verletzungen kommen.
spannungsführenden Leitung kann metallene Geräteteile unter
Spannung setzen und zu einem elektrischen Schlag führen.
b) Dieses Elektrowerkzeug ist nicht geeignet zum Polieren.
Verwendungen, für die das Elektrowerkzeug nicht vorgesehen ist,
k) Halten Sie das Netzkabel von sich drehenden
können Gefährdungen und Verletzungen verursachen.
Einsatzwerkzeugen fern. Wenn Sie die Kontrolle über das
Elektrowerkzeug verlieren, kann das Netzkabel durchtrennt oder
c) Verwenden Sie kein Zubehör, das vom Hersteller
erfasst werden und Ihre Hand oder Ihr Arm in das sich drehende
nicht speziell für dieses Elektrowerkzeug vorgesehen
Einsatzwerkzeug geraten.
und empfohlen wurde. Nur weil Sie das Zubehör an Ihrem
Elektrowerkzeug befestigen können, garantiert das keine sichere
l) Legen Sie das Elektrowerkzeug niemals ab, bevor das
Verwendung.
Einsatzwerkzeug völlig zum Stillstand gekommen ist. Das sich
drehende Einsatzwerkzeug kann in Kontakt mit der Ablageäche
d )Die zulässige Drehzahl des Einsatzwerkzeugs muss
geraten, wodurch Sie die Kontrolle über das Elektrowerkzeug verlieren
mindestens so hoch sein wie die auf dem Elektrowerkzeug
können.
angegebene Höchstdrehzahl. Zubehör, das sich schneller als
zulässig dreht, kann zerbrechen und umheriegen.
m) Lassen Sie das Elektrowerkzeug nicht laufen, während Sie
es tragen. Ihre Kleidung kann durch zufälligen Kontakt mit dem sich
e) Außendurchmesser und Dicke des Einsatzwerkzeugs
drehenden Einsatzwerkzeug erfasst werden, und das Einsatzwerkzeug
müssen den Maßangaben Ihres Elektrowerkzeugs
sich in Ihren Körper bohren.
entsprechen. Falsch bemessene Einsatzwerkzeuge können nicht
ausreichend abgeschirmt oder kontrolliert werden.
n) Reinigen Sie regelmäßig die Lüftungsschlitze Ihres
Elektrowerkzeugs. Das Motorgebläse zieht Staub in das Gehäuse,
f) Schleifscheiben, Flansche, Schleifteller oder anderes
und eine starke Ansammlung von Metallstaub kann elektrische
Zubehör müssen genau auf die Schleifspindel Ihres
Gefahren verursachen.
Elektrowerkzeugs passen. Einsatzwerkzeuge, die nicht genau
auf die Schleifspindel des Elektrowerkzeugs passen, drehen sich
o) Verwenden Sie das Elektrowerkzeug nicht in der Nähe
ungleichmäßig, vibrieren sehr stark und können zum Verlust der
brennbarer Materialien. Funken können diese Materialien
Kontrolle führen.
entzünden.
g) Verwenden Sie keine beschädigten Einsatzwerkzeuge.
p) Verwenden Sie keine Einsatzwerkzeuge, die üssige
Kontrollieren Sie vor jeder Verwendung Einsatzwerkzeuge
Kühlmittel erfordern. Die Verwendung von Wasser oder anderen
wie Schleifscheiben auf Absplitterungen und Risse,
üssigen Kühlmitteln kann zu einem elektrischen Schlag führen.
Schleifteller auf Risse, Verschleiß oder starke Abnutzung,
Rückschlag und entsprechende Sicherheitshinweise
Drahtbürsten auf lose oder gebrochene Drähte. Wenn das
Elektrowerkzeug oder das Einsatzwerkzeug herunterfällt,
Rückschlag ist die plötzliche Reaktion infolge eines hakenden oder
überprüfen Sie, ob es beschädigt ist, oder verwenden
blockierten drehenden Einsatzwerkzeugs, wie Schleifscheibe,
Sie ein unbeschädigtes Einsatzwerkzeug. Wenn Sie das
Schleifteller, Drahtbürste usw. Verhaken oder Blockieren führt zu
Einsatzwerkzeug kontrolliert und eingesetzt haben, halten Sie
einem abrupten Stopp des rotierenden Einsatzwerkzeugs. Dadurch
und in der Nähe bendliche Personen sich außerhalb der Ebene
wird ein unkontrolliertes Elektrowerkzeug gegen die Drehrichtung des
des rotierenden Einsatzwerkzeugs auf und lassen Sie das
Einsatzwerkzeugs an der Blockierstelle beschleunigt.
Elektrowerkzeug eine Minute lang mit Höchstdrehzahl laufen.
Wenn z. B. eine Schleifscheibe im Werkstück hakt oder blockiert, kann
Beschädigte Einsatzwerkzeuge brechen meist in dieser Testzeit.
sich die Kante der Schleifscheibe, die in das Werkstück eintaucht,
h) Tragen Sie persönliche Schutzausrüstung. Verwenden Sie
verfangen und dadurch die Schleifscheibe ausbrechen oder einen
Deutsch
18

Rückschlag verursachen. Die Schleifscheibe bewegt sich dann auf die
e) Verwenden Sie keine abgenutzten Schleifscheiben von
Bedienperson zu oder von ihr weg, je nach Drehrichtung der Scheibe an
größeren Elektrowerkzeugen. Schleifscheiben für größere
der Blockierstelle. Hierbei können Schleifscheiben auch brechen.
Elektrowerkzeuge sind nicht für die höheren Drehzahlen von kleineren
Elektrowerkzeugen ausgelegt und können brechen.
Ein Rückschlag ist die Folge eines falschen oder fehlerhaften Gebrauchs
der Säge. Er kann durch geeignete Vorsichtsmaßnahmen, wie
Weitere besondere Sicherheitshinweise zum Trennschleifen
nachfolgend beschrieben, verhindert werden.
a) Vermeiden Sie ein Blockieren der Trennscheibe oder zu
a) Halten Sie das Elektrowerkzeug gut fest und bringen Sie
hohen Anpressdruck. Führen Sie keine übermäßig tiefen
Ihren Körper und Ihre Arme in eine Position, in der Sie die
Schnitte aus. Eine Überlastung der Trennscheibe erhöht deren
Rückschlagkräfte abfangen können. Verwenden Sie immer
Beanspruchung und die Anfälligkeit zum Verkanten oder Blockieren
den Zusatzgri, falls vorhanden, um die größtmögliche
und damit die Möglichkeit eines Rückschlags oder Schleifkörperbruchs.
Kontrolle über Rückschlagkräfte oder Reaktionsmomente
beim Hochlauf zu haben. Die Bedienperson kann durch geeignete
b) Meiden Sie den Bereich vor und hinter der rotierenden
Vorsichtsmaßnahmen die Rückschlag- und Reaktionskräfte
Trennscheibe. Wenn Sie die Trennscheibe im Werkstück von sich
beherrschen.
wegbewegen, kann im Falle eines Rückschlags das Elektrowerkzeug mit
der sich drehenden Scheibe direkt auf Sie zugeschleudert werden.
b) Bringen Sie Ihre Hand nie in die Nähe sich drehender
Einsatzwerkzeuge. Das Einsatzwerkzeug kann sich beim Rückschlag
c) Falls die Trennscheibe verklemmt oder Sie die Arbeit
über Ihre Hand bewegen.
unterbrechen, schalten Sie das Gerät aus und halten Sie es
ruhig, bis die Scheibe zum Stillstand gekommen ist. Versuchen
c) Meiden Sie mit Ihrem Körper den Bereich, in den das
Sie nie, die noch laufende Trennscheibe aus dem Schnitt zu
Elektrowerkzeug bei einem Rückschlag bewegt wird. Der
ziehen, sonst kann ein Rückschlag erfolgen. Ermitteln und
Rückschlag treibt das Elektrowerkzeug in die Richtung entgegengesetzt
D
beheben Sie die Ursache für das Verklemmen.
zur Bewegung der Schleifscheibe an der Blockierstelle.
d) Schalten Sie das Elektrowerkzeug nicht wieder ein, solange
d) Arbeiten Sie besonders vorsichtig im Bereich von Ecken,
es sich im Werkstück bendet. Lassen Sie die Trennscheibe erst
scharfen Kanten usw. Verhindern Sie, dass Einsatzwerkzeuge
ihre volle Drehzahl erreichen, bevor Sie den Schnitt vorsichtig
vom Werkstück zurückprallen und verklemmen. Das
fortsetzen. Anderenfalls kann die Scheibe verhaken, aus dem
rotierende Einsatzwerkzeug neigt bei Ecken, scharfen Kanten oder
Werkstück springen oder einen Rückschlag verursachen.
wenn es abprallt, dazu, sich zu verklemmen. Dies verursacht einen
Kontrollverlust oder Rückschlag.
e) Stützen Sie Platten oder große Werkstücke ab, um das Risiko
eines Rückschlags durch eine eingeklemmte Trennscheibe zu
e) Verwenden Sie kein Ketten- oder gezähntes Sägeblatt.
vermindern. Große Werkstücke können sich unter ihrem eigenen
Solche Einsatzwerkzeuge verursachen häug einen Rückschlag oder
Gewicht durchbiegen. DasWerkstück muss auf beiden Seiten abgestützt
den Verlust der Kontrolle über das Elektrowerkzeug.
werden, und zwar sowohl in der Nähe des Trennschnitts als auch an
der Kante.
Besondere Sicherheitshinweise zum Schleifen und
Trennschleifen
f) Seien Sie besonders vorsichtig bei „Taschenschnitten“ in
bestehende Wände oder andere nicht einsehbare Bereiche.
a) Verwenden Sie ausschließlich die für Ihr Elektrowerkzeug
Die eintauchende Trennscheibe kann beim Schneiden in Gas- oder
zugelassenen Schleifkörper und die für diese Schleifkörper
Wasserleitungen, elektrische Leitungen oder andereObjekte einen
vorgesehene Schutzhaube. Schleifkörper, die nicht für das
Rückschlag verursachen.
Elektrowerkzeug vorgesehen sind, können nicht ausreichend
abgeschirmt werden und sind unsicher.
Besondere Sicherheitshinweise zum Sandpapierschleifen
b) Die Schutzhaube muss sicher am Elektrowerkzeug
a) Benutzen Sie keine überdimensionierten Schleifblätter,
angebracht und so eingestellt sein, dass ein Höchstmaß an
sondern befolgen Sie die Herstellerangaben zur
Sicherheit erreicht wird, d. h. der kleinstmögliche Teil des
Schleifblattgröße. Schleifblätter, die über den Schleifteller
Schleifkörpers zeigt oen zur Bedienperson. Die Schutzhaube
hinausragen, können Verletzungen verursachen sowie zum
soll die Bedienperson vor Bruchstücken und zufälligem Kontakt mit
Blockieren, Zerreißen der Schleifblätter oder zum Rückschlag führen.
dem Schleifkörper schützen.
c) Schleifkörper dürfen nur für die empfohlenen
Besondere Sicherheitshinweise zum Arbeiten mit
Einsatzmöglichkeiten verwendet werden. Z.B.: Schleifen Sie
Drahtbürsten
nie mit der Seitenäche einer Trennscheibe. Trennscheiben sind
zum Materialabtrag mit der Kante der Scheibe bestimmt. Seitliche
a) Beachten Sie, dass die Drahtbürste auch während des
Krafteinwirkung auf diese Schleifkörper kann sie zerbrechen.
üblichen Gebrauchs Drahtstücke verliert. Überlasten Sie
die Drähte nicht durch zu hohen Anpressdruck. Wegiegende
d) Verwenden Sie immer unbeschädigte Spannansche in
Drahtstücke können sehr leicht durch dünne Kleidung und/oder die
der richtigen Größe und Form für die von Ihnen gewählte
Haut dringen.
Schleifscheibe. Geeignete Flansche stützen die Schleifscheibe
und verringern so die Gefahr eines Schleifscheibenbruchs. Flansche
b) Wird eine Schutzhaube empfohlen, verhindern Sie, dass
für Trennscheiben können sich von den Flanschen für andere
sich Schutzhaube und Drahtbürste berühren können. Teller
Schleifscheiben unterscheiden.
und Topfbürsten können durch Anpressdruck und Zentrifugalkräfte
ihren Durchmesser vergrößern.
Deutsch
19


