AEG EX 125 ES: инструкция
Раздел: Офисная Техника
Тип: Телефон
Инструкция к Телефону AEG EX 125 ES

EX 125 ES
Original instructions
Instrukcją oryginalną
Originalbetriebsanleitung
Eredeti használati utasítás
Notice originale
Izvirna navodila
Istruzioni originali
Originalne pogonske upute
Manual original
Instrukcijām oriģinālvalodā
Manual original
Originali instrukcija
Oorspronkelijke gebruiksaanwijzing
Algupärane kasutusjuhend
Original brugsanvisning
Оригинальное руководство по
эксплуатации
Original bruksanvisning
Оригинално ръководство за
Bruksanvisning i original
експлоатация
Alkuperäiset ohjeet
Instrucţiuni de folosire originale
Πρωτότυπο οδηγιών χρήσης
Оригинален прирачник за работа
Orijinal işletme talimatı
Původním návodem k používání
原始的指南
Pôvodný návod na použitie
Akku
Akku
Òåõíè÷åñêèå äàííûå, Ðåêîìåíäàöèè ïî òåõíèêå áåçîïàñíîñòè,
Èñïîëüçî- âàíèå, Ïîäêëþ÷åíèå ê ýëåêòðîñåòè, Îáñëóæèâàíèå, Ñèìâîëû
Òåõíè÷åñêè äàííè, Ñïåöèàëíè óêàçàíèÿ çà áåçîïàñíîñò, Èçïîëçâàíå ïî ïðåäíàçíà÷åíèå,
ÑÅ-Äåêëàðàöèÿ çà ñúîòâåòñòâèå, Ñâúðçâàíå êúì ìðåæàòà, Ïîääðúæêà, Ñèìâîëè
Òåõíè÷êè Ïîäàòîöè, Óïàòñòâî Çà Óïîòðåáà, Ñïåöèôèöèðàíè Óñëîâè Íà
Óïîòðåáà, Åó-äåêëàðàöè¼à Çà Ñîîáðàçíîñò, БАТЕРИИ, Îäðæóâàњå, Ñèìáîëè
技术数据, 特殊安全指示, 正确地使用机器, 电源插头, 蓄电池, 维修, 符号 请详细阅读并妥善保存!
中文
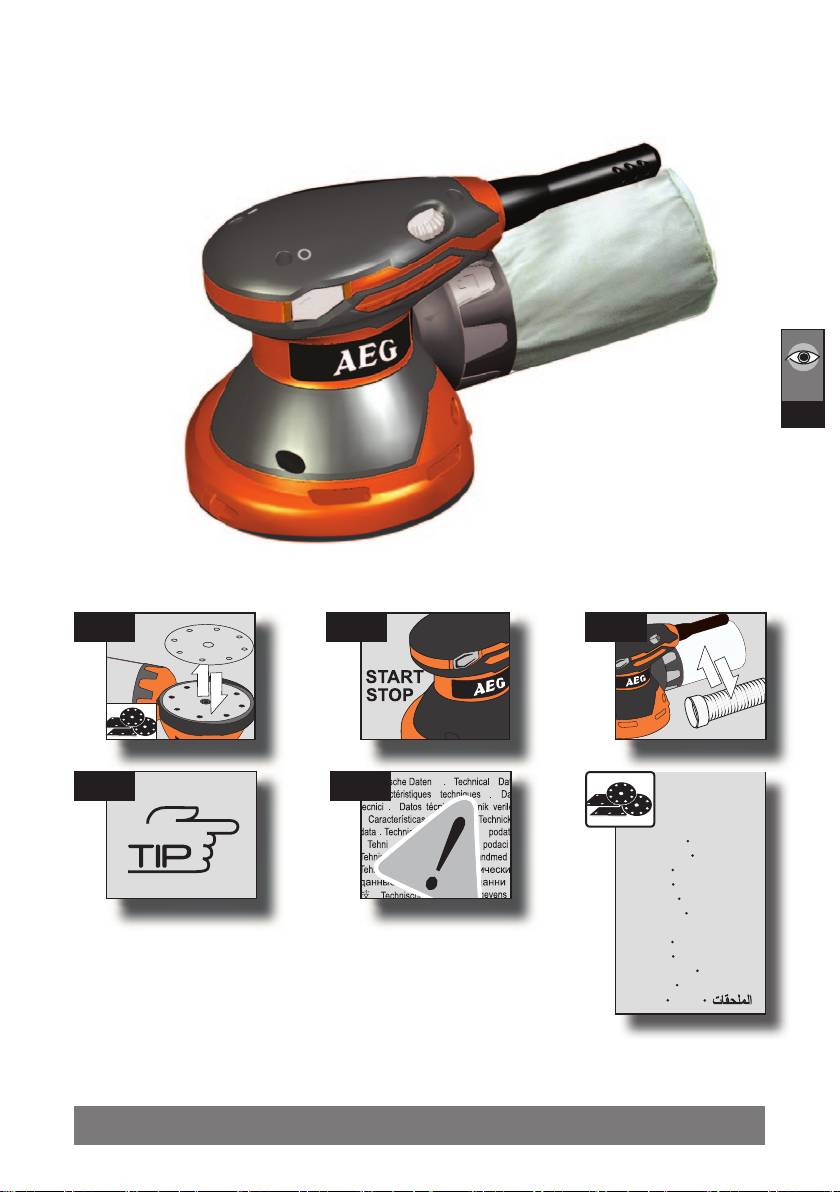
Příslušenství
Äîïîëíèòåëü
配件
I
IIIII
IV
Aufnahme
V
aufschrauben
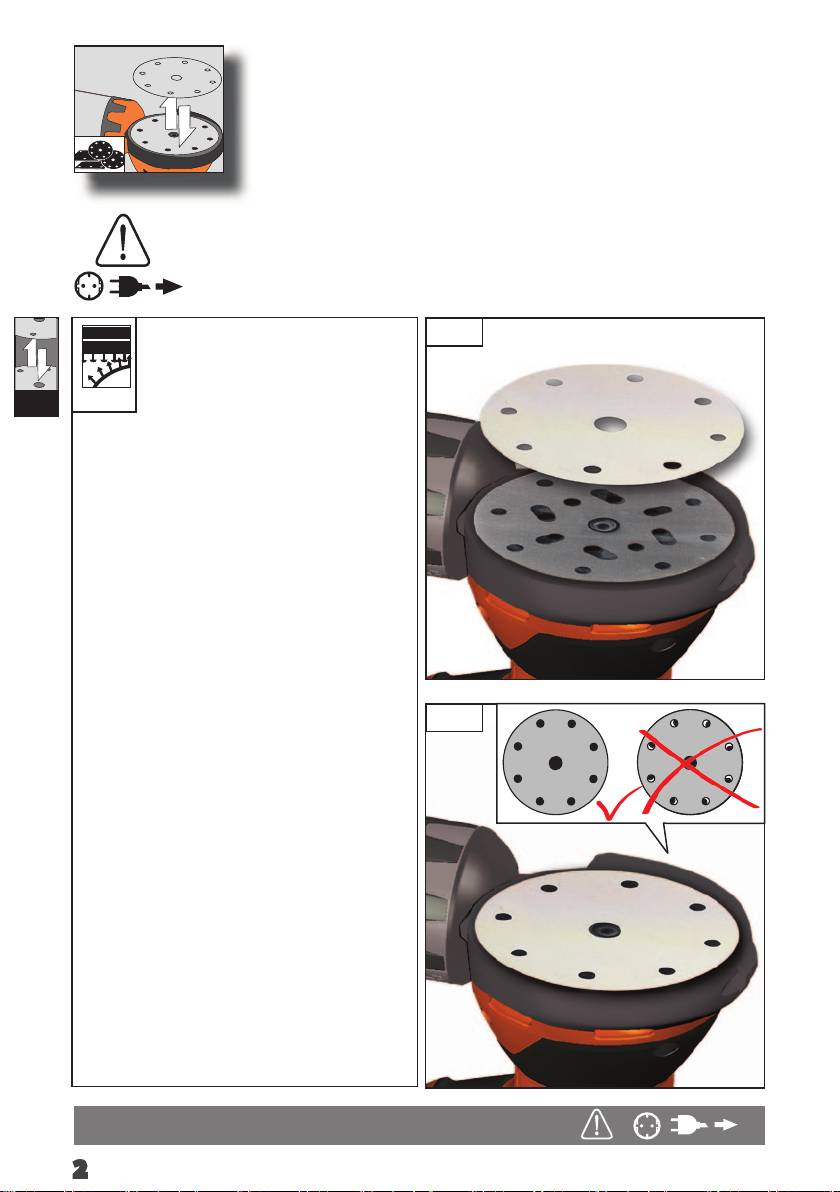
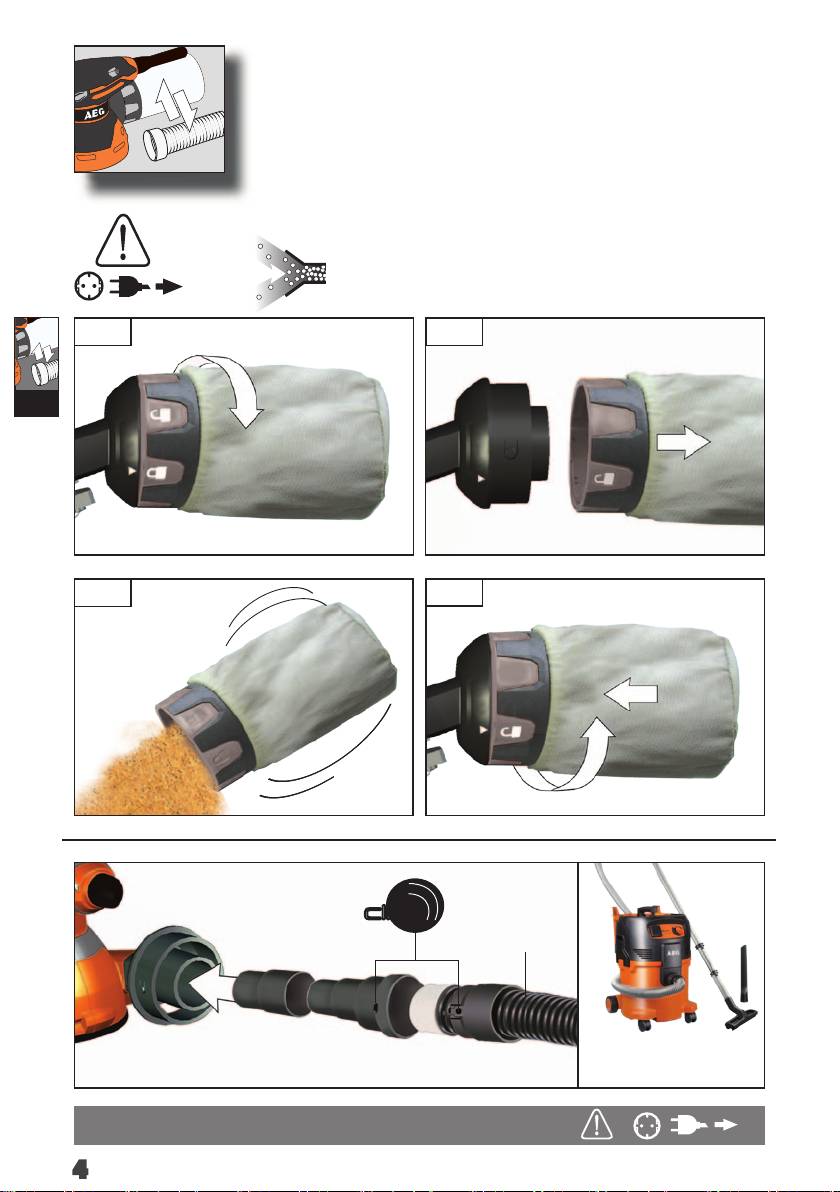
Press carefully the fuzzy side of sanding disc against the packaging
1.
pad,as rmly as possible.
Die Haftseite des Schleifpads vorsichtig auf den Schleifteller auegen und
so fest wie möglich andrücken.
VELCRO
Placer la face adhérente du disque abrasif avec précaution sur le plateau
II
de meulage et presser aussi fermement que possible.
Appoggiare attentamente il lato adesivo del dischetto levigante sul piatto levigatore e
premere il più forte possibile.
Colocar cuidadosamente la parte adherente del disco lijador en el plato de lijar y presionar
tan fuerte como sea posible.
Colocar com cuidado o lado aderente da folha de lixa sobre o disco de lixa e pressioná-lo o
melhor possível contra este
Plaats de hechtende zijde van de schuurpad voorzichtig op de schuurschijf en druk het zo
vast mogelijk aan
Sæt sliberondellens fastgørelsesside forsigtigt på slibetallerkenen og tryk den så fast
som muligt.
Legg slipepadsens klebeside forsiktig på slipeplaten og trykk den på så fast som mulig.
Placera slipkuddens vidhäftande sida försiktigt på sliptallriken och tryck sedan så hårt
som möjligt.
Aseta hiomalaikan tarttumapinta varovasti hiomalevylle ja paina se kiinni niin lujaan kuin
suinkin mahdollista
Toποθετήστε προσεκτικά την κολλητική πλευρά του γυαλόχαρτου στο δίσκο λείανσης και
πιέστε το όσο πιο δυνατά γίνεται.
Zımpara diskinin yapışkan tarafını zımpara tablasının üzerine dikkatlice oturtun ve
mümkün olduğu kadar kuvvetli bir şekilde bastırın.
Přilnavou stranu brusného kotouče položte na brusný talíř a co nejpevněji přitlačte.
Priľnavú stranu brúsneho kotúča položte na brúsny tanier a čo najpevnejšie pritlačte.
2.
Stronę przyczepną podkładki szlierskiej należy przyłożyć ostrożnie do tarczy szlierskiej
i jak najsilniej docisnąć.
A csiszolópárna tapadó oldalát helyezze óvatosan a csiszolótányérra, és a lehető
legerősebben nyomja rá.
Oprijemalno stran brusilne podloge previdno položiti na brusilni krožnik in jo čim bolj
močno pritisniti na krožnik.
Stranu prianjanja brusnog runa oprezno postaviti na klizni tanjur i pritisnuti što jače.
Pielīpošo slīpēšanas pamatnes pusi uzmanīgi novietojiet uz slīpēšanas diska un pēc
iespējas stingrāk piespiediet.
Kibiąją šlifavimo pado pusę atsargiai uždėkite ant šlifavimo disko ir kaip galima stipriau
prispauskite.
Asetage lihvpadja pehme külg ettevaatlikult lihvmasina kettale ning suruge nii tugevalt
kinni, kui võimalik.
Осторожно наложите липучку шлифовального круга на шлифовальную тарелку и
прижмите настолько сильно, насколько это возможно.
Прилепващата страна на подложката за шлайфане се поставя внимателно върху
шлифовъчния кръг и се притиска колкото е възможно по-силно.
Aşezaţi cu atenţie partea aderentă a suportului de material abraziv pe discul polizorului şi
apăsaţi-l cât puteţi de tare spre acesta.
Поставете ја страната за лепење од влошката на основата од површината за
мазнење и притиснете ја што е можно поцврсто.
将砂布片的具有绒毛的自粘面很小心地放在磨盘上并尽可能
压紧。
2
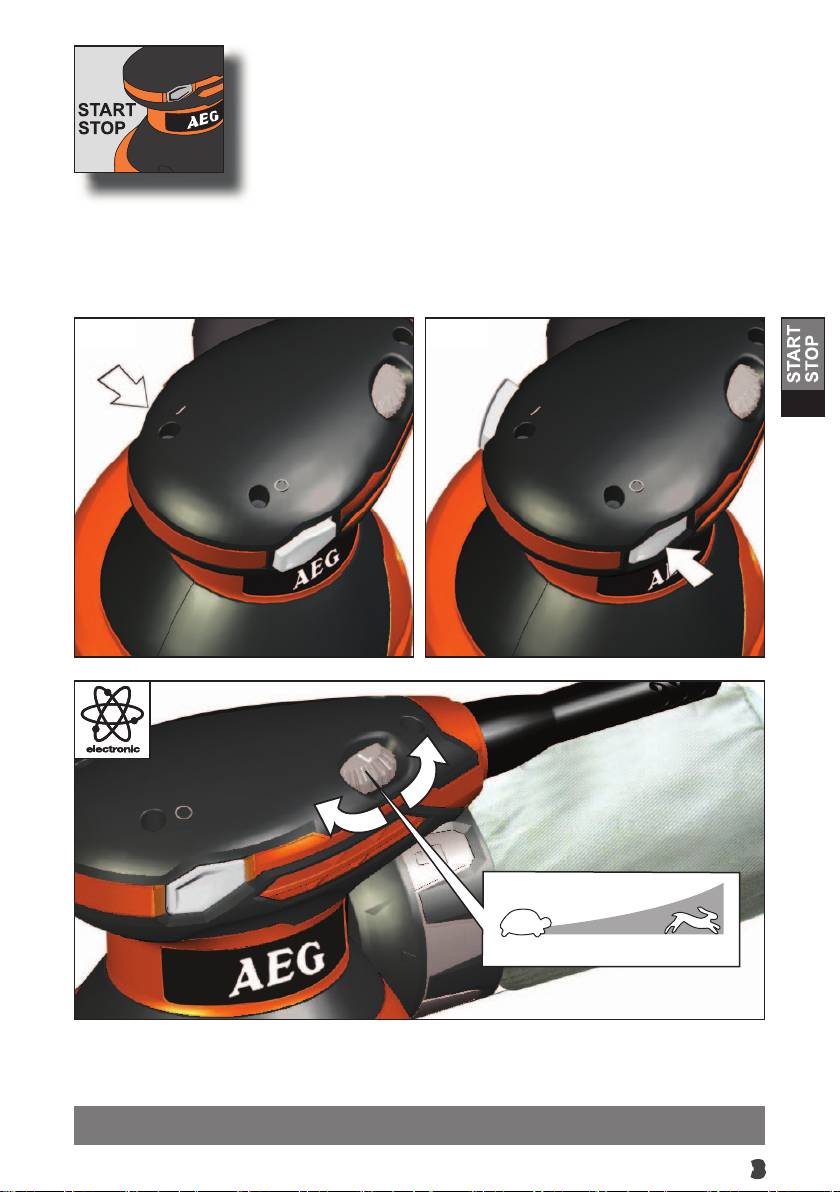
Start Stop
I
3
1.
2.
III
3.
3.
4.
4.
click
4
IV
5
TECHNICAL DATA
EX 125 ES
Random Orbital Sander
Production code 4161 01 01...
4107 11 01...
... 000001-999999
Rated input 300 W
-1
No-load speed 7000-12000 min
Orbital travel diameter 2,4 mm (3/32”)
Dimensions of grinding plate 125 mm
Weight according EPTA-Procedure 01/2003 1,7 kg
Noise/Vibration Information
Measured values determined according to EN 60 745.
Typically, the A-weighted noise levels of the tool are:
Sound pressure level (K=3dB(A))
80,0 dB(A)
Sound power level (K=3dB(A))
91,0 dB(A)
Wear ear protectors!
GB
Total vibration values (vector sum in the three axes) determined according to EN 60745.
2
Vibration emission value a
7,4 m/s
h
2
Uncertainty K=
1,5 m/s
WARNING
The vibration emission level given in this information sheet has been measured in accordance with a standardised test given in EN 60745 and
may be used to compare one tool with another. It may be used for a preliminary assessment of exposure.
The declared vibration emission level represents the main applications of the tool. However if the tool is used for dierent applications, with
dierent accessories or poorly maintained, the vibration emission may dier. This may signicantly increase the exposure level over the total
working period.
An estimation of the level of exposure to vibration should also take into account the times when the tool is switched o or when it is running
but not actually doing the job. This may signicantly reduce the exposure level over the total working period.
Identify additional safety measures to protect the operator from the eects of vibration such as: maintain the tool and the accessories, keep
the hands warm, organisation of work patterns.
WARNING! Read all safety warnings and all instruc-
The dust produced when using this tool may be harmful to health.
tions, including those given in the accompanying brochure.
Do not inhale the dust. Use a dust absorption system and wear a
Failure to follow the warnings and instructions may result in electric
suitable dust protection mask. Remove deposited dust thoroughly,
shock, re and/or serious injury.
e.g. with a vacuum cleaner.
Save all warnings and instructions for future reference.
Do not use machines on any material containing asbestos.
This machine is suitable only for dry sanding.
SAFETY INSTRUCTIONS
Wear ear protectors. Exposure to noise can cause hearing loss.
SPECIFIED CONDITIONS OF USE
Appliances used at many dierent locations including open air should
This eccentric sander is a versatile machine. The following work can
be connected via a residual current device (FI, RCD, PRCD) of 30mA
be carried out with it: Coarse sanding and grinding, Fine sanding
or less.
and polishing, Rubbing down weather-beaten paint, Rubbing down
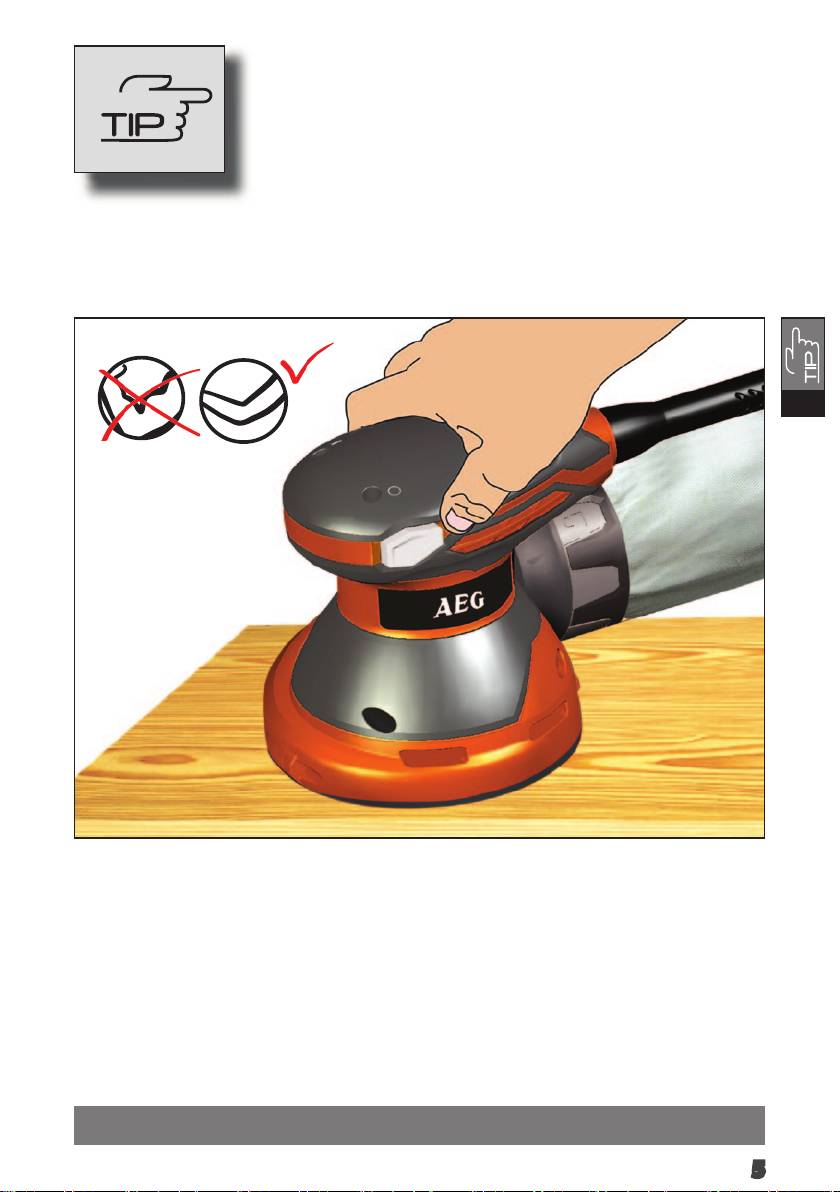
Always wear goggles when using the machine. It is recommended to
weather-beaten paint, Polishing up scratches on acrylic glass, Etc.
wear gloves, sturdy non slipping shoes and apron.
Do not use this product in any other way as stated for normal use.
Before doing any work on the machine, pull the plug out of the
socket.
MAINS CONNECTION
Only plug-in when machine is switched o.
Connect only to single-phase AC current and only to the
Keep mains lead clear from working range of the machine. Always
system voltage indicated on the rating plate. It is also possible
lead the cable away behind you.
to connect to sockets without an earthing contact as the design
Before use check machine, cable, and plug for any damages or
conforms to safety class II.
material fatigue. Repairs should only be carried out by authorised
Service Agents.
English
6

ECDECLARATION OF CONFORMITY
SYMBOLS
We declare under our sole responsibility that the product described
under “Technical Data” fullls all the relevant regulations and the
Please read the instructions carefully before starting the
directives 2011/65/EU (RoHs), 2004/108/ EC, 2006/42/EC and the
machine.
following harmonized standards have been used:
EN 60745-1:2009 + A11:2010
CAUTION! WARNING! DANGER!
EN 60745-2-4:2009 + A11:2011
EN 55014-1:2006 + A1:2009 + A2:2011
EN 55014-2:1997 + A1:2001 + A2:2008
Always disconnect the plug from the socket before
EN 61000-3-2:2006 + A1:2009 + A2:2009
carrying out any work on the machine.
EN 61000-3-3:2008
Accessory - Not included in standard equipment, availa-
Winnenden, 2013-03-01
ble as an accessory.
Do not dispose of electric tools together with household
waste material! In observance of European Directive
2002/96/EC on waste electrical and electronic equipment
and its implementation in accordance with national law,
Alexander Krug / Managing Director
electric tools that have reached the end of their life must
GB
Authorized to compile the technical le
be collected separately and returned to an environmen-
tally compatible recycling facility.
Techtronic Industries GmbH
Max-Eyth-Straße 10, 71364 Winnenden, Germany
Class II construction, tool in which protection against
electric shock does not rely on basic insulation only, but
MAINTENANCE
in which additional safety precautions, such as double
insulation or reinforced insulation, are provided.
The ventilation slots of the machine must be kept clear at all times.
Use only AEG accessories and spare parts. Should components need to
be replaced which have not been described, please contact one of our
AEG service agents (see our list of guarantee/service addresses).
Bei Bedarf kann eine Explosionszeichnung des Gerätes unter Angabe
der Maschinen Type und der sechsstelligen Nummer auf dem Lei-
stungsschild bei Ihrer Kundendienststelle oder direkt bei Techtronic
Industries GmbH, Max-Eyth-Straße 10, 71364 Winnenden, Germany
angefordert werden.
English
7
