Vitek VT-4201 SR: ENGLISH
ENGLISH: Vitek VT-4201 SR
6
ENGLISH
“START/STOP” Button (18)
BEFORE THE FIRST USE
Press the “STRAT/STOP” button to launch/ stop
After the unit transportation or storage at low
the preselected program and to save the current
temperature it is necessary to keep it for at least
time and cooking end time settings.
two hours at room temperature before switch-
Note: If the “START/STOP” button (18) is pressed
ing on.
without choosing the program, the unit will start
– Unpack the unit, remove any stickers and
operating in the “RICE” mode.
package materials.
– Place the unit on the flat, heat-resistant sur-
“MENU” Button (16)
face away from all kitchen heat sources (gas
Press the button (16) repeatedly to choose a
cooker, electric cooker or cooking unit).
cooking, reheating or keep-warm program. The
– Place the multi-cooker keeping at least 20
cooking (20), reheating (22) and keep-warm (19)
cm gap between the multi-cooker body and
program indicators are shown on the display (3).
the wall and 30-40 cm gap above the unit.
– Do not place the multi-cooker close to the
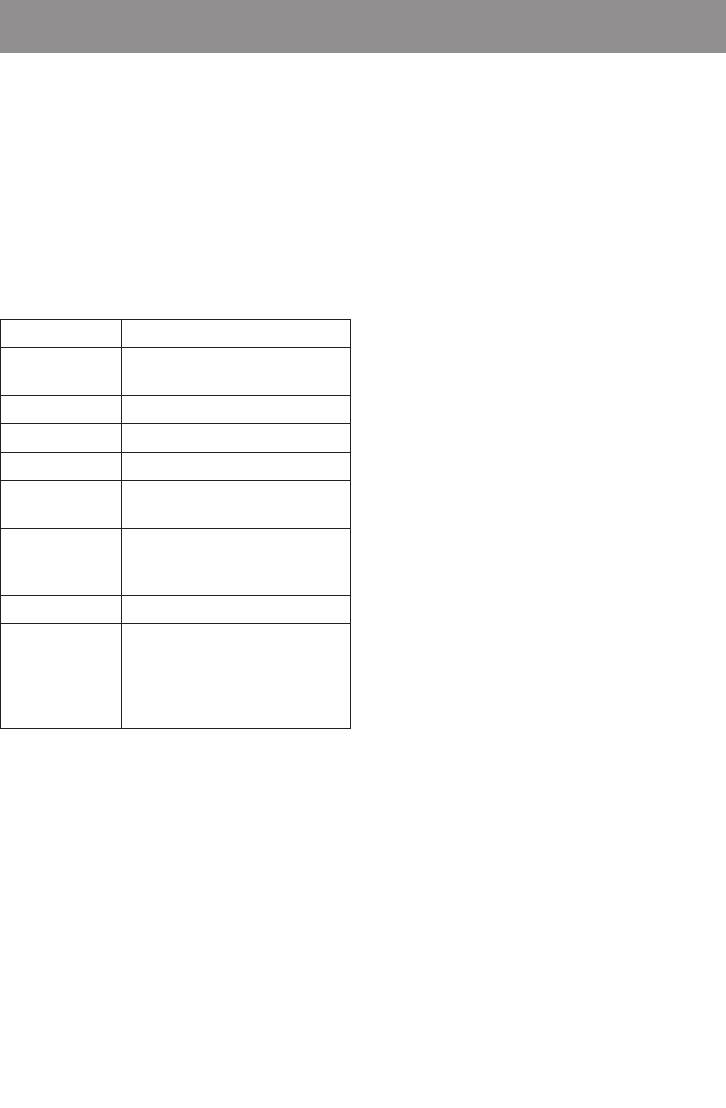
Program Products
objects that can be damaged by the released
RICE
Cooking rice and other ce-
steam of high temperature.
real porridge
Attention! Do not use the unit near bath tubs,
kitchen sinks or other containers filled with
CHICKEN Poultry and fish dishes
water.
CAKE Cakes, biscuits, pies
– Open the multi-cooker lid (8) by turning it
clockwise as far as it goes and take it off
MEAT Meat and meat dishes
(fig. 1).
BEAN Beans, peas, products re-
– Remove the protection screen (7) by pulling
quiring longer cooking
the screen handle (fig. 2).
– Remove the cooking bowl (6).
CONGEE
Glutinous rice, soup, first
– Wash the protection screen (7) with the sili-
(soup)
course meals (solyanka,
cone gasket, lid (8), bowl (6), soup ladle (13),
borscht, etc.)
spatula (14) and measuring cup (15) with
REHEAT
Reheating ready dishes
water and neutral detergent, then rinse under
running water and dry.
KEEP WARM
Keeping the ready dish warm
– Clean the unit body with a damp cloth, then
after the cooking process is
wipe it dry.
finished.
– Install the protection screen (7) with the sili-
Note: Do not use the program
cone gasket back to its place (fig. 3).
for reheating the products.
– Install the drip tray (12) back to its place (fig.
8).
Note:
– The time of the multi-cooker operation can be
Current time setting
set only in the “CAKE” and “REHEAT” modes.
– Insert the power cord connector into the
– Look for the options of using the cooking
socket on the back side of the multi-cooker
programs in the recipe book (supplied with
body.
the unit).
– Insert the plug into the socket, you will hear a
– Choose the cooking time for own recipes
sound signal and the display (3) light will be
experimentally.
switched on.
– Press the «DELAYED START» button (24), the
“MINUTES” (17) and “HOURS” (23) buttons
time indication (21) will blink.
Use the buttons (17) and (23) to set the current
– Set the current time (24 Hr) by consequent
time, cooking end-time and cooking time for the
pressing or holding the «HOURS» (23) and
“CAKE” and “REHEAT” modes.
«MINUTES» (17) buttons.
– Press the «START/STOP» button (18) in order
“DELAYED START” button (24)
to save the settings.
The “DELAYED START” button (24) is used to set
the current time or the cooking end time.
VT-4201_IM.indd 6 16.04.2013 17:11:23
Оглавление
- ENGLISH
- E N G L I S H
- ENGLISH
- E N G L I S H
- ENGLISH
- E N G L I S H
- ENGLISH
- D E U T S C H
- DEUTSCH
- D E U T S C H
- DEUTSCH
- D E U T S C H
- DEUTSCH
- D E U T S C H
- DEUTSCH
- русский
- русский
- русский
- русский
- русский
- русский
- русский
- русский
- ҚазаҚ
- ҚазаҚ
- ҚазаҚ
- ҚазаҚ
- ҚазаҚ
- ҚазаҚ
- ҚазаҚ
- ҚазаҚ
- romÂnĂ/ Moldovenească
- romÂnĂ/ Moldovenească
- romÂnĂ/ Moldovenească
- romÂnĂ/ Moldovenească
- romÂnĂ/ Moldovenească
- romÂnĂ/ Moldovenească
- romÂnĂ/ Moldovenească
- ČESKÝ
- Český
- Český
- Český
- Český
- Český
- Český
- УКРАЇНЬСКИЙ
- Беларусская
- Беларусская
- Беларусская
- Ўзбек
- Ўзбек
- Ўзбек
- Ўзбек
- Ўзбек
- Ўзбек
- Ўзбек


