Vitek VT-1662: инструкция
Раздел: Бытовая, кухонная техника, электроника и оборудование
Тип: Микроволновая Печь


Характеристики, спецификации
Инструкция к Микроволновой Печи Vitek VT-1662
Оглавление
- МИКРОВОЛНОВАЯ ПЕЧЬ ПРАВИЛА БЕЗОПАСНОГО ИСПОЛЬ- ЗОВАНИЯ ОСОБЫЕ ПРАВИЛА ПО ИСПОЛЬЗО- ВАНИЮ ПЕЧИ
- ПРАВИЛА ПРИГОТОВЛЕНИЯ ПРОДУКТОВ В МИКРОВОЛНОВЫХ ПЕЧАХ РУКОВОДСТВО ПО ВЫБОРУ ПОСУДЫ
- Проверка посуды перед использова- нием в микроволновой печи Материалы и посуда, пригодные для использования в микроволновой печи
- Материалы и посуда, не пригодные для использования в микроволновой печи
- Описание ПАНЕЛЬ УПРАВЛЕНИЯ (5)
- ДИСПЛЕЙ (9) Сборка микроволновой печи
- Защитное покрытие ЭКСПЛУАТАЦИЯ ПЕЧИ Установка Звуковой сигнал
- Установка текущего времени Установка времени начала приготов- ления Установка времени приготовления и уровня мощности Выбор функции экспресс-приготов- ления продуктов
- Установка времени разморозки про- дуктов Гриль
- Установка программы приготовления пищи Комбинированное приготовление
- Блокировка Остановка печи во время процесса приготовления пищи Чистка и уход
- НЕИСПРАВНОСТИ И МЕТОДЫ ИХ УСТРАНЕНИЯ Нормальная работа Устранение неисправностей Комплект поставки Технические характеристики
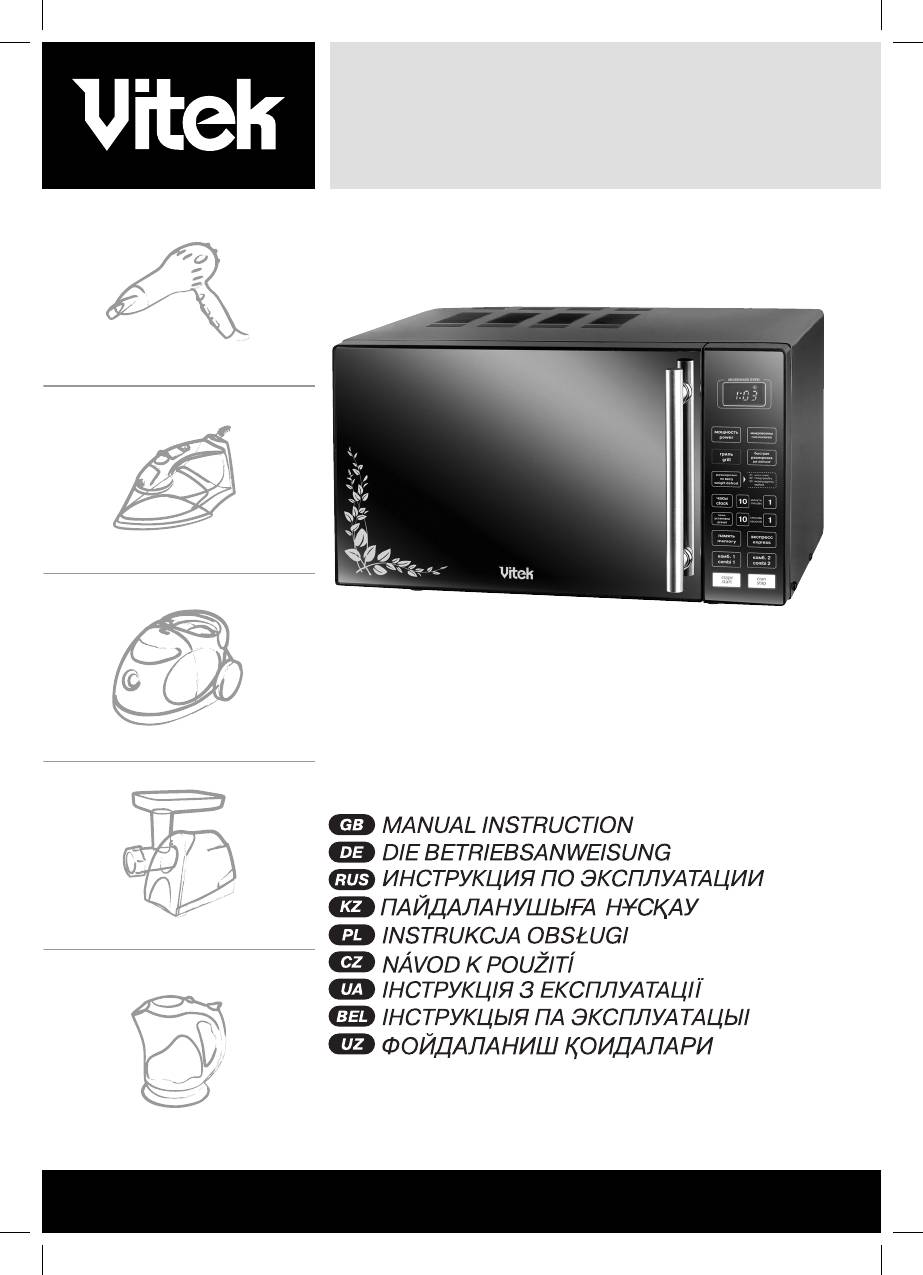
VT-1662
MANUAL INSTRUCTION
3
12
24
36
48
59
69
81
93
www.vitek-aus.com
1662.indd 11662.indd 1 24.06.2008 12:47:4424.06.2008 12:47:44

2
3
4
5
мощность
микроволны
power
microwaves
гриль
быстрая
grill
разморозка
jet defrost
разморозка
d1. мясо/meet
weight defrost
по весу
d3. морепродукты/
d2. птица/poultry
seafood
часы
минуты
clock
10 1
minutes
установка
пред
секунды
preset
10 1
seconds
память
экспресс
memory
express
комб. 1
комб. 2
combi 1
combi 2
старт
стоп
start
stop
7
6
1
1
8
9
мощность
микроволны
10
power
microwaves
18
быстрая
гриль
разморозка
11
grill
19
jet defrost
2524 27 28 29
разморозка
d1. мясо/meet
по весу
d2. птица/poultry
12
d3. морепродукты/
weight defrost
seafood
26
часы
минуты
13
clock
10 1
minutes
20
пред
секунды
установка
14
10 1
seconds
preset
память
экспресс
15
memory
express
21
комб. 1
комб. 2
16
combi 1
combi 2
22
33
старт
стоп
17
start
stop
23
30 31 32
34 35
2
1662.indd 21662.indd 2 24.06.2008 12:47:4624.06.2008 12:47:46

ENGLISH
MICROWAVE OVEN
corresponds to the voltage specified on
the unit.
SAFETY MEASURES
3. Use the unit only for the intended pur-
• Do not operate the unit when the door is
poses, specified in this manual.
open, it can cause negative microwave
4. The unit is intended for cooking and
radiation.
heating of dishes.
• Do not change electrical networks of
5. Do not switch on the unit without prod-
protective interlocks of the oven door.
ucts inside.
• Do not place any object between the
6. Do not use the unit if its power cable,
body and the door of the unit, remove dirt
the plug is damaged, in the case of mal-
and detergents from the inner side of the
function or if the unit was dropped.
door.
7. Before suing cookware in a microwave
• Adjustments and repair of the microwave
oven, make sure that the cookware are
oven should be performed only by the
selected properly;
authorized service personnel.
8. When heating food in flammable mate-
• ATTENTION! If the door or the door
rials cookware, such as plastic or pa-
packings are damaged you should not
per, watch the oven, in order to avoid
operate the unit until a qualified special-
burning;
ist removes the defect;
9. Before putting paper or plastic bags in
• ATTENTION! In order to avoid danger of
the unit, remove wire curling from them.
high leakage of microwave radiation all
10. Cookware can heat up strongly from the
repairs, connected with removal of the
cooked products, thus it is necessary to
covers, should be performed only by the
use potholders.
specialists;
11. While heating liquids, strong boiling can
• ATTENTION! Do not heat liquids or oth-
appear, that is why you should be care-
er products in firmly closed packaging or
ful while using the containers.
containers, as they can explode;
12. Before feeding children in order to avoid
• ATTENTION! Children can use the unit
burns, shake feeding bottles and check
without their parents' supervision only if
the temperature of the content.
they have been given all the necessary
13. Never cook or heat shell eggs in the mi-
instructions and they realize the danger
crowave oven, as they can explode.
of improper usage of the unit and can op-
14. Before cooking, pierce pithy products
erate the unit, following the precautions;
such as potatoes, vegetable marrows
and apples.
SPECIAL USER INSTRUCTIONS
15. When smoke appears switch off the unit
While using electrical appliances basic
and keep the door closed in order to
safety precautions should always be fol-
avoid output of flame;
lowed.
16. Do not use the operating chamber of
ATTENTION! In order to avoid burns, elec-
the unit for storage; do not leave paper
tric shocks, fire, impact of the microwave
or products in it.
radiation leakage and not to do harm to
ATTENTION! Do not heat liquids or
people's health:
products in firmly closed packaging or
1. Before using the unit, please read all
containers, as they can explode.
the instructions carefully.
17. Do not fry products in the oven.
2. Before switching on the unit, make sure
18. Do not obstruct ventilation openings in
that the voltage in your home socket
the body of the unit.
3
3
1662.indd 31662.indd 3 24.06.2008 12:47:4624.06.2008 12:47:46

ENGLISH
19. Do not store or use the unit outdoors.
and hamburgers once. If slices of meat
20. Do not use the unit near water, near a
are large turn them at least twice during
kitchen sink, in a basement or near a
cooking.
swimming pool.
• Stir the products while cooking, moving
21. Do not immerse the power cord or the
them downwards and from the center to
plug into water.
the edges.
22. Make sure that the power cord and the
plug do not touch heated surfaces.
CHOOSING COOKWARE
23. Make sure that the power cord does not
• The best material for cookware should
hang over the edges of the table.
be “transparent” for microwaves, it lets
24. While cleaning the door and the inner
their energy go through cookware and
surface of the microwave oven use a
heat food.
sponge or a soft cloth dampened in soft
• Microwaves could not go through metal;
non-abrasive substances.
that is why never use metal cookware or
plates with metal finishing.
COOKING PRODUCTS IN MICROWAVE
• Do not use cookware made of reused pa-
OVENS
per as it can contain metal and thus it can
• When cooking bacon, do not put it on a
lead to burning of the packaging.
glass tray, local overheating of the glass
• Round or oval plates better suit for usage
tray can lead to the appearance of cracks
in microwave ovens.
in it.
• Use only cookware intended for cooking
Testing cookware before using it in a
in microwave ovens;
put it on the glass
microwave oven
tray.
• Put the tested cookware (for instance, a
• For even cooking of products, put thicker
plate) in the unit, place a glass with water
slices near the edges of the cookware.
on it.
• Follow cooking time. Set the minimum
• Switch on the unit at a maximal power
cooking time, and if necessary increase
and set cooking time not more than 30
it. Do not exceed cooking time it can lead
seconds.
to burning of the products.
• Carefully touch the tested cookware, if it
• Cover products with a glass lid. The lid
is hot, but the water in the glass is cold,
will prevent juice or fat from splashing
do not use this cookware for cooking in
and will help other products be cooked
the microwave oven.
evenly.
• Do not exceed testing time. Maximal time
• To increase cooking process turn over
is 30 seconds.
easy-cooking products such as chicken
Materials and cookware intended for usage in the microwave oven
Foil can be used only in the Grill mode. The distance
between the foil and the oven walls should be not less
than 2,5 cm. Small pieces of foil can be used to cover thin
slices of meat or poultry, to avoid overroasting.
Aluminum foil
In the microwave mode, if the foil is too close to the
oven walls, sparkling, and burning-out of spill shield
on the door or breakdown of the oven can happen.
In this case you will forfeit a right for free warranty
service and repair.
4
4
1662.indd 41662.indd 4 24.06.2008 12:47:4624.06.2008 12:47:46
ENGLISH
Materials and cookware not intended for usage in the microwave oven
Can cause sparkling.
Aluminum trays
Use cookware intended for usage in a microwave oven.
Cartoon cup with a
Can cause sparkling.
metal handle
Use cookware intended for usage in a microwave oven.
Metal cookware or
Metal shields microwave energy. Metal ring can cause
cookware with a metal
sparkling.
ring
Can cause sparkling and burning of packaging during
Metal twists
cooking/heating of products.
Paper bags
Can cause burning in the microwave oven.
Soap can melt and cause pollution of the microwave oven
Soap
chamber.
Wood
Wooden cookware can get dry, crack and flame out.
Description
13. The “clock” button
1. Lockout system
Press this button to set the current time.
2. Viewing window
The current time will be displayed, except
3.
Glass tray
cases when cooking process or defrost
4. Microwaves output
process are performed. While disconnect-
5. Control panel
ing the microwave oven, settings of the cur-
6. Roller ring with glass tray support
rent time will be reset – you should set them
7. Grille heating element
again.
8. Grill rack (only for Grill mode)
14. The “preset” button
CONTROL PANEL (5)
Press this button to set the time, upon the
9. Display
reach of which the cooking process will
On display the current time, the cooking
start. The “preset” (28) indication will be
time, the power level and operating modes
flashing till the preset time is reached.
indications are reflected.
Note: the current time should be set before
10. The “power” button
programming the “preset” function.
This button is used to set the power level.
Power level selection is performed in the
15. The “memory” button
following order: 100%, 80%, 60%, 40%,
This button is used to program the cooking
20%. To check the preset power level while
process, which consists of two stages: de-
cooking, press the “power” button.
frost, cooking products in the microwave,
combination mode or the grille mode.
11. The “grill” button
Press this button to select the grille mode.
16. The “combi. 1” button
Maximal cooking time is 99 min. 99 sec.
Press this button to set the time of the com-
bination cooking mode.
12. The “weight defrost” button
Press the button to select one of the three
17. The “start” button
products categories: meat, poultry, sea-
Press this button to start the cooking proc-
food. While selecting a category and the
ess or the defrost process according to the
product weight, the defrost time and the
preset program.
power level are set automatically.
5
1662.indd 51662.indd 5 24.06.2008 12:47:4624.06.2008 12:47:46

ENGLISH
18. The “microwaves” button
34. Cooking mode 2 indication
Press the “microwaves” button and use the
35. Operating mode indication
digital buttons (20) to set the cooking time.
Maximal cooking time is 99 min. 99 sec.
Microwave oven assembly
Remove the package and the accessories
19. The “jet defrost” button
from the operating chamber. Check the
This button is used to defrost products
oven whether there is deformation or not.
according to the preset time. The defrost
Pay special attention to the door state. If
process starts from the high power level,
there is some problem do not set and do
gradually (automatically) decreasing. The
not switch on the oven.
indication (30) will be lighting on the display
during the whole defrost cycle.
Protective covering
Case: If there is protective covering, re-
20. The “10-1 minutes, 10-1 seconds”
move it from the surface.
digital buttons
Do not remove light grey mica plate inside
Digital buttons are used to set the cooking
the operating chamber; it serves to protect
time or the product weight.
the magnetron.
21. The “express” button
Setting the glass tray
Press this button to select one of the four
1. Set the roller ring with glass tray support
preset microwave cooking programs ac-
(6) in the opening situated on the bottom
cording to the time.
of the operating chamber.
2. Carefully set the glass tray (3) on the roll-
22. The “combi.2” button
er ring (6). Never set the glass tray with
Press this button to set the combination
its bottom upside down.
cooking time.
• Do not prevent rotation of the glass tray
while operating the oven.
23. The “stop” button
• During cooking always use glass tray and
Press this button to cancel the preset power
the roller ring with tray support.
level, cooking mode or the defrost time.
• Products and cookware should be always
set only on the glass tray.
Note: The “stop” function does not cancel
• The glass tray can rotate clockwise/anti
the current time.
clockwise. It is normal.
• If cracks or chops appear, stop using
DISPLAY (9)
the unit immediately or replace the glass
24. The “weight defrost” mode indication
tray.
25. First stage cooking indication
26.
Digital information/current time indica-
SETTING
tion
• Before switching on the unit, make sure
27. Second stage cooking indication
that the voltage and the power consump-
28. Switching-On time setting mode indica-
tion in your home socket corresponds to
tion
the voltage specified on the unit. Connect
29. The “LOCK” mode setting indication
the unit to the socket with secure ground-
30. The “jet defrost” mode indication
ing.
31. The “grill” mode indication
• Set the unit on the flat stable surface.
32. Cooking mode 1 indication
Place the unit out of the reach of chil-
33. Flashing dots
dren.
6
1662.indd 61662.indd 6 24.06.2008 12:47:4624.06.2008 12:47:46

ENGLISH
• Leave at least 7-8 cm of space behind
Setting cooking time and power level
and on the sides of the oven and 30 cm
For example you need to set the cooking
of space above the oven.
time of 5 minutes at 60% power level:
• Do not remove the supporting legs
1. Press the “microwaves” button, the in-
from the bottom of the microwave
dication (25) will light up.
oven.
2. Set the operating time by pressing the
• Do not block the ventilation openings on
“1 minutes” button five times.
the body of the microwave oven.
3. Set the required power, by pressing the
• Place the unit away from the television
“power” button three times.
and radio receivers to avoid interferences
4. Press the “start” button, the indication
while receipt of tele – and radio signals.
(35) will light up.
NOTE: Never place the microwave oven
Note: while setting 100% power level the
on the surface with heating (stove) and
third step is not necessary.
other heated sources.
During cooking the indication (35) will light
If the microwave oven is broken due to the
up on the display and countdown of the
fault of the owner, it loses the right for free
remaining cooking time starts. After the
warranty service and repair.
cooking time is over, the unit will switch off
During the operation the surface of the
– three sound signals will be heard. If you
microwave oven can heat up strongly,
have forgot to take the products out of the
avoid contact with heated surface of
unit, then in two minutes the repeated three
the oven, in order to avoid getting of
sound signals will remind you about it.
burns.
Start cooking time setting
OPERATION
You want to start cooking at 2:00 o’clock
Sound signal
(АМ orРМ):
Pressing buttons on the control panel you
1. Press the “preset” button, the indica-
will hear sound signals.
tion (28) will light up.
2. Set the time to start cooking, by press-
Setting current time
ing the “1 minutes” button twice.
For example you need to set the current
3. Set the required cooking mode.
time “6:00” (АМ or РМ):
4. Press the “start” button, the indication
1. Insert the plug into the socket.
(28) will be flashing.
2. Press the “clock” button.
3. Press the “stop” button.
Note: make sure that the current time is
4. Press the “1 minutes” button to set
set properly.
hours six times.
When the preset time 2:00 is reached
5. Press the “clock” button to confirm the
cooking process will start. During cooking
preset time, the dots (33) will be flashing
the remaining cooking time and the cor-
on the display.
responding operating mode indication are
displayed. After the cooking time is over,
Note: In this model a 12-hour time mode
the unit will switch off – three sound signals
is used. To display the current time during
will be heard. If you have forgot to take the
the operation of the unit, press the “clock”
products out of the unit, then in two min-
button.
utes the repeated three sound signals will
remind you about it.
7
1662.indd 71662.indd 7 24.06.2008 12:47:4624.06.2008 12:47:46

ENGLISH
Express cooking of products
Auto defrost mode
Press the “express” button for several
In this unit three modes of auto defrost are
times; to select one of the four preset pro-
intended:
grams of microwave cooking according to
- d1 – defrost “meat”.
time:
- d2 – defrost “poultry”.
15 seconds ………1 time
- d3 – defrost “seafood”.
1 minute……….3 times
For example you want to defrost 600 g of
30 seconds……….2 times
shrimps:
2 minutes………4 times
1. Press the “weight defrost” button
While selecting express cooking of prod-
three times, the select product category
ucts, 100% power level is set automati-
“d3” and the indication (24) will be dis-
cally.
played.
For example you need to cook products for
2. Press the “1 minutes” button six times.
1 minute:
3. Press the “start” button, the indication
1. Press the “express” button three times,
(35)will light up.
the selected time “1:00” will appear on
the display.
NOTE: maximal weight for each category
2. Press the “start” button, the indication
is given in the table:
(35) will light up.
PRODUCT
MAXIMAL
DISPLAY
During cooking the remaining cooking time
CATEGORY
WEIGHT
meat 2 300 g d1
is displayed.
poultry 4 000 g d2
After the cooking time is over, the unit will
seafood 900 g d3
switch off – three sound signals will be
heard. If you have forgot to take the prod-
- If the weight of the product is more than
ucts out of the unit, then in two minutes the
stated in the table, use the “jet defrost”
repeated three sound signals will remind
program.
you about it.
- If the programmed weight exceeds maxi-
mally recommended weight the unit will
Defrost time setting
not switch on.
For example you want to defrost products
for 5 min. 30 sec.:
After the cooking time is over, the unit will
1. Press the “jet defrost” button, the indi-
switch off – three sound signals will be
cation (30) will light up.
heard. If you have forgot to take the prod-
2. Press the “1 minutes” button five times
ucts out of the unit, then in two minutes the
and the “10 seconds” button three
repeated three sound signals will remind
times.
you about it.
3. Press the “start” button, the indication
(35) will light up.
Grill mode
During defrost of products the remaining
Grill is used for cooking of fried crisp
time of the mode operation is displayed.
scraps of meat, fish, poultry, and potato.
After the cooking time is over, the unit will
In this mode heat from the heating element
switch off – three sound signals will be
spreads over the whole process chamber.
heard. If you have forgot to take the prod-
For example: to switch on grill for 40 min-
ucts out of the unit, then in two minutes the
utes:
repeated three sound signals will remind
1. Press the “grill” button, the indications
you about it.
(25 and 31) will light up.
8
1662.indd 81662.indd 8 24.06.2008 12:47:4724.06.2008 12:47:47

ENGLISH
2. Press the “10 minutes” button four
for 2 minutes then to cook products for 15
times.
minutes, at microwave power level 60%,
3. Press the “start” button, the indication
and then fry them for 12 minutes on the
(35) will light up.
grille.
During the grille mode operation the re-
Open the door of the unit put the products
maining time is displayed.
inside the operating chamber, close the
After the cooking time is over, the unit will
door.
switch off – three sound signals will be
1. Press the “jet defrost” button, the indi-
heard. If you have forgot to take the prod-
cation (30) will appear on the display.
ucts out of the unit, then in two minutes the
2. Press the “1 minutes” two times and
repeated three sound signals will remind
set the defrost time “02:00”.
you about it.
3. Press the “memory” button
4. Press the “microwaves” button. Press
Combination cooking
the 10 minutes button once and the
Combination cooking combines micro-
1 minutes five times, set the “15:00”
wave and grill modes for achieving the best
cooking time.
results.
5. Press the “power” button three times,
2 modes are possible:
the selected power level 60% and the
1. The “combi. 1” mode (30%-microwave
indication (25) will be displayed – (1S
cooking + 70% grille) – cooking of fish,
– first cooking stage).
potatoes.
6. Press the “memory” button
2. The “combi. 2” mode (55%-microwave
7. Pres the “grill” button, the indications
cooking + 45% grille) – cooking of ome-
(31) and (27) will be displayed (2S
lets, baked potatoes and poultry
– second cooking stage), and set the
For example you want to cook using the
required parameters of cooking in the
2-d combination mode during 25 min-
grille mode.
utes:
8. Press the “start” button, the indication
1. Press the “combi. 2”, the indications
(35) will light up.
(25 and 34) will light up.
2. Press the “10 seconds” button two
Note: while cooking of products according
times and the “1 seconds” button five
to the program, the indications (25 and 27)
times.
will appear on the display depending on the
3. Press the “start” button, the indication
cooking stage.
(35) will light up.
During operation the remaining time is dis-
During the combination mode the remain-
played.
ing time is displayed.
After the cooking time is over, the unit will
After the cooking time is over, the unit will
switch off – three sound signals will be
switch off – three sound signals will be
heard. If you have forgot to take the prod-
heard. If you have forgot to take the prod-
ucts out of the unit, then in two minutes the
ucts out of the unit, then in two minutes the
repeated three sound signals will remind
repeated three sound signals will remind
you about it.
you about it.
NOTE: the “jet defrost” and the “weight
Setting cooking program
defrost” programs can be selected only
You can program two stages of cooking.
before cooking.
For example you need to defrost products
Lock-out function
9
1662.indd 91662.indd 9 24.06.2008 12:47:4724.06.2008 12:47:47

ENGLISH
To prevent usage of the oven by children
• If the working chamber is dirty use a soft
you can set Lock mode.
detergent.
1. Press and hold the Stop button for 3
• Do not use abrasives, wire brushes to
seconds - sound signal will be heard and
clean the unit inside and outside.
the “LOCK” symbol (29) will light up.
• Provide that no detergent gets into the air
2. To cancel lock press and hold the Stop
and steam openings on the door of the
button for 3 seconds - sound signal will
unit.
be heard and the “LOCK” symbol (29)
• Do not use detergent based on ammo-
will go out.
nia.
• Use a damp cloth to clean external sur-
Stop operating
faces.
To stop cooking process you only need to
• Keep the door clean. Provide that no
open the door, to resume the mode press
crumbs accumulate between the door
the “Start” button. To switch off the mode,
and the panel as it prevents the door
press the “Stop” button.
from closing.
• Clean ventilation openings on the body
CLEAN AND CARE
of the oven from dust and dirt.
• Before cleaning switch off the unit and
• Regularly clean the glass tray and its
unplug it.
support; wipe the bottom of the working
• Protect the control panel from water.
chamber.
Wipe the panel with a soft, slightly damp
• Wash the glass tray and draft with a neu-
cloth.
tral soapy solution.
You can wash them in
• Keep the chamber clean. If there are
a dish wash machine.
remaining of the products on the walls
• Do not immerse the heated glass tray
of the unit remove them using a damp
into cold water: due to sudden tempera-
cloth.
ture drop the glass tray can splinter.
Problems and their solutions
Normal operation
During operation of the unit interferences in the recep-
The unit makes Interferences
tion of TV and radio signals can appear. The same in-
in the reception of TV and radio
terferences appear during operation of small electrical
signals
appliances such as a mixer, a vacuum cleaner and a
hair dryer. It is normal.
If the microwave radiation level is low, the brightness of
Low brightness of the backlight
the chamber backlight can be low as well. It is normal.
During cooking, steam can evaporate from the prod-
Steam accumulation on the
ucts. Great amount of steam evaporates via the ventila-
door, hot air output from the
tion openings but some part can accumulate on the
ventilation openings.
door. It is normal.
10
1662.indd 101662.indd 10 24.06.2008 12:47:4724.06.2008 12:47:47
ENGLISH
Troubleshooting
Problem Possible cause Solution
Pull the plug out of the
The power cable plug is
socket. After10 seconds
The unit does not switch on
not properly inserted in the
insert the plug into the
socket.
socket again.
Try to connect another
Problem with the socket
appliance to the same
socket
The door is not firmly
No heating
Firmly close the door
closed
During operation the
Remove the glass tray and
The roller ring or the lower
rotating glass tray produces
the roller ring. Wash the
part of the working chamber
sounds
roller ring and the bottom of
is dirty
the working chamber.
IF THESE MEASURES DID NOT SOLVE
Specifications subject to change without
THE PROBLEM, PLEASE APPLY TO THE
prior notice.
AUTHORIZED SERVICE CENTRE, REPAIR
AND ADJUSTING OF THE UNIT SHOULD
MINIMUM SERVICE LIFE - 5 YEARS
BE PERFORMED ONLY BY THE QUALIFIED
PERSONNEL
GUARANTEE
Details regarding guarantee conditions can
Delivery set
be obtained from the dealer from whom
Microwave oven– 1 pc.
the appliance was purchased. The bill of
Glass tray – 1 pc.
sale or receipt must be produced when
Roller ring – 1 pc.
making any claim under the terms of this
Grill rack – 1 pc.
guarantee.
Instruction manual – 1 pc.
This product conforms to the
Specifications
EMC-Requirements as laid down
Power supply: 220 V ~50 Hz
by the Council Directive 89/336/
Nominal power consumption: 1200 W
EEC and to the Law Voltage
Microwave power: 800 W
Regulation (73/23 EEC)
Grill power: 1000 W
Capacity: 20 L
Glass tray: 245 mm
11
1662.indd 111662.indd 11 24.06.2008 12:47:4724.06.2008 12:47:47

DEUTSCH
MIKROWELLE
BESONDERE ANWEISUNGEN BEI DER
NUTZUNG DER MIKROWELLE
SICHERHEITSMAßNAHMEN
Beim Gebrauch der elektrischen Geräte
• Es ist nicht gestattet, die Mikrowelle mit
sind wichtige Sicherheitsmaßnahmen zu
der geöffneten Tür zu betreiben, weil es
beachten.
zur Erhöhung der schädlichen Wirkung
ACHTUNG! Um das Risiko der
der Mikrowellenstrahlung führt.
Verbrennungen, Stromschläge, Brandfälle,
• Es ist nicht gestattet, Änderungen im
Einwirkung der Mikrowellenstrahlung und
Stromkreis der Schutzverriegelungen
Gesundheitsschaden zu vermeiden:
der Mikrowellentür vorzunehmen.
1. Lesen Sie aufmerksam alle
• Es ist nicht gestattet, irgendwelche
Bedienungsanleitungen vor der
Gegenstände zwischen dem Gehäuse
Nutzung des Geräts.
der Mikrowelle und ihrer Tür zu platzie-
2. Vor dem Einschalten des Geräts verge-
ren, entfernen Sie Verschmutzungen und
wissern Sie sich, ob die Netzspannung
Reste der Reinigungsmittel von der inne-
mit der Spannung Ihres Geräts über-
ren Seite der Tür.
einstimmt, die am Gehäuse des Geräts
• Einstellung und Reparatur der Mikrowelle
steht.
sollen nur vom Fachpersonal eines auto-
3. Nutzen Sie die Mikrowelle nur be-
risierten Kundenservicedienstes durch-
stimmungsgemäß, wie es in dieser
geführt werden.
Bedienungsanleitung dargestellt ist.
• ACHTUNG! Es ist nicht gestattet, die
4. Die Mikrowelle ist für die Zubereitung
Mikrowelle bei der Beschädigung der
und Aufwärmung von fertigen Gerichten
Mikrowellentür und der Türdichtungen zu
bestimmt.
nutzen, bis die Beschädigung von einem
5. Es ist nicht gestattet, die Mikrowelle
qualifi zierten Fachmann nicht beschädigt
ohne Nahrungsmittel einzuschalten.
wird.
6. Es ist nicht gestattet, das Gerät zu
• ACHTUNG! Um das Risiko der Einwirkung
nutzen, wenn das Netzkabel, der
der Mikrowellenstrahlung zu vermeiden,
Netzstecker beschädigt ist, wenn das
sollen alle Reparaturarbeiten, die mit der
Gerät nicht ordnungsgemäß funktio-
Abnahme irgendwelcher Schutzdeckel
niert oder wenn Sie dieses fallen gelas-
von der Mikrowelle verbunden sind,
sen haben.
sollen nur von qualifi zierten Fachleuten
7. Vergewissern Sie sich vor der Nutzung
durchgeführt werden;
der Mikrowelle, dass das richtige
• ACHTUNG! Es ist nicht gestattet,
Geschirr gewählt wurde.
Flüssigkeiten und Nahrungsmittel in ge-
8. Während der Aufwärmung von
schlossenen Behältern aufzuwärmen,
Nahrungsmitteln im Geschirr aus
um ihre Explodierung zu vermeiden.
leichtentfl ammbaren Materialien,
• ACHTUNG! Die Benutzung der
wie Kunststoff oder Papier, passen
Mikrowelle ohne Aufsicht darf Kindern
Sie auf die Mikrowelle auf, um das
nur dann erlaubt werden, wenn eine an-
Entzündungsrisiko zu vermeiden;
gemessene Anweisung gegeben wurde,
9. Entfernen Sie Drähte vor der
die das Kind in die Lage versetzt, die
Unterbringung der Papier oder
Gefahren einer falschen Bedienung zu
Plastikpakete in der Mikrowelle.
verstehen, und die Mikrowelle in sicherer
10. Das Geschirr kann durch die
Weise zu nutzen.
Wärmeaufnahme von den zuberei-
tenden Nahrungsmitteln sehr stark
12
1662.indd 121662.indd 12 24.06.2008 12:47:4724.06.2008 12:47:47

DEUTSCH
erhitzt werden, nutzen Sie spezielle
22. Vermeiden Sie die Berührung des
Handschuhe und Topfl appen.
Netzkabels und des Netsteckers mit
11. Da die Kochung von Getränken, die in der
heißen Oberfl ächen.
Mikrowelle aufgewärmt werden, kann
23. Lassen Sie das Netzkabel vom Tisch
auch nach dem Aufwärmungsprozess
frei nicht hängen.
erfolgen, seien Sie beim Umgang mit
24. Nutzen Sie zur Reinigung der Tür und
den Behältern vorsichtig.
inneren Seiten der Mikrowelle wei-
12. Mischen und schütteln Sie Flaschen
che Abrasivwaschmittel, die auf einen
und Behälter mit Kindernahrung gut
Schwamm oder ein weiches Tuch auf-
durch und prüfen Sie die Temperatur
getragen werden.
der Flüssigkeit, um Verbrennungen zu
vermeiden.
ZUBEREITUNG VON
13. Es ist nicht gestattet, Eier mit Eierschale
NAHRUNGSMITTELN IN
in der Mikrowelle zu bereiten oder auf-
MIKROWELLEN
zuwärmen, diese können auch nach
• Es ist nicht gestattet, Bacon bei der
dem Aufwärmen explodieren.
Zubereitung direkt auf den Glasdrehteller
14. Stechen Sie dicke Nahrungsmittel, wie
zu legen, die Überhitzung kann zur
z.B. Kartoffeln, Auberginen oder Äpfel,
Entstehung von Rissen am Glasdrehteller
vor der Zubereitung durch.
führen.
15. Beim Erscheinen des Rauchs schal-
• Nutzen Sie während der Zubereitung das
ten Sie die Mikrowelle vom Stromnetz
Geschirr, das für Mikrowellengebrauch
ab und halten Sie die Mikrowellentür
geeignet ist, indem Sie es auf den
geschlossen, um die Verbreitung des
Glasdrehteller aufstellen.
Flammens zu vermeiden.
• Um eine bessere Zubereitung von
16. Es ist nicht gestattet, den Garraum der
Nahrungsmitteln zu erzielen, legen
Mikrowelle zur Aufbewahrung zu nut-
Sie dickere Stücke an den Rand des
zen, lassen Sie drin kein Papier oder
Geschirrs.
Nahrungsmittel.
• Passen Sie auf die Zubereitungsdauer
ACHTUNG! Es ist nicht gestattet,
auf. Stellen Sie die kürzes-
Flüssigkeiten und Nahrungsmittel in
te Zubereitungsdauer, und bei der
geschlossenen Behältern aufzuwär-
Notwendigkeit erhöhen Sie diese. Es ist
men, um ihre Explodierung zu vermei-
nicht gestattet, die Zubereitungsdauer
den.
von Nahrungsmittel zu überschreiten, es
17. Es ist nicht gestattet, Nahrungsmittel in
kann zu ihrer Entzündung führen.
der Mikrowelle zu braten.
• Bereiten Sie das Essen unter einem
18. Sperren Sie nie Entlüftungslöcher am
Glasdeckel. Der Deckel verhindert
Gehäuse der Mikrowelle ab.
das Abspritzen des Saftes oder Fettes
19. Es ist nicht gestattet, das Gerät außer-
und gewährleistet eine gleichmäßige
halb der Räumlichkeiten zu benutzen
Zubereitung von Nahrungsmitteln.
und aufzubewahren.
• Um die Zubereitung zu beschleunigen,
20. Nutzen Sie nie das Gerät in der Nähe
drehen Sie einmal Nahrungsmittel der
von Wasser, Küchenspülbecken, in
leichten Zubereitungsgrades um, so
feuchten Kellerräumen oder neben
wie Hähnchen oder Hamburgers. Wenn
dem Schwimmbecken.
Fleischstücke zu groß sind, sollen diese
21. Es ist nicht gestattet, das Netzkabel und
während der Zubereitung mindestens
den Netstecker ins Wasser zu tauchen.
zweimal umgedreht werden.
13
1662.indd 131662.indd 13 24.06.2008 12:47:4724.06.2008 12:47:47

DEUTSCH
• Rühren Sie während der Zubereitung
• Im Vergleich zum rechteckigen ist rundes
Nahrungsmitteln um, indem Sie diese
und ovales Geschirr für die Verwendung
von oben nach unten und von Zentrum
in der Mikrowelle vorteilhafter.
zum Rand des Geschirrs mischen.
Prüfung des Geschirrs vor der Nutzung
ANWEISUNGEN ZUR
in der Mikrowelle
GESCHIRRAUSWAHL
• Stellen Sie das zu prüfende Geschirr in
• Das ideale Material des Geschirrs für den
den Garraum der Mikrowelle (z.B. einen
Gebrauch in der Mikrowelle soll „durch-
Teller), stellen Sie darauf ein Glas mit kal-
sichtig" für Mikrowellenstrahlung sein,
tem Wasser auf.
indem ihre Energie durch das Geschirr
• Schalten Sie die Mikrowelle auf die ma-
strömt und Nahrungsmittel aufwärmt.
ximalen Betriebsstufe ein und stellen Sie
• Mikrowellen können durch Metall
die Zeitdauer auf 30 Sekunden ein.
nicht durchdringen, deswegen darf
• Berühren Sie vorsichtig das zu prüfende
Metallgeschirr oder Geschirr mit
Geschirr. Falls es aufgewärmt ist, und
Metalldekor nicht verwendet werden.
das Wasser im Glas kalt geblieben ist,
• Es ist nicht gestattet, Gegenstände in die
darf solches Geschirr in der Mikrowelle
Mikrowelle hineinzulegen, die aus dem
nicht benutzt werden.
Recyclingpapier hergestellt sind, da es
• Die Prüfdauer soll 30 Sekunden nicht
Metalleinprägungen enthalten kann, die
überschreiten.
die Entzündung der Verpackung hervor-
rufen können.
Stoffe und Geschirr, die für die Nutzung in der Mikrowelle geeignet sind.
Die AluFolie kann nur im Grillbetrieb verwendet werden. Der Abstand
zwischen der AluFolie und den Wänden der Mikrowelle soll nicht
weniger als 2,5 cm betragen. Kleine AluFolienstücke können zur
Abdeckung von dünnen Fleisch und Gefl ügelstücken benutzt werden,
um ihre Verbrennung zu vermeiden.
AluFolie
Im Mikrowellenbetrieb, wenn die AluFolie zu nah an
den Wänden der Mikrowelle liegt, kann das Funken, die
Durchbrennung der Abschirmgitter der Tür der Mikrowelle und
den Ausfall des Geräts hervorrufen. In diesem Fall verlieren Sie
den Anspruch auf den kostenlosen Garantieservice und die kos-
tenlose Reparatur.
Befolgen Sie die Anweisungen der Herstellers.
Der Boden des Geschirrs fürs Braten soll 5 mm dicker als der des
Geschirr fürs Braten
Glasdrehtellers sein. Nicht ordnungsgemäße Nutzung des Geschirrs
fürs Braten kann zur Entstehung der Risse im Geschirr und im
Glasdrehteller führen.
Nur das Geschirr, das für die Nutzung in der Mikrowelle geeignet ist.
Geschirr fürs
Befolgen Sie die Anweisungen des Herstellers des Geschirrs. Nutzen
Mittagessen
Sie nie das Geschirr mit Rissen oder Ausbrüchen.
Nur die Behälter, die aus dem hitzbeständigen Glas hergestellt und für
die Nutzung in der Mikrowelle geeignet sind. Vergewissern Sie sich,
Glasbehälter
dass die Behälter keine Metallränder haben. Nutzen Sie nie Behälter
mit Rissen oder Ausbrüchen.
14
1662.indd 141662.indd 14 24.06.2008 12:47:4724.06.2008 12:47:47
DEUTSCH
Nur das Geschirr, das aus dem hitzbeständigen Glas hergestellt und
für die Nutzung in der Mikrowelle geeignet ist. Vergewissern Sie sich,
Glasgeschirr
dass das Geschirr keine Metallränder hat. Nutzen Sie nie das Geschirr
mit Rissen oder Ausbrüchen.
Zubereitungsprozess in
Befolgen Sie die Anweisungen des Herstellers. Es ist nicht gestattet,
der Mikrowelle mit der
Säckchen mit Metallknebeln oder Überziehen zu verschließen. In den
Nutzung von speziellen
Säckchen sollen kleine Löcher für den Dampfaustritt gemacht werden.
Säckchen
Sind nur für kurzzeitige Zubereitung/Aufwärmung geeignet. Lassen
Papierteller und Tassen
Sie die Mikrowelle während der Zubereitung / Aufwärmung von
Nahrungsmitteln in solchem Geschirr nie unbeaufsichtigt.
Die zubereitenden Nahrungsmittel können zwecks der
Wärmeerhaltung und der Vermeidung der Abspritzung von Fett abge-
Papiertücher
deckt werden. Nutzen Sie das Pergamentpapier nur unter Kontrolle
und nur für kurzzeitige Zubereitung/Aufwärmung.
Nutzen Sie das Pergamentpapier zur Vermeidung der Abspritzung von
Pergamentpapier
Fett oder als Einschlagpapier. Nutzen Sie das Pergamentpapier nur
unter Kontrolle und nur für kurzzeitige Zubereitung/Aufwärmung.
Nutzen Sie nur jenes Kunststoffgeschirr, das aus dem hitzbeständigen
Glas hergestellt und für die Nutzung in der Mikrowelle geeignet ist.
Befolgen Sie die Anweisungen des Herstellers.
Einige Kunststoffbehälter können infolge der Erhitzung der darin ent-
Kunststoffgeschirr
haltenen Nahrungsmittel erweichen.
Hermetisch geschlossene Kunststoffpakete sollen durchgestochen
oder durchgeschnitten werden, wie es auf der Verpackung angege-
ben ist.
Nutzen Sie nur jenes Einschlagpapier aus Kunststoff, das eine ent-
sprechende Markierung hat. Die zubereitenden Nahrungsmittel kön-
Einschlagpapier aus
nen mit solchem Einschlagpapier aus Kunststoff zwecks der Erhaltung
Kunststoff
von Feuchtigkeit abgedeckt werden.
Nutzen Sie gewachstes Papier zur Vermeidung der Abspritzung von
Gewachstes Papier
Fett und zur Erhaltung der Feuchtigkeit.
Stoffe und Geschirr, die für die Nutzung in der Mikrowelle geeignet sind
Können das Funken hervorrufen.
Alutabletts
Nutzen Sie das Geschirr, das für die Mikrowelle geeignet ist.
Kann das Funken hervorrufen.
Kartontasse mit Metallgriff
Nutzen Sie das Geschirr, das für die Mikrowelle geeignet ist.
Metallgeschirr und Geschirr
Das Metall schirmt die Energie von Mikrowellen ab. Der
mit Metallrand
Metallrand des Geschirrs kann das Funken hervorrufen.
Können das Funken und Entzündung der Verpackung während
Metallknebeln
der Zubereitung / Aufwärmung von Nahrungsmitteln hervorrufen.
Papierpakete
Können Entzündung in der Mikrowelle hervorrufen.
Seife kann verschmelzen und die Verschmutzung des Garraums
Seife
der Mikrowelle hervorrufen.
Das Holzgeschirr kann austrocknen, rissig werden und sich
Holz
entzünden.
15
1662.indd 151662.indd 15 24.06.2008 12:47:4724.06.2008 12:47:47

DEUTSCH
Beschreibung
Ausnahme von Fällen, wenn Nahrungsmittel
1. Verriegelungen mit Sicherheitssystem
zubereitet oder aufgetaut werden. Beim
2. Sichtfenster
Abschalten der Mikrowelle gehen die
3. Glasdrehteller
Einstellungen der aktuellen Zeit verloren,
4. Ausgang der Mikrowellenstrahlung
sie müssen neu eingestellt werden.
5. Steuerungsplatte
6. Rollring mit der Halterung des
14. Taste „Voreinstellung – preset“
Glasdrehtellers
Drücken Sie diese Taste zur Einstellung
7. Heizelement des Grills
der Zeit, wo die Zubereitung der
8. Grillrost. Wird nur im Grillbetrieb ge-
Nahrungsmitteln laut dem eingestellten
nutzt.
Programm beginnt. Dabei wird der Indikator
„Voreinstellung – preset“ (28) bis zum
Steuerungsplatte (5)
Beginn der eingestellten Zeit blinken.
9. Bildschirm
Anmerkung: die aktuelle Zeit soll vor
Auf dem Bildschirm erscheinen die aktuelle
dem Einprogrammieren der Funktion
Zeit, Zubereitungszeit, Leistungsstufe und
„Vorenstellung – preset“ eingestellt sein.
Piktogramme der Betriebsstufen.
15. Drücken Sie die Taste "Speichern
10. Taste "Leistung/power“
memory".
Wird zur Einstellung der Leistungsstufe ge-
Wird zum Einprogrammieren des Prozesses
nutzt. Die Wahl der Leistungsstufe erfolgt
der Zubereitung genutzt, der aus zwei
folgenderweise: 100%, 80%, 60%, 40%,
Etappen besteht: Auftauen, Zubereitung in
20%. Um die gewünschte Leistungsstufe
der Mikrowelle, kombinierter Betrieb oder
während des Zubereitungsprozesses zu
Grillbetrieb.
prüfen, drücken Sie die Taste „Leistung/
power“.
16. Taste „Komb.1 – comb1“
Drücken Sie die Taste, um die Zeit
11. Taste „Grill/grill“
für die kombinierte Zubereitung von
Drücken Sie diese Taste für die Wahl des
Nahrungsmitteln einzustellen.
Grillbetriebs. Maximale Zubereitungsdauer
beträgt 99 Minuten. 99 Sekunden.
17. Taste „Start/start“
Drücken Sie die Taste, um die Zubereitung
12. Taste „Auftauen nach
oder das Auftauen der Nahrungsmittel nach
Gewichtweight defrost“
dem gewählten Programm zu starten.
Drücken Sie die Taste, wählen Sie einen
von drei Betriebsstufen der Zubereitung:
18. Taste „Mikrowellen microwaves“.
Fleisch, Gefl ügel, Meeresfrüchte. Bei
Drücken Sie die Taste „Mikrowellen –
der Wahl der Kategorie und Gewicht von
microwaves“ und stellen Sie mit den Tasten
Nahrungsmitteln werden die Zeit des
(20) die Zeit der Zubereitung ein. Maximale
Auftauens und die Leistungsstufe automa-
Zubereitungsdauer beträgt 99 Minuten. 99
tisch gewählt.
Sekunden.
13. Taste „Uhr – clock“
19. Taste „schnelles Auftauen – jet de-
Drücken Sie die Taste, um die aktuelle
frost“
Uhrzeit einzustellen. Die aktuelle Uhrzeit
Wird zum Auftauen von Nahrungsmitteln
wird auf dem Bildschirm gezeigt, mit
laut der eingestellten Zeit genutzt.
16
1662.indd 161662.indd 16 24.06.2008 12:47:4724.06.2008 12:47:47

DEUTSCH
Das Auftauen beginnt mit der hohen
31. Piktogramm des Grillbetriebs „Grill
Leistungsstufe und sinkt allmählich (auto-
– grill“.
matisch). Dabei wird auf dem Bildschirm
32. Piktogramm des kombinierten Betriebs
das Piktogramm (30) während des ganzen
der Zubereitung von Nahrungsmitteln
Zyklus des Auftauens aufl euchten.
1.
33. Trennzeichen.
20. Digitaltasten „101 Minuten – mi-
34. Piktogramm des kombinierten Betriebs
nutes“ 101 Sekunden –seconds“
der Zubereitung von Nahrungsmitteln
Mit digitalen Tasten wird die Zeit der
2.
Zubereitung eingestellt oder das Gewicht
35. Piktogramm des Mikrowellenbetriebs.
der Nahrungsmittel eingegeben.
Montage der Mikrowelle
21. Taste „Express – express“
Entfernen Sie das Verpackungsmaterial
Drücken Sie diese Taste zur Wahl eines
und Zubehör aus dem Garraum der
von vier eingegebenen Programmen der
Mikrowelle. Prüfen Sie die Mikrowelle auf
Mikrowellenzubereitung nach der Zeit.
Mängel von allen Seiten. Seien Sie be-
sonders aufmerksam bei der Prüfung der
22. Taste „Komb.2 – comb. 2“
Mikrowellentür. Es nicht gestattet, die
Drücken Sie die Taste, um die Zeit
Mikrowelle aufzustellen und einzuschalten,
für die kombinierte Zubereitung von
wenn sie beschädigt ist.
Nahrungsmitteln einzustellen.
Schutzabdeckung
23. Taste „Stop/Stopp“
Gehäuse: Beim Vorhandensein der
Drücken Sie diese Taste zur Rücknahme
Schutzfolie, entfernen Sie diese vom
der eingestellten Leistungsstufe, des
Gehäuse des Geräts.
Programms der Zubereitung oder der Zeit
Es ist nicht gestattet, die weißgraue
des Aufteuns. Anmerkung: Die Funkrion
Folienplatte von der inneren Seite des
„Stopstop“ hebt die aktuelle Zeit nicht
Garraums zu entfernen, die zum Schutz
auf.
des Magnetrons dient.
Bildschirm (9)
Aufstellung des Glasdrehtellers
24. Piktogramm des Auftauensbetriebs
1. Stellen Sie die Halterung des
„Auftauen nach Gewicht weight
Glasdrehtellers (6) in die Öffnung im
defrost“
Boden des Garraums der Mikrowelle.
25. Piktogramm der 1. Stufe der Zubereitung
2. Stellen Sie den Glasdrehteller (3) auf den
von Nahrungsmitteln.
Rolling (6). Es ist nicht gestattet, den
26. Digitale Information/aktuelle
Glasdrehteller mit der unteren Seite nach
Zeitanzeige
oben aufzustellen.
27. Piktogramm der 2. Stufe der Zubereitung
• Es ist nicht gestattet, die Drehung des
von Nahrungsmitteln.
Glasdrehtellers während des Betriebs
28. Piktogramm der Einstellung des
der Mikrowelle zu verhindern.
Beginns der Zubereitung.
• Nutzen Sie immer während der
29. Piktogramm der Einstellung des
Zubereitung von Nahrungsmitteln den
Betriebs „Lock – Kindersicherung“.
Glasdrehteller und den Rollring.
30. Piktogramm des Betriebs „schnelles
• Nahrungsmittel und das Geschirr zur
Auftauen – jet defrost“.
Zubereitung von Nahrungsmitteln soll
17
1662.indd 171662.indd 17 24.06.2008 12:47:4724.06.2008 12:47:47

DEUTSCH
nur auf den Glasdrehteller aufgestellt
ßen Oberfl ächen der Mikrowelle, um
werden.
Verbrennungen zu vermeiden.
• Der Glasdrehteller kann sich in/gegen
Uhrzeigesinn drehen. Es ist normal.
ANWENDUNG DER MIKROWELLE
• Bei der Entstehung von Rissen oder
Tonsignal
Splitterungen am Glasdrehteller, soll der
Bei jedem Drücken der Taste auf der
Glasdrehteller sofort umgetauscht wer-
Steuerungsplatte ertönt ein Tonsignal.
den.
Einstellung der aktuellen Zeit
Aufstellung der Mikrowelle
Beispiel: Sie möchten die Zeit „6:00“ (AM
• Vor dem Einschalten des Geräts verge-
oder PM) einstellen:
wissern Sie sich, ob die Netzspannung
1. Stecken Sie den Stecker in die
mit der Spannung Ihres Geräts über-
Steckdose.
einstimmt. Die Mikrowelle soll an die
2. Drücken Sie die Taste „Uhr – clock“.
Steckdose angeschlossen werden, die
3. Drücken Sie die Taste „Stop stopp“.
eine sichere Erdung hat.
4. Drücken Sie sechsmal die Taste „1
• Stellen Sie das Gerät auf eine gerade
Minute – minutes“, um die Zeit eunzu-
stabile Oberfl äche auf. Stellen Sie die
stellen.
Mikrowelle in einem für Kinder unzu-
5. Drücken Sie die Taste „Uhr/clock“
gänglichem Ort auf.
zur Bestätigung der eingestellten
• Stellen Sie die Mikrowelle so, dass die
Zeit, Trennzeichen werden auf dem
Entfernung von der Wand bis zur hinteren
Bildschirm blinken.
und Seitenwänden der Mikrowelle nicht
Anmerkung: In diesem Modell wurde 12
weniger als 78 cm und der Freiraum
Stunden Betrieb einprogrammiert. Um die
über der Mikrowelle 30 cm.
aktuelle Zeit auf dem Bildschirm während
• Es ist nicht gestattet, die
des Mikrowellenbetriebs anzeigen zu las-
Mikrowellenfüße abzunehmen.
sen, drücken Sie die Taste „Uhr clock“.
• Sperren Sie nie Entlüftungslöcher am
Gehäuse der Mikrowelle ab.
Einstellung der Zubereitungszeit und
• Es ist nicht gestattet, die Mikrowelle in der
der Leistungsstufe
Nähe Fernseh und Radioempfängern
Beispiel: Sie möchten die Zubereitungszeit
aufzustellen, um die die Entstehung
auf 5 Minuten bei der Leistung 60% ein-
von Störungen beim Fernseh und
stellen:
Radioempfang zu vermeiden.
1. Drücken Sie die Taste „Mikrowellen
– microwaves“, dabei leuchtet das
WARNUNG: Es ist nicht gestattet, die
Piktogramm (25) auf.
Mikrowelle auf die Heizfl äche (Küchenherd)
2. Drücken Sie fünfmal die Taste "1 Minute
und andere Wärmequellen aufzustellen.
minutes", um die Betriebszeit einzu-
Beim Ausfall der Mikrowelle durch Ihr
stellen.
Verschulden, verlieren Sie den Anspruch
3. Drücken Sie dreimal die Taste „Leistung
auf den kostenlosen Garantieservice und
– power“, um die gewünschte Leistung
die kostenlose Reparatur.
einzustellen.
4. Drücken Sie die Taste „Start – start“,
Während des Betriebs kann die Oberfl äche
dabei leuchtet das Piktogramm (35)
der Mikrowelle stark erhitzen, vermei-
auf.
den Sie die Berührung der Haut mit hei-
Anmerkung: Bei der Einstellung der
18
1662.indd 181662.indd 18 24.06.2008 12:47:4724.06.2008 12:47:47

DEUTSCH
Leistungsstufe 100% ist der dritte Schritt
eingegebenen Programmen der
der Einstellung nicht notwendig.
Mikrowellenzubereitung nach der Zeit:
Während der Zubereitung erscheint auf
15 Sekunden ……… einmal
dem Bildschirm das Piktogramm (35)
1 Minute ……….dreimal
und erfolgt die Ablesung der gebliebenen
30 Sekunden ……… zweimal
Zubereitungszeit. Nach dem Ablauf der Zeit
2 Minuten ……….viermal
schaltet sich die Mikrowelle aus, und ertö-
Bei der Wahl der Schnellzubereitung wird
nen drei Tonsignale. Wenn Sie vergessen
die Mikrowelle automatisch mit der maxi-
haben, Nahrungsmittel aus der Mikrowelle
malen Leistung (100%) betrieben.
herauszunehmen, werden zwei Signale Sie
Beispiel: Sie möchten Nahrungsmittel im
in zwei Minuten nochmals daran erinnern.
Laufe von 1 Minute zubereiten:
1. Drücken Sie dreimal die Taste „Express
Einstellung des Beginns der
– express“, dabei erscheint auf dem
Zubereitung
Bildschirm die gewählte Zeit „1:00“.
Wenn Sie mit der Zubereitung um 2:00 (AM
2. Drücken Sie die Taste „Start – start“,
oder PM) beginnen möchten:
dabei leuchtet das Piktogramm (35)
1. Drücken Sie die Taste „Voreinstellung –
auf.
preset“, dabei leuchtet das Piktogramm
Während des Betriebs wird auf dem
(28) auf.
Bildschirm die gebliebene Zubereitungszeit
2. Drücken Sie zweimal die Taste "1
angezeigt.
Minute minutes", um die Betriebszeit
Nach dem Ablauf der Zeit schaltet sich
einzustellen.
die Mikrowelle aus, und ertönen drei
3. Stellen Sie das gewünschte Programm
Tonsignale. Wenn Sie vergessen haben,
der Zubereitung ein.
Nahrungsmittel aus der Mikrowelle heraus-
4. Drücken Sie die Taste „Start – start“,
zunehmen, werden zwei Signale Sie in zwei
dabei leuchtet das Piktogramm (28)
Minuten nochmals daran erinnern.
auf.
Anmerkung: Vergewissern Sie sich, dass
Einstellung der Zeit des Auftauens von
die aktuelle Zeit richtig eingestellt wurde.
Nahrungsmitteln
Nach dem Erreichen der eingestellten Zeit
Beispiel: Sie möchten Nahrungsmittel im
2:00 beginnt der Prozess der Zubereitung
Laufe von 5 Minuten 30 Sekunden auftau-
laut dem eingestellten Programm.
en lassen:
Während des Betriebs der Mikrowelle er-
1. Drücken Sie die Taste „schnelles
scheint auf dem Bildschirm die gebliebene
Auftauen – jet defrost“, auf dem
Zubereitungszeit und das entsprechende
Bildschirm leuchtet das Piktogramm
Piktogramm des Betriebs.
(30) auf.
Nach dem Ablauf der Zeit schaltet sich
2. Drücken Sie fünfmal die Taste „1 Minute
die Mikrowelle aus, und ertönen drei
– minutes“ und dreimal die Taste „10
Tonsignale. Wenn Sie vergessen haben,
Sekunden – seconds“.
Nahrungsmittel aus der Mikrowelle heraus-
3. Drücken Sie die Taste „Start – start“,
zunehmen, werden zwei Signale Sie in zwei
dabei leuchtet das Piktogramm (35)
Minuten nochmals daran erinnern.
auf.
Während des Betriebs des Auftauens wird
Schnellzubereitung
auf dem Bildschirm die gebliebene Zeit der
Drücken Sie die Taste „Schnellzubereitung
Betriebsstufe angezeigt.
– express“ zur Wahl eines von vier
Nach dem Ablauf der Zeit des Auftauens
19
1662.indd 191662.indd 19 24.06.2008 12:47:4724.06.2008 12:47:47
DEUTSCH
schaltet sich die Mikrowelle aus, und ertö-
Nach dem Ablauf der Zeit des Auftauens
nen drei Tonsignale. Wenn Sie vergessen
schaltet sich die Mikrowelle aus, und ertö-
haben, das aufgetaute Produkt aus der
nen drei Tonsignale. Wenn Sie vergessen
Mikrowelle herauszunehmen, werden zwei
haben, das aufgetaute Produkt aus der
Signale Sie in zwei Minuten nochmals dar-
Mikrowelle herauszunehmen, werden zwei
an erinnern.
Signale Sie in zwei Minuten nochmals dar-
an erinnern.
Automatisches Auftauen von
Nahrungsmitteln
Grillbetrieb
Es sind drei Betriebsstufen des automa-
Dieser Betrieb wird für die Zubereitung
tischen Auftauens von Nahrungsmitteln in
von Fleisch, Fisch, Hähnchen und
dieser Mikrowelle vorgesehen:
Kartoffelstücken mit gebratener Kruste
d1 – Auftauen „Fleisch/meat“.
genutzt. Dabei verbreitet sich die Wärme
d2 – Auftauen „Gefl ügel/poultry“.
vom Heizelement im ganzen Garraum der
d3 – Auftauen „Meerechfrüchte/sea-
Mikrowelle.
food“.
Beispiel: Sie möchten die Nahrungsmittel
Beispiel: Sie möchten 600 g Garnelen auf-
im Grillbetrieb im Laufe von 40 Minuten zu-
tauen lassen:
bereiten:
1. Drücken Sie dreimal die Taste „Auftauen
1. Drücken Sie die Taste „Grill – grill“, da-
nach Gewicht – weight defrost“, auf
bei leuchtet das Piktogramm (25 und 31)
dem Bildschirm erscheint die gewähl-
auf.
te Kategorie von Nahrungsmitteln „d3“
2. Drücken Sie viermal die Taste „10
und das Piktogramm (24).
Minute – minutes“.
2. Drücken Sie sechsmal die Taste „1
3. Drücken Sie die Taste „Start – start“,
Minute – minutes“.
dabei leuchtet das Piktogramm (35)
3. Drücken Sie die Taste „Start – start“,
auf.
dabei leuchtet das Piktogramm (35)
Während des Betriebs wird auf dem
auf.
Bildschirm die gebliebene Zubereitungszeit
im Grillbetrieb angezeigt.
Anmerkung: Maximales Produktgewicht
Nach dem Ablauf der Zeit schaltet sich
für jede Kategorie von Lebensmitteln wird
die Mikrowelle aus, und ertönen drei
in der Tabelle dargestellt:
Tonsignale. Wenn Sie vergessen haben,
KATEGORIE DES
MAX.
Nahrungsmittel aus der Mikrowelle heraus-
BILDSCHIRM
PRODUKTES
GEWICHT
zunehmen, werden zwei Signale Sie in zwei
Fleisch/meat 2300 g d1
Minuten nochmals daran erinnern.
Gefl ügel/poultry 4000 g d2
Meehrechfrüchte
Kombinierter Zubereitungsbetrieb
900 g d3
/seafood
Der kombinierte Betrieb kombiniert den
Mikrowellenbetrieb mit dem Grillbetrieb,
Wenn das Gewicht der Nahrungsmittel
um bessere Resultate zu erzielen. Es sind
das maximale Gewicht überschreitet, ver-
2 Betriebsstufen möglich:
wenden Sie das Programm „Schnelles
1. „Komb.1 – comb1“ (30%
Auftauen – jet defrost“.
Mikrowellenbetrieb + 70% Grillbetrieb)
Wenn das einprogrammierte Gewicht
zur Zubereitung von Fisch, Kartoffeln.
das maximal empfohlenes Gewicht ber-
2. „Komb.2 – combi.2“ (55%
schreitet, schaltet sich die Mikrowelle
Mikrowellenbetrieb + 45% Grillbetrieb)
nicht ein.
20
1662.indd 201662.indd 20 24.06.2008 12:47:4724.06.2008 12:47:47


