Pioneer VSX-820-S Silver: Other connections
Other connections: Pioneer VSX-820-S Silver
Other connections10
Chapter 10:
Other connections
CAUTION
• Before making or changing the connections,
switch off the power and disconnect the
power cord from the power outlet.
Plugging in components should be the last
connection you make with your system.
• Do not allow any contact between speaker
wires from different terminals.
Connecting an iPod
This receiver has a dedicated iPod terminal
that will allow you to control playback of audio
content from your iPod using the controls of
1
this receiver.
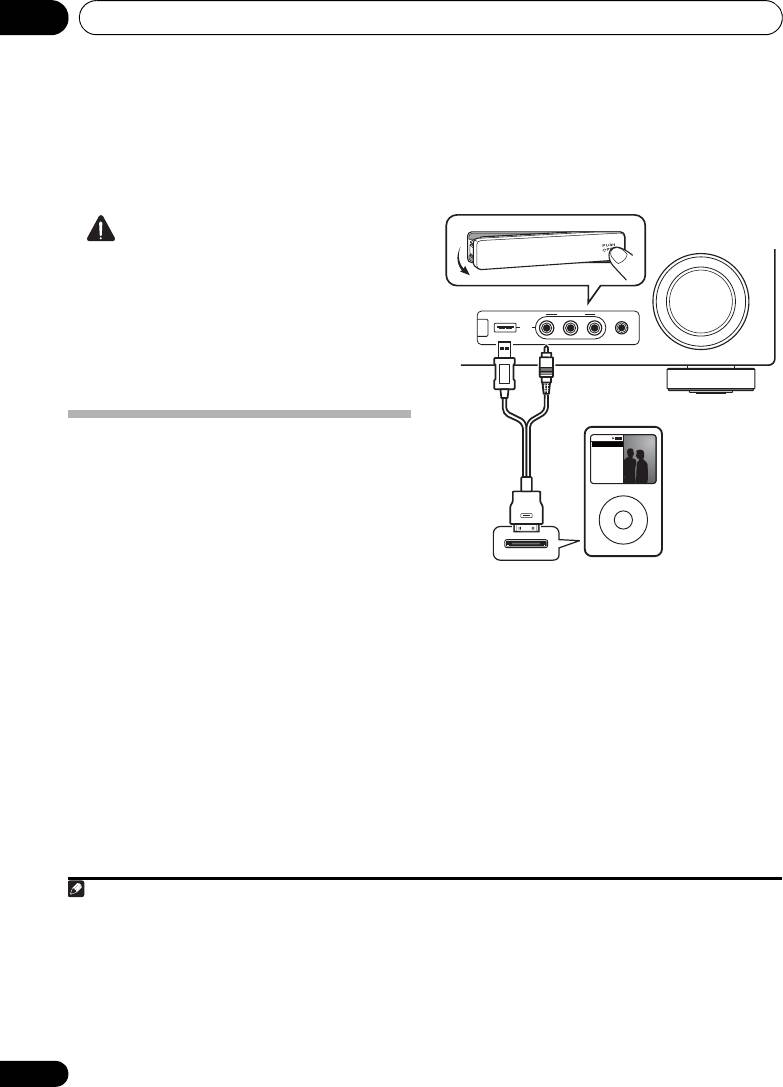
•Push down on the PUSH OPEN tab to
access the iPod terminal.
Connecting your iPod to the receiver
1 Set this receiver to the standby mode,
and then use the iPod cable to connect your
iPod to the iPod terminal on the front panel
of this receiver.
For the cable connection, refer to also the
operating instructions for iPod.
2 Switch the receiver on and press the
iPod
USB input source
button to switch the
receiver to the iPod.
The front panel display shows Loading while
the receiver verifies the connection and
retrieves data from the iPod.
66
En
Note
1 • This system is compatible with the audio and the video of the iPod nano, iPod (fifth generation), iPod classic, iPod touch and
iPhone (iPod shuffle not supported). However, that some of the functions may be restricted for some models. Note, however,
compatibility may vary depending on the software version of your iPod and iPhone. Please be sure to use the latest available
software version.
• iPod and iPhone are licensed for reproduction of non-copyrighted materials or materials the user is legally permitted to
reproduce.
• Features such as the equalizer cannot be controlled using this receiver, and we recommend switching the equalizer off
before connecting.
• Pioneer cannot under any circumstances accept responsibility for any direct or indirect loss arising from any inconvenience
or loss of recorded material resulting from the iPod failure.
MASTER
VOLUME
VIDEO INPUT
iPod
iPhone
USB
MCACC
AUDIOLRVIDEO
SETUP MIC
CONTROL ON
/
OFF
Music
Genius >
Playlists
Artists
Albums
Songs
Radio
Genres
Composers
Audiobooks
MENU
This receiver
iPod cable
iPod
VSX-820_SYXCN_En.book 66 ページ 2010年4月12日 月曜日 午後6時52分
Other connections 10
67
En
English
Deutsch
Français
Italiano
Nederlands
Español
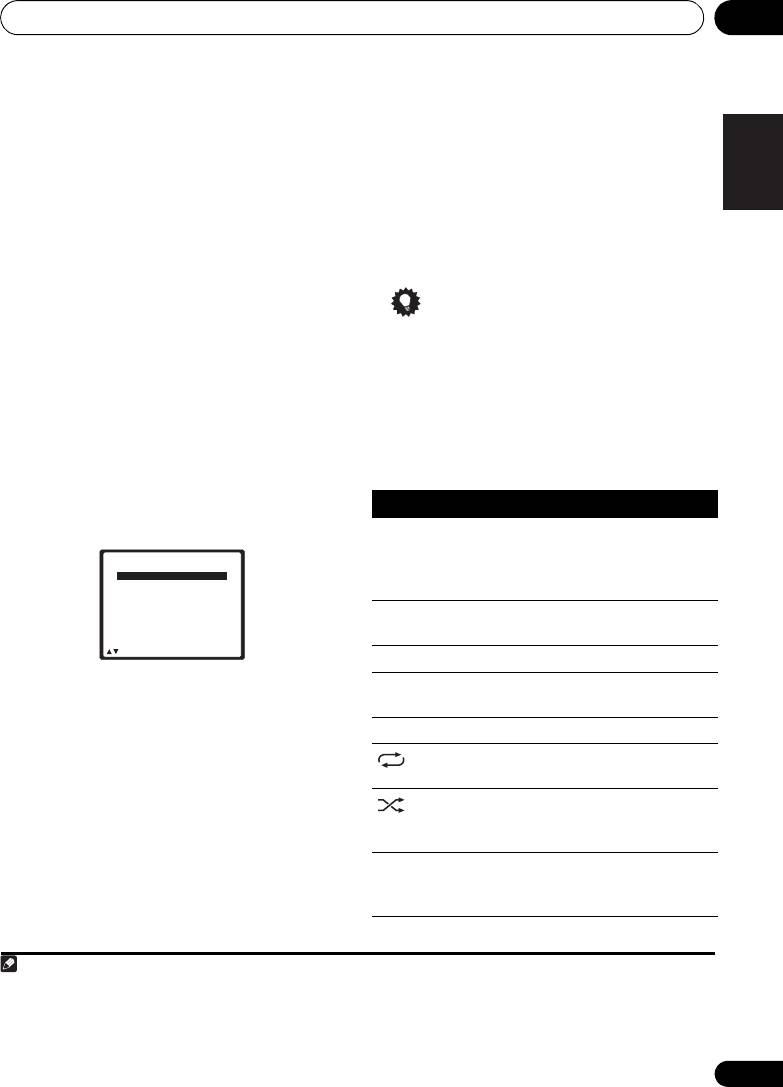
3Use the
TOP MENU
button to display iPod
Playlists Songs
Artists Albums Songs
Top menu.
Albums Songs
When the display shows Top Menu you’re
Songs
1
ready to play music from the iPod.
Podcasts
•If after pressing iPod the display shows NO
Genres Artists Albums Songs
Composers Albums Songs
DEVICE, try switching off the receiver and
Audiobooks
reconnecting the iPod to the receiver.
Shuffle Songs
iPod playback
To navigate songs on your iPod, you can take
Tip
advantage of the OSD of your TV connected to
• You can play all of the songs in a particular
2
this receiver.
You can also control all
category by selecting the All item at the
operations for music in the front panel display
top of each category list. For example, you
of this receiver.
can play all the songs by a particular artist.
Finding what you want to play
Basic playback controls
When your iPod is connected to this receiver,
The following table shows the basic playback
you can browse songs stored on your iPod by
controls for your iPod:
playlist, artist, album name, song name, genre
or composer, similar to using your iPod
directly.
1Use the / buttons to select a
category then press ENTER to browse that
category.
• To return to the previous level any time,
press RETURN.
2Use the
/
buttons to browse the
selected category (e.g., albums).
•Use / to move to previous/next levels.
3 Continue browsing until you arrive at
what you want to play, then press
to start
3
playback.
Navigation through categories on your iPod
looks like this:
Note
1 The controls of your iPod (excluding the iPod touch and iPhone) will be inoperable when connected to this receiver (Pioneer
shows in the iPod display).
2 • Note that non-roman characters in the title are displayed as *.
• This feature is not available for photos or video clips on your iPod.
3 If you’re in the song category, you can also press ENTER to start playback.
iPod Top
[ Playlists
]
[ Artists
]
[ Albums
]
[ Songs
]
[ Podcasts
]
[
Genres
]
[ Composers
]
[ Audiobooks
]
[ Shuffle Songs
]
ENTER Return
VSX-820_SYXCN_En.book 67 ページ 2010年4月12日 月曜日 午後6時52分
Button What it does
Press to start playback.
If you start playback when something
other than a song is selected, all the
songs that fall into that category will play.
Pauses playback, or restarts playback
when paused.
ENTER Press to set the play and pause modes.
/ Press and hold during playback to start
scanning.
/ Press to skip to previous/next track.
Press repeatedly to switch between
Repeat
One
,
Repeat All
and
Repeat Off
.
Press repeatedly to switch between
Shuffle Songs, Shuffle Albums and
Shuffle Off.
DISP
Press repeatedly to change the song
(DISPLAY)
playback information displayed in the
front panel display.
Other connections10
About iPod
/ When browsing, press to move to
previous/next levels.
/
During Audiobook playback, press to
switch the playback speed: Faster
Normal Slower
TOP
Press to return to the iPod Top menu
MENU
screen.
“Made for iPod” means that an electronic
RETURN Press to return to the previous level.
accessory has been designed to connect
specifically to iPod and has been certified by
Watching photos and video content
the developer to meet Apple performance
To view photos or video on your iPod, since
standards.
video control is not possible using this receiver,
you must use the main controls of your iPod
“Works with iPhone” means that an electronic
1
instead.
accessory has been designed to connect
specifically to iPhone and has been certified by
the developer to meet Apple performance
Important
standards.
• To play photos or video on your iPod, you
Apple is not responsible for the operation of
must connect the composite MONITOR
this device or its compliance with safety and
OUT jack and TV.
regulatory standards.
1 Press iPod CTRL to switch to the iPod
iPod is a trademark of Apple Inc., registered in
controls for photo and video playback.
the U.S. and other countries. iPhone is a
The receiver controls will be unavailable while
trademark of Apple Inc.
you are watching iPod videos or browsing
photos.
2Press
iPod CTRL
again to switch back to
the receiver controls when you’re done.
Tip
• Change the receiver’s input to the iPod in
one action by pressing the iPod iPhone
DIRECT CONTROL button on the front
panel to enable iPod operations on the
iPod.
68
En
Note
VSX-820_SYXCN_En.book 68 ページ 2010年4月12日 月曜日 午後6時52分
Button What it does
1 • iPod photos and video content can be viewed only when the iPod is connected to the iPod VIDEO input on the front panel.
• This feature can only be used with an iPod having video output.
Other connections 10
69
En
English
Deutsch
Français
Italiano
Nederlands
Español
Connecting a USB device
1
It is possible to listen to two-channel audio
using the USB interface on the front of this
2
receiver. Connect a USB mass storage device
as shown below.
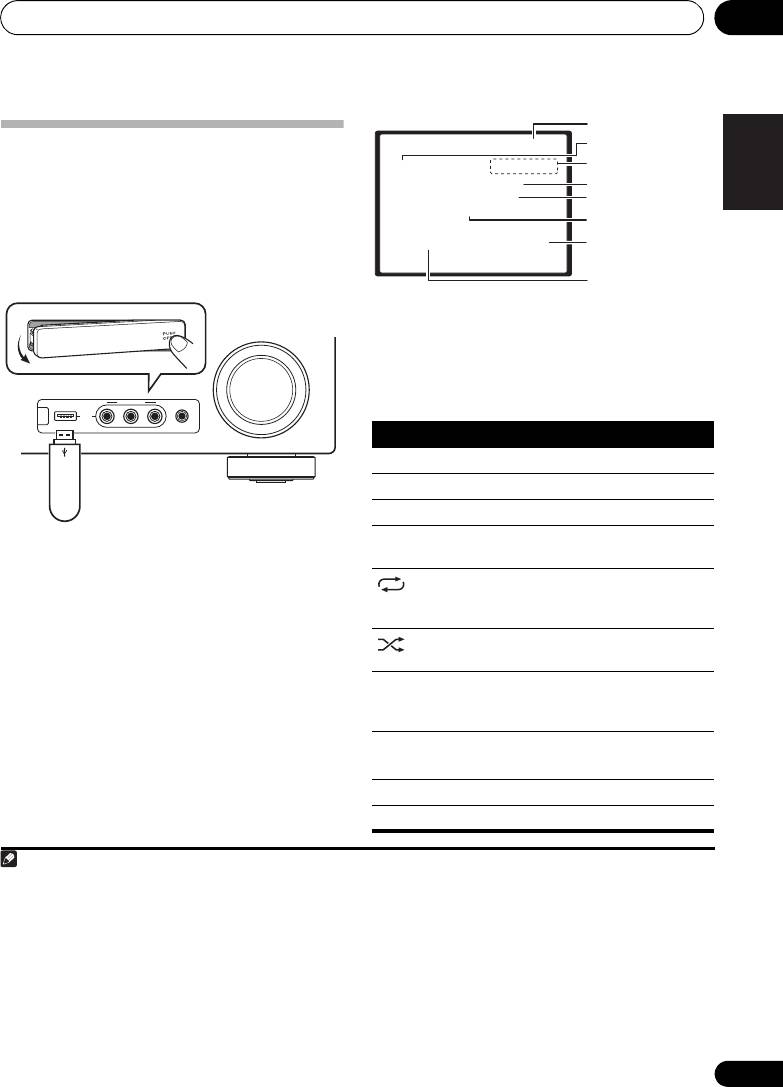
• Push down on the PUSH OPEN tab to
access the USB terminal.
Basic playback controls
The following table shows the basic controls
on the remote for USB playback. Press iPod
USB to switch the remote control to the iPod
USB operation mode.
Connecting your USB device to the
receiver
1 Switch on the receiver and your TV.
2 Press
iPod USB
on the remote control to
switch the receiver to the iPod USB.
NO DEVICE appears in the OSD.
3
3 Connect your USB device.
The USB terminal is located on the front panel.
Loading appears in the OSD as this receiver
starts recognizing the USB device connected.
After the recognition, a playback screen
appears in the OSD and playback starts
4
automatically.
Note
CONTROL ON
/
OFF
MASTER
VOLUME
VIDEO INPUT
iPod
iPhone
USB
MCACC
AUDIOLRVIDEO
SETUP MIC
1 This includes playback of WMA/MP3/MPEG-4 AAC files (except files with copy-protection or restricted playback).
2 • Compatible USB devices include external magnetic hard drives, portable flash memory (particularly keydrives) and digital
audio players (MP3 players) of format FAT16/32. It is not possible to connect this receiver to a personal computer for USB
playback.
• Pioneer cannot guarantee compatibility (operation and/or bus power) with all USB mass storage devices and assumes no
responsibility for any loss of data that may occur when connected to this receiver.
• With large amounts of data, it may take longer for the receiver to read the contents of a USB device.
3 Make sure the receiver is in standby when disconnecting the USB device.
4 • If the file selected cannot be played back, this receiver automatically skips to the next file playable.
• When the file currently being played back has no title assigned to it, the file name is displayed in the OSD instead; when
neither the album name nor the artist name is present, the row is displayed as a blank space.
• Note that non-roman characters in the playlist are displayed as *.
This receiver
USB mass
storage device
USB
001/004 PLAY
MP3
R:Fld S:On
Relax Your Body
Kevin Jackson
We are all one
32kbps 0:01
Return
Button What it does
Starts normal playback.
Pauses/unpauses playback.
/ Press to skip to previous/next track.
/
Press and hold during playback to
start scanning.
Press repeatedly to switch between
Repeat Folder, Repeat One and
Repeat All.
Press repeatedly to switch between
Shuffle On and Shuffle Off.
DISP
Press repeatedly to change the song
(DISPLAY)
playback information displayed in the
front panel display.
/
During playback, press to skip to
previous/next track.
/
TOP MENU Press to return to the menu screen.
RETURN Press to return to the previous level.
File/Folder number
File format
Repeat or Shuffle
Song name
Artist name
Album name
Elapsed time
Bit rates
VSX-820_SYXCN_En.book 69 ページ 2010年4月12日 月曜日 午後6時52分
Other connections10
About MPEG-4 AAC
Important
Advanced Audio Coding (AAC) is at the core of
If a USB Error message lights in the display, try
the MPEG-4 AAC standard, which incorporates
following the points below:
MPEG-2 AAC, forming the basis of the MPEG-4
audio compression technology. The file format
• Switch the receiver off, then on again.
and extension used depend on the application
• Reconnect the USB device with the
used to encode the AAC file. This receiver plays
receiver switched off.
®
back AAC files encoded by iTunes
bearing the
• Select another input source (like BD), then
extension ‘.m4a’. DRM-protected files will not
switch back to iPod USB.
play, and files encoded with some versions of
®
• Use a dedicated AC adapter (supplied with
iTunes
may not play.
the device) for USB power.
Apple and iTunes are trademarks of Apple Inc.,
For more information on error messages, see
registered in the U.S. and other countries.
USB messages on page 79.
About WMA
If this doesn’t remedy the problem, it is likely
your USB device is incompatible.
Compressed audio compatibility
Note that although most standard bit/sampling
rate combinations for compressed audio are
compatible, some irregularly encoded files may
The Windows Media logo printed on the box
not play back. The list below shows compatible
indicates that this receiver can playback
formats for compressed audio files:
Windows Media Audio content.
• MP3 (MPEG-1/2/2.5 Audio Layer 3) –
WMA is an acronym for Windows Media Audio
Sampling rates: 8 kHz to 48 kHz; Bit rates:
and refers to an audio compression technology
8 kbps to 320 kbps (128 kbps or higher
developed by Microsoft Corporation. This
recommended); File extension: .mp3
receiver plays back WMA files encoded using
• WMA (Windows Media Audio) – Sampling
®
Windows Media
Player bearing the extension
rates: 32 kHz / 44.1 kHz; Bit rates: 32 kbps to
‘.wma’. Note that DRM-protected files will not
192 kbps (128 kbps or higher recommended);
play, and files encoded with some versions of
File extension: .wma; WMA9 Pro and WMA
®
Windows Media
Player may not play.
lossless encoding: No
• AAC (MPEG-4 Advanced Audio Coding) –
Windows Media, and the Windows logo are
Sampling rates: 11.025 kHz to 48 kHz; Bit
trademarks or registered trademarks of
rates: 16 kbps to 320 kbps (128 kbps or
Microsoft Corporation in the United States
higher recommended); File extension:
and/or other countries.
.m4a; Apple lossless encoding: No
Other compatibility information
• VBR (variable bit rate) MP3/WMA/MPEG-4
1
AAC playback: Yes
• DRM (Digital Rights Management)
protection compatible: Yes (DRM-protected
audio files will not play in this receiver.)
70
En
Note
VSX-820_SYXCN_En.book 70 ページ 2010年4月12日 月曜日 午後6時52分
1 Note that in some cases playback time will not be displayed correctly.
Other connections 10
71
En
English
Deutsch
Français
Italiano
Nederlands
Español
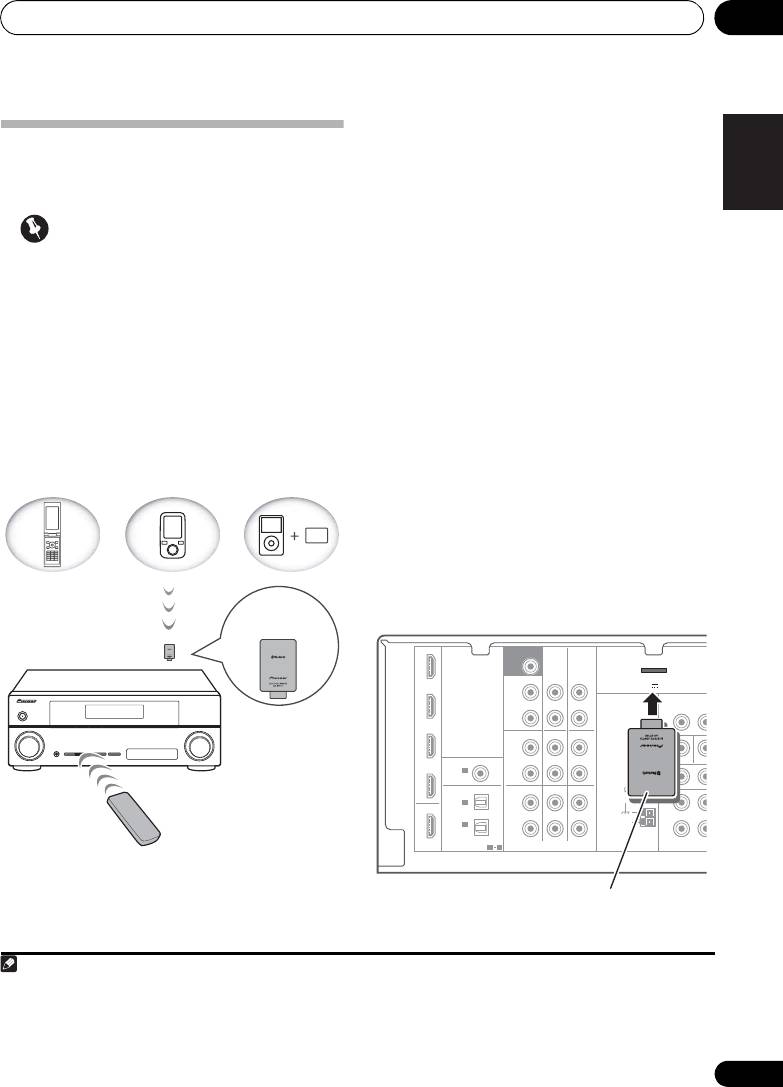
Wireless music play
Bluetooth
® ADAPTER for
When the Bluetooth ADAPTER (Pioneer Model
No. AS-BT100) is connected to this unit, a
Wireless Enjoyment of Music
product equipped with Bluetooth wireless
technology (portable cell phone, digital music
player, etc.) can be used to listen to music
Important
1
wirelessly.
Also, by using a commercially
• Do not move the receiver with the
available transmitter supporting Bluetooth
Bluetooth ADAPTER connected. Doing so
wireless technology, you can listen to music
could cause damage or faulty contact.
on a device not equipped with Bluetooth
wireless technology. The AS-BT100 model
supports SCMS-T contents protection, so
music can also be enjoyed on devices
equipped with SCMS-T type Bluetooth wireless
technology.
Remote control operation
The remote control supplied with this unit
allows you to play and stop media, and
2
perform other operations.
Connecting Optional
Bluetooth
ADAPTER
• Before making or changing connections,
switch off the power.
Device not
equipped with
Bluetooth wireless
technology:
Digital music
Bluetooth
Bluetooth wireless
player
wireless
technology
+
technology
enabled device:
Bluetooth audio
enabled device:
Digital music
transmitter
cell phone
player
(sold commercially)
®
Music data
Bluetooth
ADAPTER
This receiver
Remote control
operation
Note
1 • It must be necessary that the Bluetooth wireless technology enabled device supports A2DP profiles.
• Pioneer does not guarantee proper connection and operation of this unit with all Bluetooth wireless technology enabled
devices.
2 • It must be necessary that the Bluetooth wireless technology enabled device supports AVRCP profiles.
• Remote control operations cannot be guaranteed for all Bluetooth wireless technology enabled devices.
IN BD
SUBWOOFER
PRE OUT
CD-R/TAPE
DVR/VCR
SURR BACK /
ADAPTER PORT
FRONT
(
)
DVD
OUTPUT 5 V 100 mA MAX
HEIGHT
L
(
Single
)
VIDEO
OUT
DVR/VCR
OUT IN
R
TV/SAT
PRE OUT
CD
CD-R/TAPE
DVR/VCR
L
COAXIAL
ASSIGNABLE
IN
IN
MONITOR OUT
DVD
DVR/VCR
IN
1
ANTENNA
P
R
P
B
R
(
CD
)
FM
UNBAL
OPTICAL
TV/SAT
DVD BD
75
IN
2
L
OUT
IN
IN
1
AM
IN
R
LOOP
(
CD-R/TAPE
)
ASSIGNABLE
HDMI
1 2
AUDIO
COMPONENT VID
This receiver
®
Bluetooth
ADAPTER
VSX-820_SYXCN_En.book 71 ページ 2010年4月12日 月曜日 午後6時52分

Other connections10
1 Switch the receiver into standby and
4 Switch on the
Bluetooth
wireless
connect
Bluetooth
ADAPTER to the
technology device that you want to make
ADAPTER PORT located in the rear panel.
pairing, place it near the system and set it
into the pairing mode.
2 Switch on the receiver.
5 Check to see that the
Bluetooth
ADAPTER
3Press
ADAPTER
on the remote control to
1
is detected by the
Bluetooth
wireless
switch the receiver to ADAPTER input mode.
technology device.
When Bluetooth wireless technology device is
Pairing
Bluetooth
ADAPTER and
connected:
Bluetooth
wireless technology
Bluetooth wireless technology device name
device
3
appears in the receiver display.
“Pairing” must be done before you start
When Bluetooth wireless technology device is
playback of Bluetooth wireless technology
not connected:
content using Bluetooth ADAPTER. Make sure
to perform pairing first time you operate the
NODEVICE appears in the receiver display. In
system or any time pairing data is cleared.
this case, perform the connection operation
“Pairing” is the step necessary to register
from the side of the Bluetooth wireless
Bluetooth wireless technology device to enable
technology device.
2
Bluetooth communications.
For more details,
6From the
Bluetooth
wireless technology
see also the operating instructions of your
device list, select
Bluetooth
ADAPTER and
Bluetooth wireless technology device.
4
enter the PIN code selected in the step 4.
1 Press TOP MENU.
Listening to Music Contents of
2Press
ENTER
to enter
PAIRING
.
Bluetooth
wireless technology
3 Select the PIN code to be used from 0000/
1234/8888 using
/
, then press ENTER.
device with Your System
PAIRING blinks.
1
Press
ADAPTER
on the remote control to
switch the receiver to
ADAPTER
input mode.
Important
2 Perform the connection operation from
the side of the
Bluetooth
wireless technology
• You can use any of 0000/1234/8888 PIN
device to the
Bluetooth
ADAPTER.
codes. Bluetooth wireless technology
device using any other PIN code cannot be
used with this system.
72
En
Note
VSX-820_SYXCN_En.book 72 ページ 2010年4月12日 月曜日 午後6時52分
1 When the Bluetooth ADAPTER is not plugged into the ADAPTER PORT, NO ADAPTER will be displayed if ADAPTER input
mode is selected.
2 • Pairing is required when you first use Bluetooth wireless technology device and Bluetooth ADAPTER.
• To enable Bluetooth communication, pairing should be done with both of your system and Bluetooth wireless technology
device.
3 The system can display alphanumeric characters only. Other characters may not be displayed correctly.
4 PIN code may in some case be referred to as PASSKEY.

Other connections 10
73
En
English
Deutsch
Français
Italiano
Nederlands
Español
3 Start playback of music contents stored in
Bluetooth
wireless technology device.
The following operations are now possible for
Bluetooth wireless technology devices, using
1
the remote controller.
Button What it does
/ Starts normal playback and pauses/
unpauses playback.
Press to skip to the start of the current
file, then previous files. Press and hold
to start fast reverse scanning.
Press to skip to the next file. Press and
hold to start fast forward scanning.
®
The Bluetooth
word mark and logos are
registered trademarks owned by Bluetooth
SIG, Inc. and any use of such marks by Pioneer
Corporation is under license. Other
trademarks and trade names are those of their
respective owners.
Note
VSX-820_SYXCN_En.book 73 ページ 2010年4月12日 月曜日 午後6時52分
1• Bluetooth wireless technology device should be compatible with AVRCP profile.
• Depending on Bluetooth wireless technology device you use, operation may differ from what is shown in this table.
Оглавление
- Contents
- Flow of settings on the receiver
- Before you start
- Controls and displays
- Connecting your equipment
- Basic Setup
- Listening to your system
- The System Setup menu
- Using the tuner
- Making recordings
- Controlling the rest of your system
- Other connections
- Additional information
- Table des matières
- Organigramme des réglages sur le récepteur
- Avant de commencer
- Commandes et affichages
- Raccordement de votre équipement
- Configuration de base
- Écoute de sources à l’aide de votre système
- Menu de configuration du système
- Utilisation du tuner
- Enregistrement
- Commander le reste de votre système
- Autres raccordements
- Informations complémentaires
- Содержание
- Порядок выполнения настроек на ресивере
- Перед началом работы
- Органы управления и индикаторы
- Подключение оборудования
- Основная настройка
- Прослушивание системы
- Меню System Setup (Настройка системы)
- Использование тюнера
- Выполнение записи на внешний источник
- Управление остальными частями системы
- Другие подключения
- Дополнительная информация


