Pioneer DJM-250-W: Connections
Connections: Pioneer DJM-250-W
English
Connections
Be sure to turn off the power and unplug the AC adapter from the power outlet before making or changing connections between devices.
Wait until all connections between devices have been completed before connecting the AC adapter.
Only use the AC adapter included with this unit.
Refer to the operating instructions for the component to be connected.
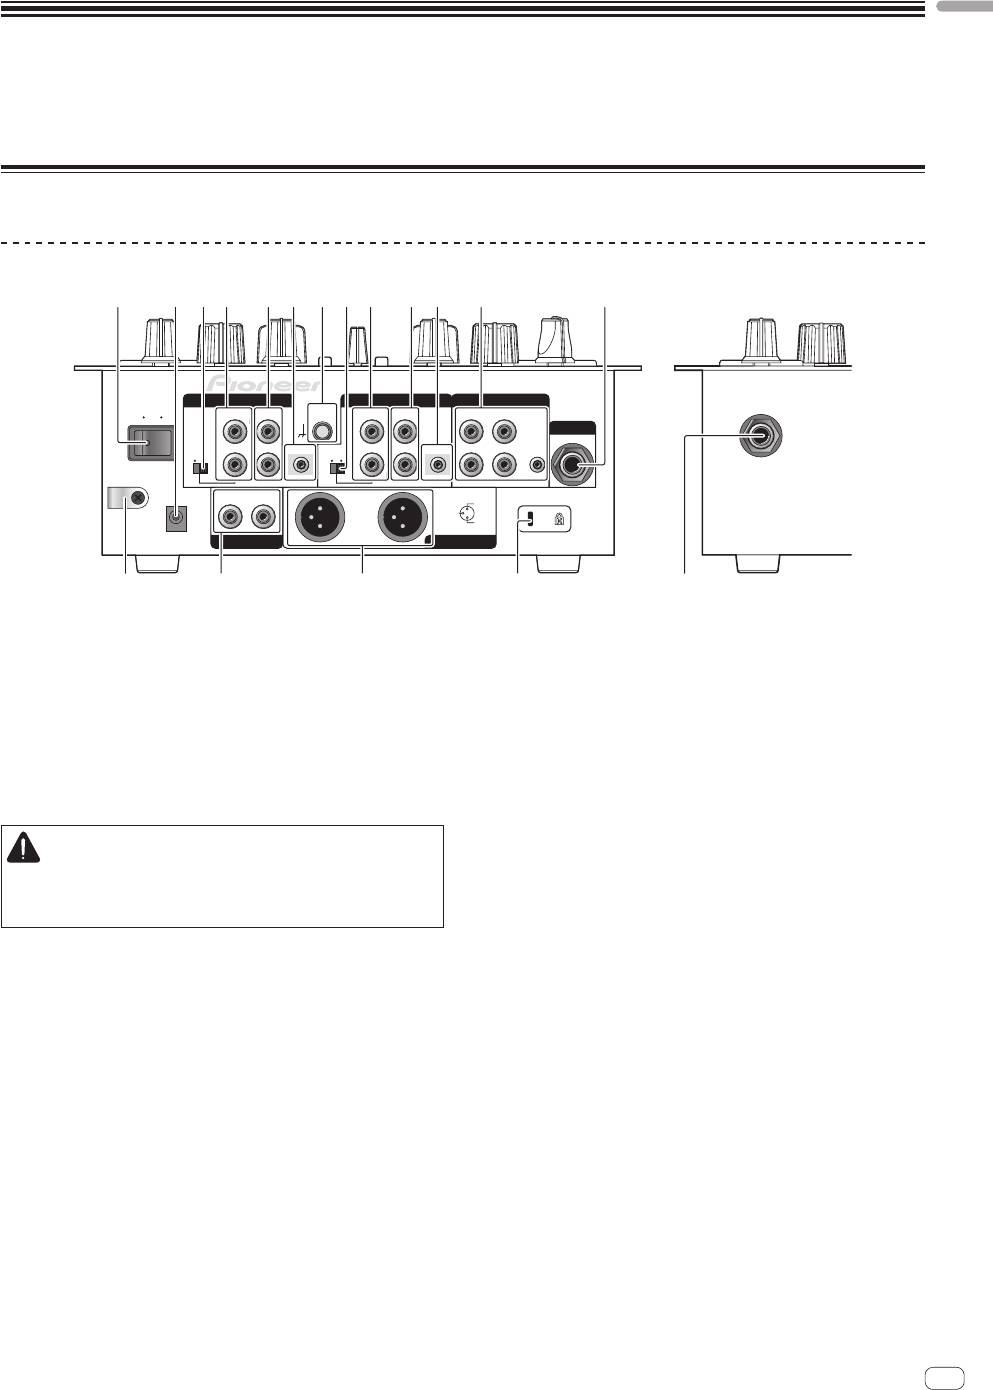
Names of Parts
Rear panel, front panel
321 4 5 86 4 5 67 3 9
CH-2
CH-1 AUX
PHONO / LINE CD
SIGNAL
GND
PHONO / LINE CD
23
ON
OFF
L
L
L
MIC
CONTROL
CONTROL
1
LINE PHONO
LINE PHONO
R
R
R
DC IN
RL
L
R
1GND
3 COLD
2 HOT
MASTER 1MASTER 2
b dc a
e
1 ON/OFF switch (page 9)
a MASTER 1 terminals (page 6)
Turns this unit’s power on and off.
Connect powered speakers, etc., here.
! Compatible with XLR connector type balanced outputs.
2 DC IN terminal
Connect to a power outlet using the included AC adapter (with the
b MASTER 2 terminals (page 6)
power plug mounted).
Connect powered speakers, etc., here.
Wait until connection of all equipment is completed before connect-
! Compatible with RCA pin-jack type unbalanced outputs.
ing the AC adapter.
Only use the included AC adapter.
c Cord hook
Hook the AC adapters’ power cord here.
3 PHONO/LINE selector switch (page 6)
Switches the function of the [PHONO/LINE] terminals.
d Kensington security slot
e PHONES jack (page 6)
CAUTION
Connect headphones here.
When switching the [PHONO/LINE] selector switch, set
[MASTER LEVEL] to [-∞]. Note that noise may be generated and
sound output at a high volume.
4 PHONO/LINE terminals (page 6)
Connect a phono level output device (analog player (for MM car-
tridges), etc.) or a line level output device (DJ player, etc.) here.
Switch the terminals’ function according to the connected device
using the [PHONO/LINE] selector switch on this unit’s rear panel.
5 CD terminals (page 6)
Connect to a DJ player or other line level device.
6 CONTROL terminal (page 6)
Connect using a control cord (included with Pioneer DJ players).
7 SIGNAL GND terminal (page 6)
Connect an analog player’s ground wire here. This helps reduce
noise when the analog player is connected.
8 AUX terminals (page 6)
Connect to the output terminals of external devices (computers,
portable audio sets, TVs, synthesizers, etc.).
9 MIC terminal (page 6)
Connect to a microphone.
En
5
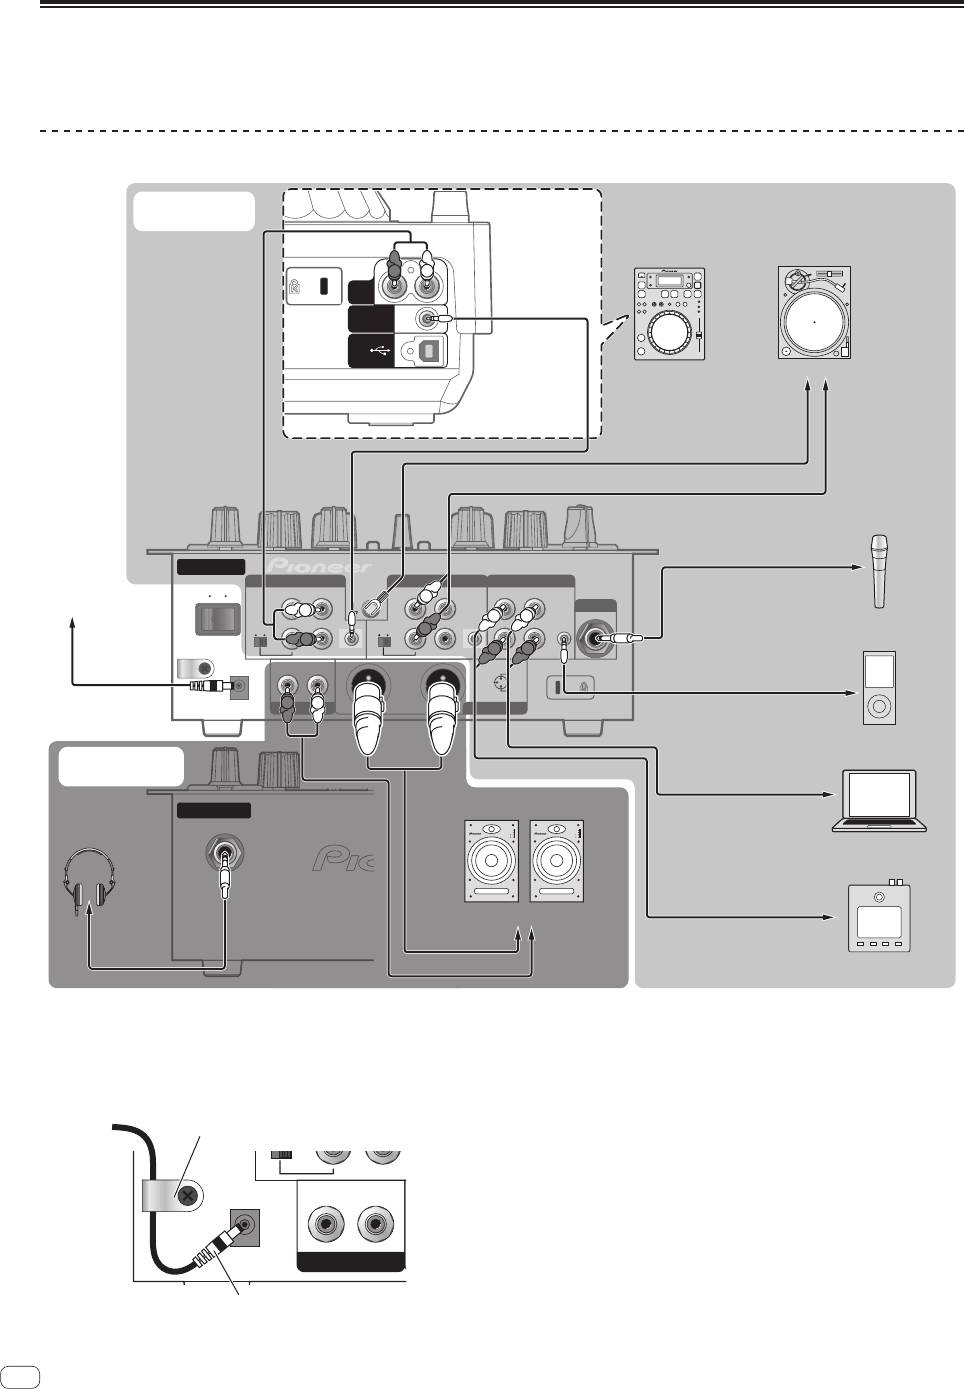
Connecting the input/output terminals
! When creating a DVS (Digital Vinyl System) combining a computer, audio interface, etc., be careful in connecting the audio interface to this unit’s
input terminals and in the settings of the input selector switches.
Also refer to the operating instructions of the DJ software and audio interface.
Rear panel, front panel
Audio input
Example:
section
CDJ-350
Audio cable
Analog playerDJ player
RL
R
L
AUDIO
OUT
Control cord
1
CONTROL
USB
To ground wire
To audio output
terminals
terminals
Ground wire
Audio cable
Microphone
Microphone cable
Rear panel
CH-2
CH-1 AUX
To microphone
PHONO / LINE
CD
SIGNAL
GND
PHONO / LINE
CD
23
ON
OFF
L
L
L
L
To power outlet
L
MIC
LL
CONTROL
LINE PHONO
LINE PHONO
R
CONTROL
1
Portable audio
R
R
R
device
R R
R
DC IN
RL
L
R
1GND
3 COLD
2 HOT
Audio cable
AC adapter
R
L
(included)
MASTER 1MASTER 2
To audio output
terminals
Audio output
Computer
section
Audio cable
Powered speaker, component,
Front panel
amplifier, etc.
To audio output
INPUT
INPUT
terminals
POWER
EQ
2
3
1
4
POWER
EQ
2
1
Headphones
4
3
synthesizer
Audio cable
To audio input terminals
To audio output
Headphones
Audio cable
terminals
cord
Audio cable
1 To use the fader start function, connect a control cord (page 11).
The fader start function can only be used when connected to a Pioneer DJ player.
Cord hook
Loosen the cord hook’s screw and pinch the AC adapters’
power cord under the hook.
R
DC IN
LR
MASTER 2
AC adapter’ s power cord
6
En
Cord hook
! Place the cord hook out of reach of children. If a child should
swallow it, contact a physician immediately.
English
About the AC adapter
Check that there are no irregularities with the AC adapter or power plug,
Safety instructions
then insert the power plug into the specified position of the AC adapter
To ensure your personal safety and to maximize the full operating poten-
using the specified procedure until a click is heard. For details, see
tial of your unit, read and follow these safety instructions.
Mounting the power plug on page 8.
If there are irregularities with the AC adapter or power plug, ask your
Read & Retain Instructions
nearest Pioneer authorized service center or your dealer to carry out
Read all operating and user information provided with this product.
repair work.
! Do not place the AC adapter cord around your neck. Doing so could
Cleaning
result in suffocation.
Use a damp cloth to clean the exterior housing. Avoid using any fluids
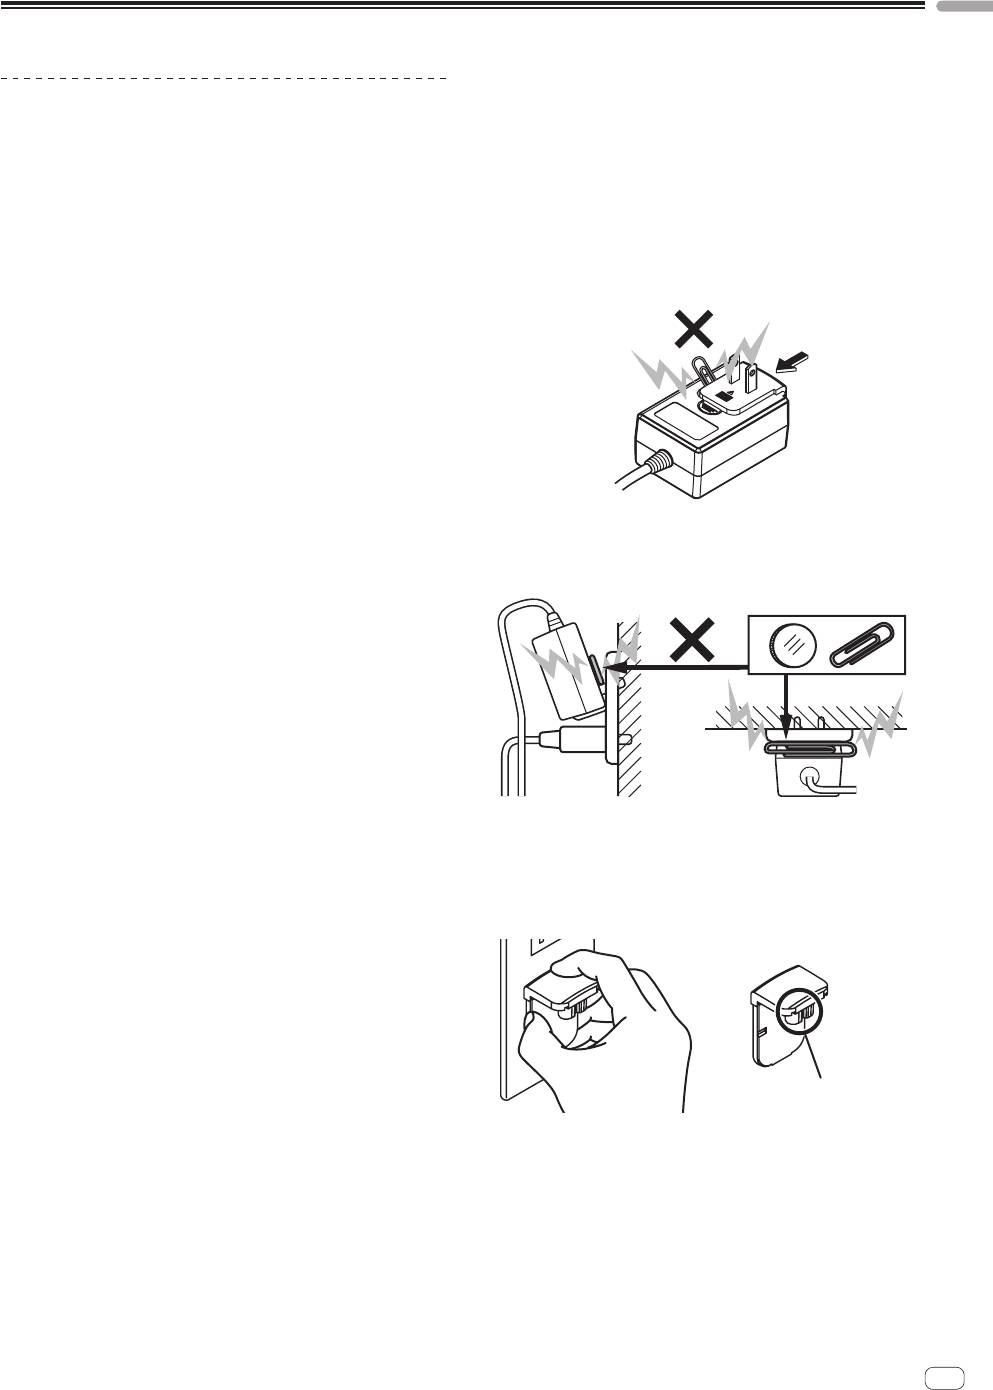
! Do not use this unit with a coin, paper clip or other metal object
including liquid, aerosol or alcohol-based cleaning products.
stuck between the AC adapter and power plug. Doing so could cause
a short circuit, leading to fire or electric shock.
Water or Moisture
Avoid operating or locating this product near water or other sources of
fluid.
Accessories
Do not place this product on an unstable cart, stand, or table. The prod-
uct may fall and be seriously damaged.
Ventilation
Do not block or cover this product in use. This unit should not be placed
in a built-in installation unless properly ventilated.
Environment
Avoid placing this product in a location with exposure to large quantities
! When mounting the AC adapter on a wall outlet, make sure there is
of dust, high temperatures, high humidity, or subject to excessive vibra-
no space between the AC adapter and the wall outlet. Faulty contact
tions or shocks.
or a coin, paper clip or other metal object getting stuck in the space
could cause a short circuit, leading to fire or electric shock.
Power Sources
Operate this product only from the recommended power sources. If
you are unsure of the power source, consult an authorized Pioneer
representative.
Power-Cord Protection
When unplugging the unit, pull on the plug – not on the cord. Do not
handle the cord or plug with wet hands; doing so could cause an electric
short or shock. Do not allow anything to pinch or rest on the power cord
and do not place in a walkway.
Power
Turn OFF the system before installing this or any other hardware device.
Overloading
Avoid connecting too many devices to a single wall socket or power
source as this can cause fires or short circuits.
Object & Liquid Entry
Never push inappropriate objects in to the device. Avoid spilling any
liquids in to or on the outside of the drive.
Servicing
Opening or removing the cover exposes you to possible electrical shock
or other danger. Contact a Pioneer authorized service representative for
repairing this product (refer to the enclosed Service & Support Card).
Damage Requiring Service
Unplug the unit and refer servicing to qualified service personnel in the
following situations:
! When the power cord, plug, or chassis is damaged.
! If liquid has been spilled, or objects have fallen into the product.
! If the product has been exposed to rain or water.
! If the product does not operate normally when the operating instruc-
tions are followed. Adjust only those controls that are covered by the
operating instructions. Improper adjustment of other controls may
result in damage and can require extensive work by a qualified tech-
nician to restore the unit to its normal operation.
! When the product exhibits a distinct change in performance – this
indicates a need for service.
En
7
Coin, paper clip or other metal object
Side
Top
! The power plug could come detached from the AC adapter and
remain in the power outlet if someone trips on the AC adapter’s
power cord or if something hits the AC adapter. If this happens,
remove the power plug remaining in the outlet with dry hands, hold-
ing it as shown on the diagram below and without touching metal
parts. Do not use any tools to remove it.
Do not touch.
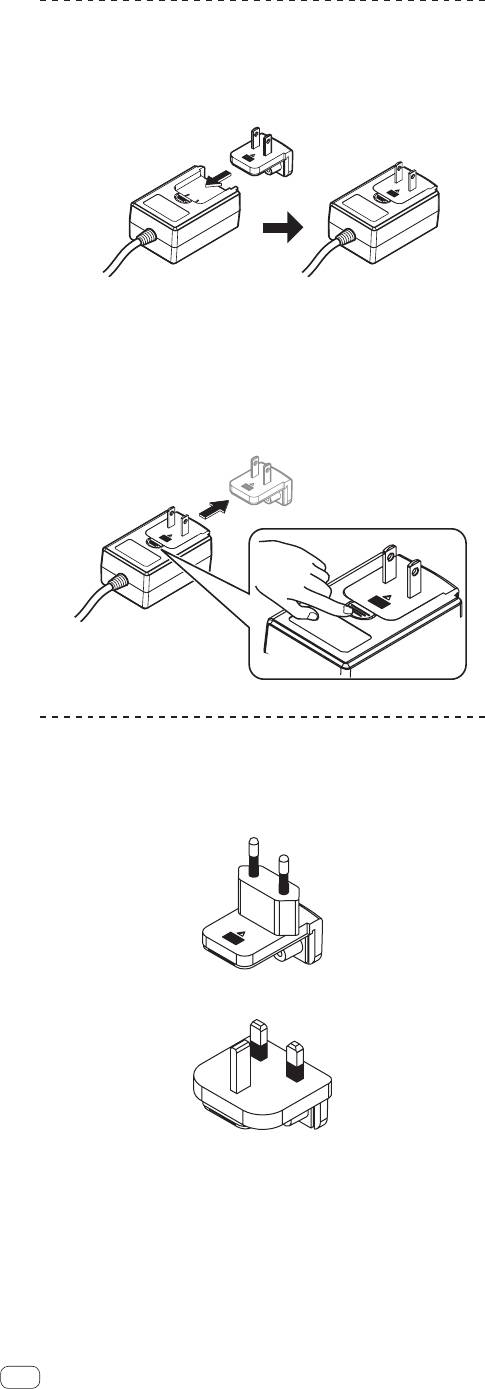
Mounting the power plug
Slide the power plug along the guide rails in the AC
adapter unit as shown on the diagram below, then press
in until a click is heard.
Removing the power plug
While pressing the [PUSH] button on the AC adapter
unit, slide the power plug away from the adapter as
shown on the diagram below to remove it.
Once the power plug is mounted, there is no need to remove it.
Power plug
This product comes with the types of power plugs shown below. Use the
appropriate power plug for the country or region you are in.
Type 1 (for Europe)
Type 2 (for the UK)
8
En
Оглавление
- Contents
- Before start
- Connections
- Operation
- Additional information
- Sommaire
- Informations préliminaires
- Raccordements
- Fonctionnement
- Informations supplémentaires
- Inhalt
- Vor der Inbetriebnahme
- Anschlüsse
- Bedienung
- Zusätzliche Informationen
- Indice
- Prima di cominciare
- Collegamenti
- Impiego
- Informazioni aggiuntive
- Inhoud
- Alvorens te beginnen
- Aansluitingen
- Bediening
- Aanvullende informatie
- Contenido
- Antes de empezar a usar la unidad
- Conexiones
- Operación
- Información adicional
- Содержание
- До начала
- Подключения
- Управление
- Дополнительная информация


