Pioneer DDJ-SX: Operation
Operation: Pioneer DDJ-SX
8
En
Operation
Wait until all connections between devices have been completed
before connecting the AC adapter.
Be sure to turn off the power and unplug the AC adapter from the
power outlet before making or changing connections between
devices.
Refer to the operating instructions for the component to be
connected.
Only use the AC adapter included with this unit.
Power is supplied to this unit by the AC adapter.
Connect this unit and the computer directly using the included USB
cable.
A USB hub cannot be used.
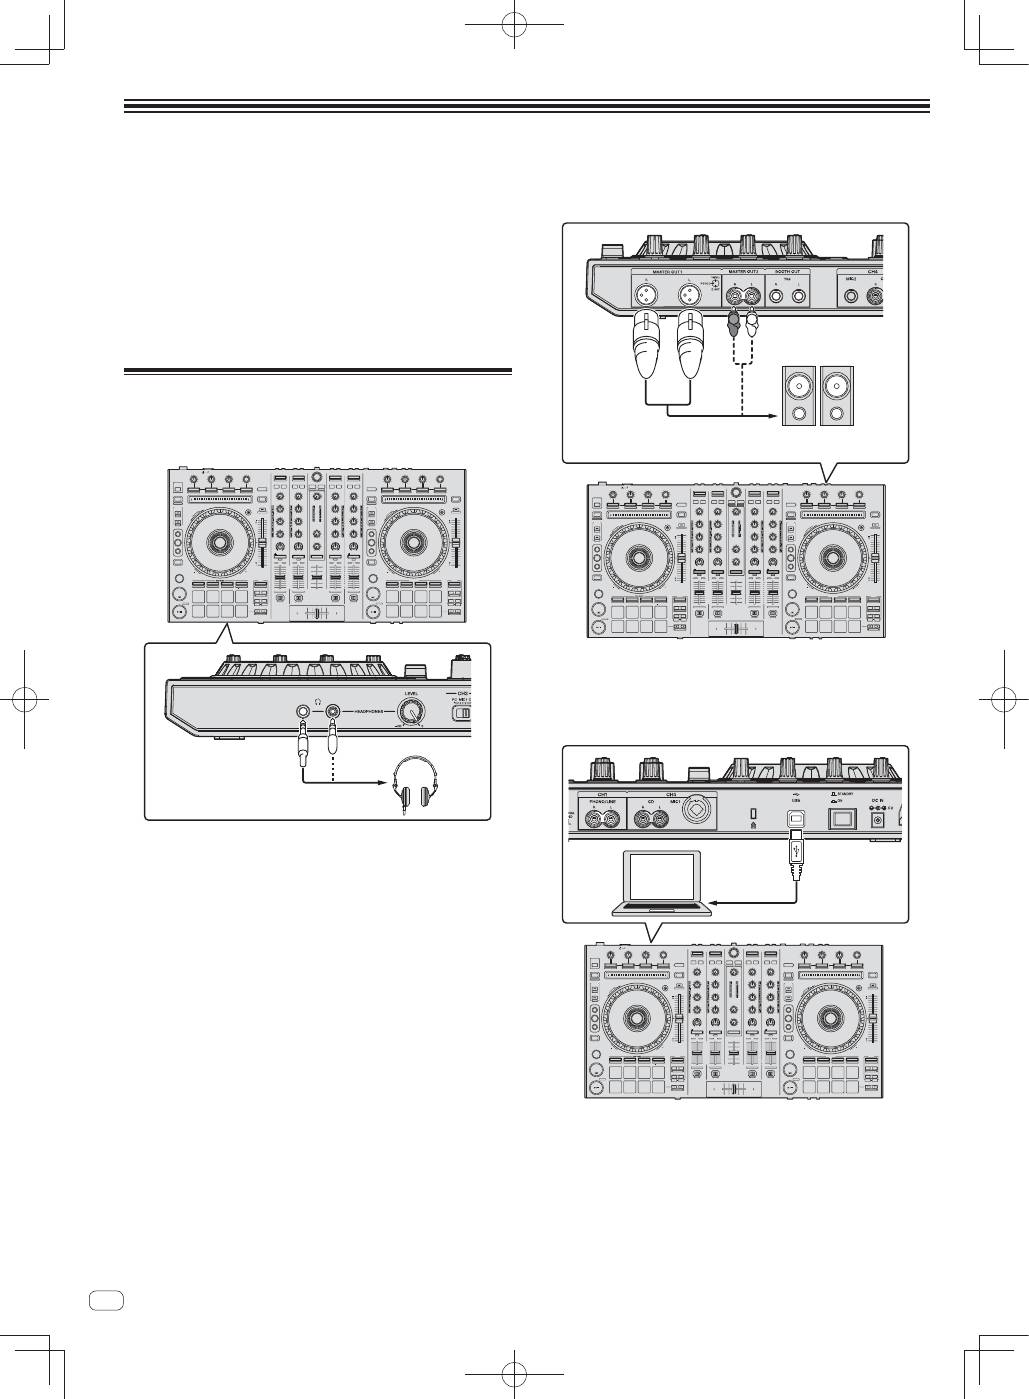
Connections
1 Connect headphones to one of the [PHONES]
terminals.
2 Connect powered speakers, a power amplifier,
components, etc., to the [MASTER OUT 1] or [MASTER
OUT 2] terminals.
R
L
Powered speaker, etc
To output the sound from the [
BOOTH
] terminals, connect speak-
ers or other devices to the [
BOOTH
] terminals.
For details on connecting the input/output terminals, see the
Operating Instructions.
3 Connect this unit to your computer via a USB cable.
4 Turn on the computer’s power.
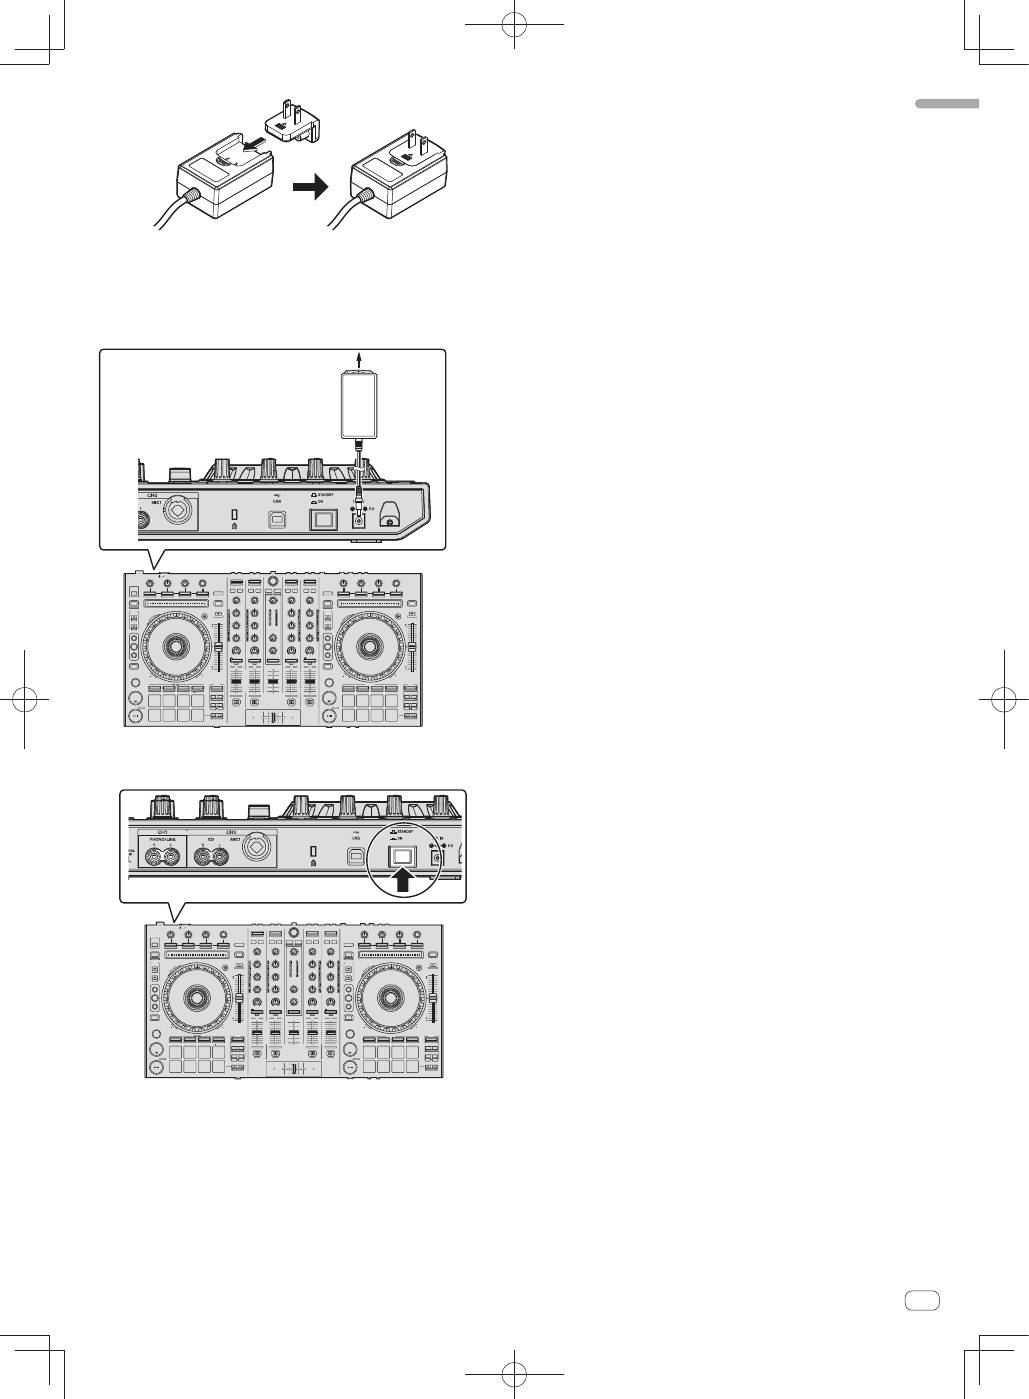
5 Connect the power plug to the AC adapter.
Slide the power plug into the AC adapter’s guide rails as shown on the
diagram and press in until a click is heard.
9
En
English
For detailed cautions on the AC adapter, see “
About the AC
adapter
” (p. 16).
The shape of the plug differs according to the region in which the
unit is sold.
6 Connect the AC adapter.
AC adapter
(included)
To power outlet
7 Press the [STANDBY/ON] switch on this unit’s rear
panel to turn this unit’s power on.
Turn on the power of this unit.
For Windows users
The message [
Installing device driver software
] may appear
when this unit is first connected to the computer or when it is
connected to a different USB port on the computer. Wait a while
until the message [
Your devices are ready for use
] appears.
8 Turn on the power of the devices connected to the
output terminals (powered speakers, power amplifier,
components, etc.).
When a microphone, DJ player or other external device is con-
nected to input terminals, the power of that device also turns on.
10
En
Starting the system
Launching Serato DJ
For Windows
From the Windows [
Start
] menu, click the [
Serato DJ
] icon under [
All Programs
] > [
Serato
] > [
Serato DJ
].
For Mac OS X
In Finder, open the [
Application
] folder, then click the [
Serato DJ
] icon.
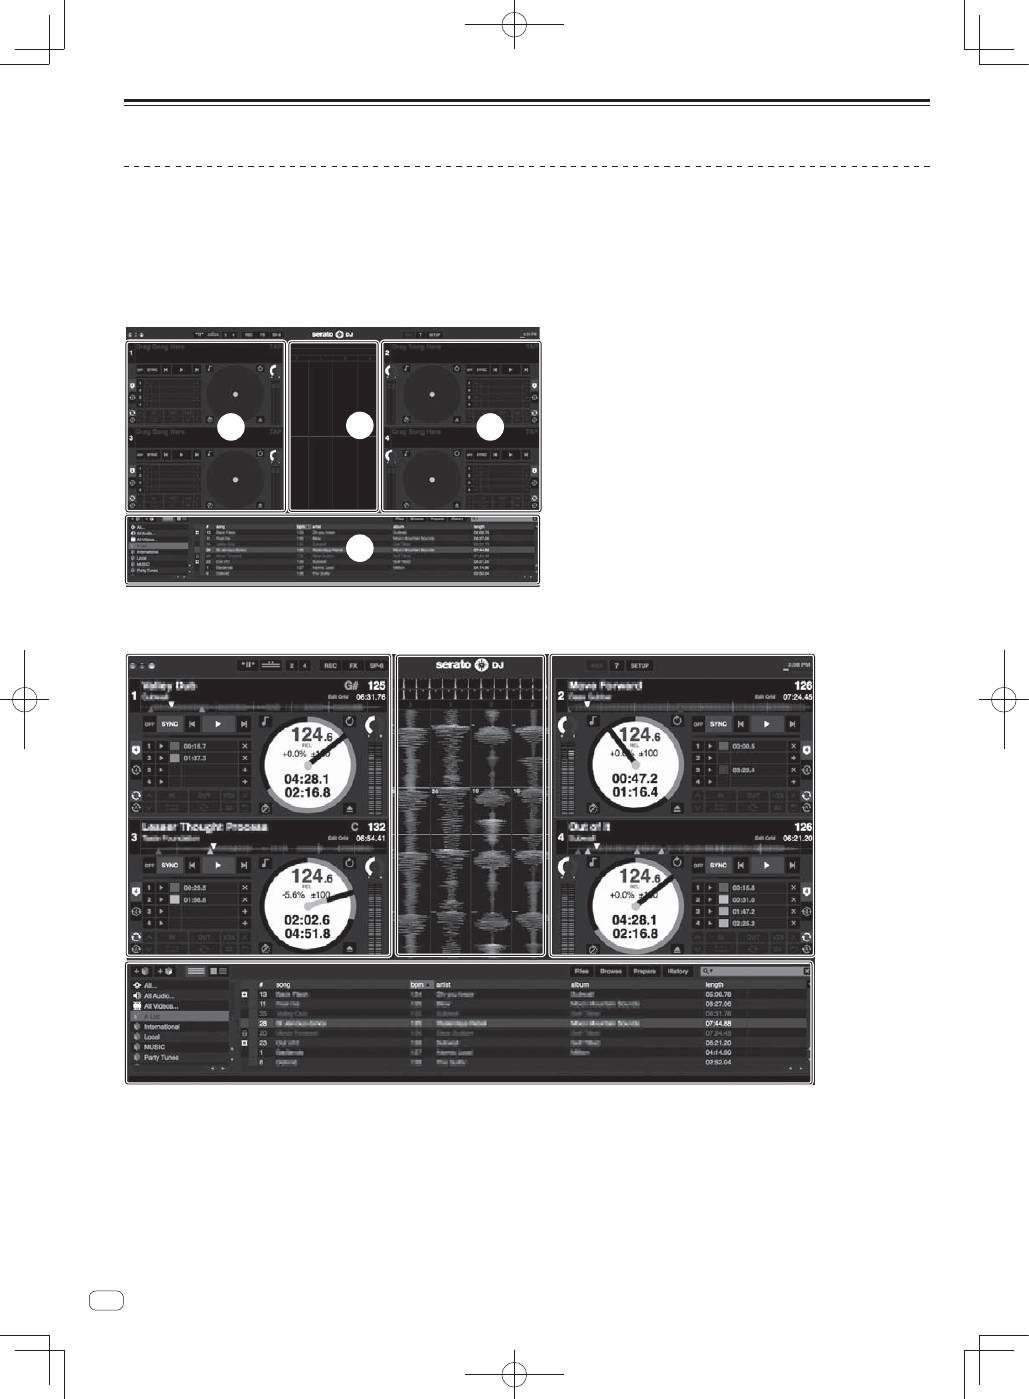
Computer screen directly after the Serato DJ software is launched
A
A
C
B
Computer screen when a track is loaded in the Serato DJ software
A
A
C
B
A Deck section
The track information (the name of the loaded track, artist name, BPM, etc.), the overall waveform and other information is displayed here.
B Waveform
display
The loaded track’s waveform is displayed here.
C Browser
section
Crates in which tracks in the library or sets of multiple tracks are stored are displayed here.
This manual consists mainly of explanations of functions of this unit as hardware. For detailed instructions on operating the Serato DJ software, see
the Serato DJ software manual.
11
En
English
Importing tracks
The following describes the typical procedure for importing tracks.
There are various ways to import tracks with the Serato DJ software. For details, see the Serato DJ software manual.
If you are already using Serato DJ software (Scratch Live, ITCH or Serato DJ Intro) and have already created track libraries, the track libraries you
have previously created can be used as such.
1 Click the [Files] key on the Serato DJ software screen to open the [Files] panel.
The contents of your computer or the peripheral connected to the computer are displayed in the [
Files
] panel.
2 Click the folder on the [Files] panel containing the tracks you want to add to the library to select it.
3 On the Serato DJ software’s screen, drag and drop the selected folder to the crates list panel.
A crate is created and the tracks are added to the library.
a
b
a
[
Files
] panel
b
Crates panel
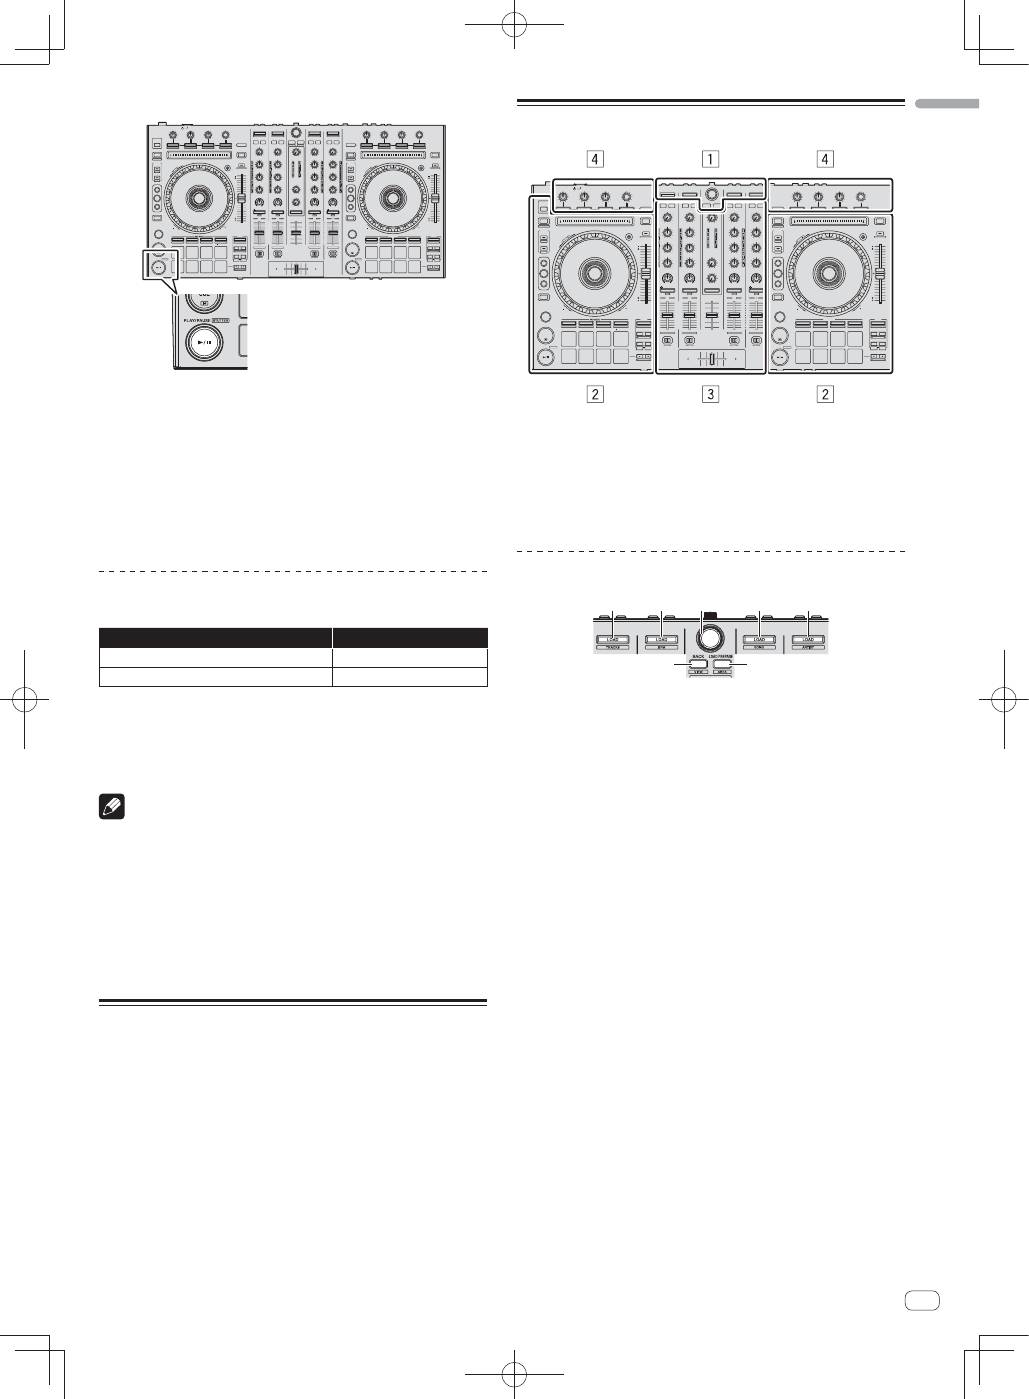
Loading tracks and playing them
The following describes the procedure for loading tracks into deck [
1
] as an example.
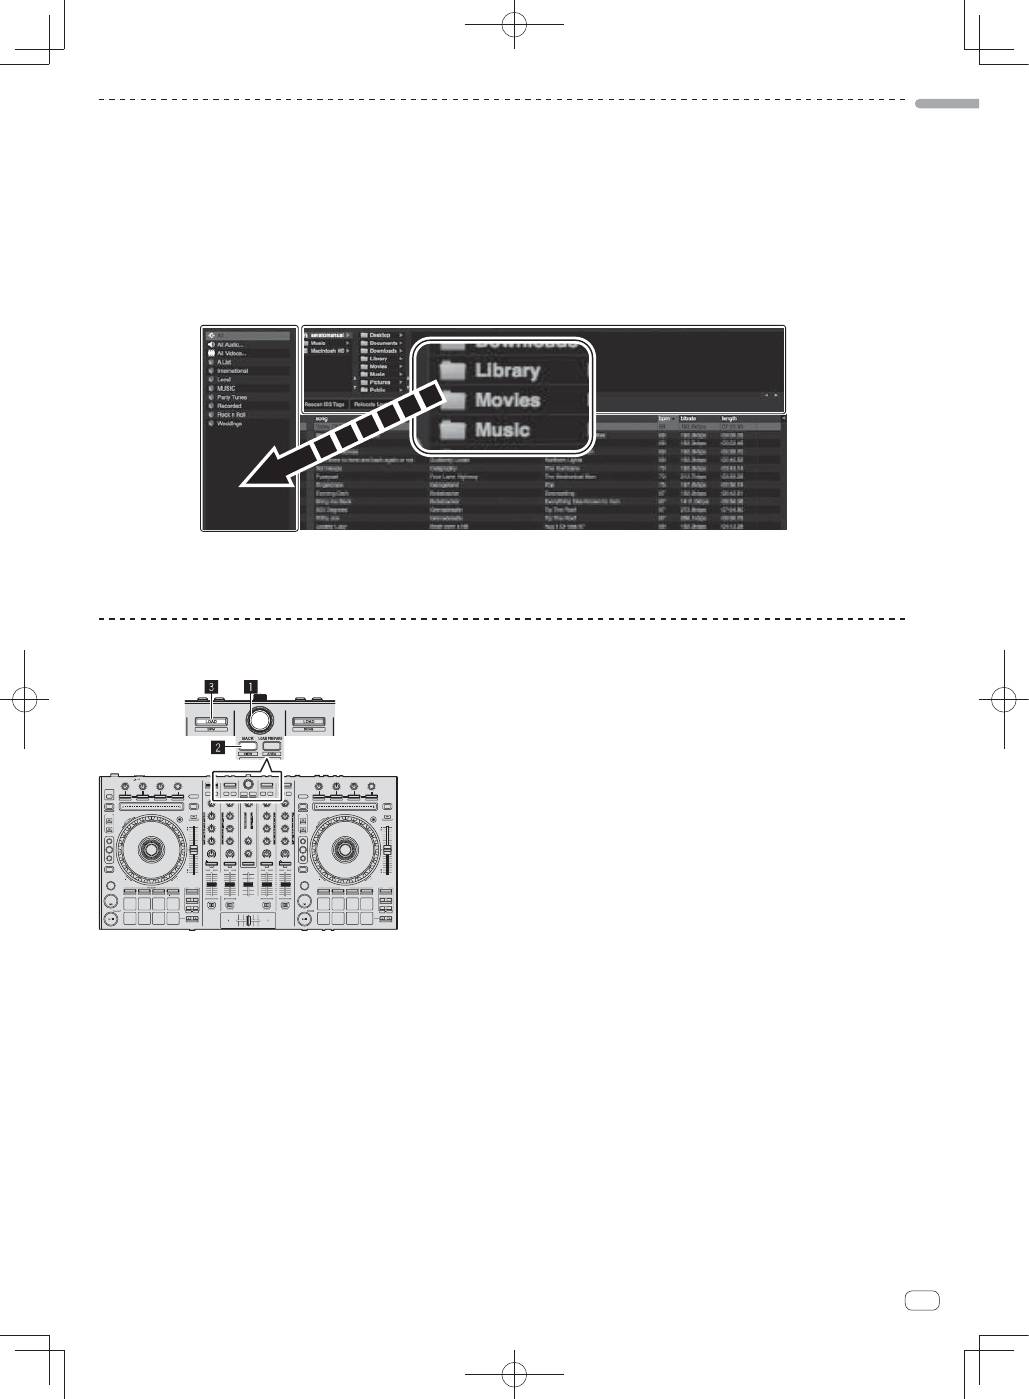
1
Rotary selector
2
BACK button
3
LOAD button
1 Press this unit’s [BACK] button, move the cursor to the crates panel on the computer’s screen, then turn the rotary
selector to select the crate, etc.
12
En
2 Press the rotary selector, move the cursor to the library on the computer’s screen, then turn the rotary selector and
select the track.
a
b
a
Library
b
Crates panel
3 Press the [LOAD] button to load the selected track onto the deck.
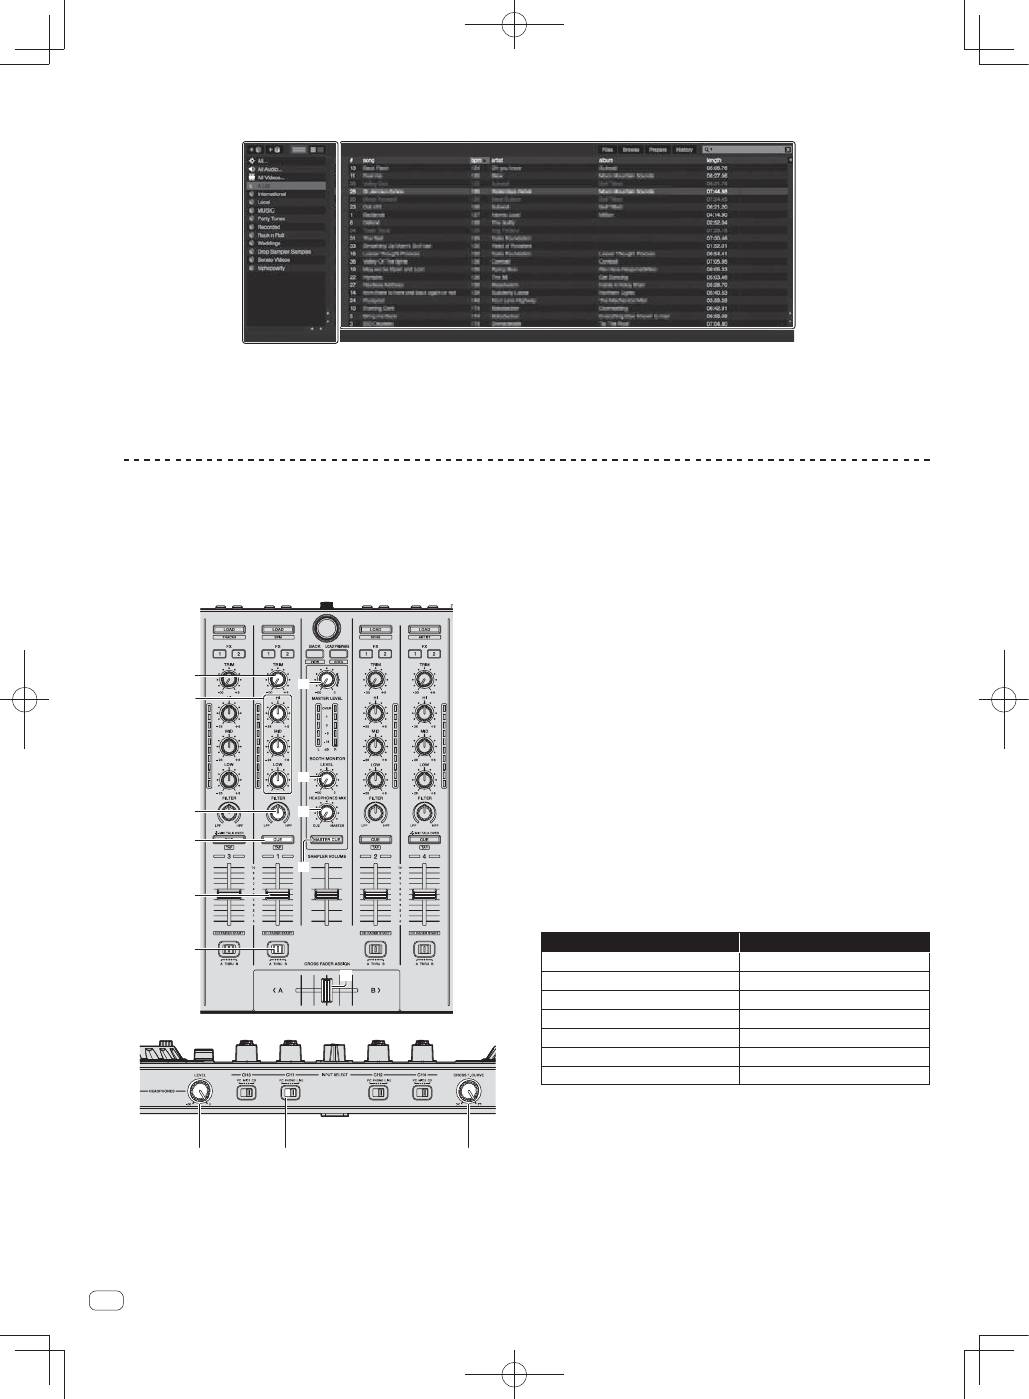
Playing tracks and outputting the sound
The following describes the procedure for outputting the channel 1
sound as an example.
Set the volume of the devices (power amplifier, powered speakers,
etc.) connected to the [
MASTER OUT 1
] and [
MASTER OUT 2
]
terminals to an appropriate level. Note that loud sound will be output
if the volume is set too high.
a
b
d
c
e
4
8
7
5
6
9
f
h
g
4
TRIM control
5
EQ (HI, MID, LOW) controls
6
FILTER control
7
Headphones CUE button
8
Channel fader
9
Crossfader Assign Switch
a
MASTER LEVEL control
b
BOOTH MONITOR LEVEL control
c
HEADPHONES MIXING control
d
MASTER CUE button
e
Crossfader
f
HEADPHONES LEVEL control
g
INPUT SELECT switch
h
Crossfader curve selector control
1 Set the positions of the controls, etc., as shown
below.
Names of controls, etc.
Position
MASTER LEVEL
control
Turned fully counterclockwise
TRIM
control
Turned fully counterclockwise
EQ
(
HI
,
MID
,
LOW
) controls
Center
FILTER
control
Center
Channel fader
Moved forward
Crossfader Assign Switch
[
THRU
] position
INPUT SELECT
switch
[
PC
] position
13
En
English
2 Press the [
"
] button to play the track.
3 Move the channel fader away from you.
4 Turn the [TRIM] control.
Adjust [
TRIM
] so that the orange indicator on the channel level indicator
lights at the peak level.
5 Turn the [MASTER LEVEL] control to adjust the audio
level of the speakers.
Adjust the sound level output from the [
MASTER OUT 1
] and [
MASTER
OUT 2
] terminals to an appropriate level.
Monitoring sound with headphones
Set the positions of the controls, etc., as shown below.
Names of controls, etc.
Position
HEADPHONES MIXING
control
Center
HEADPHONES LEVEL
control
Turned fully counterclockwise
1 Press the headphones [CUE] button for the channel 1.
2 Turn the [HEADPHONES LEVEL] control.
Adjust the sound level output from the headphones to an appropriate
level.
Note
This unit and the Serato DJ software include a variety of functions
enabling individualistic DJ performances. For details on the respective
functions, see the operating instructions and the Serato DJ software
manual.
This unit’s operating instructions can be downloaded from the
Pioneer DJ support site. For details, see
Downloading this unit’s oper-
ating instructions
(p. 15).
The Serato DJ software manual can be downloaded from “Serato.
com”. For details, see
Downloading the Serato DJ software manual
(p.
15).
Quitting the system
1 Quit [Serato DJ].
When the software is closed, a message for confirming that you want to
close it appears on the computer’s screen. Click [
Yes
] to close.
2 Press the [STANDBY/ON] switch on this unit’s rear
panel to set this unit’s power to standby.
3 Disconnect the USB cable from your computer.
Names of Parts
1
Browser section
2
Deck section
3
Mixer section
4
Effect section
Browser section
1
1
2
1
1
3
4
1
LOAD
button
2
Rotary selector
3
BACK
button
4
LOAD PREPARE
button
14
En
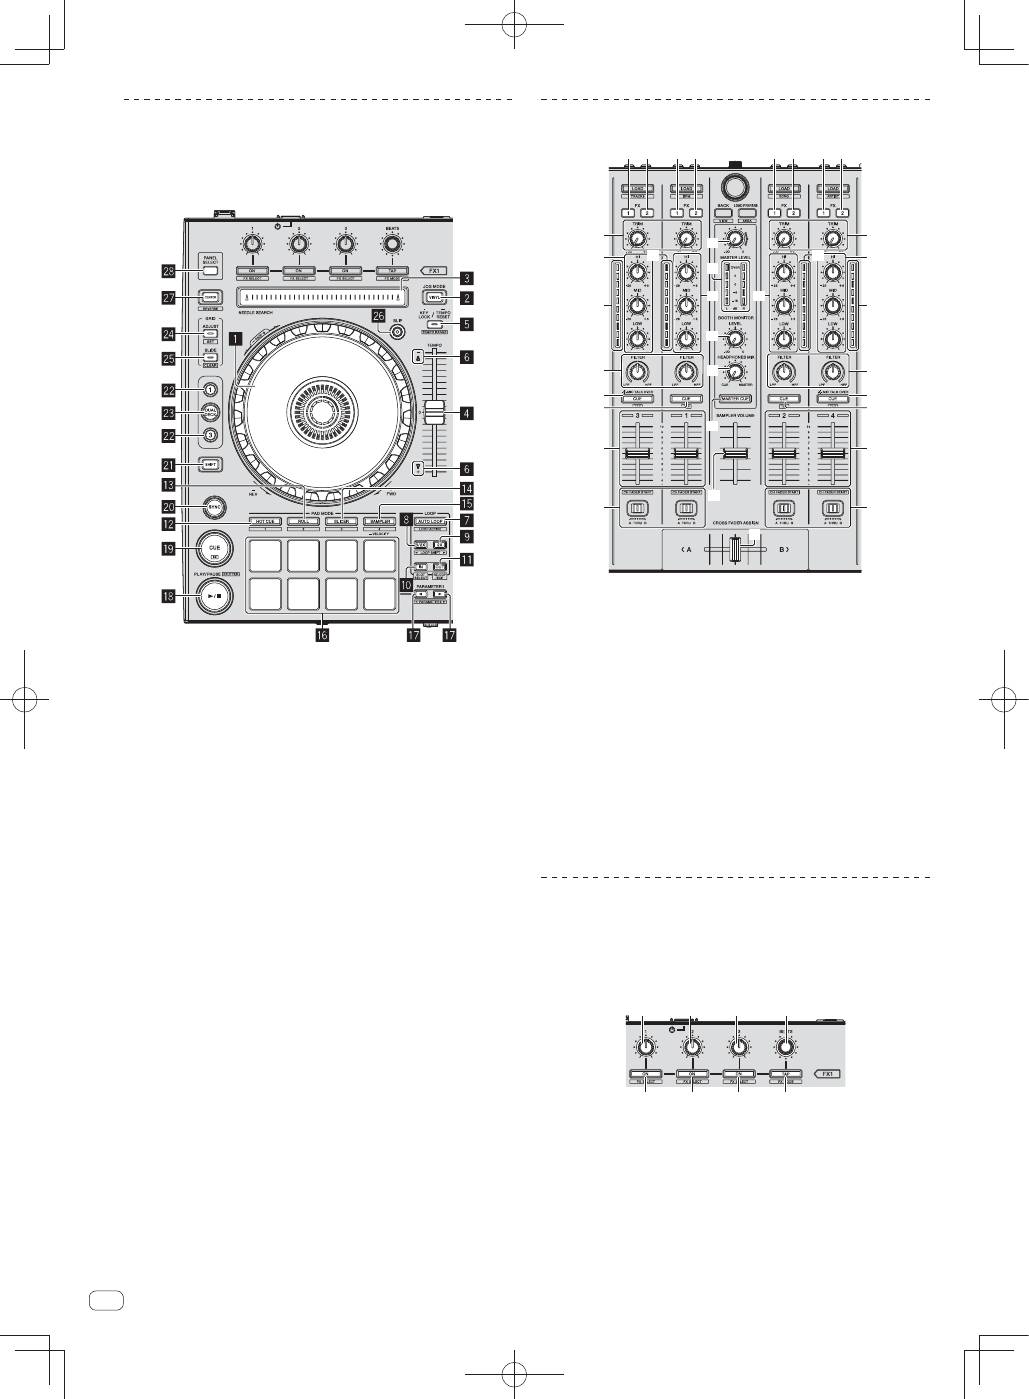
Deck section
This section is used to control the four decks. The buttons and controls
for operating decks 1 and 3 are located on the left side of the controller,
those for operating decks 2 and 4 are located on the right side of the
controller.
1
Jog dial
2
VINYL
button
3
NEEDLE SEARCH
pad
4
TEMPO
slider
5
KEY LOCK
button
6
TAKEOVER indicator
7
AUTO LOOP
button
8
LOOP 1/2X
button
9
LOOP 2X
button
a
LOOP IN
button
b
LOOP OUT
button
c
HOT CUE
mode button
d
ROLL
mode button
e
SLICER
mode button
f
SAMPLER
mode button
g
Performance pads
h
PARAMETER
button,
PARAMETER
button
i
PLAY/PAUSE
"
button
j
CUE
button
k
SYNC
button
l
SHIFT
button
m
DECK
button
n
DUAL DECK
button
o
GRID ADJUST
button
p
GRID SLIDE
button
q
SLIP
button
r
CENSOR
button
s
PANEL SELECT
button
Mixer section
c
d
4
4
e
g
f
h
b
1 2
1 2
1 2
1 2
5
3
9
7
4
6
a
5
5
5
3
9
4
6
a
8
7
8
1
FX 1
assign button
2
FX 2
assign button
3
TRIM
control
4
EQ
(
HI
,
MID
,
LOW
) controls
5
Channel Level Indicator
6
FILTER
control
7
Headphones
CUE
/
MIC TALK OVER
button
8
Headphones
CUE
button
9
Channel fader
a
Crossfader Assign Switch
b
Crossfader
c
MASTER LEVEL
control
d
Master level indicator
e
Booth monitor level control
f
HEADPHONES MIXING
control
g
MASTER CUE
button
h
SAMPLER VOLUME
fader
Effect section
This section is used to control the two effect units (FX1 and FX2).
Controls and buttons to operate the FX1 unit are located on the left side
of the controller, those to operate the FX2 unit are located on the right
side of the controller. The channels to which the effect is to be applied
are set using the effect assign buttons .
1
1
1
2
3
3
3
4
1
Effect parameter controls
2
FX BEATS
control
3
Effect parameter buttons
4
TAP
button
Оглавление
- Contents
- Before start
- Operation
- Acquiring the manual
- About the AC adapter
- Additional information
- Sommaire
- Informations préliminaires
- Fonctionnement
- Obtention du manuel
- À propos de l’adaptateur secteur
- Informations supplémentaires
- Inhalt
- Vor der Inbetriebnahme
- Bedienung
- Übernehmen der Anleitung
- Über das Netzteil
- Zusätzliche Informationen
- Indice
- Prima di cominciare
- Impiego
- Acquisizione del manuale
- L’adattatore di CA
- Informazioni aggiuntive
- Inhoud
- Alvorens te beginnen
- Bediening
- Verkrijgen van de handleiding
- Over de netstroomadapter
- Aanvullende informatie
- Contenido
- Antes de empezar a usar la unidad
- Operación
- Adquisición del manual
- Acerca del adaptador de CA
- Información adicional
- índice
- Antes de começar
- Funcionamento
- Adquirir o manual
- Acerca do transformador de CA
- Informações adicionais
- ǹȖȌȍȘȎȈȕȐȍ
- ǬȖȕȈȟȈȓȈ
- ǻȗȘȈȊȓȍȕȐȍ
- ǷȖȓțȟȍȕȐȍȘțȒȖȊȖȌșȚȊȈ
- ǶȉȈȌȈȗȚȍȘȍȗȍȘȍȔȍȕȕȖȋȖȚȖȒȈ
- ǬȖȗȖȓȕȐȚȍȓȤȕȈȧȐȕȜȖȘȔȈȞȐȧ
