Camlink Professional photo studio CL-STUDIO30: инструкция
Раздел: Оптика
Тип:
Инструкция к Camlink Professional photo studio CL-STUDIO30
CL-STUDIO30
USER MANUAL (EN)
INSTRUKCJA OBSŁUGI (PL)
GEBRUIKSAANWIJZING (NL)
NÁVOD K POUŽITÍ (CS)
BEDIENUNGSANLEITUNG (DE)
NÁVOD NA POUŽITIE (SK)
MANUAL DE USUARIO (ES)
HASZNÁLATI ÚTMUTATÓ (HU)
MANUEL DE L’UTILISATEUR (FR)
KASUTUSJUHEND (ET)
MANUALE PER L’UTENTE (IT)
LIETOTĀJA ROKASGRĀMATA (LV)
MANUAL DO UTILIZADOR (PT)
VARTOTOJO VADOVAS (LT)
BRUGSVEJLEDNING (DA)
NAVODILO ZA UPORABO (SL)
BRUKERVEILEDNING (NO)
KORISNIČKI PRIRUČNIK (HR)
BRUKSANVISNING (SV)
MANUAL DE UTILIZARE (RO)
KÄYTTÖOPAS (FI)
BG
ΕΓΧΕΙΡΙΙΟ XPHΣHΣ (EL)
(RU)
KULLANIM KILAVUZU (TR)
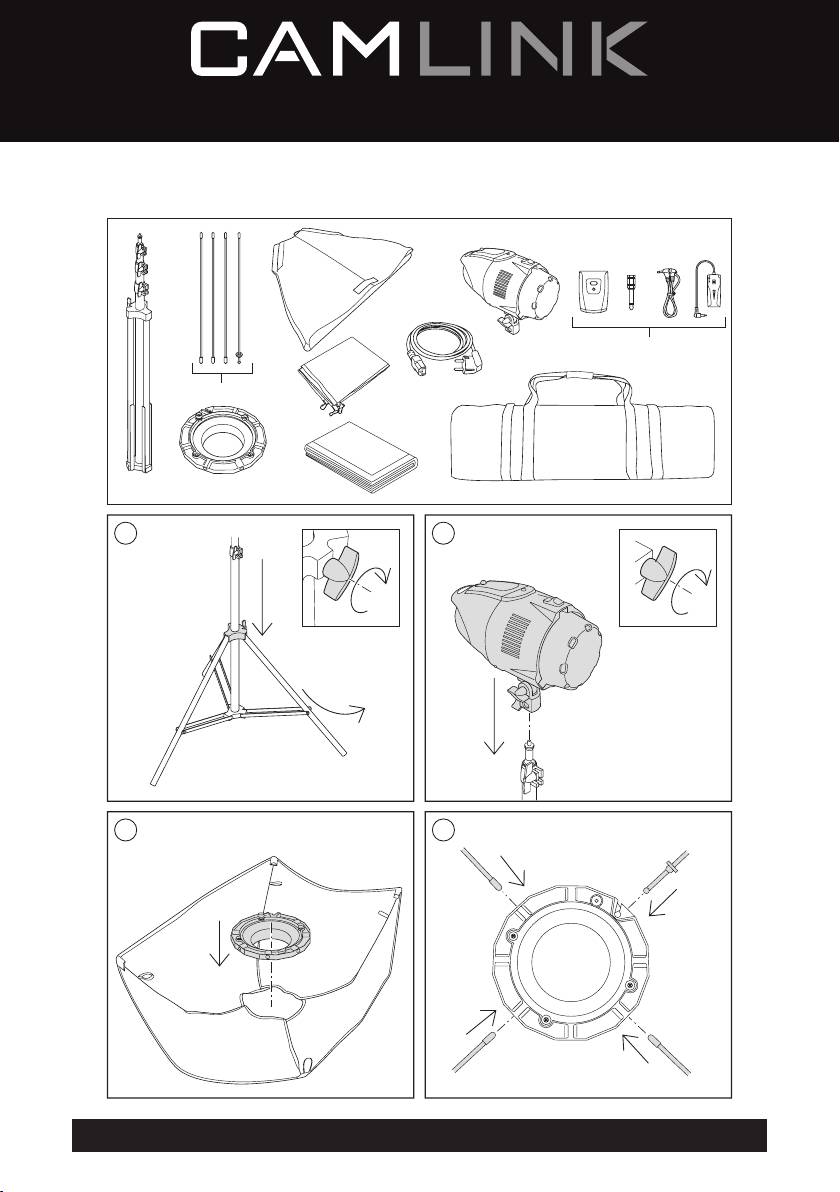
CL-STUDIO30
(2x)
(2x)
(1x)
(2x)
(2x)
(2x)
(2x)
(2x) (2x) (1x)
1 2
3 4
2
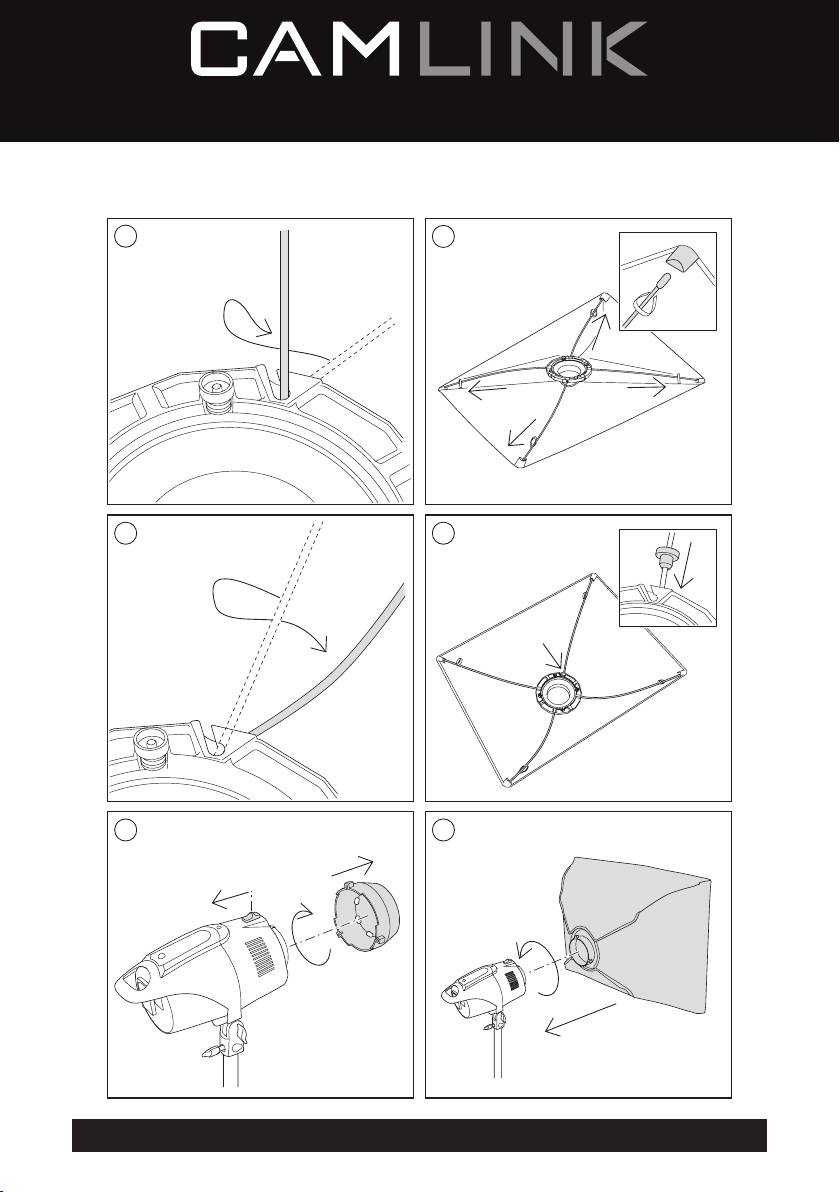
CL-STUDIO30
5
6
7 8
9 10
3
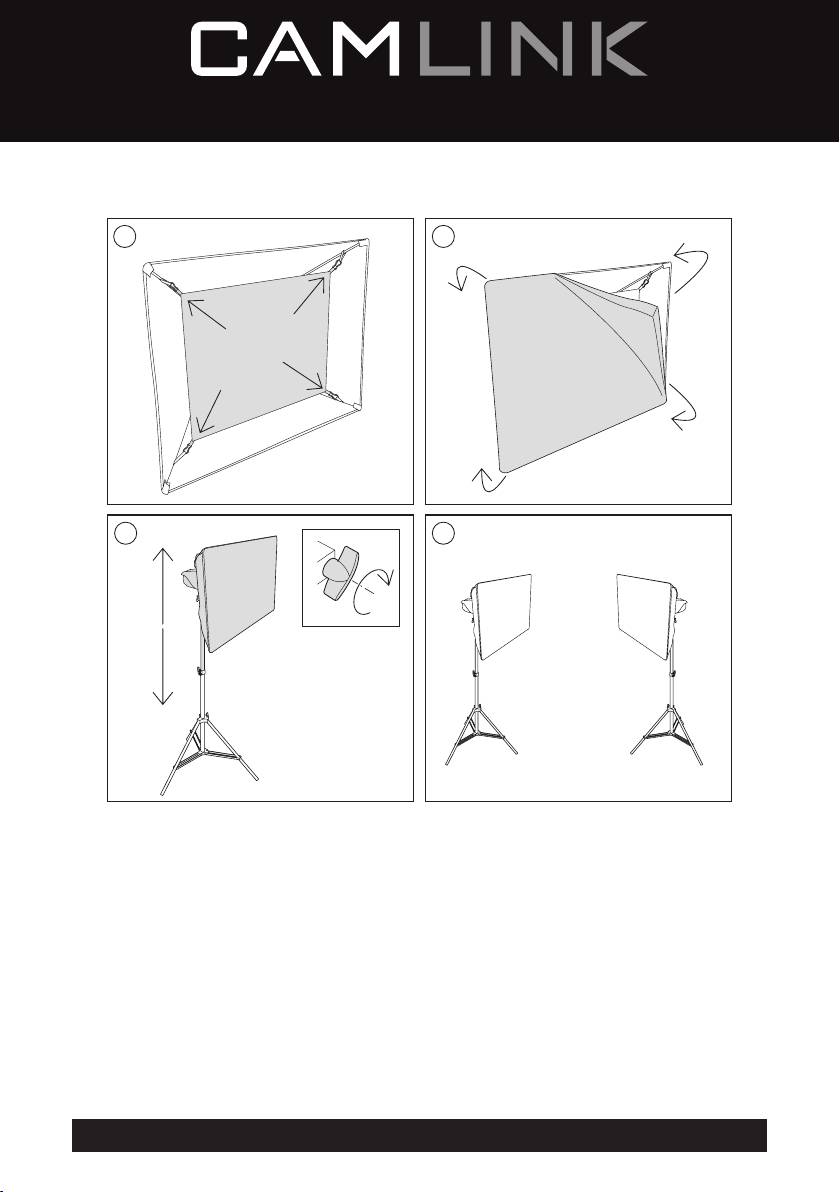
CL-STUDIO30
1211
13 14
4
English
CL-STUDIO30 - Studio ash light
Safety
General safety
• Read the manual carefully before use. Keep the manual for future reference.
• Only use the device for its intended purposes. Do not use the device for other purposes than described in the
manual.
• Do not use the device if any part is damaged or defective. If the device is damaged or defective, replace the device
immediately.
• Do not expose the product to water or moisture.
• Do not block the ventilation openings.
Electrical safety
• To reduce risk of electric shock, this product should only be opened by an authorized technician when service is
required.
• Disconnect the product from the mains and other equipment if a problem should occur.
Battery safety
• Use only the batteries mentioned in the manual.
• Do not use old and new batteries together.
• Do not use batteries of dierent types or brands.
• Do not install batteries in reverse polarity.
• Do not short-circuit or disassemble the batteries.
• Do not expose the batteries to water.
• Do not expose the batteries to re or excessive heat.
• Batteries are prone to leakage when fully discharged. To avoid damage to the product, remove the batteries when
leaving the product unattended for longer periods of time.
• If liquid from the batteries comes into contact with skin or clothing, immediately rinse with fresh water.
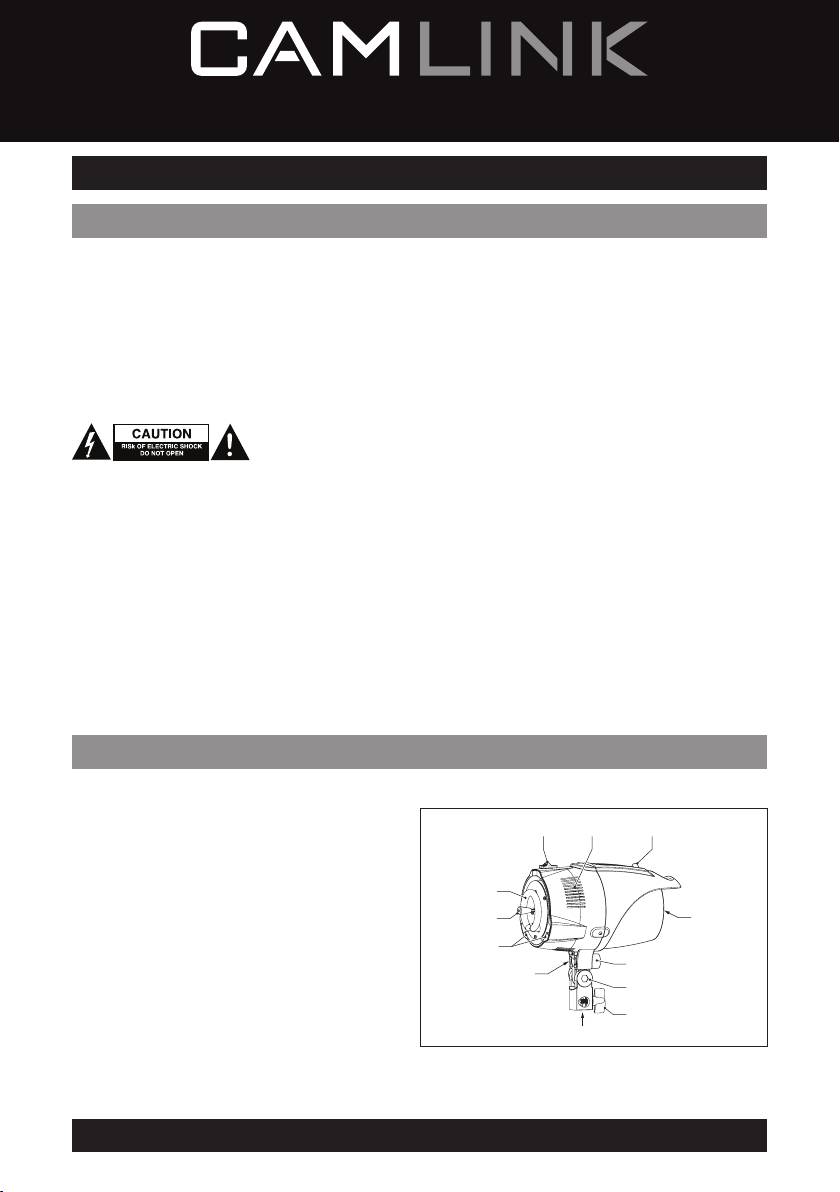
Description
The studio ash light was designed to provide optimum lighting for your location and studio photography purposes.
1. Control panel
2. Remote sensor
268
3. Lamp
4. Flash tube
5. Adjusting knob (ash light)
4
6. Ventilation openings
7. Softbox mount
3
1
8. Latch (softbox mount)
9. Tripod mount
7
10. Locking knob (tripod)
12
11
11. Umbrella mount
5
12. Locking knob (umbrella)
10
9
5
English
Use
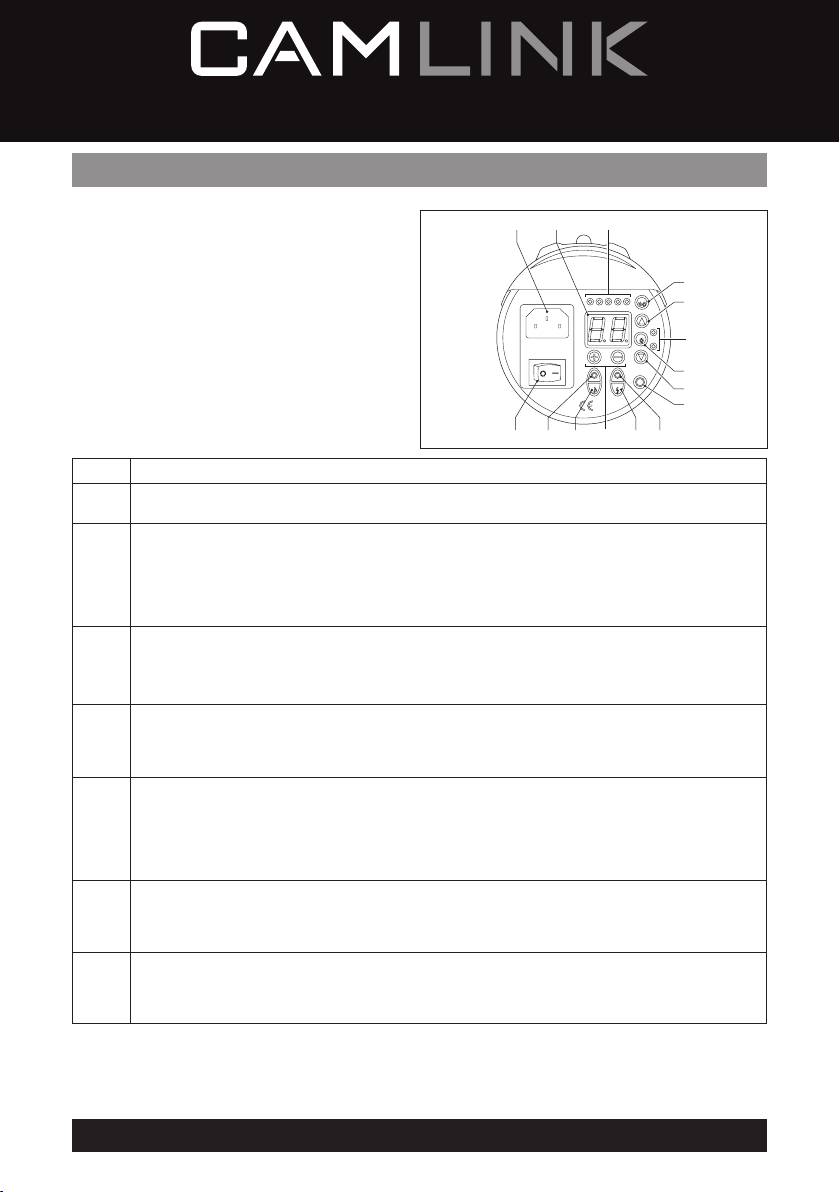
Control panel
1. Mains plug connection
1
7
10
2. On/o switch
3. Lamp selection button
4. Lamp indicator
9
5. Power control buttons (lamp)
CELL
12345
5
6. Power control buttons (ash tube)
7. Display
LAMP
4
8. Sync plug connection
9. Sync button
SYNC
3
10. Sync indicators
SOUND
TEST
11. Sound button
~220-240V/50Hz
5
8
12. Sound indicator
13. Test button
2
12 11 13 14
6
14. Test indicator
1 • Connect the mains plug to the mains plug connection.
• To switch on the device, set the on/o switch to the “I“ position.
2
• To switch o the device, set the on/o switch to the “O“ position.
• Press the lamp selection button 1x to adjust the lamps synchronously.
The upper lamp indicator is on. The lower lamp indicator is o.
• Press the lamp selection button 2x to adjust the lamps independently.
3/4
The upper and lower lamp indicator are on.
• Press the lamp selection button 3x to switch o the lamp.
The upper and lower lamp indicator are o.
• Press the upper power control button to increase the power output of the lamp.
The display shows the power output.
5/7
• Press the lower power control button to decrease the power output of the lamp.
The display shows the power output.
• Press the power control button “+“ to increase the power output of the ash tube.
The display shows the power output.
6/7
• Press the power control button “-“ to decrease the power output of the ash tube.
The display shows the power output.
• Insert the sync plug of the remote control into sync plug connection.
• Press the sync button 1x to set the standard sync mode. Sync indicator 1 comes on.
• Press the sync button 2x to set the 0.5s-delay sync mode. Sync indicator 2 comes on.
8/9/10
• Press the sync button 3x to set the 2x-trigger delay sync mode. Sync indicator 3 comes on.
• Press the sync button 4x to set the 3x-trigger delay sync mode. Sync indicator 4 comes on.
• Press the sync button 5x to set the 4x-trigger delay sync mode. Sync indicator 5 comes on.
• Press the sound button to activate a buzz sound during charging.
The sound indicator comes on.
11/12
• Press the sound button again to deactivate a buzz sound during charging.
The sound indicator goes o.
• Press the test button to start testing the operation of the ash light.
The test indicator comes on.
13/14
• Press the test button to stop testing the operation of the ash light.
The test indicator goes o.
6
English
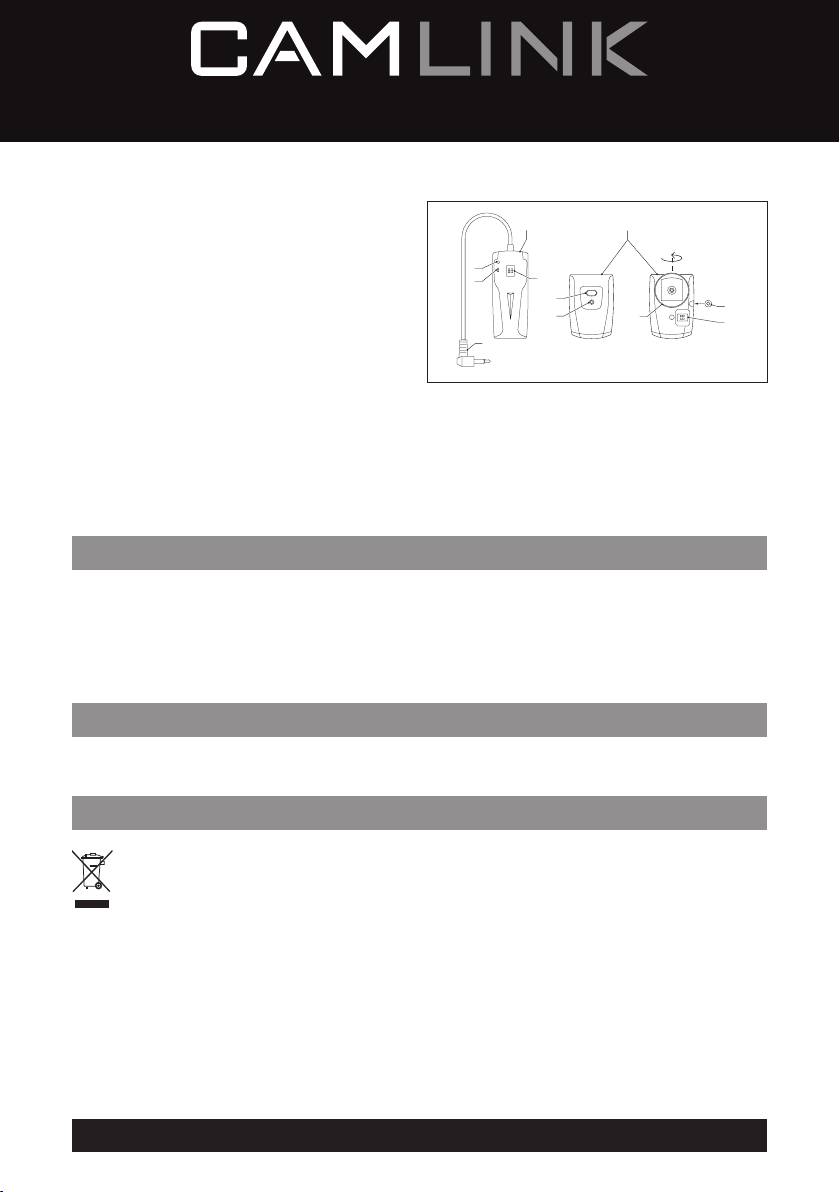
Remote control
1. Receiver
2. Receiver indicator
1
6
3. On/o switch
4. Channel code switch
ON
5. Sync plug
2
12
3
4
6. Transmitter
8
7. Transmitter indicator
11
12
ON
7
10
8. Test button
9
9. Channel code switch
5
10. Camera hot shoe mount
11. PC cable connection
• Insert the sync plug (5) into the sync plug connection of the ash light.
• Set the on/o switch (3) to the on position.
• Set the same channel code for the receiver (1) and the transmitter (6) using the channel code switches (4/9).
• Press the test button (8). The receiver indicator (2) and the transmitter indicator (7) come on.
• Attach the camera hot shoe mount (10) to the camera hot shoe. If the camera does not have a hot shoe, use the
supplied PC cable to connect the transmitter and the camera.
• Press the camera shutter.
Cleaning and maintenance
Warning!
• Do not use cleaning solvents or abrasives.
• Do not clean the inside of the device.
• Do not attempt to repair the device. If the device does not operate correctly, replace it with a new device.
• Clean the outside of the device using a soft, damp cloth.
Warranty
Any changes and/or modications to the product will void the warranty. We cannot accept any liability for damage
caused by incorrect use of the product.
Disposal
• The product is designated for separate collection at an appropriate collection point. Do not dispose of the product
with household waste.
• For more information, contact the retailer or the local authority responsible for waste management.
7
English
Technical data
Flash light
Mains voltage 220-240 V
AC
Mains frequency 50 Hz
Exposure index 62 GN
Recycling time 0.2-2.2 s
Colour temperature 5600±100K
Power control
Lamp
1.0-6.0
Flash tube
1.0-6.0
Halogen lamp, G6.35, 2-pin
Lamp
75 W (max. 100 W)
Remote control
Batteries (receiver) AAA (2x), 1.5 V
Channels 1 (RT-01) / 2 (RT-02) / 4 (RT-04) / 16 (RT-16)
Operation distance
Indoor
≥ 20
Outdoor
≥ 20~30 m
Sync speed 1/200 s
Documents
The product has been manufactured and supplied in compliance with all relevant regulations and directives, valid for
all member states of the European Union. The product complies with all applicable specications and regulations in the
country of sales.
Formal documentation is available upon request. The formal documentation includes, but is not limited to the
Declaration of Conformity, the Material Safety Data Sheet and the product test report.
Disclaimer
Designs and specications are subject to change without notice. All logos, brands and product names are trademarks or
registered trademarks of their respective holders and are hereby recognized as such.
8
