Vitek VT-3750: Гарантийный талон
Гарантийный талон: Vitek VT-3750
Оглавление
- Гарантийный талон
- УСЛОВИЯ ГАРАНТИЙНОГО ОБСЛУЖИВАНИЯ
- ЗАЖИМ ДЛЯ КРЕПЛЕНИЯ НА ПОЯСЕ ЧИСТКА КОРПУСА СПЕЦИФИКАЦИЯ
- УСИЛЕНИЕ НИЗКИХ ЧАСТОТ УСТАНОВКА ТЕКУЩЕГО ВРЕМЕНИ УСТАНОВКА ЗВУКОВОГО СИГНАЛА
- ВОСПРОИЗВЕДЕНИЕ ЗАПРОГРАММИРОВАННЫХ РАДИОСТАНЦИЙ ВОСПРОИЗВЕДЕНИЕ КАССЕТЫ
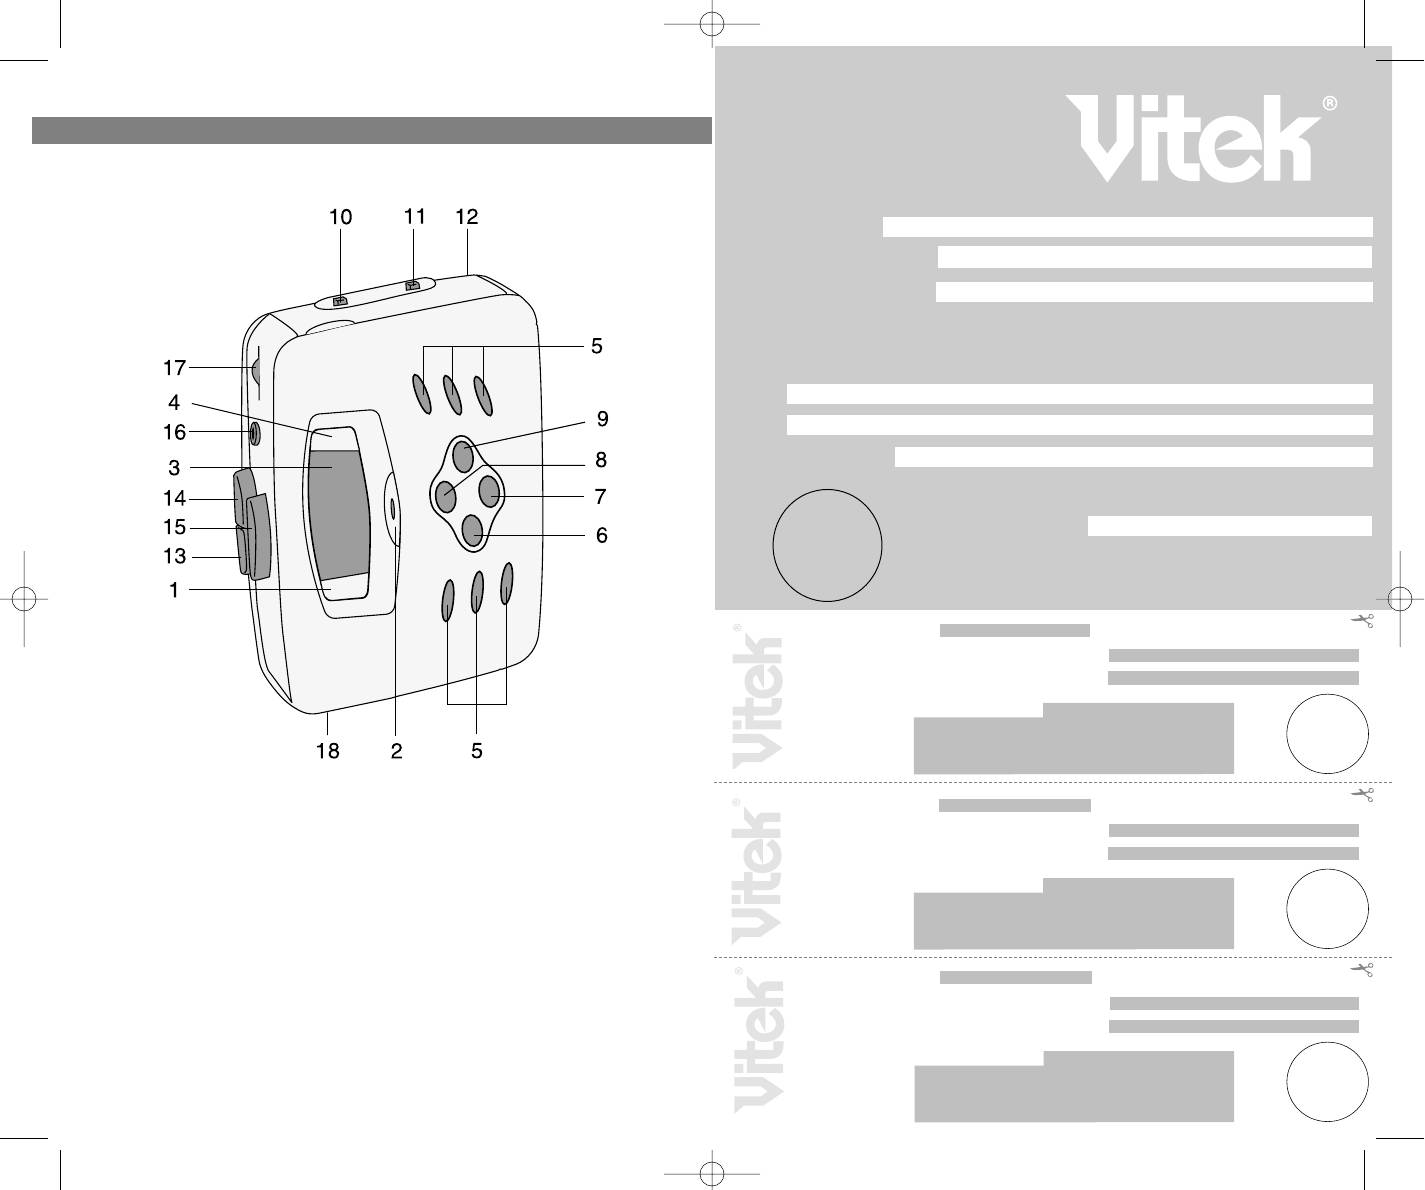
- РАСПОЛОЖЕНИЕ ЭЛЕМЕНТОВ УПРАВЛЕНИЯ ПИТАНИЕ ОТ БАТАРЕЕК ПИТАНИЕ ОТ СЕТИ РАДИОПРИЕМНИК ПРОГРАММИРОВАНИЕ РАДИОСТАНЦИЙ
ENGLISH
Гарантийный талон
NAMES OF PARTS
Сведения о покупке
Модель:
Серийный №:
RCP 375000000
Дата покупки:
Сведения о продавце
Название и адрес продающей организации
Телефон:
Подтверждаю получение исправного изделия, с условиями гарантии ознакомлен
Подпись покупателя
М.П.
Внимание!
Гарантийный талон действителен только при наличии печати
продающей организации
Модель: Серийный №:
RCP 375000000
Дата поступления в ремонт:
Дата выполнения ремонта:
Вид ремонта:
М.П.
Купон №3
Модель: Серийный №:
RCP 375000000
1. TUNING DOWN BUTTON
11.RADIO / TAPE (RADIO OFF)
Дата поступления в ремонт:
2. ALARM OFF BUTTON
FUNCTION SWITCH
Дата выполнения ремонта:
3. DISPLAY WINDOW
12.BATTERY COMPARTMENT
Вид ремонта:
4. TUNING UP BUTTON
(REAR)
М.П.
5. PRESET MEMORY BUTTONS
13. TAPE STOP BUTTON
Купон №2
6. MEMORY UP BUTTON
14. TAPE FAST FORWARD BUTTON
7. MEMORY STORE/CLOCK SET
15. TAPE PLAY BUTTON
BUTTON
16. HEADPHONE JACK
Модель: Серийный №:
RCP 375000000
8. DUAL TIME/BAND BUTTON
17. VOLUME CONTROL
Дата поступления в ремонт:
9. MEMORY DOWN BUTTON
18. DC JACK
Дата выполнения ремонта:
10. BASS BOOST SWITCH
Вид ремонта:
М.П.
2
Купон №1
3750.qxd 02.07.03 15:35 Page 4
ENGLISH
DISPLAY WINDOW
BATTERY INSTALLATION
Open the battery compartment located on the unit, and insert two size AA
batteries observing the battery polarity indicated on the set. Wrong polar
ity may damage the unit. We recommend Alkaline batteries for longer life.
NOTE: weak or dead batteries may swell and leak. To avoid damaging the
unit. Remove batteries when the unit is not to be used for a long period of
time, or when the batteries become exhausted.
• Do not mix old and new batteries.
• Do not mix alkaline, standard (carbonzinc) or rechargeable (nickel
cadmium) batteries.
NOTE: Once the batteries are low, the symbol "BAT" will be shown on the
LCD and flash.
NOTE: After you change the batteries, the preseted stations will be lost
and you will have to reprogram the memory.
EXTERNAL AC ADAPTER
This unit can be powered by an AC outlet.
Be careful to use an AC adaptor, which is correctly matched to your unit.
Your cassette radio requires a DC input of 3V (300mA or more) with a polar
ity. This AC adaptor can be purchased separately.
RADIO OPERATION
NORMAL TUNING
1. Insert the headphone plug into the Headphone jack. Unbunch the
headphone wire because this is also your FM Antenna.
2. Slide the Function switch the Radio position.
3. Select the desired band by pressing the band button.
4. Tune a station by pressing the Tuning UP or DOWN button.
5. If the stereo broadcasting station is receiving at FM band , The symbol
"ST" will be shown on the LCD..
6. Adjust the Volume Control.
7. To turn off the radio, set the Function switch to TAPE position.
MEMORY TUNING
UP TO 10 AM STATIONS AND 10 FM STATIONS CAN BE STORED IN MEM
ORY.
3
14
3750.qxd 02.07.03 15:35 Page 6


