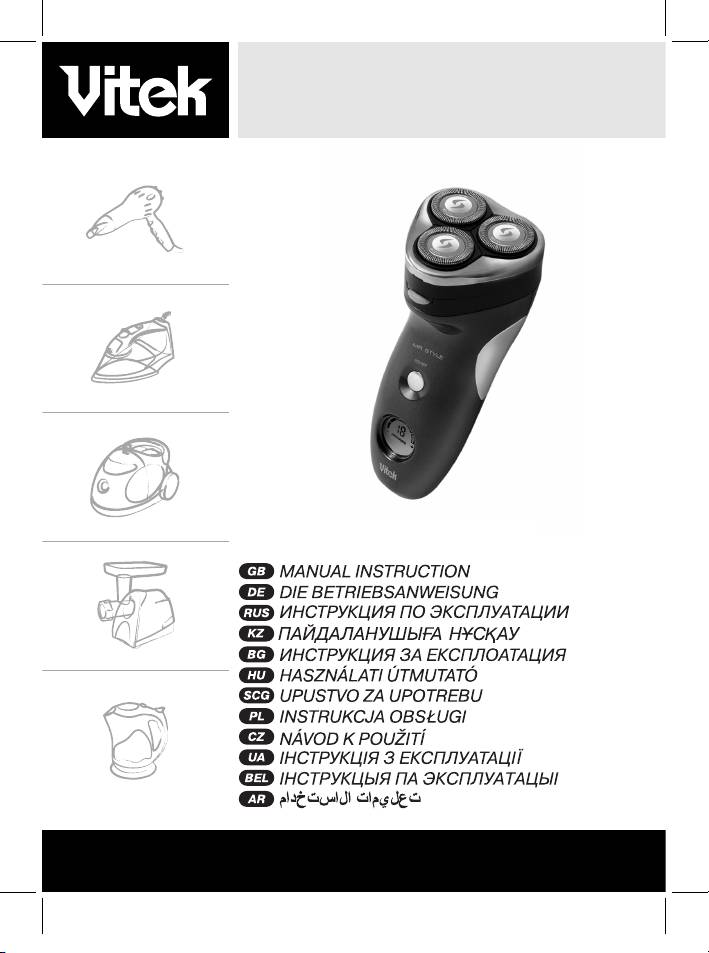
Vitek VT-1379 B: инструкция
Раздел: Красота, здоровье, спорт. туризм, хобби
Тип: Электрическая Бритва
Инструкция к Электрической Бритве Vitek VT-1379 B
Оглавление
Mr.Style
VT-1379 B
MANUAL INSTRUCTION
5
8
11
14
17
20
23
26
29
32
35
38
www.vitek-aus.com
1379.indd 11379.indd 1 28.02.2006 10:37:4028.02.2006 10:37:40
1379.indd 21379.indd 2 28.02.2006 10:37:4028.02.2006 10:37:40
1379.indd 31379.indd 3 28.02.2006 10:37:4128.02.2006 10:37:41

1379.indd 41379.indd 4 28.02.2006 10:37:4128.02.2006 10:37:41

ENGLISH
RECHARGEABLE SHAVER
play, then the rechargeable battery
needs to be charged.
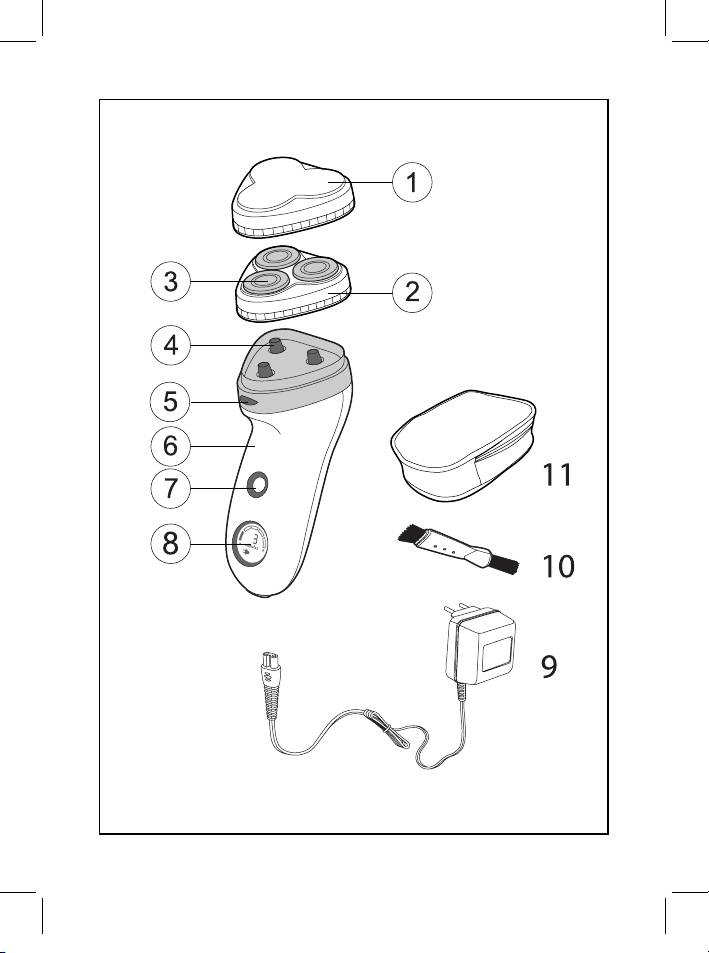
DESCRIPTION
- If the power plug symbol blinks on
1. Protective cap
the display, then the rechargeable
2. Shaver block
batteries needs to be charged.
3. Rotating blades
4. Blade drive
Attention!
5. Shaver block locking button
- Do not charge the rechargeable
6. Shaver housing
batter for more than 10 hours or
7. Power switch
in temperatures lower than 0°C or
8. LCD display
higher than 40°C, as this can cause
9. Charger
damage.
10. Cleaning brush
- If the shaver is not used for more
11. Travel bag
than 20 days, then it should be
charged for six hours.
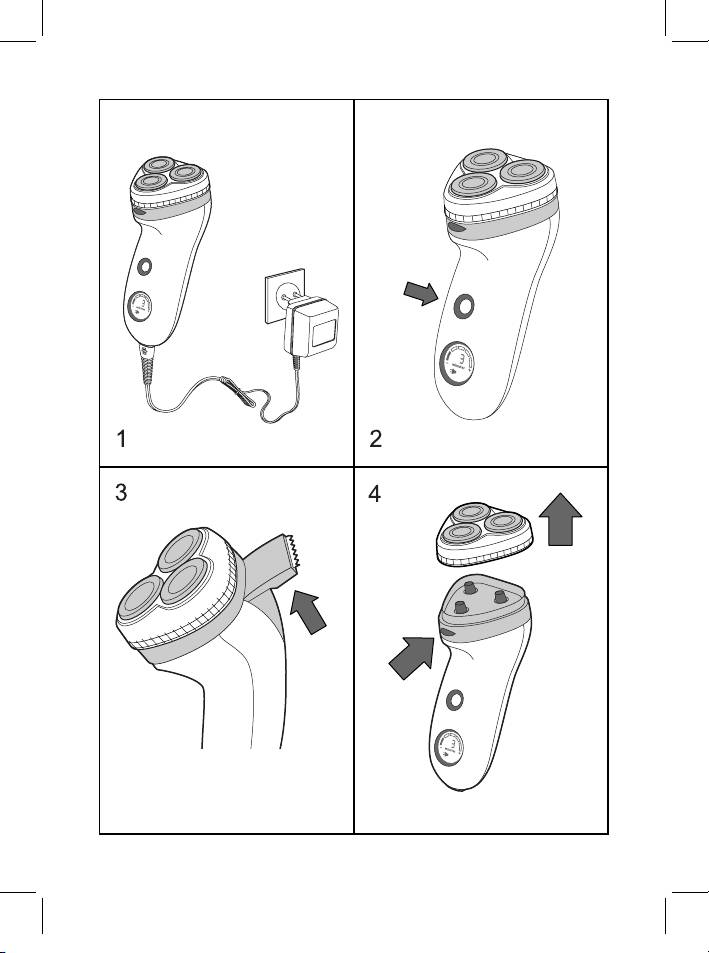
Charging (Fig.1)
Before using the shaver for the first
Using the Shaver
time or after a long period of disuse, it
The shaver achieves the best results
should be charged for 6 hours.
when your skin is dry.
- Insert the charger plug (9) into the
Your skin may need 2-3 weeks to ad-
charging socket on the bottom side
just to this shaving system.
of the housing and connect the
- Remove the protective cap (1).
charger to the electrical network;
- Turn the power switch (7) to on;
the charging indicator (8) will show
the backlight of the LCD display will
all necessary information.
light for approximately 20 seconds;
- Supplemental charging cycles of
the display will show the approxi-
the rechargeable battery should
mate remaining shaver operating
not exceed two hours.
time and the corresponding sector
symbol.
Note:
- Lightly touch the skin, moving
- Upon connecting the charger to
around the shaver block, complet-
electricity, the power plug symbol
ing simultaneous front-back and
will appear and five audible signals
rotating motions.
will be emitted.
- After shaving, turn of the device us-
- During charging, the display will
ing the power switch (7), cover the
show the remaining operating time
shaver block with the cap (1) and
of the shaver and the symbol of the
store the shaver.
corresponding sector. The maxi-
mum possible operating time of the
Using the trimmer (Pic. 2, 3)
shaver is around 40 minutes.
The trimmer is designed for evening
- If, during shaving, the shaver emits
whiskers and caring for mustaches.
five audible signals and the power
- Move the trimmer switch to the
plug symbol appears on the dis-
upper position.
5
1379.indd 51379.indd 5 28.02.2006 10:37:4128.02.2006 10:37:41

ENGLISH
- Turn on the shaver with the switch
the optimal operating characteris-
(7).
tics of each pair of blades.
- Position the shaver at the correct
If you accidentally confuse a blade
angle to the skin and move it gradu-
block, it may take several weeks to
ally down, evening the whiskers.
restore optimal shaving character-
- Turn off the shaver and move the
istics.
trimmer switch to the lower posi-
- Clean the rotating blade with the
tion.
brush. Use the side of the brush
with the short bristles.
Cleaning the shaver
- Clean the non-moving blades with
- Press the shaving block locking but-
the brush.
ton (5) to open the shaving block
- Replace the shaving heads onto
(Pic. 4).
the shaving block, install the lock-
- Using the brush (10), clean the
ing frame and turn the ring clock-
shaving block inside and out, and
wise.
also the blade drive (Pic. 5,6).
- Turn the non-moving blades clock-
- The shaving block can be washed
wise/counter-clockwise to lock
under a stream of warm water (Pic.
their plastic frame.
6). Dry the shaving block com-
- Re-install the shaving block onto
pletely before closing.
the shaver.
Do not allow water into the electric
shaver's body.
Trimmer
After completely dry, close the
- Clean the trimmer after each use.
shaving block, reinstall the protec-
- Turn off the electric shaver.
tive cap (1) and put away for stor-
- Clean the trimmer using the brush
age.
(10) included in the package.
- Apply drops of sewing machine or
It is recommended to clean the
hair clipper oil to the trimmer every
shaving heads once every two
six months.
months (Pic. 7, 8)
- Turn off the electric shaver.
Replacing the shaving heads
- Press the locking button (5) and
(Pic. 7, 8)
remove the shaving block (pic.4).
To achieve optimal results from your
- Turn the ring counter-clockwise
shaver, replace the shaving blocks
and remove the locking frame.
every 2 years.
- Remove and clean the shaving
- Turn off the electric shaver.
heads (separately rotating and
- Press the locking button (5) and
non-moving blades).
remove the shaving block (2).
Do not confuse the rotating and
- Turn the ring counter-clockwise
non-moving blades. This is impor-
and remove the locking frame.
tant because the rotating and non-
- Replace the shaving heads, install
moving blades of each head adjust
the locking frame and turn the ring
to one-another, which guarantees
clockwise.
6
1379.indd 61379.indd 6 28.02.2006 10:37:4128.02.2006 10:37:41
ENGLISH
- Turn the non-moving blades clock-
• If the shaver isn't working properly,
wise/counter-clockwise to lock
take it to an authorized service cen-
their plastic frame.
ter.
- Re-install the shaving block onto
• Only use the shaver for the pur-
the shaver.
poses intended, as instructed in
these instructions.
PROTECTING THE ENVIRONMENT
This shaver contains rechargeable
This device is designed for domestic
batteries. Before disposing of the
use only.
expired electric shaver, remove the
batteries and dispose of them accord-
TECHNICAL CHARACTERISTICS
ing to the laws of your country for
Charger
disposal of harmful waste.
Power supply: АС 220 V ~ 50 Hz
Do not throw the shaver away until
Output voltage: DC 3.2 V
you remove the built-in rechargeable
batteries.
The manufacturer reserves the right
to change the device characteristics
WARNINGS
without prior notice.
• Do not charge the batteries in plac-
es where the temperature is lower
Service life - no less than 3 years.
than 0°С or higher than 40°С, or
they are exposed to direct sunlight,
GUARANTEE
near heat sources or places with
Details regarding guarantee condi-
high levels of humidity.
tions can be obtained from the dealer
• Only use the charging device that
from whom the appliance was pur-
came with the shaver.
chased. The bill of sale or receipt must
• Keep the charger away from water
be produced when making any claim
and do not attempt to touch it with
under the terms of this guarantee.
wet hands.
• Store the charger in a dry and safe
This product conforms to
place; protect it from damage.
the EMC-Requirements as
• Do not use the charger in plac-
laid down by the Council
es where it can accidentally get
Directive 89/336/EEC and to
bumped into the bathtub or sink.
the Low Voltage Regulation
• Do not press up on the non-moving
(73/23 EEC)
shaving head screens in order to
avoid damage.
• To avoid injury, do not use the shav-
er if the external shaving screen or
internal cutting blades are dam-
aged.
• Do not push on the LCD display in
order to avoid damage.
7
1379.indd 71379.indd 7 28.02.2006 10:37:4128.02.2006 10:37:41

DEUTSCH
ELEKTRORASIERER
- Wenn auf dem Display das Steckga-
bel-Piktogramm blinkt, muss die Ak-
BESCHREIBUNG
kubatterie nachgeladen werden.
1. Schutzkappe
2. Rasierblock
Achtung!
3. Rotierklingen
- Laden Sie die Akkubatterie nicht län-
4. Klingenantrieb
ger als 10 Stunden und bei einer Tem-
5. Taste der Rasierblocksperre
peratur nicht unter 0°C und über 40°C
6. Gehäuse des Rasierers
auf, da das zu einer Beschädigung
7. Speiseschalter mit Sperrtaste
führen kann.
8. LCD-Display
- Wenn Sie den Rasierer über 20 Tage
9. Ladegerät
nicht benutzen, laden Sie ihn sechs
10. Reinigungsbürste
Stunden land auf.
11. Reiseetui
Anwendung
Aufladung (Abb.1)
Die besten Ergebnisse beim Rasieren
Vor der ersten Anwendung des Rasierers
erhalten Sie in dem Fall, wenn Ihre Haut
oder nach einer längeren Pause in der
trocken ist.
Anwendung ist eine 6 Stunden lange Auf-
Ihre Haut kann 2-3 Wochen brauchen,
ladung der Akkubatterie erforderlich.
um sich an dieses Rasiersystem zu ge-
- Stecken Sie den Stecker des Lade-
wöhnen.
geräts (9) in die Ladebüchse auf dem
- Nehmen Sie die Schutzkappe (1) ab.
Unterteil des Gehäuses und schließen
- Schalten Sie den Rasierer mit dem
Sie das Ladegerät an das Stromnetz
Schalter (7) ein, dabei wird sich die
an, dabei wird auf dem Display (8) die
Beleuchtung des LCD-Displays ein-
notwendige Information angezeigt.
schalten und etwa 20 Sek. Lang
- Die nachfolgenden Ladezyklen der
leuchten, und auf dem Display wird
Akkubatterie dürfen nicht mehr als
die ungefähre Betriebsdauer des Ra-
zwei Stunden betragen.
sierers und das Piktogramm des ent-
sprechenden Sektors angezeigt.
Anmerkung:
- Bewegen Sie in leichtem Hautkontakt
- Beim Anschluss des Ladegeräts an
den Rasierblock leicht drehend vor
das Stromnetz wird as Piktogramm in
und zurück.
Form einer Steckgabel ständig leuch-
- Schalten Sie das Gerät nach dem
ten und es ertönen fünf Tonsignale.
Rasieren mit dem Schalter (7) aus,
- Während der Aufladung wird auf dem
schließen Sie den Rasierblock mit der
Display die Zeit angezeigt, innerhalb
Schutzkappe (1) und räumen Sie den
welcher der Rasierer arbeiten kann,
Rasierer zur Aufbewahrung weg.
und das Piktogramm des entspre-
chenden Sektors. Die Maximale Be-
Anwendung des Trimmers (Abb. 2, 3)
triebszeit des Rasierers beträgt etwa
Der Trimmer ist zum Stützen von
40 Minuten.
Schläfen und zur Schnurrbartpflege
- Wenn während der Arbeit des Rasie-
bestimmt.
rers fünf Tonsignale erklingen und das
- Schieben Sie den Trimmerschalter
Piktogramm in Form einer Steckga-
nach oben.
bel erscheint, muss die Akkubatterie
- Schalten Sie den Rasierer mit dem
nachgeladen werden.
Schalter (7) ein.
8
1379.indd 81379.indd 8 28.02.2006 10:37:4128.02.2006 10:37:41

DEUTSCH
- Setzen Sie den Trimmer im richtigen
und die feststehenden Messer jedes
Winkel an die Haut und bewegen Sie
Scherkopfes aneinander angepasst
ihn langsam nach unten, während Sie
sind, was die optimalen Betriebswerte
den Schnurrbart oder die Schläfen
jedes Klingenpaares gewährt. Wenn
stützen.
Sie die Messersets zufällig verwech-
- Schalten Sie den Rasierer ab und
selt haben sollten, kann es einige
schieben Sie den Trimmerschalter
Wochen dauern, bis sich das optimale
nach unten.
Rasurergebnis wieder einstellt.
- Reinigen Sie das rotierende Messer
Reinigung des Rasierers
mit dem Pinsel. Verwenden Sie
- Pressen Sie die Fixiertaste des
dazu die Pinselseite mit den kurzen
Scherblocks (5), dabei öffnet sich der
Borsten.
Scherblock und gewährt den Zugang
- Reinigen Sie das feststehende Messer
für die Reinigung (Abb. 4).
mit dem Pinsel.
- Säubern Sie mit dem Pinsel (10)
- Setzen Sie die Scherköpfe in den
die Innen- und Außenseiten des
Scherblock ein, setzen Sie das
Scherblocks, sowie den Klingenantrieb
Fixierrähmchen auf und drehen Sie
(Abb. 5,6).
das Rädchen im Uhrzeigersinn.
- Der Scherblock kann unter einem
- Drehen Sie die feststehenden Messer
Warmwasserstrahl ausgewaschen
im/gegen den Uhrzeigersinn, um sie
werden (Abb. 6). Lassen Sie den
mit dem Plastikrähmchen zu fixieren.
Scherblock vollständig trocknen,
- Setzen Sie den Scherblock zurück auf
bevor Sie ihn schließen. Vermeiden
den Elektrorasierer auf.
Sie das Gelangen von Wasser in
das Gehäuse des Elektrorasierers.
Trimmer
Schließen Sie den Scherblock nach
- Reinigen Sie den Trimmer nach jeder
dem vollständigen Trocknen, setzen
Anwendung.
Sie die Schutzkappe (1) auf und räu-
- Schalten Sie den Elektrorasierer ab.
men Sie ihn zur Aufbewahrung weg.
- Reinigen Sie den Trimmer mit dem
mitgelieferten Pinsel (10).
Es wird empfohlen die Scherköpfe
- Schmieren Sie den Trimmer alle
jede zwei Monate zu reinigen
sechs Monate mit einem Tropfen
(Abb. 7, 8)
Öl für Nähmaschinen oder
- Schalten Sie den Elektrorasierer ab.
Haarschneidemaschinen.
- Pressen Sie die Fixiertaste (5) und
nehmen Sie ihn ab (Abb. 4).
Auswechseln der Scherköpfe
- Drücken Sie leicht auf das Rädchen,
(Abb. 7, 8)
drehen Sie es gegen den Uhrzeigersinn
Um optimale Ergebnisse beim Rasieren
und nehmen Sie das Fixierrähmchen
zu erhalten, sollten Sie die Scherköpfe
ab.
alle zwei Jahre auswechseln.
- Nehmen Sie die Scherköpfe ab und
- Schalten Sie den Elektrorasierer aus.
reinigen Sie sie (die rotierenden und
- Pressen Sie die Fixiertaste (5) und
die feststehenden Messer sind sepa-
nehmen Sie den Scherblock ab.
rat zu säubern).
- Drehen Sie das Rädchen der
Verwechseln Sie die rotierenden und
Fixiervorrichtung gegen den
die feststehenden Messer nicht.
Uhrzeigersinn und nehmen Sie das
Das ist wichtig, da die rotierenden
Fixierrähmchen ab.
9
1379.indd 91379.indd 9 28.02.2006 10:37:4228.02.2006 10:37:42
DEUTSCH
- Wechseln Sie die Scherköpfe aus,
beschädigten äußeren Schergittern
setzen Sie den Fixierrahmen wieder
oder den inneren Schermesser, um
auf und drehen Sie das Rädchen im
Verletzungen zu vermeiden.
Uhrzeigersinn.
• Drücken Sie mit den Händen auf
- Drehen Sie die feststehenden Messer
das LCD-Display, um dessen
im/gegen den Uhrzeigersinn, um sie
Beschädigung zu vermeiden.
mit dem Plastikrähmchen zu fixieren.
• Wenn der Rasierer nicht korrekt funk-
- Setzen Sie den Scherblock auf den
tioniert, wenden Sie sich an ein auto-
Elektrorasierer auf.
risiertes Service-Center.
• Verwenden Sie den Rasierer nur
UMWELTSCHUTZ
gemäß seiner Bestimmung, wie es in
Dieser Rasierer enthält eine Akkubatterie,
dieser Bedienungsanleitung angege-
die entsorgt werden muss. Bevor Sie
ben ist.
einen unbrauchbaren Rasierer loswer-
Dieser Artikel ist nur für den Gebrauch im
den, muss zuerst die Akkubatterie daraus
Privathaushalt bestimmt.
entfernt werden. Handeln Sie danach
gemäß den landesgültigen Regelungen
TECHNISCHE KENNDATEN
für die Entsorgung von schädlichen
Ladegerät:
Abfallstoffen. Werfen Sie den Rasierer
Speisespannung: AC 220 V ~ 50 Hz
nicht weg, bevor Sie die eingebaute
Ausgangsspannung: DC 3,2 V
Akkubatterie nicht entfernt haben.
Der Hersteller behält sich das Recht vor
WARNUNGEN
die Charakteristiken des Gerätes ohne
• Laden Sie die Akkubatterie des
Vorbescheid zu ändern.
Elektrorasierers nicht an Orten auf,
wo die Temperatur unter 0°C und
Die Lebensdauer des Gerätes beträgt
über 40°C liegt, sowie auch nicht
nicht weniger als 3 Jahre
unter direkten Sonnenstrahlen, neben
Heizgeräten oder an Orten mit hoher
Gewährleistung
Luftfeuchtigkeit.
Ausführliche Bedingungen der
• Benutzen Sie zu Aufladen des
Gewährleistung kann man beim Dealer,
Rasierers nur das mitgelieferte
der diese Geräte verkauft hat, bekom-
Ladegerät.
men. Bei beliebiger Anspruchserhebung
• Halten Sie das Ladegerät von Wasser
soll man während der Laufzeit der vor-
fern und fassen Sie es nicht mit feuch-
liegenden Gewährleistung den Check
ten Händen an.
oder die Quittung über den Ankauf
• Bewahren Sie das Gerät an einem
vorzulegen.
trockenen und sicheren Platz auf,
schützen Sie es vor Beschädigungen.
Das vorliegende Produkt
• Bewahren Sie das Ladegerät nicht an
entspricht den Forderungen
solchen Stellen auf, von denen es in
der elektromagnetischen
die Badewanne oder ins Waschbecken
Verträglichkeit, die in
fallen könnte.
89/336/EWG -Richtlinie des
• Üben Sie keinen Druck auf die fest-
Rates und den Vorschriften
stehenden Gitter der Scherköpfe, um
73/23/EWG über die
deren Beschädigung zu vermeiden.
Niederspannungsgeräte vor-
• Benutzen Sie den Rasierer nicht mit
gesehen sind.
10
1379.indd 101379.indd 10 28.02.2006 10:37:4228.02.2006 10:37:42

РУССКИЙ
ЭЛЕКТРОБРИТВА
вижные сетки бреющих головок, во
ОПИСАНИЕ
избежании их повреждения.
1. Защитный колпачок
• Во избежание травм не пользуйтесь
2. Бреющий блок
бритвой, если повреждены внешние
3. Вращающиеся лезвия
бреющие сетки или внутренние ре-
4. Привод лезвий
жущие ножи.
5. Кнопка фиксатора бреющего блока
• Не нажимайте руками на LCD-ди-
6. Корпус бритвы
сплей, чтобы избежать его повреж-
7. Выключатель питания с кнопкой
дения.
блокировки
• Если бритва не работает должным
8. LCD-дисплей
образом, обратитесь с авторизован-
9. Зарядное устройство
ный сервисный центр.
10. Кисточка для чистки
• Всегда пользуйтесь бритвой только
11. Дорожная сумка
по назначению, как указано в данной
инструкции.
Внимание!
- Не заряжайте аккумуляторную бата-
Изделие предназначено только для бы-
рею свыше 10 часов и при темпера-
тового использования.
туре ниже 0°С и выше 40°С, т.к. это
может привести к ее повреждению.
Зарядка (Рис.1)
- Если вы не используете бритву свы-
Перед первым использованием брит-
ше 20 дней, зарядите ее в течение
вы или после длительного перерыва в
шести часов.
ее эксплуатации необходима 6-часо-
вая зарядка аккумуляторной батареи.
ПРЕДУПРЕЖДЕНИЯ
- Вставьте разъем зарядного устрой-
• Не заряжайте аккумуляторную ба-
ства (9) в гнездо зарядки с нижней
тарею электробритвы в местах с
стороны корпуса и включите заряд-
температурой ниже 0°С и выше 40°С,
ное устройство в сеть, при этом на
а также под прямыми солнечными
дисплее (8) будет отображаться не-
лучами, около нагревательных при-
обходимая информация.
боров или в местах с повышенной
- Повторные циклы зарядки аккуму-
влажностью.
ляторной батареи не должны превы-
• Для подзарядки бритвы пользуйтесь
шать двух часов.
только зарядным устройством, вхо-
дящим в комплект поставки.
Примечание:
• Держите зарядное устройство по-
- При включении зарядного устрой-
дальше от воды и не дотрагивайтесь
ства в сеть, пиктограмма в виде
до него влажными руками.
сетевой вилки будет светиться по-
• Храните зарядное устройство в су-
стоянно и прозвучат пять звуковых
хом и безопасном месте и обере-
сигналов.
гайте его от повреждений.
- Во время зарядки на дисплее ото-
• Не храните зарядное устройство в
бражается время, в течение которо-
таких местах, где оно может упасть
го может работать бритва и пикто-
в ванну или в раковину.
грамма соответствующего сектора.
• Не надавливайте сверху на непод-
11
1379.indd 111379.indd 11 28.02.2006 10:37:4328.02.2006 10:37:43

РУССКИЙ
Максимально возможное время ра-
ным углом к коже и передвигайте его
боты бритвы около 40 минут.
постепенно вниз, подравнивая усы
- Если во время работы бритвы про-
или виски.
звучат пять звуковых сигналов и по-
- Выключите бритву и сдвиньте пере-
явится пиктограмма в виде сетевой
ключатель триммера по направле-
вилки, то необходимо произвести
нию вниз.
зарядку аккумуляторной батареи.
- Если на дисплее мигает пиктограм-
Чистка бритвы
ма в виде сетевой вилки, то аккуму-
- Нажмите на кнопку фиксатора брею-
ляторную батарею необходимо за-
щего блока (5), и снимите бреющий
рядить.
блок (2) (Рис. 4).
- Использую кисточку (10), прочисти-
Использование
те бреющий блок с внутренней и с
Наилучшие результаты бритья дости-
наружной стороны, а также привод
гаются в том случае, если ваша кожа
лезвий (Рис. 5, 6).
сухая.
- Допускается промывка бреющего
Вашей коже может потребоваться 2-3
блока под струей теплой воды (Рис.
недели для того, чтобы привыкнуть к
6). Полностью просушите бреющий
данной бритвенной системе.
блок, прежде чем его закрыть. Из-
- Снимите защитный колпачок (1).
бегайте попадания воды в корпус
- Включите бритву выключателем (7),
электробритвы.
при этом включиться и будет го-
После полного высыхания закройте
реть в течение приблизительно 20
бреющий блок, оденьте на него, за-
сек. подсветка LCD-дисплея, а на
щитный колпачок (1) и уберите брит-
дисплее будет показываться при-
ву на хранение.
близительное время работы бритвы
и пиктограмма соответствующего
Один раз в два месяца рекоменду-
сектора.
ется очищать бритвенные головки
- Слегка касаясь кожи, перемещайте
(Рис.7, 8)
бреющий блок, совершая одновре-
- Выключите электробритву.
менно возвратно-поступательные и
- Нажмите кнопку фиксатора (5) и
вращательные движения.
снимите бреющий блок (2) (Рис. 4).
- По окончании бритья выключите
- Поверните колесико фиксатора про-
устройство выключателем (7), за-
тив часовой стрелки и снимите фик-
кройте бреющий блок защитным
сирующую рамку.
колпачком (1) и уберите бритву на
- Снимите и очистите бритвенные го-
хранение.
ловки (отдельно вращающиеся и не-
подвижные ножи).
Использование триммера (Рис. 2, 3)
Не перепутайте вращающиеся и не-
Триммер предназначен для подравни-
подвижные ножи.
вания висков и для ухода за усами.
Это важно, поскольку вращающийся
- Сдвиньте переключатель триммера
и неподвижный ножи каждой голов-
по направлению вверх.
ки подогнаны друг к другу, что га-
- Включите бритву выключателем (7).
рантирует оптимальные рабочие ха-
- Расположите триммер под правиль-
рактеристики каждой пары ножей.
12
1379.indd 121379.indd 12 28.02.2006 10:37:4328.02.2006 10:37:43

РУССКИЙ
Если вы случайно перепутали ком-
и поверните колесико по часовой
плекты ножей, то может потребо-
стрелке.
ваться несколько недель для того,
- Поверните неподвижные ножи по/
чтобы восстановить оптимальные
против часовой стрелке для фикса-
характеристики бритья.
ции их пластмассовой рамкой.
- Очистите вращающийся нож с по-
- Установите бреющий блок на элек-
мощью кисточки.
тробритву.
Используйте сторону кисточки с ко-
роткой щетиной.
ЗАЩИТА ОКРУЖАЮЩЕЙ СРЕДЫ
- Очистите неподвижный нож при по-
Данная бритва содержит аккумуля-
мощи кисточки.
торную батарею, подлежащую утили-
- Установите бритвенные головки в
зации.
бреющий блок, установите фикси-
Перед тем как избавиться от при-
рующую рамку и поверните колеси-
шедшей в негодность электробритвы,
ко по часовой стрелке.
необходимо извлечь из нее аккумуля-
- Поверните неподвижные ножи по/
торную батарею и действовать по при-
против часовой стрелке для фикса-
нятым в вашей стране правилам утили-
ции их пластмассовой рамкой.
зации вредных отходов.
- Установите бреющий блок на элек-
Не выбрасывайте бритву, пока не уда-
тробритву.
лите из нее встроенную аккумулятор-
ную батарею.
Триммер
- Очищайте триммер после каждого
ТЕХНИЧЕСКИЕ ХАРАКТЕРИСТИКИ
использования.
Зарядное устройство
- Выключите электробритву.
Напряжение питания: АС 220 В ~ 50 Гц
- Очистите триммер с помощью ки-
Выходное напряжение: DC 3,2 В
сточки (10), входящей в комплект
поставки.
Производитель оставляет за собой
- Каждые шесть месяцев смазывайте
право изменять характеристики при-
триммер каплей масла для швейных
бора без предварительного уведом-
машин или машинок для стрижки.
ления.
Замена бритвенных головок
Срок службы прибора не менее
(Рис. 7, 8)
3-х лет
Для достижения оптимальных ре-
зультатов бритья производите замену
Данное изделие соответ-
бритвенных головок каждые 2 года.
ствует всем требуемым
- Выключите электробритву.
европейским и российским
- Нажмите кнопку фиксатора (5) и
стандартам безопасности и
снимите бреющий блок (2).
гигиены.
- Поверните колесико фиксатора про-
тив часовой стрелки и снимите фик-
Производитель: АН-ДЕР ПРОДАКТС
сирующую рамку.
ГмбХ, Австрия
- Замените бритвенные головки,
Нойбаугюртель 38/7А, 1070 Вена,
установите фиксирующую рамку
Австрия
13
1379.indd 131379.indd 13 28.02.2006 10:37:4328.02.2006 10:37:43

ҚАЗАҚ
ЭЛЕКТР АЛМАС
масы көрінсе, сонда аккумулыторлы
батареяны зарядтау керек.
СУРЕТТЕМЕ
- Егер дисплейде электр айырғы есе-
1. Қорғаушы қалпақша
бінде пиктограммасы жыпылықтаса,
2. Қырыну блок
сонда аккумулыторлы батареяны за-
3. Айналмалы алмастар
рядтау керек.
4. Алмастың жетегі
5. Қырыну блоктың фиксатор түймесі
Назар салыңыз!
6. Алмастың корпусы
- Аккумуляторлы батареяны 10
7. Қуат алудың ажыратқышы шектеу
сағаттан аса жəне 0°С төмен емес
түймемен
жəне 40°С жоғары емес температу-
8. LCD-дисплей
рада зарядтауға болмайды, себебі
9. Зарядты жабдық
бұл оның бұзылуына келтіреді.
10. Тазалау ұшін қылқалам
- Егер Сіз алмаспен 20 күннен аса
11. Жолдық сөмке
қолданбасаңыз, оны алты сағат бойы
зарядтаңыз.
Зарядтау (1 сурет)
Алмаспен бірінші рет қолдану алдына
Пайдалану
немесе оның қолдану ұзақ үзілістен
Қырынудың ең жақсы зейнеттері жетеді
кейін 6 сағат аккумуляторлы батареяны
сол жағдайда, егер Сіздің теріңіз құрғақ
зарядтау керек.
болса.
- Зарядты жабдықтың айырғышын (9)
Сіздің теріңізге осы қырыну системаға
зарядтау жүйесіне корпустың төмен
үйрену ұшін 2-3 апта керек болады.
жағынан тығыңыз жəне зарядты
- Қорғаушы қалпақты шешіңіз (1).
жабдықты электр токқа тығыңыз, сон-
- Ажыратқышпен алмасты қосыңыз (7),
да дисплейде (8) керек хабарлама
сонда қосылады жəне жақын 20 се-
көрсетіледі.
кунд бойы LCD-дисплейдің көмескі
- Қайталанған аккумуляторлы
жарығы жанып тұрады, дисплейде
батареяның зарядтау циклдары екі
жақын алмастың жұмыс уақыты
сағаттан аспау керек.
жəне сəйкес сектордың пиктограмма-
сы көрсетіледі.
Ескерту:
- Теріні сəл тиіп, қырыну блокты
- Зарядты жабдықты электр токқа
жұргізіңіз, бір мезгілде артқы-
қосқанан кейін, электр айырғы
алдынғы жəне айналмалы
есебінде пиктограммасы қашанда
қимылдарды жасап.
нұршашады жəне бес дыбысты бел-
- Қырынып болғаннан кейін жабдықты
гілер естіледі.
ажыратқышпен сқндіріңіз (7),
- Зарядтау кезінде дисплейде уақыт
қырыну блокты қорғаушы қалпақпен
көрсетіледі, осы уақыт бойы алмас
жабыңыз(1) жəне алмасты сақтауға
жəне сəйкес сектордың пиктограм-
алып қойыңыз.
масы жұмыс істейді. Барынша көп
мүмкін алмастың жұмыс істейтін
Триммерді қолдану (2, 3-сурет)
уақыты 40 минут жақын.
Триммер самайды түзету үшін жəне
- Егер алмас жұмыс істеп тұрғанда
мұртты күту үшін арналған.
бес дыбысты белгілер естілсе жəне
- Триммер ауыстырғышын жоғарыға
электр айырғы есебінде пиктограм-
қарай көтеріңіз.
14
1379.indd 141379.indd 14 28.02.2006 10:37:4328.02.2006 10:37:43

ҚАЗАҚ
- Ұстараны сөндіргішпен (7) қосыңыз.
алсаңыз, онда қырынудың оң
- Триммерді дұрыс бұрышқа
сипаттамаларын қалпына келтіру
орнатыңыз жəне мұртты немесе
үшін бірнеше апта қажет болуы
самайды түзете отырып, біртіндеп
мүмкін.
астыға түсіріңіз.
- Айналмалы жүзді жаққыштың
- Ұстараны өшіріңіз жəне триммер
көмегімен тазалаңыз. Жаққыштың
ауыстырғышын төмен қарай
түгі қысқа жағын пайдаланыңыз.
қозғалтыңыз.
- Қозғалмайтын жүзді жаққыштың
көмегімен тазалаңыз.
Ұстараны тазалау
- Қыру бастарын қыру блогына
- Қыру блогының (5) бекіткіш
орнатыңыз жəне дөңгелекті сағат тілі
батырмасына басыңыз, бұл жағдайда
бойынша бұраңыз.
қыру блогы ашылады жəне оны
- Қозғалмайтын жүздерді оларды
тазалауға жол ашылады (4-сурет).
пластмассалық рамкаға бекіту үшін
- Жаққышты (10) қолданыңыз, қыру
сағат тілі бойынша/қарсы бұраңыз.
блогын ішінен жəне сыртынан,
- Қыру блогын электр ұстараға
сонымен қатар жүз жетегін тазалаңыз
орнатыңыз.
(5, 6-сурет).
- Қыру блогын ағып тұрған жылы судың
Триммер
астында жууға болады (6-сурет).
- Триммерді əрбір қолданғаннан кейін
Қыру блогын жаппас бұрын, оны
тазалаңыз.
толық кептіріңіз. Электр ұстараның
- Электр ұстараны өшіріңіз.
ішіне су тигізуден сақтаныңыз.
- Триммерді жеткізу топтамасына
Толық кепкеннен кейін қыру блогын
кіретін жаққыштың (10) көмегімен
жабыңыз, оған қорғау қалпақшасын
тазалаңыз.
(1) кигізіңіз жəне ұстараны сақтауға
- Əрбір алты ай сайын триммерді
алып қойыңыз.
тігін машинасына немесе шаш қию
машинасына арналған маймен
Екі айда бір рет қыру бастарын
жағып тұрыңыз.
тазалап тұру қажет (7, 8-суреттер)
- Электр ұстараны өшіріңіз.
Қыру бастарын ауыстыру(7, 8-сурет)
- Бекіткіш батырмасына (5) басыңыз.
Қырынуда жақсы нəтижелерге жету
- Бекіткіш дөңгелектерін сағат тіліне
үшін қыру бастарын əрбір екі жылда
қарсы бұраңыз жəне бекіту рамасын
ауыстырып тұрыңыз.
шешіңіз.
- Электр ұстараны өшіріңіз.
- Қыру бастарын (айналмалы жəне
- Бекіткіш батырмасын (5) басыңыз да
қозғалмайтын жүздер) шешіңіз
қыру блогын шешіңіз.
жəне тазалаңыз. Айналмалы
- Бекіткіш дөңгелегін сағат тіліне
жəне қозғалмайтын жүздерді
қарсы бұраңыз да бекіткіш раманы
шатастырмаңыз. Бұл өте маңызды,
шешіңіз.
себебі əрбір бастың айналмалы
- Қыру бастарын ауыстырыңыз,
жəне қозғалыссыз жүздері бір-біріне
бекіткіш раманы орнатыңыз жəне
сəйкестендірілген, бұл əрбір жүз
дөңгелекшені сағат тілі бойынша
жұбының оң жұмыс сипаттамаларына
бұраңыз.
кепілдік береді. Егер сіз жүздердің
- Қозғалмайтын жүздерді
жинағын кездейсоқ шатастырып
пластмассалық рамаға бекіту үшін
15
1379.indd 151379.indd 15 28.02.2006 10:37:4428.02.2006 10:37:44
ҚАЗАҚ
оларды сағат тілі бойынша/қарсы
• LCD-дисплейді зақымдамас үшін
бұраңыз.
оған қолмен баспаңыз.
- Қыру блогын электр ұстараға
• Егер ұстара дұрыс жұмыс істемесе,
орнатыңыз.
онда рұқсат етілген сервис
орталығына жүгініңіз.
ҚОРШАҒАН ОРТАНЫ ҚОРҒАУ
• Ұстараны, осы нұсқаулықта
Осы ұстараның құрамына
көрсетілгендей, тек арнауы бойынша
аккумуляторлық батарея кіреді жəне
ғана пайдаланыңыз.
олар қайта өңдеуге жатады. Жарамсыз
электр ұстараны лақтырудың алдында,
Аспап тек үй жағдайында пайдалануға
одан аккумуляторлық батареяларды
арналған.
шығарып тастау қажет жəне сіздің
еліңізде зиянды қалдықтарды
Техникалық сипаттамалары
қайта өңдеу жөніндегі ережелерге
Зарядтау құрылғысы:
сəйкес əрекет ету керек. Ұстараның
Қорек кернеуі АС 220В ~ 50Гц
ішінен аккумуляторлық батареяны
Шығу кернеуі DC ~3,2 В
шығармағанға дейін оны лақтырмаңыз.
Өндіруші алдын ала хабарламастан
САҚТЫҚ ШАРАЛАРЫ
аспаптың сипаттамаларын өзгертуге
• Электр ұстараның аккумуляторлық
құқылы.
батареяларын температурасы
0°С төмен жəне 40°С жоғары
Аспаптың қызмет мерзімі 3 жылдан
жерлерде, сонымен қатар тікелей күн
кем емес
сəулесі түсетін жерлерде, жылыту
аспаптарының жанында немесе
Гарантиялық мiндеттiлiгi
ылғалдылығы жоғары жерлерде
Гарантиялық жағдайдағы қаралып
зарядтамаңыз.
жатқан бөлшектер дилерден тек
• Ұстараны зарядтау үшін тек жеткізу
сатып алынған адамға ғана берiледi.
топтамасына кіретін зарядтау
Осы гарантиялық мiндеттiлiгiндегi
құрылғысын ғана пайдаланыңыз.
шағымдалған жағдайда төлеген чек
• Зарядтау құрылғысын судан алыс
немесе квитанциясын көрсетуi қажет.
сақтаңыз жəне оны су қолмен
ұстамаңыз.
Бұл тауар ЕМС
• Зарядтау құрылғысын құрғақ жəне
– жағдайларға сəйкес келедi
қауіпсіз жерде сақтаңыз, оны
негiзгi Мiндеттемелер
зақымданулардан қорғаңыз.
89/336/EEC Дерективаның
• Қыру бастарының қозғалмайтын
ережелерiне енгiзiлген
торларын зақымдамау үшін олардың
Төменгi Ережелердiң
үстінен баспаңыз.
Реттелуi (73/23 EEC)
• Жарақат алудан сақтану үшін сыртқы
қыру торлары немесе ішкі кесу
блоктары зақымданған ұстараны
қолданбаңыз.
• Зарядтау құрылғысын оның ваннаға
немесе раковинаға құлап кетуі
мүмкін жерлерге қоймаңыз.
16
1379.indd 161379.indd 16 28.02.2006 10:37:4428.02.2006 10:37:44

БЪЛГАРСКИ
ЕЛЕКТРОБРЪСНАЧКА
и се появи пиктограмата във вид на
щепсел за мрежата, е необходимо
ОПИСАНИЕ
да се зареди акумулаторната бате-
1. Предпазна капачка
рия.
2. Бръснещ блок
- Ако на дисплея мига пиктограмата
3. Въртящи се остриета
във вид на щепсел за мрежата, е
4. Задвижвател на остриета
необходимо да заредите акумула-
5. Бутон на фиксатора на бръснещия
торната батерия.
блок
6. Корпус на бръсначката
Внимание!
7. Прекъсвач на захранването с бутон
- Не зареждайте акумулаторната ба-
за блокиране
терия повече от 10 часа и при тем-
8. Дисплей LCD
пература под 0°С и над 40°С, тъй
9. Зареждащо устройство
като може да предизвика повреж-
10. Четчица за почистване
дането и.
11. Пътна чанта
- Ако не използвате бръсначката по-
вече от 20 дни, зареждайте я в про-
Зареждане (Рис.1)
дължение на шест часа.
Преди първото използване на бръс-
начката или след продължително пре-
Използване
късване на експлоатацията и е необхо-
Най-добрите резултати на бръснене
димо 6-часово зареждане на акумула-
се получават в случай, ако кожата Ви
торната батерия.
е суха. За кожата Ви може да са необ-
- Вкарайте буксата на зареждащото
ходими 2-3 седмици, за да свикне тя с
устройство (9) в гнездотото за за-
тази система за бръснене.
реждане в долната част на корпуса
- Махнете предпазната капачка (1).
и включете зареждащото устройст-
- Включете бръсначката с бутона за
во в мрежата, при това на дисплея
включване (7) при това ще се вклю-
(8) ще бъде показана необходимата
чи и ще свети в продължение на
информация.
приблизително 20 секунди светли-
- Повторните цикли за зареждане на
ната на LCD-дисплея, а на дисплея
акумулаторната батерия не трябва
ще бъде показано приблизителното
да бъдат повече от два часа.
време на работа на бръсначката и
пиктограмата на съответния сек-
Забележка:
тор.
- При включване на зареждащото ус-
- Леко докосвайки кожата местете
тройство в мрежата пиктограмата
блока за бръснене, правейки еднов-
във вид на щепсел за мрежата ще
ременно възвратно-постъпателни и
свети постоянно и ще прозвучат пет
кръгообразни движения.
звукови сигнала.
- След бръснене изключете устройс-
- По време на зареждане на дисплея
твото с прекъсвача (7), затворете
се отразява времето, в продълже-
бръсначния блок с предпазната ка-
ние на което може да работи бръс-
пачка (1) и приберете бръсначката
начката и пиктограмата на съответ-
за съхраняване.
ния сектор. Максимално възможно
време на работа на бръсначката
Използване на тримера (Рис. 2, 3)
- около 40 минути.
Тример е предназначен за подравня-
- Ако по време на работа на бръснач-
ване на бакембарди и за поддържане
ката прозвучат пет звукови сигнала
на мустаци.
17
1379.indd 171379.indd 17 28.02.2006 10:37:4528.02.2006 10:37:45

БЪЛГАРСКИ
- Преместете превключвателя на три-
оптимални работни характеристики
мера нагоре. Включете бръсначката
за всека двойка ножчета.
с бутона за включване (7).
Ако случайно сте объркали комп-
- Разположете тримера под правилен
лектите на ножчета, ще потрябват
ъгъл към кожата и предвижвайте
няколко седмици за възстановява-
го надолу, подравнявайки мустаци
не на оптималните характеристики
или бакембарди.
за бръснене.
- Изключете бръсначката и премес-
- Почистете въртящ се нож с помощ-
тете превключвателя на тримера
та на четчица.
надолу.
Използвайте страната на четчица с
къса четина.
Почистване на бръсначката
- Почистете неподвижен нож с
- Натиснете бутона на фиксатора на
помощта на четчици.
бръсначния блок (5), при това бръс-
- Установете главичките на бръснач-
нещия блок ще се отвори, осигуря-
ката в бръсначния блок, установе-
вайки достъп за почистване (Рис.
те фиксираща рамка и завъртете
4).
колелцето по посока на часовнико-
- С помощта на четчицата (10), почис-
вата стрелка.
тете бръсначния блок от вътрешна и
- Завъртете неподвижните ножове
външна страни, а също така зад-
по/против часовниковата стрелка
вижвател на остриета (Рис. 5, 6).
за тяхното фиксиране с помощта на
- Допуска се измиването на бръсне-
пластмасова рамка.
щия блок под течаща топла вода
- Установете бръсначния блок върху
(Рис. 6). Напълно изсушете бръс-
електробръсначката.
начния блок, преди да го затворите.
Не допускайте попадане на вода
Тример
в корпуса на електробръсначката.
- Почиствайте тримера след всяко
След пълното изсъхване затворе-
използване.
те бръсначния блок, като сложите
- Изключете електробръсначката.
върху него предпазната капачка (1)
- Почистете тримера с помощта на
и приберете бръсначката за съхра-
четчица (10), която влиза в комп-
няване.
лекта на доставката.
- Всеки шест месеца смазвайте три-
Един път на два месеца се препо-
мера с капка масло за шевни маши-
ръчва почистване на бръсначните
ни или машинки за подстригване.
главички (Рис. 7, 8)
- Изключете електробръсначката.
Смяна на бръсначните главички
- Натиснете бутона на фиксатора (5).
(Рис. 7, 8)
- Завъртете колелцето на фиксато-
За да постигнете оптимален резултат
ра против часовниковата стрелка и
на бръснене заменяйте бръсначните
махнете фиксираща рамка.
главички всеки 2 години.
- Снемете и почистете бръсначните
- Изключете електробръсначката.
главички (по отделно въртящи се и
- Натиснете бутона на фиксатора (5)
неподвижни ножчета).
и свалете бръсначния блок.
Не обърквайте въртящи се и непод-
- Завъртете колелцето на фиксато-
вижни ножчета. Това е важно,
ра против часовниковата стрелка и
понеже въртящи се и неподвижни
махнете фиксираща рамка.
ножчета на всяка главичка подбра-
- Сменете бръсначните главички,
ни един към друг, което гарантира
установете фиксираща рамка и
18
1379.indd 181379.indd 18 28.02.2006 10:37:4528.02.2006 10:37:45

БЪЛГАРСКИ
завъртете колелцето по посока на
ни външните бръснещи мрежи или
часовниковата стрелка.
вътрешните режещи ножчета.
- Завъртете неподвижните ножове
• Не натискайте с ръце LCD-дисплея,
по/против часовниковата стрелка
за да не го повредете.
за тяхното фиксиране с помощта на
• Ако бръсначката не работи както
пластмасова рамка.
трябва, обърнете се към авторизо-
- Установете бръсначния блок върху
ван сервизен център.
електробръсначката.
• Винаги използвайте бръсначката
по назначение, както е посочено в
ОПАЗВАНЕ НА ОКОЛНАТА СРЕДА
дадената инструкция.
Дадената бръсначка има акумулатор-
на батерия, подлежаща за оползот-
Уредът е предназначен само за битово
воряване.
използване.
Преди да се изхвърли електробръс-
начката, необходимо е да се извади
ТЕХНИЧЕСКИ ХАРАКТЕРИСТИКИ
от нея акумулаторната батерия и да се
Зареждащо устройство
постъпва в съответствие със законите
Напрежение на захранването:
на вашата страна относно оползотво-
АС 220 В ~ 50 Хц
ряване на вредните отпадъци.
Изходно напрежение: DC 3,2 В
Не изхвърляйте бръсначката, докато
не извадите от нея вградената акуму-
Производителят си запазва право-
латорна батерия.
то да променя характеристиките на
прибора без предварително уведо-
УКАЗАНИЯ ЗА СИГУРНОСТ
мяване.
• Не зареждайте акумулаторната
батерия на електробръсначката при
Срок на използване - над 3 години
температура под 0°С и над 40°С, а
също така под въздействието на
Гаранция
слънчевите лъчи, около нагревател-
Подробни условия на гаранцията
ни прибори или на места с повише-
могат да бъдат получени от дилера,
на влажност.
който е продал тази апаратура. При
• За дозареждане на бръсначката
всяка рекламация по време на срока
използвайте само зареждащо уст-
на действие на тази гаранция е необ-
ройство, което влиза в комплекта
ходимо да се представи чека или кви-
на доставката.
танцията за купуване.
• Дръжте зареждащото устройство
по-далече от вода и не докосвайте
Това изделие съответства
го с влажни ръце.
на изискванията за елект-
• Съхранявайте зареждащото уст-
ромагнитна съвместимост
ройство на сухо и безопасно място
на директива 89/336/ЕЕС
и пазете го от повреди.
на Съвета на Европа и на
• Не слагайте зареждащото устройс-
нареждането 73/23 ЕЕС за
тво на такива места, където то може
апаратурата с низко напре-
да падне във ваната или мивката.
жение.
• Не натискайте върху неподвижните
мрежи на бръсначните главички, за
да не ги повредите.
• За да избегнете травми не използ-
вайте бръсначката, ако са повреде-
19
1379.indd 191379.indd 19 28.02.2006 10:37:4528.02.2006 10:37:45

MAGYAR
VILLAMOS BOROTVA
akkor az akkumulátor feltöltése
szükséges.
LEÍRÁS
1. Védőkupak
Figyelem!
2. Borotváló egység
- Ne töltse az akkumulátort 10 óránál
3. Forgó pengék
tovább, 0°C alatt és 40°C felett, mi-
4. A pengék meghatója
vel ez meghibásodáshoz vezethet.
5. A borotváló egység
- Ha 20 nap napnál hosszabb ideig
rögzítőtőgombja
nem használja a borotvát, a feltöl-
6. A borotva teste
tés tartson 6 óra hosszat.
7. Tápkapcsoló biztonsági zárral
8. LCD kijelző
Használat
9. Töltőegység
A borotválkozás legjobb eredményét
10. Tisztító ecset
akkor éri el, ha bőre száraz.
11. Utitáska
A bőrének 2-3 hétre lehet szüksége,
hogy megszokja ezt a borotvarendz-
Feltöltés (1. ábra)
szert.
A borotba első használata előtt vagy
- Vegye le a védőkupakot (1).
huzamosabb szünet után az akkumu-
- Kapcsolja be a borotvát a (7) kaps-
látor 6 órás feltöltése szükséges.
csolóval, ekkor bekapcsol és kb.
- Dugja a töltőegység csatlakozóját
20 másodpercig égni fog az LCD
(9) a feltöltő fészkébe a test alsó
kijelző világítása, a kijelzőn pedig
oldalán és csatlakoztassa a töltő-
a borotva megközelítőleg fennma-
egységet a hálózathoz, ekkor a ki-
radt üzemelési ideje és a megfelelő
jelzőn (8) megjelenik a szükséges
piktogram lesz látható.
információ.
- Enyhén érintve a bőrt mozgassa a
- Az ismételt töltési ciklusok nem kell
borotvaegységet, egydejűleg vé-
hogy meghaladják a két órát.
gezzen oda-vissza irányú és körkö-
rös mozgást.
Megjegyzés:
- A borotválkozás befejezése után
- A töltőegység bekapcsolása után a
kapcsolja ki a készüléket a (7) kaps-
hálózatba a hálózati villát ábrázoló
csoló segítségével, zárja le a borot-
piktogram állandóan világít és öt
váló egységet az (1) védőkupakkal
hangjelzés hallatszik.
és tegye el a borotvát.
- A feltöltés alatt a kijelzőn a borot-
va üzemelésének ideje látható és
A pajeszvágó használata
a megfelelő szektor piktogramja.
(2, 3 ábra)
A borotva maximálisan lehetséges
A pajeszvágó a halánték-szőrzet
üzemelési ideje kb. 40 perc.
egyenesítésére és a bajusz gondozá-
- Ha a borotva üzemelése közben öt
sára szolgál.
hangjelzés hallatszik és megjelenik
- Állítsa a pajeszvágó kapcsolóját
a hálózati villát ábrázoló piktogram,
felső helyzetbe.
20
1379.indd 201379.indd 20 28.02.2006 10:37:4628.02.2006 10:37:46
- 1
- 2
