Pioneer PD-30-S: Connecting up
Connecting up: Pioneer PD-30-S
Connecting up 02
English
Chapter 2:
Connecting up
Caution
• Before making or changing the connections,
switch off the power and disconnect the power cord
from the AC outlet.
• Connect the power cord after all the connections
between devices have been completed.
DeutschFrançais
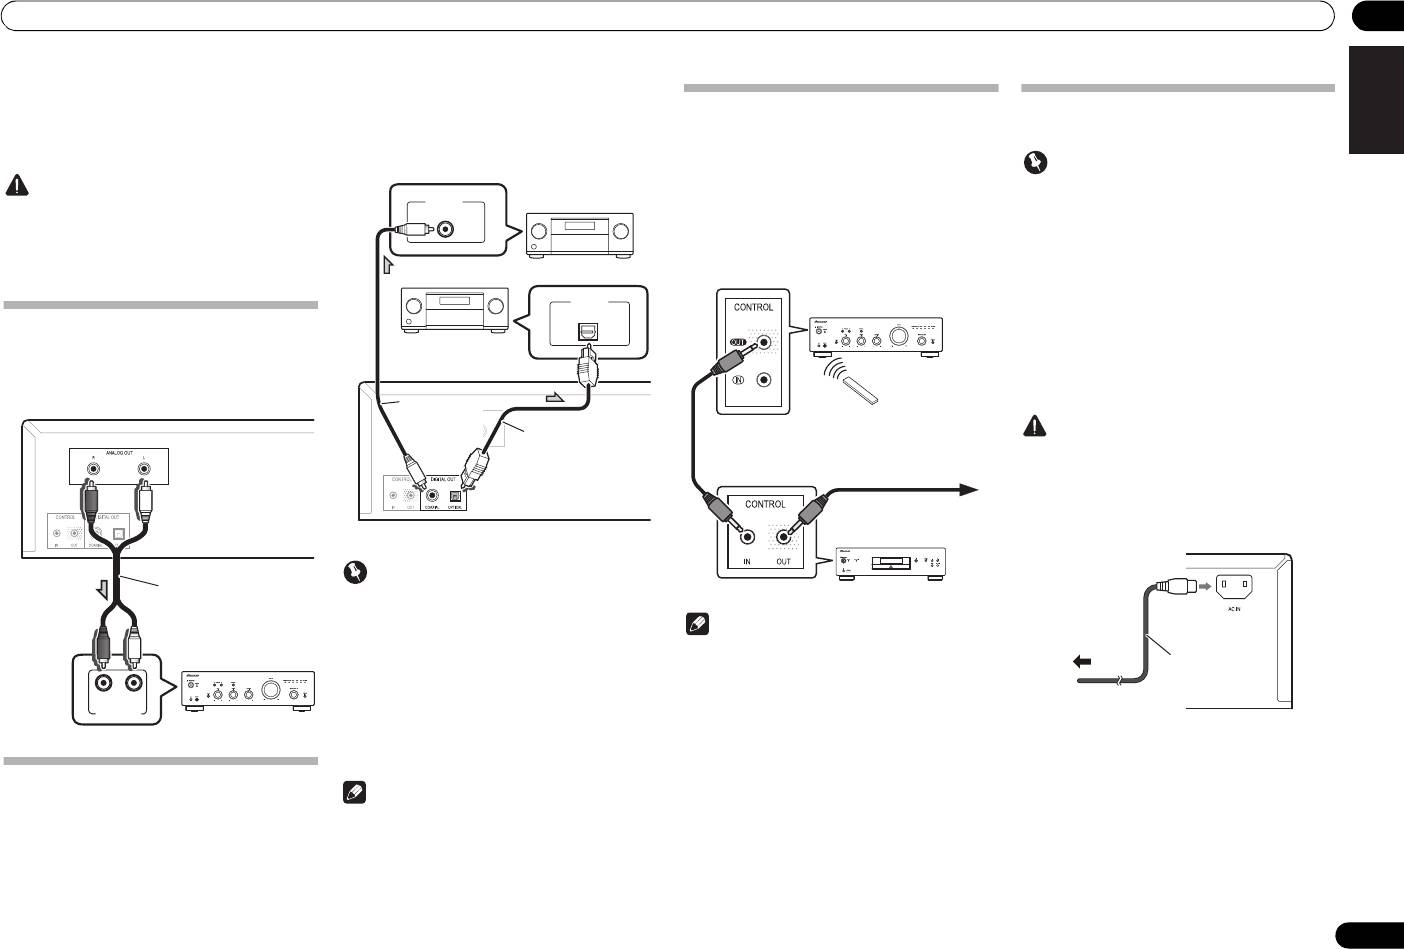
Analog audio output connections
By connecting this unit’s analog audio output to the
analog audio input of an amplifier, you can use the
amplifier to enjoy analog audio produced from this unit.
Italiano Español Русский
Nederlands
Important
Care in the handling of optical fiber cables
• Do not allow optical fiber cables to be bent at sharp
angles. When storing optical fiber cables, roll in
coils of at least 15 cm diameter.
• When connecting optical fiber cables, align the
connectors correctly and insert fully. If the
RL
ANALOG
orientation of the cable connector is incorrect and
AUDIO INPUT
excessive force is applied in the attempt to fasten
the connector, the connector may be deformed,
preventing the shutter from closing when the cable
is removed.
Digital audio output connections
Note
If desired, the digital audio output from this unit can be
connected to an AV amplifier or digital recording device
• For digital audio output, CDs played on this unit
(CD recorder, MD, etc.).
must produce linear PCM signals with a sampling
• This unit’s DIGITAL OUT terminals do not output
rate up to 44.1 kHz and quantitative bits up to 16
sound from SACD and DSD discs, nor from iPod/
bits (some discs may not be playable depending on
iPhone/iPad devices.
the connected component and environment). For
information about other files, see page 12.
5
En
PD-30’s rear panel
Audio cable (included)
Amplifier
DIGITAL IN
COAXIAL
DIGITAL IN
OPTICAL
AV amplifier or
digital recording
device
AV amplifier or
digital recording
device
Coaxial digital
audio cable
Optical fiber cable
(commercially
(commercially
available)
available)
PD-30’s rear panel
Using centralized control with other
Plugging in
Pioneer components (PD-30 only)
This unit and other Pioneer components equipped with
CONTROL IN/OUT jacks can be controlled with a single
Important
remote control by aiming the remote toward the signal
• If it is necessary to detach the power cord, first be
receptor on the AV amplifier or other component. This
sure to press the
/I
STANDBY/ON button on the
also allows remote control of components not equipped
front panel of the unit so the PD-30 is turned OFF or
with a remote sensor, or installed in places where the
the PD-10 is in standby mode before detaching the
component’s remote sensor cannot be accessed.
cord.
• Confirm that the [-OFF-] indicator is not lighted in
the main unit’s front panel display before
disconnecting the power cord. If the power cord is
disconnected while the [-OFF-] indicator is still
lighted, the unit’s settings may revert to factory
defaults.
• When going on a trip or otherwise not using the
unit for an extended period, always disconnect the
power cord from its outlet.
Caution
• Do not use any power cord other than the one
supplied with this unit.
• Do not use the supplied power cord for any purpose
other than that described below.
After you’ve finished making all connections, plug the
unit into an AC outlet.
Note
• For connections use a commercially available
monaural miniplug cord (without resistor).
• When connecting the CONTROL IN/OUT jacks,
commercially available audio cords must also be
used to make analog connections. Merely
connecting the CONTROL IN/OUT jacks alone will
not allow proper system control.
1 Plug the supplied power cord into the
• When a control cord is connected to the PD-30’s
AC IN
socket on the rear of the unit.
CONTROL IN jack, the unit cannot be controlled by
pointing the remote control at the PD-30 (the
2 Plug the other end into AC outlet.
remote sensor is automatically disabled).
Other Pioneer component
equipped with CONTROL
IN/OUT jacks
Remote control for
AV amplifier, etc.
Point the remote
control toward the
signal receiver on
the AV amplifier, etc.
To other Pioneer
component equipped
with CONTROL IN jack
PD-30
PD-30’s rear panel
To AC outlet
Power cord
PD-30_PWSYXZT8.book 5 ページ 2012年5月7日 月曜日 午前11時33分
Оглавление
- Before you start
- Connecting up
- Controls and displays
- Playback
- Using advanced functions
- Additional information
- Avant de commencer
- Connexions
- Commandes et écrans
- Lecture
- Les fonctions avancées
- Informations complémentaires
- Bevor Sie beginnen
- Anschließen
- Bedienelemente und Anzeigen
- Wiedergabe
- Erweiterte Funktionen
- Zusätzliche Informationen
- Prima di iniziare
- Collegamento
- Controlli e display
- Riproduzione
- Utilizzo delle funzioni avanzate
- Informazioni aggiuntive
- Voordat u begint
- Aansluitingen
- Bedieningsorganen en display-aanduidingen
- Afspelen
- Geavanceerde functies gebruiken
- Extra informatie
- Antes de comenzar
- Conexiones
- Controles y visualizadores
- Reproducción
- Utilizar funciones avanzadas
- Información adicional
- Подготовка к использованию
- Подключение
- Органы управления и индикации
- Воспроизведение
- Использование дополнительных
- Дополнительная информация


