Vitek VT-3605: 19. КНОПКА ВЫБОРА РЕЖИМОВ СD/РАДИО (MODE) 20. КНОПКА ВКЛЮЧЕНИЯ/ВЫКЛЮЧЕНИЯ (PWR) 21. МИГАЮЩИЙ ИНДИКАТОР 22. КНОПКА СБРОСА (RESET) 23. КНОПКА ВЫБРОСА ДИСКА ПОДСОЕДИНЕНИЕ К СЕТИ ПОСТОЯННОГО ТОКА
19. КНОПКА ВЫБОРА РЕЖИМОВ СD/РАДИО (MODE) 20. КНОПКА ВКЛЮЧЕНИЯ/ВЫКЛЮЧЕНИЯ (PWR) 21. МИГАЮЩИЙ ИНДИКАТОР 22. КНОПКА СБРОСА (RESET) 23. КНОПКА ВЫБРОСА ДИСКА ПОДСОЕДИНЕНИЕ К СЕТИ ПОСТОЯННОГО ТОКА: Vitek VT-3605
Оглавление
- ВНИМАНИЕ ВОСПРОИЗВЕДЕНИЕ ДИСКА: ТЕХНИЧЕСКИЕ ХАРАКТЕРИСТИКИ
- ВОЗМОЖНЫЕ НЕИСПРАВНОСТИ
- 19. КНОПКА ВЫБОРА РЕЖИМОВ СD/РАДИО (MODE) 20. КНОПКА ВКЛЮЧЕНИЯ/ВЫКЛЮЧЕНИЯ (PWR) 21. МИГАЮЩИЙ ИНДИКАТОР 22. КНОПКА СБРОСА (RESET) 23. КНОПКА ВЫБРОСА ДИСКА ПОДСОЕДИНЕНИЕ К СЕТИ ПОСТОЯННОГО ТОКА
- 8 (1/PAU)'9 (2/SCN)'10 (3/RPT)'11 (4/SHF)'12 (5)'13 (6). ПРЕДУСТАНОВЛЕННЫЕ РАДИОСТАНЦИИ, РЕЖИМЫ ВОСПРОИЗВЕДЕНИЯ CD ДИСКА 14. КНОПКА УСТАНОВКИ ТЕКУЩЕГО ВРЕМЕНИ (CLK) 15. КНОПКА ОТКЛЮЧЕНИЯ ЗВУКА (MUTE) 16. КНОПКА ВКЛЮЧЕНИЯ ЭЛЕКТРОННОГО ЗКВАЛАЙЗЕРА (DSP) 17. КНОПКА ПОИСКА (SCAN) 18. НАСТРОЙКА С АВТОПОИСКОМ (A.PS)
- СЪЕМНАЯ ПЕРЕДНЯЯ ПАНЕЛЬ ОСНОВНЫЕ ФУНКЦИИ 1. КНОПКА ОТКРЫТИЯ ПАНЕЛИ (OPEN) 2.3. КНОПКИ РЕГУ ЛИРОВКИ ГРОМКОСТИ (+/') И КНОПКА ВЫБОРА (SEL) (7): НИЗКИЕ 4/6. КНОПКИ НАСТРОЙКИ/ВЫБОРА МУЗЫКАЛЬНЫХ ФРАГМЕНТОВ / 5. КНОПКА ВЫБОРА ДИАПАЗОНА (BAND)
- УСТАНОВКА ПРЕДОСТЕРЕЖЕНИЯ КОМПЛЕКТ ДЛЯ УСТАНОВКИ МАГНИТОЛЫ
- РЕГУЛЯТОРЫ УПРАВЛЕНИЯ И ФУНКЦИИ
ENGLISH
РУССКИЙ
16. DSP BUTTON
19. КНОПКА ВЫБОРА РЕЖИМОВ СD/РАДИО (MODE)
Press it to switch between 4 preset equalizer curves: FLAT.CLAS.POP M.ROCK M. The sound quality will
Находясь в режиме RADIO, нажмите кнопку (MODE), чтобы перейти в режим воспроизведения
be changed.
CD диска.
20. КНОПКА ВКЛЮЧЕНИЯ/ВЫКЛЮЧЕНИЯ (PWR)
17. SCAN BUTTON
Нажмите кнопку (PWR), чтобы включить или выключить устройство. Включить данное устройство
Press it to scan up by one channel step with station detection. If a valid signal has detected, the current
можно любой кнопкой, расположенной на передней панели.
frequency is blinked with in 5 seconds, then press it again to stop scan and remain the current frequen
cy; otherwise, the unit continue to scan up by one channel step with station detection 5 seconds later.
21. МИГАЮЩИЙ ИНДИКАТОР
Если передняя панель отсутствует на корпусе, то мигает индикатор (21).
18. APS BUTTON
In radio mode:
22. КНОПКА СБРОСА (RESET)
When short pressing, the radio searches for each preset station.
Нажимайте кнопку RESET заостренным предметом, например шариковой ручкой, при этом
When the field strength level is more than the threshold level of stop level, the radio is holding at that pre
обратите внимание, что все первоначальные настройки сбрасываются.
set number for few secretaries with releasing mute, and than searches again. In FM band, FM1, FM 2 and
Кнопку RESET необходимо нажимать в следующих случаях:
FM 3 is checked one at a time. When long pressing (more than 1 second), the radio searches from the
При первоначальной установке устройства после монтажа.
current frequency and checks the signal strength level until 1 cycle search is finished. And then 6
Если функциональные кнопки не работают.
strongest stations are preset to the corresponding preset number.
Если на дисплее появился знак ошибки.
The AS operation is implemented in the each band of selected band. When the AS operation is finished,
Обратите внимание:
Вы нажали на кнопку RESET, а устройство все еще не работает, пожалуйста,
the radio executes the preset scan.
воспользуйтесь хлопковой салфеткой, смоченной в спирте, для очистки разъема на обратной
стороне передней панели.
19. MODE BUTTON
Press it repeatedly to select CDP, AUX and RADIO mode in sequence and circulation.
23. КНОПКА ВЫБРОСА ДИСКА
Нажмите кнопку расположенную на обратной стороне лицевой панели, чтобы извлечь CD ДИСК.
20. POWER BUTTON
Press it to turn on or off the unit.
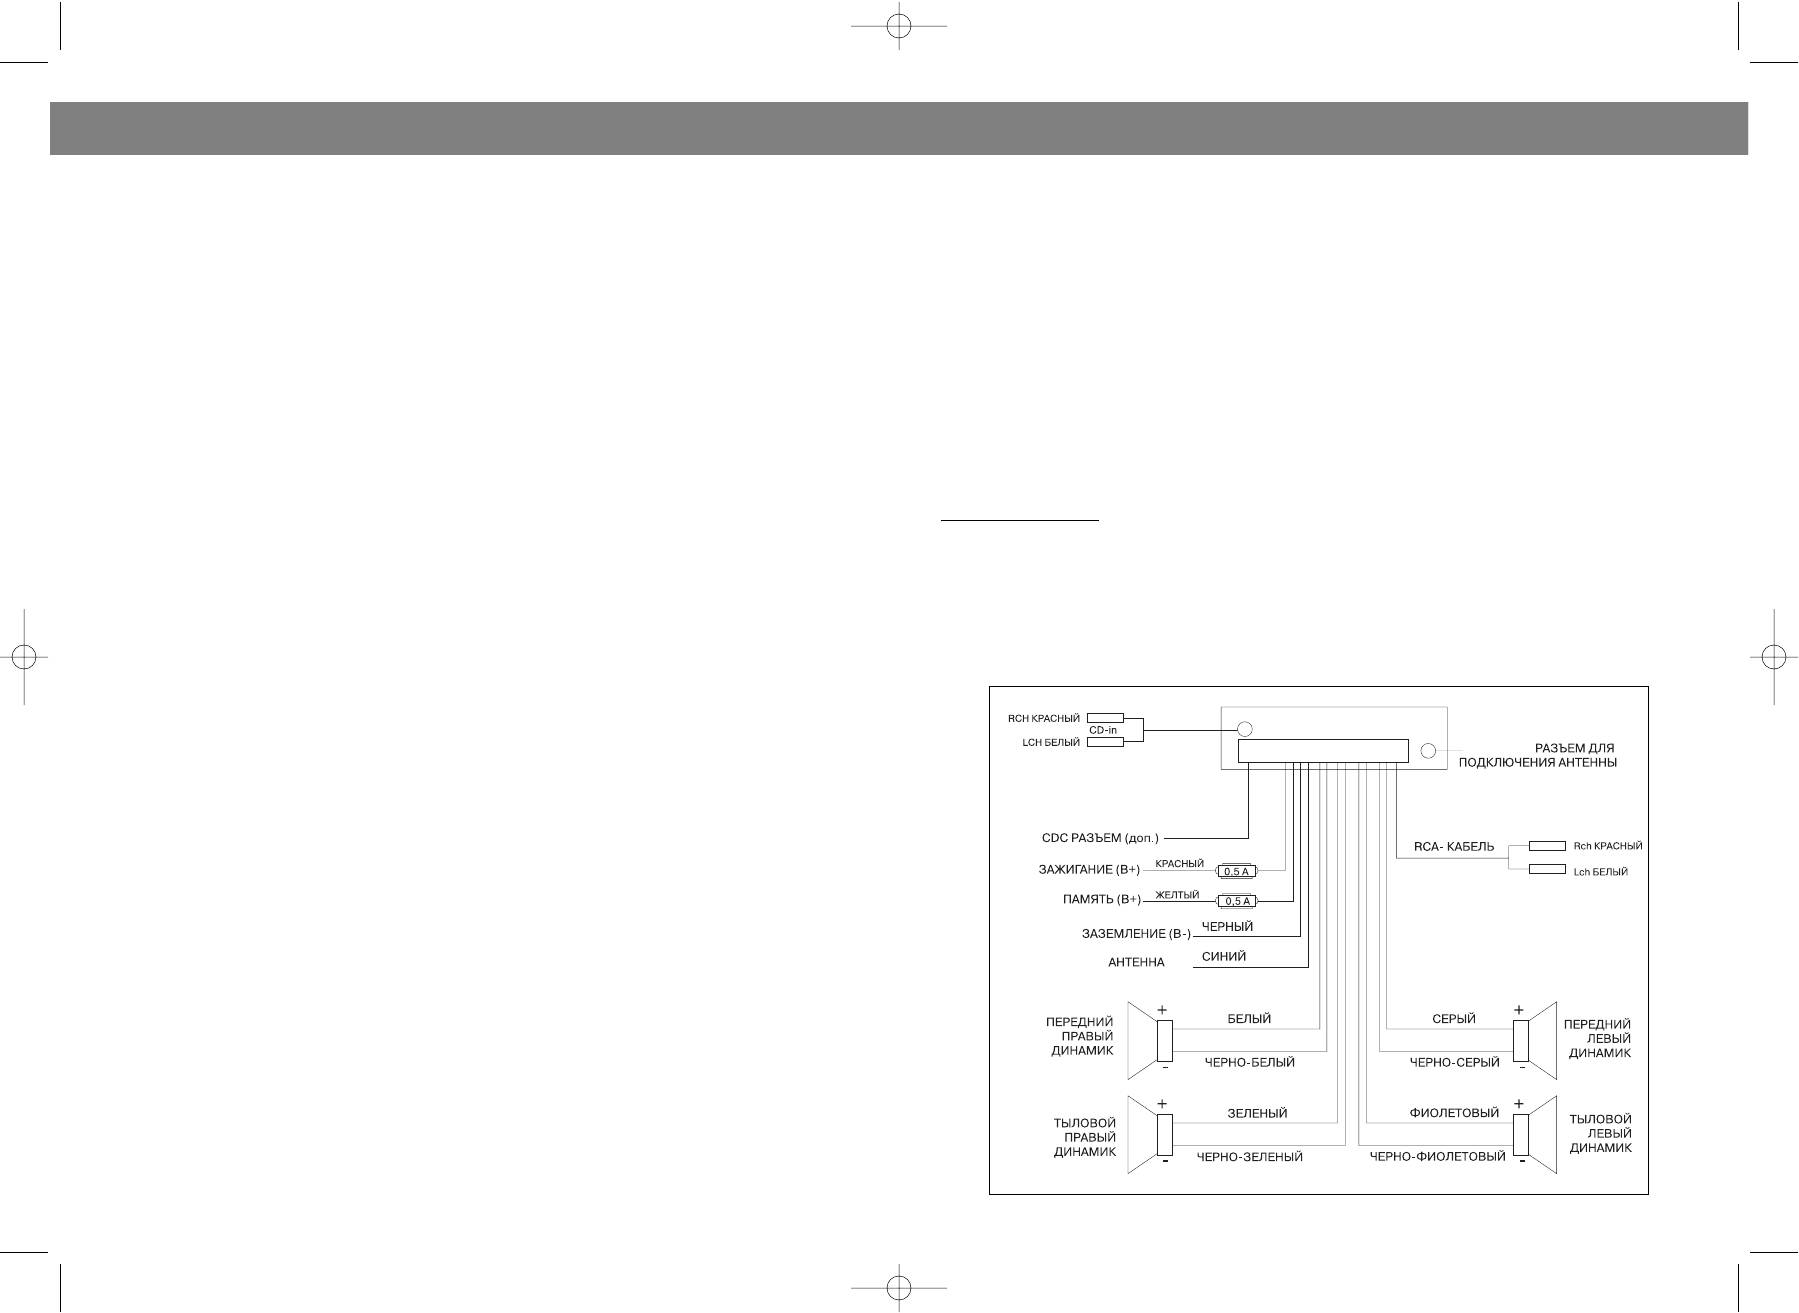
ПОДСОЕДИНЕНИЕ К СЕТИ ПОСТОЯННОГО ТОКА
21. FLASHING LED
If the front panel is not on the main unit, LED will be flashing.
22. RESET
RESET button is placed on the housing and must be activated with either a ballpoint pen or thin metal
object. The RESET button is to be activated for the following reasons:
Initial installation of the unit when all wiring is completed.
All the function buttons do not operate.
Error symbol on the display.
Note: If press RESET button, the unit can't work yet, please use a cotton swab soaked in isopropyl alco
hol to clean the socket on the back of the front panel.
4
13
3605.qxd 25.03.04 15:10 Page 6


