AEG AET3520: 9 REMOVING THE CONTENTS OF THEDUST CONTAINER.
9 REMOVING THE CONTENTS OF THEDUST CONTAINER.: AEG AET3520
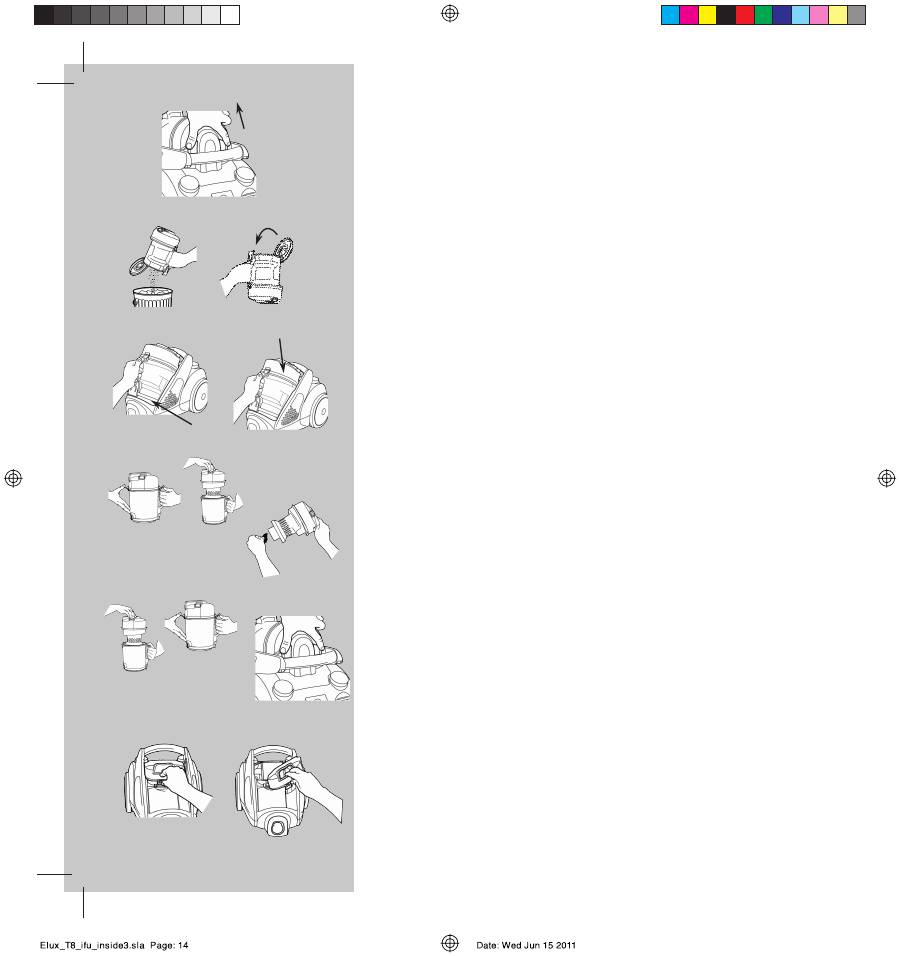
9 REMOVING THE CONTENTS OF THE DUST CONTAINER.
Always operate the cleaner with the dust
container installed.
14. Remove the dust container by pressing in
the 2 grey buttons on the dust container lid.
15. Remove the contents of the dust container
by pressing the grey button on the bottom
of the container.
16. Close the dust container trapdoor lid until it
clicks shut.
17 Replace the dust container by placing it
base first into the cleaner. Press down until
it clicks into place.
18 Lock the dust container in place by pushing
down on the handle until it clicks into place.
DISMANTLING THE DUST CONTAINER.
To ensure there is no restriction of airflow
and optimal suction power, it is important
to check the dust container for blockages.
19. There are 2 clips on the top part of the
dust container, one above the handle on
the front and one on the back. Release
these clips and lift the top part of the dust
container assembly from the clear dust bin.
20. Inspect inside and around the grey central
filtration assembly. Be sure to remove any
obstructions that may be stuck in or on the
assembly. At this stage you can rinse the
dust container under lukewarm water. Be
sure to air dry it completely before placing
back into the cleaner.
21. Re-assemble the dust container by placing
the central filtration assembly back into the
dust container bin and securing the front
and rear clips.
CLEANING AND REPLACING THE MOTOR PROTECTION FILTER.
22. Remove the dust container as previously
described.
23. Refer to the image for where to find the
motor protection filter. Lift the top plastic
cover from its position and pull the filter
from its position.
To clean the filter rinse under cold water
and be sure to air dry for at least 24 hours
before placing it back in the vacuum
cleaner. The motor filter is placed in a
plastic frame. Both the filter and the frame
can be rinsed. Be sure to dry them before
placing back.
FJERNE INNHOLDET I STØVBEHOLDEREN
Bruk støvsugeren bare når at
støvbeholderen er montert.
14. Fjern støvbeholderen ved å trykke de 2 grå
knappene på lokket til støvbeholderen.
15. Fjern innholdet i støvbeholderen ved å
trykke den grå knappen i bunnen av
beholderen.
16. Lukk dekselet til støvbeholderen til det
festes på plass med et klikk.
17. Erstatt støvbeholderen ved å plassere det
med bunnen først inn i støvsugeren. Trykk
ned til festes med et klikk.
18. Lås støvbeholderen på plass ved å trykke
håndtaket til det klikker på plass.
DEMONTERE STØVBEHOLDEREN.
Får å sikre frie luftstrømmer og optimal
sugestyrke, er det viktig å kontrollere at det
ikke er blokkeringer i støvbeholderen.
19. Det er to klemmer på den øverste delen av
støvbeholderen, en over håndtaket og en
på baksiden. Løsne disse to klemmene og
løft den øverste delen av støvbeholderen
fra den klare søppeldunken.
20. Inspiser innsiden av og rundt det grå filteret.
Fjern alle hindringer inni eller på filteret. På
dette trinnet kan du rense støvebeholderen
med lunkent vann. Sørg for å lufttørke den
fullstendig før den settes tilbake i
støvsugeren.
21. Sett sammen støvbeholderen ved å erstatte
det sentrale filteret tilbake i støvbeholderen
ved å feste og sikre klemmene foran og bak.
RENSE OG ERSTATTE MOTORFILTERET
22. Fjern støvbeholderen som tidligere
beskrevet.
23. Se på bildet for å se hvor du finner
motorfilteret. Løft det øverste plastdekselet
og dra bort filteret.
Du renser filteret under kaldt vann og lar
det lufttørke i minst 24 timer før du setter
det tilbake i støvsugeren.
Motorfilteret er plassert i en plastramme.
Både filteret og rammen kan renses. Sørg
for at de er tørre før du setter dem tilbake.
14
15
16
17
18
19
20
21
22
23
Оглавление
- ENGLISH 1
- ROMÂNA 34
- 1 TILBEHØR
- 2 TILBEHØR
- 3 SAFETY PRECAUTIONS
- 4 SIKKERHEDSFORANSTALTNINGER
- 5 BEFORE STARTING
- 6 INDEN START
- 7 GETTING THE BEST RESULTS
- 8 HVORDAN MAN OPNÅR DE BEDSTERESULTATER
- 9 REMOVING THE CONTENTS OF THEDUST CONTAINER.
- 10 TØMNING AF STØVBEHOLDEREN.
- 11 CLEANING AND REPLACING THE MAINHEPA FILTER.
- 12 RENGØRING OG UDSKIFTNING AF DETPRIMÆRE HEPA-FILTER.
- 13 RENGJØRE SLANGEN OG MUNNSTYKKET
- 14 RENGØRING AF SLANGE OGMUNDSTYKKE
- 15 CONSUMER INFORMATION
- 16 FORBRUGERSERVICE
- 17
- 18
- 19
- 20 BEZPEČNOSTNÉ OPATRENIA
- 21 AVANT DE COMMENCER
- 22 PŘED UVEDENÍM DO PROVOZU
- 23
- 24
- 25 VIDAGE DU RÉCEPTACLE À POUSSIÈRE
- 26 VYPRÁZDNĚNÍ PRACHOVÉHOKONTEJNERU
- 27 NETTOYAGE ET REMPLACEMENT DUFILTRE HEPA PRINCIPAL.
- 28 ČIŠTĚNÍ A VÝMĚNA HLAVNÍHO FILTRUHEPA
- 29
- 30
- 31 INFORMATIONS CONSOMMATEUR
- 32 UŽIVATELSKÉ INFORMACE
- 33 TARTOZÉKOK
- 34 ACCESORII
- 35 BIZTONSÁGI ELŐÍRÁSOK
- 36 MĂSURI DE PROTECŢIE
- 37 HASZNÁLAT ELŐTT
- 38 ÎNAINTE DE A ÎNCEPE
- 39
- 40
- 41 A PORTARTÁLY ÜRÍTÉSE
- 42 ELIMINAREA CONŢINUTULUICONTAINERULUI DE PRAF.
- 43 A HEPASZŰRŐ TISZTÍTÁSA ÉSCSERÉJE
- 44 CURĂŢAREA I ÎNLOCUIREAFILTRULUI HEPA PRINCIPAL.
- 45 A TÖMLŐ ÉS A SZÍVÓFEJ TISZTÍTÁSA
- 46 CURĂŢAREA FURTUNULUI I A DUZEI
- 47 HIBAELHÁRÍTÁS
- 48 REZOLVAREA PROBLEMELOR
- 49 TARVIKUD
- 50
- 51 OHUTUSMEETMED
- 52 VEILIGHEIDSINSTRUCTIES
- 53 ENNE TÖÖ ALUSTAMIST
- 54
- 55
- 56
- 57 TOLMUKONTEINERI TÜHJENDAMINE.
- 58
- 59 PEAMISE HEPA-FILTRI VAHETAMINE.
- 60
- 61 VOOLIKU JA OTSIKU PUHASTAMINE
- 62
- 63 VEAOTSING
- 64
- 65 ZUBEHÖR
- 66 ACESSÓRIOS
- 67 SICHERHEITSVORKEHRUNGEN
- 68 PRECAUÇÕES DE SEGURANÇA
- 69 VORBEREITUNGEN
- 70 ANTES DE COMEÇAR
- 71 BESTMÖGLICHEREINIGUNGSERGEBNISSE ERZIELEN
- 72 OBTER OS MELHORES RESULTADOS
- 73 ENTLEEREN DES STAUBBEHÄLTERS
- 74 REMOÇÃO DO CONTEÚDO DOCOMPARTIMENTO DO PÓ.
- 75 REINIGEN UND AUSTAUSCHEN DESHEPA-HAUPTFILTERS
- 76 LIMPEZA E COLOCAÇÃO DO FILTROHEPA PRINCIPAL.
- 77 REINIGUNG DES SCHLAUCHESUND DER DÜSEN
- 78 LIMPEZA DA MANGUEIRA E DO BOCALDA ESCOVA
- 79 FEHLERSUCHE
- 80 RESOLUÇÃO DE PROBLEMAS
- 81
- 82 PRIBOR
- 83 NORME DI SICUREZZA
- 84 MERE PREDOSTROŽNOSTI
- 85
- 86 PRE POČETKA
- 87 PER OTTENERE I MIGLIORI RISULTATI
- 88 POSTIZANJE NAJBOLJIH REZULTATA
- 89 RIMOZIONE DEL CONTENUTO DALCONTENITORE DELLA POLVERE.
- 90 UKLANJANJE SADRŽAJA IZSPREMIŠTA ZA PRAŠINU
- 91 PULIZIA E SOSTITUZIONE DEL FILTROHEPA PRINCIPALE.
- 92 ČIŠĆENJE I ZAMENA GLAVNOG HEPAFILTERA
- 93 PULIZIA DEL FLESSIBILE E DELLASPAZZOLA
- 94 ČIŠĆENJE FLEKSIBILNE CEVI INASTAVKA
- 95 RICERCA DEI GUASTI
- 96 REŠAVANJE PROBLEMA
