Vitek VT-4027-4037: SUBWOOFER REAR PANEL HINTERTAFEL DES SUBWOOFERS ЗАДНЯЯ ПАНЕЛЬ САБВУФЕРА ЗАДНЯ ПАНЕЛЬ САБВУФЕРА REMOTE CONTROL UNIT FERNBEDIENUNGSPULT ПУЛЬТ ДИСТАНЦИОННОГО УПРАВЛЕНИЯ ПУЛЬТ ДИСТАНЦІЙНОГО КЕРУВАННЯ
SUBWOOFER REAR PANEL HINTERTAFEL DES SUBWOOFERS ЗАДНЯЯ ПАНЕЛЬ САБВУФЕРА ЗАДНЯ ПАНЕЛЬ САБВУФЕРА REMOTE CONTROL UNIT FERNBEDIENUNGSPULT ПУЛЬТ ДИСТАНЦИОННОГО УПРАВЛЕНИЯ ПУЛЬТ ДИСТАНЦІЙНОГО КЕРУВАННЯ: Vitek VT-4027-4037
Оглавление
- DEVICE DESCRIPTION BESCHREIBUNG DES GERÄTES ОПИСАНИЕ УСТРОЙСТВА ОПИС ПРИСТРОЮ
- SUBWOOFER REAR PANEL HINTERTAFEL DES SUBWOOFERS ЗАДНЯЯ ПАНЕЛЬ САБВУФЕРА ЗАДНЯ ПАНЕЛЬ САБВУФЕРА REMOTE CONTROL UNIT FERNBEDIENUNGSPULT ПУЛЬТ ДИСТАНЦИОННОГО УПРАВЛЕНИЯ ПУЛЬТ ДИСТАНЦІЙНОГО КЕРУВАННЯ
- Активная акустическая система 5.1 КОМПЛЕКТ ПОСТАВКИ ОПИСАНИЕ УСТРОЙСТВА ЗАДНЯЯ ПАНЕЛЬ САБВУФЕРА ПУЛЬТ ДИСТАНЦИОННОГО УПРАВЛЕНИЯ ПОДКЛЮЧЕНИЕ
- РАБОТА СИСТЕМЫ A. ВКЛЮЧЕНИЕ / ВЫКЛЮЧЕНИЕ ПИТАНИЯ B. ГРОМКОСТЬ C. РЕЖИМ ЗВУКА 3D D. ЦЕНТРАЛЬНАЯ КОЛОНКА E. ЗАДНИЕ КОЛОНКИ F. ПЕРЕДНИЕ КОЛОНКИ G. ВЫБОР ИСТОЧНИКА 2.1 CH и 5.1 CH H. ФУНКЦИЯ ОТКЛЮЧЕНИЯ ЗВУКА (MUTE) I. AM/FMТЮНЕР УСТРАНЕНИЕ НЕИСПРАВНОСТЕЙ 1. НЕТ ЗВУКА
- 2. НЕТ ЗВУКА В ПЕРЕДНЕЙ ЛЕВОЙ КОЛОНКЕ 3. НЕТ ЗВУКА В ПЕРЕДНЕЙ ПРАВОЙ КОЛОНКЕ 4. НЕТ ЗВУКА В ЦЕНТРАЛЬНОЙ КОЛОНКЕ 5. ЗАДНИЕ КОЛОНКИ НЕ ВОСПРОИЗВОДЯТ ЗВУК ПРИЛОЖЕНИЕ МЕРЫ ПРЕДОСТОРОЖНОСТИ ТЕХНИЧЕСКИЕ ХАРАКТЕРИСТИКИ AM/FMтюнер

SUBWOOFER REAR PANEL HINTERTAFEL DES SUBWOOFERS ЗАДНЯЯ ПАНЕЛЬ САБВУФЕРА ЗАДНЯ ПАНЕЛЬ САБВУФЕРА REMOTE CONTROL UNIT FERNBEDIENUNGSPULT ПУЛЬТ ДИСТАНЦИОННОГО УПРАВЛЕНИЯ ПУЛЬТ ДИСТАНЦІЙНОГО КЕРУВАННЯ
4027.qxd 04.10.2005 11:16 Page 3
5.1 Active Speaker System
Carefully read these instructions before installing the system.
SYSTEM COMPONENTS
The following components are included in the 5.1 acoustical system:
1. Subwoofer
2. Five satellite speakers with wires
3. Three audio cables
4. Remote control unit
5. Batteries for remote control unit
6. Operating instructions
DEVICE DESCRIPTION
1. Subwoofer
2. Satellite unit
3. Center unit
4. Signal line
5. Remote
SUBWOOFER REAR PANEL
1. 2.1 Channel audio inputs
2. 5.1 Channel audio inputs
3. Output jacks for front right and left satellite speakers (FR, FL)
4. Output jacks for rear right and left satellite speakers (RR, RL)
5. Output jack for center speaker (CEN)
6. Power switch
7. Power fuse
8. Power cord
9.FM antenna jack
10.AM antenna jack
REMOTE CONTROL UNIT
1. Power on/off button (STANDBY)
2. MUTE button
3. Audio source selection button (INPUT)
4. 3D sound mode button
5. STEREO/MONO signal reception selection button (ST/MN)
6. Volume control buttons for all channels (VOL+/)
7. Volume control buttons for frontleft channel (FL+/)
8. Volume control buttons for frontright channel (FR+/)
9. Volume control buttons for center channel (CEN+/)
10. Volume control buttons for subwoofer (SUB+/)
11. Volume control buttons for rearleft channel (SL+/)
12. Volume control buttons for rearright channel (SR+/)
13. Number entry buttons (09)
14. Button for entering number of 10 and higher (10+)
15. Button for programming radio stations into memory (MEMORY)
16.Radio band selection button (AM/FM)
17.Manual tuning buttons (TUNE +/)
18.Button for automatic tuning of radio stations (SCAN)
ENGLISH
4
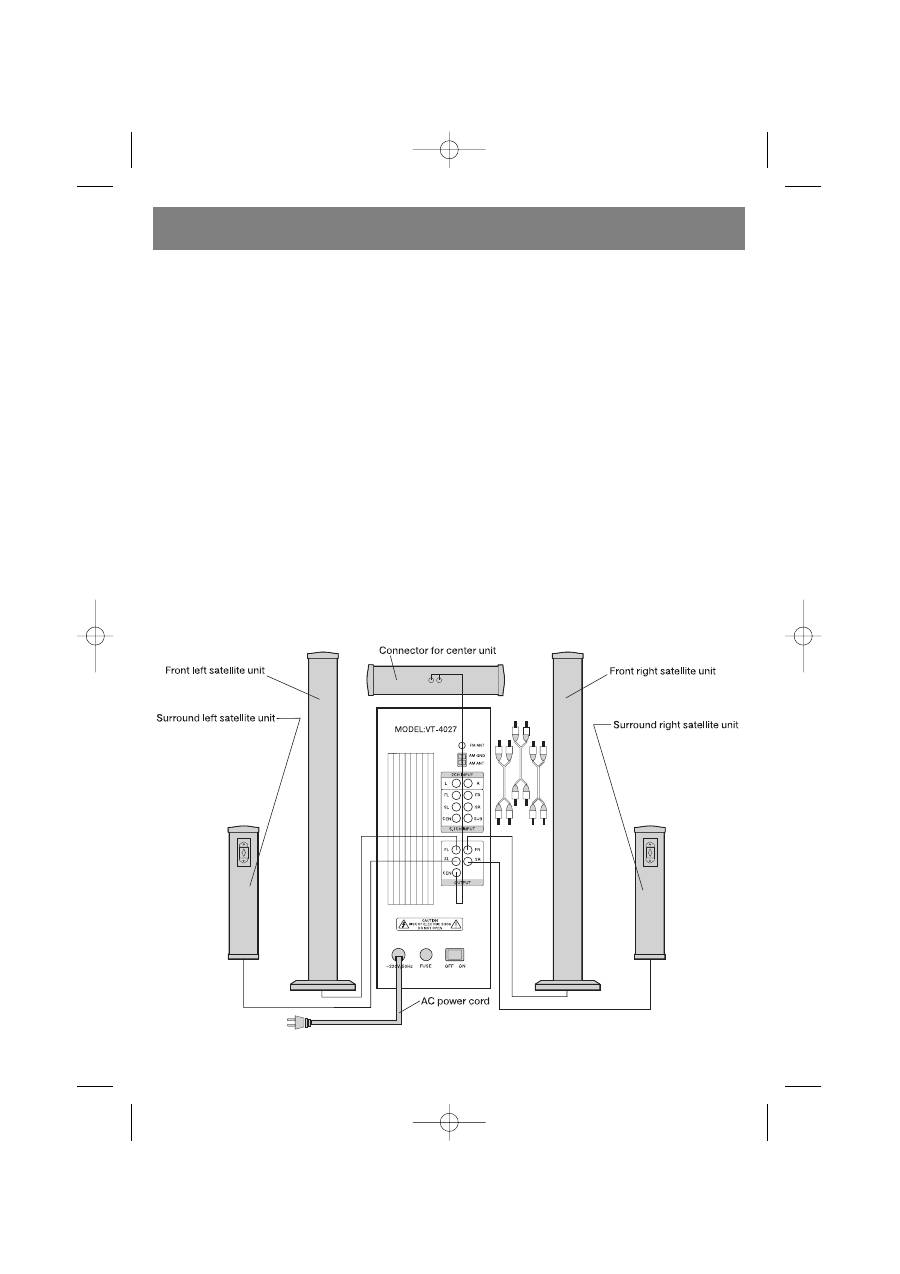
CONNECTIONS
4027.qxd 04.10.2005 11:16 Page 4

Make sure that the device connected to the subwoofer (DVD player,
for example) is turned off. Set the overall system volume to a mini
mum before making connections.
1. Open the lid of the battery compartment on the remote control
unit and insert the batteries, according to proper polarity.
2. Connect the wires from the front left and right satellite speakers,
the central speaker, and the rear left and right satellite speakers
to the output jacks on the rear panel of the subwoofer marked
FR, FL, CEN, RR, and RL.
3. Using an audio cable, connect any 2channel audio source (CD
player, for example) to the 2.1 CH INPUT jacks and any 6channel
audio source (for example, a DVD player with builtin AC3/Dolby
Digital decoder) to the 5.1 CH INPUT jacks on the subwoofer.
4. Connect the power cord to an electrical outlet and set the power
switch, located on the rear panel of the subwoofer, to the ON
position. Start playback on the connected audio source and use
the volume control, located on the remote control unit or on the
front panel of the subwoofer, to set the desired volume level.
SYSTEM OPERATION
A. TURNING THE POWER ON / OFF
1. Make all the necessary connections in accordance with the setup
instructions before turning on the device.
2.
Connect the system's power cord to an electrical outlet. (ATTEN
TION: The power source should conform to the device's power
supply requirements).
3. Set the power switch, located on the rear panel of the device, to
the ON position. Press the STANDBY button, located on the
remote control unit or on the front panel of the device, to turn on
the device's power.
B. VOLUME
1. Press the VOL + button on the remote control unit to increase the
overall system volume; the display on the front panel will show
the overall volume level of the system in a numerical format.
2. Press the VOL button on the remote control unit to decrease the
overall system volume; the display on the front panel will show
the overall volume level of the system in a numerical format.
C. 3D SOUND MODE
1. Connect the center and rear speakers to the system.
2. Press the 3D button located on the remote control unit to turn the
3D sound on or off.
D. CENTER SPEAKER
1. Press the CEN + button on the remote control unit to increase the
volume level on the central speaker; the display on the front
panel will show the volume level of the central speaker in a
numerical format.
2. Press the CEN button on the remote control unit to decrease
the volume level on the central speaker; the display on the front
panel will show the volume level of the central speakers in a
numerical format.
E. REAR SPEAKERS
1. Press the REAR + button on the remote control unit to increase
the volume level on the rear speakers; the display on the front
panel will show the volume level of the rear speakers in a numeri
cal format.
2. Press the REAR button on the remote control unit to decrease
the volume level on the rear speakers; the display on the front
panel will show the volume level of the rear speakers in a numeri
cal format.
F. FRONT SPEAKERS
1. Press the FRONT + button on the remote control unit to increase
the volume level on the front speakers; the display on the front
panel will show the volume level of the front speakers in a numer
ical format.
2. Press the FRONT button on the remote control unit to decrease
the volume level on the front speakers; the display on the front
panel will show the volume level of the front speakers in a numer
ical format.
G. AUDIO SOURCE SELECTION 2.1 CH or 5.1 CH
1. Connect the system correctly to the audio source.
2. Press the CD/DVD button on the remote control unit or on the
front panel of the subwoofer to select the audio source (2.1 CH
or 5.1 CH).
H. MUTE FUNCTION
1. Press the MUTE button on the front panel or on the remote con
trol unit to turn off the sound.
2. The MUTE indicator will appear on the front of the subwoofer.
3. Press the MUTE button again to turn on the sound.
I. AM/FM
TUNER
Connect the AM and FM antennas to their respective jacks locat
ed on the rear panel of the subwoofer.
1. Press the INPUT button on the remote control unit or on the front
panel until the subwoofer’s display shows the “TUNE” indicator.
3. Use the FM/AM button located on the remote control unit to
choose the desired band (FM or AM).
4. Press the SCAN button on the remote control unit to activate the
automatic tuning function. The tuner will tune to a radio station
automatically.
5. Press the TUNE+ or TUNE button on the remote control unit to
tune to a radio station manually.
6. Press the ST/MN button on the remote control unit while in the
FM band to choose between stereo and mono modes.
7. To save a chosen radio station into memory, press the MEMORY
button on the remote control unit and then press the desired
memory location number on the numeric keypad and the station
will be saved into memory. To enter a number of ten or higher,
first press the 10+ button and then a numeric button from 09.
NOTE: You can save up to 20 radio stations into memory.
RESOLVING MALFUNCTIONS
1. THERE IS NO SOUND AT ALL
(1) Make sure the system is connected properly.
(2) Increase the volume.
(3) Make sure the audio input is selected properly.
(4) Make sure the MUTE function has not been activated.
2. NO SOUND IS COMING FROM THE FRONTLEFT SPEAKER
(1) Make sure the frontleft speaker is properly connected to the
device.
(2) Make sure the device is properly connected to the audio source.
3. NO SOUND IS COMING FROM THE FRONTRIGHT SPEAKER
(1) Make sure the frontright speaker is properly connected to the
device.
ENGLISH
5
4027.qxd 04.10.2005 11:16 Page 5

(2) Make sure the device is properly connected to the audio source.
4. NO SOUND IS COMING FROM THE CENTRAL SPEAKER
(1) Make sure the central speaker is properly connected to the
device.
(2) Make sure the device is properly connected to the audio source.
(3) Increase the volume of the central speaker.
5. NO SOUND IS COMING FROM THE REAR SPEAKERS
(1) Maker sure the rear speakers are connected properly.
(2) Make sure the device is properly connected to the audio source.
NOTE: The central and rear speakers only work if the system is con
nected to a sixchannel audio source (for example, a DVD player with
an AC3/Dolby Digital decoder) or, if in 3D mode, when connected
through the 2.1 CH audio input.
APPENDIX
When connecting the device to a DVD player with a builtin DD/DTS
decoder, verify the following:
1. When connected through the 5.1 CH. audio input, the 5.1 CH audio
output should be chosen in the player's settings. Playback discs with
AC3/Dolby Digital 5.1 CH audio tracks.
2. To turn on the subwoofer, make sure that the speaker size in the
player's settings for the front, central and rear speakers is "Small"
and that the subwoofer output is set to "On."
When connecting the device to DVD player, carefully read the operat
ing instructions for the DVD player.
PRECAUTIONARY MEASURES:
Attention:
Please carefully read the points listed below to ensure
safe use of the device.
1. Read the instructions The safety instructions and operating
rules should be read before using the device.
2. Save the instructions Save the instructions for future use.
3. Follow the operating rules All of the safety instructions should
be followed.
4. Warning symbols Heed the indications of all warning symbols
located on the device's panels or in these instructions.
5. Power source The device should only be connected to a power
source with the characteristics indicated on the rear panel of the
device or in these instructions.
6. Protecting the power cord The power cord should be laid out in
such a way that it will not be damaged by external items or its
surroundings.
7. Water and moisture Do not use the device near reservoirs of
water (for example, bath tubs, sinks, etc).
8. Ventilation Install the device in a well ventilated room. Do not
install the device on couches, beds or carpets because the
device's ventilation may be blocked.
9. The effects of heat Do not install the device near heat sources
(for example, radiators, kitchen stoves, etc).
10. Periods of nonuse if the device will not be used for a long peri
od of time, disconnect the power plug from the electrical outlet.
11. The need for maintenance Utilize the services of qualified tech
nicians if:
•
The power cord is damaged; or
•
The device body is damaged; or
•
The device was subjected to rain; or
•
The device is not functioning properly; or
•
The device was subjected to shock.
12. Repair service The consumer should not attempt to repair the
device himself. Use only the services of a qualified technician.
13. Clean the device with a dry, soft clothe only.
14. Turn off the device during thunderstorms or when not in use for a
long period of time.
TECHNICAL CHARACTERISTICS
Power supply:
~220230 Volts
Output power:
60 W (Subwoofer)
+ 5 x 35 W (Satellite speakers)
Subwoofer speaker:
8"/4 Om
Satellite speakers:
2"/8 Om
Channel separation:
>45 dB
Signal/noise ratio:
>85 dB
Reproducible frequency band:
35 Hz 200 Hz (Subwoofer)
150 Hz 20 KHz (Satellite speakers)
AM/FM Tuner
General FM tuner characteristics:
Frequency band:
87.00 MHz ~108.00 MHz
Frequency tuning step:
50/100 KHz
Intermediate frequency of oscillation:
10.7 MHz
Temperature range:
5 +70°C
Antenna input impedance:
75 Om
Signal/noise ratio:
>45 dB
General AM tuner characteristics:
Frequency band:
522 KHz ~ 1610 KHz
Frequency tuning step:
9/10 KHz
Intermediate frequency of oscillation:
450 KHz
Temperature range:
5 +70°C
Signal/noise ratio:
>45 dB
The technical characteristics of the device may be changed without
prior notice.
Service life – no less than 5 years.
Guarantee
Details regarding guarantee conditions can be obtained from the
dealer from whom the appliance was purchased. The bill of sale or
receipt must be produced when making any claim under the terms of
this guarantee.
This product conforms to the EMCRequirements as laid
down by the Council Directive 89/336/EEC and to the Low
Voltage Regulation (23/73 EEC)
ENGLISH
6
4027.qxd 04.10.2005 11:16 Page 6
Aktives Akustiksystem 5.1
Lesen Sie vor dem Aufbau des Gerätes diese Bedienungsanleitung
aufmerksam durch.
LIEFERUMFANG
In das Akustiksystemset 5.1 sind folgende Elemente eingeschlossen:
1. Subwoofer
2. Fünf Satelliten mit Kabel
3. Drei AudioKabel
4. Fernbedienungspult
5. Batterien für Fernbedienungspult
6. Bedienungsanleitung
BESCHREIBUNG DES GERÄTES
1. Subwoofer
2. Satelliten (Lautsprecher)
3. Zentrallautsprecher
4. AudioKabel
5. Fernbedienung
HINTERTAFEL DES SUBWOOFERS
1. AudioEingangsbüchsen 2.1
2. AudioEingangsbüchsen 5.1
3. Ausgangsbüchsen für den rechten und den linken Frontalsatelliten
(FR, FL)
4. Ausgangsbüchsen für den rechten und den linken Hintersatelliten
(RR, RL)
5. Ausgangsbüchse für den Zentrallautsprecher (CEN)
6. Speiseschalter
7. Stromsicherung
8. Netzschnur
9. Anschlussbüchse für FM Antenne
10. Anschlussbüchse für AM Antenne
FERNBEDIENUNGSPULT
1. Taste zum Ein und Ausschalten (STANDBY)
2. Stummschalttaste (MUTE)
3. Wahltaste für Audioquelle (INPUT)
4. Wahltaste für Raumklangbetrieb (3D)
5. Taste für Empfangsbetrieb STEREO/MONO (ST/MN)
6. Lautstärketasten für alle Kanäle (VOL+/)
7. Lautstärketasten für den linken Frontalkanal (FL+/)
8. Lautstärketasten für den rechten Frontalkanal (FR+/)
9. Lautstärketasten für den Zentralkanal (CEN+/)
10. Lautstärketasten für den Subwoofer (SUB+/)
11. Lautstärketasten für den linken Hinterkanal (SL+/)
12. Lautstärketasten für den rechten Hinterkanal (SR+/)
13. Zifferntasten (09)
14. Ziffernwahltaste ab 10 und höher (10+)
15. Speichertaste für Radiosender (MEMORY)
16. Wahltaste für Radioempfangsbereich (AM/FM)
17. Tasten zur manuellen Abstimmung des Radiosenders (TUNE +/)
18. Taste zur automatischen Abstimmung des Radiosenders (SCAN)
DEUTSCH
7
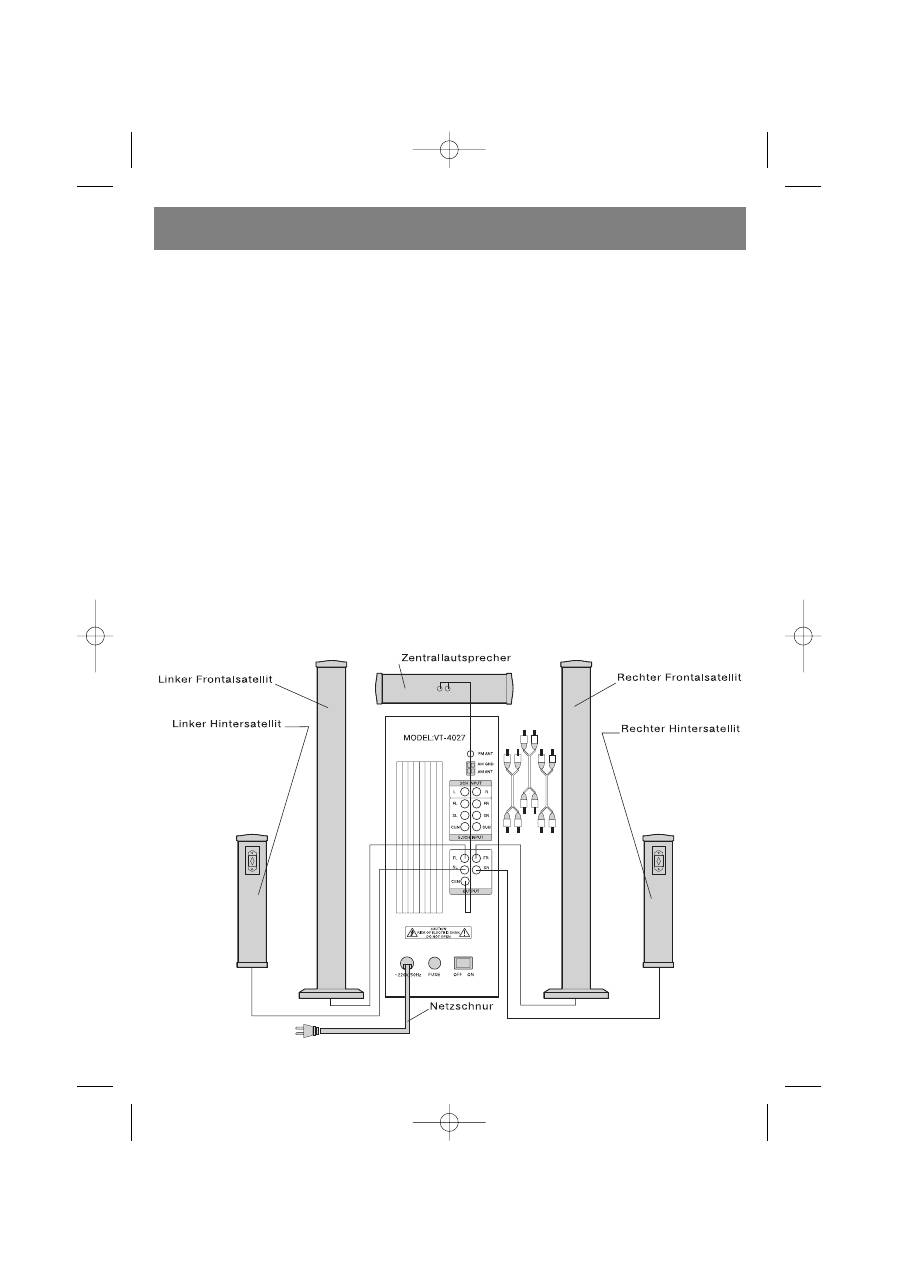
ANSCHLUSS
4027.qxd 04.10.2005 11:16 Page 7

Überzeugen Sie sich davon, dass das an den Subwoofer
anzuschließende Gerät ausgeschaltet ist. Stellen Sie vor dem
Anschließen die Lautstärke des Systems auf Minimum.
1. Öffnen Sie den Deckel des Batteriefachs des
Fernbedienungspults und legen Sie die Batterien ein, beachten
Sie dabei die Polarität.
2. Schließen Sie die Kabel des linken und des rechten
Frontallautsprechers, des Zentrallautsprechers, des linken und
des rechten Hinterlautsprechers an die Ausgangsbüchsen auf
der Hintertafel des Subwoofers an, die mit FR, FL, CEN, RP, RL
markiert sind.
3. Schließen Sie mit dem AudioKabel eine Zweikanaltonquelle
(z.B., einen CDSpieler) an den Eingang 2.1 CH INPUT, und eine
Sechskanaltonquelle (z.B., einen DVDSpieler mit eingebautem
ACs/Dolby Digital Decoder) an den Eingang 5.1 CH INPUT des
Subwoofers an.
4. Schließen Sie die Netzschnur an eine Steckdose an und stellen
Sie den Speiseschalter, der sich auf der Hintertafel des
Subwoofers befindet, in die Position ON. Schalten Sie die
Wiedergabe des angeschlossenen Gerätes ein und stellen Sie
mit den Lautstärkenreglertasten, die sich auf der Fernbedienung
oder auf der Hintertafel des Subwoofers befinden, die gewün
schte Lautstärke ein.
BETRIEB DES SYSTEMS
A. EINSCHALTEN / AUSSCHALTEN DES SPEISUNG
1. Führen Sie vor dem Einschalten des Gerätes die notwendigen
Anschlüsse durch gemäß der Anschlussanleitung durch.
2. Schließen Sie die Netzschnur des Systems an eine Steckdose
an.
(ACHTUNG: Die Speisequelle muss den Speisewerten des
Gerätes entsprechen).
3. Stellen Sie den Speiseschalter, der sich auf der Hintertafel des
Gerätes befindet, in die Position ON. Pressen Sie die Taste
STANDBY, die sich auf der Fernbedienung oder auf der Fronttafel
des Gerätes befindet, u die Speisung des Gerätes einzuschalten.
B. LAUTSTÄRKE
1. Pressen Sie die Taste VOL+ , um die Lautstärke des gesamtem
Systems zu steigern, dabei wird auf dem Display an der
Fronttafel wird der allgemeine Lautstärkenpegel des Systems in
Ziffern angezeigt.
2. Pressen Sie die Taste VOL, um die Lautstärke des gesamtem
Systems zu senken, dabei wird auf dem Display an der Fronttafel
wird der allgemeine Lautstärkenpegel des Systems in Ziffern
angezeigt.
C. 3DRaumklangbetrieb
1. Schließen Sie an das Gerät den Zentrallautsprecher und die
Hinterlautsprecher an.
2. Pressen Sie die Taste 3D, die sich auf dem Fernbedienungspult
befindet, um den 3DRaumklangbetrieb ein oder auszuschal
ten.
D. ZENTRALLAUTSPRECHER
1. Pressen Sie auf der Fernbedienung die Taste CEN+, um die
Lautstärke des Zentrallautsprechers zu steigern, dabei wird auf
dem Display an der Fronttafel der Lautstärkenpegel des
Zentrallautsprechers in Ziffern angezeigt.
2. Pressen Sie auf der Fernbedienung die Taste CEN, um die
Lautstärke des Zentrallautsprechers zu senken, dabei wird auf
dem Display an der Fronttafel der Lautstärkenpegel des
Zentrallautsprechers in Ziffern angezeigt.
E. HINTERLAUTSPRECHER
1. Pressen Sie auf der Fernbedienung die Taste REAR+, um die
Lautstärke der Hinterlautsprecher zu steigern, dabei wird auf
dem Display an der Fronttafel der Lautstärkenpegel der
Hinterlautsprecher in Ziffern angezeigt.
2. Pressen Sie auf der Fernbedienung die Taste REAR, um die
Lautstärke der Hinterlautsprecher zu senken, dabei wird auf dem
Display an der Fronttafel der Lautstärkenpegel der
Hinterlautsprecher in Ziffern angezeigt.
F. FRONTALLAUTSPRECHER
1. Pressen Sie auf der Fernbedienung die Taste FRONT +, um die
Lautstärke der Frontallautsprecher zu steigern, dabei wird auf
dem Display an der Fronttafel der Lautstärkenpegel der
Frontallautsprecher in Ziffern angezeigt.
2. Pressen Sie auf der Fernbedienung die Taste FRONT , um die
Lautstärke der Frontallautsprecher zu senken, dabei wird auf
dem Display an der Fronttafel der Lautstärkenpegel der
Frontallautsprecher in Ziffern angezeigt.
G. WAHL DER TONQUELLE: 2.1 CH und 5.1 CH
1. Schließen Sie das System korrekt an die Audioquelle an.
2. Pressen Sie auf der Fernbedienung oder auf der Fronttafel des
Subwoofers die Taste CD/DVD, um die Tonquelle zu wählen (2.1
CH oder 5.1 CH).
H. STUMMSCHALTFUNKTION (MUTE)
1. Pressen Sie auf der Fernbedienung oder auf der Fronttafel die Taste
MUTE, um den Ton stumm zu schalten.
2. Auf der Fronttafel des Subwoofers wird das Zeichen MUTE
angezeigt.
3.
Pressen Sie die Taste MUTE ein weiteres Mal, um den Ton
wieder einzuschalten.
I. AM/FM TUNER
Schließen Sie die AM und FM Antennen an die entsprechenden
Büchsen, die sich auf der Hintertafel des Subwoofers befinden, an.
1. Pressen Sie auf dem Fernbedienungspult oder auf der Fronttafel
die Taste INPUT solange, bis auf dem Display des Subwoofers
die Aufschrift “TUNE” erscheint.
3. Wählen Sie mit der Taste FM/AM, die sich auf dem
Fernbedienungspult befindet, den gewünschten
Radioempfangsbereich aus (FM oder AM).
4. Pressen Sie auf dem Fernbedienungspult die Taste SCAN, um die
automatische Sendersuche einzuschalten. Der Tuner wird sich
automatisch auf einen Radiosender einstellen.
5. Pressen Sie auf der Fernbedienung die Taste TUNE+ oder die
Taste TUNE, um den Radiosender manuell einzustellen.
6. Pressen Sie im FMBetrieb die Taste ST/MN, die sich auf der
Fernbedienung befindet, um die Radiosender im Stereo oder
Monobetrieb zu empfangen.
7. Um den gewählten Radiosender in den Speicher des Gerätes
einzutragen, pressen Sie auf dem Fernbedienungspult die Taste
MEMORY, pressen Sie danach die Zifferntaste, unter deren
Nummer der gewählte Sender in den Speicher eingetragen wird.
Um Ziffern über 10 anzuwählen, pressen Sie zuerst die Taste 10+,
pressen Sie danach eine der Tasten von 09.
DEUTSCH
8
4027.qxd 04.10.2005 11:16 Page 8

ANMERKUNG: In den Speicher des Gerätes können höchstens 20
Radiosender eingetragen werden.
STÖRUNGSBEHEBUNG
1. KEIN TON
(1) Prüfen Sie, ob das System korrekt angeschlossen ist.
(2) Steigern Sie die Lautstärke.
(3) Überzeigen Sie sich davon, dass der Audioeingang des Systems
richtig gewählt wurde.
(4) Überzeigen Sie sich davon, dass die Funktion MUTE ausgeschal
tet ist.
2. KEIN TON IM LINKEN FRONTALLAUTSPRECHER
(1) Prüfen Sie nach, ob der linke Frontallautsprecher korrekt an das
Gerät angeschlossen wurde.
(2) Prüfen Sie, ob das Gerät richtig an die Audioquelle angeschlossen
ist.
3. KEIN TON IM RECHTEN FRONTALLAURSPRECHER
(1) Prüfen Sie nach, ob der rechte Frontallautsprecher korrekt an das
Gerät angeschlossen wurde.
(2) Prüfen Sie, ob das Gerät richtig an die Audioquelle angeschlossen
ist.
4. KEIN TON AUS DEM ZENTRALLAUTSPRECHER
(1) Prüfen Sie nach, ob der Zentrallautsprecher korrekt an das Gerät
angeschlossen wurde.
(2) Prüfen Sie, ob das Gerät richtig an die Audioquelle angeschlossen
ist.
(3) Steigern Sie die Lautstärke des Zentrallautsprechers.
5. KEIN TON IN DEN HINTERLAUTSPRECHERN
(1) Prüfen Sie nach, ob die Hinterlautsprecher korrekt an das Gerät
angeschlossen wurden.
(2) Prüfen Sie, ob das Gerät richtig an die Audioquelle angeschlossen
ist.
ANMERKUNG: Der Zentrallautsprecher und die Hinterlautsprecher
funktionieren nur in dem Fall, wenn das System an eine
Sechskanaltonquelle (z.B., DVDSpieler mit AC3/Dolby Digital
Decoder) angeschlossen ist, beim Anschluss über den Audioeingang
2.1 CH INPUT funktionieren Sie nur im 3DBetrieb.
ANHANG
Wenn das Gerät an einen DVDSpieler mit eingebautem DD/DTS
Decoder angeschlossen wird, sollten Sie sich in den folgenden
Punkten überzeugen:
1. Beim Anschluss über den Audioeingang 5.1 CH. wird in den
Einstellungen des Spielers der Audioausgang 5.1CH gewählt.
Benutzen Sie für die Wiedergabe eine Audiodisk mit AC3/Dolby
Digital 5.1 CH Track.
2. Um den Subwoofer einzuschalten, sollten Sie sich davon überzeu
gen, dass in den Einstellungen des Spielers die Größe der
frontalen, der hinteren und des zentralen Lautsprechers als
“Klein” eingestellt ist, und der Ausgang auf den Subwoofer sich
in de Zustand “Ein” befindet.
Wenn das Gerät an einen DVDSpieler angeschlossen wird, sollten
Sie die Bedienungsanleitung des DVDSpielers aufmerksam durchle
sen.
VORSICHTSMASSNAHMEN:
Achtung:
Lesen Sie bitte die unten angeführten Punkte in Zielen der
Sicherheit bei der Anwendung des Gerätes aufmerksam durch.
1. Lesen Sie die Anleitung – Die Anleitungen über die
Sicherheitsmassnahmen und die Bedienungsvorschriften
müssen vor der Anwendung des Gerätes durchgelesen werden.
2. Bewahren Sie die Anleitung auf – Bewahren Sie die Anleitung
auf, um darauf zurückgreifen zu können.
3. Halten Sie alle Anwendungsvorschriften ein – Es müssen alle
Sicherheitsvorschriften eingehalten werden.
4. Warnzeichen – Halten Sie sich an die Anweisungen aller
Warnzeichen, die sich auf der Gerätetafel oder in dieser
Anleitung befinden.
5. Speisequelle – Das Gerät darf nur an Speisequellen angeschaltet
werden, die den Werten, die auf der Hintertafel des Gerätes oder
in dieser Anleitung befinden, entsprechen.
6. Schutz der Netzschur – Die Netzschnur muss so ausgelegt wer
den, dass sie nicht der Einwirkung von anderen Gegenständen
oder Umwelteinflüssen ausgesetzt wird.
7. Wasser und Feuchtigkeit – Benutzen Sie das Gerät nicht in der
Nähe von vollen Wasserbehältern (z.B., Badewanne,
Waschbecken, Swimmingpools etc.).
8. Lüftung – Stellen Sie das Gerät in eine Raum mit guter Lüftung
auf. Stellen Sie das Gerät nicht auf Sofas, Betten oder Teppichen
auf, da das die Lüftung des Gerätes behindern könnte.
9. Wärmeeinwirkung – Stellen Sie das Gerät nicht neben
Wärmequellen auf (z.B., Heizkörper, Küchenherde etc.).
10. Anwendungspause Wenn das Gerät innerhalb von einer län
geren Zeitspanne nicht benutzt wird, trennen Sie die Steckgabel
von der Steckdose.
11. Bedarf an Wartungsservice – Wenden Sie sich nur an quali
fiziertes Fachpersonal, wenn:
•
Die Steckgabel beschädigt ist; oder
•
Wenn das Gehäuse des Gerätes beschädigt ist; oder
•
Wenn das Gerät unter die Einwirkung von Regen gekommen
ist; oder
•
Wenn das Gerät nicht ordnungsgemäß funktioniert; oder
•
Wenn das Gerät unter Stoßeinwirkung gekommen ist.
12. Servicewartung – Der Benutzer sollte nicht versuchen das Gerät
selbstständig zu reparieren. Wenden Sie sich nur an qualifiziertes
Fachpersonal.
13. Reinigen Sie das Gerät nur mit einem trockenen, weichen
Stofftuch.
14. Schalten Sie das Gerät bei Gewitter oder wenn Sie es für längere
Zeit nicht benutzen immer von der Steckdose ab.
DEUTSCH
9
4027.qxd 04.10.2005 11:16 Page 9

TECHNISCHE KENNDATEN
Speisung: ~220230
Volt
Ausgangsleistung:
60 W (Subwoofer)
+ 5 x 35 W (Satelliten)
Subwooferlautsprecher: 8”/4
Ohm
Satellitenlautsprecher: 2”/8
Ohm
Kanaleinteilung: >45
dB
Signal/RauschVerhältnis: >85
dB
Wiedergabefrequenzbereich: 35 Hz – 200 Hz (Subwoofer)
150 Hz – 20 KHz (Satelliten)
AM/FM Tuner
Allgemeine Kennwerte des FMTuners:
Bandbereich:
87.00 MHz ~108.00 MHz
Abstimmungsskala: 50/100
KHz
Überlagerungszwischenfrequenz: 10.7
MHz
Temperaturenbereich:
5 +70°C
Impedanz am Antenneneingang:
75 Ohm
SignalRauschVerhältnis: >45
dB
Allgemeine Kennwerte des AMTuners:
Frequenzbereich:
522 KHz~ 1610 KHz
Abstimmungsskala: 9/10
KHz
Überlagerungszwischenfrequenz: 450
KHz
Temperaturenbereich:
5 +70 °C
SignalRauschVerhältnis: >45dB
Die technischen Kennwerte des Gerätes können ohne Vorbescheid
geändert werden.
Die Lebensdauer des Gerätes beträgt nicht
weniger als 5 Jahre
Gewährleistung
Ausführliche Bedingungen der Gewährleistung kann man beim Dealer,
der diese Geräte verkauft hat, bekommen. Bei beliebiger
Anspruchserhebung soll man während der Laufzeit der vorliegenden
Gewährleistung den Check oder die Quittung über den Ankauf
vorzulegen.
Das vorliegende Produkt entspricht den Forderungen der
elektromagnetischen Verträglichkeit, die in 89/336/EWG
Richtlinie des Rates und den Vorschriften 23/73/EWG
über die Niederspannungsgeräte vorgesehen sind.
DEUTSCH
10
4027.qxd 04.10.2005 11:16 Page 10
