Vitek 1903: Гарантийный талон
Гарантийный талон: Vitek 1903
Оглавление
Гарантийный талон
ENGLISH
Сведения о покупке
Модель:
Серийный №:
FN 190300000
Дата покупки:
Сведения о продавце
Название и адрес продающей организации
Телефон:
Подтверждаю получение исправного изделия, с условиями гарантии ознакомлен
Подпись покупателя
М.П.
Внимание!
Гарантийный талон действителен только при наличии печати
продающей организации
Модель: Серийный №:
FN 190300000
Дата поступления в ремонт:
Дата выполнения ремонта:
Вид ремонта:
М.П.
Купон №3
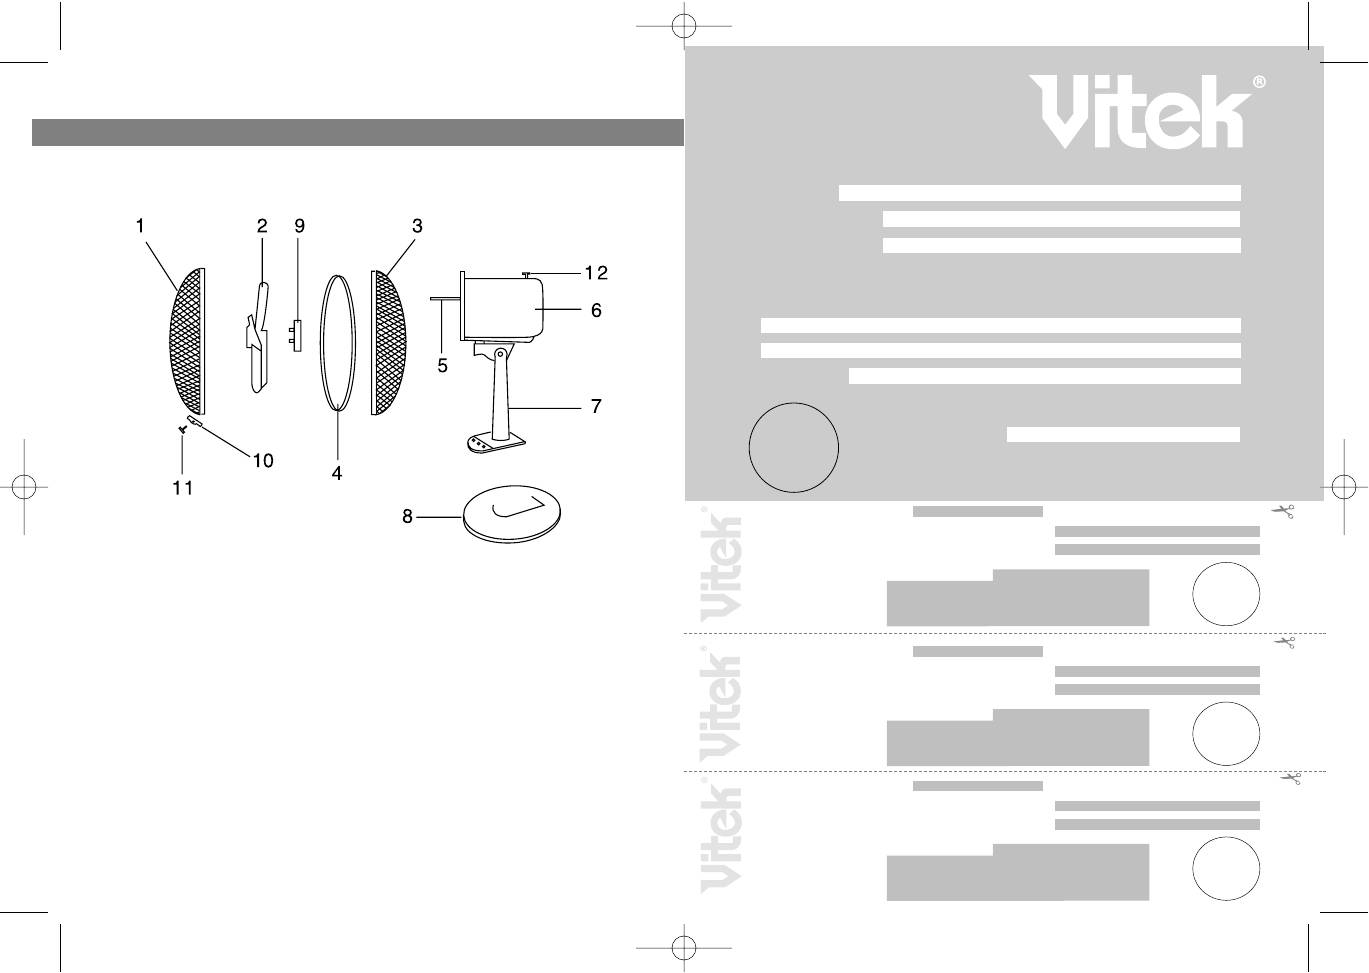
DESCRIPTION OF PARTS
Модель: Серийный №:
FN 190300000
Дата поступления в ремонт:
Дата выполнения ремонта:
1. Front Grill
7. Stand
Вид ремонта:
2. Blade
8. Base
М.П.
3. Rear Grill
9. Nut
Купон №2
4. Rim
10. Safety Pin
5. Shaft
11. Screw A
Модель: Серийный №:
FN 190300000
6. Motor
12. Oscillation Control Bar
Дата поступления в ремонт:
Дата выполнения ремонта:
Вид ремонта:
2
М.П.
Купон №1
1903.qxd 02.12.02 16:37 Page 4
ENGLISH
SAFETY PRECAUTIONS
1. Always turn this appliance off and unplug immediately after using
and before cleaning.
2. Always turn this appliance off before removing plug from the wall
outlet.
3. To protect against electrical hazards, do not place this appliance in
water or other liquid. Do not allow fan to become wet or damp.
4. Do not store appliance where it can fall into water or other liquid.
5. Do not leave this appliance unattended when plug in. Turn fan off
when leaving for an extended period.
6. Supervision is recommended when this appliance is used near chilZ
dren, invalids or pets.
7. Use this appliance only for its intended use as described in this
instruction sheet.
8. Do not operate any appliance with a damaged cord or plug, or after
the appliance malfunctions, or in dropped or damaged in any manZ
ner. Follow warranty instructions.
9. Place fan on a flat, level surface to avoid tapping.
10. Avoid contacting any moving parts.
11. Never drop or insert any object into any opening. Do not insert any
object into the area protected by the wire guards.
12. Do not obstruct the air flow.
13. Do not operate the fan without the guard.
ASSEMBLY INSTRUCTIONS
1. Carefully unpack all parts from the box.
2. Remove the rear grill Zmounting nut and mount the rear grill. Make
sure that the grill fit snugly over the prongs protruding from the
motor housing. Install the grill nut and hand tighten.
3. Insert the fan blade onto the motor shaft and make sure that il fits
as far back on the Shaft as possible. Tighten the blade nut into place
to secure the blade onto the shaft.
Turning counterZclockwise tightens the blade nut.
4. Mount the front mesh grill onto the rear grill with plastic round rim.
3
10
1903.qxd 02.12.02 16:37 Page 6


