Pioneer VSX-520-S: The System Setup menu
The System Setup menu: Pioneer VSX-520-S
The System Setup menu 06
39
En
English
Français
Español
Chapter 6:
The System Setup menu
These settings are designed to fine-tune your
system, but if you’re satisfied with the settings
Using the System Setup menu
made in Automatically setting up for surround
The following section shows you how to make
sound (MCACC) on page 27, it isn’t necessary
detailed settings to specify how you’re using
to make all of these settings.
the receiver. It also explains how to fine-tune
individual speaker system settings.
CAUTION
RECEIVER
TV
• The test tones used in the System Setup
SOURCESLEEP
CONTROL
are output at high volume.
RECEIVER
INPUT SELECT
DTV/TV
INPUT
BD DVD
TV
Important
• Depending on the PRE OUT setting, there
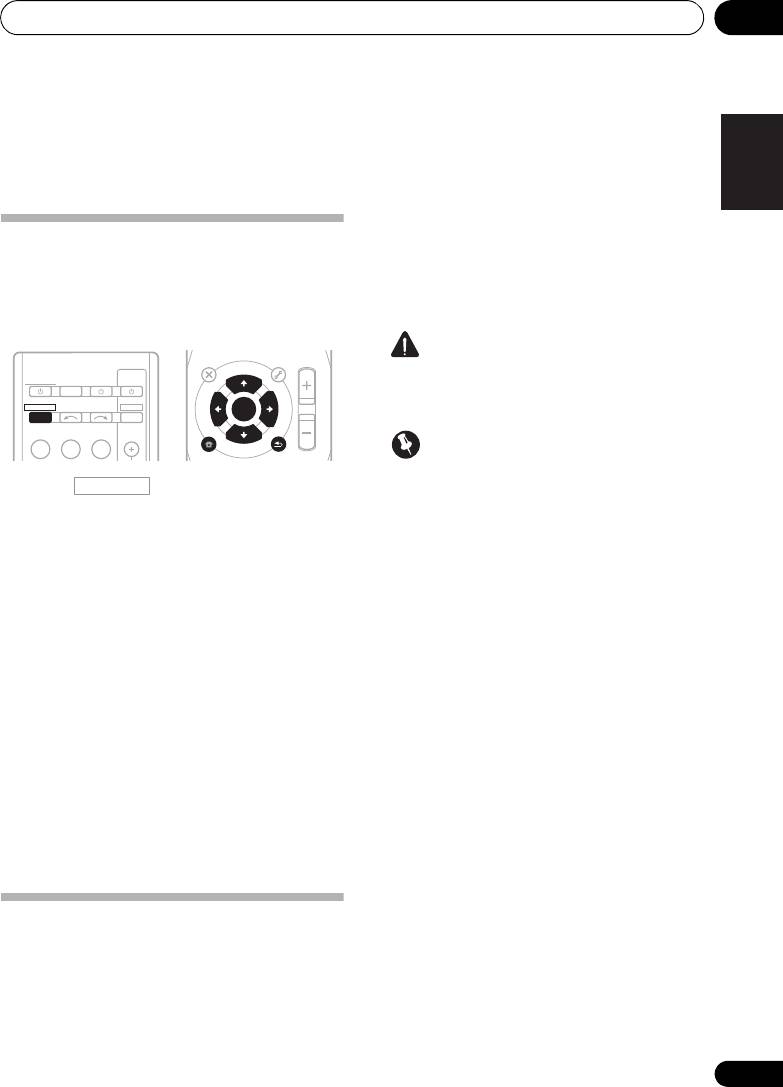
1 Press on the remote control,
will be differences in the speaker items that
then press the
SETUP
button.
can be adjusted.
2Use
/
to select the setting you want to
1 Select ‘SP SETUP’ from the System Setup
adjust then press
ENTER
.
menu.
• A.MCACC – This is a quick and effective
automatic surround setup (see
2Use
/
to select the setting you want to
Automatically setting up for surround
adjust then press
ENTER
.
sound (MCACC) on page 27).
• SP SET – Specify size / number of speakers
connected (see Speaker setting on
• SP SETUP – Specify the size, number,
page 40).
distance and overall balance of the
speakers you’ve connected (see Manual
• X.OVER – Specify which frequencies will
speaker setup below).
be sent to the subwoofer (see Crossover
network on page 41).
• IN ASSIG – Specify what you’ve connected
to the component video inputs (see The
• CH LEVEL – Adjust overall balance of your
Input Assign menu on page 42).
speaker system (see Channel level on
page 41).
• PRE OUT – Specify how to use the PRE
OUT outputs (see The Pre Out Setting on
• SP DISTN – Specify the distance of your
page 42).
speakers from the listening position (see
Speaker distance on page 41).
3Press
RETURN
after making the
Manual speaker setup
adjustments necessary for each setting.
These setting optimize surround sound
performance. You only need to make these
settings once (unless you change the
placement of your current speaker system or
add new speakers).
AUDIO
TUNER EDIT
MASTER
PARAMETER
TOOLS
VOLUME
U
N
E
MENU
TOP
T
MENU
P
R
E
E
S
E
T
ENTER
S
T
E
P
R
HOME
MENU
SETUP
T
U
N
E
BAND
CATEGORY
RETURN
RECEIVER
VSX-520_SYXCN_En.book 39 ページ 2010年4月12日 月曜日 午後7時13分

The System Setup menu06
Speaker setting
• Surround (S) – Select LARGE if your
surround speakers reproduce bass
Use this setting to specify your speaker
frequencies effectively. Select SMALL to
configuration (size, number of speakers). It is a
send bass frequencies to the other
good idea to make sure that the settings made
speakers or subwoofer. If you didn’t
in Automatically setting up for surround sound
connect surround speakers choose NO
(MCACC) on page 27 are correct.
(the sound of the surround channels is
1 Select ‘SP SET’ from the SP SETUP menu.
sent to the other speakers).
3
2Use
/
to choose the speaker(s) that
• Surround Back (SB)
– Select the number
you want to set then select a speaker size.
of surround back speakers you have (one,
4
Use / to select the size (and number) of
two or none).
Select LARGE if your
each of the following speakers:
surround back speakers reproduce bass
frequencies effectively. Select SMALL to
• Front (F) – Select LARGE if your front
send bass frequencies to the other
speakers reproduce bass frequencies
speakers or subwoofer. If you didn’t
effectively, or if you didn’t connect a
connect surround back speakers choose
subwoofer. Select SMALL to send the bass
NO.
1
frequencies to the subwoofer.
• Subwoofer (SW) – LFE signals and bass
• Center (C) – Select LARGE if your center
frequencies of channels set to SMALL are
speaker reproduces bass frequencies
output from the subwoofer when YES is
effectively, or select SMALL to send bass
5
selected.
Choose the PLUS setting if you
frequencies to the other speakers or
want the subwoofer to output bass sound
subwoofer. If you didn’t connect a center
continuously or you want deeper bass (the
speaker, choose NO (the center channel is
bass frequencies that would normally
sent to the other speakers).
come out the front and center speakers are
2
• Front Height (FH)
– Select LARGE if your
also routed to the subwoofer). If you did not
front height speakers reproduce bass
connect a subwoofer choose NO (the bass
frequencies effectively. Select SMALL to
frequencies are output from other
send bass frequencies to the other
speakers).
speakers or subwoofer. If you didn’t
connect front height speakers choose NO.
40
En
Note
VSX-520_SYXCN_En.book 40 ページ 2010年4月12日 月曜日 午後7時13分
1 If you select SMALL for the front speakers, the subwoofer will automatically be fixed to YES. Also, the center, surround,
surround back and front height speakers can’t be set to LARGE if the front speakers are set to SMALL. In this case, all bass
frequencies are sent to the subwoofer.
2 • You can only adjust this setting when PRE OUT is set to HEIGHT.
• If the surround speakers are set to NO, the front height speakers will automatically be set to NO.
3 You can only adjust the this setting when PRE OUT is set to SURR.BACK.
4 • If the surround speakers are set to NO, the surround back speakers will automatically be set to NO.
• If you select one surround back speaker only, make sure that additional amplifier is hooked up to the PRE OUT L (Single)
terminal.
5 If you can’t get good bass results, listen to the bass response with the subwoofer set to PLUS and YES or the front speakers
set to LARGE and SMALL alternatively and let your ears judge which sounds best. If you’re having problems, the easiest option
is to route all the bass sounds to the subwoofer by selecting SMALL for the front speakers.
The System Setup menu 06
41
En
English
Français
Español
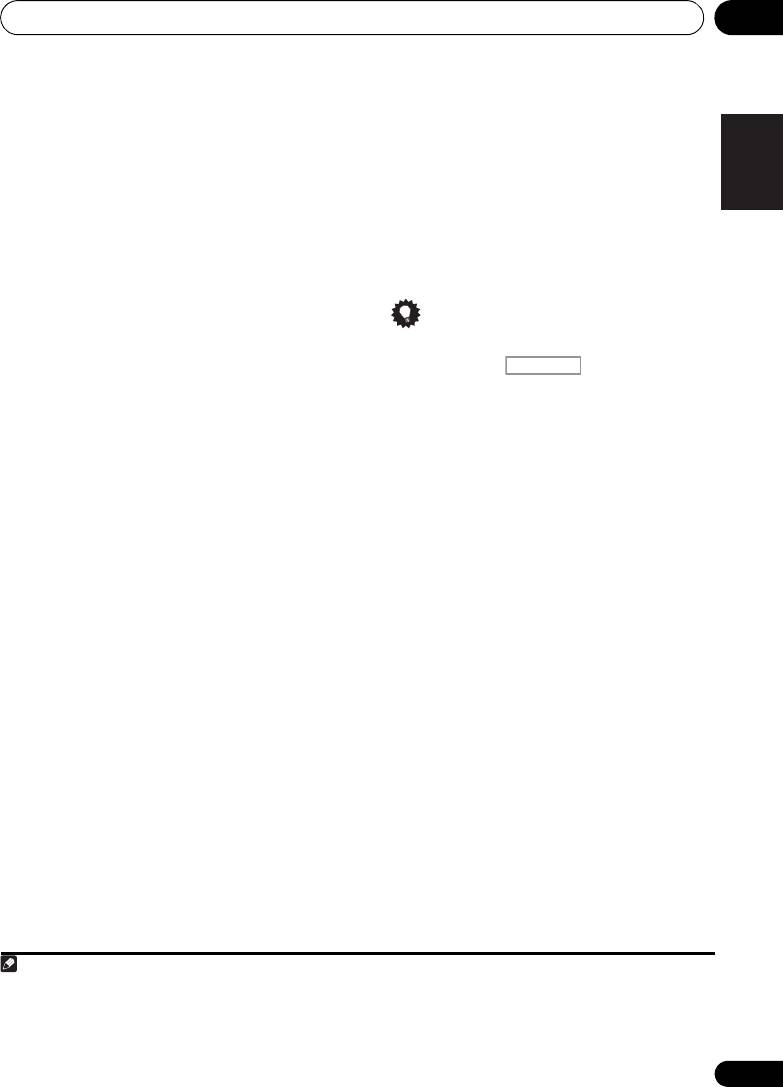
Crossover network
When the surround back speakers are
connected:
•Default setting: 100Hz
L
C
R
SR
SBR
SBL
SL
SW
This setting decides the cutoff between bass
sounds playing back from the speakers
When the front height speakers are connected:
selected as LARGE, or the subwoofer, and bass
L
FHL
C
FHR
R
SR
SL
SW
sounds playing back from those selected as
1
Adjust the level of each speaker as the test
SMALL.
It also decides where the cutoff will
3
tone is emitted.
be for bass sounds in the LFE channel.
1 Select ‘X.OVER’ from the SP SETUP menu.
Tip
2Use
/
to choose the frequency cutoff
• You can change the channel levels at any
point.
time by press , then press CH
Frequencies below the cutoff point will be sent
SELECT and LEV +/– on the remote
to the subwoofer (or LARGE speakers).
control. You can also press CH SELECT
and use / to select the channel, and
Channel level
then use / to adjust the channel
Using these settings, you can adjust the overall
levels.
balance of your speaker system.
1 Select ‘CH LEVEL’ from the SP SETUP
Speaker distance
menu.
For good sound depth and separation from
your system, you need to specify the distance
2Use
/
to select a setup option.
of your speakers from the listening position.
• T. TONE M – Move the test tone manually
The receiver can then add the proper delay
from speaker to speaker and adjust
needed for effective surround sound.
individual channel levels.
• T. TONE A – Adjust channel levels as the
1 Select ‘SP DISTN.’ from the SP SETUP
test tone moves from speaker to speaker
menu.
automatically.
2Use
/
to choose the speaker that you
3 Confirm your selected setup option.
want then set the distance.
2
The test tones will start after you press ENTER.
Use / to adjust the distance of each
speaker (in 0.1 m increments).
4 Adjust the level of each channel using
/.
If you selected T. TONE M, use / to switch
speakers.
The T. TONE A setup outputs test tones in the
following order (depends on speaker settings).
Note
1 For more on selecting the speaker sizes, see Speaker setting on page 40.
2 After the volume increases to the reference level, test tones will be output.
3 • If you are using a Sound Pressure Level (SPL) meter, take the readings from your main listening position and adjust the level
of each speaker to 75 dB SPL (C-weighting/slow reading).
• The subwoofer test tone is output at low volumes. You may need to adjust the level after testing with an actual soundtrack.
RECEIVER
VSX-520_SYXCN_En.book 41 ページ 2010年4月12日 月曜日 午後7時13分

VSX-520_SYXCN_En.book 42 ページ 2010年4月12日 月曜日 午後7時13分42
The System Setup menu06
• For the assignment of the digital signal
inputs, see Choosing the input signal on
The Input Assign menu
page 38.
You only need to make settings in the Input
Assign menu if you didn’t hook up your
equipment according to the default settings for
the component video inputs.
The Pre Out Setting
Specify either using the surround back speaker
• Default settings:
or the front height speaker connection with the
COMP 1 – BD
PRE OUT outputs. An additional amplifier is
COMP 2 – DVD
required for the speaker connection.
If you didn’t make component video
•Default setting: SURR.BACK (Surround
connections according to the defaults above,
back)
you must assign the numbered input to the
1 Select ‘PRE OUT’ from the System Setup
component you’ve connected (or else you may
menu.
see the video signal of a different component).
For more on this, see Using the component
2 Select which speaker to connect to the
video jacks on page 24.
PRE OUT outputs using
/
.
• SURR.BACK – Connect the surround back
1 Select ‘IN ASSIG’ from the System Setup
speaker.
menu.
• HEIGHT – Connect the front height
2 Select ‘COMP. IN’ from the IN ASSIG
speaker.
menu.
3Use
/
to select the number of the
component video input to which you’ve
connected your video component.
The numbers correspond with the numbers
beside the inputs on the rear of the receiver.
4 Select the component that corresponds
with the one you connected to that input.
•Use the / buttons and ENTER to select
BD, DVD, TV, DVR or OFF.
• If you assign a component input to a
certain function, any component inputs
previously assigned to that function will
automatically be switched off.
• Make sure you have connected the audio
from the component to the corresponding
inputs on the rear of the receiver.
• If you connect any source component to
the receiver using a component video
input, you should also have your TV
connected to this receiver’s COMPONENT
VIDEO OUT jacks.
42
En
Оглавление
- Contents
- Flow of settings on the receiver
- Before you start
- Controls and displays
- Connecting your equipment
- Basic Setup
- Listening to your system
- The System Setup menu
- Using the tuner
- Making recordings
- Other connections
- Additional information
- Table des matières
- Organigramme des réglages sur le récepteur
- Avant de commencer
- Commandes et affichages
- Raccordement de votre équipement
- Configuration de base
- Écoute de sources à l’aide de votre système
- Menu de configuration du système
- Utilisation du tuner
- Enregistrement
- Autres raccordements
- Informations complémentaires
- Содержание
- Порядок выполнения настроек на ресивере
- Перед началом работы
- Органы управления и индикаторы
- Подключение оборудования
- Основная настройка
- Прослушивание системы
- Меню System Setup (Настройка системы)
- Использование тюнера
- Выполнение записи на внешний источник
- Другие подключения
- Дополнительная информация
