Pioneer VSX-520-S: Basic Setup
Basic Setup: Pioneer VSX-520-S
Basic Setup 04
27
En
English
Français
Español
Chapter 4:
Basic Setup
1 Switch on the receiver.
Automatically setting up for
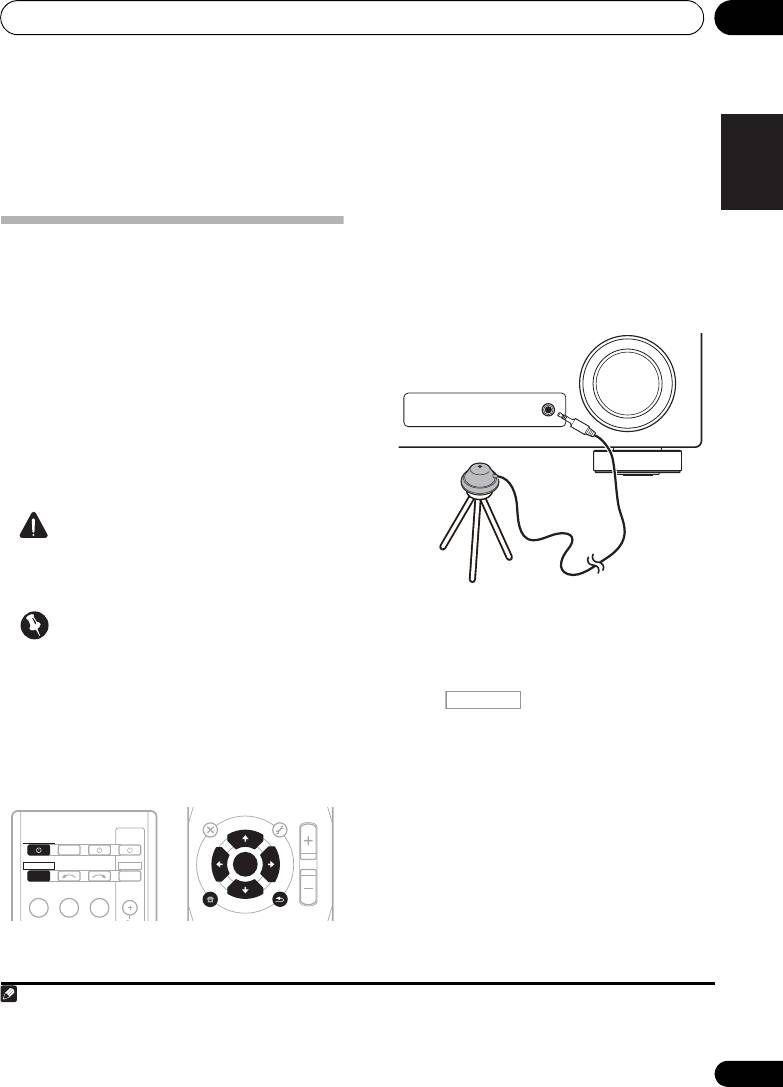
2 Connect the microphone to the
MCACC
SETUP MIC
jack on the front panel.
surround sound (MCACC)
Make sure there are no obstacles between the
The Auto Multi-Channel Acoustic Calibration
speakers and the microphone.
(MCACC) setup measures the acoustic
characteristics of your listening area, taking
into account ambient noise, speaker size and
distance, and tests for both channel delay and
channel level. After you have set up the
microphone provided with your system, the
receiver uses the information from a series of
test tones to optimize the speaker settings and
equalization for your particular room.
CAUTION
• The test tones used in the Auto MCACC
Setup are output at high volume.
If you have a tripod, use it to place the
Important
microphone so that it’s about ear level at your
normal listening position. Otherwise, place the
• The Auto MCACC Setup will overwrite any
microphone at ear level using a table or a chair.
existing speaker settings you’ve made.
• If you connected either the surround back
3 Press on the remote control,
speaker or the front height speaker, make
then press the
SETUP
button.
sure that the Pre Out setting is correctly set
•Press SETUP at any time to exit the System
1
before performing the Auto MCACC Setup
Setup menu.
(see page 42).
4 Select ‘A.MCACC’ from the System
2
Setup menu then press ENTER.
Try to be as quiet as possible after pressing
ENTER. The system outputs a series of test
tones to establish the ambient noise level.
AUDIO
TUNER EDIT
MASTER
PARAMETER
TOOLS
VOLUME
U
N
E
MENU
TOP
T
MENU
E
T
P
R
S
E
E
ENTER
S
R
T
E
P
HOME
MENU
T
U
N
E
BAND
SETUP
RETURN
PTY SEARCH
RECEIVER
TV
SOURCESLEEP
CONTROL
RECEIVER
INPUT SELECT
DTV/TV
INPUT
BD DVD
TV
C
Note
1 The screensaver automatically starts after three minutes of inactivity. If you cancel the Auto MCACC Setup at any time, the
receiver automatically exits and no settings will be made.
2 MIC IN blinks when the microphone is not connected to MCACC SETUP MIC.
MASTER
VOLUME
MCACC SETUP MIC
Microphone
Tripod
VSX-520_SYXCN_En.book 27 ページ 2010年4月12日 月曜日 午後7時13分
RECEIVER

Basic Setup04
If the noise level is too high, NOISY! blinks in
Again, try to be as quiet as possible while this
the display for five seconds. To exit and check
is happening. It may take 1 to 3 minutes.
the noise levels again, press SETUP (see the
7 The Auto MCACC Setup has finished!
notes about ambient noise below) or press
The front panel MCACC indicator lights to
ENTER when you’re prompted to RETRY?.
show the surround settings are complete.
• Do not adjust the volume during the test
The settings made in the Auto MCACC Setup
tones. This may result in incorrect speaker
should give you excellent surround sound from
settings.
your system, but it is also possible to adjust
The system now checks the microphone and
these settings manually using the System
your speaker setup.
1
Setup menu (starting on page 39).
If you see an ERR message in the display, there
may be a problem with your mic or the speaker
Other problems when using the Auto
connections. Turn off the power, and check the
MCACC Setup
problem indicated by the ERR message (see
If the room environment is not optimal for the
below), then try the auto surround setup again.
Auto MCACC Setup (too much background
• ERR Fch – Check front speaker
noise, echo off the walls, obstacles blocking
connections.
the speakers from the microphone) the final
settings may be incorrect. Check for household
• ERR Sch – Check surround speaker
appliances (air conditioner, fridge, fan, etc.),
connections.
that may be affecting the environment and
• ERR SBch – Check surround back or front
switch them off if necessary. If there are any
height speaker connection.
instructions showing in the front panel display,
5 When you see CHECK OK in the display,
please follow them.
confirm your speaker configuration.
• Some older TVs may interfere with the
Use / to check each speaker in turn. YES or
operation of the microphone. If this seems
NO should reflect the actual speakers
to be happening, switch off the TV when
connected. If the speaker configuration
doing the Auto MCACC Setup.
displayed isn’t correct, use / to change
the setting. When you’re finished, go to the
next step.
6 Select CHECK OK in the display then press
ENTER
.
If the display in step 5 is left untouched for 10
seconds, and the ENTER button is not pressed
in Step 6, the Auto MCACC Setup will start
again from the beginning.
The receiver outputs more test tones to
determine the optimum receiver settings for
speaker setting, channel level, speaker
distance, and Acoustic Calibration EQ.
28
En
Note
VSX-520_SYXCN_En.book 28 ページ 2010年4月12日 月曜日 午後7時13分
1 • Depending on the characteristics of your room, sometimes identical speakers with cone sizes of around 12 cm will end up
with different size settings. You can correct the setting manually using the Speaker setting on page 40.
• The subwoofer distance setting may be farther than the actual distance from the listening position. This setting should be
accurate (taking delay and room characteristics into account) and generally does not need to be changed.
Оглавление
- Contents
- Flow of settings on the receiver
- Before you start
- Controls and displays
- Connecting your equipment
- Basic Setup
- Listening to your system
- The System Setup menu
- Using the tuner
- Making recordings
- Other connections
- Additional information
- Table des matières
- Organigramme des réglages sur le récepteur
- Avant de commencer
- Commandes et affichages
- Raccordement de votre équipement
- Configuration de base
- Écoute de sources à l’aide de votre système
- Menu de configuration du système
- Utilisation du tuner
- Enregistrement
- Autres raccordements
- Informations complémentaires
- Содержание
- Порядок выполнения настроек на ресивере
- Перед началом работы
- Органы управления и индикаторы
- Подключение оборудования
- Основная настройка
- Прослушивание системы
- Меню System Setup (Настройка системы)
- Использование тюнера
- Выполнение записи на внешний источник
- Другие подключения
- Дополнительная информация
