Pioneer VSX-520-S: Controls and displays
Controls and displays: Pioneer VSX-520-S

Controls and displays 02
9
En
English
Français
Español
Chapter 2:
Controls and displays
Front panel
1 27854 6
3
AUDIO/ VIDEO MULTI-CHANNEL RECEIVER
VSX
-520
CONTROL
PHASE
STANDBY/ON
SPEAKERS
DIMMER DISPLAY BAND TUNE TUNER EDIT PRESET ENTER
INPUT
MASTER
SELECTOR
VOLUME
PHONES
LISTENING MODE
AUTO/DIRECT STEREO/ ALC STANDARD
ADV SURROUND SOUND RETRIEVER
MCACC SETUP MIC
9 1110 12
1
STANDBY/ON
DIMMER
Dims or brightens the display. The
2
INPUT SELECTOR
dial
brightness can be controlled in four steps.
Selects an input source.
DISPLAY
3
MCACC
indicator
Switches the display of this unit. The
Lights when Acoustic Calibration EQ (page 34)
listening mode, sound volume, Pre Out
is on (Acoustic Calibration EQ is automatically
setting or input name can be checked by
set to on after the Auto MCACC Setup
1
selecting an input source.
(page 27)).
6 Character display
4 Remote sensor
See Display on page 11.
Receives the signals from the remote control
(see Operating range of remote control on
7 Tuner control buttons
page 10).
BAND
5
SPEAKERS
Switches between AM, FM ST (stereo) and
Use to change the speaker system on or
FM MONO radio bands (page 43).
off. When the SP OFF is selected, no sound
is output from the speakers connected to
TUNE /
this receiver.
Used to find radio frequencies (page 43).
Note
VSX-520_SYXCN_En.book 9 ページ 2010年4月12日 月曜日 午後7時13分
1 The Pre Out setting may or may not be displayed, depending on the input source you have selected.
Controls and displays02
TUNER EDIT
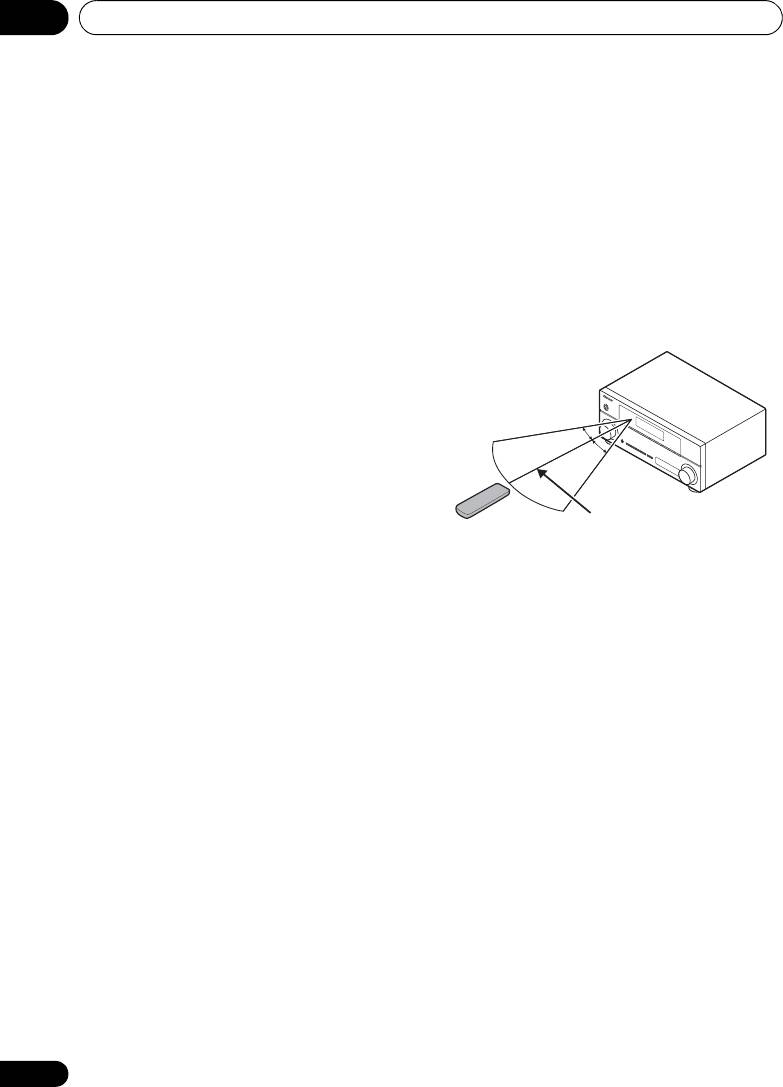
Operating range of remote control
Use with TUNE /, PRESET / and
The remote control may not work properly if:
ENTER to memorize and name stations for
• There are obstacles between the remote
recall (page 43, 44).
control and the receiver’s remote sensor.
PRESET /
• Direct sunlight or fluorescent light is
Use to select preset radio stations
shining onto the remote sensor.
(page 43).
• The receiver is located near a device that is
8
MASTER VOLUME
dial
emitting infrared rays.
9
PHONES
jack
• The receiver is operated simultaneously
Use to connect headphones. When the
with another infrared remote control unit.
headphones are connected, there is no sound
output from the speakers (page 38).
10 Listening mode buttons
AUTO/DIRECT
Switches between Auto surround mode
(Auto playback on page 30) and Stream
Direct playback. Stream Direct playback
bypasses the tone controls for the most
accurate reproduction of a source
(page 33).
STEREO/ALC
Switches between stereo playback, Auto
level control stereo mode (page 32) and
Front Stage Surround Advance modes
(page 32).
STANDARD
Press for Standard decoding and to switch
between the various 2 Pro Logic II, 2 Pro
Logic IIx, 2 Pro Logic IIz and NEO:6
options (page 30).
ADV SURROUND
Switches between the various surround
modes (page 31).
11
SOUND RETRIEVER
Press to restore CD quality sound to
compressed audio sources (page 33).
12
MCACC SETUP MIC
jack
Use to connect a microphone when
performing Auto MCACC setup.
10
En
30°
30°
7 m
VSX-520_SYXCN_En.book 10 ページ 2010年4月12日 月曜日 午後7時13分
Controls and displays 02
11
En
English
Français
Español
VSX-520_SYXCN_En.book 11 ページ 2010年4月12日 月曜日 午後7時13分
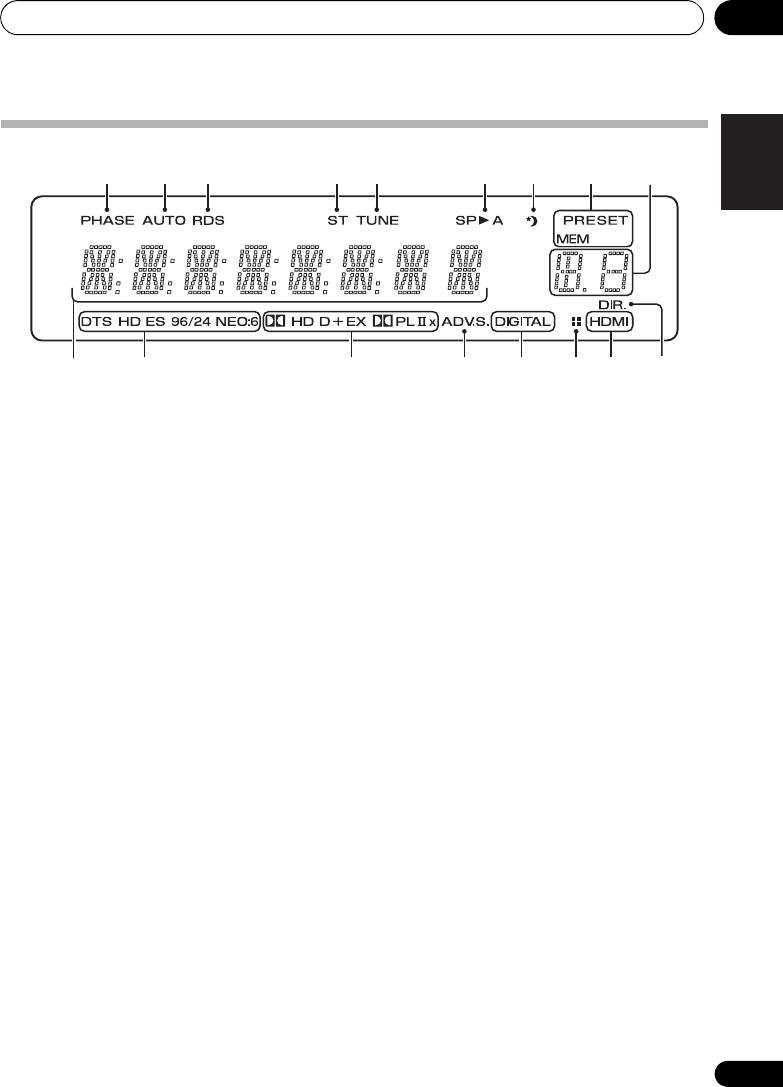
Display
1 2 3 4 5 6 7 8
9
10
11 12 13 14 14 1615
1PHASE
9 PRESET information or input signal
Lights when the Phase Control is switched on
indicator
(page 33).
Shows the preset number of the tuner or the
input signal type, etc.
2AUTO
Lights when the Auto Surround feature is
10 Character display
switched on (see Auto playback on page 30).
Displays various system information.
3RDS
11 DTS indicators
Lights when an RDS broadcast is received
DTS
(page 45).
Lights when a source with DTS encoded
4ST
audio signals is detected.
Lights when a stereo FM broadcast is being
HD
received in auto stereo mode.
Lights when a source with DTS-EXPRESS
5TUNE
or DTS-HD encoded audio signals is
Lights when a broadcast is being received.
detected.
6 Speaker indicator
ES
Shows if the speaker system is on or not
Lights to indicate DTS-ES decoding.
(page 9).
SP
A means the speakers are switched on.
96/24
Lights when a source with DTS 96/24
SP
means the speakers are switched off.
encoded audio signals is detected.
7 Sleep timer indicator
Lights when the receiver is in sleep mode
NEO:6
(page 13).
When one of the NEO:6 modes of the
receiver is on, this lights to indicate
8 Tuner preset indicators
NEO:6 processing (page 30).
PRESET
12 Dolby Digital indicators
Shows when a preset radio station is
registered or called.
2D
Lights when a Dolby Digital encoded signal
MEM
is detected.
Blinks when a radio station is registered.

VSX-520_SYXCN_En.book 12 ページ 2010年4月12日 月曜日 午後7時13分
Controls and displays02
2D+
Lights when a source with Dolby Digital
Plus encoded audio signals is detected.
2HD
Lights when a source with Dolby TrueHD
encoded audio signals is detected.
EX
Lights to indicate Dolby Digital EX
decoding.
2PLll(x)
Lights to indicate 2 Pro Logic II / 2 Pro
Logic IIx decoding. Light will go off during
2 Pro Logic IIz decoding (see Listening in
surround sound on page 30 for more on
this).
13 ADV.S.
Lights when one of the Advanced Surround
modes has been selected (see Using the
Advanced surround effects on page 31 for more
on this).
14 SIGNAL SELECT indicators
DIGITAL
Lights when a digital audio signal is
selected.
Blinks when a digital audio signal is
selected and if selected audio input is not
provided.
HDMI
Lights when an HDMI signal is selected.
Blinks when an HDMI signal is selected
and selected HDMI input is not provided.
15 Up Mix/DIMMER indicator
Lights when the Up Mix function is set to ON
(see page 35). Also, lights when DIMMER is set
to off.
16 DIR.
Lights when the DIRECT or PURE DIRECT
mode is switched on (page 33).
12
En
Controls and displays 02
13
En
English
Français
Español
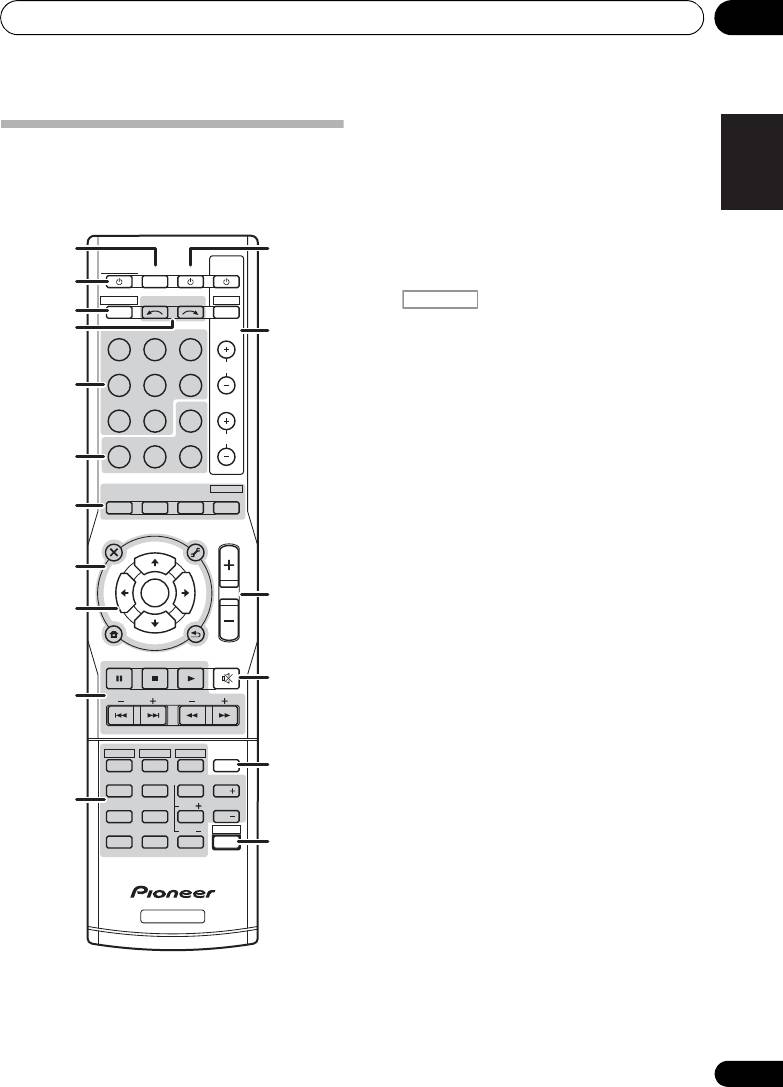
1
SLEEP
Press to change the amount of time
Remote control
before the receiver switches into standby (30
As for operating other devices, the remote
min – 60 min – 90 min – Off). You can check
control codes for the Pioneer products are
the remaining sleep time at any time by
preset. The settings cannot be changed.
pressing SLEEP once.
1
12
2
RECEIVER
TV
RECEIVER
SOURCESLEEP
CONTROL
Switches the receiver between standby and on.
2
RECEIVER
INPUT SELECT
DTV/TV
3
3
INPUT
Switches the remote to control the receiver
4
BD DVD
TV
13
(used to select the white commands above
the number buttons (MIDNIGHT, etc)). Also
DVR CD
CD-R
CH
use this button to set up surround sound
5
(page 39) or Audio parameters (page 35).
ADAPTER
TUNER
EQ
4 INPUT SELECT
PHASE
S.RETRIEVER SIGNAL SEL
VOL
Use to select the input source.
6
5 MULTI CONTROL buttons
AUTO/
STEREO/
BD MENU
DIRECT
A.L.C.
STANDARD
ADV SURR
Press to select control of other components.
7
6 Receiver control buttons
AUDIO
TUNER EDIT
MASTER
PARAMETER
TOOLS
VOLUME
MENU
TOP
T
U
N
E
MENU
EQ
8
T
P
Press to switch on/off Acoustic Calibration
E
R
S
E
E
ENTER
S
R
E
T
14
EQ setting (page 34).
P
9
HOME
PHASE
MENU
T
U
N
E
BAND
SETUP
RETURN
Press to switch on/off Phase Control
PTY SEARCH
MUTE
(page 33).
15
10
BASS
TRE
S. RETRIEVER
Press to restore CD quality sound to
compressed audio sources (page 33).
HDD
DVD
VCR
1
2
3
DISP
16
SIGNAL SEL
SB CH
CH SELECT
4
5
6
CH
Use to select an input signal (page 38).
11
MIDNIGHT
SPEAKERS
LEV
7
8
9
CH
7 Listening mode buttons
DIMMER
LEV
SHIFT
CLR
0
ENTER
17
+
10
AUTO/DIRECT
Switches between Auto surround mode
(Auto playback on page 30) and Stream
Direct playback. Stream Direct playback
RECEIVER
bypasses the tone controls for the most
accurate reproduction of a source
(page 33).
RECEIVER
VSX-520_SYXCN_En.book 13 ページ 2010年4月12日 月曜日 午後7時13分

Controls and displays02
STEREO/A.L.C.
Press TUNER first to access:
Switches between stereo playback, Auto
TUNER EDIT
level control stereo mode (page 32) and
Memorizes/names stations for recall
Front Stage Surround Advance modes
(page 43, 44).
(page 32).
PTY SEARCH
STANDARD
Use to search for RDS program types
Press for Standard decoding and to switch
(page 45).
between 2 Pro Logic II options (page 30).
BAND
ADV SURR
Switches between AM, FM ST (stereo) and
Switches between the various surround
FM MONO radio bands (page 43).
modes (page 31).
9
(
TUNE /
,
PRESET
/
),
Press BD first to access:
ENTER
BD MENU*
Use the arrow buttons when setting up your
Displays the disc menu of Blu-ray Discs.
surround sound system (page 39). Also used to
control BD/DVD menus/options.
8 System Setup and component control
buttons
Use the TUNE / buttons can be used to
The following button controls can be accessed
find radio frequencies (page 43) and the
after you have selected the corresponding
PRESET / buttons can be used to select
MULTI CONTROL button (BD, DVD, etc.).
preset radio stations (page 44).
Press first to access:
10 Component control buttons
The main buttons (, , etc.) are used to
AUDIO PARAMETER
control a component after you have selected it
Use to access the Audio options (page 35).
using the input source buttons.
SETUP
The controls above these buttons can be
Press to access the System Setup menu
accessed after you have selected the
(page 39).
corresponding input source button (BD, DVD,
DVR or CD). These buttons also function as
RETURN
described below.
Confirm and exit the current menu screen.
Press first to access:
Press BD, DVD or DVR first to access:
BASS –/+
TOP MENU
1
Use to adjust Bass
Displays the disc ‘top’ menu of a BD/DVD.
TRE –/+
HOME MENU
1
Use to adjust Treble
Displays the HOME MENU screen.
11 Number buttons and other component
RETURN
controls
Confirm and exit the current menu screen.
Use the number buttons to directly select the
tracks on a CD or tuner. There are other
MENU
buttons that can be accessed after the
Displays the TOOLS menu of Blu-ray Disc
button is pressed. (For example
player.
MIDNIGHT, etc.)
14
En
RECEIVER
Note
RECEIVER
1 The tone controls are disabled when the listening mode is set to DIRECT or PURE DIRECT.
RECEIVER
VSX-520_SYXCN_En.book 14 ページ 2010年4月12日 月曜日 午後7時13分

Controls and displays 02
15
En
English
Français
Español
HDD*, DVD*, VCR*
DTV/TV*
These buttons switch between the hard
Switches between the DTV and analog TV
disk, DVD and VCR controls for HDD/DVD/
input modes for Pioneer TVs.
VCR recorders.
14
MASTER VOLUME
+/–
SB CH
Use to set the listening volume.
Press to select ON, AUTO, OFF the
15
MUTE
surround back channel.
Mutes/unmutes the sound.
CH SELECT
16
DISP
Press repeatedly to select a channel, then
Switches the display of this unit. The listening
use LEV +/– to adjust the level (page 41).
mode, sound volume, Pre Out setting or input
name can be checked by selecting an input
LEV +/–
1
source.
Use to adjust the channel levels.
17
SHIFT
MIDNIGHT
Press to access the ‘boxed’ commands (above
Switches to Midnight or Loudness
the buttons) on the remote. These buttons are
listening (page 35).
marked with an asterisk (* ) in this section.
SPEAKERS
Use to change the speaker system on or
off. When the SP OFF is selected, no sound
is output from the speakers connected to
this receiver.
DIMMER
Dims or brightens the display. The
brightness can be controlled in four steps.
12
SOURCE
Turns on or off the power of the Pioneer DVD/
DVR units when BD, DVD, DVR or CD is
selected using the MULTI CONTROL buttons.
13
TV CONTROL
buttons
These buttons can control only be used with
Pioneer TVs.
Use to turn on/off the power of the TV.
INPUT
Use to select the TV input signal.
CH +/–
Use to select channels.
VOL +/–
Use to adjust the volume on your TV.
Note
VSX-520_SYXCN_En.book 15 ページ 2010年4月12日 月曜日 午後7時13分
1 The Pre Out setting may or may not be displayed, depending on the input source you have selected.
Оглавление
- Contents
- Flow of settings on the receiver
- Before you start
- Controls and displays
- Connecting your equipment
- Basic Setup
- Listening to your system
- The System Setup menu
- Using the tuner
- Making recordings
- Other connections
- Additional information
- Table des matières
- Organigramme des réglages sur le récepteur
- Avant de commencer
- Commandes et affichages
- Raccordement de votre équipement
- Configuration de base
- Écoute de sources à l’aide de votre système
- Menu de configuration du système
- Utilisation du tuner
- Enregistrement
- Autres raccordements
- Informations complémentaires
- Содержание
- Порядок выполнения настроек на ресивере
- Перед началом работы
- Органы управления и индикаторы
- Подключение оборудования
- Основная настройка
- Прослушивание системы
- Меню System Setup (Настройка системы)
- Использование тюнера
- Выполнение записи на внешний источник
- Другие подключения
- Дополнительная информация
