Pioneer HTP-SB300: Installation
Installation: Pioneer HTP-SB300
Installation 01
7
En
English Deutsch Italiano Español
Français
Nederlands
Pyccкий
Chapter 1
Installation
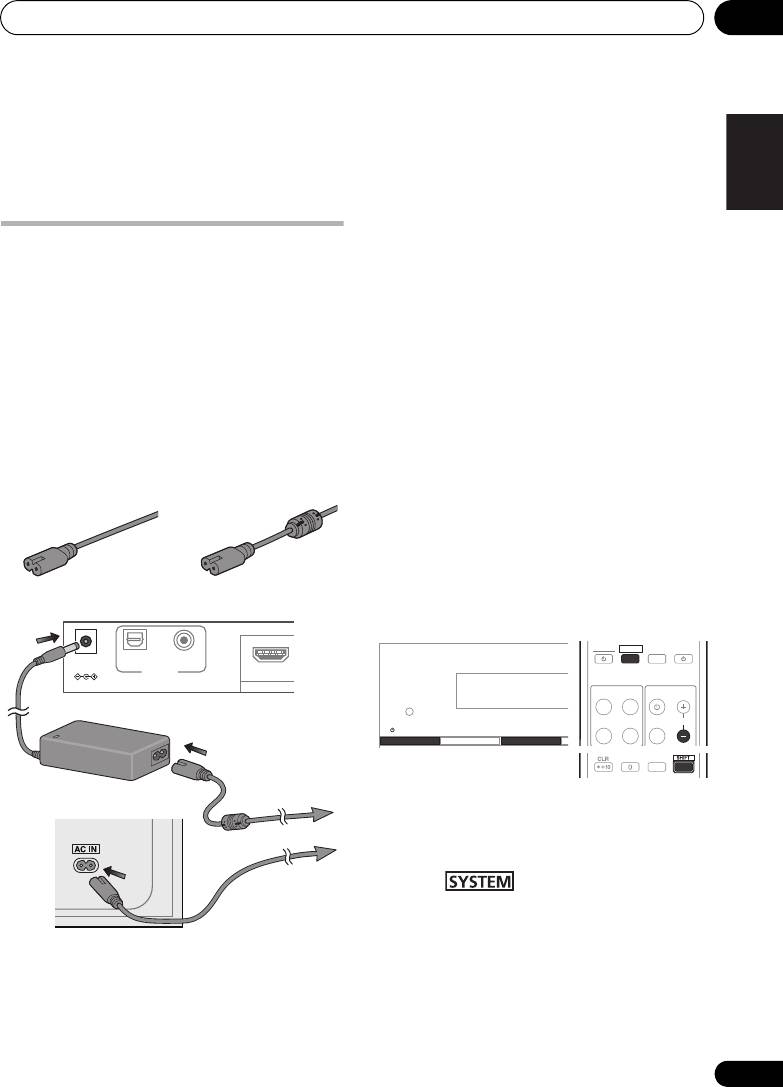
1 Plug the supplied AC adapter into the
DC
Before you start
IN
socket on the back of the unit.
Before installing the unit and performing
2 Plug the supplied power cord into the AC
connections with other components, confirm
adapter then plug the other end into a power
that the main unit and subwoofer properly
outlet.
support wireless communication.
3 Plug the supplied power cord into the
AC
• Place the main unit and subwoofer near
IN
socket on the back of the subwoofer then
together.
plug the other end into a power outlet.
• The power cords are furnished with
different connectors for the subwoofer and
4Press
STANDBY/ON
on the main unit.
AC adapter. Note that the power cord for
Confirm that the indicators of the main unit
the AC adapter is contained in the same
and subwoofer both light green.
box as the AC adapter.
• If either of the indicators does not light
green, perform pairing (see below).
• After confirming communication between
the two units, unplug the power cords and
perform installation and connections.
Pairing main unit and subwoofer
1 After you’ve finished making the AC
adapter and power cord connections, press
STANDBY/ON on the main unit (see above).
2 Press on remote control.
3 While holding the main unit’s
STEREO/
A.L.C.
button depressed, simultaneously
press the remote control’s
SHIFT
and
TV
CONTROL CH–
buttons.
The indicator of the subwoofer light green, and
the pairing of main unit and subwoofer is
completed.
For subwoofer For AC adapter
DC IN
OPTICAL
COAXIAL
24V
AUDIO IN
OUT
Main unit
AC adapter
To AC outlet
Subwoofer
SYSTEM
SYSTEM
SOURCEINPUT
INPUT
TV CONTROL
HDMI1 HDMI2
OPTICAL COAXIAL
INPUT
CH
ENTER
HTP-SB300_SVYXCN_En.book 7 ページ 2009年10月23日 金曜日 午後1時58分
STANDBY/ON INPUT STEREO
/
A.L.C.
Installation01
Important
Concerning the placement of
Precautions regarding subwoofer installation:
this system
• Do not place objects behind the subwoofer
and occlude the ventilation ports.
Caution
• Sound from the subwoofer may be
• When assembling the system, lay them
interrupted due to poor signal conditions,
down flat on their side to avoid accidents or
but this is not a malfunction. If it occurs,
injury. Make sure to use a stable surface
rearrange the position and orientation of the
when assembling, setting up, and placing
main unit and/or subwoofer as required.
the system.
• The subwoofer is designed to be used
This system allows you to enjoy 3.1 channel
within a distance of 10 m from the main
surround sound merely by installing the main
unit. The actual distance within which it
unit and subwoofer.
can be used, however, may be less,
To achieve optimum audio performance, place
depending on the environment and design
the main unit beneath the television monitor.
of the room where it is used.
The subwoofer receives its audio signals
• Signal reception by the subwoofer may be
wirelessly from the main unit, so it requires no
unstable if it is placed too close to the main
speaker cables, allowing you to place it in the
unit. In this case, separate the subwoofer
most convenient location (a power cord
at least 1 m from the main unit.
connection is required, however).
• Signal reception by the subwoofer may be
interrupted if an obstruction (metal door or
concrete wall, aluminum covered
insulation, etc.) is placed between it and
the main unit. In this case, install the
subwoofer in an uninterrupted line-of-sight
orientation from the main unit.
8
En
Main unit
Subwoofer
HTP-SB300_SVYXCN_En.book 8 ページ 2009年10月23日 金曜日 午後1時58分
Installation 01
9
En
English Deutsch Italiano Español
Français
Nederlands
Pyccкий
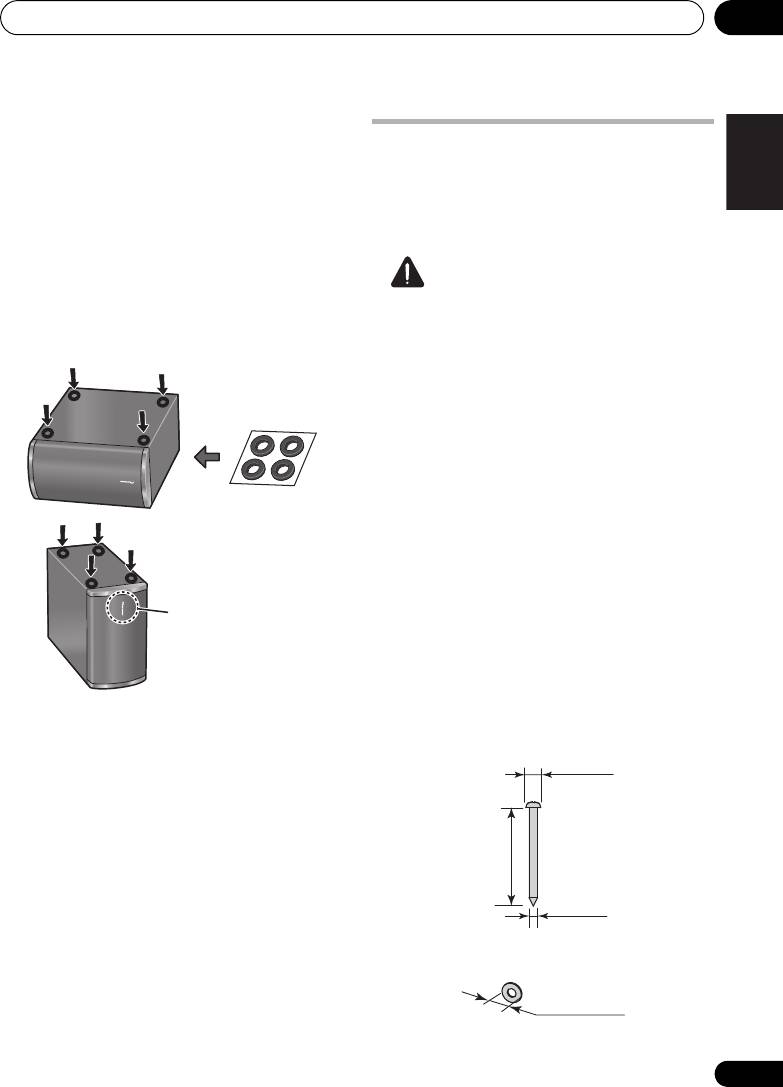
Preparing the subwoofer
Wall mounting the main unit
• Attach the non-skid pads to the base of
The main unit can be mounted on a wall if
subwoofer.
desired. Before performing a wall mounting,
Use the supplied adhesive to attach four pads
consult page 11 and complete the wiring
to the base of subwoofer.
connections.
• The subwoofer has been designed for
normal use when placed on its side as
Caution
shown. If installing the subwoofer
vertically, affix the non-skid pads to the side
• Remember that the main unit is heavy and
of the subwoofer as indicated in the
that its weight could cause the screws to
accompanying illustration.
work loose, or the wall material to fail to
support it, resulting in the unit falling.
Make sure that the wall you intend to
mount the unit on is strong enough to
support them. Do not mount on plywood or
soft surface walls. If you are unsure of the
qualities, consult a professional for advice.
• Pioneer is not responsible for any
accidents or damage that result from
improper installation, misuse or
modification of the product, or natural
disasters.
• Mounting screws and washers are not
supplied. Use screws suitable for the wall
material and support the weight of the unit.
Recommended dimensions are for a screw
4 mm in diameter and 50 mm long, with a
washer 10 mm in diameter.
For vertical installation
Pioneer logo
Screw (not supplied):
maximum Ø 10 mm
50 mm
Ø 4 mm
Washer (not supplied):
Ø 10 mm
HTP-SB300_SVYXCN_En.book 9 ページ 2009年10月23日 金曜日 午後1時58分
Installation01
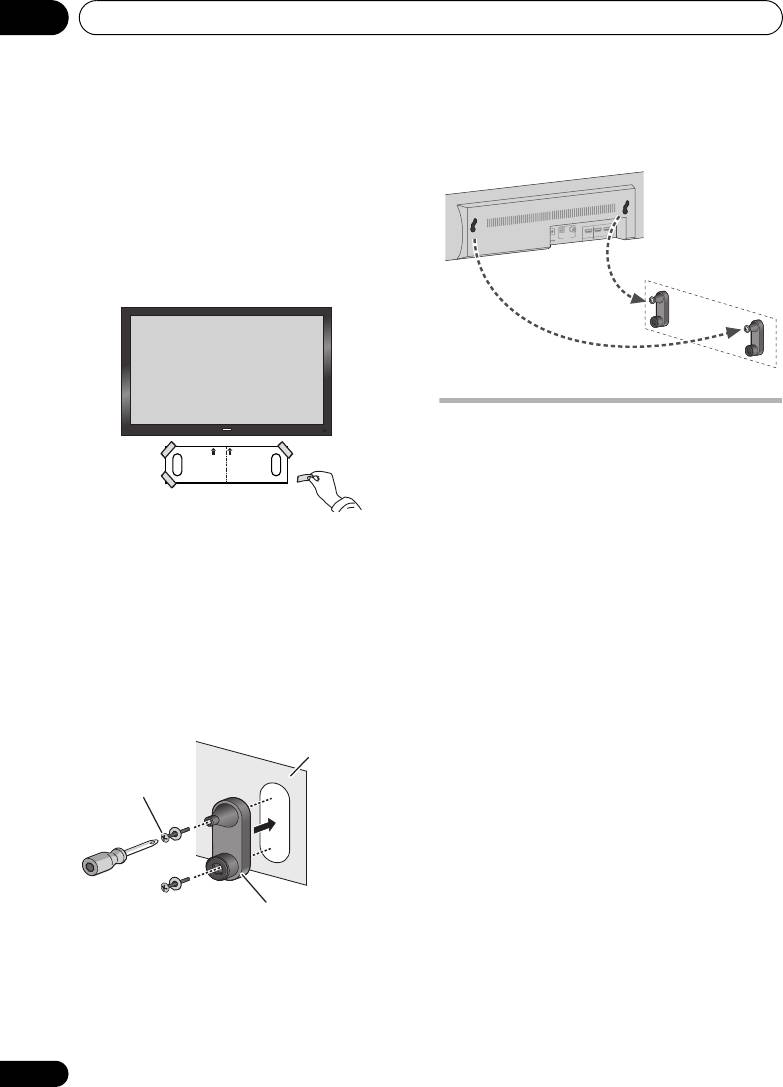
1 Paste the supplied wall mounting
• Confirm that the screws come fully to the
template on the area of installation.
top of the mounting holes.
Attach the template level to the ground using
an adhesive such as tape. Make sure the
template is straight to avoid mounting the unit
crookedly. Pasting the template too close to
the TV may cause the TV to get in the way of the
unit when installing. Make sure the template
and TV do not overlap.
Additional notes on the
system placement
Precautions:
• When installing the main unit on top of the
TV, be sure to secure it with tape or some
2 Attach the bracket to the specified
other suitable means. Otherwise, the main
location on the template.
unit may fall from the TV due to external
Align the brackets to the specified locations on
shocks such as earthquakes, endangering
the template,
and attach with two screws as
those nearby or damaging the main unit.
shown.
• The main unit is magnetically shielded.
Adjust the attachment position of the bracket
However, depending on the installation
so that it is aligned with the template.
location, color distortion may occur if the
main unit is installed extremely close to the
•After attach
the right and left brackets, take
screen of a television set. If this case
down the template.
happens, turn the power switch of the
television set OFF, and turn it ON after
15 min. to 30 min. If the problem persists,
place the main unit away from the
television set.
• The subwoofer is not magnetically shielded
and so should not be placed near a TV or
monitor. Magnetic storage media (such as
floppy discs and tape or video cassettes)
should also not be kept close to the
subwoofer.
3 Hang the main unit on the brackets.
• Do not attach the subwoofer to a wall or
Align the two mounting holes on the rear of the
ceiling. They may fall off and cause injury.
main unit with the bracket’s exposed top
mounting screws, and hang the main unit on
the screws as shown.
10
En
Template
Template
Screw and washer
(not supplied)
Bracket
HTP-SB300_SVYXCN_En.book 10 ページ 2009年10月23日 金曜日 午後1時58分
HDMI
DC IN
24V
OPTICAL
AUDIO IN
COAXIAL
OUT IN 1 IN 2
Оглавление
- Setup Guide
- Contents
- Installation
- Connecting up
- Controls and displays
- Listening to your system
- Controlling the rest of your system
- Additional information
- Guide d’installation
- Sommaire
- Installation
- Connexions
- Commandes et affichages
- Écoute de votre système
- Commande des autres fonctions du système
- Informations complémentaires
- Руководство по установке
- Содержание
- Установка
- Подключение
- Органы управления и дисплеи
- Прослушивание системы
- Управление другими компонентами системы
- Дополнительная информация


