Pioneer HTP-SB300: Controls and displays
Controls and displays: Pioneer HTP-SB300
Controls and displays 03
15
En
English Deutsch Italiano Español
Français
Nederlands
Pyccкий
Chapter 3
Controls and displays
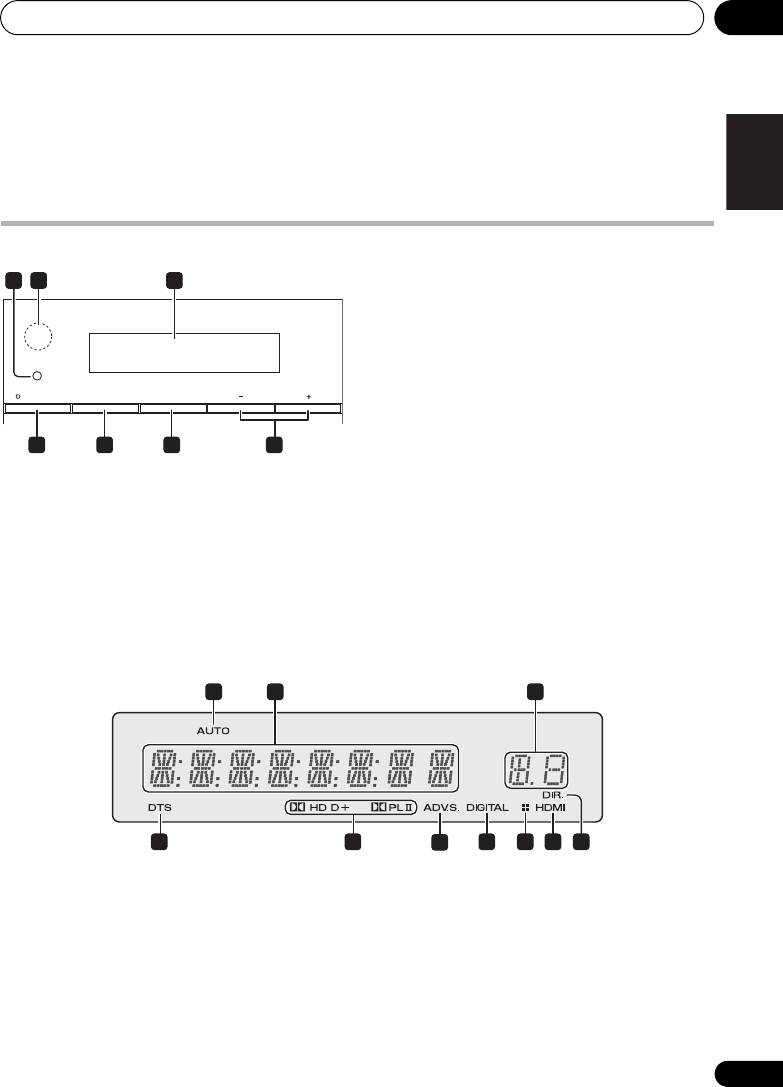
Front panel
2 IR remote sensor
3 Front panel display
See Display below for details.
4
STANDBY/ON
Switches the system on or into standby.
5 INPUT
Selects an input source.
6
STEREO/A.L.C.
1 Wireless indicator
Switches between stereo playback, Auto level
Lights red or green, depending on status of unit.
control stereo mode (page 21) and Front Stage
Surround Advance modes (page 22).
Standby mode: Lights red
Power on, without wireless transmission
7
VOLUME +/–
(subwoofer operation): Lights red
Adjusts the volume.
Power on, with wireless transmission
(subwoofer operation): Lights green
Display
1AUTO
3 Sound Delay indicator
Lights when the Auto Surround feature is
Displays the Audio Parameter sound delay
switched on (page 20).
status.
2 Character display
4 DTS indicator
Displays various system information.
Lights when a source with DTS encoded audio
signals is detected.
1 2
3
STANDBY/ON INPUT STEREO
/
A.L.C. VOLUME
4 5 6 7
1 2
3
4 5
6
7 8 7 9
HTP-SB300_SVYXCN_En.book 15 ページ 2009年10月23日 金曜日 午後1時58分
HTP-SB300_SVYXCN_En.book 16 ページ 2009年10月23日 金曜日 午後1時58分
Controls and displays03
5 Dolby Digital indicators
Subwoofer
2D
Lights when a Dolby Digital encoded signal
1
is detected.
2D
+
Lights when a source with Dolby Digital
Plus encoded audio signals is detected.
2HD
Lights when a source with Dolby TrueHD
encoded audio signals is detected.
2PLll
1 Wireless indicator
Lights to indicate 2 Pro Logic II decoding
Standby mode: Lights red
(see Listening in surround sound on
During subwoofer operation: Lights green
page 21 for more on this).
6 ADV.S.
Lights when one of the Advanced Surround
modes has been selected (see Using the
Advanced surround effects on page 21 for more
on this).
7 SIGNAL SELECT indicators
DIGITAL
Lights when a digital audio signal is
selected.
Blinks when a digital audio signal is not
selected.
HDMI
Lights when an HDMI signal is selected.
Blinks when an HDMI signal is not
selected.
8 Dimmer indicator
Lights when DIMMER is set to off.
9DIR.
Lights when the DIRECT or PURE DIRECT
mode is switched on (page 22).
16
En
Controls and displays 03
17
En
English Deutsch Italiano Español
Français
Nederlands
Pyccкий
HTP-SB300_SVYXCN_En.book 17 ページ 2009年10月23日 金曜日 午後1時58分
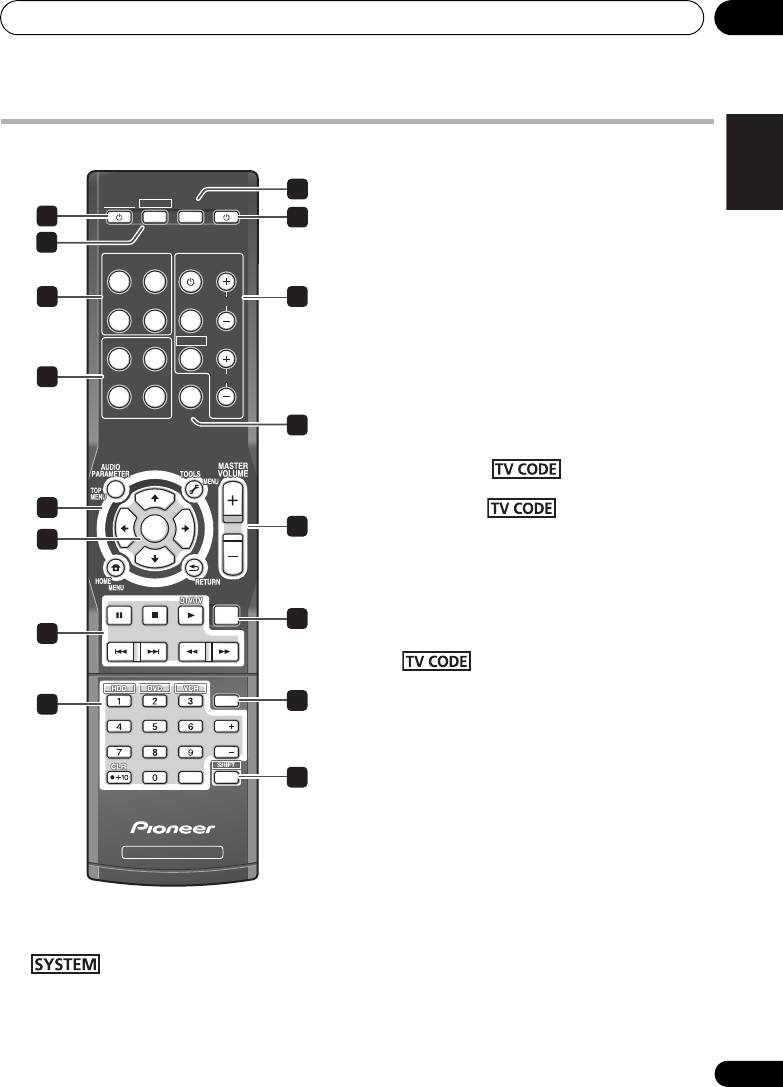
Remote control
3
INPUT SELECT
3
Use to select the input source.
SYSTEM
SYSTEM
SOURCEINPUT
1
4
4
SOURCE
2
Press to turn on/off other components
INPUT
TV CONTROL
HDMI1 HDMI2
connected to the system (see page 29 for more
on this).
5
6
OPTICAL
COAXIAL
INPUT
CH
5
INPUT SELECT
buttons
STANDARD
ADV SURR
TV CODE
Use to select the input source. Switch the
remote control to operate any other components
AUTO/
STEREO/
7
DIRECT
A.L.C.
DIMMER
VOL
allocated to the selected buttons (see
Controlling the rest of your system on page 26).
LISTENING MODE
BD MENU
8
6
TV CONTROL
buttons
These buttons are dedicated to control the TV
assigned to the button. Thus if you
only have one TV to hook up to this system
9
assign it to the button (see page 28
ENTER
11
for more on this).
10
Use to turn on/off the power of the TV.
INPUT
MUTE
13
Use to select the TV input signal.
12
Press to select control of TV. Also use to
DISPLAY
14
15
input a preset code allocated to the TV
CH
CONTROL button.
CH
CH +/–
Use to select channels.
ENTER
16
VOL +/–
Use to adjust the volume on your TV.
SURROUND SYSTEM
7 Listening mode buttons
AUTO/DIRECT
Switches between Auto surround mode
1
SYSTEM
(Auto playback on page 20) and Stream
Switches the system between standby and on.
Direct playback. Stream Direct playback
bypasses the tone controls for the most
2
accurate reproduction of a source
Switches the remote to control the system.
(page 22).
Also use to adjust the Audio parameters
(page 23).
HTP-SB300_SVYXCN_En.book 18 ページ 2009年10月23日 金曜日 午後1時58分
Controls and displays03
STEREO/A.L.C.
10
, ENTER
Switches between stereo playback, Auto
Use the arrow buttons when setting up your
level control stereo mode (page 21) and
surround sound system (page 23). Also used to
Front Stage Surround Advance modes
control BD/DVD menus/options.
(page 22).
11
MASTER VOLUME
+/–
STANDARD
Use to set the listening volume.
Press for Standard decoding and to switch
12 Component control buttons
between 2 Pro Logic II options (page 21).
The main buttons (, , etc.) are used to
ADV SURR
control a component after you have selected it
Switches between the various surround
using the input source buttons.
modes (page 21).
The controls above these buttons can be
8
DIMMER
accessed after you have selected the
Dims or brightens the display. The brightness
corresponding input source button. These
can be controlled in four steps.
buttons also function as described below.
First use INPUT SELECT button to select the
Press first to access:
input for the desired connected Blu-ray disc
DTV/TV
player, then access the following:
Switches between the DTV and analog TV
BD MENU
input modes for Pioneer flat screen TVs.
Displays the disc menu of Blu-ray Discs.
13
MUTE
9
System
and component control buttons
Mutes/unmutes the sound.
Press first to access:
14 Number buttons and other component
AUDIO PARAMETER
controls
Use to access the Audio options (page 23).
Use the number buttons to directly select the
tracks on a CD, DVD, etc.
RETURN
Confirm and exit the current menu screen.
HDD*, DVD*, VCR*
These buttons switch between the hard
First use INPUT SELECT button to select the
disk, DVD and VCR controls for HDD/DVD/
input for the desired connected component,
VCR recorders.
then access the following:
TOP MENU
15
DISPLAY
Displays the disc ‘top’ menu of a BD/DVD.
Switches the display of this unit. The input
name, listening mode or sound volume can be
HOME MENU
checked by selecting an input source.
Displays the HOME MENU screen.
16
SHIFT
RETURN
Press to access the ‘boxed’ commands (above
Confirm and exit the current menu screen.
the buttons) on the remote. These buttons are
MENU
marked with an asterisk (* ) in this section.
Displays the TOOLS menu screen of Blu-ray
Disc player.
18
En
Controls and displays 03
19
En
English Deutsch Italiano Español
Français
Nederlands
Pyccкий
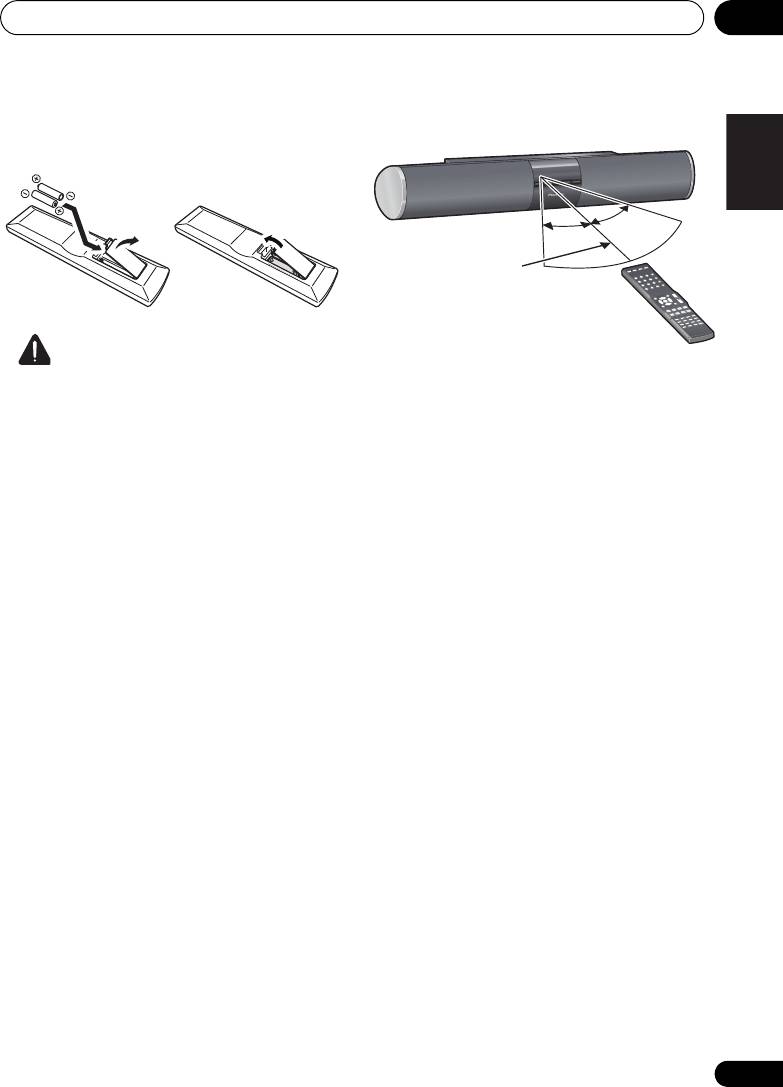
Putting the batteries in the remote
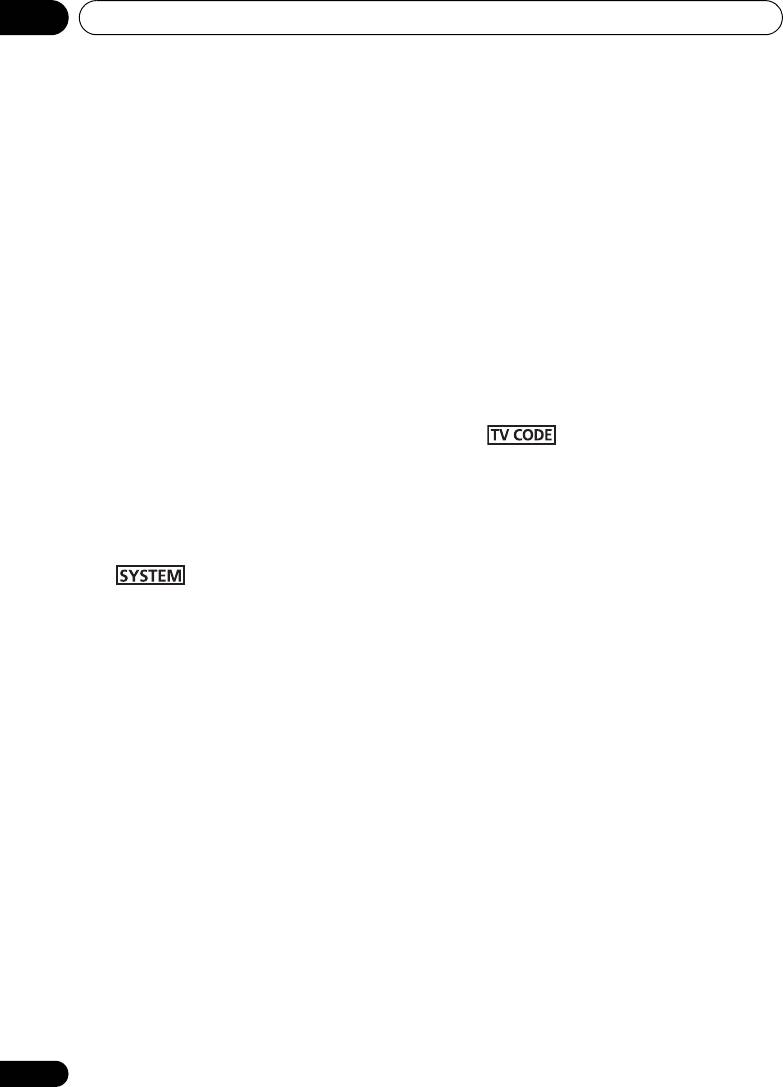
Using the remote control
control
Caution
Please keep in mind the following when using
Incorrect use of batteries can result in hazards
the remote control:
such as leakage and bursting. Please observe
• Make sure that there are no obstacles
the following:
between the remote and the remote sensor
• Don’t mix new and old batteries together.
on the unit.
• Don’t use different kinds of battery
• Remote operation may become unreliable
together — although they may look similar,
if strong sunlight or fluorescent light is
different batteries may have different
shining on the unit’s remote sensor.
voltages.
• Remote controllers for different devices
• Make sure that the plus and minus ends of
can interfere with each other. Avoid using
each battery match the indications in the
remotes for other equipment located close
battery compartment.
to this unit.
• Remove batteries from equipment that
• Replace the batteries when you notice a
isn’t going to be used for a month or more.
fall off in the operating range of the remote.
• When disposing of used batteries, please
• Use within the operating range in front of
comply with governmental regulations or
the remote control sensor on the unit, as
environmental public instruction’s rules
shown.
that apply in your country/area.
• Do not use or store batteries in direct
sunlight or other excessively hot place,
such as inside a car or near a heater. This
can cause batteries to leak, overheat,
explode or catch fire. It can also reduce the
life or performance of batteries.
30°
30°
7 m
HTP-SB300_SVYXCN_En.book 19 ページ 2009年10月23日 金曜日 午後1時58分
Оглавление
- Setup Guide
- Contents
- Installation
- Connecting up
- Controls and displays
- Listening to your system
- Controlling the rest of your system
- Additional information
- Guide d’installation
- Sommaire
- Installation
- Connexions
- Commandes et affichages
- Écoute de votre système
- Commande des autres fonctions du système
- Informations complémentaires
- Руководство по установке
- Содержание
- Установка
- Подключение
- Органы управления и дисплеи
- Прослушивание системы
- Управление другими компонентами системы
- Дополнительная информация


