Karcher Balayeuse KM 80 W P: Shutdown Maintenance and care
Shutdown Maintenance and care: Karcher Balayeuse KM 80 W P

-
4
In order to sweep the dirt to the side, the
roller brush can be swivelled to the left or
right.
This is also a benefit for removing snow by
means of the snow removal shield upgrade
kit.
Tilt the swivel bracket forwards until the
notch is free.
Swivel to the left or right, depending on
which side you wish to sweep the dirt to.
Tilt swivel bracket backwards and snap
into place.
Release parking brake.
Pull clutch lever for travel drive.
Note:
The driving speed is fixed and
cannot be modified.
Release clutch lever for travel drive.
Device comes to a halt.
Pull the lever for the roller brush drive,
roller brush is turning.
Release the lever for roller brush drive.
Roller brush comes to a halt.
Release clutch lever for roller brush
drive and travel drive.
Gas lever to "OFF" position.
Close the fuel supply.
Turn the rotating knob perpendicular to
the fuel tap.
Activate immobilising brake.
Danger
Risk of injury and damage! Observe the
weight of the appliance when you transport
it.
Switch off engine.
Empty fuel tank.
Secure the machine with tensioning
straps or cables.
When transporting in vehicles, secure
the appliance according to the guide-
lines from slipping and tipping over.
Note:
Do not kink the bowden or sheathed
cables.
Danger
Risk of injury and damage! Note the weight
of the appliance in case of storage.
Park the machine in a safe and dry
place.
Activate immobilising brake.
Follow operating instructions of the en-
gine manufacturer!
If the sweeper is going to be out of service
for a longer time period, observe the follow-
ing points:
Park the sweeper on an even surface.
Switch off engine.
Allow engine to cool down.
Drain the fuel tank and the carburettor.
Change engine oil.
Raise roller brush. In order to do this,
turn the height adjustment all the way to
the top (direction –).
Clean the device.
Park the machine in a safe and dry
place.
Activate immobilising brake.
Note:
For description, see section on Care
and maintenance.
Caution
Switch off the motor and unplug the spark
plug connector prior to performing repair,
maintenance or cleaning tasks.
Please note that only the handling of the
engine that is necessary for operating
the sweeper is explained in these in-
structions.
For all other information on the motor
please refer to the enclosed operating
manual of the manufacturer of the en-
gine!
–
Maintenance work may only be carried
out by approved customer service out-
lets or experts in this field who are famil-
iar with the respective safety
regulations.
–
Mobile appliances used for commercial
purposes are subject to safety inspec-
tions according to VDE 0701.
Caution
Do not clean the appliance with a water
hose or high-pressure water jet (danger of
short circuits or other damage).
Clean the machine with a damp cloth
which has been soaked in mild deter-
gent.
Note:
Do not use aggressive cleaning
agents.
Note:
With a new motor, the oil must be
changed after the first 5 operating hours.
In order to safeguard warranty claims, all
service and maintenance work during the
warranty period must be carried out by the
authorised KÄRCHER specialist in accord-
ance with the maintenance booklet.
Note:
Where maintenance is carried out by
the customer, all service and maintenance
work must be undertaken by a qualified
specialist. If required, a specialised Kärch-
er dealer may be contacted at any time.
Note:
For description, see section on Main-
tenance work.
Daily maintenance:
Check engine oil level.
Check air filter.
Check tyre pressure.
Check the roller brush for wear and
wrapped belts.
Check the height adjustment of the roll-
er brush.
Check for smooth running of the
Bowden cables and the moveable parts
Maintain every 3 months or 25 hours of
operation:
Clean air filter.
Note: If the appliance is frequently used
in a dusty environment, maintain more
frequently.
Maintain every 6 months or 50 hours of
operation:
Perform a motor oil change.
Check spark plug.
Maintain every 2 years or 250 hours of
operation:
Replace the air filter.
Replace the spark plug.
Maintenance after the first month or 5 oper-
ating hours:
Carry out initial inspection.
In order to safeguard warranty claims, all
service and maintenance work during the
warranty period must be carried out by the
authorised KÄRCHER specialist in accord-
ance with the maintenance booklet.
Preparation:
Park the sweeper on an even surface.
Activate immobilising brake.
Danger
Risk of injury!
The engine requires approx. 3-4 seconds
to come to a standstill once it has been
switched off. During this time, stay well
clear of the working area.
–
Allow the machine sufficient time to cool
down before carrying out any mainte-
nance and repair work.
–
Do not touch any hot parts, such as the
drive motor and exhaust system.
Note:
The appliance may only be tilted
backwards if the fuel tank is empty.
Park the sweeper on an even surface.
Connect air pressure testing device to
tyre valve.
Check air pressure and adjust if re-
quired.
For permissible tyre air pressures see
"Technical data".
Angle adjustment roller brush
Driving operations
Roller brush drive
Turn off the appliance
Transport
Storage
Shutdown Maintenance and care
General notes
Cleaning
Cleaning the device
Maintenance intervals
Maintenance by the customer
Maintenance by Customer Service
Maintenance Works
General notes on safety
Check the tyre pressure
12
EN
-
5
Danger
Risk of burns!
Allow engine to cool down.
Wait for at least 5 minutes after switch-
ing off the engine before checking the
engine oil fill level.
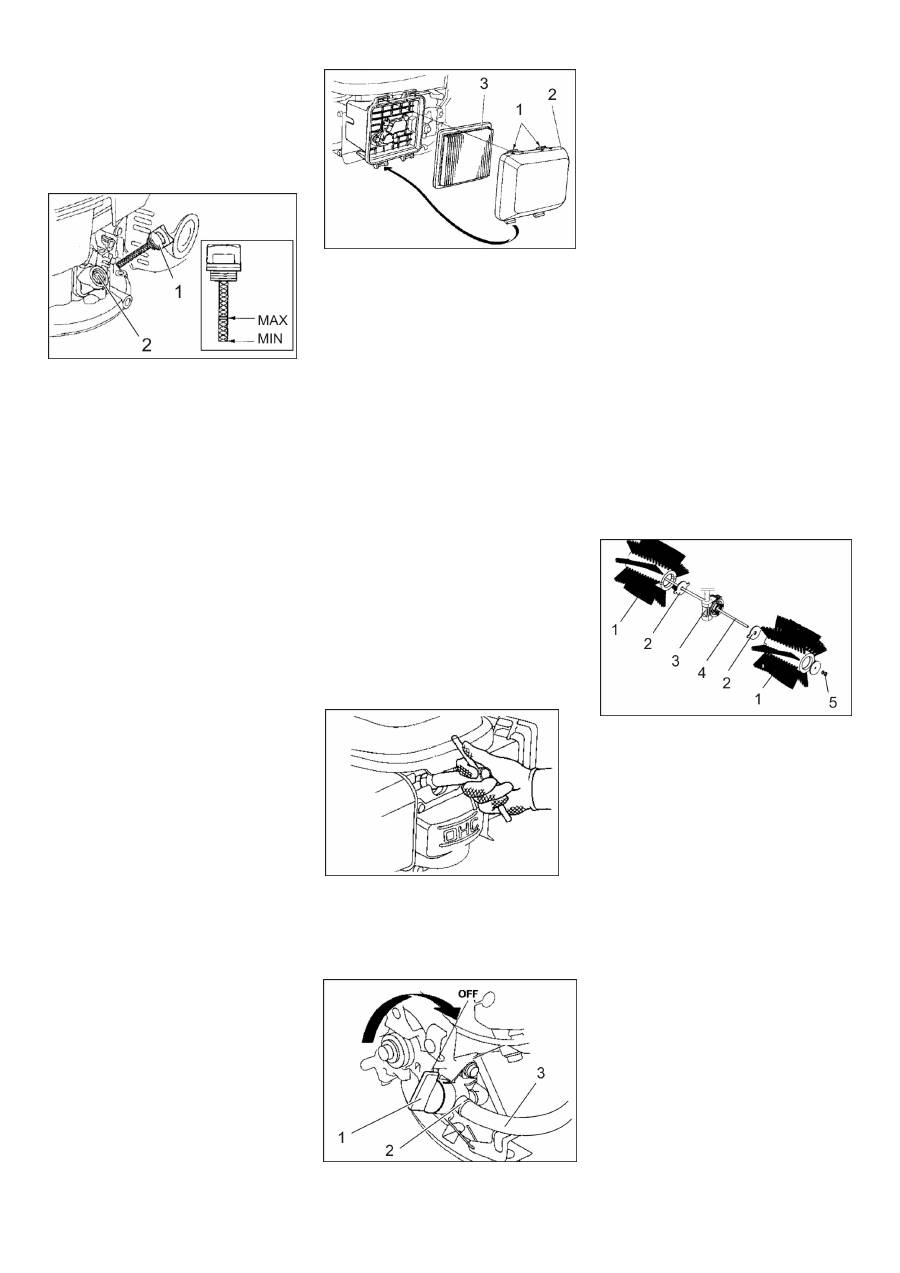
1 Oil dipstick
2 Oil filling nozzle
Unscrew and withdraw oil dipstick.
Wipe off and insert the oil dipstick (do
not turn it in).
Remove the oil dip one more time and
check the oil level.
–
The oil level must lie between “MIN“
and “MAX“ marking.
–
Add motor oil if the oil level is below the
"MIN" marking.
–
Do not fill oil above the "MAX" marking.
Fill motor oil into the oil fill neck.
For oil type refer to Chapter "Technical
specifications".
Wait at least 5 minutes.
If the engine oil level is correct, screw in
the oil dipstick.
Danger
Risk of burns due to hot oil!
Allow engine to cool down.
Open the device hood.
Unscrew and withdraw oil dipstick.
Draw off engine oil via the oil filler neck
using 6.491-538 oil-change pump.
Fill motor oil into the oil fill neck.
For oil type and filling quantity refer to
Chapter "Technical specifications".
Reinsert the oil dipstick.
Wait at least 5 minutes.
Check engine oil level.
Deliver the old oil to the respective col-
lection centres.
1 Latching tabs
2 Filter cover
3 Filter inlay
Press the locking nose in the direction
of the arrow.
Remove the filter cover.
Take out the filter inlay.
Check filter inlay and clean or replace if
required.
Blow out the filter cartridge from the in-
side using compressed air (max. 2 bar)
or knock it on a hard surface. Do not
brush down.
Carefully clean the filter housing and fil-
ter cover by means of a damp cloth and
ensure that no dirt finds its way into the
carburettor.
Close the filter cover.
Danger
Risk of burns!
Allow engine to cool down.
Remove spark-plug connector.
Unscrew and clean spark plug.
Screw in cleaned or new spark plug.
Recommended spark plug: see techni-
cal data
Push on spark-plug connector.
1 Fuel cock closed
2 Hose clip
3 Fuel hose
Close fuel cock.
Turn the rotating knob perpendicular to
the fuel tap.
Press together the fuel hose from the
tank to the fuel tap.
Loosen the hose clamp on the fuel tap.
Remove the fuel hose.
Open fuel filler cap.
Hold the fuel hose over a suitable catch
bin and drain the fuel.
If the tank is empty, reattach the fuel
hose to the stub of the fuel tap and in-
stall the hose clamp.
Note
: If the appliance is not used for a
longer period of time, drain the carbu-
rettor too. In order to do so, start the
motor and let it run until it stops due to
a lack of fuel.
Remove belts or cords from roller
brush.
Replacement is due if a visible deteriora-
tion in sweeping performance caused by
bristle wear despite height adjustment of
the roller brush is evident.
Park the sweeper on an even surface.
1 Roller brush
2 Dog plate
3 Dog, roller brush drive
4 Threaded rod
5 Nut
Loosen the nut on the threaded rod and
pull out the rod.
Remove the roller brush halves and re-
place it by new ones.
Note
: Ensure that the recesses of the
roller brush halves point towards the
dog.
Insert the threaded rod and secure it by
means of a nut.
Set the roller brush to the proper height,
using the height adjustment.
Check engine oil level and top up, if re-
quired
Change the engine oil
Clean or replace filter cartridge
Clean or replace the spark plug
Empty fuel tank
Checking roller brush
Replacing roller brush
13
EN
Оглавление
- Deutsch
- Sicherheitshinweise
- Bedien- und Funktionsele- mente
- Stilllegung Pflege und Wartung
- Hilfe bei Störungen
- EG-Konformitätserklärung
- English
- Safety instructions
- Operating and Functional El- ements
- Shutdown Maintenance and care
- Troubleshooting
- EC Declaration of Conformity
- Français
- Utilisation conforme
- Eléments de commande et de fonction
- Remisage Entretien et maintenance
- Assistance en cas de panne
- Déclaration de conformité CE
- Italiano
- Norme di sicurezza
- Elementi di comando e di fun- zione
- Fermo dell'impianto Cura e manutenzione
- Guida alla risoluzione dei guasti
- Dichiarazione di conformità CE
- Nederlands
- Veiligheidsinstructies
- Elementen voor de bediening en de functies
- Stillegging Onderhoud
- Hulp bij storingen
- EG-conformiteitsverklaring
- Español
- Indicaciones de seguridad
- Elementos de operación y funcionamiento
- Parada Cuidados y mantenimiento
- Ayuda en caso de avería
- Declaración de conformidad CE
- Português
- Avisos de segurança
- Elementos de comando e de funcionamento
- Desactivação da máquina Conservação e manutenção
- Ajuda em caso de avarias
- Declaração de conformidade CE
- Dansk
- Sikkerhedsanvisninger
- Betjenings- og funktionsele- menter
- Afbrydning/nedlæggelsePleje og vedligeholdelse
- Hjælp ved fejl
- EU-overensstemmelseser- klæring
- Norsk
- Forskriftsmessig bruk
- Betjenings- og funksjonele- menter
- Sette bort Pleie og vedlikehold
- Feilretting
- EU-samsvarserklæring
- Svenska
- Säkerhetsanvisningar
- Manövrerings- och funktions- element
- Nedstängning Skötsel och underhåll
- Åtgärder vid störningar
- Försäkran om EU-överens- stämmelse
- Suomi
- Turvaohjeet
- Ohjaus- ja käyttölaitteet
- Seisonta-aika Hoito ja huolto
- Häiriöapu
- EU-standardinmukaisuusto- distus
- Πίνακας περιεχομένων
- Χρήση σύμφωνα με τους κα - νονισμούς
- Στοιχεία χειρισμού και λει - τουργίας
- Διακοπή της λειτουργίας Φροντίδα και συντήρηση
- Αντιμετώπιση βλαβών
- Δήλωση Συμμόρφωσης των Ε . Κ .
- Türkçe
- Güvenlik uyar ı lar ı
- Kullan ı m ve çal ı ş ma eleman- lar ı
- Durdurma Koruma ve Bak ı m
- Ar ı zalarda yard ı m
- AB uygunluk bildirisi
- Оглавление
- Использование по назначе - нию
- Описание элементов управ - ления и рабочих узлов
- Эксплуатация
- Помощь в случае неполадок
- Заявление о соответствии ЕС
- Magyar
- Rendeltetésszer ű használat
- Kezelési- és funkciós elemek
- Leállítás Ápolás és karbantartás
- Segítség üzemzavar esetén
- EK konformitási nyiltakozat
- eština
- Používání v souladu s ur č e- ním
- Ovládací a funk č ní prvky
- Odstavení Ošet ř ování a údržba
- Pomoc p ř i poruchách
- Prohlášení o shod ě pro ES
- Slovenšina
- Varnostna navodila
- Upravljalni in funkcijski ele- menti
- Mirovanje naprave Nega in vzdrževanje
- Pomo č pri motnjah
- ES-izjava o skladnosti
- Polski
- U ż ytkowanie zgodne z prze- znaczeniem
- Elementy urz ą dzenia
- Wy łą czenie z eksploatacji Czyszczenie i konserwacja
- Usuwanie usterek
- Deklaracja zgodno ś ci UE
- Românete
- Utilizarea corect ă
- Elemente de utilizare ş i func- ţ ionale
- Scoaterea din func ţ iune Îngrijirea ş i între ţ inerea
- Remedierea defec ţ iunilor
- Declara ţ ie de conformitate CE
- Slovenina
- Bezpe č nostné pokyny
- Ovládacie a funk č né prvky
- Odstavenie Starostlivos ť a údržba
- Pomoc pri poruchách
- Vyhlásenie o zhode s norma- mi EÚ
- Hrvatski
- Sigurnosni napuci
- Komandni i funkcijski ele- menti
- Stavljanje ure đ aja van pogo- na Njega i održavanje
- Otklanjanje smetnji
- EZ izjava o uskla đ enosti
- Srpski
- Namensko koriš ć enje
- Komandni i funkcioni elementi
- Stavljanje ure đ aja van pogona Nega i održavanje
- Otklanjanje smetnji
- Izjava o uskla đ enosti sa propisima EZ
- Съдържание
- Употреба по предназначе - ние
- Обслужващи и функцио - нални елементи
- Спиране от експлоатация Грижи и поддръжка
- Помощ при неизправности
- Технически данни
- Eesti
- Ohutusalased märkused
- Enne seadme kasutuselevõt- tu
- Seismapanek Korrashoid ja tehnohooldus
- Abi häirete korral
- EÜ vastavusdeklaratsioon
- Latviešu
- Noteikumiem atbilstoša lieto- šana
- Vad ī bas un funkcijas elemen- ti
- Iekonserv ē šana Kopšana un tehnisk ā apkope
- Pal ī dz ī ba darb ī bas trauc ē jumu gad ī jum ā
- EK Atbilst ī bas deklar ā cija
- Lietuviškai
- Naudojimas pagal paskirt į
- Valdymo ir funkciniai elemen- tai
- Laikinas prietaiso nenaudoji- mas Prieži ū ra ir aptarnavimas
- Pagalba gedim ų atveju
- EB atitikties deklaracija
- Перелік
- Правильне застосування
- Елементи управління і функціональні вузли
- Експлуатація
- Допомога у випадку неполадок
- Заява при відповідність Європейського співтовариства
