Karcher Balayeuse KM 80 W P: Operating and Functional El- ements
Operating and Functional El- ements: Karcher Balayeuse KM 80 W P
-
3
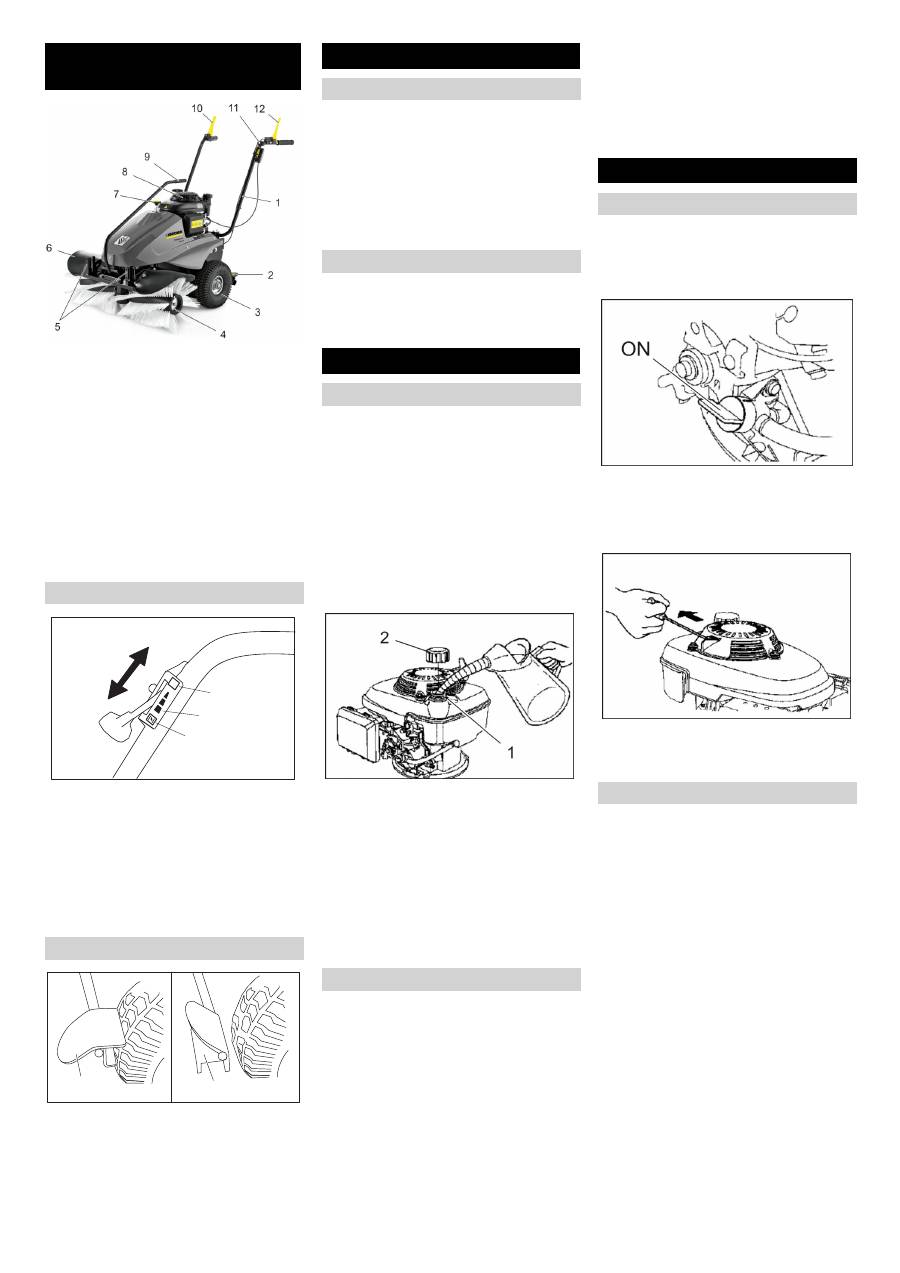
1 Push handle
2 Parking brake
3 Drive wheels
4 Roller brush
5 Application points for upgrade kids
6 Protective cover roller brush
7 Height adjustment roller brush
8 Petrol engine
9 Swivel bracket for angle adjustment of
the roller brush
10 Clutch lever travel drive
11 Gas lever
12 Clutch lever roller brush drive
1 Position "CHOKE"
Position of the gas lever for starting the
motor
2 Operating position "full load"
The appliance works best while in the
operating position.
3 "OFF" position
Motor off
1 Activate parking brake
2 Parking brake released
To unload the machine, proceed as follows:
Remove the cardboard.
Manually lift appliance off the pallet.
Kerb weight: approximately 70 kg
or
Fold up and install the push handle.
Then use the push handle to pull the
appliance off the pallet.
Loosen the star handle screw.
Align the pushing handle.
Tighten star handle screw.
Danger
Risk of explosion!
–
Only fuel up while motor is turned off.
–
Only use the fuels specified in the Op-
erations Manual.
–
Do not refuel the machine in enclosed
spaces.
–
Smoking and naked flames are strictly
prohibited.
–
Ensure that no fuel reaches the hot
open surfaces.
1 Filling nozzle
2 Tank lid
Switch off engine.
Open fuel filler cap.
Use "regular unleaded petrol".
Tank filling with empty tank approx. 0.7
litre.
Wipe off any spilt fuel and close fuel fill-
er cap.
Check engine oil level.
Check air filter.
Check tyre pressure.
Check the roller brush for wear and
wrapped belts.
Check the height adjustment of the roll-
er brush.
Check for smooth running of the
Bowden cables and the moveable parts
Empty waste container (option).
Check the fuel filler cap and other clo-
sures and replace if damaged.
Check the sound absorber and replace
if necessary.
Note:
For description, see section on Care
and maintenance.
Activate immobilising brake.
Open fuel cock.
Turn the rotating knob parallel to the
hose of the fuel tap.
Gas lever in " CHOKE" position.
Pull the starter rope slowly until a resist-
ance can be felt.
Pull starter rope swiftly.
Once the motor runs, release the starter
rope. In order to work, put gas lever in
the "full load" position.
Danger
Risk of injury! During work, the roller brush
can eject stones or loose chippings to-
wards the front or sides. Make sure that this
does not endanger persons, animals or ob-
jects.
Caution
Do not sweep up packing strips, wire or
similar objects as this may damage the
sweeping mechanism.
The height of the roller brush is adjusted via
a rotary knob. The height must be selected
so that the bristles just touch the ground.
Note
: An adjustment that is too low leads to
overstraining the drives and unnecessary
wear of the roller brush without achieving a
better sweeping result.
Turning in (–) direction: Roller brush ris-
es.
Turning in (+) direction: Roller brush is
lowered.
Operating and Functional El- ements
Gas lever
Parking brake
OFF
3
2
1
1 2
Before Startup
Unloading
Fold up and install the push handle
Start up
Refuelling
Prior to start/safety test
Maintenance Works
Operation
Starting the machine
Sweeping mode
Height adjustment roller brush
11
EN
Оглавление
- Deutsch
- Sicherheitshinweise
- Bedien- und Funktionsele- mente
- Stilllegung Pflege und Wartung
- Hilfe bei Störungen
- EG-Konformitätserklärung
- English
- Safety instructions
- Operating and Functional El- ements
- Shutdown Maintenance and care
- Troubleshooting
- EC Declaration of Conformity
- Français
- Utilisation conforme
- Eléments de commande et de fonction
- Remisage Entretien et maintenance
- Assistance en cas de panne
- Déclaration de conformité CE
- Italiano
- Norme di sicurezza
- Elementi di comando e di fun- zione
- Fermo dell'impianto Cura e manutenzione
- Guida alla risoluzione dei guasti
- Dichiarazione di conformità CE
- Nederlands
- Veiligheidsinstructies
- Elementen voor de bediening en de functies
- Stillegging Onderhoud
- Hulp bij storingen
- EG-conformiteitsverklaring
- Español
- Indicaciones de seguridad
- Elementos de operación y funcionamiento
- Parada Cuidados y mantenimiento
- Ayuda en caso de avería
- Declaración de conformidad CE
- Português
- Avisos de segurança
- Elementos de comando e de funcionamento
- Desactivação da máquina Conservação e manutenção
- Ajuda em caso de avarias
- Declaração de conformidade CE
- Dansk
- Sikkerhedsanvisninger
- Betjenings- og funktionsele- menter
- Afbrydning/nedlæggelsePleje og vedligeholdelse
- Hjælp ved fejl
- EU-overensstemmelseser- klæring
- Norsk
- Forskriftsmessig bruk
- Betjenings- og funksjonele- menter
- Sette bort Pleie og vedlikehold
- Feilretting
- EU-samsvarserklæring
- Svenska
- Säkerhetsanvisningar
- Manövrerings- och funktions- element
- Nedstängning Skötsel och underhåll
- Åtgärder vid störningar
- Försäkran om EU-överens- stämmelse
- Suomi
- Turvaohjeet
- Ohjaus- ja käyttölaitteet
- Seisonta-aika Hoito ja huolto
- Häiriöapu
- EU-standardinmukaisuusto- distus
- Πίνακας περιεχομένων
- Χρήση σύμφωνα με τους κα - νονισμούς
- Στοιχεία χειρισμού και λει - τουργίας
- Διακοπή της λειτουργίας Φροντίδα και συντήρηση
- Αντιμετώπιση βλαβών
- Δήλωση Συμμόρφωσης των Ε . Κ .
- Türkçe
- Güvenlik uyar ı lar ı
- Kullan ı m ve çal ı ş ma eleman- lar ı
- Durdurma Koruma ve Bak ı m
- Ar ı zalarda yard ı m
- AB uygunluk bildirisi
- Оглавление
- Использование по назначе - нию
- Описание элементов управ - ления и рабочих узлов
- Эксплуатация
- Помощь в случае неполадок
- Заявление о соответствии ЕС
- Magyar
- Rendeltetésszer ű használat
- Kezelési- és funkciós elemek
- Leállítás Ápolás és karbantartás
- Segítség üzemzavar esetén
- EK konformitási nyiltakozat
- eština
- Používání v souladu s ur č e- ním
- Ovládací a funk č ní prvky
- Odstavení Ošet ř ování a údržba
- Pomoc p ř i poruchách
- Prohlášení o shod ě pro ES
- Slovenšina
- Varnostna navodila
- Upravljalni in funkcijski ele- menti
- Mirovanje naprave Nega in vzdrževanje
- Pomo č pri motnjah
- ES-izjava o skladnosti
- Polski
- U ż ytkowanie zgodne z prze- znaczeniem
- Elementy urz ą dzenia
- Wy łą czenie z eksploatacji Czyszczenie i konserwacja
- Usuwanie usterek
- Deklaracja zgodno ś ci UE
- Românete
- Utilizarea corect ă
- Elemente de utilizare ş i func- ţ ionale
- Scoaterea din func ţ iune Îngrijirea ş i între ţ inerea
- Remedierea defec ţ iunilor
- Declara ţ ie de conformitate CE
- Slovenina
- Bezpe č nostné pokyny
- Ovládacie a funk č né prvky
- Odstavenie Starostlivos ť a údržba
- Pomoc pri poruchách
- Vyhlásenie o zhode s norma- mi EÚ
- Hrvatski
- Sigurnosni napuci
- Komandni i funkcijski ele- menti
- Stavljanje ure đ aja van pogo- na Njega i održavanje
- Otklanjanje smetnji
- EZ izjava o uskla đ enosti
- Srpski
- Namensko koriš ć enje
- Komandni i funkcioni elementi
- Stavljanje ure đ aja van pogona Nega i održavanje
- Otklanjanje smetnji
- Izjava o uskla đ enosti sa propisima EZ
- Съдържание
- Употреба по предназначе - ние
- Обслужващи и функцио - нални елементи
- Спиране от експлоатация Грижи и поддръжка
- Помощ при неизправности
- Технически данни
- Eesti
- Ohutusalased märkused
- Enne seadme kasutuselevõt- tu
- Seismapanek Korrashoid ja tehnohooldus
- Abi häirete korral
- EÜ vastavusdeklaratsioon
- Latviešu
- Noteikumiem atbilstoša lieto- šana
- Vad ī bas un funkcijas elemen- ti
- Iekonserv ē šana Kopšana un tehnisk ā apkope
- Pal ī dz ī ba darb ī bas trauc ē jumu gad ī jum ā
- EK Atbilst ī bas deklar ā cija
- Lietuviškai
- Naudojimas pagal paskirt į
- Valdymo ir funkciniai elemen- tai
- Laikinas prietaiso nenaudoji- mas Prieži ū ra ir aptarnavimas
- Pagalba gedim ų atveju
- EB atitikties deklaracija
- Перелік
- Правильне застосування
- Елементи управління і функціональні вузли
- Експлуатація
- Допомога у випадку неполадок
- Заява при відповідність Європейського співтовариства
