Samsung LE-19 A656A1D: инструкция
Раздел: Бытовая, кухонная техника, электроника и оборудование
Тип: Телевизор
Характеристики, спецификации
Инструкция к Телевизору Samsung LE-19 A656A1D
LE32A656/LE37A656
LE40A656/LE46A656
LE52A656
ESTONIA 800-7267 www.samsung.ee
LATVIA 800-7267 www.samsung.com/lv
LITHUANIA 8-800-77777 www.samsung.lt
KAZAHSTAN 8-10-800-500-55-500 www.samsung.kz
KYRGYZSTAN 00-800-500-55-500 -
RUSSIA 8-800-555-55-55 www.samsung.ru
TADJIKISTAN 8-10-800-500-55-500 -
UKRAINE 8-800-502-0000 www.samsung.com
UZBEKISTAN 8-10-800-500-55-500 www.samsung.uz
www.samsung.com/global/register
BN68-01412E-00

Contact SAMSUNG WORLDWIDE
If you have any questions or comments relating to Samsung products, please contact the SAMSUNG
customer care centre. (See back cover for more informations.)
Precautions When Displaying a Still Image
A still image may cause permanent damage to the TV screen.
•
Do not display a still image on the LCD panel for more than 2 hours as it can cause screen image
retention. This image retention is also known as "screen burn". To avoid such image retention, reduce the
degree of brightness and contrast of the screen when displaying a still image.
•
Watching the LCD TV in 4:3 format for a long period of time may leave traces of borders
displayed on the left, right and center of the screen caused by the difference of light emission on
the screen. Playing a DVD or a game console may cause a similar effect to the screen. Damages
caused by the above effect are not covered by the Warranty.
•
Displaying still images from Video games and PC for longer than a certain period of time may produce
partial after-images.
To prevent this effect, reduce the ‘brightness’ and ‘contrast’ when displaying still images.
© 2008 Samsung Electronics Co., Ltd. All rights reserved.

English
Contents
CONNECTING AND PREPARING YOUR TV
FUNCTION DESCRIPTION
List of Parts ........................................................ 3
Choosing Your Language ................................. 26
Installing the Stand ............................................. 3
Melody / Entertainment / Energy Saving ......... 27
Installing the Wall Mount Kit ............................... 3
Selecting the Source ........................................ 28
Viewing the Control Panel .................................. 4
Editing the Input Source Names ...................... 29
Viewing the Connection Panel ........................... 5
Viewing the Remote Control ............................... 8
USING THE DTV FEATURE
Installing Batteries in the Remote Control .......... 9
Previewing the DTV Menu System .................. 30
Switching On and Off ......................................... 9
Updating the Channel List Automatically .......... 31
Placing Your Television in Standby Mode........... 9
Updating the Channel List Manually ................ 31
Viewing the Menus ........................................... 10
Editing Your Favourite Channels ...................... 32
Using the TOOLS Button .................................. 10
Selecting Channel List ..................................... 34
Plug & Play ........................................................11
Displaying Programme Information .................. 34
Viewing the EPG (Electronic Programme Guide)
SETTING THE CHANNELS
Information ....................................................... 35
Storing Channels Automatically ....................... 12
Using the Scheduled List ................................. 36
Storing Channels Manually .............................. 13
Setting the Default Guide ................................. 36
Adding / Locking Channels .............................. 14
Viewing All Channels and Favourite Channels 37
Sorting the Stored Channels ............................ 15
Adjusting the Menu Transparency .................... 37
Assigning Channels Names ............................. 15
Setting up the Parental Lock ............................ 38
Fine Tuning Channel Reception ....................... 16
Setting the Subtitle ........................................... 39
............................... 16
Setting the Subtitle Mode ................................. 39
Selecting the Audio Format .............................. 39
Selecting the Audio Description ....................... 40
SETTING THE PICTURE
Selecting the Digital Text (UK only) .................. 40
Changing the Picture Standard ........................ 17
Selecting the Time Zone (Spain only) .............. 41
Adjusting the Custom Picture ........................... 18
Viewing Product Information ............................ 41
... 18
Checking the Signal Information ...................... 42
Resetting the Picture Settings to the Factory
Upgrading the Software ................................... 42
Defaults ............................................................ 19
Viewing Common Interface .............................. 43
............................... 20
Selecting the CI (Common Interface) Menu ..... 43
Viewing the Picture In Picture (PIP) ................. 22
Resetting .......................................................... 44
Selecting the Preferred Language
SETTING THE SOUND
(Subtitle , Audio or Teletext) ............................. 44
Preference ........................................................ 45
Sound Features ................................................ 23
Selecting the Sound Mode ............................... 24
Connecting Headphones (Sold separately) ..... 24
SETTING THE TIME
Setting and Displaying the Current Time .......... 25
Setting the Sleep Timer .................................... 25
Switching the Television On and Off
Automatically .................................................... 26
English - 1

SETTING THE PC
RECOMMENDATIONS FOR USE
Setting up Your PC Software
Teletext Feature ............................................... 61
(Based on Windows XP) .................................. 46
Auto Wall-Mount (Sold separately) ................... 63
Display Modes .................................................. 46
Using the Anti-Theft Kensington Lock
Setting up the TV with your PC ........................ 47
(depending on the model) ................................ 64
Troubleshooting: Before Contacting Service
Personnel ......................................................... 65
WISELINK
... 66
Using the WISELINK Function ......................... 48
Using the WISELINK Menu .............................. 49
Using the PHOTO (JPEG) List ......................... 50
Using the MP3 List ........................................... 53
Using the Setup Menu ...................................... 54
ABOUT ANYNET
+
What is Anynet+? ............................................ 55
Connecting Anynet+ Devices ........................... 55
Setting Up Anynet+ .......................................... 56
Scanning and Switching between Anynet+
Devices ............................................................ 57
Recording ......................................................... 59
Listening through a Receiver ........................... 59
Check Points before Requesting Service ......... 60
Symbol Press Note One-Touch
Button
English - 2
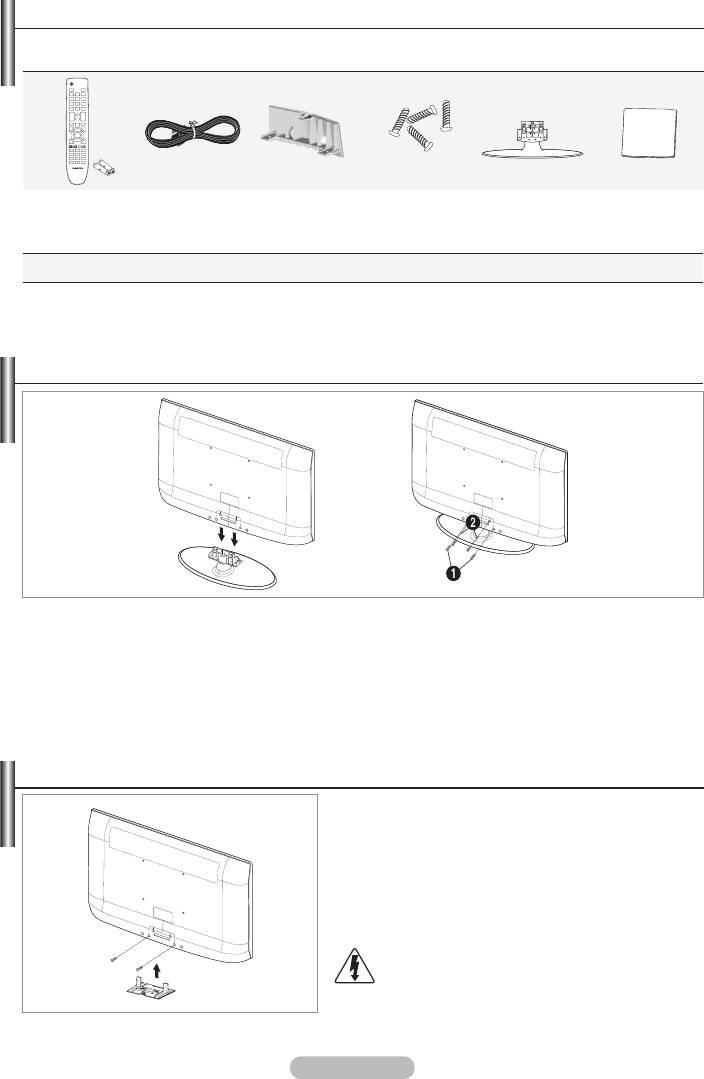
List of Parts
Please make sure the following items are included with your LCD TV.
If any items are missing, contact your dealer.
M4 X L16
Remote Control
Stand Screw
& Batteries
Power Cord Cover-Bottom
Stand Cleaning Cloth
X 4
(AAA x 2)
•
Owner’s Instructions
•
Warranty card
•
Safety Guide
•
Registration Cards
➣
Warranty card / Safety Guide / Registration Cards (Not available in all locations)
➣
The stand and stand screw may not be included depending on the model.
Installing the Stand
1. Connect your LCD TV and the stand.
➣
Two or more people should carry the TV.
➣
Make sure to distinguish between the front and back of the stand when assembling them.
2. Fasten two screws at position 1 and then fasten two screw at position 2.
➣
Stand the product up and fasten the screws. If you fasten the screws with the LCD TV placed
down, it may lean to one side.
➣
The stand is installed for models with the screen size of 37 inch and above.
Installing the Wall Mount Kit
Wall mount items (sold separately) allow you to mount the
TV on the wall.
For detailed information on installing the wall mount,
see the instructions provided with the Wall Mount items.
Contact a technician for assistance when installing the
wall mounted bracket.
Samsung Electronics is not responsible for any damage
to the product or injury to yourself or others
if you elect to install the TV on your own.
Do not install your Wall Mount Kit while your TV is
turned on. It may result in personal injury due to
electric shock.
➣
Remove the stand and cover the bottom hole with a
cap and fasten with two screws.
English - 3
Оглавление
-
- List of Parts
- Viewing the Control Panel
- Viewing the Connection Panel
- Viewing the Remote Control
- Installing Batteries in the Remote Control
- Viewing the Menus
- Plug & Play
- Storing Channels Automatically
- Storing Channels Manually
- Adding / Locking Channels
- Sorting the Stored Channels
- Fine Tuning Channel Reception
- Changing the Picture Standard
- Adjusting the Custom Picture
- Resetting the Picture Settings to the Factory Defaults
-
- Viewing the Picture In Picture (PIP)
- Sound Features
- Selecting the Sound Mode
- Setting and Displaying the Current Time
- Switching the Television On and Off Automatically
- Melody / Entertainment / Energy Saving
- Selecting the Source
- Editing the Input Source Names
- Previewing the DTV Menu System
- Updating the Channel List Automatically
- Editing Your Favourite Channels
- Selecting Channel List
- Viewing the EPG (Electronic Programme Guide) Information
- Using the Scheduled List
- Viewing All Channels and Favourite Channels
- Setting up the Parental Lock
- Setting the Subtitle
- Selecting the Audio Description
- Selecting the Time Zone (Spain only)
- Checking the Signal Information
- Viewing Common Interface
- Resetting
- Preference
- Setting up Your PC Software (Based on Windows XP)
- Setting up the TV with your PC
- Using the WISELINK Function
- Using the WISELINK Menu
- Using the PHOTO (JPEG) List
- Using the MP3 List
- Using the Setup Menu
- What is Anynet+?
- Setting Up Anynet+
- Scanning and Switching between Anynet+ Devices
- Recording
- Check Points before Requesting Service
- Teletext Feature
- Auto Wall-Mount (Sold separately)
- Using the Anti-Theft Kensington Lock (depending on the model)
- Troubleshooting: Before Contacting Service Personnel
-
-
-
-
-
-
-
-
-
-
-
-
-
-
-
-
-
-
-
-
-
-
-
-
-
-
-
-
-
-
-
-
-
-
-
-
-
-
-
-
-
-
-
-
-
-
-
-
-
-
-
-
-
-
-
-
-
-


