Samsung SCC-C4201P: инструкция
Раздел: Бытовая, кухонная техника, электроника и оборудование
Тип: Цифровая Видеокамера
Инструкция к Цифровой Видеокамере Samsung SCC-C4201P
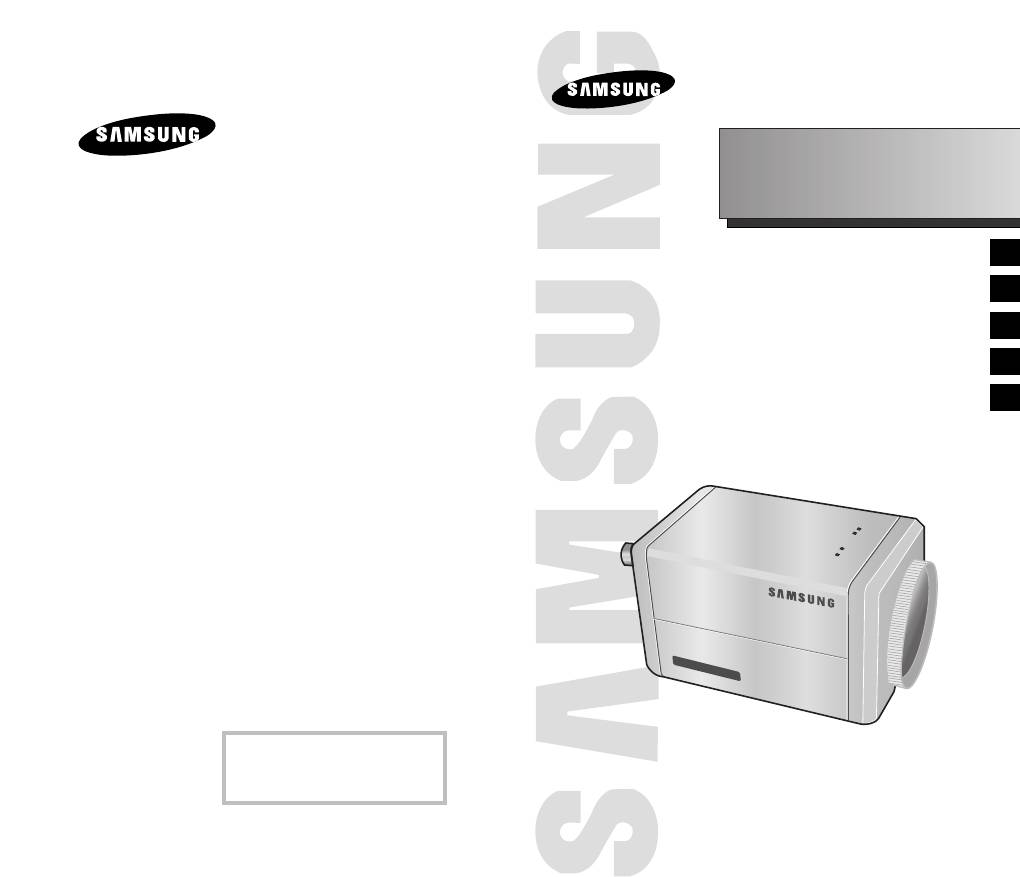
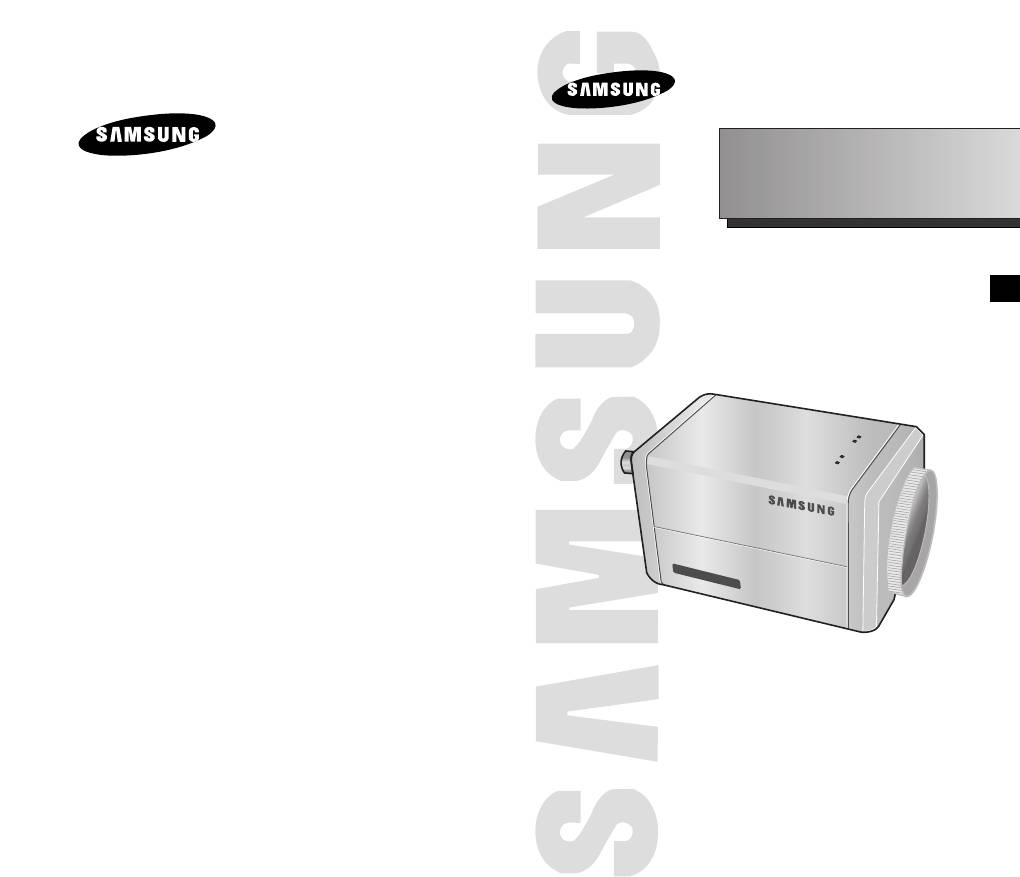
220X POWER ZOOM CAMERA
E
D
F
Es
I
Part : AB68-00366A
Printed in Korea
220x Power Zoom
LOW LIGHT
DIGITAL COLOR CAMERA
SCC-C4201(P), C4203(P),
C4301(P), C4303(P)
Owner’s Instructions
Gebrauchsanleitung
Guide d’utilisation
Guía del usuario
Istruzioni per l’uso
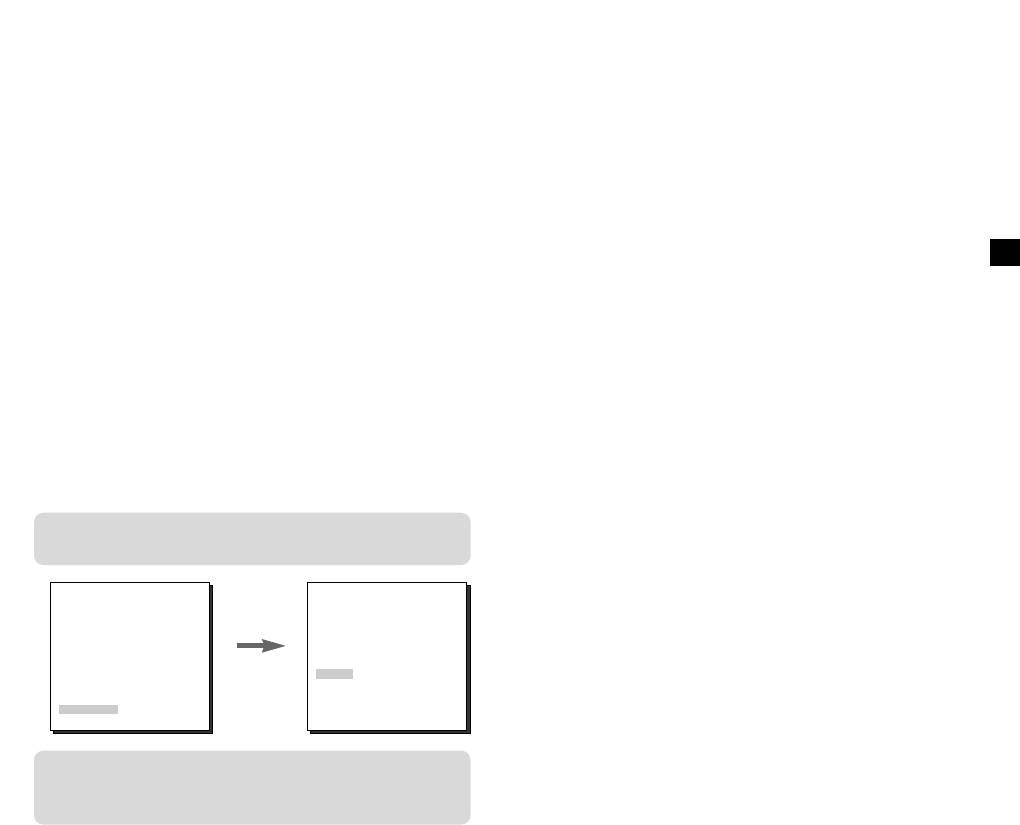
✽ Be sure to read the "Safety Precautions" in this manual
to ensure correct use and operation of this product.
Safety Precautions
The purpose of safety precautions is to prevent
4. Securely plug the power cord into the power
accidental injury or property damage. Always observe
receptacle. (A loose connection may result in fire.)
all safety precautions.
✽
The precautions are divided into "Warnings" and
5. When mounting the camera on a wall or ceiling,
"Cautions" as distinguished below:
fasten it safely and securely. (A falling camera may
cause personal injury.)
E
6. Do not place conductive objects (e.g.,
screwdrivers, coins, and metal things) or containers
filled with water on top of the camera. (Serious
Warning
Caution
injury may result from fire, electrical shock, or
Ignoring this precaution
Ignoring this precaution
falling objects.)
may result in death or
may result in injury or
serious injury.
damage to property.
7. Do not install the unit in humid, dusty, or sooty
locations. (Doing so may cause fire or electrical
shock.)
8. If any unusual smells or smoke come from the unit,
Warnings
stop using the product. In such case, immediately
disconnect the power source and contact the
1. Be sure to use only the standard adapter which is
service center. (Continued use in such a condition
specified in the specification sheet. (page 28~31)
may cause fire or electrical shock.)
Using any other adapter could cause fire, electrical
shock, or damage to the product.
9. If this product fails to operate normally, contact the
store of purchase or your nearest service center.
2. Check the external connection terminals first before
Never disassemble or modify this product in any
connecting the power source and signal wires.
way. (Problems caused by unauthorized user
Connect the alarm signal wires to the alarm
disassembly or repairs are not covered by your
terminals. Connect the DC12V power adapter to
warranty.)
the SCC-C4201(P)/C4203(P) power input, making
sure that the currect polarity is observed.
10. When cleaning, do not spray water directly onto
Connect the DC12V or AC24V power adapter to
parts of the product. (Doing so may cause fire or
the SCC-C4301(P)/C4303(P) power input.
electrical shock.) Gently wipe the surface with a dry
cloth. Never use detergents or chemical cleaners
3. Do not connect multiple cameras to a single
on the product, as this may result in discoloration
adapter. (Exceeding the capacity may cause
of surface or cause damage to the finish.
abnormal heat generation or fire.)
1
2

Contents
Cautions
1. Overview.............................................................5
1. Do not drop objects on the product or apply strong
2. Part Names and Functions ...............................6
shock to it. Keep away from a location subject to
excessive vibration or magnetic interference.
3. Installation........................................................ 8
Checking the Package Contents ....................... 8
2. Do not install in a location subject to high
E
temperature, low temperature, or high humidity.
Preparing the Cables ........................................ 9
(Doing so may cause fire or electrical shock.)
Connecting the Cables .................................... 10
3. Avoid a location which is exposed to direct sunlight,
4. Navigating the Setup Menu........................... 12
or near heat sources such as heaters or radiators.
Structure of the Setup Menu ........................... 12
(Neglecting to do so may result in a risk of fire.)
- CAMERA ID................................................... 16
4. If you want to relocate the already installed product,
- IRIS................................................................ 17
be sure to turn off the power before moving or
- BLC................................................................ 17
reinstalling it.
- ALC ............................................................... 17
5. Install in a well-ventilated location.
- MANU ............................................................ 18
- SHUTTER...................................................... 19
6. Remove the power plug from the outlet when there
- AGC (MOTION) ............................................. 20
is a lightning storm. (Neglecting to do so may cause
- WHITE BAL ................................................... 21
fire or damage to the product.)
- SPECIAL ....................................................... 22
- AUTO FOCUS ............................................... 24
- MOTION DET ................................................ 24
- PRESET ........................................................ 25
- COLOR/ BW .................................................. 26
- EXIT............................................................... 28
5. Specifications ............................................... 29
6. Others ............................................................ 33
3 4
1
Overview
2
Part Names and Functions
This camera is a high performance surveillance camera that
provides a maximum of 220x zoom surveillance capability
with its 22x optical zoom lens and digital zoom IC.
It is a multifunction camera that is equipped with all of the
key features of the existing surveillance cameras :
●
Day & Night function (SCC-C4203(P), C4303(P)) that
E
ensures sharp and clear images even at night.
●
Low - Light Surveillance function that enables image
capture even under extremely low light conditions.
●
White Balance function that provides accurate color
rendition under any light conditions.
●
BLC function that enables effective back light
compensation even under a spotlight or a very bright
incident light.
●
Auto Focus function that automatically tracks and focuses
on the moving subject.
●
RS485/ Wired remote control function.
Broadcast System
●
SCC-C4201/ C4203/ C4301/ C4303 : NTSC System
●
SCC-C4201P/ C4203P/ C4301P/ C4303P : PAL System
Power System/Power Consumption
●
SCC-C4201(P), C4203(P) : DC 12V/5.0W
●
SCC-C4301(P), C4303(P) : AC 24V, DC 12V/5.5W
5
6
220x Power Zoom
LOW LIGHT
DIGITAL COLOR CAMERA
REMOTE RS-485 POWER
SET-UP button
Instead of “POWER”, “DC IN”
is writtern in
SCC-C4201(P)/4203(P).
Instead of “POWER”, “PWR
IN” and instead of “GND”,
“DC12&AC24V” is writtern in
SCC-C4301(P)/4303(P).
SET-UP button
The function of the SET-UP button varies depending on
whether you are currently in Normal Operation mode (i.e.,
the Setup Menu is not displayed) or Setup Menu mode.
☞
In Normal Operation Mode
- UP/ DOWN buttons : Use as the ZOOM Tele button
and the ZOOM Wide button respectively.
- LEFT/ RIGHT buttons : Use as the FOCUS Near
button and the FOCUS Far button respectively.
- SET- UP button: Use to enter the Setup Menu.
Hold the SET- UP button for longer than 3 seconds to
enter the Setup Menu.
3
Installation
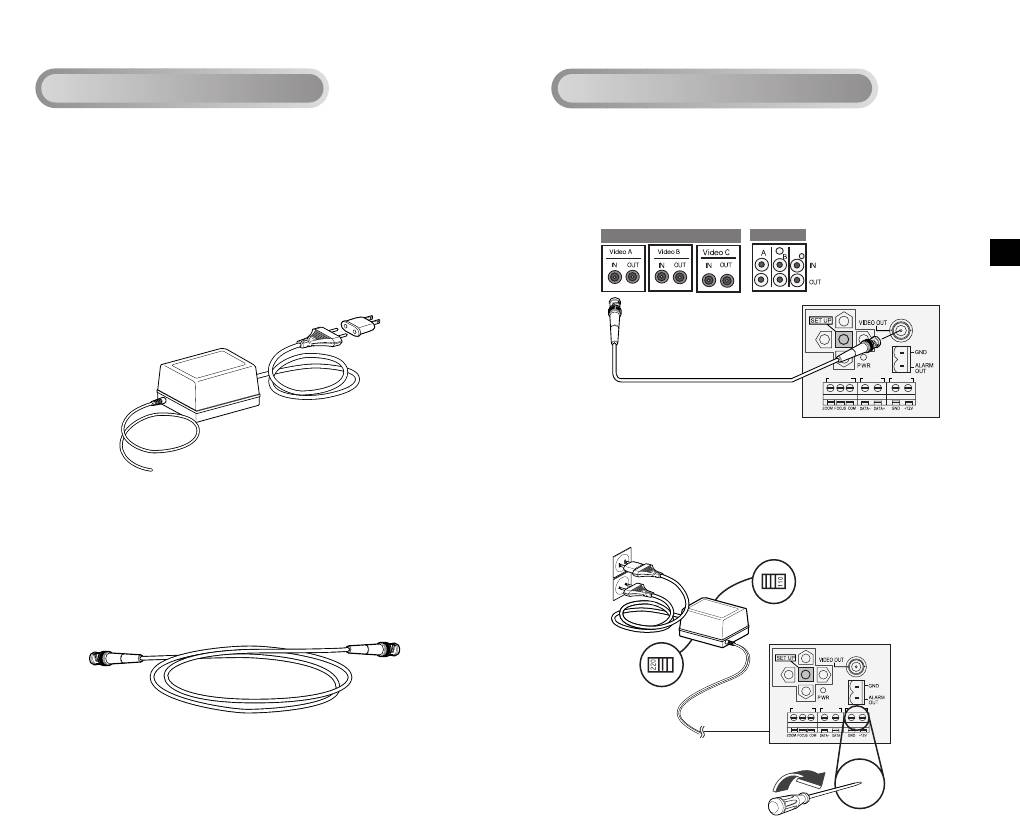
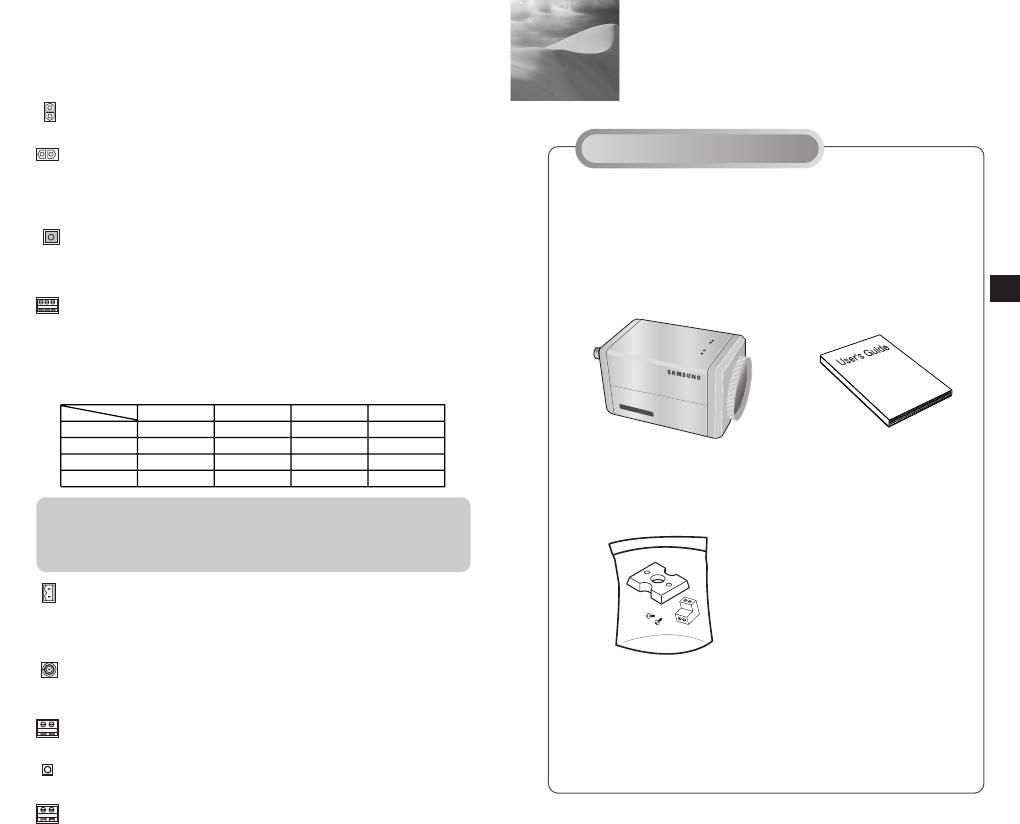
Checking the Package Contents
Make sure that the following accessories are included in
E
the package.
7
8
220x Power Zoom
DIGITAL COLOR CAMERA
LOW LIGHT
☞
In Setup Menu Mode
- UP/ DOWN buttons: Use to move the cursor up or down.
- LEFT/ RIGHT buttons: Use to move the cursor left or
Before Installation
right, or to sequentially view the values that can be
assigned to a parameter.
- ENTER button: Use to select a Sub Menu item, and to
accept the current value.
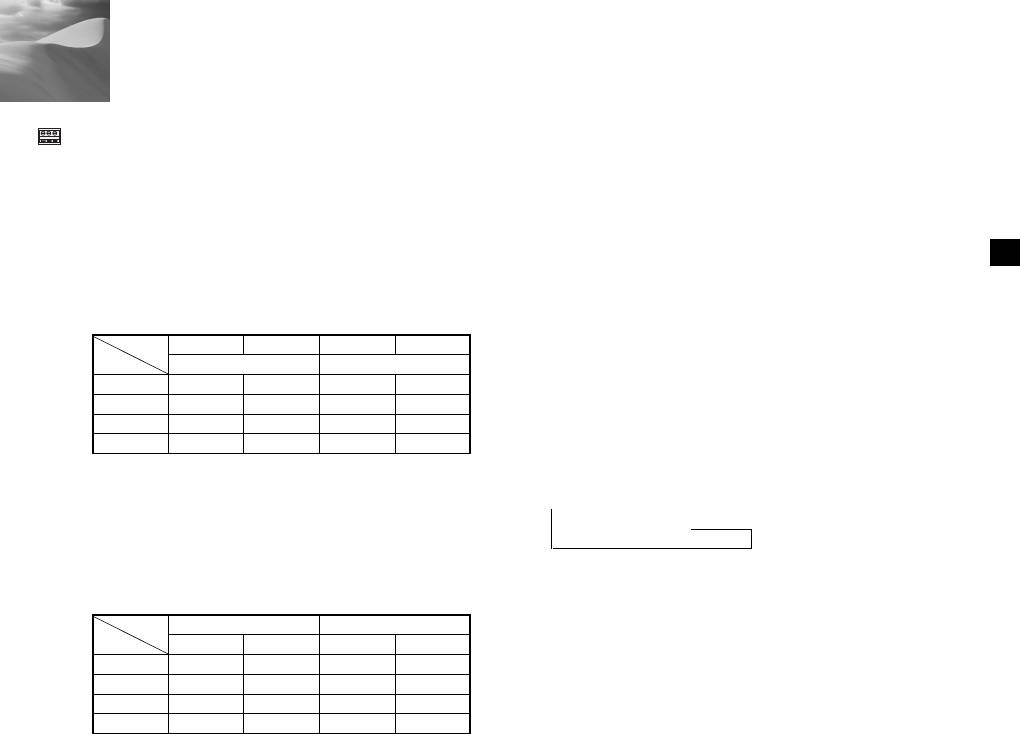
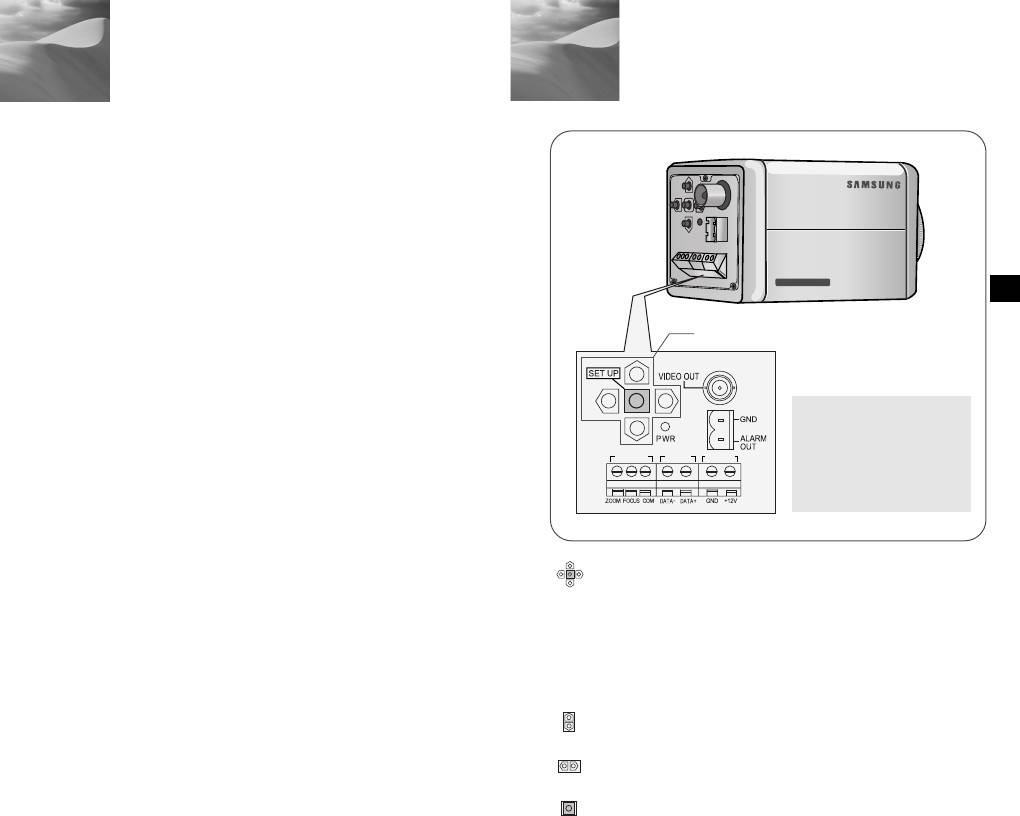
ZOOM/ FOCUS REMOTE terminals
Use to control ZOOM/ FOCUS from an external controller.
Depending on the input conditions, the terminals can be
set to 4 different modes.
(Operating Voltage Range : +3V ~+13V, -3V~-13V)
Code
Item
Tele
Wide
Far
Near
A
-6V
+6V
+6V
-6V
B
-6V
+6V
-6V
+6V
C
+6V
-6V
+6V
-6V
D
+6V
-6V
-6V
+6V
Caution : In the event of a simultaneous input of RS485 and
SCC-C4201(P),C4203(P),
User's Guide
wired remote control signal, whichever was input first
C4301(P),C4303(P)
will be activated.
(For a camera with the ROM version 1.2 or above,
please refer to page 33.)
ALARM OUT terminal
An alarm signal is output from this terminal when the
MOTION DET mode is activated or BW mode is activated.
(Open Collector
:
DC24V 40mA Max)
VIDEO OUT terminal
Connect the monitor's VIDEO IN. The video signal from
Mount Adapter
the camera is transmitted to the monitor via this terminal.
Screw (2)
RS485 terminal
Terminal Block
RS485 remote control terminal.
Power LED
Lights when power is on.
POWER IN terminal
Plug in the power adapter here.
1. Connect one end of the BNC cable to the VIDEO OUT.
2. Connect the other end of the BNC cable to the VIDEO IN
of the monitor.
E
3.
Plug in the power adapter. Use a "minus" screwdriver to
connect one part of the power adapter, which consists of two
lines, to the POWER terminal of the camera as follows :
9 10
REMOTE RS-485 POWER
REMOTE RS-485 POWER
Preparing the Cables
Connecting the Cables
To install and use the camera, first prepare the following
cables.
The requirements for the power adapter, which connects to
the camera's POWER IN terminal, are as follows:
●
SCC-C4201(P), SCC-C4203(P) : DC12V 600mA
●
SCC-C4301(P), SCC-C4303(P) : AC24V 300mA
DC12V 600mA
Video terminals on the back
of the monitor
BNC cable
Video Cable
Use a BNC cable, such as the one shown below, to connect
POWER SELECTION switch
the camera's VIDEO OUT to the monitor.
underneath the power adapte
POWER SELECTION
switch underneath the
power adapte
4
Navigating the Setup Menu
In this chapter, we will take a look at the menu system of the
SCC-C4201(P), C4203(P), C4301(P), and C4303(P). First,
we will take a look at the structure of the Setup Menu and
then describe the functions of each menu item in the menu.
Structure of the Setup Menu
E
●
Structure of the Setup Menu of the SCC-C4201(P)
11 12
CAMERA ID
OFF/ON...
IRIS
ALC.../MANU...
OFF/1/100(1/120) ~ 1/10K
SHUTTER
/AUTO X2~X128/FIX X2~X128
AGC
OFF/LOW/HIGH
MOTION S.S/SLOW/NORMAL/FAST/F.F
WHITE BAL
ATW/AWC/MANU...
SPECIAL
...
LANGUAGE ENGLISH
CTRL TYPE A/B/C/D
RS-485 ...
PIP OFF/ON...
MIRROR OFF/ON
D-ZOOM OFF/X2 ~ X10
POSI/NEGA +/-
ZOOM SPEED 1/2/3/4
DETAIL(0) ---- I----
RET
AUTO FOCUS
AF/MF/ONEAF
MOTION DET
OFF/ON...
PRESET
...
EXIT
QUIT/SAVE/PRESET
4. Determine the type of power supply and set the POWER
SELECTION switch accordingly. Next, plug the power
adapter into a wall outlet.
The requirements for the power adapter for each model are
as follows:
●
SCC-C4201(P), SCC-C4203(P) : DC12V 600mA
●
SCC-C4301(P), SCC-C4303(P) : AC24V 300mA
DC12V 600mA
5. If the camera operates normally, the following screen will
be displayed for 5 seconds and then disappears.
SAMSUNG PROTOCOL
ADDR : 0
TYPE : RS-485, HALF
BAUD : 9600
LENS CHECK : OK!
6. The requirements for RS485 control is as follows :
●
Signaling Speed: 9600 bps
●
Data Bit : 8 bits
●
Stop Bit : 1 bit
●
Parity Bit : none

Structure of the Setup Menu
●
Structure of the Setup Menu of the SCC-C4301(P)
E
13 14
CAMERA ID
OFF/ON...
IRIS
ALC.../MANU...
OFF/1/100(1/120) ~ 1/10K
SHUTTER
/AUTO X2~X128/FIX X2~X128
AGC
OFF/LOW/HIGH
MOTION S.S/SLOW/NORMAL/FAST/F.F
WHITE BAL
ATW/AWC/MANU...
SPECIAL
...
LANGUAGE ENGLISH
V-SYNC INT/LINE...
CTRL TYPE A/B/C/D
RS-485 ...
PIP OFF/ON...
MIRROR OFF/ON
D-ZOOM OFF/X2 ~ X10
POSI/NEGA +/-
ZOOM SPEED 1/2/3/4
DETAIL(0) ----I----
RET
AUTO FOCUS
AF/MF/ONEAF
MOTION DET
OFF/ON...
PRESET
...
EXIT QUIT/SAVE/PRESET
●
Structure of the Setup Menu of the SCC-C4203(P)
CAMERA ID
OFF/ON...
IRIS
ALC.../MANU...
OFF/1/100(1/120) ~ 1/10K
SHUTTER
/AUTO X2~X128/FIX X2~X128
AGC
OFF/LOW/HIGH
MOTION S.S/SLOW/NORMAL/FAST/F.F
WHITE BAL
ATW/AWC/MANU...
SPECIAL
...
LANGUAGE ENGLISH
CTRL TYPE A/B/C/D
RS-485 ...
PIP OFF/ON...
MIRROR OFF/ON
D-ZOOM OFF/X2 ~ X10
POSI/NEGA +/-
ZOOM SPEED 1/2/3/4
DETAIL(0) ---- I----
RET
AUTO FOCUS
AF/MF/ONEAF
MOTION DET
OFF/ON...
PRESET
...
COLOR/BW
COLOR/BW/AUTO...
EXIT QUIT/SAVE/PRESET
(SET UP)
(SET UP)
CAMERA ID OFF
CAMERA ID OFF
IRIS ALC...
IRIS ALC...
SHUTTER OFF
SHUTTER OFF
AGC LOW
AGC LOW
●
Structure of the Setup Menu of the SCC-C4303(P)
WHITE BAL ATW
WHITE BAL ATW
SPECIAL ...
SPECIAL ...
AUTO FOCUS ONEAF
AUTO FOCUS ONEAF
MOTION DET OFF
MOTION DET OFF
PRESET ...
PRESET ...
COLOR/BW COLOR
EXIT QUIT
EXIT QUIT
[SCC-C4201(P),SCC-C4301(P)] [SCC-C4203(P),SCC-C4303(P)]
E
The COLOR/BW option is available only with the
SCC-C4203(P) and C4303(P).
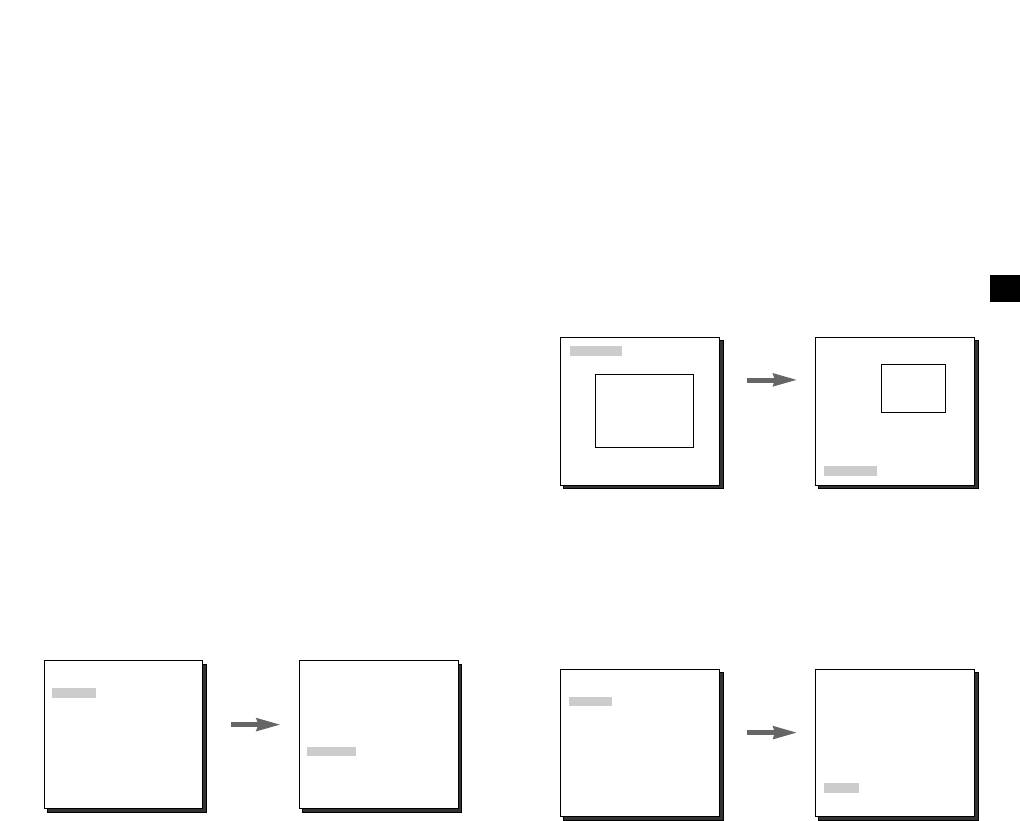
CAMERA ID
In the CAMERA ID menu, you can assign an ID to the camera
that appears on the monitor screen. If you select ON...
for CAMERA ID and press the ENTER button, a screen from
which you can assign a camera ID will appear.
You can use alphanumeric characters and a few special
characters that are displayed on the screen to assign a
maximum of 20 characters for the CAMERA ID.
You can use the LOCATION option to place the camera ID
anywhere on the screen.
(SET UP)
(CAMERA ID)
CAMERA ID ON...
IRIS ALC...
ABCDEFGH I JKL
SHUTTER OFF
MNOPQR S TU VWX
AGC LOW
YZ0 123 45 6 7 8 9
WHITE BAL ATW
:!-+*()/
SPECIAL ...
Press the
AUTO FOCUS ONEAF
SP SP
MOTION DET OFF
ENTER
LOCATION...
PRESET ...
RET
button.
COLOR/BW COLOR
EXIT QUIT
ZOOM.CAMERA.........
15 16
CAMERA ID
OFF/ON...
IRIS
ALC.../MANU...
OFF/1/100(1/120) ~ 1/10K
SHUTTER
/AUTO X2~X128/FIX X2~X128
AGC
OFF/LOW/HIGH
MOTION S.S/SLOW/NORMAL/FAST/F.F
WHITE BAL
ATW/AWC/MANU...
SPECIAL
...
LANGUAGE ENGLISH
V-SYNC INT/LINE...
CTRL TYPE A/B/C/D
RS-485 ...
PIP OFF/ON...
MIRROR OFF/ON
D-ZOOM OFF/X2 ~ X10
POSI/NEGA +/-
ZOOM SPEED 1/2/3/4
DETAIL(0) ----I----
RET
AUTO FOCUS
AF/MF/ONEAF
MOTION DET
OFF/ON...
PRESET
...
COLOR/BW COLOR/BW/AUTO...
EXIT QUIT/SAVE/PRESET
Structure of the Setup Menu
IRIS
If you set the AREA option to USER and press the ENTER
button, you can customize the area to which the BLC function
The level of video output to the monitor can be controlled by
will be applied. You can specify the size of the area by using
the iris lens according to the intensity of the incoming light.
the UP, DOWN, LEFT, and RIGHT buttons. After setting the
This product is equipped with an iris lens. In the ALC (Auto
size of the area, press the ENTER button. The specified area
Light Compensation) menu, you can set the video output
will start flashing. Then, you can use the UP, DOWN, LEFT
level. In the MANU menu, you can manually set the opening
and RIGHT buttons to specify the location of the area.
and closing of the iris.
Use the ENTER button and the UP, DOWN, LEFT and
RIGHT buttons to specify the size of the area and to position
BLC (Option in the ALC Menu)
the area. Press the ENTER button again to exit the AREA
E
If you use an ordinary camera when a strong light source,
setting menu.
such as a spot light, is shining from behind the subject, the
subject will appear dark on the monitor because of the back
SIZE
SIZE
light. For the SCC-C4201(P), C4203(P), C4301(P), and
C4303(P), appropriately set the BLC in the ALC menu to
➞
solve the back -light problem and have a clear picture even
Use the UP,
➞
➞
under a spotlight or a very bright incident light.
➞
DOWN,
LEFT, and
RIGHT
ALC
POSITION
buttons.
POSITION
If you select ALC for IRIS and press the ENTER button, a
screen from which you can set the video output level and BLC
will appear. In the LEVEL option, you can use the LEFT/
MANU
RIGHT buttons to set the video output level. If you set the
BLC to ON, the BLC function will be applied to the screen
If you select MANU for IRIS and press the ENTER button, a
area specified in the AREA option. The AREA option can be
screen from which you can manually adjust the iris to a
set to either PRESET or USER to specify the screen area to
desired level will appear. In the LEVEL option, you can use
which the BLC function will be applied. If you set the AREA
the LEFT/ RIGHT buttons to set the manual opening and
option to PRESET, the BLC function will be applied to the
closing of the iris.
area specified at the time of factory shipment.
(SET UP)
CAMERA ID OFF
(MANUAL)
(SET UP)
(ALC)
CAMERA ID OFF
IRIS MANU...
IRIS ALC...
SHUTTER OFF
SHUTTER OFF
AGC LOW
AGC LOW
WHITE BAL ATW
WHITE BAL ATW
SPECIAL ...
Press the
SPECIAL ...
AUTO FOCUS ONEAF
Press the
AUTO FOCUS ONEAF
MOTION DET OFF
ENTER
AREA PRESET...
MOTION DET OFF
ENTER
PRESET ...
LEVEL ( 00) ----I----
BLC OFF
button.
PRESET ...
COLOR/BW COLOR
RET
button.
LEVEL ( 0) ----I----
COLOR/BW COLOR
EXIT QUIT
RET
EXIT QUIT
17 18
SHUTTER
AGC (MOTION)
In the AGC (Automatic Gain Control) option, you can specify
In the SHUTTER option, you can specify the speeds of the
whether to automatically control the GAIN when the obtained
high-speed electronic shutter, auto low-speed shutter, and fix
video is below a certain level of brightness because it was
low-speed shutter. The high - speed electronic shutter
recorded under insufficient lighting. To automatically control
supports 7 shutter speeds from 1/100 seconds to 1/10K
the GAIN, set the AGC option to LOW or HIGH. Otherwise,
seconds, and the auto low-speed shutter and fix low-speed
set it to OFF. If the you set the AGC option to LOW, the
maximum GAIN of the AGC will be set to low, and if set to
shutter support 12 shutter speeds from 2x to 128x
HIGH, the maximum GAIN will be set to high.
respectively. The low-speed shutter allows you to set the
If the SHUTTER option is set to an auto low-speed, the AGC
shutter speed to a slow setting to obtain a clearer video
option will change to the MOTION option. In the MOTION
E
when shooting in dark lighting conditions. Select an auto
option, use the LEFT and RIGHT buttons to select from S.S,
low -speed shutter in order to have the camera detect the
SLOW, NORMAL, FAST, and F.F.
amount of light and automatically set the shutter speed to a
(SET UP)
slow setting according to the degree of darkness. Select an
CAMERA ID OFF
item that starts with "FIX" to specify the shutter speed
IRIS ALC...
SHUTTER AUTOX4
yourself. The numbers that immediately follow the "AUTO"
MOTION NORMAL
WHITE BAL ATW
and "FIX" indicate the number of accumulated fields.
SPECIAL ...
The higher the field number, the slower the shutter speed.
AUTO FOCUS ONEAF
MOTION DET OFF
Accordingly, a still picture will be sharper. In the case of
PRESET ...
video, an image captured of an object will be blurry.
COLOR/BW COLOR
EXIT QUIT
(SET UP)
CAMERA ID OFF
S.S : Select to maximally enhance the resolution of a still
☞
IRIS ALC...
image by increasing the lowest value of AGC GAIN and
SHUTTER OFF
the scale of low speed shutter to their maximum.
AGC LOW
WHITE BAL ATW
(This is used mainly to monitor almost still objects in dark
SPECIAL ...
places.)
AUTO FOCUS ONEAF
MOTION DET OFF
SLOW : Select to enhance the resolution of a still image
☞
PRESET ...
as much as possible by increasing a low value of AGC
COLOR/BW COLOR
EXIT QUIT
GAIN and the scale of low speed shutter. (This is used
mainly to monitor objects that make a small movement in
dark places.)
NORMAL : Select to display the normal picture with a
SHUTTER
☞
medium value of AGC GAIN and the scale of normal
speed shutter. (This is used mainly to monitor moving
➞
OFF ➞ 1/100(1/120) ➞ 1/250 ➞ 1/500 ➞ 1/1000 ➞ 1/2000 ➞
objects in dark places.)
1/4000 ➞ 1/10K ➞ OFF ➞ AUTOX2 ➞ AUTOX4 ➞ AUTOX6 ➞
☞
FAST : Select to focus on the moving objects by
AUTOX8 ➞ AUTOX12 ➞ AUTOX16 ➞ AUTOX24 ➞ AUTOX32
decreasing a high value of AGC GAIN and the scale of
➞ AUTOX48 ➞ AUTOX64 ➞ AUTOX96 ➞ AUTOX128 ➞ OFF
normal speed shutter. (This is used mainly to monitor
➞ FIXX2 ➞ FIXX4 ➞ FIXX6 ➞ FIXX8 ➞ FIXX12 ➞ FIXX16 ➞
objects showing active movements in dark places.)
FIXX24 ➞ FIXX32 ➞ FIXX48 ➞ FIXX64 ➞ FIXX96 ➞ FIXX128
F.F : Select to focus on the moving objects by
☞
decreasing the highest value of AGC GAIN and the scale
of low speed shutter to their minimum. (This is used
mainly to monitor fast moving objects in dark places.)
19 20
WHITE BAL
SPECIAL
In the WHITE BAL option, you can set the White Balance
You can manually adjust the LANGUAGE, V-SYNC, CTRL TYPE,
function, which enables you to see the white color correctly
RS485, PIP, MIRROR, D-ZOOM, POSI/ NEGA, ZOOM SPEED,
and DETAIL.
under illumination of any color temperature. If you set the
WHITE BAL option to ATW, the camera will continuously
The V-SYNC option is available only with the SCC-C4301(P)
monitor changes in the ambient color temperature and
and C4303(P).
automatically set the White Balance according to the color
If you press the ENTER button while in "---" is shown, the
temperature. If you set the WHITE BAL option to AWC, place
SPECIAL screen from which you can set the special functions
a piece of white paper in front of the camera, and press the
will appear. When activating each function, use the LEFT and
E
ENTER button, the Auto White Balance Control will be
RIGHT buttons to set the desired item.
activated just once to set the color temperature and this
(SET UP)
(SPECIAL)
value will be maintained.
CAMERA ID OFF
LANGUAGE ENGLISH
IRIS ALC...
V-SYNC INT
If you set the WHITE BAL option to MANUAL, you can
SHUTTER OFF
CTRL TYPE A
AGC LOW
RS-485 ...
customize the white balance to take into account the current
WHITE BAL ATW
PIP OFF
SPECIAL ...
MIRROR OFF
lighting condition.
Press the
AUTO FOCUS ONEAF
D-ZOOM OFF
MOTION DET OFF
ENTER
POSI/NEGA +
☞
3200°K : Select to set the color temperature to 3200°K.
PRESET ...
ZOOM SPEED 3
button.
COLOR/BW COLOR
DETAIL (0) ----I--
5600°K : Select to set the color temperature to 5600°K.
EXIT QUIT
RET
☞
USER : Select to set the color temperature by selecting
☞
☞
V - SYNC : Specify the vertical synchronization method that
appropriate values from the RED and BLUE
will be used by the SCC-C4301(P) and C4303(P).
graphs.
There are 2 types of vertical synchronization signal that the
camera supports : INT mode in which the signal is generated
MANU : If you select the MANU option and press the
by the camera's internal clock and LINE mode which sets the
ENTER button, a screen from which you can manually select
vertical synchronization by the external power frequency. If
the white balance will appear. In the PRESET option, use the
you select LINE and press ENTER button, the LL-PHASE
LEFT and RIGHT buttons to select 3200°K, 5600°K, or
screen from which you can adjust the phase of LINE LOCK
will appear. You can specify the desired phase level in the
USER.
PHASE option.
(SET UP)
(AWB/MANU)
(SPECIAL)
CAMERA ID OFF
(LL-PHASE)
LANGUAGE ENGLISH
IRIS ALC...
V-SYNC LINE...
SHUTTER OFF
CTRL TYPE A
AGC LOW
RS-485 ...
WHITE BAL MANU...
PIP OFF
SPECIAL ...
Press the
MIRROR OFF
AUTO FOCUS ONEAF
Press the
PRESET OFF(USER)..
D-ZOOM OFF
MOTION DET OFF
ENTER
RED (-2C) ---I----
POSI/NEGA +
ENTER
PRESET ...
button.
BLUE (-5B) -I------
ZOOM SPEED 3
COLOR/BW COLOR
button.
PHASE (0) ----|----
RET
DETAIL (0) ----I--
EXIT QUIT
RET
RET
If you are using DC power supply, it will work only in INT mode.
For LINE mode operation, use the AC power adapter (50Hz).
21 22
CTRL TYPE : You can select the A, B, C, or D mode
☞
AUTO FOCUS
depending on the input of the wired remote control terminal.
In the AUTO FOCUS option, you can specify the Focus
(See page 7.)
method to AF, MF, or ONEAF.
RS-485 : It sets up ADDRESS, PROTOCOL, and BAUD
☞
RATE of RS-485 communication.
AF : Focuses automatically by continuously monitoring the
☞
(BAUD RATE: 2400bps, 4800bps, 9600bps, 19200bps, 38400bps)
screen in AUTO FOCUS mode. It does not process the
FOCUS button input because it focuses automatically
Caution : A communication error may occur if you connect
during ZOOM.
more than one camera set with an identical address.
☞
MF : You can manually adjust
(SET UP)
the focus.
CAMERA ID OFF
E
PIP :
This is the Picture in Picture feature. It will show a
IRIS ALC...
☞
ONEAF : Focuses about 5
SHUTTER OFF
screen reduced by 1/16 of the main screen only when
☞
AGC LOW
operating the Digital Zoom. If you set the PIP option to ON
seconds only when ZOOM is
WHITE BAL ATW
SPECIAL ...
and press the ENTER button, you can use the UP, DOWN,
moved Wide to Tele. It is same
AUTO FOCUS AF
LEFT, and RIGHT buttons to set the PIP position.
as MF mode while in STOP
MOTION DET OFF
PRESET ...
mode, and same as AF mode
COLOR/BW COLOR
* The PIP feature does not work in a low speed shutter mode.
after ZOOM Tele.
EXIT QUIT
The MIRROR feature does not work on the PIP window
.
(SPECIAL)
EANGUAGE ENGLISH
MOTION DET
V-SYNC LINE...
CTRL TYPE A
In the MOTION DET option, you can set the Motion
RS-485 ...
PIP ON
Detection function, motion detection sensitivity, and the
MIRROR OFF
PIP
Press the
D-ZOOM OFF
motion detection area. If you set the Motion Detection
POSI/NEGA +
ENTER
function, you can detect an intruder's movement and check it
ZOOM SPEED 3
button.
DETAIL (0) ----I--
through the monitor and the ALARM OUT terminal.
RET
If you set ALARM which is located under COLOR/BW
MIRROR : Horizontally flips the video output signal.
☞
AUTO menu to ON while MOTION DET remains ON, the
D-ZOOM : Sets the magnification of the Digital Zoom.
☞
ALARM output port can not send any motion.
The magnification level can be set to up to 10x.
POSI/ NEGA : Outputs the video output signal normally or
☞
inversely.
(SET UP)
(MOTION DET)
CAMERA ID OFF
ZOOM SPEED : In the ZOOM SPEED option, use the
☞
IRIS ALC...
LEFT and RIGHT buttons to set the speed as follows:
SHUTTER OFF
AGC LOW
1 : Takes about 17 seconds from 1 x to 22 x magnification (slowest speed).
WHITE BAL ATW
SPECIAL ...
2 : Takes about 10 seconds from 1 x to 22 x magnification (slow speed).
Press the
AUTO FOCUS ONEAF
3 : Takes about 6 seconds from 1 x to 22 x magnification (fast speed).
MOTION DET ON...
ENTER
PRESET ...
AREA PRESET...
4 : Takes about 3 seconds from 1 x to 22 x magnification (fastest speed).
button.
COLOR/BW COLOR
SENSITIVITY MEDIUM
EXIT QUIT
RET
DETAIL: Adjusts the sharpness.
☞
23 24
If you select ON and press the ENTER button, the MOTION
(PRESET MAP)
PRESET NO. 0
DET screen will come up. You can set the AREA to which the
0 H 1 2 3 4
Motion Detection function will be applied to either PRESET or
56789
POSITION SET ...
10 11 12 13 14
USER. If you set the AREA option to PRESET, the Motion
PRESET ID ON...
15 16 17 18 19
Detection function will be applied to the areas preset as factory
20 21 22 23 24
Press the
25 26 27 28 29
defaults. If you set the AREA option to USER and press the
30 31 RET
ENTER
ENTER button, you can change the area size and position and
HOME RETURN OFF
button.
select the area where you want to apply the Motion Detection
EXIT QUIT
EXIT QUIT
function. You can specify the size of the area by using the UP,
DOWN, LEFT, and RIGHT buttons. If the area is not flashing,
If you select a preset number and press the ENTER button, a screen
press the ENTER button. When the area starts flashing, use the
E
that looks as above will appear.
UP, DOWN, LEFT and RIGHT buttons to specify the location of
the area. Use the ENTER button and the UP, DOWN, LEFT,
POSITION SET : Select to store the ZOOM and FOCUS
☞
and RIGHT buttons to specify the size of the area and to
positions.
position the area. Press the ENTER button again to exit the
PRESET ID : Select to set an ID for the PRESET position,
AREA setting menu. You can use the SENSITIVITY option to
☞
as you did with Camera ID.
set the motion detection sensitivity. The higher the setting, the
more sensitive the motion detection.
The HOME RETURN function is available with a camera
SIZE
SIZE
with the ROM version 1.2 or above. For instruction on the
use of this function, please refer to page 33.
➞
Use the UP,
➞
➞
➞
DOWN,
LEFT, and
COLOR / BW
RIGHT
buttons.
POSITION
POSITION
The COLOR / BW option is available only with the SCC-C4203(P)
and C4303(P).
PRESET
In the COLOR / BW option, you can set the IR (infrared) Filter to ON or
OFF. In the BW mode, the IR Filter is turned OFF and the level of
(SET UP)
(PRESET MAP)
sensitivity is increased to a level comparable to a black and white
CAMERA ID OFF
camera. In the COLOR mode, on the other hand, the IR Filter is turned
IRIS ALC...
0 H 1 2 3 4
SHUTTER OFF
56789
ON and the screen turns normal, as the level of sensitivity is decreased.
AGC LOW
10 11 12 13 14
WHITE BAL ATW
15 16 17 18 19
SPECIAL ...
20 21 22 23 24
COLOR : The IR Filter is ON and the screen is normal.
☞
Press the
AUTO FOCUS ONEAF
25 26 27 28 29
MOTION DET OFF
ENTER
30 31 RET
☞
BW : The IR Filter is OFF and the screen is black and
PRESET ...
button.
HOME RETURN OFF
white. (Sensitivity to low light is increased to a level
COLOR/BW COLOR
EXIT QUIT
EXIT QUIT
comparable to a black and white camera.)
AUTO : Select to automatically switch between the COLOR
☞
You can store up to 128 ZOOM and FOCUS positions with the
mode and BW mode depending on the amount of light.
PRESET. You can use the PRESET function when you connect
the SSC-1000 to the RS-485.
25 26
In low light conditions, the IR Filter is turned OFF and the
EXIT
sensitivity to low light is increased by switching to the BW
The EXIT option is used to quit the Setup Menu mode and
mode, but in bright light conditions, the IR Filter is turned
return to the Normal Operation mode.
ON and the sensitivity is decreased by switching to the
COLOR mode. If you select AUTO and press the ENTER
button, a screen from which you can set the ALARM
QUIT : Select to ignore any changes you have made and
☞
ON/OFF, BURST ON / OFF, BW LEVEL and DWELL TIME
restore the previously saved settings.
will appear.
☞
SAVE : Select to save the settings that have been
changed so far.
- ALARM ON : It sends out signals through the ALARM output
☞
PRESET : Select to ignore any changes you have made
port in the BW mode.
E
and restore the factory default settings.
- ALARM OFF : The ALARM output port is synchronized with
the MOTION DET finction regardiess of the COLOR/BW
mode.
- BURST ON : The color burst signal is output together with
black and white composite video signal.
BURST OFF : The color burst signal is not output.
- LEVEL : You can set the brightness level that changes from
COLOR mode to BW mode in 3 steps : LOW, MEDIUM, and
HIGH.
- DWELL TIME : Set the HOLDING time for switching between
COLOR and BW mode depending the changes in the amount
of light. You can set the HOLDING time to 10sec (S), 30sec,
60sec, or 300sec( L).
In AUTO mode, AGC will operates in high speed mode, and
you cannot change it manually, as it is indicated by "---".
(SET UP)
(BW SETUP)
CAMERA ID OFF
IRIS ALC...
SHUTTER OFF
AGC ---
WHITE BAL ATW
SPECIAL ...
Press the
AUTO FOCUS ONEAF
ALARM OFF
MOTION DET OFF
ENTER
BURST ON
PRESET ...
LEVEL MEDIUM
button.
COLOR/BW AUTO...
DWELL TIME S--|----L
EXIT QUIT
RET
Caution : If you use an infrared light source while in AUTO
mode, AUTO switching malfunction and camera
AF malfunction may occur.
27 28
5
Specifications
SCC-C4201/C4203
SCC-C4201P/C4203P
Item Description
Remark
Item Description
Remark
Product Type
- 22x Zoom Camera
Product Type
- 22x Zoom Camera
Power Supply Voltage
- DC 12V ± 10%
Power Supply Voltage
- DC 12V ± 10%
Power Consumption
- 5.0 W
Power Consumption
- 5.0 W
Broadcast System
- NTSC Standard Color System
Broadcast System
- PAL Standard Color System
E
Imaging Device
- 1/4 inch IT CCD
Imaging Device
- 1/4 inch IT CCD
Effective Pixe
- 768(H) x 494 (V)
Effective Pixe
- 752 (H) X 582 (V)
Scanning Method
- 525 Line, 2:1 Interlace
Scanning Method
- 625 Line, 2:1 Interlace
- Horizontal : 15,734 Hz (INT)
- Horizontal : 15,625 Hz(INT)
Line Frequency
Line Frequency
- Vertical : 59.94 Hz (INT)
- Vertical : 50 Hz(INT)
Synchronization Method
- INT Only
Synchronization Method
- INT Only
Resolution
- 480 TV Lines
Resolution
- 480 TV Lines
S/N Ratio
- 52dB(AGC OFF)
S/N Ratio
- 52dB(AGC OFF)
- 0.3Lux(SENS UP X4)
- 0.3Lux(SENS UP X4)
(0.01Lux)
Minimum Scene Illumination
(0.01Lux)
Minimum Scene Illumination
- B/W(SCC-C4203):0.4Lux
- B/W(SCC-C4203P):0.4Lux
(0.003Lux)
(0.003Lux)
- ATW/ AWC/ Manual Mode
- ATW/ AWC/ Manual Mode
White Balance
White Balance
(3200°K, 5600°K, R/B Gain Control)
(3200°K, 5600°K, R/B Gain Control)
- Composite Video Out : 1.0 Vp-p
- Composite Video Out : 1.0 Vp-p
Signal Output
Signal Output
75ohms/BNC
75ohms/BNC
- 22x Zoom Lens in a single unit
- 22x Zoom Lens in a single unit
- Focal length : 3.6 to 79.2 mm
- Focal length : 3.6 to 79.2 mm
Lens
Lens
- Aperture : F1.6(Wide), F3.8(Tele)
- Aperture : F1.6(Wide), F3.8(Tele)
- IR Filter On/Off (SCC-C4203 Only)
- IR Filter On/Off (SCC-C4203P Only)
- Off, 1/100, 1/250, 1/500, 1/1K, 1/2K,
- Off, 1/120, 1/250, 1/500, 1/1K, 1/2K,
Electronic Shutter
Electronic Shutter
1/4K, /10K sec
1/4K, /10K sec
Back Light Compensation
- Off / On (Area Setting)
Back Light Compensation
- Off / On (Area Setting)
Sense Up
- Off/Auto 2x~128x/Fix 2x~128x
Sense Up
- Off/Auto 2x~128x/Fix 2x~128x
Digital Zoom
- Off / On (x10), PIP
Digital Zoom
- Off / On (x10), PIP
Motion Detection
- Off / On (Area / Sensitivity Setting)
Motion Detection
- Off / On (Area / Sensitivity Setting)
Operating Temperature
Operating Temperature
- 14°F ~ +122°F, ~90 %
and Humidity
- 14°F ~122°F, ~90 %
and Humidity
Dimensions
- 59.5 x 60.5 x 109.5mm
Dimensions
- 59.5 x 60.5 x 109.5mm
Weight
- 375g
Weight
- 375g
29 30
Specifications
SCC-C4301/C4303
SCC-C4301P/C4303P
Item Description
Remark
Item Description
Remark
Product Type
- 22x Zoom Camera
Product Type
- 22x Zoom Camera
Power Supply Voltage
- AC 24V (60Hz) or DC 12V ± 10%
Power Supply Voltage
- AC 24V (50Hz) or DC 12V ± 10%
Power Consumption
- 5.5W
Power Consumption
- 5.5W
Broadcast System
- NTSC Standard Color System
Broadcast System
- PAL Standard Color System
E
Imaging Device
- 1/4 inch IT CCD
Imaging Device
- 1/4 inch IT CCD
Effective Pixe
- 768(H) X 494(V)
Effective Pixe
- 752(H) X 582(V)
Scanning Method
- 525 Line, 2:1 Interlace
Scanning Method
- 625 Line, 2:1 Interlace
-
Horizontal : 15,734 Hz(INT), 15,750 Hz(L/L)
-
Horizontal : 15,625 Hz(INT), 15,625 Hz(L/L)
Line Frequency
Line Frequency
- Vertical : 59.94 Hz(INT), 60 Hz(L/L)
- Vertical : 50 Hz(INT), 50 Hz(L/L)
Synchronization Method
- INT / Line Lock
Synchronization Method
- INT / Line Lock
Resolution
- 480 TV Lines
Resolution
- 480 TV Lines
S/N Ratio
- 52dB(AGC OFF)
S/N Ratio
- 52dB(AGC OFF)
- 0.3Lux(SENS UP X4)
- 0.3Lux(SENS UP X4)
(0.01Lux)
Minimum Scene Illumination
(0.01Lux)
Minimum Scene Illumination
- B/W(SCC-C4303):0.4Lux
- B/W(SCC-C4303P):0.4Lux
(0.003Lux)
(0.003Lux)
- ATW/ AWC/ Manual Mode
- ATW/ AWC/ Manual Mode
White Balance
White Balance
(3200°K, 5600°K, R/B Gain Control)
(3200°K, 5600°K, R/B Gain Control)
- Composite Video Out : 1.0 Vp-p
- Composite Video Out : 1.0 Vp-p
Signal Output
Signal Output
75ohms/BNC
75ohms/BNC
- 22x Zoom Lens in a single unit
- 22x Zoom Lens in a single unit
- Focal length : 3.6 to 79.2 mm
Lens
- Focal length : 3.6 to 79.2 mm
Lens
- Aperture : F1.6(Wide), F3.8(Tele)
- Aperture : F1.6(Wide),F3.8(Tele)
- IR Filter On / Off (SCC-C4303 Only)
- IR Filter On/ Off (SCC-C4303P Only)
- Off, 1/100, 1/250, 1/500, 1/1K, 1/2K,
- Off, 1/120, 1/250, 1/500, 1/1K, 1/2K,
Electronic Shutter
1/4K, /10K sec
Electronic Shutter
1/4K, /10K sec
Back Light Compensation
- Off / On (Area Setting)
Back Light Compensation
- Off / On (Area Setting)
Sense Up
- Off/Auto 2x~128x/Fix 2x~128x
Sense Up
- Off/Auto 2x~128x/Fix 2x~128x
Digital Zoom
- Off / On (x10), PIP
Digital Zoom
- Off / On (x10), PIP
Motion Detection
- Off / On (Area / Sensitivity Setting)
Motion Detection
- Off / On (Area / Sensitivity Setting)
Operating Temperature
Operating Temperature
- 14°F ~122°F, ~90 %
and Humidity
- 14°F ~122°F, ~90 %
and Humidity
Dimensions
- 59.5 x 60.5 x 143mm
Dimensions
- 59.5 x 60.5 x 143mm
Weight
- 500g
Weight
- 500g
31
32
6
Others
ZOOM/FOCUS Remote Terminals
1 : With the menu "off", if voltage is applied for shorter than 2
These terminals are to activate the ZOOM/FOCUS,
seconds, the AF function will be activated, and if voltage is
MENU CONTROL, HOME RETURN, and AF functions
applied for longer than 2 seconds, the menu will be "on".
by using an external controller. They could be set to one
With the menu "on", if voltage is applied, the ENTER
of four modes depending on the input condition: A, B, C,
function will be activated.
and D. (SPECIAL - CTRL TYPE)
2 : If voltage is applied for longer than 2 seconds, the
(Operating Voltage Range : +3V~+13V, -3V~-13V)
camera will return to the specified home position
E
(PRESET 0).
1) If voltage is applied to either the ZOOM or FOCUS
terminal, but not both
HOME RETURN
Function
*1
TELE (Up)
WIDE (Down) NEAR (Left) FAR (Right)
If no keys are pressed for a period of time, the camera will
Code
ZOOM Terminal
FOCUS Terminal
automatically return to the specified home position.
A
-6V
+6V
-6V
+6V
The home position is set to PRESET 0. If the position of
B
-6V
+6V
+6V
-6V
PRESET 0 has not been saved, the HOME RETURN
C
+6V
-6V
-6V
+6V
function will not work.
D
+6V
-6V
+6V
-6V
1: In MENU OFF, these are used to control the
Setting the Home Return Time
ZOOM/FOCUS function, and in MENU ON, these
are used as the UP, DOWN, LEFT, and RIGHT
➞
OFF ➞ 1 MIN ➞ 2 MIN ➞ 3 MIN~60 MIN ➞ 2HOUR ➞
keys
3HOUR ~12HOUR
2) If voltage is applied to the ZOOM and FOCUS
terminals at the same time
Function
ENTER/AF
*1
HOME RETURN
*2
Code
ZOOM Terminal
FOCUS Terminal
ZOOM Terminal
FOCUS Terminal
A
-6V
-6V
+6V
+6V
B
-6V
+6V
+6V
-6V
C
+6V
-6V
-6V
+6V
D
+6V
+6V
-6V
-6V
33
34

Memo
Memo
220X POWER ZOOM KAMERA
D
220x Power Zoom
LOW LIGHT
DIGITAL COLOR CAMERA
SCC-C4201(P), C4203(P),
C4301(P), C4303(P)
Gebrauchsanleitung
✽ Die “Sicherheitshinweise” in diesem Handbuch
sorgfältig lesen, damit Sie dieses Produkt korrekt
benutzen und betreiben können.

Sicherheitshinweise
Ziel dieser Information ist es, den ordnungsgemäßen Gebrauch
5. Bei der Wand - oder Deckeninstallation bringen Sie die
dieses Geräts sicherzustellen und dadurch Gefahren oder
Kamera sicher und fest an.
Sachbeschädigungen zu vermeiden. Bitte befolgen Sie alle
(Fällt die Kamera herunter, kann es zur Verletzung von
Anweisungen.
Personen kommen.)
✽ Die Hinweise sind in “Achtung” und “Warnung” wie unten geteilt.
6. Plazieren Sie keine leitfähigen Gegenstände (wie z.B.
Schraubenzieher, Münzen und metallene Objekte) oder mit
D
Wasser gefüllte Behälter auf der Kamera.
(Das kann zur Verletzung von Personen durch Feuer,
Warnung
Achtung
Stromschlag oder herunterfallende Gegenstände führen.)
Die Nichtbeachung eines
Die Nichtbeachtung eines mit
Warnhinweises kann zum
Achtung gekennzeichneten
7. Die Kamera darf nicht an einem rußigen, staubigen oder
Tode oder zu schweren
Hinweises kann zu Verletzungen
feuchten Ort installiert werden.
Verletzungenführen.
und Sachschaden führen.
(Andernfalls besteht die Gefahr eines Brandes oder
Stromschlags.)
Warnung
8. Beim Auftreten eines ungewöhnlichen Geruchs oder einer
Rauchentwicklung, die vom Gerät ausgehen, ziehen Sie
1. Achten Sie darauf, daß Sie nur den mitgelieferten Adapter
unverzüglich das Netzkabel aus der Steckdose und wenden
verwenden. (Seite 28-31)Die Verwendung eines anderen
Sie sich an Ihr Kundendienstzentrum.
Adapters als des mitgelieferten kann Feuer, einen
(Die Fortsetzung des Gebrauchs kann in diesem Fall zu
Stromschlag oder die Beschädigung des Geräts verursachen.
Feuer oder einem elektrischen Schlag führen.)
2.
Beim Anschließen der Netz- und Signalkabel müßen Sie
9. Sollte das Gerät nicht störungfrei funktionieren, setzen Sie
zuerst die externen Anschlußbuchsen überprüft werden.
sich mit Ihrem Händler oder dem nächsten
Schließen Sie die Alarmsignalkabeladern an die
Kundendienstzentrum in Verbindung. Das Gerät darf niemals
Alarmanschlüße an.
in keiner Weise zerlegt oder modifiziert werden.
Der DC12V Netzadapter an die SCC-C4201(P)/C4203(P)
(Keine Haftung für die Probleme übernimmt werden, die durch
Netzsteckdose anschließen und achten Sie dabei auf die richtige
unbefugte Abänderungen oder einen Reparaturversuch
Polarität. Schließen Sie der DC12V oder AC24V Netzadapter an
herbeigeführt sind.)
den SCC-C4301(P)/C4303(P) Stromeingang an.
10. Beim Reinigen darf Wasser niemals direkt auf die Geräteteile
3. Schließen Sie nicht mehrere Kameras an einen Adapter an.
gelangen. (Andernfalls besteht die Gefahr eines Brandes oder
(Wird die Kapazität überschritten, kann es zu einer anormalen
Stromschlags.)Die Oberfläche kann mit einem trockenen
Wärmeentwicklung oder Feuer verursachen.)
Tuch abgewischt werden. Verwenden Sie für das Gerät keine
4. Stecken Sie das Neztkabel fest in die Steckdose ein.
Reinigungsmittel oder chemischen Reiniger, da sich durch
(Ein loser Anschluß kann Feuer verursachen.)
solch Mittel die Farbe ablösen und der Oberflächenüberzug
beschädigt werden kann.
1
2

Inhalt
Achtungen
1. Übersicht ................................................................................. 5
1. Lassen Sie keine Gegenstände auf das Gerät fallen, und
2. Bezeichnung der Teile und ihrer Funktionen ..................... 6
setzen Sie es einen starken Stößen aus. Setzen Sie die
Kamera keinen Starken Vibrationen oder magnetischen
3. Installation ............................................................................... 8
Störfeldern aus.
Überprüfung des Lieferumfangs ........................................... 8
2. Die Kamera darf nicht an Orten mit hohen Temperaturen bzw
Vorbereitung der Kabel ......................................................... 9
.tiefen Temperaturen oder hoher Luftfeuchtigkeit installiert
Anschluß der Kabel ............................................................. 10
D
werden.
4. Übersicht über das Einstellmenu ....................................... 12
(Andernfalls besteht die Gefahr eines Brandes oder
Stromschlags.)
Aufbau des Einstellmenus ................................................... 12
- KAMERA ID ....................................................................... 16
3. Installieren Sie das Gerät nicht in der Nähe von
Wärmequellen, wie z.B. einem Heizgerät oder Heizkärper,
- BLENDE ............................................................................ 17
und an Orten, an denen es direktem Sonnenlicht ausgesetzt
- GLK .................................................................................... 17
ist. (Hier besteht Feuergefahr.)
- ALC .................................................................................... 17
- MANUEL ........................................................................... 18
4. Wenn Sie die bereits installierte Kamera an einen anderen Ort
verlegen wollen, achten Sie darauf, die Kamera
- SHUTTER ......................................................................... 19
auszuschalten, bevor Sie sie abnehmen oder neu installieren.
- AGC (BEWEGUNG) ......................................................... 20
- WEISSABGL ..................................................................... 21
5. Die Installation sollte an einer gut belüfteten Stelle erfolgen.
- SPEZIAL ............................................................................ 22
6. Ziehen Sie bei einem Gewitter den Netzstecken.
- AUTO FOKUS ................................................................... 24
(Die Nichtbeachtung kann zu Feuer oder einer Beschädigung
- AKTIVITAET ...................................................................... 24
des Geräts führen.)
- PRESET ............................................................................ 25
- FARBE S/W ....................................................................... 26
- AUSGANG ........................................................................ 28
5. Spezifikationen ......................................................................29
6. Sonstiges ................................................................................33
3 4
Bezeichnung der Teile und ihrer
1
Ü
bersicht
2
Funktionen
Diese Kamera ist eine hohe Erfüllung - überwachungskamera, die
dank 22fach-zoomobjektiv und digitalem Zoom - IC eine
Überwachung mit max. 220fachem Zoom erlaubt.
Die Kamera ist ein multifunktionales Überwachungsgerät, daß mit
allen Hauptmerkmalen bereits existierender
Überwachungskameras ausgestattet ist:
●
Die Tag & Nacht Funktion (SCC-C4203(P), C4303(P) folgen
die deutliche und klare Bilder auch an der Nacht.
D
●
Die Low - Light - Überwachungsfunktion ermöglicht die
Aufnahme bewegter Objekte bei sehr geringer Beleuchtung.
●
Die Weße Abgleichsfunktion sorgt für eine exakte
Farbwiedergabe bei einer beliebigen Lichtquelle.
●
Die GLK-funktion erlaubt eine wirkungswolle Gegenlicht
Kompensation auch an Orten mit einem Scheinwerfer oder
starkem Lichteinfall.
●
Die Autofokus Funktion verfolgt und fokussiert automatisch die
bewegte Objekte.
●
RS485/Kabel Fernbedienung Funktion
Übertragung System
●
SCC-C4201/C4203/C4301/C4303 : NTSC System
●
SCC-C4201P/C4203P/C4301P/C4303P : PAL System
Power System / Power Verbrauch
●
SCC-C4201(P), C4203(P) : DC 12V/5.0W
●
SCC-C4301(P), C4303(P) : AC 24, DC 12V/5.5W
5
6
220x Power Zoom
LOW LIGHT
DIGITAL COLOR CAMERA
REMOTE RS-485 POWER
Bouton SET-UP
“POWER”ist gleich “DC IN”bei
SCC-C4201(P)/C4203(P).
“POWER”ist gleich “PWR IN”ber
SCC-C4301(P)/C2303(P).
“GND” und “+12V”ist gleich
“DC12&AC24V”bei
SCC-C4301(P)/C4303(P)
SET-UP Taste
Die Funktion der SET-UP Taste ändern sich je nachdem, ob sich
die Kamera gerade in der Normalbetriebsart (wo das Einstellmenu
nicht auf dem Bildschirm angezeigt wird) oder Setup Menu Mode
befindet.
☞
In normaler Betriebsmode
-
Die Richtungstasten AUF/AB : Diese Tasten fungiert als
ZOOM Tele Taste und als ZOOM Breit Taste.
-
Die Richtungstasten LINKS/RECHTS: Diese Tasten fungiert
als FOKUS Weit Taste und FOKUS Nah Taste.
-
Setup Taste : Diese Taste ist für das Einstellmenu.
Die SETUP Taste länger als 3 Sekunden drücken bleiben,
das Setup Menu zu befinden.
3
Installation
Überpüfung des Lieferumfangs
Überprüfen Sie bitte, ob die folgenden Zubehörteile im
Lieferumfang enthalten sind.
D
7 8
220x Power Zoom
DIGITAL COLOR CAMERA
LOW LIGHT
☞
In Setup Menu Mode
- Die Richtungstasten AUF/AB : Mit diesen Tasten wird der
Cursor auf - und abwärts bewegt.
- Die Richtungtasten LINKS/RECHTS : Mit diesen Tasten wird
Vor der Installation
der Cursor nach links oder rechts bewegt oder werden die
Werte, die in jedem Einstellmenu zugewiesen werden
können, der Reihe nach angezeigt.
- Die Taste ENTER : Mit dieser Taste wird ein Einstellmenu mit
dem jeweiligen Untermenu ausgewählt und der aktuelle Wert
akzeptiert.
ZOOM/FOKUS FERN - anschlußklemme
Mit dieser Klemme wird ZOOM/FOKUS von einer
Außenkontrolle kontrolliert. Je nach den Input-bedingungen,
kann die Anschlußklemme in 4 verschiedene Mode einstellen.
(In Betriebs-spannung Bereich : +3V ~ +13V, -3V ~ -13V)
Artikel
Code
Tele
Breit
Weit
Nah
A
-6V
+6V
+6V
-6V
B
-6V
+6V
-6V
+6V
C
+6V
-6V
+6V
-6V
SCC-C4201(P), C4203(P),
Bedienungsanleitung
D
+6V
-6V
-6V
+6V
C4301(P), C4303(P)
Achtung : Im Falle eines gleichzeitigen RS485 Input und des
Kabel-fernbedienungssignals, welcher Input zuerst war,
aktiviert werden. (Informationen für die Kamera mit der
ROM-Version 1.2 oder höher finden Sie auf Seite 33.)
ALARM OUT Anschlußklemme
Ein Alarm signal ist ein Ausgang von diesem Terminal wenn die
AKTIVITAET Mode aktiviert ist, oder die S/W Mode aktiviert
ist.(offen kollektor). (freier Kollektor: DC24V 40mA Max)
VIDEO OUT Anschlußklemme
Montier-adapter
Schließen Sie VIDEO IN in Monitor an. Das Videosignal von
Schrauben(2)
der Kamera wird zum Monitor über diese Klemme getragen.
Anschlu
ß
klemme Block
RS485 Anschlußklemme
RS485 Fernbedienungsklemme
POWER LED
Bei POWER auf ON leuchtet.
POWER IN Anschlußklemme
Der Netzadapter hier anschließen.
1. Schließen Sie zuerst das eine Ende des BNC Kabels an den
VIDEO OUT an.
2. Schließen Sie als nächstes das andere Ende des BNC Kabels
an die VIDEO IN des Monitors an.
D
3. Schließen Sie dann den Netzadapter an. Verwenden Sie einen
“Schlitz” Schraubenzieher, um das zweiadrige Ende des
Netzadapterkabels an den POWER Anschlußklemme der
Kamera wie folgt anzuschließen
9 10
REMOTE RS-485 POWER
REMOTE RS-485 POWER
Vorbereitung der Kabel
Anschluß der Kabel
Folgende Kabel werden für die Installation und den Einsatz der
Kamera benötigt.
Der Netzadapter, der an die POWER IN Buchse der Kamera
angeschloßen wird, sind wie folgt :
●
SCC-C4201(P), SCC-C4203(P) : DC 12V 600mA
●
SCC-C4301(P), SCC-C4303(P) : AC 24V 300mA
DC 12V 600mA
Videobuchse auf der Hinterseite
des Monitors BNC Kabel
BNC Kabel
Video Kabel
Das Kabel, das den VIDEO OUT der Kamera mit dem Monitor
verbindet, ist ein BNC Kabel.
POWER AUSWAHL
schaltet unter den
Netzadapter um.
POWER AUSWAHL
schaltet unter den
Netzadapter um.
4
Übersicht über das Setup Menu
Aufbau des Setup Menu
●
Aufbau des SCC-C4201(P) Einstellmenus
D
11 12
KAMARA ID
AUS/EIN...
BLENDE
ALC.../MANU...
AUS/1/100(1/120)~1/10K/AUTO X2~
SHUTTER
X128/FEST X2~X128
AGC
AUS/WENIG/HOCH
BEWEGUNG S.LANG/LANG/NORM/SCHN/S.SCHN
WEISSABGL
ATW/AWC/MANU...
SPEZIAL
...
SPRACHE DEUTSCH
CTRL TYPE A/B/C/D
RS-485 ...
BIB AUS/EIN...
SPIEGEL AUS/EIN
D-ZOOM AUS/X2~X10
POSI/NEGA +/-
ZOOM GESCH 1/2/3/4
DETAIL (0) ----I----
RUE
AUTO FOKUS
AF/MF/EINAF
AKTIVITAET
AUS/EIN...
PRESET
...
AUSGANG
VERL/SICHERN/PRESET
4. Wählen Sie die Art der Stromquelle, die Sie benutzen wollen,
In diesem Kapitel, wir werden einen Überblick über dem Menu
und stellen Sie die entsprechende POWER AUSWAHL Taste
System des SCC-C4201(P), C4203(P), C4301(P) und C4303(P)
ein. Stecken Sie anschließend den Netzadpter am Wand-ablauf
geben.Zuerst, wir werden einen Überblick über den Aufbau der
ein.
Einstellmenu und ihrer Funktionen des jeden Menu Artikels geben.
Der Netzadapter für jedes Model sind wie folgt :
●
SCC-C4201(P), SCC-C4203(P) : DC 12V 600mA
●
SCC-C4301(P), SCC-C4303(P) : AC 24V 300mA
DC 12V 600mA
5. Wenn die Kamera normal funktioniert, erscheint der folgende
Bildschirm und wird nach 5 Sekunden wieder ausgeblendet.
SAMSUNG PROTOKOLL
ADDR : 0
TYPE : RS-485, HALB
BAUD : 9600
OBJEKTIV TEST : OK!
6. Bei der RS485-Steuerung überprüfen Sie bitte Folgendes :
●
Kommunikations-geschwindigkeit : 9600 bps
●
Daten Bit : 8 Bits
●
Stopp Bit : 1 Bit
●
Parität Bit : None
Aufbau des Setup Menu
●
Aufbau des SCC-C4301(P) Einstellmenus
D
13 14
KAMARA ID
AUS/EIN...
BLENDE
ALC.../MANU...
AUS/1/100(1/120)~1/10K/AUTO X2~
SHUTTER
X128/FEST X2~X128
AGC
AUS/WENIG/HOCH
BEWEGUNG S.LANG/LANG/NORM/SCHN/S.SCHN
WEISSABGL
ATW/AWC/MANU...
SPEZIAL
...
SPRACHE DEUTSCH
V-SYNC INT/LINIE...
CTRL TYPE A/B/C/D
RS-485 ...
BIB AUS/EIN...
SPIEGEL AUS/EIN
D-ZOOM AUS/X2~X10
POSI/NEGA +/-
ZOOM GESCH 1/2/3/4
DETAIL (0) ----I----
RUE
AUTO FOKUS
AF/MF/EINAF
AKTIVITAET
AUS/EIN...
PRESET
...
AUSGANG VERL/SICHERN/PRESET
●
Aufbau des SCC-C4203(P)
KAMARA ID
AUS/EIN...
BLENDE
ALC.../MANU...
AUS/1/100(1/120)~1/10K/AUTO X2~
SHUTTER
X128/FEST X2~X128
AGC
AUS/WENIG/HOCH
BEWEGUNG S.LANG/LANG/NORM/SCHN/S.SCHN
WEISSABGL
ATW/AWC/MANU...
SPEZIAL
...
SPRACHE DEUTSCH
CTRL TYPE A/B/C/D
RS-485 ...
BIB AUS/EIN...
SPIEGEL AUS/EIN
D-ZOOM AUS/X2~X10
POSI/NEGA +/-
ZOOM GESCH 1/2/3/4
DETAIL (0) ----I----
RUE
AUTO FOKUS
AF/MF/EINAF
AKTIVITAET
AUS/EIN...
PRESET
...
FARBE S/W
FARBE/S/W/AUTO...
AUSGANG VERL/SICHERN/PRESET
(SET UP)
(SET UP)
KAMERA ID AUS
KAMERA ID AUS
BLENDE ALC...
BLENDE ALC...
SHUTTER AUTO X4
SHUTTER AUTO X4
BEWEGUNG NORM
BEWEGUNG NORM
●
WEISSABGL ATW
Aufbau des SCC-C4303(P)
WEISSABGL ATW
SPEZIAL ...
SPEZIAL ...
AUTO FOKUS EINAF
AUTO FOKUS EINAF
AKTIVITAET AUS
AKTIVITAET AUS
PRESET ...
PRESET ...
FARBE S/W FARBE
AUSGANG VERL
AUSGANG VERL
[SCC-C4201(P),SCC-C4301(P)] [SCC-C4203(P),SCC-C4303(P)]
Die FARBE/SW Option ist nur mit SCC-C4203(P) und
D
C4303(P) verfügbar.
KAMERA ID
Im Menu KAMRA ID, können Sie ein ID Für die Kamera festlegen,
die auf dem Monitor Bildschirm erscheint.
Wenn Sie im Einstellmenu KAMERA ID auf EIN stellen und ENTER
drücken, wird ein Untermenu Bildschirm eingeblendet, in dem Sie
der Kamera ID zuweisen können. Dazu können Sie
alphanumerische Zeichen und einige Sonderzeichen verwenden,
die Untermenu Bildschirm gezeigt werden.
In Untermenu POSITION können Sie die Kamera ID an einer
bestimmten Stelle auf dem Monitor plazieren.
(SET UP)
(KAMERA ID)
KAMERA ID AUS
BLENDE ALC...
ABCDEFGH I JKL
SHUTTER AUTO X4
MNOPQR S TU VWX
BEWEGUNG NORM
YZ0 123 456 789
WEISSABGL ATW
:!-+*()/
SPEZIAL ...
Die ENTER
AUTO FOKUS EINAF
SP SP
AKTIVITAET AUS
Taste
POSITION...
PRESET ...
RUE
drücken.
FARBE S/W FARBE
AUSGANG VERL
ZOOM.CAMERA.........
15 16
KAMARA ID
AUS/EIN...
BLENDE
ALC.../MANU...
AUS/1/100(1/120)~1/10K/AUTO X2~
SHUTTER
X128/FEST X2~X128
AGC
AUS/WENIG/HOCH
BEWEGUNG S.LANG/LANG/NORM/SCHN/S.SCHN
WEISSABGL
ATW/AWC/MANU...
SPEZIAL
...
SPRACHE DEUTSCH
V-SYNC INT/LINIE...
CTRL TYPE A/B/C/D
RS-485 ...
BIB AUS/EIN...
SPIEGEL AUS/EIN
D-ZOOM AUS/X2~X10
POSI/NEGA +/-
ZOOM GESCH 1/2/3/4
DETAIL (0) ----I----
RUE
AUTO FOKUS
AF/MF/EINAF
AKTIVITAET
AUS/EIN...
PRESET
...
FARBE S/W
FARBE/S/W/AUTO...
AUSGANG VERL/SICHERN/PRESET
Aufbau des Setup Menu
BLENDE
Wenn Sie BEREICH auf PRESET einstellen, wird die werkseitige
Standardeinstellung der GLK Funktion auf den Bildschirm Bereich
Der Pegel des Videoausgans zum Monitor kann durch das BLENDE
angewendet. Wenn Sie BEREICH auf BENUTZER einstellen und
Objektiv je nach Intensität des einfallenden Lichts gesteuert werden.
ENTER drücken, können Sie selbst einen Bereich angeben, auf den
Die Kamera ist grundsätzlich mit einem BLENDE -Objektiv ausgestattet.
die GLK Funktion angewendet werden soll. Sie können die Größe des
Im ALC Menu (Auto Licht Kompensation) können Sie den
Bereichs mit den Tasten AUF, AB, LINKS und RECHTS angeben.
Videoausgangspegel einstellen. Im Menu MANUEL können Sie
Nach der Einstellung der Größe des Bereichs, drücken Sie die Taste
Öffnung und Verschluss der Irisblende manuell einstellen.
ENTER. Der angegebene Bereich beginnt zu blinken. Sie können jetzt
mit den Tasten AUF, AB, LINKS und RECHTS die Position des
GLK
(Ein Untermenu des ALC Menus)
Bereichs festlegen.Sie können mit den Tasten von ENTER und den
Wird bei einer normalen Kamera eine starke Lichtquelle benutzt, wie
Tasten AUF, AB, LINKS und RECHTS die Größe des Bereichs und
z.B. ein Scheinwerfer, der das Objekt von hinten beleuchtet, dann
die Position des Bereichs festlegen. Durch erneutes Drücken von
D
erscheint es auf dem Monitor aufgrund des Gegenlichts dunkel. Zur
ENTER verlassen Sie das Einstellmenu BEREICH.
Lösung des Gegenlichtproblems, SCC-C4201(P), C4203(P), C4301(P)
und C4303(P) können bei der Kamera die Gegenlichtkompensation
GROESSE
GROESSE
GLK als Untermenu von ALC/MANUEL so eingestellt werden, dass bei
einen Scheinwefer oder sehr hellem beiläufigem Licht klare
➞
Videobilder gelingen.
Die Tasten
➞
➞
➞
AUF, AB,
LINKS und
ALC
RECHTS
Wenn Sie die BLENDE auf ALC einstellen und ENTER drücken, wird
POSITION
verwenden.
POSITION
ein Untermenu eingeblendet, in dem Sie den Videoausgangspegel und
die GLK einstellen können. Die Option PEGEL ermöglicht Ihnen die
Einstellung des Videoausgangspegels mit Hilfe der Tasten
MANUEL
LINKS/RECHTS. Wenn Sie das GLK Menu auf ON stellen, wird die
Wenn Sie die BLENDE auf MANUEL einstellen und ENTER drücken,
GLK Funktion auf den im Menu BEREICH festgelegten Bildschirm
wird ein Untermenu eingeblendet, in dem Sie Öffnung und Verschluss
Bereich angewendet. Das Menu BEREICH, in dem der Bildschirm
der BLENDE manuell einstellen können. Im Punkt PEGEL können Sie
Bereich festgelegt wird, auf den die GLK Funktion angewendet werden
mit den Tasten LINKS/RECHTS Öffnung und Verschluss der
soll, lässt sich auf PRESET oder BENUTZER einstellen.
BLENDE manuell einstellen.
(SET UP)
(ALC)
KAMERA ID AUS
(SET UP)
KAMERA ID AUS
(MANUAL)
BLENDE ALC...
SHUTTER AUTO X4
BLENDE MANU...
BEWEGUNG NORM
SHUTTER AUTO X4
WEISSABGL ATW
BEWEGUNG NORM
SPEZIAL ...
WEISSABGL ATW
Die ENTER
AUTO FOKUS EINAF
BEREICH PRESET...
SPEZIAL ...
Die Taste
AKTIVITAET AUS
Taste
GLK
AUTO FOKUS EINAF
PRESET ...
AUS
AKTIVITAET AUS
ENTER
drücken.
FARBE S/W FARBE
PEGEL ( 0) ----I----
PRESET ...
drücken.
PEGEL ( 00) ----I----
AUSGANG VERL
RUE
FARBE S/W FARBE
RUE
AUSGANG VERL
17 18
SHUTTER
AGC
(BEWEGUNG)
Sie können angeben, ob die AGC (Automatische Verstärkung Kontrolle)
Im Menu SHUTTER können Sie die Verschlusszeiten des
Option aktiviert werden soll, wenn das erhaltene Videobild unter einer
elektronischen Schnellverschlusses sowie von AUTO Low-Speed
bestimmten Helligkeit-stufe liegt, weil es bei unzureichenden Licht
Shutter und FEST Low-Speed Shutter festlegen.
Verhältnissen aufgenommen wurde.Der GAIN automatisch zu
Der elektronische Schnellverschluss unterstützt 7 Verschlusszeiten von
kontrollieren, stellen Sie die Option AGC zu WENIG oder HOCH ein.
1/100 Sekunden bis 1/10K Sekunden. AUTO Low-speed Shutter und
Anderenfalls, zu AUS einstellen. Wenn Sie die AGC Option zu WENIG
einstellen, der maximum GAIN des AGC wird auf Niedrig eingestellt und
FEST Low-Speed Shutter unterstützen jeweils 12 Verschusszeiten von
wenn Sie es HOCH einstellen, der maximum GAIN wird auf Hoch
2x bis 128x. Die Funktion Low-Speed Shutter ermöglicht Ihnen die
eingestellt. Wenn Die Option SHUTTER zu einer Auto Low Speed
Einstellung einer langsameren Verschlusszeit in der Dunkelheit, um die
eingestellt ist, wird die Option AGC zur BEWEGUNG Option wechseln.
klare Bilder zu erhalten.Wählen Sie AUTO Low-speed Shutter, damit
In der BEWEGUNG Option, mit den Tasten LINKS und RECHTS
die Kamera die Lichtmenge ermittelt und je nach Grad der Dunkelheit
können Sie von S.LANG, LANG, NORM, SCHN und S.SCHN
auswählen.
D
automatisch eine langsame Verschlusszeit einstellt. Wählen FEST,
um die Verschlusszeit selbst einzustellen. Die Nummern, die gerade
(SET UP)
KAMERA ID AUS
“AUTO” und “FEST” folgen, zeigen die Nummern der sammelten Felder
BLENDE MANU...
an. Je höher die Feldnummer ist, desto langsamer die Shutter
SHUTTER AUTO X4
BEWEGUNG NORM
Schnelligkeit. Folglich, ein stilles Bild wird deutlicher. Im Fall von Video,
WEISSABGL ATW
SPEZIAL ...
wird ein festgenommenes Bild eines Gegenstandes verschwommen.
AUTO FOKUS EINAF
AKTIVITAET AUS
PRESET ...
FARBE S/W FARBE
(SET UP)
AUSGANG VERL
KAMERA ID AUS
BLENDE MANU...
SHUTTER AUTO X4
BEWEGUNG NORM
S.LANG : Die Resolution eines stillen Bild zur maximalen
☞
WEISSABGL ATW
Erhöhung, der niedrigst AGC GAIN Wert und der Umfang des
SPEZIAL ...
AUTO FOKUS EINAF
niedrigen Speed Shutters erhöhend. (Diese läßt sich hauptsächlich,
AKTIVITAET AUS
um unbewegliche Objekte an dunklen Orten überzuwachen.)
PRESET ...
FARBE S/W FARBE
LANG : Die Resolution eines stillen Bild zur Erhöhung, der
☞
AUSGANG VERL
niedrige AGC GAIN Wert und der Umfang des niedrigen Speed
Shutters möglichst erhöhend.
(Diese läßt sich hauptsächlich, um nur wenig bewegte Objekte an
SHUTTER
dunklen Orten überzuwachen.)
NORM : Das normale Bild mit einem mittleren AGC GAIN Wert
☞
➞
AUS ➞ 1/100(1/120) ➞ 1/250 ➞ 1/500 ➞ 1/1000 ➞ 1/2000 ➞
wird angezeigt und der Umfang des normalen Speed Shutters
1/4000 ➞ 1/10K ➞ AUS ➞ AUTOX2 ➞ AUTOX4 ➞ AUTOX6 ➞
anzuzeigen. (Diese läßt sich hauptsächlich, um bewegte Objekte an
dunklen Orten überzuwachen.)
AUTOX8 ➞ AUTOX12 ➞ AUTOX16 ➞ AUTOX24 ➞ AUTOX32
➞ AUTOX48 ➞ AUTOX64 ➞ AUTOX96 ➞ AUTOX128 ➞ AUS
SCHN : Die bewegende Objekte werden eingestellt, ein AGC GAIN
☞
hoher Wert und der Umfang des normalen Speed Shutters
➞ FESTX2 ➞ FESTX4 ➞ FESTX6 ➞ FESTX8 ➞ FESTX12 ➞
mindernd. (Diese läßt sich hauptsächlich, um sich schnell
FESTX16 ➞ FESTX24 ➞ FESTX32 ➞ FESTX48 ➞ FESTX64
bewegende Objekte an dunklen Orten überzuwachen.)
➞ FESTX96 ➞ FESTX128
S.SCHN : Die bewegende Objekte werden eingestellt, ein AGC
☞
GAIN höchster Wert und der Umfang des niedrigen speed Shutters
möglichst mindernd.(Diese läßt sich hauptsächlich, um sich schnell
bewegende Objekte an dunklen Orten überzuwachen.)
19 20
WEISSABGL
SPEZIAL
Im Menu WEISSABGL können Sie den Weissabgleich einstellen,
Sie können die Optionen SPRACHE, V-SYNC, CTRL TYPE,
der eine korrekte Weiß-Wiedergabe bei Lichtquellen mit
RS-485, BIB, SPIEGEL, D-ZOOM, POSI/NEGA, VITE ZOOM und
DETAIL manuell einstellen.
verschiedenen Farbtemperaturen gewährleistet. Wenn Sie
WEISSABGL auf ATW Mode einstellen, überwacht die Kamera
Die V-SYNC Option ist nur mit SCC-C4301(P) und C4303(P) verfügbar.
kontinuierlich die Veränderungen der Farbtemperatur und passt
Wenn Sie während des “---” Menus ENTER drücken, wird ein
den Weißabgleich automatisch an die Farbtemperatur an. Wenn
SPEZIAL Untermenu eingeblendet, indem Sie Sonderfunktionen
Sie WEISSABGL auf AWC Mode einstellen, plazieren Sie ein
einstellen können. Um jede einzelne Funktion zu aktivieren,
Stück Weißen Papier in der Vorderseite der Kamera, dann
stellen Sie mit den Tasten LINKS und RECHTS den gewünschten
drücken Sie die ENTER Taste, wird der Weißabgleich einmal an
Punkt ein.
die Farbtemperatur angepasst, und dieser Wert wird beibehalten.
(SET UP)
(SPEZIAL)
KAMERA ID EIN...
SPRACHE DEUTSCH
D
Wenn Sie WEISSABGL auf MANUEL Mode einstellen, können
BLENDE MANU...
V-SYNC INT
SHUTTER AUTO X4
CTRL TYPE A
Sie den Weißabgleich an die aktuellen Lichtverhältnisse anpassen.
BEWEGUNG NORM
RS-485 ...
WEISSABGL MANU...
BIB AUS
SPEZIAL ...
SPIEGEL AUS
3200°K : Die Farbtemperatur wird auf 3200°K eingestellt.
Die Taste
☞
AUTO FOKUS EINAF
D-ZOOM AUS
AKTIVITAET AUS
ENTER
POSI/NEGA +
5600°K : Die Farbtemperatur wird auf 5600°K eingestellt.
☞
PRESET ...
drücken.
ZOOM GESCH 3
FARBE S/W FARBE
DETAIL ( 0) ----I--
BENUTZER : Die Farbtemperatur wird durch Auswahl des
☞
AUSGANG VERL
RUE
entsprechenden Wertes der ROT und BLAU Einstellungen
eingestellt.
☞
V-SYNC : Die vertikale Synchronisation Methode ist für
SCC-C4301(P) und C4303(P) bestimmt. Es gibt 2 Type des
MANUEL : Wenn Sie die Option MANUEL auswählen und ENTER
vertikalen Synchronisation Signals, die der Kamera anhänglich
drücken, wird ein Untermenu eingeblendet, in dem Sie einen
sind: Die INT Mode hat das Signal, zu der internen Uhr der
manuellen Weißabgleich vornehmen können. Sie haben die Wahl
Kamera führt und die LINIE Mode ist für die vertikale
zwischen 3200°K, 5600°K oder BENUTZER, indem Sie die Tasten
Synchronisation erforderlich, um die Kameras mit Hilfe des
LINKS und RECHTS in der Option PRESET drücken.
externen Signals zu betreiben. Wenn Sie LINIE wählen und die
Taste ENTER drücken, erschein der LINIE LOCK Bildschirm,
(SET UP)
in dem Sie die LINIE LOCK eingestellt haben. Sie können die
(AWB/MANUEL)
KAMERA ID EIN...
gewünschte Phase Stufe in der PHASE Option einstellen.
BLENDE MANU...
SHUTTER AUTO X4
(SPEZIAL)
BEWEGUNG NORM
(LINIE LOCK)
SPRACHE DEUTSCH
WEISSABGL MANU...
V-SYNC LINIE...
SPEZIAL ...
Die Taste
CTRL TYPE A
AUTO FOKUS EINAF
PRESET AUS(BENUTZER)..
RS-485 ...
AKTIVITAET AUS
ENTER
ROT (-2C) ---I-----
BIB AUS
PRESET ...
drücken.
BLAU (-5B) -I-------
SPIEGEL AUS
FARBE S/W FARBE
Die Taste
RUE
D-ZOOM AUS
AUSGANG VERL
POSI/NEGA +
ENTER
VITE ZOOM 3
drücken.
PHASE ( 0) ----I----
DETAIL ( 0) ----I--
RUE
RUE
Wenn Sie DC Stromversorgung benutzen, wird es nur in INT
Mode betreiben. Für die LINIE Mode Operation, der AC
Netzadapter (50Hz) benutzen.
21 22
CTRL TYPE : Sie können die A,B,C oder D Mode jenach dem
☞
AUTO FOKUS
Input der Kabel Fernbedienungsklemme auswählen.
Im Menu AUTO FOKUS können Sie die Fokus Methode auf AF,
(Siehe auf die Seite 7).
MF oder ONEAF festlegen.
RS-485 : Es stellt ADRESSE, PROTOKOLL und BAUD RATE
☞
der RS-485 Kommunikation ein.
AF : Fokussiert automatisch durch kontinuierliche
☞
(BAUD RATE: 2400bps, 4800bps, 9600bps, 19200bps, 38400bps)
Überwachung des Bildschirms in der AUTO FOKUS Mode. In
dieser Mode bleibt ein Druck auf der Taste FOKUS ohne
Achtung : Ein Kommunikationsfehler kann sich ereignen
Reaktion, da die fokussierung automatisch erfolgt, wenn Sie
wenn Sie mehr als eine Kamera Set mit einer
die Taste ZOOM betätigen.
identischen Adresse anschließen lassen.
☞
MF : Sie können manuell die
PIP : Es ist Bild-in Bild Funktion. Zeigt einen 1/16-großen
(SET UP)
☞
Mode Fokus einstellen.
KAMERA ID EIN...
Bildschirm, nur bei Verwendung des Digital Zooms. Wenn Sie
BLENDE MANU...
EINAF : In dieser Mode wird für 5
D
die PIP Option auf ON einstellen und die Taste ENTER
☞
SHUTTER AUTO X4
Sekunden fokussiert, nur wenn die
BEWEGUNG NORM
drücken, können Sie mit dem Tasten AUF, AB, LINKS und
WEISSABGL ATW
ZOOM Taste auf TELE gedrückt
RECHTS die PIP Position einstellen.
SPEZIAL ...
wird. Diese Mode kombiniert den
AUTO FOKUS EINAF
* Das PIP Feature betreibt nicht in der niedrigen Speed Shutter
AKTIVITAET EIN...
MF Mode beim STOP Mode der
PRESET ...
Mode. Das SPIEGEL Feature betreibt nicht auf das PIP Window.
Kamera mit dem AF Mode nach
FARBE S/W FARBE
AUSGANG VERL
(SPEZIAL)
der ZOOM Tele Mode.
SPRACHE DEUTSCH
V-SYNC LINIE...
CTRL TYPE A
RS-485 ...
AKTIVITAET
BIB EIN...
SPIEGEL AUS
PIP
In der Option AKTIVITAET können Sie die
Die Taste
D-ZOOM AUS
POSI/NEGA +
ENTER
Bewegungsmelderfunktion, die Bewegungsmelder-empfindlichkeit
ZOOM GESCH 3
drücken.
und den Bewegungsmelder-bereich einstellen. Die Aktivität-
DETAIL ( 0) ----I--
RUE
funktion erkennt sich bewegende Objekte und kann durch den
Monitor und die ALARM OUT Anschlußklemme kontrollieren.
☞
SPIEGEL : Dreht das Videoausgangssignal horizontal.
D-ZOOM : Stellt die Vergrößerung des Digitalzooms ein.
☞
Bei der AKTIVITAET EIN, wenn Sie der ALARM in der FARBE
Die Vergrößerung Stufe ist bis 10fach einstellbar.
S/W AUTO Mode ouf EIN stellen, auch eigendeine Bewenng
☞
POSI/NEGA : Gibt das Videoausgangssignal normal oder
wahrnimmt, vom ALARM Ausgang-anschlusskanal kann kein
umgekehrt aus.
VITE ZOOM : In der Option VITE ZOOM, mit den Tasten LINKS
Signal ansgehen.
☞
und RECHTS kann die Geschwindigkeit wie folgt einstellen:
1: Dauer 17 Sekunden von 1fach bis 22fach Vergrößerung
(SET UP)
(AKTIVITAET)
KAMERA ID EIN...
(Langsamste Geschwindigkeit.)
BLENDE MANU...
2: Dauer 10 Sekunden von 1fach bis 22fach Vergrößerung
SHUTTER AUTO X4
BEWEGUNG NORM
(Langsame Geschwindigkeit.)
WEISSABGL ATW
3: Dauer 6 Sekunden von 1fach bis 22fach Vergrößerung
SPEZIAL ...
Die Taste
AUTO FOKUS EINAF
(Schnelle Geschwindigkeit.)
AKTIVITAET EIN...
ENTER
4: Dauer 3 Sekunden von 1fach bis 22fach Vergrößerung
PRESET ...
BEREICH PRESET...
drücken.
(Schnellste Geschwindigkeit.)
FARBE S/W FARBE
EMPFINDLICH MITTEL
AUSGANG VERL
RUE
DETAIL : Reguliert die Schärfe.
☞
23 24

Wenn Sie auf ON wählen und ENTER drücken, wird das AKTIVITAET
(PRESET KARTE)
PRESET NR. 0
Bild eingeblendet. Sie können BEREICH einstellen, in dem die
0 H 1 2 3 4
Bewegungsmelder-funktion zu PRESET oder BENUTZER
56789
POSITIONS PROG ...
10 11 12 13 14
angewendet wird. Wenn Sie die Option EREICH zu PRESET
PRESET ID EIN...
15 16 17 18 19
angeben wird die Bewegungsmelder-funktion auf den Bereich Preset
20 21 22 23 24
Die Taste
25 26 27 28 29
als werkseitige Standardeinstellung. Wenn Sie die Option BEREICH
30 31 RET
ENTER
auf BENUTZER einstellen und ENTER drücken, können Sie die
HOME ZURÜCK AUS
drücken
Bereichgröße und die Position ändern und die Bereich wählen wo Sie
ID : PRESET Ø
AVSGANG VERL
die Bewegungsmelder-funktion anwenden möchten.Sie können die
Größe des Bereichs mit den Tasten AUF, AB, LINKS und RECHTS
Wenn Sie eine PRESET-Nummer auswählen und die ENTER Taste
angeben. Drücken Sie die Taste ENTER , wenn der Bereich nicht
drücken, erscheint der oben abgebildete Bildschirm.
blinkt. Wenn er beginnt zu blinken, können Sie jetzt mit den Tasten
AUF, AB, LINKS und RECHTS die Position des Bereichs
D
POSITIONS PROG : Speichert die ZOOM und FOKUS Positionen.
☞
festlegen.Mit der Taste ENTER und die Tasten AUF, AB, LNKS und
PRESET ID : Stellt eine ID für die PRESET Position ein, wie das
RECHTS können Sie die Gräßen und die Position des Bereichs
☞
der Fall bei Kamera ID war.
festlegen. durch erneutes Drücken von ENTER verlassen Sie die
Menu BEREICH. Sie können ödie Option EMPFINDLICH verwenden,
die Bewegungsmelder-empfindlichkeit einzustellen. Je höher die
Die Funktion ZUR_CK ZUM ANFANG steht bei Kameras ab der
Einstellung, desto empfindlicher der Bewegungsmelder.
ROM-Version 1.2 oder h_her zur Verf_gung. Anweisungen zur
Anwendung dieser Funktion finden Sie auf Seite 33.
GROESSE
GROESSE
FARBE S/W
➞
Die Tasten
➞
➞
➞
AUF, AB,
Die FARBE S/W Option ist nur mit SCC-C4203(P) und
LINKS und
C4303(P) verfügbar.
RECHTS
verwenden.
POSITION
POSITION
In der FARBE S/W Option, können Sie das IR(Infrarot) Filter EIN-oder
AUS-schalten. In der S/W Mode schaltet das IR Filter AUS und die Stufe
der Empfindlichkeit wird bis zu einer vergleichbaren Stufe mit einer
PRESET
schwarz und weisse Kamera erhöht. Andernfalls, in der FARBE Mode,
schaltet das IR Filter EIN und das Bild kommt normal zurück, wie die Stufe
(SET UP)
(PRESET KARTE)
der Empfindlichkeit niedriger geworden ist.
KAMERA ID AUS
BLENDE ALC...
0 H 1 2 3 4
SHUTTER AUTO X4
56789
FARBE : Das IR Filter ist EIN und der Bildschirm ist normal.
BEWEGUNG NORM
☞
10 11 12 13 14
WEISSABGL ATW
15 16 17 18 19
☞
S/W : Das IR Filter ist AUS und der Bildschirm ist schwarz und
SPEZIAL ...
Die Taste
20 21 22 23 24
AUTO FOKUS EINAF
25 26 27 28 29
weiß. (Die Empfindlichkeit bei wenigem Licht wird bis zu einer
AKTIVITAET AUS
ENTER
30 31 RET
vergleichbaren Stufe mit einer Schwarz und Weisse Kamera
PRESET ...
drücken.
HOME ZURÜCK AUS
FARBE S/W FARBE
erhöht.)
AUSGANG VERL
ID : PRESET Ø
AUTO : Dieses Menu ändert sich automatisch die FARBE Mode
☞
auf S/W Mode oder umgekehrt, je nach Lichteinfall, Bei geringen
Sie können bis zu 128 ZOOM und FOKUS Positionen mit PRESET
Lichteinfall, schalter der IR Filter AUS und die Empfindlichkeit für
speichern. Die Funktion PRESET kann genutzt werden, wenn Sie
das wenigen Licht wird bei der Schaltung auf S/W Mode, erhöht.
den SSC-1000 mit RE-485 anschließen.
25 26
Bei hochem Lichtumgebung schaltet der IR Filter EIN und die
AUSGANG
Empfindlichkeit wird bei der Schaltung aufr FARB Mode niedriger.
Die AUSGANG Option beendet das Einstellmenu und kehrt zum
Wenn Sie AUTO wählen und die Taste ENTER drücken, wird ein
Normalbetrieb zurück.
Menüpunkt erschienen, in dem Sie ALARM EIN/AUS,
FARBTRAGER EIN/AUS, S/W PEGEL und SCHWELLZEIT
VERL : Übergeht alle von Ihnen vorgenommenen Veränderungen
☞
einstellen können.
und stellt das vorherig gespeicherte Einstellmenu wieder her.
- ALARM EIN : Es sendet die Signale durch die ALARM Ausgangs-
☞
SICHERN : Speichert die Einstellungen, die bisher verändert
buchse in der S/W Mode.
worden sind.
- ALARM AUS : Die ALARM Ausgangs-buchse ist mit der
☞
PRESET : Übergeht alle von Ihnen vorgenommenen
AKTIVITAET Funktion ohne Rüsicht auf der FARBE S/W Mode
Veränderungen und stellt die werkseitigen Standardeinstelllungen
synchronisiert.
wieder her.
- FARBTRAGER EIN : Das Farbe Bruch Signal ist mit dem
D
Schwarz und Weiss bildeten Videosignal zusammen ausgegeben.
- FARBTRAGER AUS : Das Farbe Bruch Signal ist nicht
ausgegeben.
- PEGEL : Sie können die Helligkeitsstufe einstellen, die von der
FARBE Mode zur S/W Mode in 3 Stufen ändert: WENIG, MITTEL
und HOCH.
- SCHWELLZEIT : Die HOLDING ZEIT für die Schaltung zwischen
der FARBE und der SW Mode je nach der Änderung in der
Lichtsmenge einstellen. Sie können die HOLDING ZEIT in 10Sek
(S), 30Sek, 60Sek oder 300 Sek (L) einstellen.
In der AUTO Mode, wird AGC in der hohen Speedmode betreiben
und Sie können nicht es
manuell ändern, wie es bei “---” angezeigt wird.
(SET UP)
(S/W SETUP)
KAMERA ID AUS
BLENDE ALC...
SHUTTER AUTO X4
BEWEGUNG NORM
WEISSABGL ATW
SPEZIAL ...
Die Taste
AUTO FOKUS EINAF
ALARM EIN
AKTIVITAET AUS
ENTER
FARBTRAGER EIN
PRESET ...
PEGEL WENIG
drücken.
FARBE S/W AUTO...
SCHWELLZEIT S--|----L
AUSGANG VERL
RUE
Achtung : Wenn Sie eine Infrarot Lichtquelle in der AUTO
Mode verwenden, kann eine AUTO
Schaltungsstörung und eine Kamera AF Störung
auftreten.
27 28

5
Spezifikationen
SCC-C4201/C4203
SCC-C4201P/C4203P
Parameter Beschreibung Bemerkung
Parameter Beschreibung Bemerkung
Produkt Typ
- 22fach Zoom Kamera
Produkt Typ
- 22fach Zoom Kamera
Spannungsquelle
- DC 12V ± 10%
Spannungsquelle
- DC 12V ± 10%
Leistungsaufnahme
- 5.0 W
Leistungsaufnahme
- 5.0 W
Fernsehnorm
- NTSC Standard Farbe System
Fernsehnorm
- PAL Standard Farbe System
Bildaufnehmer
- 1/4 inch IT CCD
Bildaufnehmer
- 1/4 inch IT CCD
Effektive Pixel
- 768 (H) X 494 (V)
Effektive Pixel
- 752 (H) X 582 (V)
D
Abtastverfahren
- 525 Zeilen, 2:1 Zeilensprung
Abtastverfahren
- 625 Zeilen, 2:1 Zeilensprung
- Horizontal : 15,734 Hz (INT)
- Horizontal : 15,625 Hz (INT)
Zeilenfrequenz
Zeilenfrequenz
- Vertikal : 59.94 Hz (INT)
- Vertikal : 50 Hz (INT)
Synchronisationsverfahren
- INT nur
Synchronisationsverfahren
- INT nur
Auflösung
- 480 Fernsehzeilen
Auflösung
- 480 Fernsehzeilen
S/N Abstand
- 52dB(AGC OFF)
S/N Abstand
- 52dB(AGC OFF)
- 0.3Lux(Sense Up X4)
- 0.3Lux(Sense Up X4)
Minimum Szenen
(0.01Lux)
Minimum Szenen
(0.01Lux)
Beleuchtung
- S/W(SCC-C4203):0.4Lux
Beleuchtung
- S/W(SCC-C4203P):0.4Lux
(0.003Lux)
(0.003Lux)
- ATW/AWC/Manuell MODE
- ATW/AWC/Manuell MODE
Weissabgleich
Weissabgleich
(3200°K, 5600°K, R/B Gain Kontrolle)
(3200°K, 5600°K, R/B Gain Kontrolle)
- Composite-Videoausgang : 1.0 Vp-p
- Composite-Videoausgang : 1.0 Vp-p
Signalausgang
Signalausgang
75 ohms/BNC
75 ohms/BNC
- 22fach Zoom in einziger Einheit
- 22fach Zoom in einziger Einheit
- Brennweite : 3.6 - 79.2mm
- Brennweite : 3.6 - 79.2mm
Objektiv
Objektiv
- Öffnung : F1.6 (Weite), F3.8 (Tele)
- Öffnung : F1.6 (Weite), F3.8 (Tele)
- IR Filter ON/OFF (SCC-C4203 nur)
- IR Filter ON/OFF (SCC-C4203P nur)
- Off, 1/100, 1/250, 1/500, 1/1K, 1/2K,
- Off, 1/120, 1/250, 1/500, 1/1K, 1/2K,
Elektronischer Shutter
Elektronischer Shutter
1/4K, 1/10K sec
1/4K, 1/10K Sek.
Gegenlicht Kompensation
- Off/On (Einstellung des Bereichs)
Gegenlicht Kompensation
- Off/On (Einstellung des Bereichs)
Sense Up
-
Off/AUTO 2fach - 128fach / Fest 2fach - 128fach
Sense Up
-
Off/AUTO 2fach - 128fach / Fest 2fach - 128fach
Digital Zoom
- Off/On (10fach) BIB
Digital Zoom
- Off/On (10fach) BIB
Bewegungsmeldung
-
Off/On (einstellung von Bereich/Empfindlichkeit)
Bewegungsmeldung
-
Off/On (einstellung von Bereich/Empfindlichkeit)
Temperatur und Feuchtigkeit
Temperatur und Feuchtigkeit
- 14°F - +122°F, -90%
- 14°F - +122°F, -90%
beim Betrieb
beim Betrieb
Abmessungen
- 59.5 x 60.5 x 109.5 (H)mm
Abmessungen
- 59.5 x 60.5 x 109.5 (H)mm
Gewicht
- 375g
Gewicht
- 375g
29 30

Spezifikationen
SCC-C4301/C4303
SCC-C4301P/C4303P
Parameter Beschreibung Bemerkung
Parameter Beschreibung Bemerkung
Produkt Typ
- 22fach Zoom Kamera
Produkt Typ
- 22fach Zoom Kamera
Spannungsquelle
- AC 24V (60Hz) oder DC 12V ± 10%
Spannungsquelle
- AC 24V (50Hz) oder DC 12V ± 10%
Leistungsaufnahme
- 5.0 W
Leistungsaufnahme
- 5.0 W
Fernsehnorm
- NTSC Standard Farbe System
Fernsehnorm
- PAL Standard Farbe System
Bildaufnehmer
- 1/4 inch IT CCD
Bildaufnehmer
- 1/4 inch IT CCD
Effektive Pixel
- 768 (H) X 494 (V)
Effektive Pixel
- 752 (H) X 582 (V)
D
Abtastverfahren
- 525 Zeilen, 2:1 Zeilensprung
Abtastverfahren
- 625 Zeilen, 2:1 Zeilensprung
-
Horizontal : 15,734 Hz (INT), 15,750 Hz (L/L)
-
Horizontal : 15,625 Hz (INT), 15,625 Hz (L/L)
Zeilenfrequenz
- Vertikal : 59.94 Hz (INT), 60 Hz (L/L)
Zeilenfrequenz
- Vertikal : 50 Hz (INT), 50 Hz (L/L)
Synchronisationsverfahren
- INT/Zeilen Lock nur
Synchronisationsverfahren
- INT/Zeilen Lock
Auflösung
- 480 Fernsehzeilen
Auflösung
- 480 Fernsehzeilen
S/N Abstand
- 52dB(AGC OFF)
S/N Abstand
- 52dB(AGC OFF)
- 0.3Lux(Sense Up X4)
- 0.3Lux(Sense Up X4)
Minimum Szenen
(0.01Lux)
Minimum Szenen
(0.01Lux)
Beleuchtung
- S/W(SCC-C4303):0.4Lux
Beleuchtung
- S/W(SCC-C4303P):0.4Lux
(0.003Lux)
(0.003Lux)
- ATW/AWC/Manuell MODE
Weissabgleich
- ATW/AWC/Manuell MODE
Weissabgleich
(3200°K, 5600°K, R/B Gain Kontrolle)
(3200°K, 5600°K, R/B Gain Kontrolle)
- Composite-Videoausgang : 1.0 Vp-p
Signalausgang
- Composite-Videoausgang : 1.0 Vp-p
Signalausgang
75 ohms/BNC
75 ohms/BNC
- 22fach Zoom in einziger Einheit
- 22fach Zoom in einziger Einheit
- Brennweite : 3.6 - 79.2mm
Objektiv
- Brennweite : 3.6 - 79.2mm
Objektiv
- Öffnung : F1.6 (Weite), F3.8 (Tele)
- Öffnung : F1.6 (Weite), F3.8 (Tele)
- IR Filter ON/OFF (SCC-C4303 nur)
- IR Filter ON/OFF (SCC-C4303P nur)
- Off, 1/100, 1/250, 1/500, 1/1K, 1/2K,
- Off, 1/120, 1/250, 1/500, 1/1K, 1/2K,
Elektronischer Shutter
1/4K, 1/10K Sek.
Elektronischer Shutter
1/4K, 1/10K Sek.
Gegenlicht Kompensation
- Off/On (Einstellung des Bereichs)
Gegenlicht Kompensation
- Off/On (Einstellung des Bereichs)
Sense Up
-
Off/AUTO 2fach - 128fach / Fest 2fach - 128fach
Sense Up
-
Off/AUTO 2fach - 128fach / Fest 2fach - 128fach
Digital Zoom
- Off/On (10fach) BIB
Digital Zoom
- Off/On (10fach) BIB
Bewegungsmeldung
-
Off/On (einstellung von Bereich/Empfindlichkeit)
Bewegungsmeldung
-
Off/On (einstellung von Bereich/Empfindlichkeit)
Temperatur und Feuchtigkeit
Temperatur und Feuchtigkeit
- 14°F - +122°F, -90%
beim Betrieb
- 14°F - +122°F, -90%
beim Betrieb
Abmessungen
- 59.5 x 60.5 x 143 (H)mm
Abmessungen
- 59.5 x 60.5 x 143 (H)mm
Gewicht
- 500g
Gewicht
- 500g
31
32
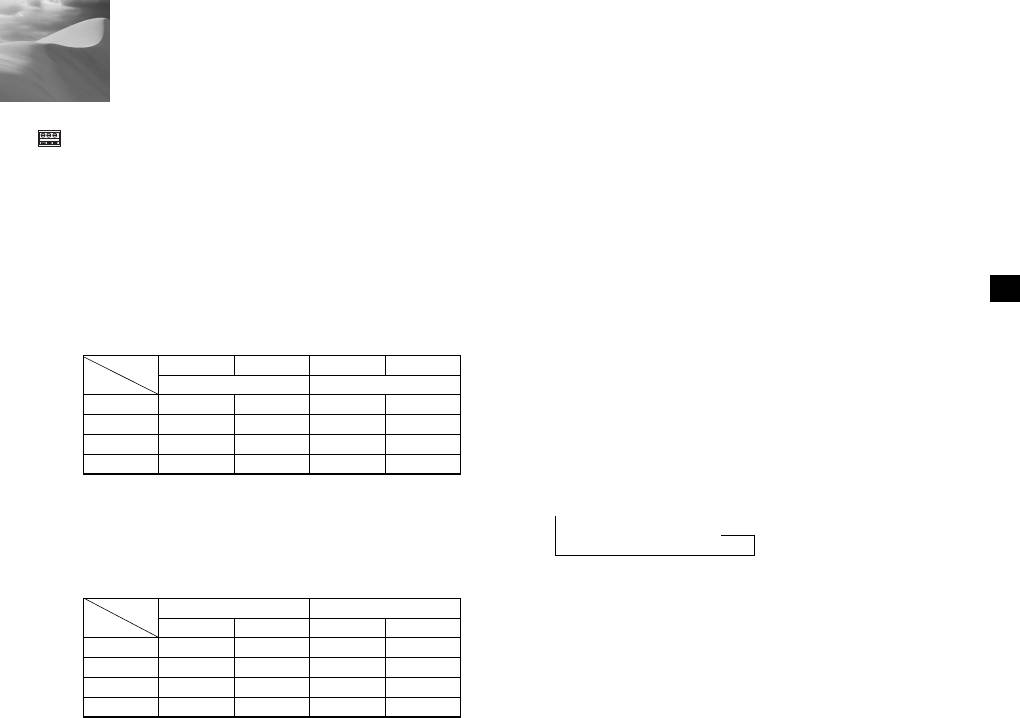
6
Sonstiges
ZOOM/FOCUS FB-Anschlüsse
1: In der Stellung Menü „aus“ wird bei Spannung für weniger als 2
Sekunden die Funktion AF aktiviert, bei mehr als 2 Sekunden
Diese Anschlüsse ermöglichen die Aktivierung der Funktionen
wird das Menü auf „an“ gesetzt. Ist das Menü auf „an“ gesetzt,
ZOOM-/FOKUS, MENÜ-STEUERUNG, RESET und die AF
wird die EINGABE-Funktion aktiviert.
durch Verwenden einer externen Steuereinheit.
In Abhängigkeit von der Eingabebedingung können Sie auf
2: Wenn die Spannung länger als 2 Sekunden angelegt wird, so
einen der folgenden Modi gesetzt werden: A, B, C und D.
wird die Kamera in die angegebene Reset-Position (PRESET 0)
(EXTRA – STRG-TYP)
gesetzt.
(Bereich der Betriebs-Spannung: +3V~+13V, -3V~-13V)
D
1) Spannung kann entweder auf ZOOM oder FOKUS gelegt
werden, aber nicht auf beide.
HOME ZURÜCK
1
Wenn für eine Weile keine Taste betätigt wird, kehrt die Kamera
Funktion*
TELE (Aufärts)
WEITWINKEL (Abwärts)
NAH (Links) FERN (Rechts)
automatisch zur angegebenen Reset-Position zurück. Die Reset-
Kode
ZOOM-Anschluss
FOKUS-Anschluss
Position ist auf die PRESET 0 gesetzt. Wurde die PRESET 0 zuvor
A
-6V
+6V
-6V
+6V
nicht gespeichert, so kann die HOME ZURÜCK-Funktion nicht
B
-6V
+6V
+6V
-6V
arbeiten.
C
+6V
-6V
-6V
+6V
D
+6V
-6V
+6V
-6V
Die Reset-Zeit festlegen
1: In MENÜ AUS wird mit diesen die Zoom-/Fokus-Funktion
gesteuert; in MENÜ AN haben sie die Funktion der Knöpfe
➞
OFF ➞ 1 MIN ➞ 2 MIN ➞ 3 MIN~60 MIN ➞ 2STUNDE ➞
AUF, AB, LINKS und RECHTS
3STUNDE~12STUNDE
2)
Wenn Spannung gleichzeitig auf ZOOM und FOKUS gelegt wird
Funktion
EINGABE/AF*
1
RESET*
2
Kode
ZOOM-Anschluss
FOKUS-Anschluss
ZOOM-Anschluss
FOKUS-Anschluss
A
-6V
-6V
+6V
+6V
B
-6V
+6V
+6V
-6V
C
+6V
-6V
-6V
+6V
D
+6V
+6V
-6V
-6V
33
34

Note
Note
Оглавление
- Gebrauchsanleitung
- Guide d’utilisation
- Guía del usuario
- Istruzioni per l’uso

