Samsung SPF-71E: инструкция
Раздел: Бытовая, кухонная техника, электроника и оборудование
Тип: Цифровая Фоторамка
Инструкция к Цифровой Фоторамке Samsung SPF-71E
SPF-71E
Digital Photo Frame
Thank you for purchasing this Samsung
product. To receive more complete
user manual
service, please register your product at
www.samsung.com/global/register
Manuel de l’utilisateur
Model Serial No.
Merci d’avoir acheté un produit Samsung.
Pour obtenir un service complet, veuillez
enregistrer votre produit à:
www.samsung.com/global/register
Modèle N° de série
BN68-01567C-03.indb 1 2008-09-23 �� 5:26:38
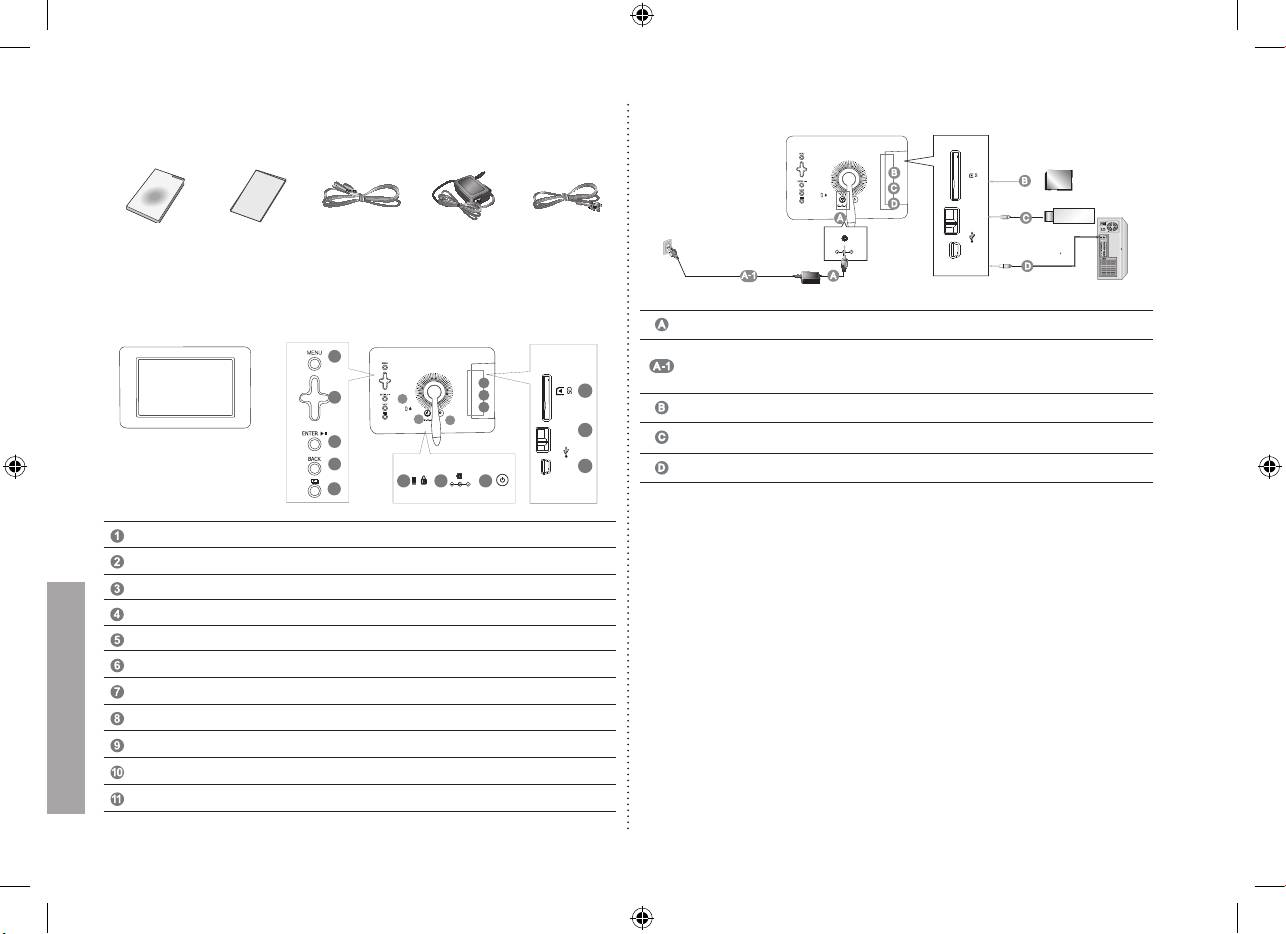
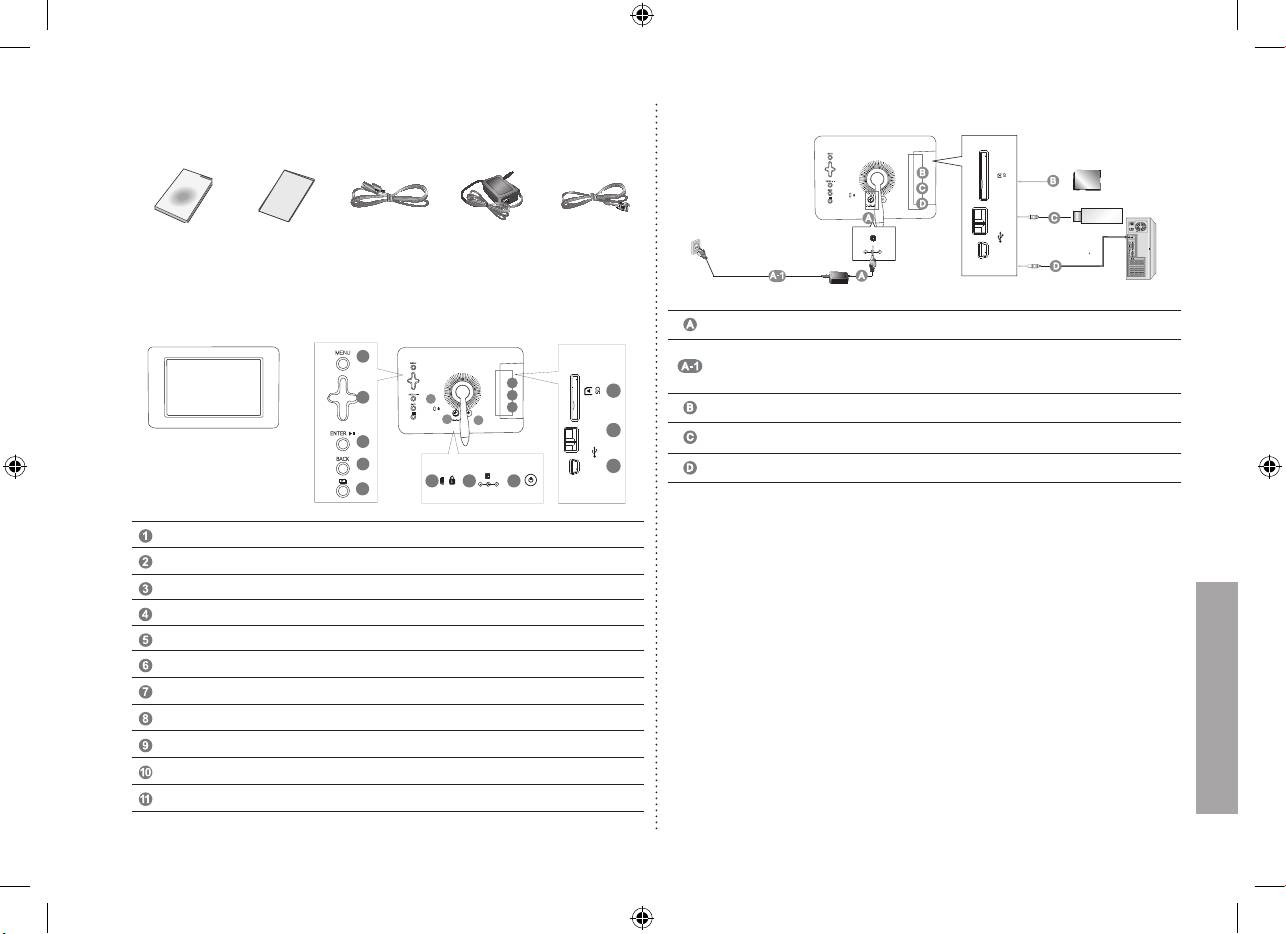
Components
Please check all items are contained in your delivered package.
USB cablePower AdapterPower CodeUser manual Warranty Card
Front / Back Overview
Menu button ( Displays the menu )
Navigation buttons
Enter button ( Play/Stop while slide show )
Back button
Slideshow button ( Starts slide show instantly )
Kensington lock
Power outlet
Power On/Off button
SD memory card slot
USB Downstream ( for USB storage devices )
USB Upstream ( for PC connection )
1
9
2
/
6
10
9
11
7
8
/
10
3
4
11
6 7
8
5
Connections
Connect the power adapter to the power terminal at the back of the product.
Connect the power cord to the power adapter. Plug the power cord for the monitor
into a nearby outlet.
The images here are for reference only, and are not applicable in all cases (or countries).
Allows you to insert SD memory card. (SD Card only)
Connect your Digital Photo Frame to a USB-supporting storage device.
Connect your Digital Photo Frame to a PC’s USB terminal with a USB cable.
Updating the rmware
Preparations
Digital Photo Frame, Firmware update le, SD card or USB memory stick
Please visit www.samsung.com for the latest rmware update.
Connect SD card or USB memory stick to PC
Connect SD card or USB memory stick to your PC
Copy the rmware update le to SD card or USB memory stick.
Make sure to copy the rmware update le to the root directory.
Connect SD card or USB memory stick to Digital Photo Frame
Remove SD card or USB memory stick from your PC and connect to your Digital Photo Frame.
If your Digital Photo Frame is off, turn it on.
Updating
Press the Back button to go to the Main screen.
Navigate until you reach the following stage. [Settings] -> [Update/Reset] -> [Firmware Update]
Press the Enter button and choose the appropriate memory location.
Wail until the message says it is done.
Press the power button to turn off the Digital Photo Frame.
Remove the SD card or USB memory stick.
Press the power button again to turn on the Digital Photo Frame.
/
English
2
BN68-01567C-03.indb 2 2008-09-23 �� 5:26:39
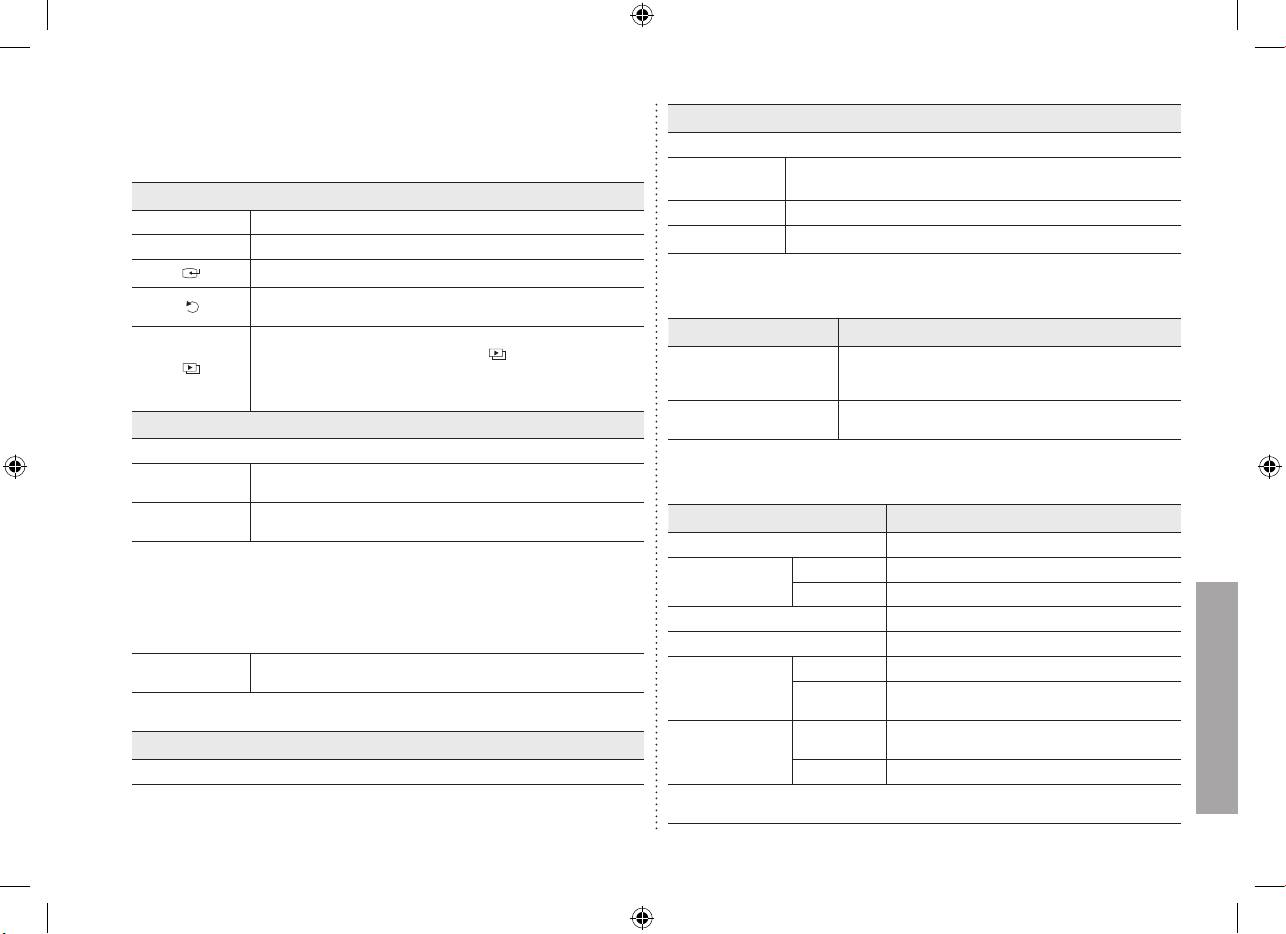
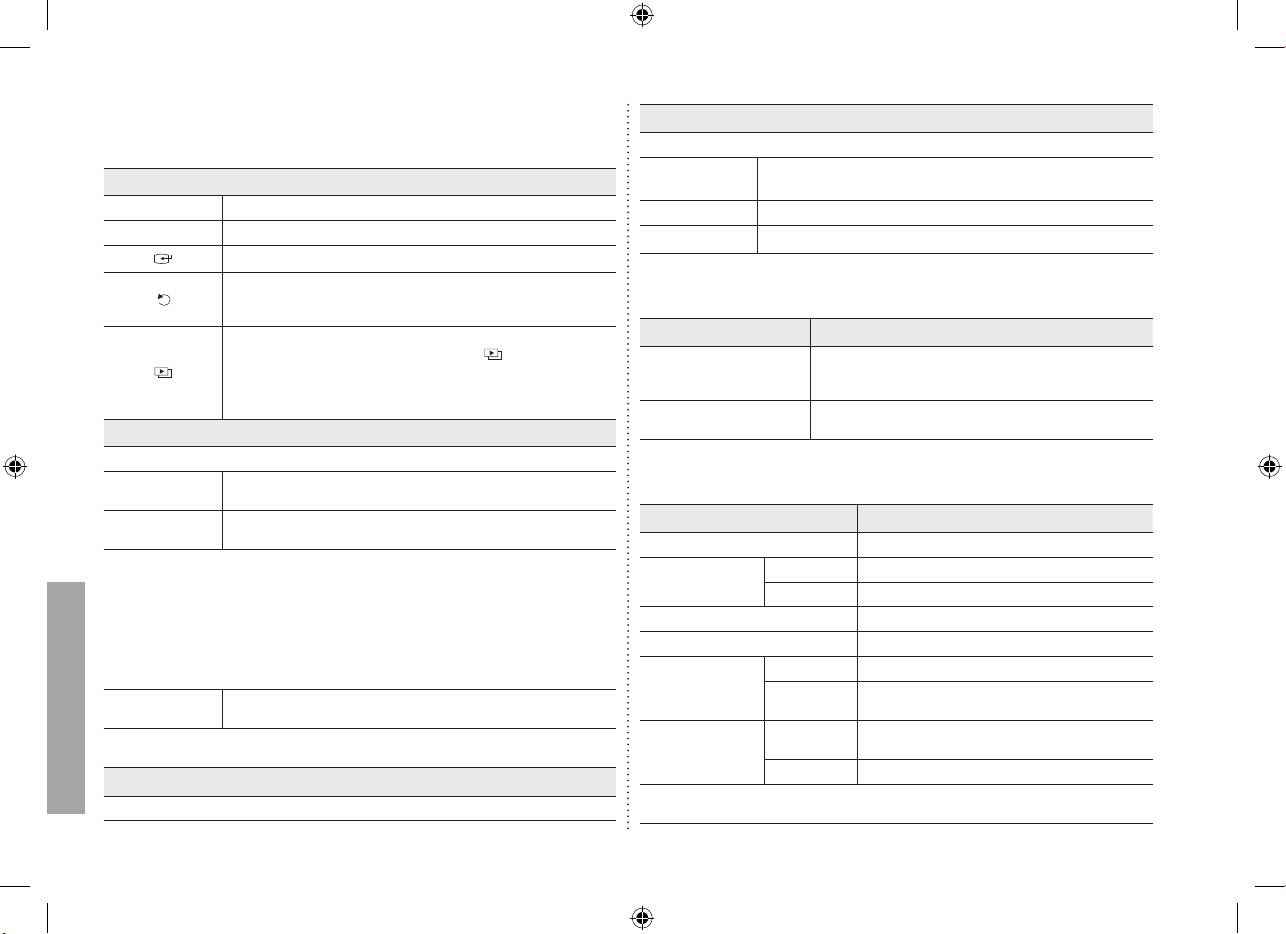
Operations
Settings
If no button is operated for ten minutes, the screensaver starts to protect the monitor.
If you press the Menu button, the menu of the selected item is displayed on the screen.
However, the screensaver does not start in the slideshow status.
Language, Brightness, Direct Slideshow, Auto Fit Portrait Photo,
Options
Frame Memory Copy
Direct Functions
Preference Starting Mode, Screen Saver, Home Background, Auto Picture On/Off
MENU
Enters or exits a menu.
Update/Reset Firmware Update, Reset Settings, Product Information
Navigation buttons
Moves around the items and adjusts a value.
Selects a function you want to use.
Returns to the previous screen.
Troubleshooting
Hold down this button for two seconds to return to the Main screen.
Starts a slideshow.
Symptoms Causes and Actions
When playing a slideshow by pressing the [ ] button, the photos
I have connected an external
in the location of the last played photo are played. If the photos in
Check the connection between product and external storage.
storage device but it is not
the location of the last played photo have been removed, they are
Connect to PC and check the operation state.
recognized.
automatically searched for and then played in a slideshow.
It takes time to display the
When the resolution is high or the le size is large, it takes
Photo
next photo.
some time to display on the screen.
If you press the Menu button, the menu of the selected item is displayed on the screen.
When selecting a
Open, Copy, Delete
Specications
folder
When selecting a
Start Slideshow, Copy, Copy All les, Delete, Delete All les,
Items Specifications
thumbnail
Set as background
Model Name SPF-71E
When copying a photo from external memory (SD, USB memory) to internal memory and
the following option (Settings -> Options -> Frame Memory Copy -> Resized) is activated,
Type 7” (17cm) TFT (Analog)
the screen quality size is reduced automatically before copying. This provides the resized
Panel
photo to be displayed ideally in the screen. But the EXIF (camera related information) is
Resolution 480 x 234
removed when this option is used.
Supported Formats JPEG (Progressive,CMYK JPEG is not supported.)
So please make sure that resized photo is used only in the Digital Photo Frame.
It may take a long time if many les are copied at a time.
Built-in Memory 120 MB
Stop Slideshow, Slide Show Settings, Brightness, Rotate, Zoom,
Slide Show
Rating External DC power adapter (12 V, 2 A, 24 W)
Aspect Ratio, Delete, Set as Background
Power
Normal mode : under 7 W
Only photos with a resolution of less than 8000 (width) * 8000 (height) pixels can be
Consumption
Power off mode : under 1 W
displayed on the screen.
Dimensions
217.5 x 156.5 x 43 mm
Clock
General
(WxHxD)
Date and Time, Time Format, Date Format, Clock Type
Weight 496.3 g
The product design may differ according to the model, and specications are subject to
change without prior notice for product performance enhancement.
English
3
BN68-01567C-03.indb 3 2008-09-23 �� 5:26:39
Warning! Important Safety Instructions
(Please read the appropriate section that corresponds to the marking on your Samsung product before attempting to install the product.)
CAUTION
This symbol indicates that high voltage is present inside. It is dangerous to make any
kind of contact with any internal part of this product.
RISK OF ELECTRIC SHOCK DO NOT OPEN
This symbol alerts you that important literature concerning operation and mainte-
CAUTION: TO REDUCE THE RISK OF ELECTRIC SHOCK, DO NOT REMOVE COVER (OR BACK).
nance has been included with this product.
THERE ARE NO USER SERVICEABLE PARTS INSIDE. REFER ALL SERVICING TO QUALIFIED PERSONNEL.
• The slots and openings in the cabinet and in the back or bottom are provided for necessary
• Make sure to plug the power cord in until it is firmly inserted. When removing the power
ventilation. To ensure reliable operation of this apparatus, and to protect it from overheating,
cord, make sure to hold the power plug when pulling the plug from the outlet. Do not touch the
these slots and openings must never be blocked or covered.
power cord with wet hands.
- Do not cover the slots and openings with a cloth or other materials.
• If this appratus does not operate normally - in particular, if there are any unusual sounds or
- Do not block the slots and openings by placing this apparatus on a bed, sofa, rug or other
smells coming from it
similar surface.
- unplug it immediately and contact an authorized dealer or service center.
- Do not place this apparatus in a confined space, such as a bookcase, or built-in cabinet,
• Be sure to contact an authorized service center, when installing your set in a location with
unless proper ventilation is provided.
heavy dust, high or low temperatures, high humidity, chemical substances and where it oper-
• Do not place this apparatus near or over a radiator or heat resistor, or where it is exposed to
ates for 24 hours such as the airport, the train station etc. Failure to do so may cause serious
direct sunlight.
damage to your set.
• Do not place a water containing vessel(vases etc.) on this apparatus, as this can result in a risk
• Use only a properly grounded plug and receptacle.
of fire or electric shock.
- An improper ground may cause electric shock or equipment damage. (Class l Equipment
• Do not expose this apparatus to rain or place it near water(near a bathtub, washbowl, kitchen
only.)
sink, or laundry tub, in a wet basement, or near a swimming pool etc.). If this appratus acci-
• To disconnect the apparatus from the mains, the plug must be pulled out from the mains
dentally gets wet, unplug it and contact an authorized dealer immediately. Make sure to pull
socket, therefore the mains plug shall be readily operable.
out the power cord from the outlet before cleaning.
• Do not allow children to hang onto the product.
• Do not overload wall outlets, extension cords or adaptors beyond their capacity, since this can
• Store the accessories (battery, etc.) in a location safely out of the reach of children.
result in fire or electric shock.
• Do not install the product in an unstable location such as a shaky self, a slanted floor or a
• Power-supply cords should be routed so that they are not likely to be walked on or pinched by
location exposed to vibration.
items placed upon or against them, paying particular attention to cords at plug end, adaptors
• Do not drop or impart any shock to the product. If the product is damaged, disconnect the
and the point where they exit from the appliance.
power cord and contact a service center.
• To protect this apparatus from a lightning storm, or when it is left unattended and unused for
• Unplug the power cord from the power outlet and wipe the product using a soft, dry cloth. Do
long periods of time, unplug it from the wall outlet and disconnect the antenna or cable system.
not use any chemicals such as wax, benzene, alcohol, thinners, insecticide, air freshener, lubri-
This will prevent damage to the set due to lightning and power line surges.
cant or detergent. This may damage the appearance or erase the printing on the product.
• Before connecting the AC power cord to the DC adaptor outlet, make sure the voltage desig-
• Apparatus shall not be exposed to dripping or splashing.
English
nation of the DC adaptor corrsponds to the local electrical supply.
• WARNING - TO PREVENT THE SPREAD OF FIRE, KEEP CANDLES OR OTHER OPEN
• Never insert anything metallic into the open parts of this apparatus. Doing so many create a
FLAMES AWAY FROM THIS PRODUCT AT ALL TIMES.
danger of electric shock.
• To avoid electric shock, never touch the inside of this apparatus. Only a qualified technician
should open this apparatus.
4
BN68-01567C-03.indb 4 2008-09-23 �� 5:26:40
Komponenter
Kontroller, at alle elementer ndes i produktets emballage.
USB-kabelStrømadapterStrømkabelBrugervejledning Garantikort
Set forfra/bagfra
Menu-knap (viser menuen)
Navigationsknapper
Enter-knap (afspil/stop under diasshow)
Back-knap
Diasshow-knap (starter diasshow med det samme)
Kensington-lås
Strømstik
Tænd/sluk-knap
Åbning til SD-hukommelseskort
USB-downstream (til USB-lagringsenheder)
USB-upstream (til pc-tilslutning)
1
9
2
/
6
10
9
11
7
8
/
10
3
4
11
6 7
8
5
Tilslutninger
Tilslut strømadapteren til strømstikket på bagsiden af produktet.
Tilslut strømstikket til strømadapteren. Sæt skærmens strømkabel i en nærliggende
stikkontakt.
Billederne her er kun til reference, og gælder ikke i alle tilfælde (eller lande).
Gør det muligt at isætte SD-hukommelseskort. (Kun SD-kort)
Tilslut din digitale fotoramme til en USB-understøttet lagringsenhed.
Tilslut din digitale fotoramme til en pc’s USB-stik med et USB-kabel.
Opdatering af rmwaren
Forberedelser
Digital fotoramme, l med rmwareopdatering, SD-kort eller USB-hukommelsesnøgle
Besøg www.samsung.com for den nyeste rmwareopdatering.
Tilslut SD-kortet eller USB-hukommelsesnøglen til pc'en
Tilslut SD-kortet eller USB-hukommelsesnøglen til din pc
Kopier len med rmwareopdateringen til SD-kortet eller USB-hukommelsesnøglen.
Sørg for at kopiere len med rmwareopdateringen rodmappen.
Tilslut SD-kortet eller USB-hukommelsesnøglen til den digitale fotoramme
Fjern SD-kortet eller USB-hukommelsesnøglen fra din pc og tilslut den til din digitale fotoramme.
Hvis der er slukket for din digitale fotoramme, så tænd for den.
Opdatering
Tryk på knappen Back (Tilbage) for at vende tilbage til hovedskærmbilledet.
Naviger, til du når frem til følgende: [Settings] -> [Update/Reset ]-> [Firmware Update]
Tryk på Enter-knappen, og vælg den relevante hukommelsesplacering.
Vent, indtil meddelelsen fortæller, at det er udført.
Tryk på tænd/sluk-knappen for at slukke for den digitale fotoramme.
Fjern SD-kortet eller USB-hukommelsesnøglen.
Tryk på tænd/sluk-knappen igen for at tænde for den digitale fotoramme.
/
Dansk
5
BN68-01567C-03.indb 5 2008-09-23 �� 5:26:41
Betjening
Settings
Hvis der ikke trykkes på nogen knap i 10 minutter, begynder pauseskærmen at beskytte
Hvis du trykker på Menu-knappen, vises menuen for det valgte emne på skærmen.
skærmen. Pauseskærmen starter dog ikke i tilstanden Diasshow.
Language, Brightness, Direct Slideshow, Auto Fit Portrait Photo,
Direkte funktioner
Options
Frame Memory Copy
MENU
Går ind i eller afslutter en menu
Preference Starting Mode, Screen Saver, Home Background, Auto Picture On/Off
Navigationsknapper
Flytter rundt mellem emnerne og justerer en værdi.
Update/Reset Firmware Update, Reset Settings, Product Information
Vælger en funktion, du vil anvende.
Vender tilbage til den forrige skærm.
Hold denne knap nede i to sekunder for at vende tilbage til
Fejlnding
hovedskærmen.
Starter et diasshow
Problem Årsag og løsning
Når du viser et diasshow ved at trykke på knappen [ ], afspilles fotos fra
Jeg har tilsluttet en ekstern
Kontroller forbindelsen mellem produktet og den eksterne
den seneste anvendte fotoplacering. Hvis dine fotos på placeringen for det
lagringsenhed, men den
lagringsenhed.
sidst viste foto er blevet fjernet, søges der automatisk efter dem, og derefter
genkendes ikke.
Tilslut til en pc, og kontroller brugen.
vises de i et diasshow.
Det tager tid at vise det
Når opløsningen er høj, eller lstørrelsen er stor, tager det
næste foto.
nogle gange lang tid at vise billedet på skærmen.
Photo (Foto)
Hvis du trykker på Menu-knappen, vises menuen for det valgte emne på skærmen.
Ved valg af en
Specikation
Open, Copy, Delete
mappe
Ved valg af en
Start Slideshow, Copy, Copy All les, Delete, Delete All les,
Elementer Specifikation
miniature
Set as background
Modelnavn SPF-71E
Ved kopiering af et foto fra en ekstern hukommelse (SD, USB-hukommelse) til intern
Type 7” (17cm) TFT (analog)
hukommelse og følgende mulighed (Settings (Indstillinger) -> Options (Muligheder) ->
Panel
Frame Memory Copy (Kopier til rammehukommelse) -> Resized (Ændret størrelse))
Opløsning 480 x 234
er aktiveret, reduceres skærmstørrelsen/kvaliteten automatisk inden kopiering. Dette
sørger for, at fotoet med den ændrede størrelse vises bedst på skærmen. Men EXIF’en
Understøttede formater JPEG (progressiv, CMYK JPEG understøttes ikke.)
(kamerarelaterede informationer) fjernes, når denne mulighed anvendes.
Så sørg for, at fotoet med den ændrede størrelse kun skal anvendes på den digitale
Indbygget hukommelse 120 MB
fotoramme.
Klassikation Ekstern DC-strømadapter (12 V, 2 A, 24 W)
Det kan tage lang tid, hvis der kopieres mange ler på én gang.
Strøm
Normal tilstand: under 7 W
Stop Slideshow, Slide Show Settings, Brightness, Rotate, Zoom,
Forbrug
Slide Show
Slukket-tilstand: under 1 W
Aspect Ratio, Delete, Set as Background
Dimensioner
Kun fotos med en opløsning på mindre end 8000 (bredde) * 8000 (højde) pixels kan vises
217,5 x 156,5 x 43 mm
(BxHxD)
på skærmen.
Generelt
Vægt 496,3 g
Clock
Produktdesignet kan variere afhængigt af modellen, og specikationer kan ændres uden
Date and Time, Time Format, Date Format, Clock Type
forudgående varsel af hensyn til forbedring af produktet.
Dansk
6
BN68-01567C-03.indb 6 2008-09-23 �� 5:26:41
