Samsung LS19UBPEBQ-XAA: инструкция
Раздел: Компьютерная техника, комплектующие, аксессуары
Тип: Монитор
Инструкция к Монитору Samsung LS19UBPEBQ-XAA

Usb_Monitor_gudie_Cover1225L.fm Page 1 Monday, October 8, 2007 9:30 AM
USB Monitor
Installation Guide
Thank you for purchasing a Samsung product.
To recevie a more complete service, please
register your product at
www.samsung.com/global/register
Code No. BN68-01225N-00

USB_Monitor_install_guide_906.fm Page 0 Wednesday, October 10, 2007 1:18 PM
USB_Monitor_install_guide_906.fm Page 1 Wednesday, October 10, 2007 1:18 PM
USB MONITOR INSTALLATION GUIDE
You can use this product as a monitor simply by connecting the power cable and the USB cable
English
to your PC.
Minimum hardware requirements
iWhen connecting one (1) or two (2) USB monitors
Minimum hardware requirements: 1.2 GHz CPU / 512 MB memory
Display: One monitor can support DVD quality resolution in full screen mode.
( It may not support a sufficient frame speed during playback.)
iWhen connecting three (3) USB monitors
Minimum hardware requirements: 1.8 GHz CPU / 1GB memory
Display: One monitor can support DVD quality resolution in full screen mode.
( It may not support a sufficient frame speed during playback.)
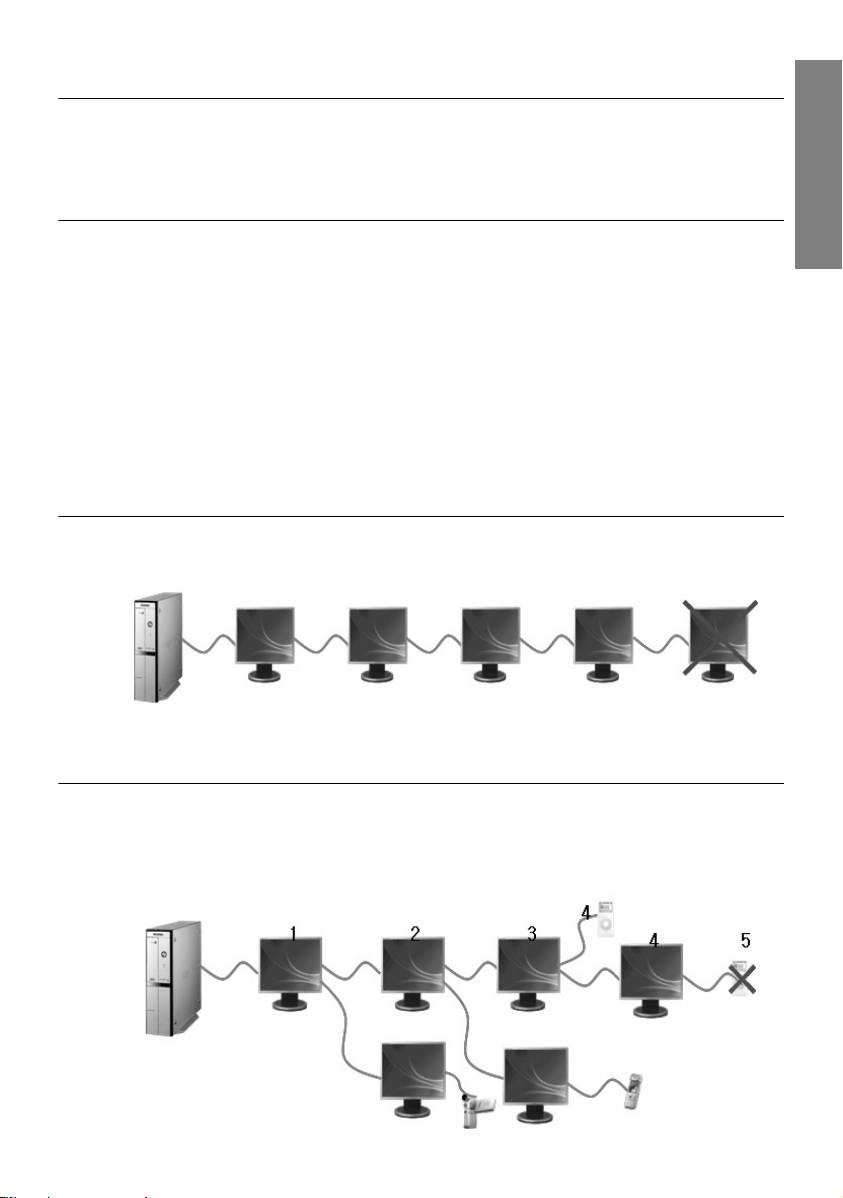
iMonitor connection: Multiple screens of 6 monitors
Minimum hardware requirements: 1.6 GHz Dual core CPU / 1 GB memory
Display: One monitor can support DVD quality resolution in full screen mode.
( It may not support a sufficient frame speed during playback.)
When connecting serially
You can connect up to four (4) USB monitors serially.
When connecting in parallel
You can connect up to six (6) USB monitors in parallel.
When connecting external devices to the USB monitor, you can only connect up to four (4)
devices.
1_English
USB_Monitor_install_guide_906.fm Page 2 Wednesday, October 10, 2007 1:18 PM
Installing Your USB Monitor
- Make sure to connect the USB cable and begin the installation after your PC has
booted.
English
- The auto installation will take about one minute. If you turn off your monitor or
remove the USB cable while the installation is in progress, it may cause a problem
with your PC and Windows OS.
- For the recommended resolutions, refer to the user manual provided in the CD.
Installation(Auto&Manual)
* The installation method is subject to change without prior notice for product enhancement purposes.
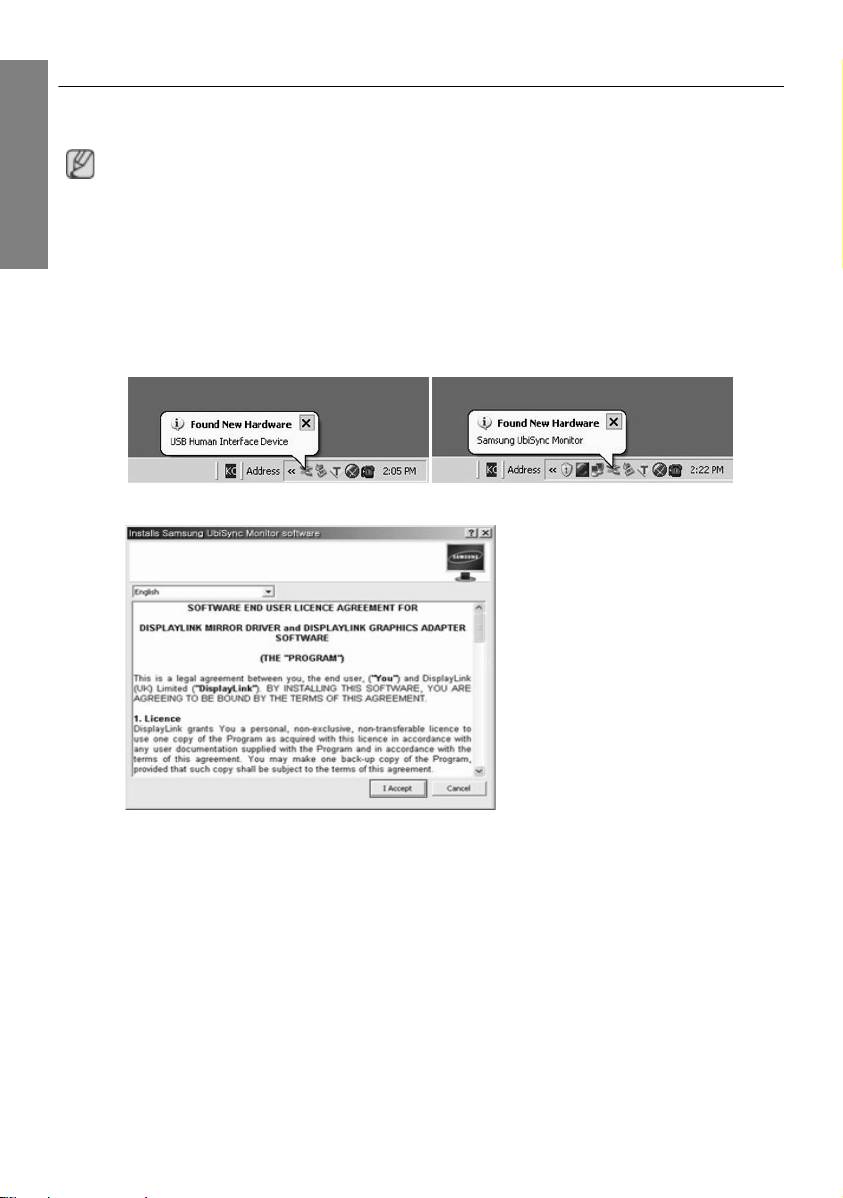
1. If you connect your USB monitor to your PC, it recognizes the monitor and the "Found New
Hardware" wizard is displayed, as shown in the figure below.
2.Click I Accept.
2_English
USB_Monitor_install_guide_906.fm Page 3 Wednesday, October 10, 2007 1:18 PM
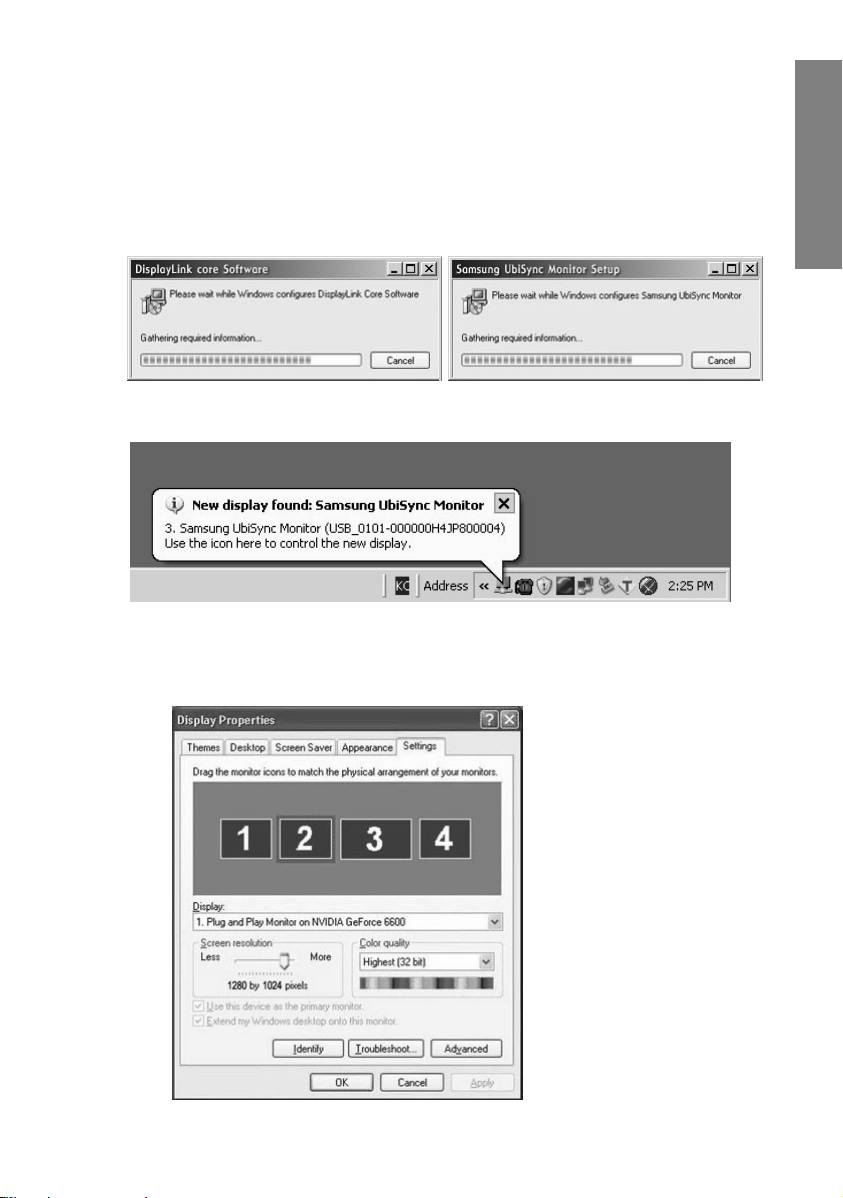
3. The installation is started automatically and the installation progress window is displayed, as
shown in the figure below.
•Manual Installation: If the USB driver is not installed automatically, insert the provided USB
Monitor Install CD into the CD-ROM drive of your PC. Double-click 'My Computer on the
English
Windows Desktop' and click on 'User Manual (I:)'. The volume name of the removable
storage disk (for example, E:, F:, G: ) may be different depending on your computer
environment.
Right-click it and select 'Open' from the displayed menu. Double-click the 'Setup' file and an
installation progress window is displayed, as shown in the figure below. The remaining steps
are the same as for the automatic installation.
4. When setup is finished, a monitor icon is created in the system tray at the bottom of the monitor
screen, and the information for the installed USB monitor is displayed.
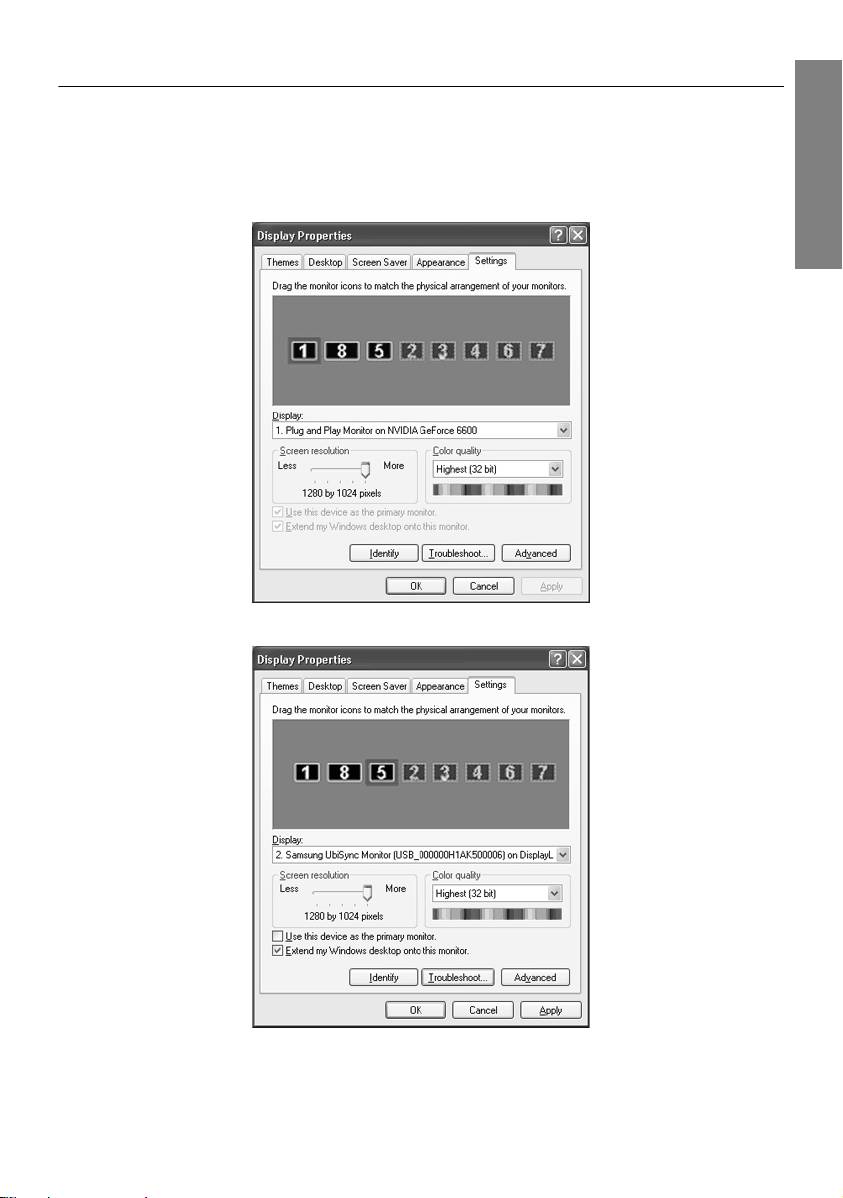
5. When the installation is completed, configure the following settings to use multiple monitors.
5-1. Right-click on the ‘Windows Desktop’ and select ‘Properties’ from the displayed menu. The
“Display Properties” window appears.
5-2. Select the “Settings” tab. A list of connected USB monitors is displayed.
3_English
USB_Monitor_install_guide_906.fm Page 4 Wednesday, October 10, 2007 1:18 PM
5-3. Arrange the monitors displayed in the 'Display Properties' window in the order they are
actually used.
English
5-4. Then click "OK" button.
Configuring the USB Monitor Display Information
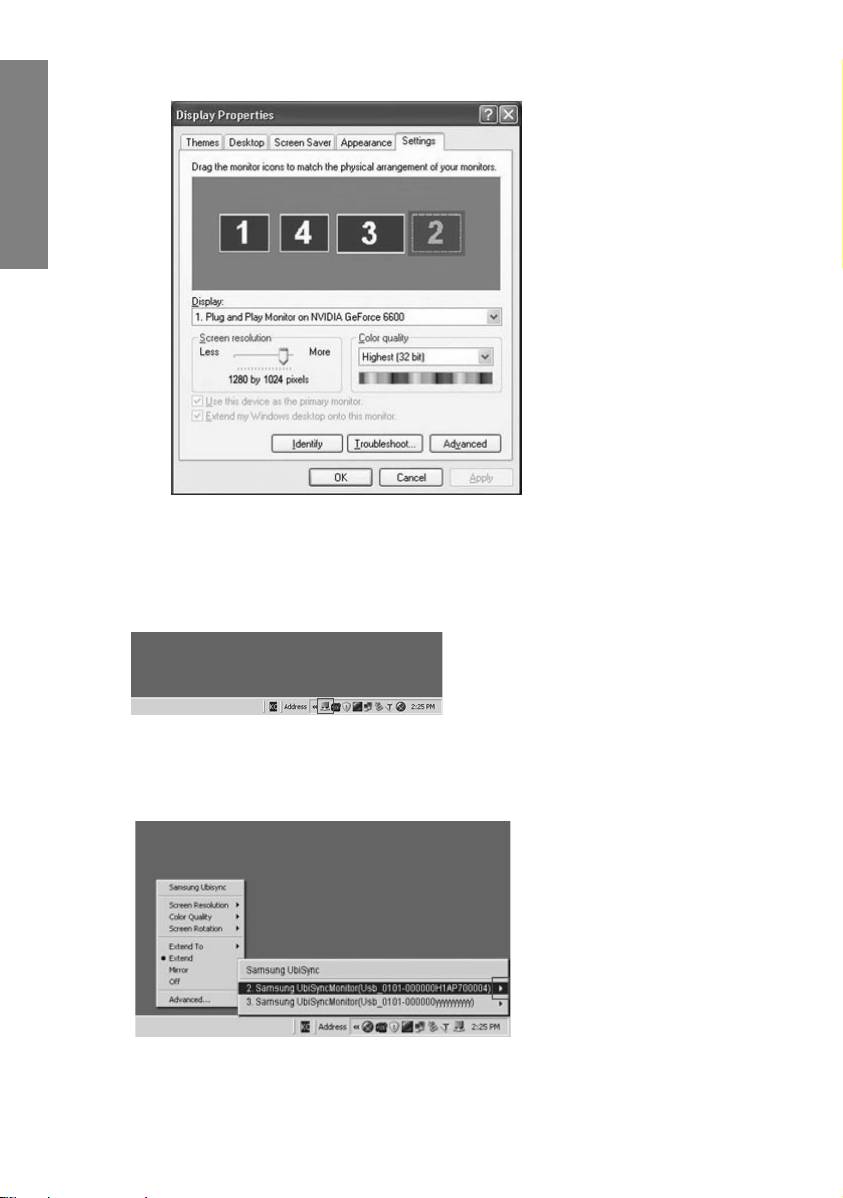
1. When the driver setup for the USB monitor is finished, a monitor icon is created in the system
tray at the bottom of the monitor screen.
2.Click the monitor icon to display a list of connected USB monitors.
Example) The following figure shows when two USB monitors are connected.
3.Select the monitor for which you want to configure the display settings. You can configure the
"Screen Resolution" , "Color Quality" and "Screen Rotation" settings for your monitor.
4_English

USB_Monitor_install_guide_906.fm Page 5 Wednesday, October 10, 2007 1:18 PM
The Initial Screen Settings after Installing the Program
Applicable mode: Extend mode
Mode position: To the right of the primary screen
English
Mode rotation: 0°
USB Monitor - Limitation
Supported OS (Operating Systems)
Windows XP
- Service Pack 1 or earlier: Unsupported
- Service Pack 2 or later: Supported
Windows 2000
- Service Pack 3 or earlier: Not Supported
- Service Pack 4 or later: Supported
Windows Server 2003
- Not Supported
Windows Vista
- Supported(64bit Not Supported)
- To check the information on the operating system of your PC, right-click ‘My Computer’ on the
‘Windows Desktop’ and select ‘Properties’ from the displayed menu. Check the information in the
‘General’ tab of the ‘Computer Properties’ window.
Because this USB monitor is recognized as a USB device, the DOS screen that appears for
general monitors when a PC is booting up is not displayed.
- If you want to use your USB monitor as the Primary Monitor, connect a D-Sub cable (for analog
signals) or a DVI cable (for digital signals) as well.
You cannot use the USB monitor for software using 3D hardware acceleration.
- Real Player (Expansion mode is not supported.)
- For most 3D games
- Programs running on the base of Direct X
Supported movie programs
- Power DVD
- Win DVD(Version 5 onwards)
- VLC
This monitor does not support the MagicTune program.
- The MagicRotation function may not function normally.
- If the MagicTune program is installed on your PC, it may not be compatible with this monitor.
The USB monitor does not support the Auto Pivot function.
-The function may not be supported depending on the model. For more information, refer to the user
manual.
The USB monitor turns on automatically whenever the power cord is connected.
- The function may not be supported depending on the model.
The USB monitor may not work normally with USB 1.0.
5_English

USB_Monitor_install_guide_906.fm Page 6 Wednesday, October 10, 2007 1:18 PM
If you connect multiple USB monitors, a blank screen is displayed while your PC recognizes
them.
Screens are displayed on your USB monitors after your PC has recognized them.
If the graphics card of your PC does not support WDDM, the extended mode may not be available
in Windows Vista.
Example) Some versions of the Matrox Card
English
Check List
Before calling for assistance, check the information in this section to see if you can remedy any
problems yourself. If you do need assistance, please call the phone number on the Information
section or contact your dealer.
There is no image on the screen. I cannot turn on the monitor.
If you quickly and repeatedly turn your USB monitor off and on, it may not work normally.
Your USB monitor is recognized as a general USB device on your PC. Therefore, please refer to the
troubleshooting information for USB devices by visiting Microsoft’s customer support site.
- Right-click the My Computer and click on Properties.
- The Device Manager is displayed.
- From the “Action” menu, click “Scan for hardware changes”.
- If the problem persists, you have to restart your computer.
The screen of the USB monitor freezes.
Set the ‘Hardware acceleration’ value to ‘Full’. For more information on how to configure the
settings, click here.
Set the ‘Hardware acceleration’ value to ‘Full’.
- Right-click the ‘Windows Desktop’ and click on ‘Properties’.
- The “Display Properties” window appears.Select the “Settings” tab and click on “Advanced”.
- If the “Properties” window for your monitor is displayed, select the “Troubleshoot” tab.Move the
“Hardware acceleration” slide to “Full”.)
My computer is on and the LED is blinking. However, only a blank screen is displayed on the
monitor.
Check whether the USB cable is connected correctly.
Connect the USB cable again.
My USB monitor is connected but the screen is blank.
Does the Auto Installation program run when your USB monitor is connected?
Check your user account in the Control Panel.
- Click Start - Control Panel - User Accounts - Change an account - Admin: Computer administrator - Change
my account type. In the displayed window, Computer administrator (Power User or higher) must be selected.
- For Windows XP computers.
- Set your account type as directed above.
- Then turn the Power button at the front of your USB monitor off and on or reconnect the USB cable
connected to the monitor.
- If the problem persists, install the “USB Monitor Installation Driver” from the provided CD.
- For more information, refer to the Manual Installation section.
- When the installation is finished, reboot your PC.
6_English
USB_Monitor_install_guide_906.fm Page 7 Wednesday, October 10, 2007 1:18 PM
Q & A
How I can clone or extend screen mode?
English
1. After the automatic installation of your USB monitor is finished, right-click on the Windows Desktop
and click “Properties” from the displayed menu to show the “Display Properties” window.
2. Select the “Settings” tab. A list of connected USB monitors is displayed.
The default mode for the USB monitor is Extended mode.
3. Select the monitor to change to Clone mode.
7_English

USB_Monitor_install_guide_906.fm Page 8 Wednesday, October 10, 2007 1:18 PM
4. Click the right mouse button and then click the v mark to the left of “Connection” at position 1 to
remove it.(Or, remove the v mark at position 2.)
English
5. The selected USB monitor is changed to Clone mode and is also displayed as deactivated.
How can I remove the “USB Monitor Installation Program” completely?
1. Click ‘Add/Remove Programs’ in the ‘Control Panel’. A list of ‘currently installed programs’ is
displayed.
2. Select ‘Samsung UbiSync Monitor’ from the list and click ‘Remove’.
There is no response when I right-click “Samsung image (P:) (USB Monitor)” in the “My
Computer” window and click “Eject” in the displayed menu.
Though your USB monitor is recognized as a drive by your PC, it has been designed so that the
context menu usually displayed when right-clicking on the “My Computer” window does not work.
8_English

USB_Monitor_install_guide_906.fm Page 9 Wednesday, October 10, 2007 1:18 PM
The screen size of the USB monitor is larger than the actual monitor size.
If the primary monitor has a high resolution, screens are expanded beyond the recommended
resolution in Clone mode (USB monitor). (For the recommended resolutions, refer to the user
manual provided in the CD.)
English
The screen size of the USB monitor is smaller than the actual monitor size. The screen is
centered on the monitor.
If the primary monitor has a high resolution, screens are smaller than the recommended resolution
in Clone mode (USB monitor). (For the recommended resolutions, refer to the user manual provided
in the CD.)
I disconnected or turned off my USB monitor but my PC still displays the old monitor information
in the Display Properties window.
The deactivated USB monitors are such that the power to them is turned off or their USB cables are
disconnected. To remove this information, you have to remove the 'Samsung Ubisync Monitor'
program from ‘Add/Remove Programs’ in the ‘Control Panel’. If you remove the program you cannot
use all the connected USB monitors. If you want to use the USB monitor again, you have to setup
the installation program again.
Icons and photos are broken or jagged in Clone mode (USB monitor).
This occurs because Windows does not send the screen updating information to Clone mode if
Extended mode is active on a single PC. We recommend using the monitor in Extend mode.
9_English
