Samsung BIXOLON SRP-275: инструкция
Раздел: Бытовая, кухонная техника, электроника и оборудование
Тип: Принтер
Инструкция к Принтеру Samsung BIXOLON SRP-275

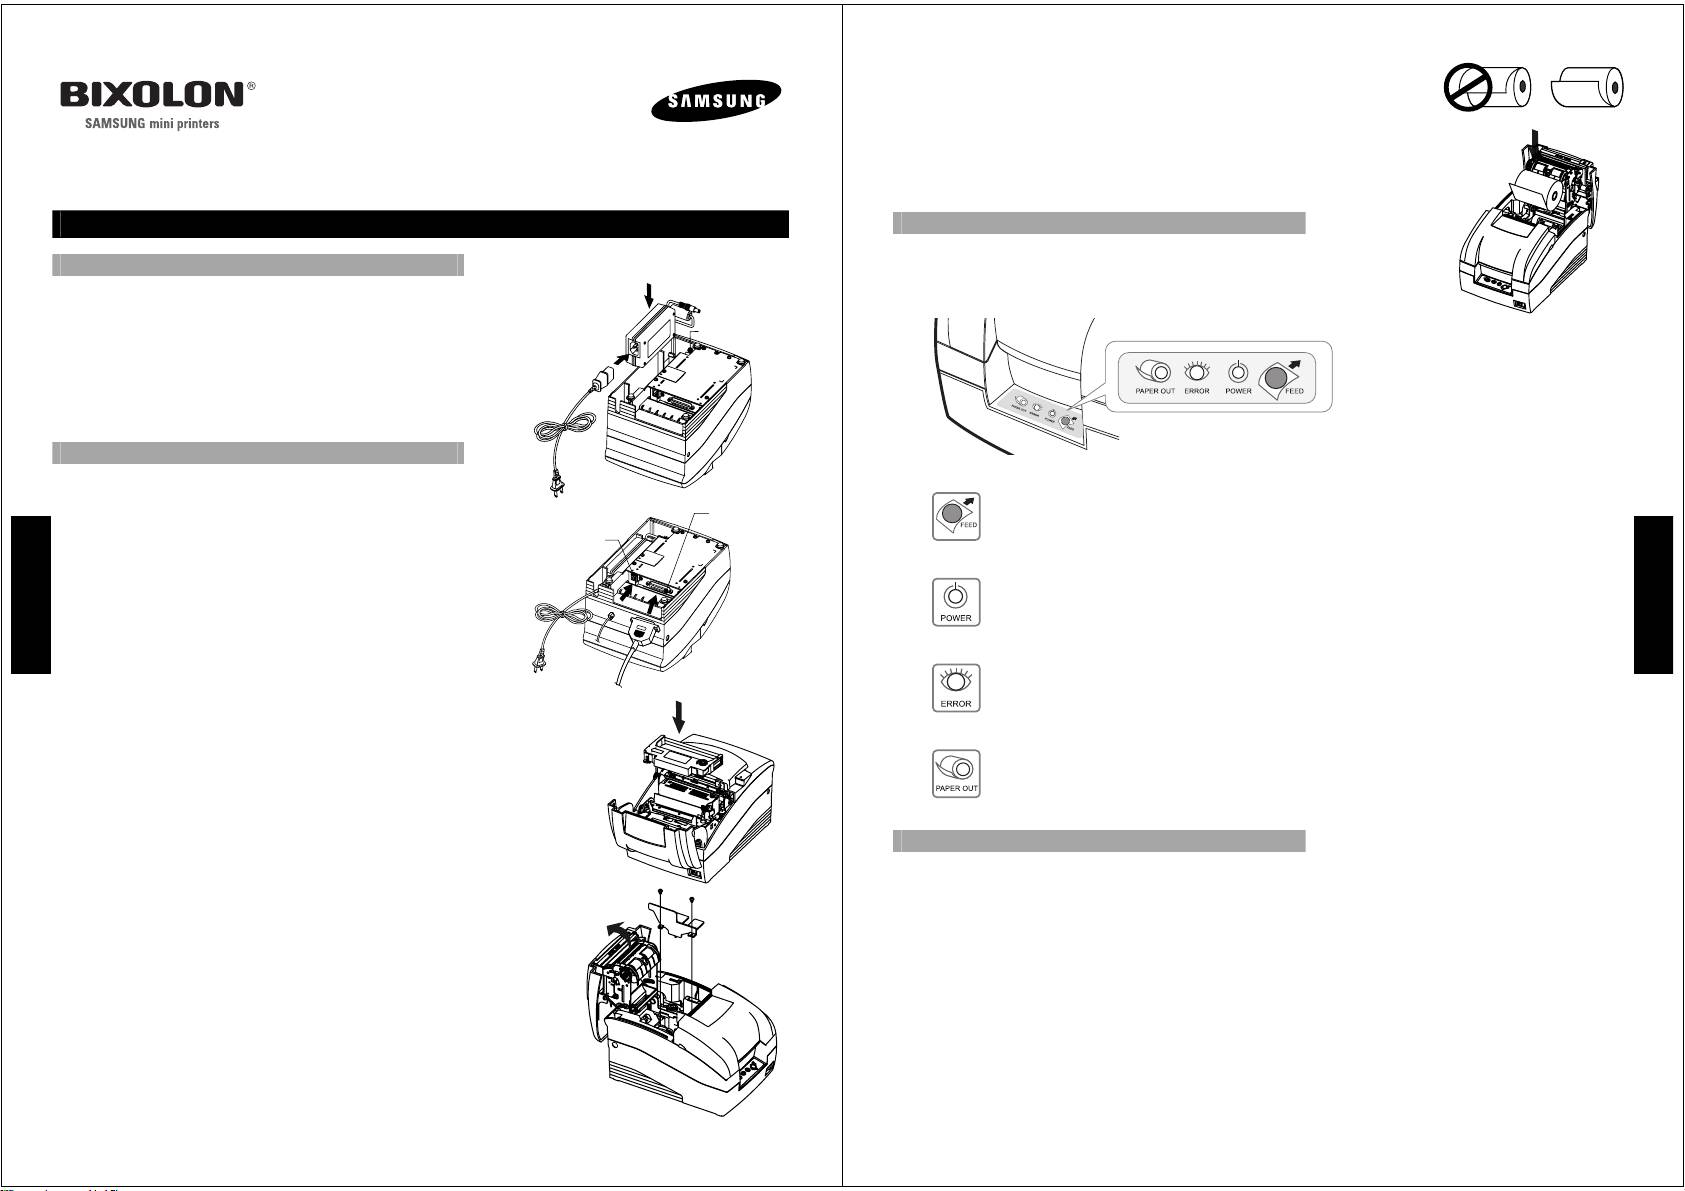
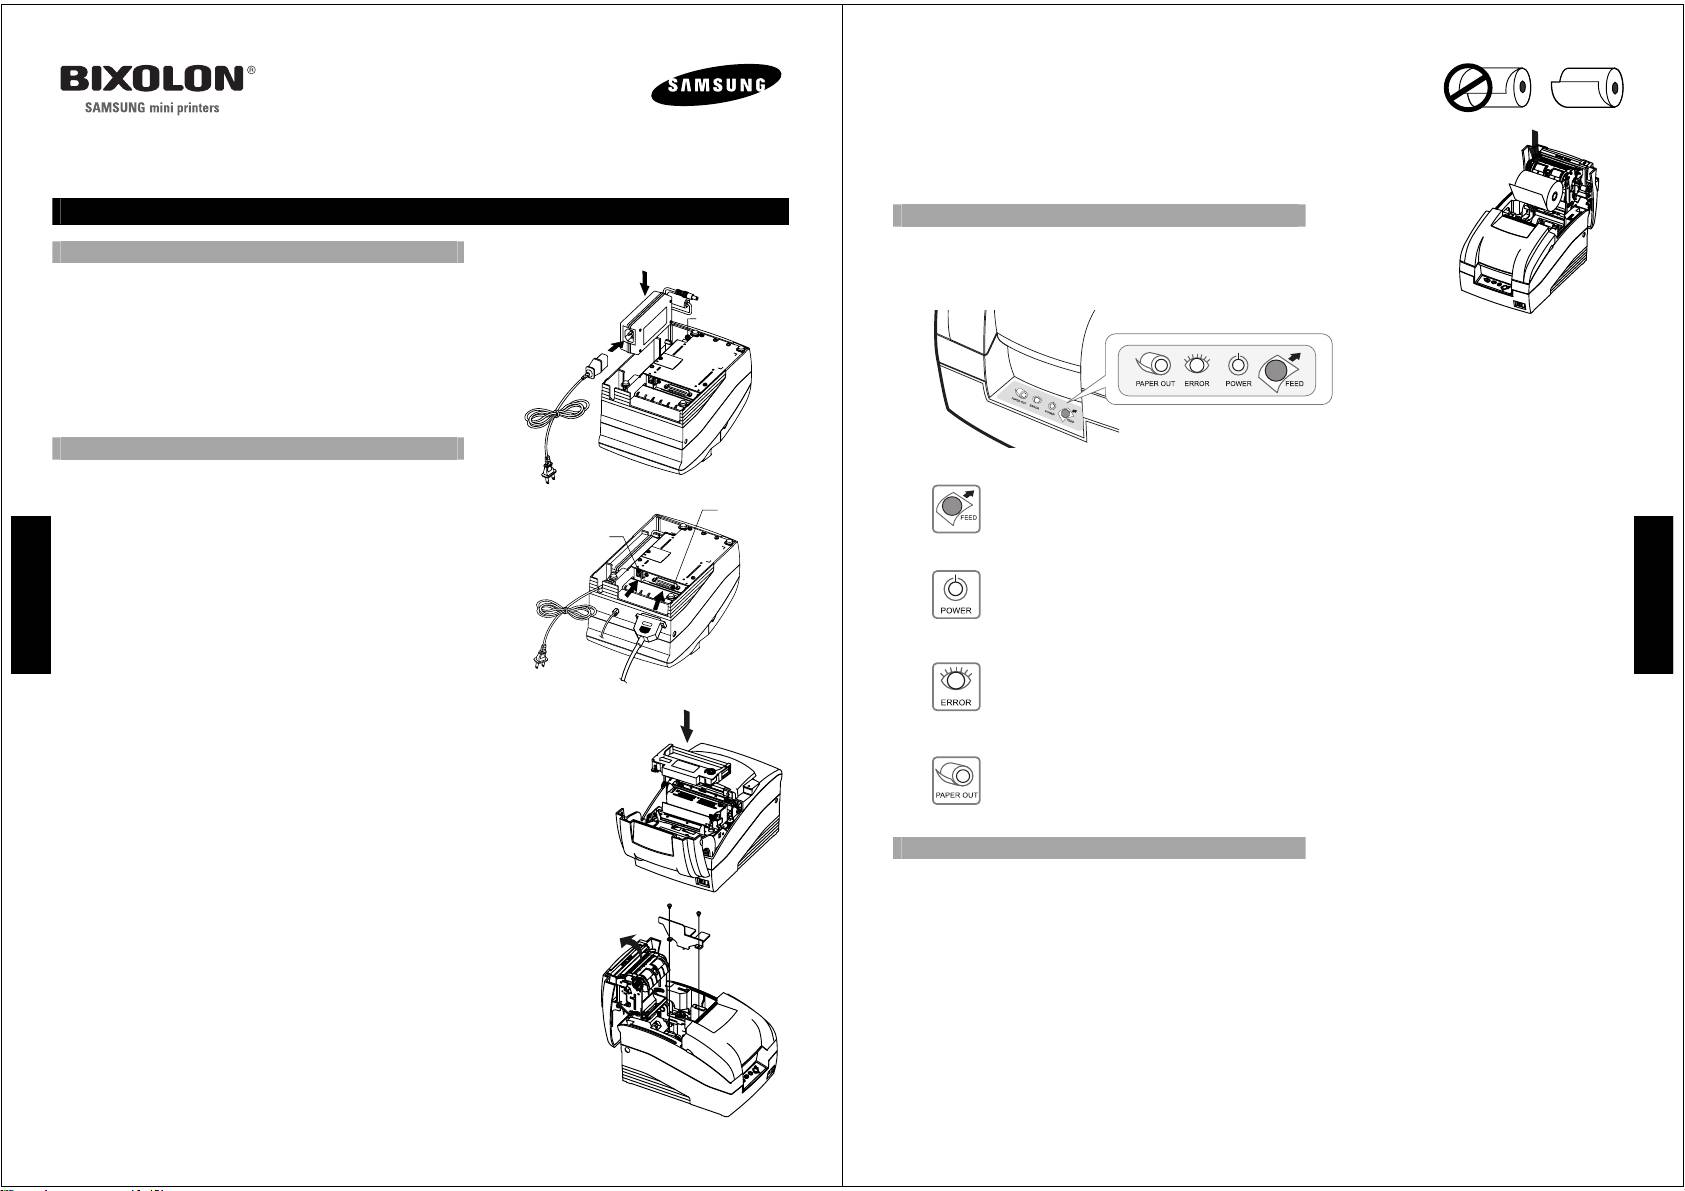
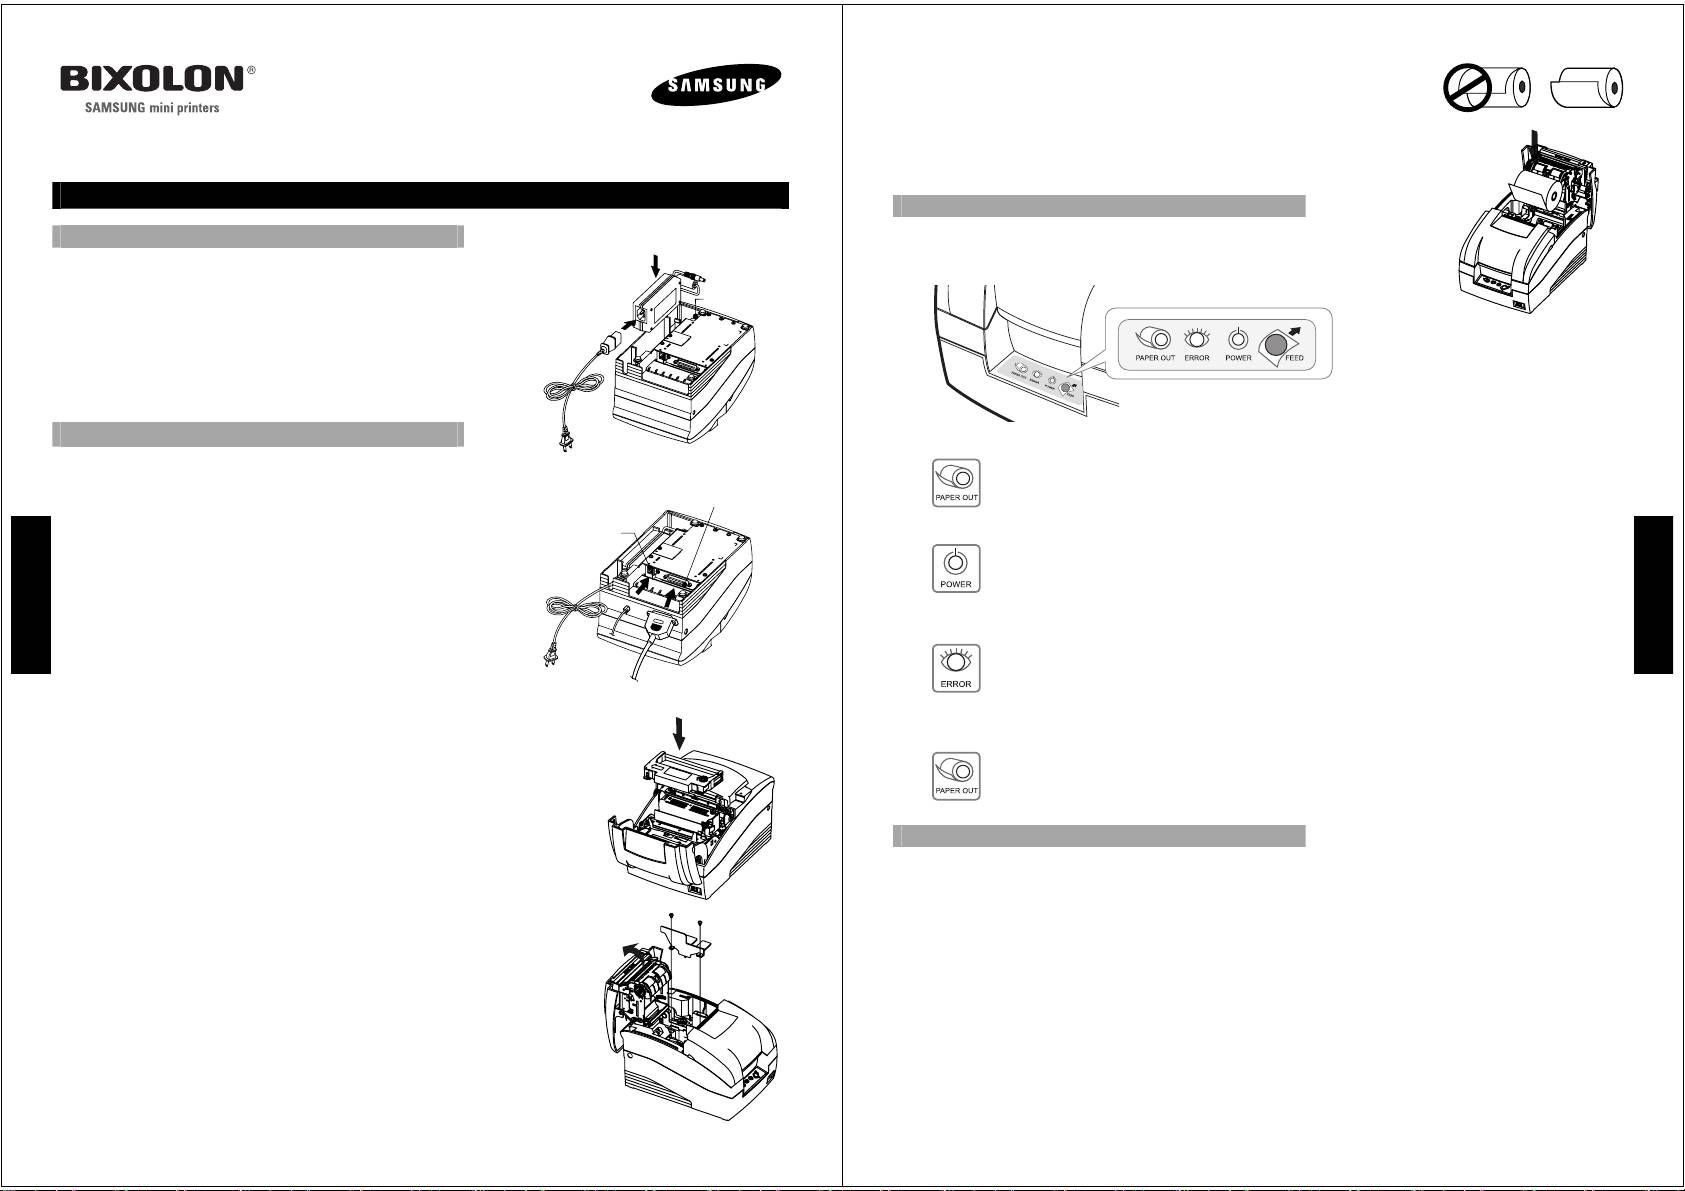
■ Loading New Paper Roll
1. Turn on the printer and open the rear cover by pressing open button.
2. Insert new paper roll.
Be sure to note the correct direction of the paper roll.
3. Pull out a small amount of paper, then close the cover and tear off the extra
paper by pulling it toward the front of the printer.
Quick Reference Guide
Impact printer SRP-275
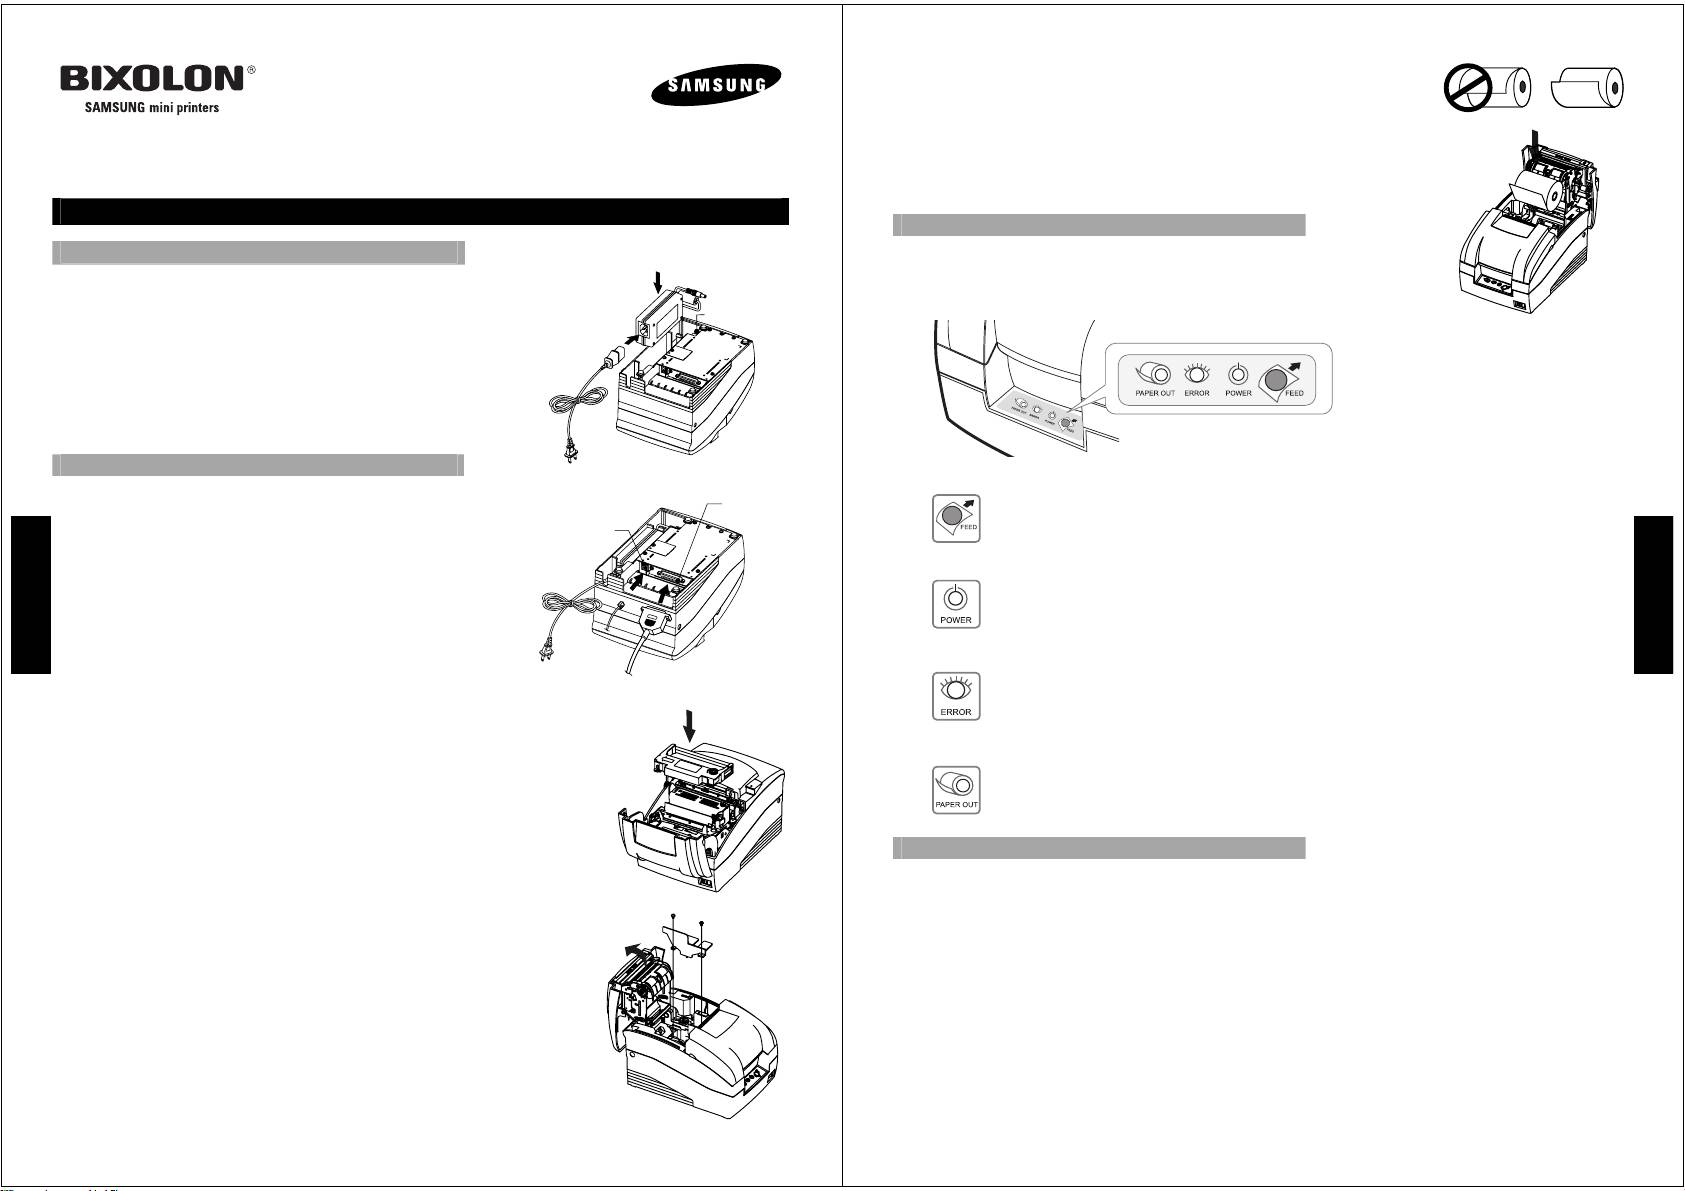
◈ Using the Operation Panel
◈ Check that all Items are Present
Most of the functions of this printer are governed by software, but
you can monitor the printer’s status by looking at the lights on the
AC Adaptor
The following items are packed in the box. If any items appear to have
control panel and for some procedures you will use the buttons.
shipping damage or are missing, please contact your dealer.
Power
connector
• Impact Printer SRP-275
• AC Adapter & Power Cord
• Ribbon Cassette
Power cord
• Paper Roll
• User’s Manual & Quick Reference Guide
◈ Startup Information
■ Feed Button
■ Connecting the Cables
Interface
1. Plug the AC adapter and power cord to the power connector of
connector
The feed button is used to feed paper or to start self test and for hexadecimal dump mode.
Drawer kick-out
the printer.
connector
(See the User’s manual)
E
2. Turn off printer and the host ECR(host computer).
E
n
3. Plug the interface cable(serial, parallel, USB or Ethernet) into the
■ Power Indicator Light (Green color)
n
g
interface connector on the printer then fasten the screw on both
g
This indicator light is on when the power is turned on. It blinks when the printer is in the self test
l
sides of the connector.
l
printing standby state. Always wait until this indicator light stops blinking before you start using the
i
4. Plug the drawer kick-out cable into the drawer kick-out connector
printer and before you turn it off.
i
s
on the printer.
s
h
Drawer kick-out
■ Error Indicator Light (Red color)
h
■ Installing the New Ribbon Cassette
cable
Serial/ Parallel/ USB/ Ethernet
Interface cable
When this indicator light is on(but not blinking), it means that the printer is out of paper or almost
1. Before inserting the ribbon cassette, turn the knob clockwise to
out of paper or the printer covers are open. When this light blinking, there is an error. If you see
prevent twisting the ribbon.
this light blinking, turn off the printer for a few seconds and then turn it back on. If the light is still
2. Open the front cover of printer.
blinking, call your supervisor or a service person.
3. Insert the new ribbon cassette as shown below and pay particular attention to the
■ Paper Indicator Light (Red color)
placement of the ribbon behind the Print Head.
4. During inserting the ribbon cassette, turn the knob clockwise again to make sure
the ribbon moves freely in the cassette.
When this indicator light is on, it means that the paper end. Replace the new paper roll.
5. Close front cover of printer
Note
Malfunctions and other problems may arise if other than specified ribbon
◈ Self Test
cassettes are used in the printer. The Warranty may be void if other than specified
ribbon cassettes are used. Contact your dealer or place of purchase for more
The self test lets you know if your printer is operating properly. It checks the print quality, ROM version, DIP switch
information about proper ribbon cassettes.
settings, memory switch settings and statistic data. The test is independent of any other equipment or software, so it
is a good idea to run it when you first set up the printer or if you have any trouble. If the self test works correctly, the
Screw(3x6)
■ Changing the paper width
problem is in the other equipment or the software, not the printer.
(2pieces)
1. Open the rear cover.
Frame paper
2. Remove the frame paper control by loosing the two screws(3×6).
control
■ Running the self test
1. Make sure the printer is turned off and the printer cover is closed properly.
3. Reattach the frame paper control in you want. (Insert and tighten two
screws(3×6) to reattach. See the instructions "1.7 Changing the paper width" in
2. While holding down the Feed button, turn on the printer and continue to hold until the paper begins to feed. The
User’s manual.)
self test prints the printer DIP switch settings and memory switch settings. And cuts the paper and pauses.
(The power light blinks.)
4. Close the rear cover.
3. Press the Feed button to continue printing the statistic data.
5. Change the Memory Switch setting for changing paper roll width. (See the
instructions "3.1 Setting the Memory Switches" in User’s manual.)
4. Press the Feed button to continue printing the rolling ASCII pattern.
5. The self test mode terminates after printing the rolling ASCII pattern automatically.
KN02-00008A Rev. 2.0
■ Loading New Paper Roll
1. Ouvrir le capot arrière en poussant sur le bouton d’ouverture.
2. Insérer le rouleau de papier tel qu’illustré.
3. Veuillez vérifier que le papier se déroule dans la bonne direction.
4. Tirer une petite quantité de papier comme illustré. Puis fermer le capot et
déchirer le papier supplémentaire en tirant vers le devant de l’imprimante.
Guide de démarrage rapide
Imprimante matricielle SRP-275
◈ Utilisation du panneau de contrôle
La plupart des fonctions de cette imprimante sont gouvernées par logiciel, mais
◈ Déballage de l’imprimante
vous pouvez surveiller l’évolution de l’imprimante en regardant les lumières du
La boîte de l’imprimante devrait contenir les articles. Si l’un des
Sortie secteur
panneau de contrôle et pour certaines procédures vous utiliserez les boutons.
articles était endommagé ou manquant, veuillez communiquer avec
votre revendeur.
Connexion
d’alimentation
• Imprimante matricielle SRP-275
• Sortie-secteur & Cordon d’alimentation
• Cartouche de ruban
Cordon
• Rouleau de papier
d’alimentation
• Guide de l’utilisateur & Références rapides
Configuration de l’imprimante ◈
■ Connexion des câbles
■ Touche FEED
1. Brancher le câble de la sortie secteur dans le connecteur
Connecteur
de
Utiliser ce bouton pour alimenter le papier, pour lancer l’autotest et pour le mode de vidage
d’alimentation de l’imprimante.
communication
hexadécimal.
F
2. Brancher le cordon d’alimentation dans la prise et mettre
Connexion tiroir dévidoir
F
r
l’imprimante sous tension.
r
a
3. Mettre l’imprimante et l’ordinateur hôte hors tension.
■ VOYANT LUMINEUX COURANT (Couleur verte)
a
n
4. Brancher le câble d’interface dans le connecteur d’interface de
Ce voyant est lumineux lorsqu’il y a du courant. Il clignote lorsque l’imprimante est en mode de
n
ç
l’imprimante puis serrer les vis de chaque côté du connecteur.
test automatique. Toujours attendre que la lumière du voyant arrête de clignoter avant d’utiliser ou
ç
a
5. Brancher le câble du tiroir dévidoir dans le connecteur du tiroir
d’éteindre l’imprimante.
a
i
dévidoir de l’imprimante.
i
s
Câble
■ VOYANT LUMINEUX ERREUR (Couleur rouge)
■ Installation de la cartouche de ruban
tiroir dévidoir
s
Lorsque ce voyant est allumé (mais ne clignote pas), cela signifie que l’imprimante manque de
1. Avant d’insérer la cartouche ruban, tourner la poignée dans le
Câble de communication
série/parallèle/UBS/Ethernet
papier, qu’elle est presque en manque de papier ou que le capot de l’imprimante n’est pas fermé.
sens des aiguilles d’une montre pour éviter que le ruban ne se
Lorsque ce voyant clignote, il y a une erreur.
tortille.
2. Ouvrir le capot avant de l’imprimante.
■ VOYANT LUMINEUX MANQUE DE PAPIER (Couleur rouge)
3. Insérer la nouvelle cartouche tel que montré tout en prêtant une attention
Lorsque le voyant lumineux est allumé, ceci signifie que la réserve de papier est presque vide.
particulière au positionnement du ruban derrière la tête d’impression.
Installer un nouveau rouleau de papier. Lorsque les voyants lumineux ERROR et PAPER OUT
4. Pendant l’insertion de la cartouche, tourner la poignée dans le sens des aiguilles
sont allumés ceci signifie que le rouleau de papier est fini.
pour vérifier la liberté de mouvement du ruban dans la cartouche.
5. Fermer le capot avant de l’imprimante.
REMARQUES
◈ Autotest
Des défauts de fonctionnement ou d’autres problèmes peuvent survenir si
d’autres cartouches de ruban que celles indiquées sont utilisées dans
L’autotest permet de déterminer si l’imprimante fonctionne correctement. Il vérifie la qualité d’impression, la version
l’imprimante. L’utilisation de cartouches de ruban autre que celles indiquées
ROM, les paramètres du commutateur DIP, les paramètres du commutateur mémoire et les données de statistique.
Vis (3x6) (2 pièces)
peut entraîner l’annulation de la garantie. Veuillez communiquer avec votre
Le test est indépendant de tout autre équipement ou logiciel, ce serait donc une bonne idée de l’exécuter lorsque
revendeur ou avec le magasin où s’est effectué l’achat pour plus de
Trame de
vous configurez l’imprimante ou si vous avez des problèmes. Si l’autotest fonctionne correctement, le problème se
renseignements sur les cartouches appropriées.
contrôle de papier
situe au niveau des autres appareils ou logiciels.
■ Modification de la largeur du papier
■ Effectuer un autotest
1. Ouvrir le capot arrière.
1. S’assurer que l’imprimante est hors tension et que le capot de l’imprimante est fermé.
2. Enlever la trame de contrôle de papier en dévissant les deux vis (3x6).
2. Tout en appuyant sur la touche FEED, mettre l’imprimante en marche et continuer d’appuyer jusqu’à ce que le
3. Si désiré, reposer la trame de contrôle de papier. (Insérer et serrer les deux
papier soit chargé. L’imprimante imprimera les paramètres du commutateur DIP et du commutateur de
vis (3x6)).
mémoire. Elle coupera le papier et s’arrêtera. (Le voyant de courant clignotera.)
4. Fermer le capot arrière.
3. Appuyer sur la touche FEED pour poursuivre l’impression des données de statistiques.
5. Modifier le réglage du commutateur de carte mémoire pour changer la
4. Appuyer sur la touche FEED pour poursuivre l’impression du roulement du code ASCII.
largeur du rouleau de papier. (Consulter les directives « 3.1 Réglages des
commutateurs carte mémoire » (3.1) au Guide de l’utilisateur.)
5. Le mode autotest s’interrompt automatiquement après l’impression du code ASCII.
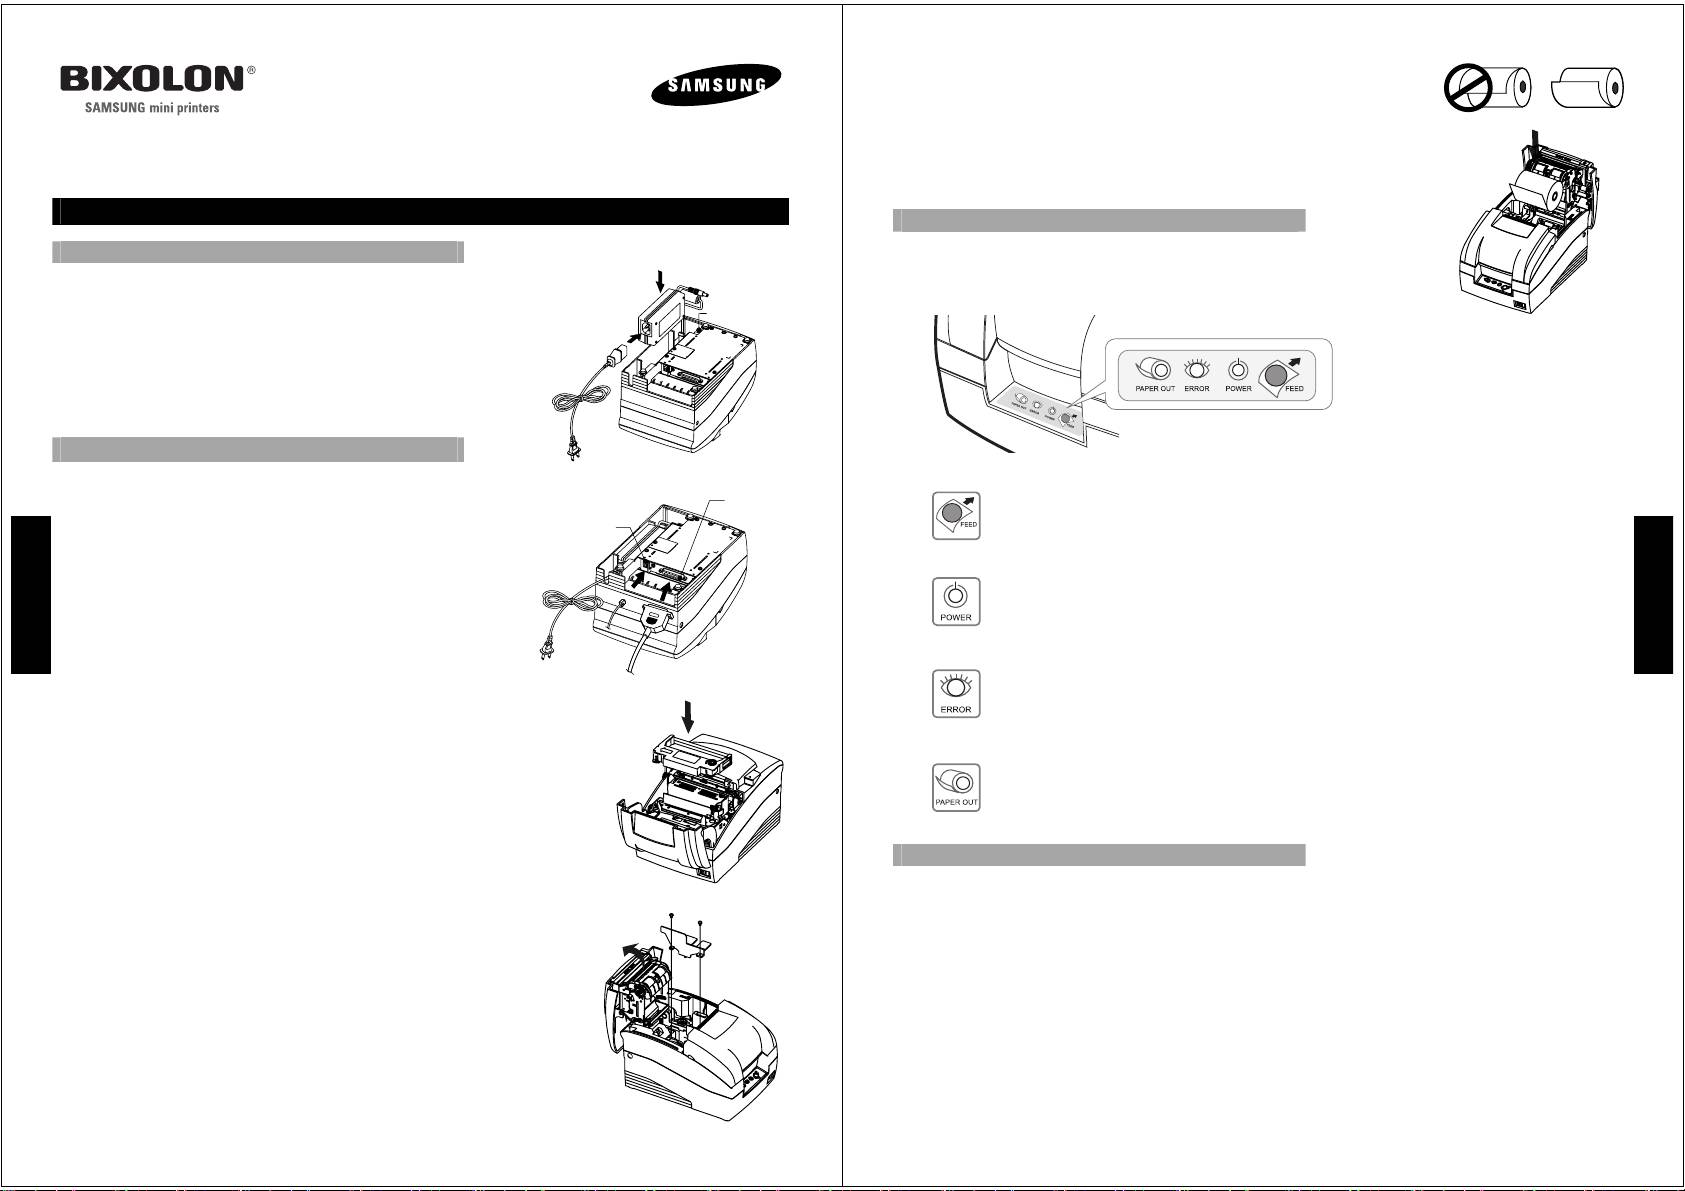
■ Instalación de un nuevo rollo de papel.
1. Encienda la impresora y abra la tapa posterior pulsando el botón de apertura e
impulse hacia atrás en la dirección de la flecha.
2. Coloque el nuevo rollo de papel.
Asegúrese de colocarlo en la dirección correcta..
3. Saque una pequeña porción de papel, luego cierre la tapa y rasgue el papel
Guía de Referencia Rápida
sobrante tirando hacia el frontal de la impresora.
Impresora matricial SRP-275
◈ Panel de Operación
◈ Verificación de los accesorios
La mayoría de funciones de esta impresora se regulan mediante software, pero Vd.
Adaptador AC
Puede controlar el estado de la impresora observando las luces en el panel de
La caja de la impresora debería incluir los siguientes accesorios. Si
control y para algunos procedimientos deberá utilizar los botones
alguno de ellos está dañado o no se encuentra, por favor, contacte con
Conector
su distribuidor para asistencia.
Corriente
• Impresora matricial SRP-275
• Adaptador AC y Cable de Corriente
Cable Corriente
• Casete de Cinta
• Rollo de Papel
• Manual de usuario y Guía de Referencia Rápida
◈ Preparación de la impresora
■ Botón de Avance (Feed)
Conector
■ Conexión de los Cables
Interface
El botón de avance se utiliza para avanzar el papel o para iniciar el autochequeo y para el modo
Conector
1. Enchufe el adaptador AC y el cable de corriente al conector de
Salida
de volcado hexadecimal (Ver el Manual de usuario).
corriente de la impresora.
Cajón
E
E
s
2. Apague la Impresora y la Registradora (PC).
s
■ Luz Indicadora de Corriente (Color verde)
p
3. Enchufe el cable interfaz (Serie, Paralelo, USB o Ethernet) al
p
Esta luz está activada cuando se enciende la máquina. Parpadea cuando la impresora se
a
conector de interfaz en la impresora. Apretar los tornillos a
a
encuentra en autochequeo de impresión. Esperar siempre a que deje de parpadear antes de
ñ
ambos lados del conector.
ñ
4. Enchufe el cable de apertura del cajón en el conector de apertura
comenzar a utilizar la impresora y antes de apagarla.
o
o
l
de cajón de la impresora.
Cable Salida
l
■ Luz indicadora de Error (Color rojo)
Cajón
Cable Interfaz/Serie/Paralelo
■ Instalación de un Casete de Cinta nuevo
USB/Ethernet
Cuando está luz está encendida ( pero sin parpadear), significa que la impresora está sin papel o
casi sin papel o que la tapa de la impresora está abierta. Cuando parpadea, significa que hay un
1. Antes de introducir el casete, girar el botón a la derecha para evitar que se doble
error. En este caso, apague la impresora durante unos segundos y vuelva a encender. Si la luz
la cinta.
todavía parpadea contacte al distribuidor.
2. Abra la tapa frontal de la impresora y saque el casete de cinta viejo.
3. Inserte el nuevo casete de cinta como indica la figura poniendo especial atención
■ Luz Indicadora del Papel (Color rojo)
en colocar la cinta detrás del cabezal de la impresora.
4. Gire de nuevo el botón a la derecha para asegurarse que la cinta se mueve
Cuando está luz está encendida, significa el final del papel. Sustituir el rollo de papel..
libremente en el casete.
5. Cierre la tapa de la impresora
Nota
◈ Autochequeo
Si se utiliza un casete distinto del especificado para la impresora, puede
El autochequeo le permite conocer si su impresora opera correctamente. Verifica la calidad de la impresión,
ocurrir mal funcionamiento y otros problemas. También puede quedar
versión del ROM, , ajustes de Microinterruptores DIP, del Microinterruptor de Memoria y datos estadísticos.
anulada la garantía. Contacte al distribuidor para más información sobre
Tornillos (3x6)
los casetes de cinta adecuados que se deben utilizar.
Tla prueba es independiente de cualquier otro equipo o software, por lo tanto, es buena idea realizarla cuando
(2piezas)
instale por primera vez la impresora o si tiene algún problema. Si el resultado del autochequeo es correcto, el
■ Cambio de la anchura del papel
Control
problema está en el otro equipo o en el software, no en la impresora.
Anchura
del Papel
1. Abra la tapa posterior.
■ Realizando el autochequeo
2. Retire la pieza selección tamaño del papel aflojando los dos tornillos (3X6).
1. Asegúrese de que la impresora está apagada y la tapa correctamente cerrada.
3. Ajuste la pieza a la posición deseada y apriete los dos tornillos (3x6). Ver
2. Mientras mantiene pulsado el botón de Avance, encienda la impresora y continúe pulsando hasta que el papel
instrucciones “1.7 Cambio de la anchura del papel” en el Manual de usuario.
comienza a avanzar. El autochequeo imprime los ajustes del microinterruptor DIP y de Memoria. Corta el
4. Cierre la tapa posterior.
papel y se para. (La luz de corriente parpadea).
5. Cambiar el ajuste del Microinterruptor de Memoria para el cambio de anchura
3. Pulse el botón de Avance para continuar imprimiendo los datos estadísticos.
del rollo de papel. (Ver las instrucciones “3.1 Ajuste de los Microinterruptores
4. Pulse el botón de Avance para continuar imprimiendo el formato ASCII.
de Memoria” en el Manual de usuario).
5. Después de imprimir el formato ASCII el modo de autochequeo termina automáticamente.
Guia de Referência Rápida
Mecanismo matricial SRP-275
Verifique se recebeu todos os itens◈
Adaptador CA
A embalagem contém os itens seguintes. Se alguns deles faltarem
ou parecerem ter sido danificados durante o transporte, queira
Conector de
contactar o seu revendedor.
Alimentação
energia
• Mecanismo matricial SRP-275
• Adaptador CA e cabo de alimentação de energia
Cabo
• Cassete de fita
alimenção
• Rolo de papel
• Manual de usuário e Guia de referência rápida
◈ Informações básicas
■ Ligação dos cabos
1. Ligue o adaptador CA e o cabo de alimentação de energia ao
Conector
conector de alimentação de energia da impressora.
alimentação
Conector de abertura
P
2. Desactive a impressora e a CRE anfitriã (computador anfitrião).
de gaveta
o
3. Ligue o cabo de interface (série, paralela, USB ou Ethernet) ao
r
conector de interface da impressora e, em seguida, aperte o
t
parafuso de ambos os lados do conector.
u
4. Ligue o cabo de abertura de gaveta ao conector de abertura da
g
gaveta da impressora.
u
ê
■ Instalação da cassete de fita nova
Cabo
de abertura
1. Antes de introduzir a cassete de fita, rode o botão no sentido dos
de gaveta
Cabo de interface Série
ponteiros do relógio para evitar que a fita fique torcida.
/ Paralela/ USB/ Ethernet
2. Abra a cobertura dianteira da impressora e retire a cassete de fita
velha.
3. Insira a cassete de fita nova conforme indicado abaixo, prestando especial
atenção à colocação da fita por detrás da cabeça de impressão.
4. Durante a introdução da cassete de fita, volte a rodar o botão no sentido dos
ponteiros do relógio para se certificar de que a fita se move livremente dentro da
cassete.
5. Feche a cobertura dianteira da impressora.
Nota
Podem verificar-se avarias e outros problemas se se utilizarem cassetes de fita
diferentes das especificadas na impressora. A garantia pode ser anulada se se
utilizarem cassetes de fita diferentes das especificadas. Contacte o seu
revendedor ou o estabelecimento onde adquiriu a impressora para mais
Parafuso(3x6)
informações sobre as cassetes de fita adequadas.
(2unidades)
Guia de Papel
■ Alterar a largura do papel
1. Abra a cobertura traseira.
2. Remova a guia de papel desapertando os dois parafusos (3x6).
3. Instale a guia de papel pretendida. (Introduza-a e aperte dois parafusos (3x6)
para a fixar. Veja as instruções “1.7 Alterar a largura do papel” no Manual de
usuário.)
4. Feche a cobertura traseira.
5. Altere a definição do interruptor Memory relativa à largura do rolo de papel.
(Veja as instruções “3.1 Definir os interruptores Memory” no Manual de
usuário.)
s
■ Colocar rolo de papel novo
1. Ligue a impressora e abra a cobertura traseira premindo o botão de abertura.
2. Introduza o rolo de papel novo.
Atente na direcção correcta do rolo de papel.
3. Puxe para fora uma pequena porção de papel e, em seguida, feche a cobertura
e destaque o papel desnecessário puxando-o na direcção da parte da frente da
impressora.
◈ Utilizar o painel de operações
A maior parte das funções da impressora são controladas por software, mas
poderá monitorizar o seu estado por meio das luzes do painel de controlo e, para
algumas operações, poderá utilizar os botões.
■ Botão FEED
O botão FEED é utilizado para fazer avançar o papel, para iniciar o autoteste e para o modo de
saída hexadecimal.
(Veja o manual de usuário.)
■ Indicador POWER (cor verde)
A luz deste indicador acende-se quando a alimentação de energia está ligada e pisca quando a
impressora se encontra em modo de espera de impressão de autoteste. Aguarde sempre que ela
pare de piscar antes de começar a utilizar a impressora e antes de a desligar.
■ Indicador ERROR (cor vermelha)
Quando a luz deste indicador acende-se(mas não piscando), significa que falta papel ou está
quase sem papel, ou as coberturas estão abertas. Quando esta luz pisca, existe um erro. Nesse
caso, desligue a impressora durante alguns segundos e volte a ligá-la. Se a luz continuar a
piscar, chame o seu supervisor ou um técnico de manutenção.
■ Indicador de papel (cor vermelha)
Quando a luz deste indicador se acende, o papel acabou. Coloque um rolo de papel novo.
◈ Autoteste
O autoteste permite-lhe saber se a sua impressora está a funcionar correctamente. Verifica a qualidade de
impressão, a versão ROM, as definições do interruptor DIP, as definições do interruptor Memory e os dados
estatísticos. Este teste é independente de qualquer outro equipamento ou software, pelo que é aconselhável fazê-
lo quando se prepara a impressora pela primeira vez ou se encontra alguma dificuldade. Se o autoteste funcionar
correctamente, o problema reside no outro equipamento ou no software, e não na impressora.
■ Execução do autoteste
1. Certifique-se de que a impressora está desligada e de que a respectiva tampa está bem fechada.
2. Enquanto mantém premido o botão FEED, ligue a impressora. Continue a premir o botão até o papel começar a
avançar. O autoteste imprime as definições do interruptor DIP e do interruptor Memory da impressora, corta o
papel e suspende-se. (A luz de alimentação de energia pisca.)
3. Prima o botão FEED para continuar a imprimir os dados estatísticos.
4. Prima o botão FEED para continuar a imprimir o padrão ASCII rolante.
5. O modo de autoteste termina após a impressão automática do padrão ASCII rolante.
P
o
r
t
u
g
u
ê
s

■ 롤 용지 설치
1. 열림 버튼을 밀어 뒷면 커버를 엽니다.
2. 새로운 롤 용지를 삽입합니다. 용지가 롤 용지에서 공급되어야 하는 올바른
방향을 알아 두십시오.
3. 그림과 같이 약간의 용지를 당깁니다. 그런 다음, 뒷면 커버를 닫고 여분의
시작안내서
용지는 프린터 앞면으로 잡아 당겨 찢어냅니다.
임팩트 프린터 SRP-275
◈ 조작부 사용
◈ 내용물 확인
대부분의 프린터 기능은 소프트웨어로 작동되지만 조작부에 있는 표시등을 통해
AC 어댑터
프린터 상태를 확인하고 상태에 따라 사용할 버튼을 결정할 수 있습니다.
다음 품목이 포장된 박스에 모두 포함되어 있는지 확인한 후, 운송 중
손상되었거나 빠진 품목이 있으면 구매한 곳에 문의 하십시오.
전원 커넥터
• 임팩트 프린터 SRP-275
• AC 어댑터 & 전원 코드
• 리본 카세트
전원 코드
용지없음 오류
전원 이송
• 롤 용지
• 사용설명서 & 시작안내서
◈ 사용전 준비
■ 이송 버튼
■ 케이블 연결
인터페이스
커넥터
용지를 공급하거나 자가 진단을 시작하거나 16 진수 덤프 모드에서 사용합니다.
1. AC 어댑터와 전원 코드를 프린터의 전원 커넥터에 연결하십시오.
드로어 킥아웃 커넥터
이송
(사용설명서 참조)
2. 프린터와 ECR(호스트 컴퓨터)을 끕니다.
3. 프린터에 있는 인터페이스 커넥터에 인터페이스 케이블(직렬,
■ 전원 표시등 (녹색)
병렬, USB 또는 이더넷)을 연결한 다음, 커넥터 양쪽을 나사로
한
조입니다.
프린터 전원을 켜면 이 표시등이 켜집니다. 자가 진단 인쇄를 위한 대기 상태일 경우 이
한
전원
표시등이 깜박입니다. 표시등이 깜박일 때 프린터를 사용하거나 전원을 끄지 마십시오.
4. 프린터에 있는 드로어 킥아웃 커넥터에 드로어 킥아웃 케이블을
글
글
연결합니다.
드로어 킥아웃
케이블
■ 오류 표시등 (적색)
직렬/ 병렬/ USB/ 이더넷
■ 리본 카세트 설치
인터페이스 케이블
표시등이 깜박이지 않고 켜져 있으면 용지가 없거나 프린터 뒷면커버가 열려 있을 수
1. 리본 카세트를 삽입하기 전, 리본의 꼬임을 방지하기 위하여
있습니다. 표시등이 깜박이면 오류가 있음을 나타내는 것이므로 표시등이 깜박이면 잠시
손잡이를 시계 방향으로 돌립니다.
오류
프린터를 껐다 켭니다. (사용설명서“2.1 오류 표시등 깜빡임 패턴”를 참조하십시오.)
표시등이 계속 깜박이면 관리자나 서비스 기사에게 문의하십시오.
2. 프린터의 앞면 커버를 열고 사용한 리본 카세트가 있다면 꺼내십시오.
3. 그림과 같이 리본 카세트를 삽입하고 프린터 헤드 뒤에 리본이 장착되도록 각별한
■ 용지없음 표시등 (적색)
주의를 기울이십시오.
표시등이 켜져 있으면 용지가 거의 없음을 의미합니다. 새 롤 용지로 교체하십시오. 오류
4. 리본 카세트를 삽입하는 동안 리본이 카세트 안에서 자유롭게 움직일 수 있도록
표시등과 용지없음 표시등이 동시에 켜져 있으면 용지가 없거나 다 사용하였음을 의미합니
하기 위해 손잡이를 다시 한 번 시계 방향으로 돌립니다.
용지없음
다. 새 롤 용지로 교체하십시오. (사용설명서“1.5 롤 용지 설치”를 참조하십시오.)
5. 프린터 앞면 커버를 닫습니다.
※ 참고
◈ 자가 진단
지정 리본 카세트를 프린터에 사용하지 않을 경우 오작동 및 다른 문제가
발생할 수 있습니다. 지정 리본 카세트를 사용하지 않았을 경우 보증 수리를
자가 진단을 통해 프린터가 제대로 작동되고 있는지 확인할 수 있습니다. 자가 진단으로 제어 회로, 프린터
받을 수 없을 수도 있습니다. 적당한 리본 카세트에 대한 자세한 정보는
메커니즘, 인쇄 품질, ROM 버전, DIP 설정을 확인합니다. 자가 진단은 다른 장치나 소프트웨어와는
판매자나 구입한 곳에 문의하십시오.
스크류(3x6) 2개
독립적으로 실행되므로 프린터를 처음 설정하거나 문제가 있을 경우 자가 진단을 실행하는 것이 좋습니다.
프레임 페이퍼
자가 진단 결과, 프린터에 문제가 없을 경우 다른 장치나 소프트웨어를 살펴 보십시오.
■ 용지 폭 변경
컨트롤
1. 뒷면 커버를 엽니다.
■ 자가 진단 실행
2. 두 개의 나사를 풀어 프레임 페이퍼 컨트롤을 분리합니다.
1. 프린터 전원을 끄고 프린터 커버를 닫습니다.
3. 원하는 위치에 프레임 페이퍼 컨트롤을 놓고 두 개의 나사를 다시 조입니다.
2. 이송 버튼을 누르면서 전원을 켜고 버튼을 놓으면 급지가 시작됩니다. 자가 진단이 실행되고 프린터 설정이
(사용자설명서의 “1.7 용지 폭 변경”을 참조하세요.)
인쇄됩니다. 테스트 중 용지를 자르고 인쇄가 중지됩니다. (전원 표시등이 깜박입니다.)
4. 뒷면 커버를 닫습니다.
3. 통계 데이터를 인쇄하려면 이송 버튼을 누릅니다.
5. 용지 폭 변경을 마무리 하기 위해 메모리 스위치 설정을 바꾸십시오. (메모리
4. 롤링 ASCII 패턴을 인쇄하려면 이송 버튼을 누릅니다.
스위치 설정에 관련된 내용은 사용자설명서의 “3.1 메모리 스위치 설정”을
참조하십시오.)
5. 롤링 ASCII 패턴이 인쇄되면 자가 진단 모드가 자동으로 종료됩니다.
KN02-00008B Rev. 2.0

■ 装入新的卷纸
1. 打开打印机,按住打开按钮打开后盖。
2. 插入新的卷纸。
一定注意纸张卷的方向要正确。
3. 拔出少量纸张,然后关闭机盖,将多余的纸张拉到打印机的前面撕掉。
快速参考指南
针式打印机 SRP-275
◈ 使用操作面板
◈ 检查所有的物品是否完好
打印机的大多数功能都通过软件进行控制。但是查看控制面板上的指示灯,可以了解
交流电适配器
打印机的状态,并通过这些按钮执行一些操作。
包装盒中包括下列物品。如果出现毁坏或丢失,请与经销商联系。
• 针式打印机 SRP-275
电源连接器
• 交流整流器和电源线
• 色带盒
• 卷纸
电缆线
无打印纸 错误 电源
进纸
• 用户使用手册和快速参考指南
◈ 启动信息
■ 供纸按钮
■ 连接电缆
界面连接器
该按钮用于供纸或启动自检和十六进制转储方式。
1. 将交流整流器和电源线插入打印机的电源连接器。
钱箱打开连接器
进纸
(请参见用户使用手册)
中
2. 关闭打印机和主机 ECR(主计算机)。
中
■ 电源指示灯(绿色)
3. 插入接口电缆(串行、并行、USB 或者 Ethernet)到打印机上的
國
國
接口连接器,然后拧紧连接器两端的螺丝。
打开电源时,该指示灯发光。闪烁时表示打印机处于自检打印备用状态。始终记住,要在该指示灯
語
电源
停止闪烁后,才可以开始使用打印机,或者关闭打印机。
4. 将抽屉推出电缆插入打印机上的抽屉连接器。
語
钱箱打开电缆
■ 安装新的色带盒
■ 错误指示灯(红色)
串口/并口/USB/以太网界面电缆
该指示灯发光(而不是闪烁)时,表示打印机中无纸或纸张差不多快用完了或打印机盖打开了。该
1. 在插入色带盒之前,顺时针方向转动旋钮,以免出现色带缠绕。
指示灯闪烁时,表示出现了错误。如果看见该指示灯闪烁,请关闭打印机几秒钟,然后重新打开。
错误
2. 打开打印机的前盖,取出旧的色带盒。
如果指示灯仍在闪烁,请电话联系管理人员或服务人员。
3. 按照图示插入新的色带盒,并特别注意打印头后的色带位置。
■ 纸张指示灯(红色)
4. 在插入色带盒时,请再次顺时针方向转动旋钮,确保色带盒中的色带可以移动自
如。
该指示灯发光时,表示快到纸张末端了。请换上新的卷纸。
无打印纸
5. 关闭打印机的前盖。
注意
◈ 自检
如果打印机中使用了非指定的色带盒,则可能会出现故障及其它问题。如果使用
了非指定的色带盒,将无法享受保修服务。有关使用正确色带盒的更多信息,请
通过自检可以了解打印机的运行是否正常。它会检查打印质量、ROM 版本、选项开关(DIP 开关)设置、存储开关设置
联系您的经销商或销售商。
和统计数据。自检与其它任何设备或软件无关,因此,建议在首次安装打印机或出现任何故障时运行自检。如果自检
螺钉 2
个
(3
×
6)
运行无误,则表示问题出现在其它设备或软件上,与打印机无关。
■ 更改纸张宽度
机架纸张控
■ 运行自检
1. 打开后盖。
1. 确定已关闭打印机,且已正确地盖上打印机盖。
2. 松开两个螺钉(3×6),取下纸张机架控件。
2. 按住供纸按钮的同时打开打印机,并继续按住供纸按钮直到开始供纸。自检会打印出打印机的 选项开关(DIP 开
3. 如果需要,可重新装上纸张机架控件。(插入后,上紧两个螺钉(3×6)即可重
关)设置和存储开关设置。并在切开纸张后暂停。(电源指示灯闪烁。)
新装上控件。请参见用户使用手册“1.7 更改纸张宽度”中的说明。)
3. 按住供纸按钮继续打印统计数据。
4. 关闭后盖。
4. 按住供纸按钮继续打印滚动的 ASCII 样式。
5. 在打印了滚动的 ASCII 样式后,会自动停止自检方式。
5. 更改内存开关设置,从而更改卷纸宽度。(请参见用户使用手册“3.1 设置内存
开关”中的指导。)
■ Установка рулона бумаги
1. Нажатием кнопки откройте заднюю крышку и откиньте ее в направлении,
указываемом стрелкой.
2. Вставьте новый рулон, как показано на рисунке. Убедитесь, что рулон
вставлен правильно – бумага должна идти из-под рулона.
3. Вытяните небольшой кусочек ленты, как показано на рисунке. Закройте
Cправочное Pуководство
крышку и оторвите излишек бумаги, потянув его на себя.
Mатричный принтер SRP-275
◈ Панель управления
Большинство функций принтера задаются программно, но вы можете следить
◈ Проверте наличие всего перечня
за состоянием принтера по индикаторам на панели управления, и для
Сетевой адаптер
выполнения некоторых функций вы будете пользоваться кнопками.
Cледующий перечень упакован в коробку. Если какие-то из них
отсутствуют или повреждены, обратитесь к продавцу.
Разъем питания
• Mатричный принтер SRP-275
• Cетевой адаптер, Шнур питания
• Картридж с красящей лентой
• Pулон бумаги
Сетевой шнур
• Pуководство пользователя, справочное руководство
◈ Подготовка к эксплуатации
■ КНОПКА ПРОГОНА БУМАГИ
■ Подключение и установка
Она служит для прогона бумаги вперед или для начала автотестирования, а также в
1. Перед установкой сетевого адаптера подключите шнур
режиме выдачи шестнадцатеричных данных.
Интерфейсный разъем
питания. Шнур сетевого адаптера подключите к разъему
питания принтера.
Pазъем выдвижного
кассового ящика
■ ЗЕЛЕНЫЙ ИНДИКАТОР "СЕТЬ"
Р
2. Вставьте шнур интерфейса в разъем интерфейса принтера и
Р
Он светится, когда включено электропитание, мигает, когда принтер находится в режиме
у
затяните винты с двух сторон разъема.
у
готовности к распечатке автотеста. Не начинайте пользоваться принтером и не выключайте
с
3. Вставьте шнур интерфейса в разъем интерфейса принтера и
с
его, пока этот индикатор мигает. Дождитесь, когда он перестанет мигать.
с
затяните винты с двух сторон разъема.
с
к
4. Вставьте шнур управления денежным ящиком в
■ КРАСНЫЙ ИНДИКАТОР НЕПОЛАДОК
к
и
соответствующий разъем принтера.
и
Если он светится, не мигая, значит, в принтере кончилась бумага (совсем или почти), или
й
Kабель выдвижного
й
открыта одна из его крышек. Если он мигает - в принтере неполадка. См. раздел 2,
■ Установка картриджа с красящей лентой
кассового ящика
параграфа 2.1 "Расшифровка миганий индикатора неполадок". Попробуйте выключить
Последовательный/параллельный/
1. Чтобы красящая лента не перекрутилась, перед установкой
USB/Ethernet интерфейсный кабель
принтер и через несколько секунд снова включить. Если индикатор продолжает мигать,
картриджа поверните его маховичок по часовой стрелке.
позовите системного администратора или обратитесь в ЦТО
2. Откройте переднюю крышку принтера.
■ КРАСНЫЙ ИНДИКАТОР "ЗАКАНЧИВАЕТСЯ БУМАГА"
3. Вставьте новый картридж как показано на рисунке. Внимание: не забудьте
завести ленту за печатающую головку.
Его свечение означает, что бумага заканчивается. Установите новый рулон бумаги. Если
светятся одновременно два индикатора "закончилась бумага" и индикатор неполадок,
4. Вставляя картридж, снова проверните маховичок по часовой стрелке,
значит, бумага закончилась. Как установить новый рулон - см. параграф 1.5, раздел 1
чтобы убедиться, что лента в нем свободно двигается.
"Установка рулона бумаги".
5. Закройте переднюю крышку принтера.
ПРИМЕЧАНИЯ
◈ Автотест
Применение иных, чем указанные, картриджей с красящей лентой, может
Самотестирование позволяет проверить исправность принтера. При этом проверяется качество печати,
вызвать сбои в работе принтера и привести к утрате права на гарантийный
версия ROM, положение двухрядных (DIP) переключателей, положение переключателя памяти,
ремонт. Узнайте у продавца, какие картриджи можно применять.
распечатывается статистика. Этот тест не зависит от наличия какого-либо иного оборудования или
программного обеспечения, поэтому желательно выполнить его при первом включении принтера и в случае
■ Переключение на работу с бумагой другой ширины
2 Винта
(3x6)
сомнений в его исправности. Если автотест выполнен правильно, значит неполадка не в принтере, а в
1. Откройте заднюю крышку.
другом оборудовании или в программном обеспечении.
Рамку
2. Выньте рамку бумагодержателя, открутив два винта (3×6).
бумагодержателя
■ Как выполнить автотест
3. Установите рамку бумагодержателя нужного вам размера, закрутив два
1. Принтер должен быть выключен, а его крышка надежно закрыта.
винта (3×6).
2. Нажмите клавишу подачи бумаги (FEED). Удерживая ее в нажатом положении, включите принтер.
4. Закройте заднюю крышку.
Продолжайте держать клавишу прогона бумаги (FEED) пока бумажная лента не начнет двигаться
5. Установите переключатель памяти в положение, соответствующее новой
вперед. Автотест распечатает положения двухрядных (DIP) переключателей принтера и положения
ширине бумаги. (См. параграф 3.1 "Установка переключателей памяти" в
переключателей памяти, после чего обрежет ленту и остановится. (Зеленый индикатор "сеть" (POWER)
разделе 3 этой инструкции.)
при этом будет мигать.)
3. Если вы хотите распечатать также и статистику, еще раз нажмите клавишу подачи бумаги (FEED).
4. Для распечатки таблицы символов ASCII, нажмите клавишу подачи бумаги (FEED) еще раз.
5. После распечатки таблицы символов ASCII самотестирование автоматически закончится.
■ Loading New Paper Roll
1. Turn on the printer and open the rear cover by pressing open button.
2. Insert new paper roll.
Be sure to note the correct direction of the paper roll.
3. Pull out a small amount of paper, then close the cover and tear off the extra
paper by pulling it toward the front of the printer.
Quick Reference Guide
Impact printer SRP-275
◈ Using the Operation Panel
◈ Check that all Items are Present
Most of the functions of this printer are governed by software, but
you can monitor the printer’s status by looking at the lights on the
AC Adaptor
The following items are packed in the box. If any items appear to have
control panel and for some procedures you will use the buttons.
shipping damage or are missing, please contact your dealer.
Power
connector
• Impact Printer SRP-275
• AC Adapter & Power Cord
• Ribbon Cassette
Power cord
• Paper Roll
• User’s Manual & Quick Reference Guide
◈ Startup Information
■ Feed Button
■ Connecting the Cables
Interface
1. Plug the AC adapter and power cord to the power connector of
connector
The feed button is used to feed paper or to start self test and for hexadecimal dump mode.
Drawer kick-out
the printer.
connector
(See the User’s manual)
E
2. Turn off printer and the host ECR(host computer).
E
n
3. Plug the interface cable(serial, parallel, USB or Ethernet) into the
■ Power Indicator Light (Green color)
n
g
interface connector on the printer then fasten the screw on both
g
This indicator light is on when the power is turned on. It blinks when the printer is in the self test
l
sides of the connector.
l
printing standby state. Always wait until this indicator light stops blinking before you start using the
i
4. Plug the drawer kick-out cable into the drawer kick-out connector
printer and before you turn it off.
i
s
on the printer.
s
h
Drawer kick-out
■ Error Indicator Light (Red color)
h
■ Installing the New Ribbon Cassette
cable
Serial/ Parallel/ USB/ Ethernet
Interface cable
When this indicator light is on(but not blinking), it means that the printer is out of paper or almost
1. Before inserting the ribbon cassette, turn the knob clockwise to
out of paper or the printer covers are open. When this light blinking, there is an error. If you see
prevent twisting the ribbon.
this light blinking, turn off the printer for a few seconds and then turn it back on. If the light is still
2. Open the front cover of printer.
blinking, call your supervisor or a service person.
3. Insert the new ribbon cassette as shown below and pay particular attention to the
■ Paper Indicator Light (Red color)
placement of the ribbon behind the Print Head.
4. During inserting the ribbon cassette, turn the knob clockwise again to make sure
the ribbon moves freely in the cassette.
When this indicator light is on, it means that the paper end. Replace the new paper roll.
5. Close front cover of printer
Note
Malfunctions and other problems may arise if other than specified ribbon
◈ Self Test
cassettes are used in the printer. The Warranty may be void if other than specified
ribbon cassettes are used. Contact your dealer or place of purchase for more
The self test lets you know if your printer is operating properly. It checks the print quality, ROM version, DIP switch
information about proper ribbon cassettes.
settings, memory switch settings and statistic data. The test is independent of any other equipment or software, so it
Screw(3x6)
is a good idea to run it when you first set up the printer or if you have any trouble. If the self test works correctly, the
(2pieces)
■ Changing the paper width
problem is in the other equipment or the software, not the printer.
Frame paper
1. Open the rear cover.
control
■ Running the self test
2. Remove the frame paper control by loosing the two screws(3×6).
1. Make sure the printer is turned off and the printer cover is closed properly.
3. Reattach the frame paper control in you want. (Insert and tighten two
screws(3×6) to reattach. See the instructions "1.7 Changing the paper width" in
2. While holding down the Feed button, turn on the printer and continue to hold until the paper begins to feed. The
User’s manual.)
self test prints the printer DIP switch settings and memory switch settings. And cuts the paper and pauses.
(The power light blinks.)
4. Close the rear cover.
3. Press the Feed button to continue printing the statistic data.
5. Change the Memory Switch setting for changing paper roll width. (See the
instructions "3.1 Setting the Memory Switches" in User’s manual.)
4. Press the Feed button to continue printing the rolling ASCII pattern.
5. The self test mode terminates after printing the rolling ASCII pattern automatically.
