Pioneer FH-X360UB: Installation Installation
Installation Installation: Pioneer FH-X360UB
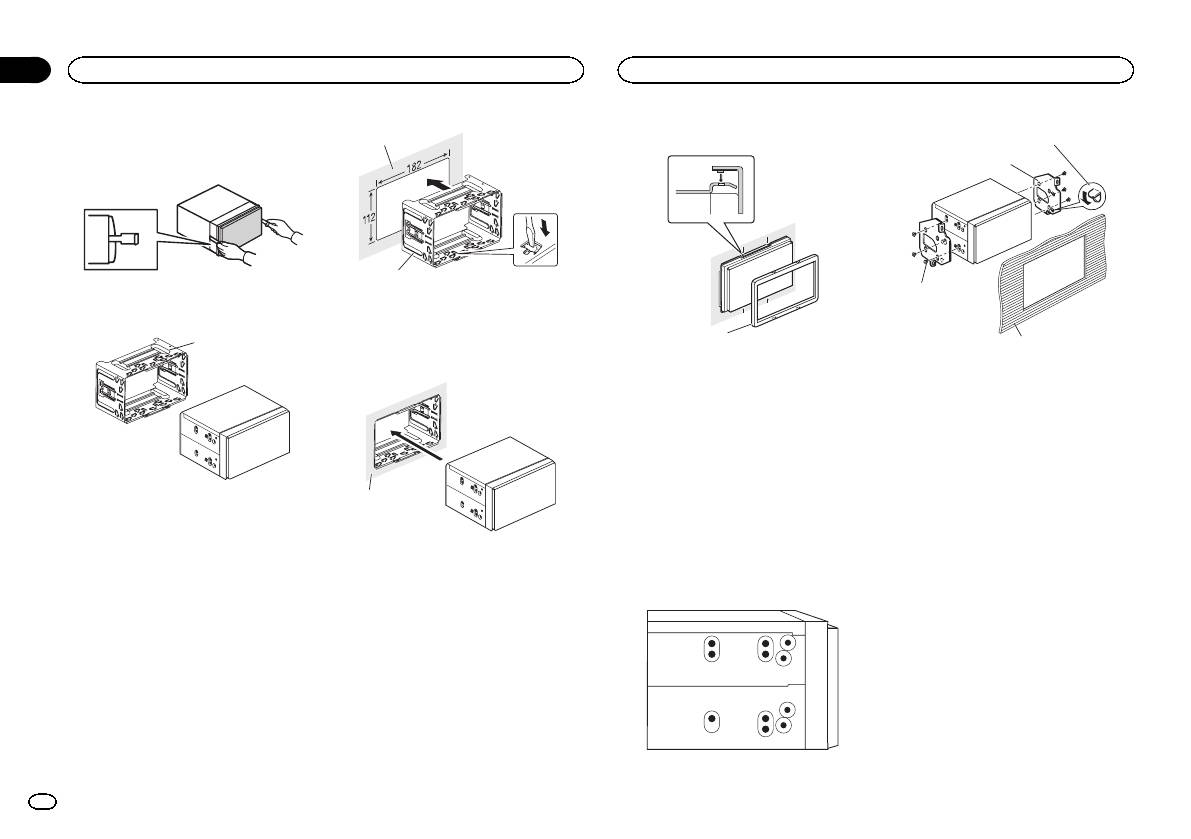
2 Insert the supplied extraction keys into
1
both sides of the unit until they click into
place.
3 Pull the unit out of the holder.
Remove the holder.
1
1 Holder
(factory-supplied part)
Installation with the holder
1 Install the holder into the dashboard.
After inserting the holder into the dashboard, se-
lect and bend the tabs appropriate to the thick-
ness of the dashboard material. (Install this unit
as firmly as possible using the top and bottom
tabs. To secure this unit, bend the tabs 90 de-
grees.)
2
3 Attach the trim ring.
1 Dashboard
2 Holder
(factory-supplied part)
2 Install this unit.
1
1 Dashboard
1
1
2
1 Trim ring
Removing the holder
The procedure is the same as that for Before in-
stalling this unit. For details, refer to Before in-
stalling this unit on page 9.
Installation using the screw
holes on the side of the unit
% Fastening the unit to the factory radio-
mounting bracket.
Position the unit so that its screw holes are
aligned with the screw holes of the bracket, and
tighten the screws at three locations on each
side.
4
Section
03
Installation
Installation
3
1 If the pawl gets in the way, bend it down.
2 Factory radio mounting bracket
3 Truss (5 mm × 8 mm) screws
4 Dashboard or console
10
En
Оглавление
- Before you start Before you start
- Head unit
- Using this unit Using this unit Frequently used menu
- Using this unit Using this unit
- Using this unit Using this unit
- Connections
- Installation
- Installation Installation
- Additional information Additional information Troubleshooting
- Additional information Additional information
- Additional information Specifications
- Перед началом эксплуатации Перед началом эксплуатации
- Основное устройство
- Использование данного устройства Использование данного устройства
- Использование данного устройства Использование данного устройства
- Использование данного устройства Использование данного устройства
- Использование данного устройства Использование данного устройства
- Использование данного устройства Использование данного устройства Меню системы
- Использование данного устройства Использование данного устройства
- Соединения
- Установка
- Установка Установка
- Дополнительная информация Дополнительная информация Устранение неисправностей
- Дополнительная информация Дополнительная информация
- Последовательность
- Дополнительная информация Дополнительная информация Таблица символов для
- Дополнительная информация Дополнительная информация


