Pioneer FH-X360UB: Head unit
Head unit: Pioneer FH-X360UB
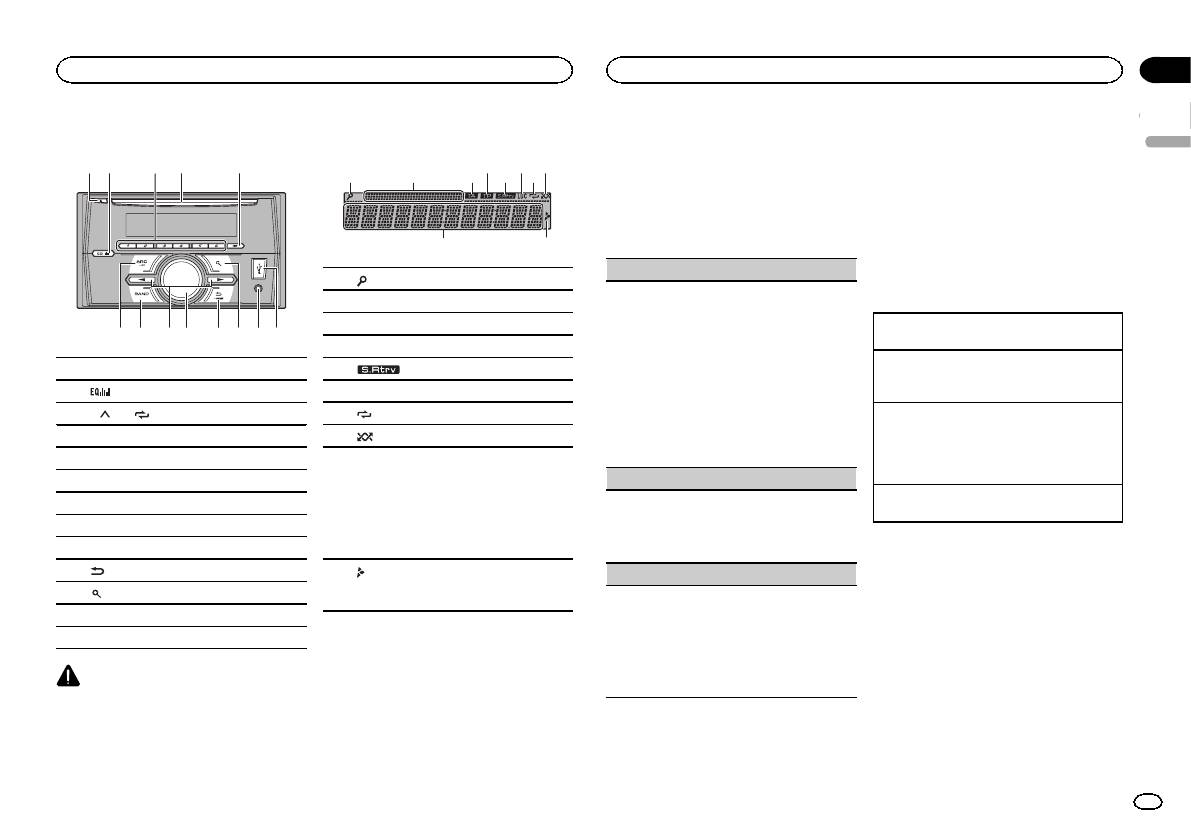
Head unit
1 2 4 5
8 97 a c6 b d
Display indication
3
21 3 75
1 h (eject)
2
(equalizer)
3 1/
to 6/
4 Disc loading slot
5 DISP
6 SRC/OFF
7 BAND
8 c/d
9 MULTI-CONTROL (M.C.)
a
(back)/DIMMER (dimmer)
b
(list)
c AUX input jack (3.5 mm stereo jack)
d USB port
CAUTION
Use an optional Pioneer USB cable (CD-U50E)
to connect the USB storage device as any device
connected directly to the unit will protrude out
from the unit, which could be dangerous.
9
Section
Using this unit
Using this unit
02
# If you prefer not to set up at this time, turn M.C.
6 Press M.C. to select.
to switch to NO.
English
Notes
4 6 8
3 Press M.C. to select.
! You can set up the menu options from the
system menu and initial menu. For details
4 Follow these steps to set the menu.
about the settings, refer to System menu on
To proceed to the next menu option, you need to
page 6 and Initial menu on page 7.
a
confirm your selection.
! You can cancel set up menu by pressing
SRC/OFF.
LANGUAGE (multi-language)
1 (list)
This unit can display the text information from a
Basic operations
2 Sub information section
compressed audio file even for information em-
3 TA (traffic announcements)
bedded in English, Russian or Turkish.
Turning the unit on
! If the embedded language and the selected
1 Press SRC/OFF to turn the unit on.
4 TP (traffic program identification)
language setting are not the same, text infor-
Turning the unit off
5
(sound retriever)
mation may not display properly.
1 Press and hold SRC/OFF until the unit turns
! Some characters may not be displayed prop-
6 LOC (local seek tuning)
off.
erly.
7
(repeat)
1 Turn M.C. to select the desired setting.
Selecting a source
РУС (Russian)—TUR (Turkish)—ENG (Eng-
1 Press SRC/OFF to cycle between:
8
(random)
lish)
RADIO—CD—USB—AUX
Main information section
2 Press M.C. to confirm the selection.
! USB MTP displays while the MTP connection
! Tuner: band and frequency
is in use.
CLOCK SET (setting the clock)
! RDS: program service name, PTY infor-
Adjusting the volume
9
mation and other literal information
1 Turn M.C. to adjust hour.
1 Turn M.C. to adjust the volume.
! CD player and USB storage device:
2 Press M.C. to select minute.
elapsed playback time and text informa-
3 Turn M.C. to adjust minute.
Note
tion
4 Press M.C. to confirm the selection.
When this unit’s blue/white lead is connected to
the vehicle’s auto-antenna relay control termi-
FM STEP (FM tuning step)
a
Appears when a lower tier of folder or menu
nal, the vehicle’s antenna extends when this
exists.
Use FM STEP to set FM tuning step options (seek
unit’s source is turned on. To retract the anten-
step settings).
na, turn the source off.
1 Turn M.C. to select the FM tuning step.
100 (100 kHz)—50 (50 kHz)
Set up menu
2 Press M.C. to confirm the selection.
1 After installation of this unit, turn the
QUIT appears.
ignition switch to ON.
! The manual tuning step is fixed at 50 kHz.
SET UP appears.
5 To finish your settings, turn M.C. to select
2 Turn M.C. to switch to YES.
YES.
# If you do not use the unit for 30 seconds, the set
# If you prefer to change your setting again, turn
up menu will not be displayed.
M.C. to switch to NO.
En
3
Оглавление
- Before you start Before you start
- Head unit
- Using this unit Using this unit Frequently used menu
- Using this unit Using this unit
- Using this unit Using this unit
- Connections
- Installation
- Installation Installation
- Additional information Additional information Troubleshooting
- Additional information Additional information
- Additional information Specifications
- Перед началом эксплуатации Перед началом эксплуатации
- Основное устройство
- Использование данного устройства Использование данного устройства
- Использование данного устройства Использование данного устройства
- Использование данного устройства Использование данного устройства
- Использование данного устройства Использование данного устройства
- Использование данного устройства Использование данного устройства Меню системы
- Использование данного устройства Использование данного устройства
- Соединения
- Установка
- Установка Установка
- Дополнительная информация Дополнительная информация Устранение неисправностей
- Дополнительная информация Дополнительная информация
- Последовательность
- Дополнительная информация Дополнительная информация Таблица символов для
- Дополнительная информация Дополнительная информация


