Pioneer MVH-150UBG: Installation Additional information
Installation Additional information: Pioneer MVH-150UBG
Black plate (10,1)
Section
03
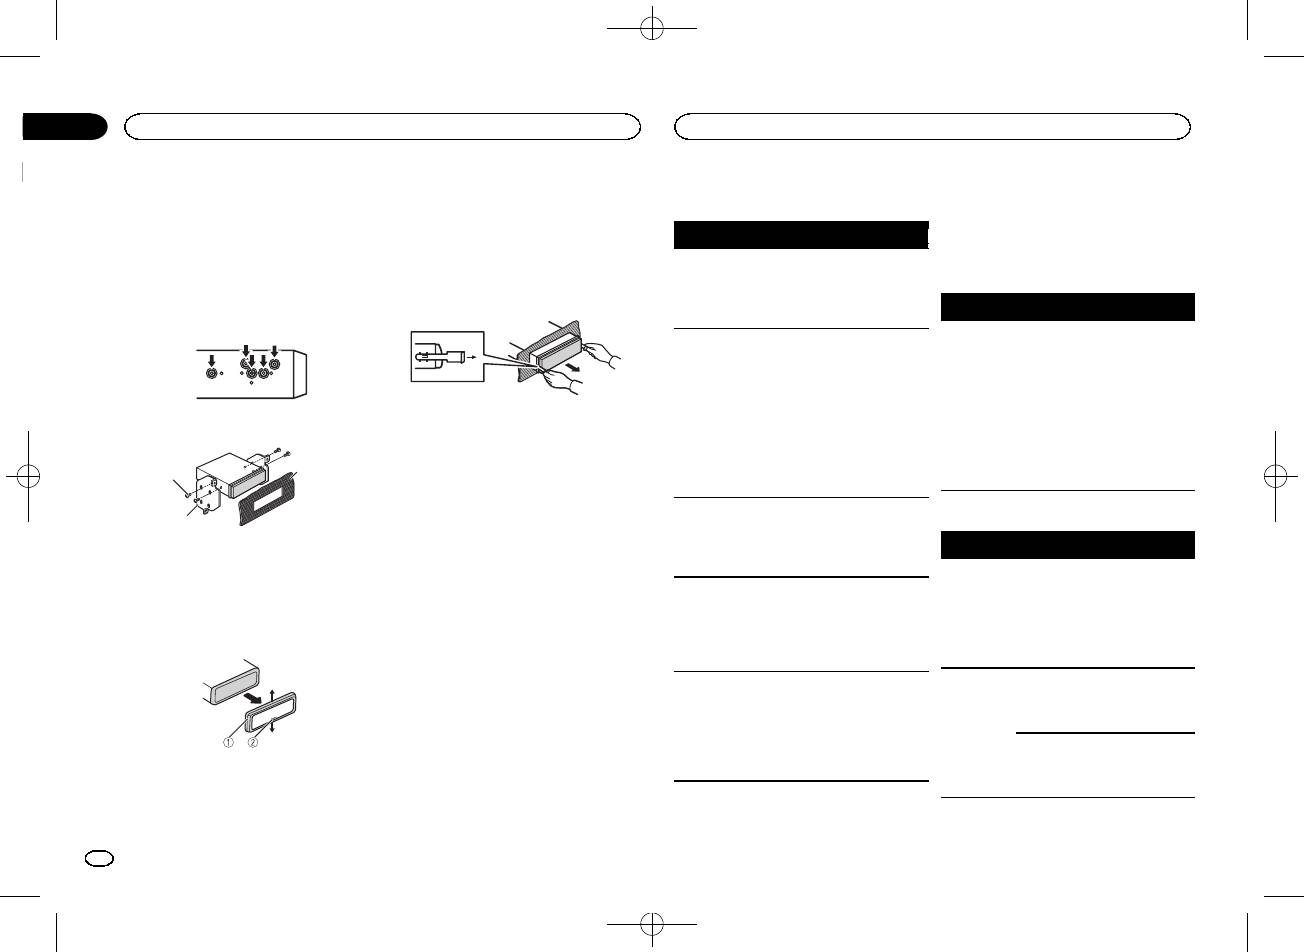
Installation
Additional information
2 Mounting sleeve
! When reattaching the trim ring, point the
Troubleshooting
Error messages
# Make sure that the unit is installed securely in
side with the notched tab down.
place. An unstable installation may cause skipping
When you contact your dealer or your nearest
or other malfunctions.
2 Insert the supplied extraction keys into
Symptom Cause Action
Pioneer Service Center, be sure to note the error
both sides of the unit until they click into
message.
The display
You did not per-
Perform operation
DIN Rear-mount
place.
automatically
form any opera-
again.
returns to the
tion within
Common
1 Determine the appropriate position
3 Pull the unit out of the dashboard.
ordinary dis-
about 30 sec-
where the holes on the bracket and the side
Message Cause Action
play.
onds.
of the unit match.
AMP ERROR Unit fails to op-
Check the speak-
The repeat
Depending on
Select the repeat
erate or speaker
er connection. If
play range
the repeat play
play range again.
connection is
the message fails
changes un-
range, the se-
incorrect; pro-
to disappear even
expectedly.
lected range
tective circuit is
after the engine is
may change
activated.
switched off/on,
when another
contact your deal-
2 Tighten two screws on each side.
Removing and re-attaching the front
folder or track is
er or an author-
panel
being selected
ized Pioneer
You can remove the front panel to protect your
or during fast
3
Service Station
1
unit from theft.
forwarding/re-
for assistance.
Press the detach button and push the front
versing.
panel upward and pull it toward you.
A subfolder is
Subfolders can-
Select another re-
2
For details, refer to Removing the front panel to
not played
not be played
peat play range.
USB storage device
protect your unit from theft and Re-attaching the
back.
when FLD (fold-
1 Tapping screw (5 mm × 8 mm)
Message Cause Action
front panel on page 3.
er repeat) is se-
2 Mounting bracket
lected.
FORMAT
Sometimes
Wait until the
3 Dashboard or console
NO XXXX ap-
There is no em-
Switch the display
READ
there is a delay
message disap-
pears when a
bedded text in-
or play another
between the
pears and you
Removing the unit
display is
formation.
track/file.
start of playback
hear sound.
changed (NO
and when you
1 Remove the trim ring.
TITLE, for ex-
start to hear any
ample).
sound.
The unit is
You are using a
Move electrical
NO AUDIO There are no
Transfer the audio
malfunction-
device, such as
devices that may
songs.
files to the USB
ing.
a cellular
be causing the in-
storage device
There is inter-
phone, that
terference away
and connect.
ference.
transmits elec-
from the unit.
The connected
Follow the USB
tric waves near
USB storage de-
storage device in-
1 Trim ring
the unit.
vice has secur-
structions to dis-
2 Notched tab
ity enabled.
able the security.
! Releasing the front panel allows easier ac-
cess to the trim ring.
10
En
<QRB3391-A>10
Оглавление
- About this unit Head unit
- Operating this unit Operating this unit
- Operating this unit Operating this unit
- Operating this unit Operating this unit
- Operating this unit Operating this unit
- Operating this unit Operating this unit
- Using an AUX source Connections
- Installation
- Installation Additional information
- Additional information Additional information
- Additional information Additional information
- Additional information Specifications
- Перед началом эксплуатации Перед началом эксплуатации
- Основное устройство
- Управление данным устройством Управление данным устройством
- Управление данным устройством Управление данным устройством
- Управление данным устройством Управление данным устройством
- Управление данным устройством Управление данным устройством
- Управление данным устройством Управление данным устройством
- Управление данным устройством Управление данным устройством
- Соединения
- Установка
- Установка Дополнительная информация
- Дополнительная информация Дополнительная информация
- Последовательность
- Дополнительная информация Дополнительная информация Авторское право и Серийный номер товарные знаки
- Дополнительная информация Дополнительная информация Технические характеристики
")


