Pioneer DEH-X3800UI: Radio
Radio: Pioneer DEH-X3800UI
5En
English
The tuner frequencies on this unit are allocated for use in Western Europe, Asia, the
Middle East, Africa and Oceania. Use in other areas may result in poor reception. The RDS
(radio data system) function only works in areas that broadcast RDS signals for FM
stations.
1 Press SRC/OFF to select [RADIO].
2 Press BAND/ or BAND/ to select the band from [FM1], [FM2], [FM3], [MW]
or [LW].
3 Press a number button (1/ to 6/).
TIP
The / buttons can be also used to select a preset station when [SEEK] is set to [PCH] in the
FUNCTION settings (page 9).
The six strongest stations are stored on the number buttons (1/ to 6/).
1 After selecting the band, press the M.C. dial to display the main menu.
2 Turn the M.C. dial to select [FUNCTION], then press to confirm.
3 Turn the M.C. dial to select [BSM], then press to confirm.
To seek a station manually
1
After selecting the band, press / to select a station.
Press and hold / then release to seek an available station. Scanning stops
when the unit receives a station. To cancel seek tuning, press / .
NOTE
Radio
The unit searches for a station by PTY (program type) information.
1 Press during FM reception.
2 Turn the M.C. dial to select a program type from [NEWS/INFO], [POPULAR],
[CLASSICS] or [OTHERS].
3 Press the M.C. dial.
Receiving preset stations
The unit begins to search for a station. When it is found, its program service name is
displayed.
Best stations memory (BSM)
[SEEK] needs to be set to [MAN] in the FUNCTION settings (page 9).
To store stations manually
1
While receiving the station you want to store, press and hold one of the number
buttons (1/ to 6/ ) until it stops flashing.
NOTES
Using PTY functions
• To cancel the search, press the M.C. dial.
• The program of some stations may differ from that indicated by the transmitted PTY.
• If no station is broadcasting the type of program you searched for, [NOT FOUND] is displayed for
about two seconds and then the tuner returns to the original station.
PTY list
For more details about PTY list, visit the following site:
http://www.pioneer.eu/eur/products/25/121/tech/CarAudio/PTY.html
CD/USB/iPod/AUX
Playing back
Disconnect headphones from the device before connecting it to the unit.
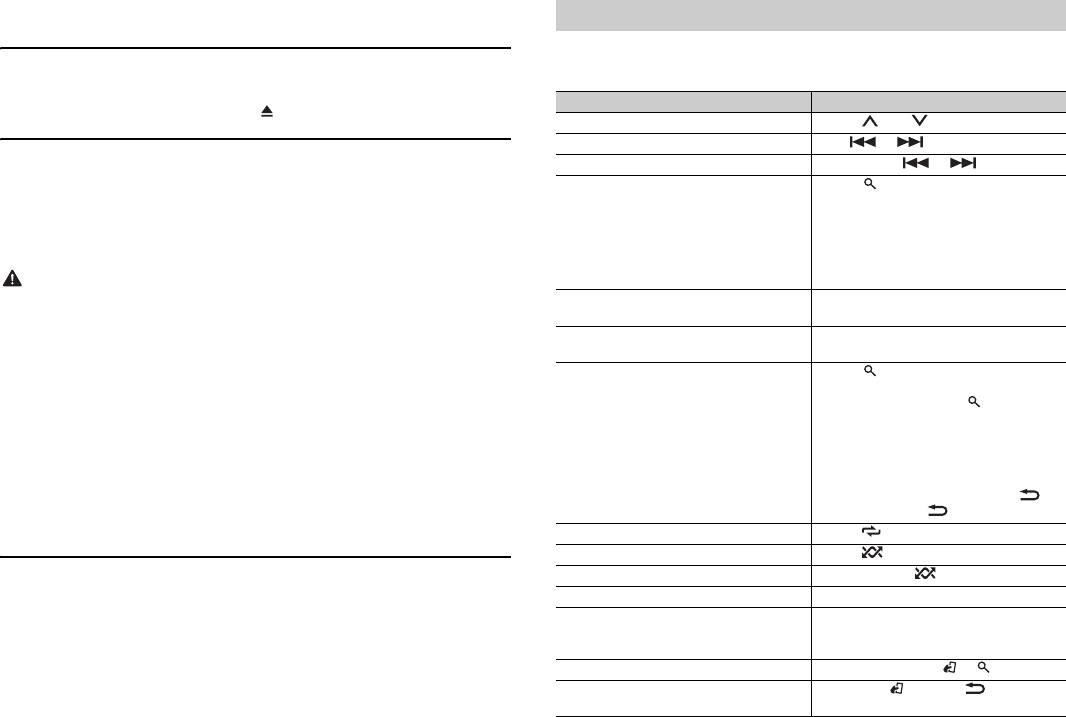
(eject)
Disc loading slot USB port
M.C. (multi-control) dial
SRC (source)/OFF
AUX input jack (3.5 mm stereo jack)
6En
NOTE
The arrangement of the buttons varies depending on the unit.
CD
1
Insert a disc into the disc loading slot with the label side up.
To eject a disc, stop playback first then press .
USB devices (including Android)/iPod
1
Open the USB port cover.
2 Plug in the USB device/iPod using an appropriate cable.
NOTE
To automatically switch to [USB] source when a USB device/iPod is connected to the unit, set [USB
AUTO] to [ON] in the SYSTEM settings (page 10).
CAUTION
Use an optional Pioneer USB cable (CD-U50E) to connect the USB device as any device connected
directly to the unit will protrude out from the unit, which could be dangerous.
Before removing the device, stop playback.
AOA connections
For details on AOA connection, see page 8.
MTP connection
A device installed with Android OS 4.0 or later can be connected to the unit via MTP, using the cable
supplied with the device. However, depending on the connected device and the numbers of the files in
the device, audio files/songs may not be able to be played back via MTP. Note that MTP connection is
not compatible with WAV and FLAC* file formats, and cannot be used with the MIXTRAX function.
* The FLAC files are only compatible with DEH-2800UI.
NOTE
If you use an MTP connection, [ANDROID WIRED] needs to be set to [MEMORY] in the SYSTEM settings
(page 10).
AUX
1
Insert the stereo mini plug into the AUX input jack.
2 Press SRC/OFF to select [AUX] as the source.
NOTE
Operations
You can make various adjustments in the FUNCTION settings (page 9).
Note that the following operations do not work for an AUX device. To operate an AUX
device, use the device itself.
Purpose Operation
Select a folder/album*1 Press 1/ or 2/.
Select a track/song (chapter) Press or .
Fast forward or reverse Press and hold or .
Search for a file from a list 1 Press to display the list.
2 Turn the M.C. dial to select the desired
file (folder) name or category, then press
to confirm.
3 Turn the M.C. dial to select the desired
file, then press to confirm.
Playback starts.
View a list of the files in the selected folder/
Press the M.C. dial when a folder/category
category*1
is selected.
Play a song in the selected folder/
Press and hold the M.C. dial when a folder/
category*1
category is selected.
Alphabetical search (iPod only) 1 Press to display the list.
2 Turn the M.C. dial to select the desired
category list, then press to enter the
alphabetical search mode.
(Turning the M.C. dial twice also enters
the alphabetical search mode.)
3 Turn the M.C. dial to select a letter, then
press to display the alphabetical list.
To cancel alphabetical search, press /
DIMMER or BAND/.
Repeat play Press 6/.
Random/shuffle play Press 5/.
Shuffle all play (iPod only) Press and hold 5/.
Pause/resume playback Press 4/PAUSE.
Sound retriever*1*2 Press 3/S.Rtrv.
[1]: Effective for low compression rates
[2]: Effective for high compression rates
If [AUX] is set to [OFF] in the SYSTEM settings, [AUX] cannot be selected as a source (page 10).
Return to root folder (CD/USB only)*1 Press and hold BAND/ or .
Switch between compressed audio and CD-
Press BAND/ or BAND/.
DA (CD only)
Оглавление
- Table of Contents
- Getting Started
- Radio
- App Mode
- Car Remote Mode
- Connections/Installation
- Additional Information
- Table des matières
- Mise en route
- Radio
- CD/USB/iPod/AUX
- Mode d’application
- Réglages
- Raccordements/Installation
- Informations complémentaires
- Sommario
- Operazioni preliminari
- Radio
- CD/USB/iPod/AUX
- Modalità app
- Impostazioni
- Connessioni/Installazione
- Informazioni aggiuntive
- Índice
- Procedimientos iniciales
- Radio
- CD/USB/iPod/AUX
- Modo app
- Ajustes
- Conexiones/instalación
- Información complementaria
- Inhaltsverzeichnis
- Erste Schritte
- Radio
- CD/USB/iPod/AUX
- App-Modus
- Fahrzeug-Fernbedienungsmodus
- Anschlüsse/Einbau
- Zusätzliche Informationen
- Inhoud
- Aan de slag
- Radio
- Cd/USB/iPod/AUX
- App-modus
- Instellingen
- Verbindingen/installatie
- Aanvullende informatie
- Содержание
- Начало работы
- Радио
- Компакт-диск/USB/iPod/AUX
- Режим приложения
- Настройки
- Подключения/Установка
- Дополнительная информация


