Pioneer DEH-X3800UI: Getting Started
Getting Started: Pioneer DEH-X3800UI
3En
English
If you experience problems
Should this unit fail to work properly, please contact your dealer or nearest authorized PIONEER Service
Station.
Getting Started
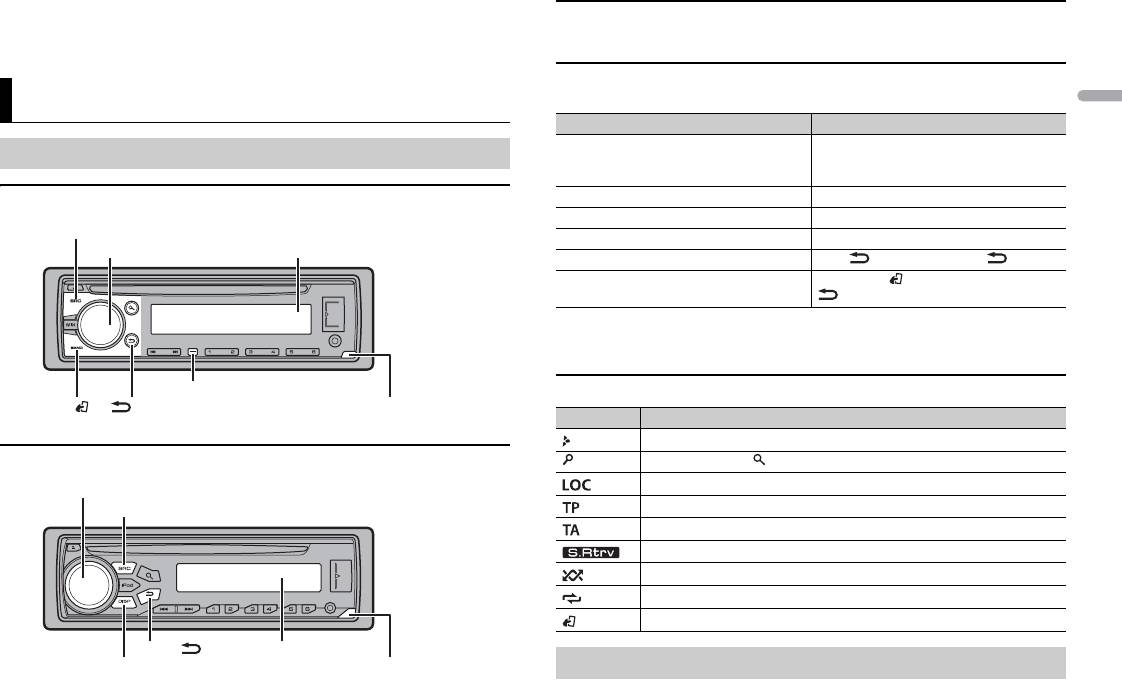
Basic operation
DEH-X3800UI
DEH-2800UI
SRC (source)/OFF
M.C. (multi-control) dial
Display window
DISP (display)
BAND/
/DIMMER
Detach button
M.C. (multi-control) dial
SRC (source)/OFF
BAND/
Display window
DISP (display)
Detach button
Optional remote control
The remote control CD-R320 is sold separately.
Frequently used operations
The available buttons vary depending on the unit.
Purpose Operation
Turn on the power* Press SRC/OFF to turn on the power.
Press and hold SRC/OFF to turn off the
power.
Adjust the volume Turn the M.C. dial.
Select a source Press SRC/OFF repeatedly.
Change the display information Press DISP repeatedly.
Return to the previous display/list Press /DIMMER or BAND/.
Return to the normal display from the menu Press BAND/, or press and hold BAND/
.
* When this unit’s blue/white lead is connected to the vehicle’s auto-antenna relay control terminal,
the vehicle’s antenna extends when this unit’s source is turned on. To retract the antenna, turn the
source off.
Display indication
Indication Description
Appears when a lower tier of the menu or folder exists.
Appears when the button is pressed.
Appears when the local seek tuning function is set (page 9).
Appears when a traffic program is received.
Appears when the TA (traffic announcements) function is set (page 9).
Appears when the sound retriever function is set (page 9).
Appears when random/shuffle play is set.
Appears when repeat play is set.
Appears when the iPod control function is set (page 7).
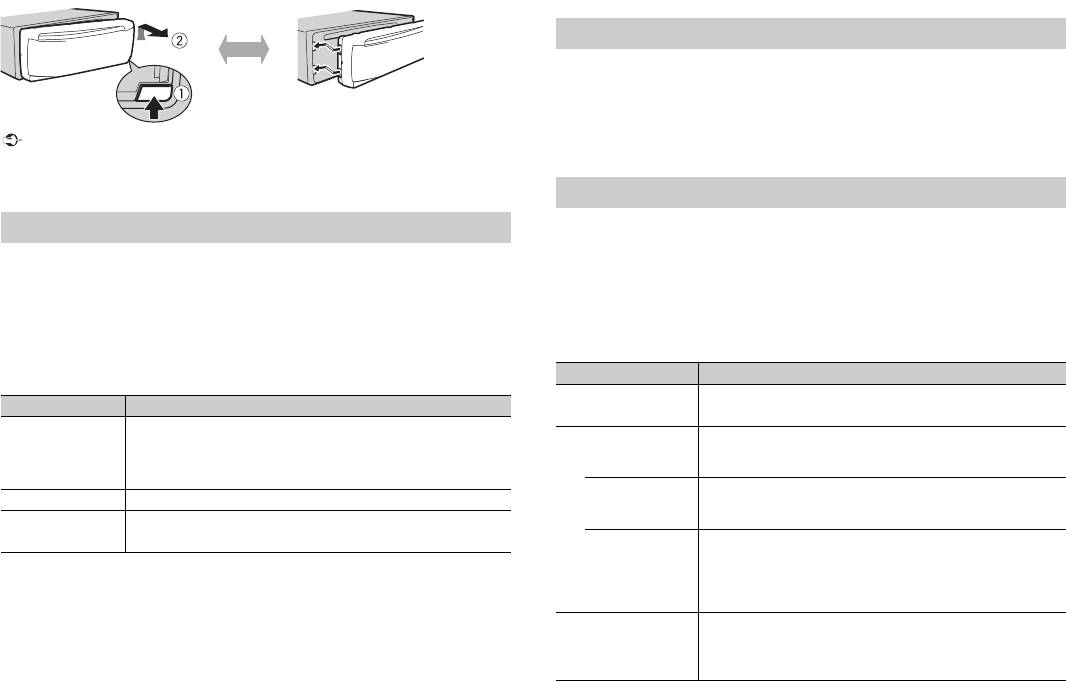
Detaching the front panel
Detach the front panel to prevent theft. Remove any cables and devices attached to the
front panel and turn off the unit before detaching it.
4En
Important
• Avoid subjecting the front panel to excessive shock.
• Keep the front panel out of direct sunlight and high temperatures.
• Always store the detached front panel in a protective case or bag.
When you turn the ignition switch to ON after installation, [SET UP :YES] appears in the
display.
1 Press the M.C. dial.
The setup menu disappears after 30 seconds of no operation. If you prefer not to set
at this time, turn the M.C. dial to select [NO], then press to confirm.
2 Turn the M.C. dial to select the options, then press to confirm.
To proceed to the next menu option, you need to confirm your selection.
3 [QUIT :YES] appears when all the settings have been made.
To return to the first item of the setup menu, turn the M.C. dial to select [QUIT :NO],
then press to confirm.
4 Press the M.C. dial to confirm the settings.
NOTES
Setup menu
Menu Item Description
LANGUAGE Select the language to display the text information from a
[ENG](English),
compressed audio file.
[РУС](Russian),
[TUR](Turkish)
CLOCK SET Set the clock.
FM STEP Select the FM tuning step from 100 kHz or 50 kHz.
[100], [50]
• You can cancel the menu setting by pressing SRC/OFF.
Detach Attach
• These settings can be made at any time from the SYSTEM settings (page 10) and INITIAL settings
(page 4).
1 Press the M.C. dial to display the main menu.
2 Turn the M.C. dial to select [SYSTEM], then press to confirm.
3 Turn the M.C. dial to select [DEMO OFF], then press to confirm.
4 Turn the M.C. dial to select [YES], then press to confirm.
1 Press and hold SRC/OFF until the unit turns off.
2 Press and hold SRC/OFF to display the main menu.
3 Turn the M.C. dial to select [INITIAL], then press to confirm.
4 Turn the M.C. dial to select an option, then press to confirm.
NOTE
Canceling the demonstration display (DEMO OFF)
INITIAL settings
The options vary depending on the unit.
Menu Item Description
FM STEP Select the FM tuning step from 100 kHz or 50 kHz.
[100], [50]
SP-P/O MODE Select when there is a full-range speaker connected to the rear
speaker output leads and there is a subwoofer connected to the
[REAR/SUB.W]
RCA output.
[SUB.W/SUB.W] Select when there is a passive subwoofer connected directly to
the rear speaker output leads and there is a subwoofer
connected to the RCA output.
[REAR/REAR] Select when there are full-range speakers connected to the rear
speaker output leads and RCA output. If there is a full-range
speaker connected to the rear speaker output leads, and the
RCA output is not used, you may select either [REAR/SUB.W] or
[REAR/REAR].
SYSTEM RESET Select [YES] to initialize the unit settings. The unit will be
restarted automatically.
[YES], [CANCEL]
(Some of the settings may be retained even after resetting the
unit.)
Оглавление
- Table of Contents
- Getting Started
- Radio
- App Mode
- Car Remote Mode
- Connections/Installation
- Additional Information
- Table des matières
- Mise en route
- Radio
- CD/USB/iPod/AUX
- Mode d’application
- Réglages
- Raccordements/Installation
- Informations complémentaires
- Sommario
- Operazioni preliminari
- Radio
- CD/USB/iPod/AUX
- Modalità app
- Impostazioni
- Connessioni/Installazione
- Informazioni aggiuntive
- Índice
- Procedimientos iniciales
- Radio
- CD/USB/iPod/AUX
- Modo app
- Ajustes
- Conexiones/instalación
- Información complementaria
- Inhaltsverzeichnis
- Erste Schritte
- Radio
- CD/USB/iPod/AUX
- App-Modus
- Fahrzeug-Fernbedienungsmodus
- Anschlüsse/Einbau
- Zusätzliche Informationen
- Inhoud
- Aan de slag
- Radio
- Cd/USB/iPod/AUX
- App-modus
- Instellingen
- Verbindingen/installatie
- Aanvullende informatie
- Содержание
- Начало работы
- Радио
- Компакт-диск/USB/iPod/AUX
- Режим приложения
- Настройки
- Подключения/Установка
- Дополнительная информация


