Philips HR7758: инструкция
Раздел: Бытовая, кухонная техника, электроника и оборудование
Тип: Кухонный Комбайн
Характеристики, спецификации
Инструкция к Кухонному Комбайну Philips HR7758
Recipes & Directions for use
Przepisy i instrukcja obsługi
Reţete şi Instrucţiuni de utilizare
Рецепты и Инструкции по эксплуатации
Recepty & Návod k použití
Receptek & Használati utasítások
Recepty a návod na použitie
Рецепти та інструкції з використання приладу
Recepti i uputstvo za upotrebu
Pечепти и инструкчии за употреба
Essence HR7758

2
N
M
Z
e
U
T
L
Y
f
K
b
J
V
g
j
I
S
a
c
i
H
W
d
h
X
G
R
F
Q
E
D
P
C
B
O
A
3

4

5
ENGLISH 6
POLSKI 30
ROMÂNĂ 56
РУССКИЙ 81
ČESKY 111
MAGYAR 135
SLOVENSKY 161
УКРАЇНСЬКІЙ 187
БЪЛГАРСКИ 214
SRPSKI 242
HR7758

ENGLISH6
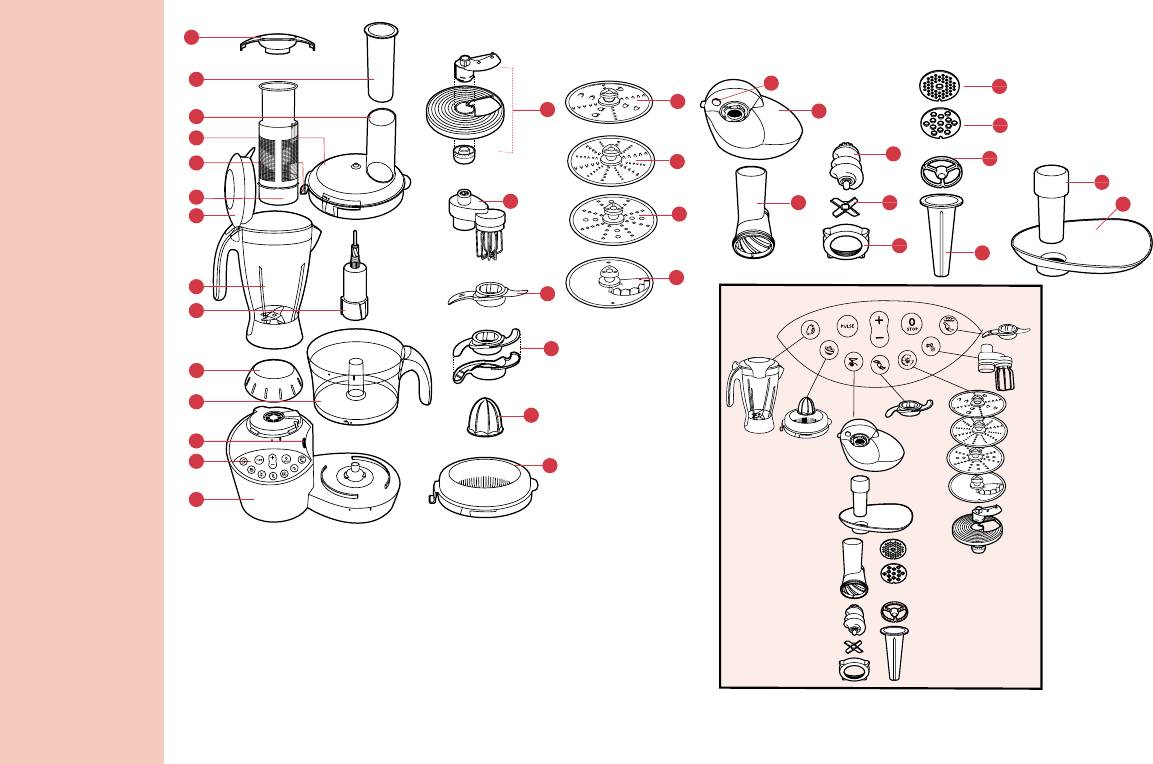
Parts and accessories
e Medium grinding disc, 4 mm dia.
A Motor unit
f Coarse grinding disc, 8 mm dia.
B Smart Process Control panel
g Separator
C Built-in safety lock
h Sausage horn
D Food processing bowl
i Tr ay
E Screw cap (must be placed to use bowl
j Pusher
functions)
F Tool holder
Important
G Blender jar
H Blender jar lid
Read these instructions for use carefully before
I Fruit filter
using the appliance and save them for future
J Peg of lid (activates and deactivates the safety
reference.
switch)
K Lid of food processing bowl
◗ Check if the voltage indicated on the
L Stopper
appliance corresponds to the local mains
M Feed tube
voltage before you connect the appliance.
N Pusher
◗ In order to avoid a hazardous situation, this
O Sieve of citrus press
appliance must never be connected to a timer
P Cone of citrus press
switch.
Q Stainless steel blade + protective cover
◗ Do not use the appliance if the mains cord,
R Stainless steel kneading accessory
the plug or other parts are damaged.
S Stainless steel balloon beater
◗ If the mains cord is damaged, it must be
T Stainless steel adjustable slicing disc (slicing
replaced by Philips, a service centre
insert, carrier and adjusting knob)
authorised by Philips or similarly qualified
U Stainless steel grating disc medium
persons in order to avoid a hazard.
V Stainless steel grating disc fine
◗ Keep the appliance out of the reach of
W Stainless steel granulating disc
children.
X Stainless steel French fries disc
◗ Never let the appliance run unattended.
Y Gear housing meat mincer
◗ Always switch the appliance off by pressing
Z Release button
the stop button.
a Cutter housing meat mincer
◗ Switch the appliance off before detaching any
b Worm shaft
accessory.
c Cutter unit
◗ Unplug the appliance immediately after use.
d Screw ring

ENGLISH 7
◗ Never immerse the motor unit in water or
inserted into the blender jar before you
any other fluid, nor rinse it under the tap.
switch the appliance on.
◗ Never use your fingers or an object (e.g. a
◗ The food processing functions, the citrus
spatula) to push ingredients down the feed
press and the meat mincer can only be used
tube while the appliance is running. Only the
when the screw cap is attached.
pusher is to be used for this purpose.
◗ Always unplug the appliance before reaching
Safety features
into the blender jar with your fingers or an
object (e.g. a spatula).
Thermal safety cut-out
◗ Wait until moving parts have stopped running
This appliance is equipped with a thermal safety
before you remove the lid of the appliance.
cut-out which will automatically cut off the power
◗ Never use any accessories or parts from
supply to the appliance in case of overheating.
other manufacturers or that have not been
specifically advised by Philips.Your guarantee
◗ If your appliance stops running:
will become invalid if such accessories or
parts have been used.
1 Pull the mains plug out of the socket.
◗ Do not exceed the maximum content
indicated on the bowl or the blender jar.
2 Let the appliance cool down for
◗ Consult the table in these directions for use
60 minutes.
for the correct processing times.
◗ Let hot ingredients cool down before
3 Put the mains plug in the socket.
processing them (max. temperature
80cC/175cF).
4 Switch the appliance on again.
◗ If you are processing a liquid that is hot or
Please contact your Philips dealer or an
tends to foam (e.g. milk), do not put more
authorised Philips service centre if the thermal
than 1 litre in the blender jar to avoid spillage.
safety cut-out is activated too often.
◗ Never use the cutter unit of the meat mincer
in combination with the separator and
Safety lock
sausage horn.
This feature ensures that you can only switch the
◗ Do not attempt to grind bones or other hard
appliance on when the accessories have been
items with the meat mincer.
placed on the motor unit in the correct position.
◗ Do not use the fruit filter in the blender jar to
When the accessories have been assembled
process hot ingredients.
correctly, the built-in safety lock will be deblocked.
◗ Make sure the filter has been properly
See chapter 'Using the appliance'.
ENGLISH8
Before first use
You can stop the process at any point by pressing
◗ Thoroughly clean the parts that will come
the stop button.
into contact with food before you use the
appliance for the first time.
If you press the same process button again within
40 seconds, the process will continue where it
Using the appliance
was stopped.
◗ The appliance can be used with or without
Built-in safety lock
the blender attached to the motor unit. If you
want to use another function than the
1 This feature ensures that you can only
blender function, make sure the blender jar
switch the appliance on when the
has been removed and the screw cap has
accessories have been placed on the
been screwed properly onto the motor
motor unit in the correct position.When
housing.
the accessories have been assembled
◗ You can only remove the screw cap to attach
correctly, the built-in safety lock will be
the blender when you have removed the lid of
deblocked.
the food processing bowl, the citrus press or
the meat mincer.
C
◗ Bowl
◗ Noise level: Lc= 89 dB [A]
You can only use the bowl and the accessories if
you have assembled the bowl and the lid properly
Smart Process Control Panel
and when the screw cap has been screwed onto
This appliance is equipped with a Smart Process
the motor unit correctly.
Control Panel to ensure an optimal process and a
If this is the case the dot on the bowl will be
perfect end result. Each process button is linked
opposite the dot on the motor unit and the dot
to a pre-programmed speed profile representing
on the lid will be opposite the dot on the bowl.
the optimal process for a specific accessory.
The projection of the lid will complete the shape
of the handgrip of the bowl.
You can increase or decrease the speed up to
The screw cap has been fastened properly when
3 times by pressing the + or - button.
the groove on the screw cap is directly opposite
the groove on the motor unit and the two
If you press the pulse button, the appliance will
grooves together form one long groove.
run at the highest speed.When you release the
button, the appliance will stop or return to the
previously selected processing speed.
CLICK
ENGLISH 9
C
◗ Blender
You can only use the blender when the groove on
the blender jar is directly opposite the groove on
the motor unit and the two grooves together
form one long groove.
C
◗ Meat mincer
You can only use the meat mincer when the
screw cap is properly screwed onto the motor
unit, when you have turned the gear housing to
the left until you heard a click and you have
assembled the cutter housing on the gear housing
by turning it to the left until you heard a click.
C
◗ Citrus press
You can only use the citrus press when the screw
cap has been screwed properly onto the motor
unit, the bowl has been assembled correctly and
the sieve has been turned in the direction of the
arrow until a click was heard.
Food processing bowl
C
1 Make sure the screw cap is properly
screwed onto the motor unit, then mount
the bowl on the motor unit by turning the
handle in the direction of the arrow until
you hear a click.
C
2 Put the lid on the bowl.Turn the lid in the
direction of the arrow until you hear a
click (this may require some force).
1
2
CLICK
1
2
CLICK
1
2
CLICK
Feed tube and pusher
C
1 Use the feed tube to add liquid and/or
solid ingredients. Use the pusher to push
solid ingredients down the feed tube.
C
2 You can also use the pusher to close the
feed tube in order to prevent ingredients
from escaping through the feed tube.
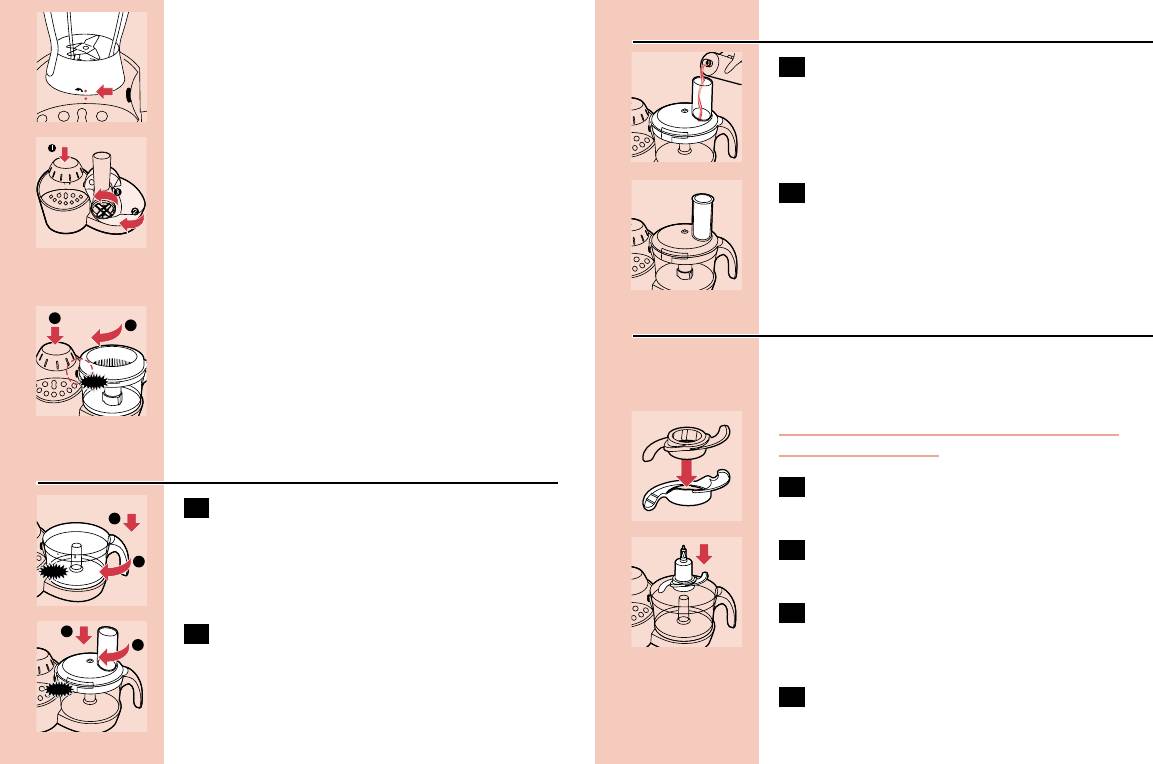
Stainless steel blade
The blade can be used for chopping, mixing,
blending and pureeing.
The cutting edges of the blade are very sharp
Avoid touching them!
C
1 Remove the protective cover from the
blade.
C
2 Put the tool holder in the bowl and put
the blade on the tool holder.
3 Put the ingredients in the bowl. Pre-cut
large pieces of food into pieces of approx.
3 x 3 x 3 cm. Put the lid on the bowl.
4 Put the pusher in the feed tube.
ENGLISH10
C
5 Press the ¥ button on the control panel.
2 Remove the lid from the bowl.
- The process will start with 4 pulses to ensure
that the ingredients (i.e. onions or nuts) are
3 Remove the ingredients from the blade or
chopped regularly.
from the wall of the bowl with a spatula.
- Next the processing speed gradually increases
to maximum speed and this speed is
Stainless steel discs
maintained until the stop button is pressed.
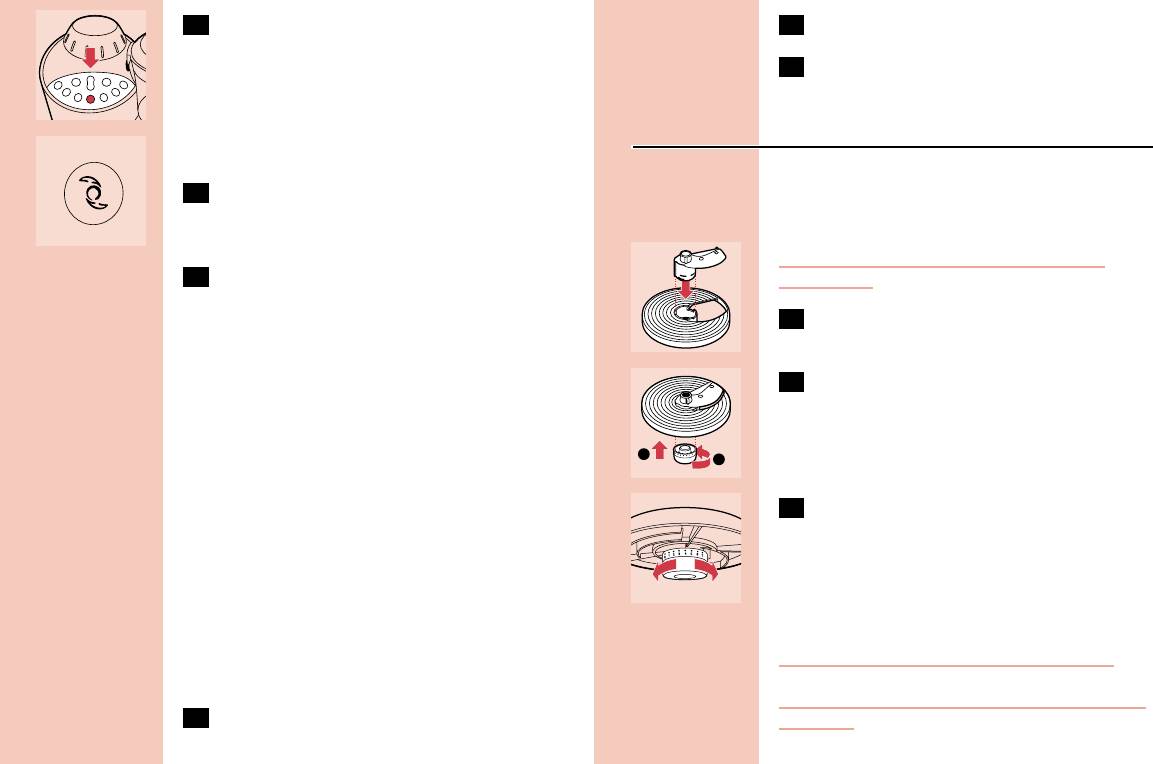
Adjustable slicing disc
6 You can press the - button to decrease the
The adjustable slicing disc allows you to cut
speed (
®).
ingredients to any thickness you like.
Be careful: the slicing insert has a very sharp
7 The process can be stopped any time
cutting edge.
during the pulses by pressing the stop
button (
¥).
C
1 Insert the slicing insert into the top of the
carrier.
Tips
C
2 Connect the adjusting knob from the
◗ If you are chopping onions, stop the appliance
bottom side of the disc and turn it to the
after the four pulses to prevent them from
position marked with a dot to lock it.
becoming too finely chopped.
◗ Do not let the appliance run too long when
you are chopping (hard) cheese.The cheese
will become too hot, will start to melt and
C
3 Turn the adjusting knob to set the slicing
will turn lumpy.
disc to the slicing thickness you prefer.
◗ Do not use the blade to chop very hard
ingredients like coffee beans, turmeric, nutmeg
and ice cubes, as this may cause the blade to
get blunt.
Inserting and using the discs
If food sticks to the blade or to the inside of the
Be careful: the discs have sharp cutting edges.
bowl:
Do not use the granulating disc to shred any kind
1 Switch the appliance off.
of cheese.
1
2
ENGLISH 11
Never use the discs to process hard ingredients
C
5 Press the ¨ button on the control panel.
such as ice cubes.
The appliance will gradually increase the kneading
speed within 10 seconds to avoid splashing.This
C
4 Place the disc you want to use on the tool
speed will be maintained for about 50 seconds to
holder.
mix the ingredients properly.Then the speed will
decrease to a speed that is optimal for kneading.
5 Close the lid and put the ingredients in the
The appliance will continue to run at this speed
feed tube.
until the stop button is pressed.You can decrease
or increase the speed up to 3 times by pressing
C
6 Press the Î button on the control panel.
the - or + button.
◗ The speed increases rapidly to the defined
Balloon beater
processing speed to guarantee an optimal end
result.
You can use the balloon beater to whisk eggs, egg
◗ Press the ingredients slowly down the feed
whites, instant pudding, cream, mayonnaise and
tube with the pusher, if necessary.
sponge cake mixtures.
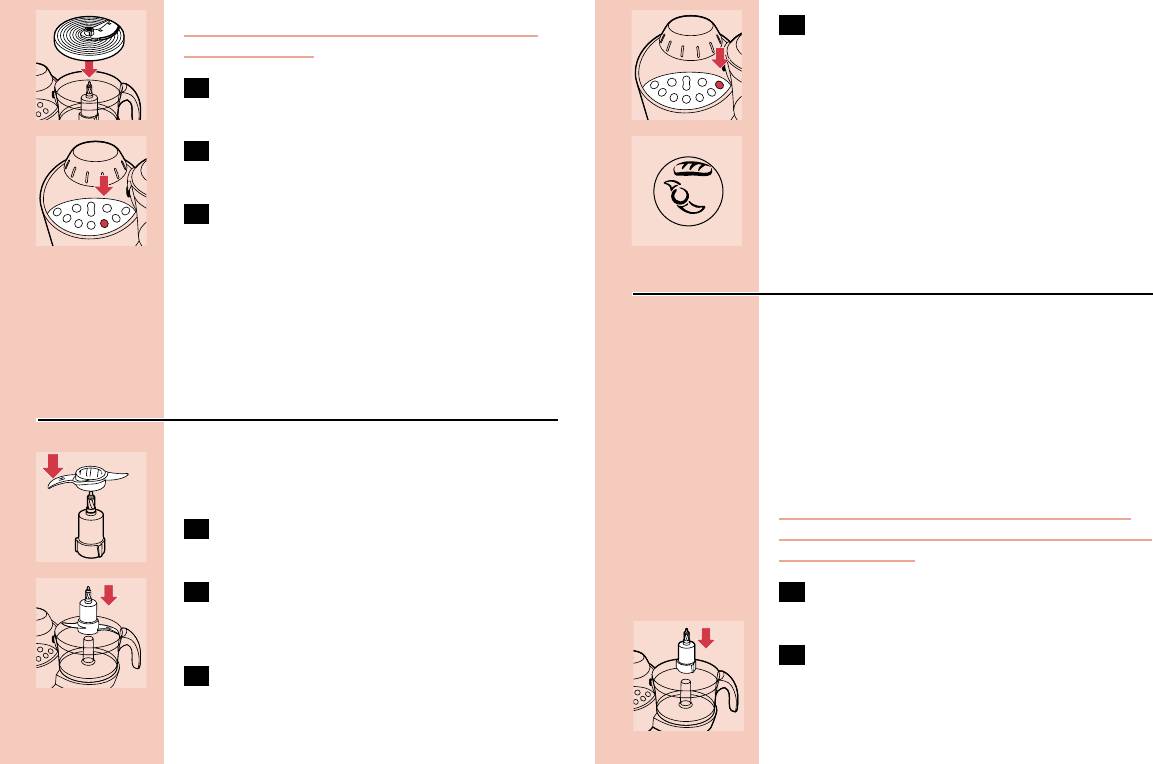
Stainless steel kneading accessory
When you want to whisk egg whites, make sure
the bowl and the whisk are entirely dry and free
The kneading accessory, which has been marked
from grease. Use egg whites at room
with
—, can be used for kneading yeast dough
temperature.
for bread and pizzas.
Do not use the balloon beater to prepare cake
C
1 Put the bowl on the motor unit and turn
mixtures with butter or margarine and do not use
the handle in the direction of the arrow.
it to knead dough.
C
2 Place the tool holder in the bowl and fit
1 Put the bowl on the motor unit and turn it
the kneading accessory onto the tool
to the left until you hear a click.
holder.
C
2 Put the tool holder in the bowl.
3 Put the ingredients in the bowl.
ENGLISH12
C
3 Fit the balloon beater onto the tool
holder.
4 Put the ingredients in the bowl, put the lid
on the bowl and turn it to the right until
you hear a click.
C
5 Press the ∆ button on the control panel.
The appliance increases the whisking speed to
maximum speed within 15 seconds.The appliance
then continues to run at this speed until the stop
button is pressed.You can decrease the speed up
to 3 times by pressing the - button.When
whipping cream or whisking egg whites, press the
- button 3 times to obtain optimal results.
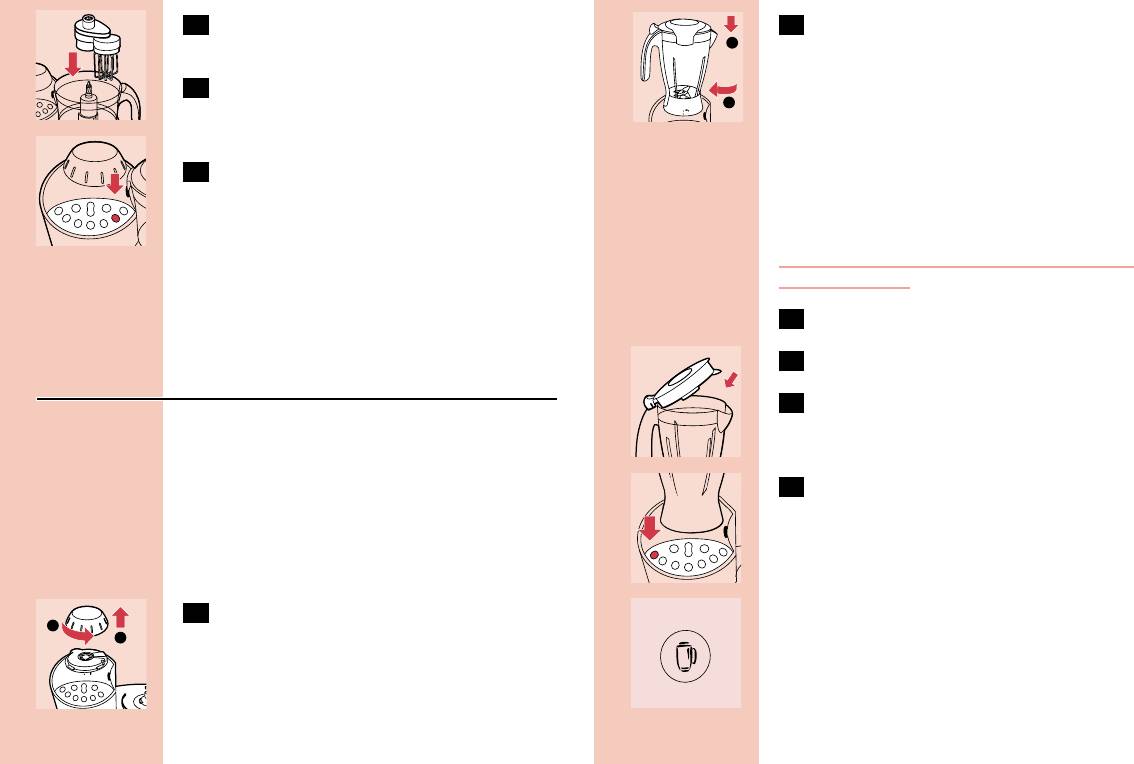
Blender and fruit filter
Blender
The blender is intended for:
- Blending fluids, e.g. dairy products, sauces, fruit
juices, soups, mixed drinks, sweet teas, shakes.
- Mixing soft ingredients, e.g. pancake batter or
mayonnaise.
- Pureeing cooked ingredients, e.g. for making
baby food.
C
1 To attach the blender jar, remove the
screw cap from the motor unit.
Note:You can only remove the screw cap to
attach the blender when you have removed the
lid of the food processing bowl or the meat
mincer.
1
2
C
2 Place the blender jar on the motor unit
with the groove opposite the semi-circular
mark on the motor housing (1).Then turn
the blender jar to the left until it locks into
place with a click (2).
The blender jar is properly mounted when the
groove on the blender jar is directly opposite the
groove on the motor unit and the two grooves
together form one long groove.The handle of the
blender jar will be pointing to the left.
Do not exert too much pressure on the handle
of the blender jar.
3 Put the ingredients in the blender jar.
C
4 Close the lid.
5 Always place the stopper in the blender lid
before you start processing.
C
6 Press the † button on the control panel.
The blender will start to operate.The
speed gradually increases to maximum
speed.The appliance will continue to run
at this speed until the stop button is
pressed. During the blending process you
can decrease the speed up to 3 times by
pressing the - button.
1
2
13ENGLISH
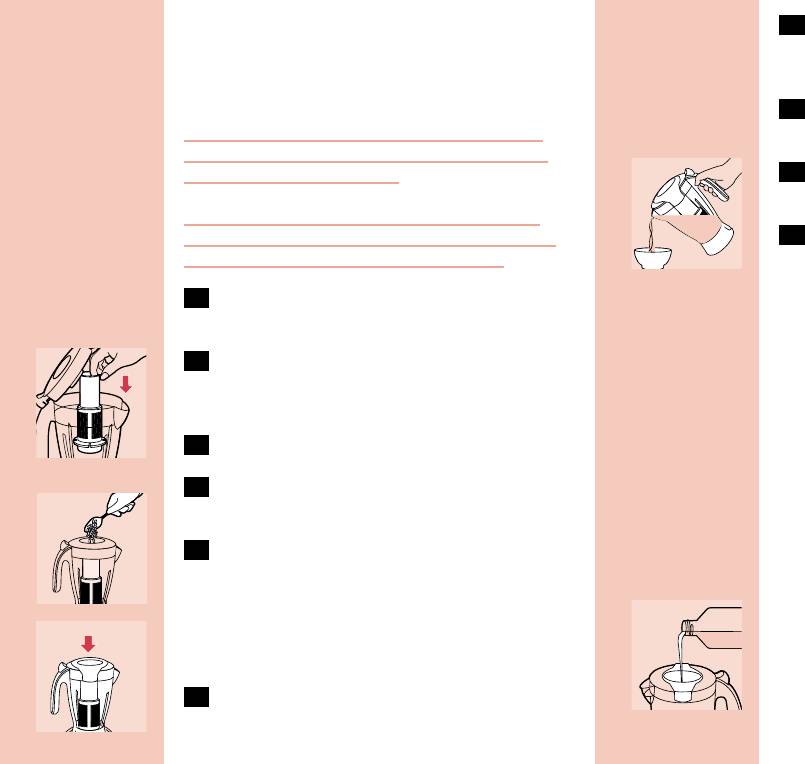
Fruit filter
7 Press the † button to switch the
With this filter you can make delicious fresh fruit
appliance on.
juices, cocktails or soy milk.The filter prevents pips
Let the appliance run for approx. 40 seconds.
and skins from ending up in your drink.
8 Switch the appliance off and remove the
Never overload the filter. Do not put more than
blender jar from the motor unit.
50g of unsoaked dried soy beans or 150g of fruit
in the filter at the same time.
C
9 Pour the drink out via the pouring lip of
the blender jar.
Do not let the appliance run more than 2 times
without interruption. Let the appliance cool down
10 For optimal results, put the jar with the
at room temperature before you continue.
remaining ingredients back onto the
appliance and let it run for a few more
1 Mount the blender jar onto the motor
seconds.
unit.
Note: when you are processing a large quantity,
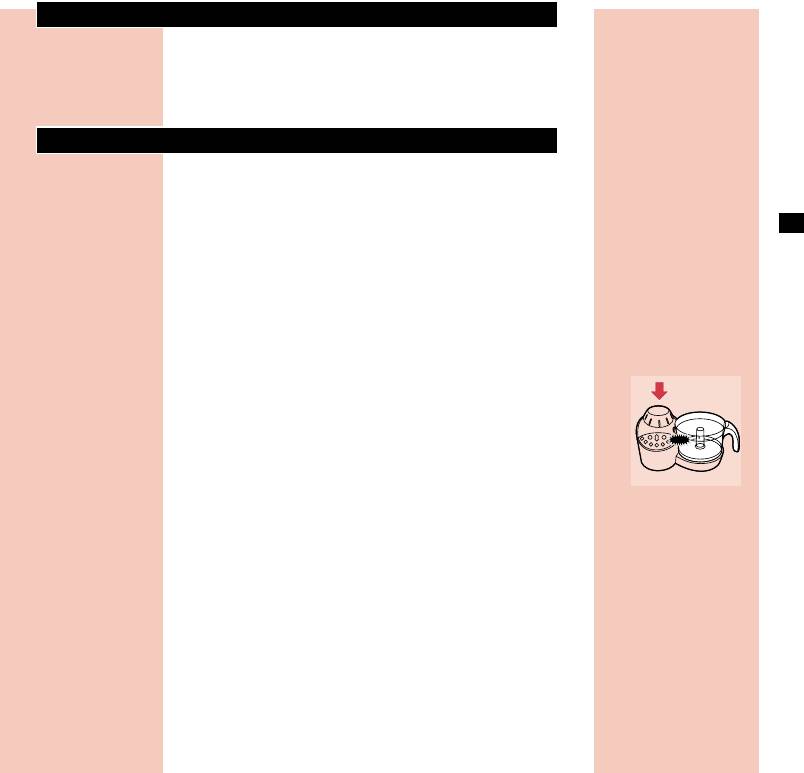
C
2 Put the filter in the blender jar.
we advise you not to put all the ingredients in the
Make sure that the grooves of the filter fit exactly
filter at the same time. Start processing a small
onto the ribs inside the blender jar.
quantity and let the appliance run for a few
seconds.Then switch the appliance off and add
3 Close the lid.
another small quantity, but do not exceed the top
of the sieve mesh. Repeat this procedure until you
4 Pour water or another liquid (milk, juice,
have processed all the ingredients. Always keep
etc.) into the blender jar.
the lid on the blender jar during processing.
C
5 Put the ingredients in the filter. Do not fill
the filter beyond the top of the sieve
Tips
mesh.
Cut fruits into smaller pieces and soak dried
C
◗ Pour liquid ingredients into the blender jar
pulses, such as soy beans, before putting them in
through the hole in the lid.
the filter.
◗ The longer you let the appliance run, the finer
the blending result will be.
C
6 Put the stopper in the blender lid.
◗ Pre-cut solid ingredients into smaller pieces
before putting them in the blender. If you
Оглавление
- ®).
- “ button is pressed
- Í button on the control panel.We
- ¥ P
- Î/” ¨/{
- ¥/P ¥/P
- ®).
- †.
- “ zatrzymuje się z chwilą
- Í.
- ¥ P
- ¨/{
- ¥/P ¨/{
- ∆/˚
- ®).
- “ şi se opreşte când apăsaţi butonul
- Í de pe panoul de comandă.
- ¥ P
- Î/’ ¨/{
- ¥/P
- ∆/˚
- ®).
- “ и остановится при нажатии на
- Í на панели
- ¥ P
- ¥/P ¥/P
- ¨/{ ∆/˚
- ∆/˚ ¨/{
- Í/Å
- ®).
- ¥ P
- Î/’
- ¨/{
- ¨/{ Î/Ø
- ®).
- † gombot.
- “
- Í gombot.
- ¥ P
- ¥/P
- ¨/{ ∆/˚
- ∆/˚ ¥/P
- ®).
- “
- Í.Pri
- ¥ P
- ¥/P
- Í/Å
- ´).
- “, і зупиняється при натисканні кнопки "stop".
- Í на панелі управління.
- ¥ P
- ¨/{ ¥/P
- †/D
- ¥/P
- ´).
- “, и спира, когато се натисне стоп-бутонът.
- ¥ P
- ¥/P
- ¨/{
- Î/¬
- ´).
- “ a
- Í na kontrolnom panelu.
- ¥ P
- Î/’
- ¨/{
- †/D
