Philips SRU5170: инструкция
Раздел: Бытовая, кухонная техника, электроника и оборудование
Тип: Универсальный Пульт Ду
Инструкция к Универсальному Пульту Ду Philips SRU5170
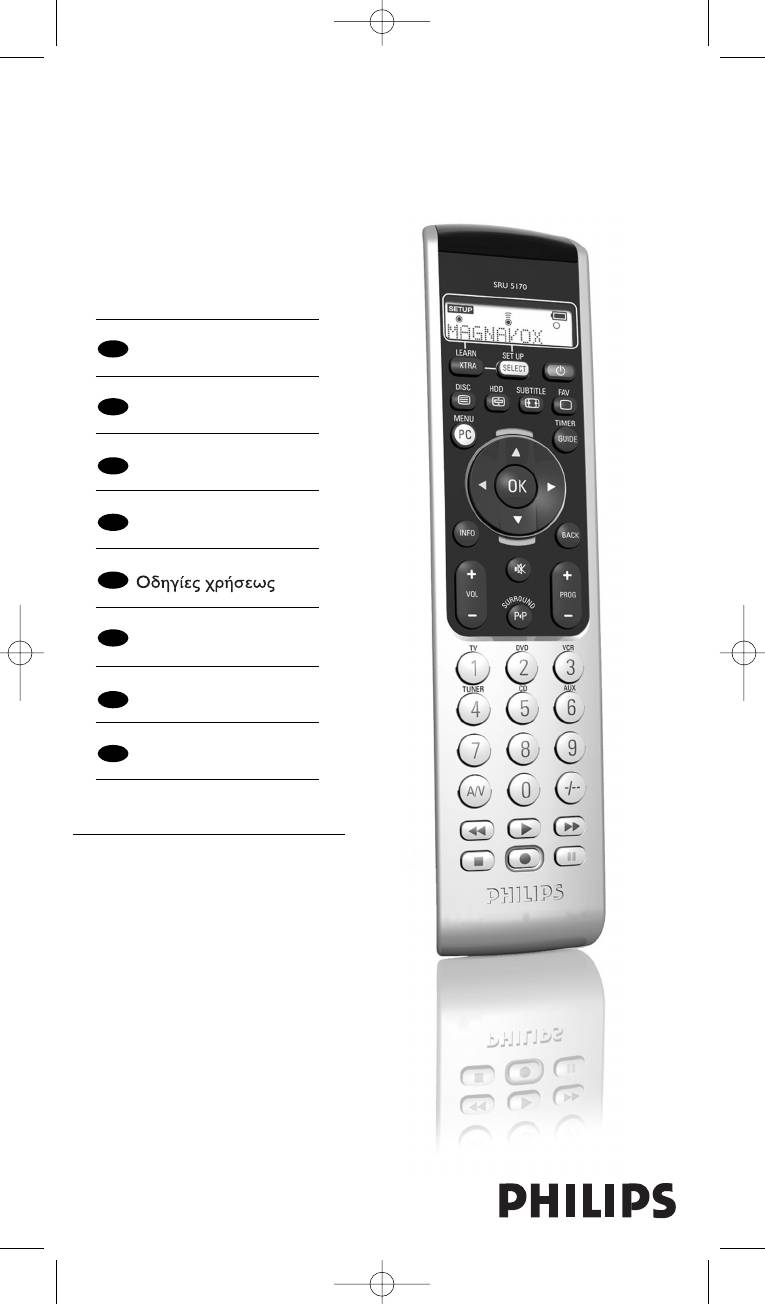
SRU 5170/87
EN
Instructions for use 4
IT
Instruzioni per l'uso 13
Instrucciones
ES
22
de manejo
PR
Manual de utilização 31
GR
40
TR
Kullanım kılavuzu 49
Инструкции по
RU
58
использованию
PL
Instrukcja obsługi 67
Quick, Clean & Easy Setup
www.philips.com/urc
Manual_SRU5170_87 24-04-2007 15:50 Pagina 1
Manual_SRU5170_87 24-04-2007 15:50 Pagina 2
Manual_SRU5170_87 24-04-2007 15:50 Pagina 3
1
(
2
*
3
4
&
5
^
6
%
7
8
$
#
9
0
@
!
Instructions for use
English
Contents
1. Introduction . . . . . . . . . . . . . . . . . . . . . . . . . . . . . . . . . . . . . . . . . . . . . . . . . . . . . . . . . . . . 4
2. Setting up the remote control . . . . . . . . . . . . . . . . . . . . . . . . . . . . . . . . . . . . . . . . 4-6
3. Using the remote control . . . . . . . . . . . . . . . . . . . . . . . . . . . . . . . . . . . . . . . . . . . . 6-7
Keys and functions . . . . . . . . . . . . . . . . . . . . . . . . . . . . . . . . . . . . . . . . . . . . . . . . . . . . . . . 6-7
Extra functions . . . . . . . . . . . . . . . . . . . . . . . . . . . . . . . . . . . . . . . . . . . . . . . . . . . . . . . . . . . . 7
4. Extra possibilities . . . . . . . . . . . . . . . . . . . . . . . . . . . . . . . . . . . . . . . . . . . . . . . . . . . 8-10
Adding extra functions . . . . . . . . . . . . . . . . . . . . . . . . . . . . . . . . . . . . . . . . . . . . . . . . . . . . . 8
Delete devices. . . . . . . . . . . . . . . . . . . . . . . . . . . . . . . . . . . . . . . . . . . . . . . . . . . . . . . . . . . 8-9
Learning key functions . . . . . . . . . . . . . . . . . . . . . . . . . . . . . . . . . . . . . . . . . . . . . . . . . . . . . 9
Activating/de-activating the backlight function . . . . . . . . . . . . . . . . . . . . . . . . . . . . . . . 9-10
Restoring the original functions of the remote control . . . . . . . . . . . . . . . . . . . . . . . . . 10
5. Replacing the batteries . . . . . . . . . . . . . . . . . . . . . . . . . . . . . . . . . . . . . . . . . . . . . . . . 10
6. Support . . . . . . . . . . . . . . . . . . . . . . . . . . . . . . . . . . . . . . . . . . . . . . . . . . . . . . . . . . . . 11-12
Troubleshooting . . . . . . . . . . . . . . . . . . . . . . . . . . . . . . . . . . . . . . . . . . . . . . . . . . . . . . . 11-12
Need help? . . . . . . . . . . . . . . . . . . . . . . . . . . . . . . . . . . . . . . . . . . . . . . . . . . . . . . . . . . . . . . 12
Extra functions list . . . . . . . . . . . . . . . . . . . . . . . . . . . . . . . . . . . . . . . . . . . . . . . . . . . . . . . . 76
Information to the Consumer . . . . . . . . . . . . . . . . . . . . . . . . . . . . . . . . . . . . . . . . . . . . . . 77
1. Introduction
Congratulations on your purchase of the Philips SRU 5170 universal remote control.
The SRU 5170 is capable of operating up to 7 different devices. During setup you can
define yourself exactly which devices will be operated (see table below).
You can find information on how to prepare the SRU 5170 for use in
chapter 2 ‘Setting up the remote control’.
2. Setting up the remote control
The remote control can be set up to operate any 7 of the following devices:
Device Display indication
TV TV
Second TV TV2
VCR VCR
Second VCR VCR2
Personal Video Recorder PVR
TV-VCR combo TV-VCR
TV-DVD combo TV-DVD
DVD-VCR combo DVD-VCR
Amplifier AMPLIFIER
Home Theatre System HTS
Audio set AUDIO-SET
Tuner TUNER
Digital Media Receiver DMR
Set Top Box STB
Satellite receiver SAT
Digital Video Broadcasting Terrestrial device DVB-T
Cable decoder CABLE
CD player CD
Mini Disk MD
DVD player DVD
DVD recorder DVDR
Game console GAME
DVD recorder with Hard Disk Drive DVDR-HDD
Multimedia PC PC
4
Manual_SRU5170_87 24-04-2007 15:50 Pagina 4
Instructions for use
Notes:
– Batteries are already installed in the remote control.
– If you wish to set up the remote control for operating your TV, you can skip step 3.
English
– If your device is a Philips device, you can skip step 5.
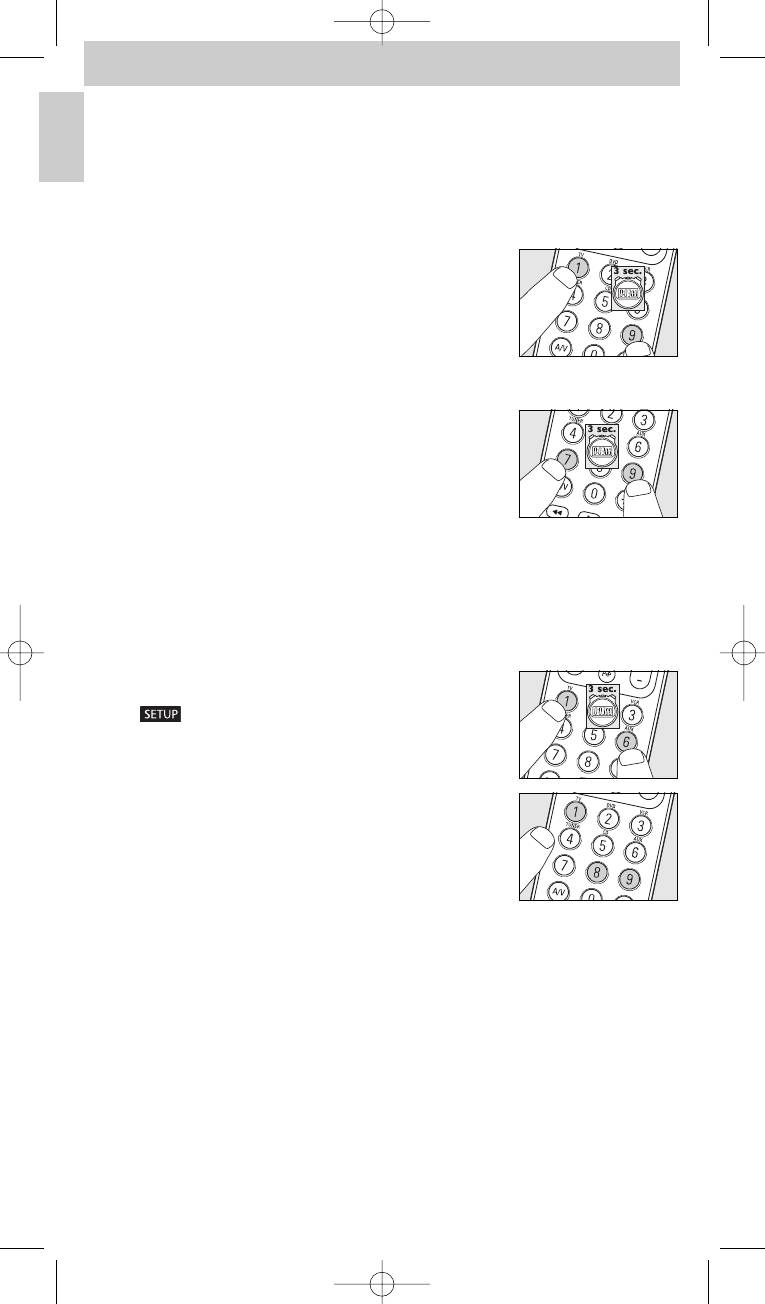
– You can exit setup mode at any time by keeping SETUP pressed for three seconds.
– Once installed, a device cannot be deleted from the device list. Only the brand name can
be changed (e.g. if you wish to operate a device type of a different brand).
To delete a device you have to clear the entire memory. For this,
see ‘Restoring the original functions of the remote control’ under 4. ‘Extra possibilities’.
1 Switch on the device you wish to set up the remote control for. If the device is a
DVD-player/recorder or video recorder, insert a disk or tape and start playback.
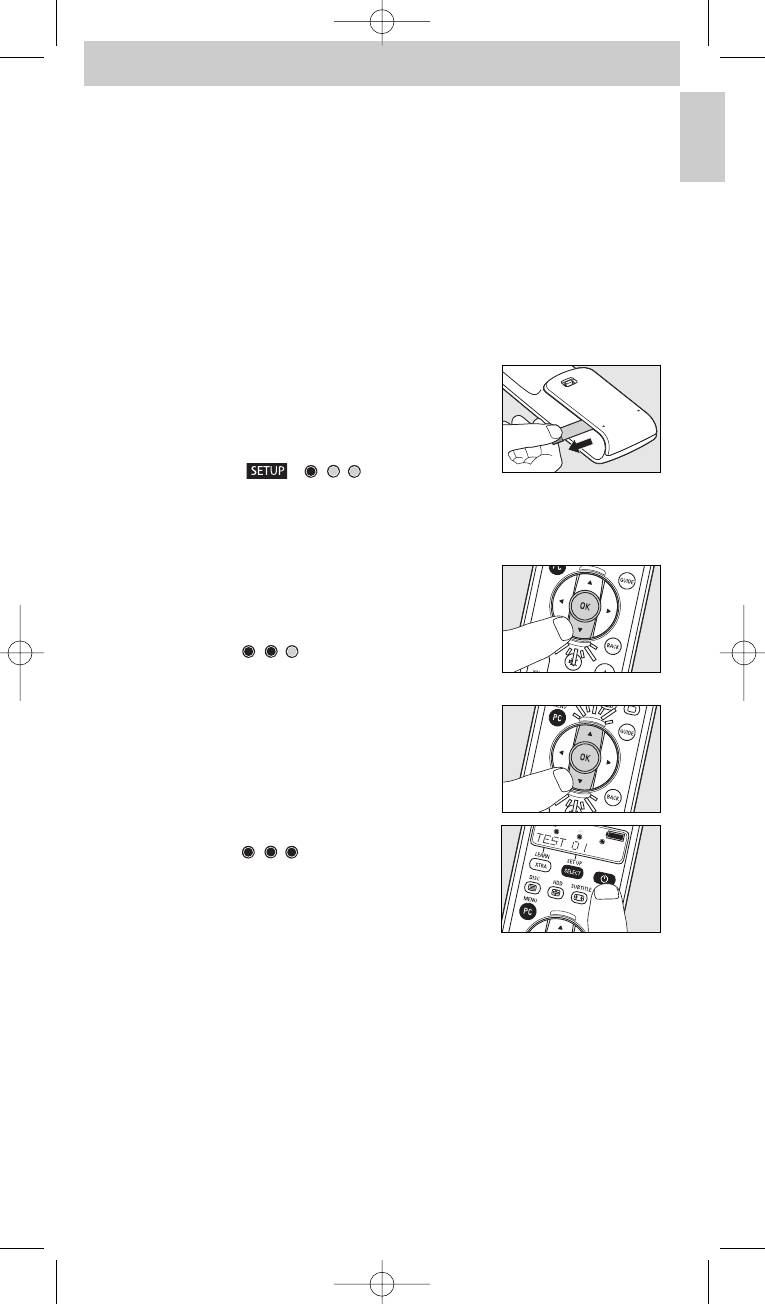
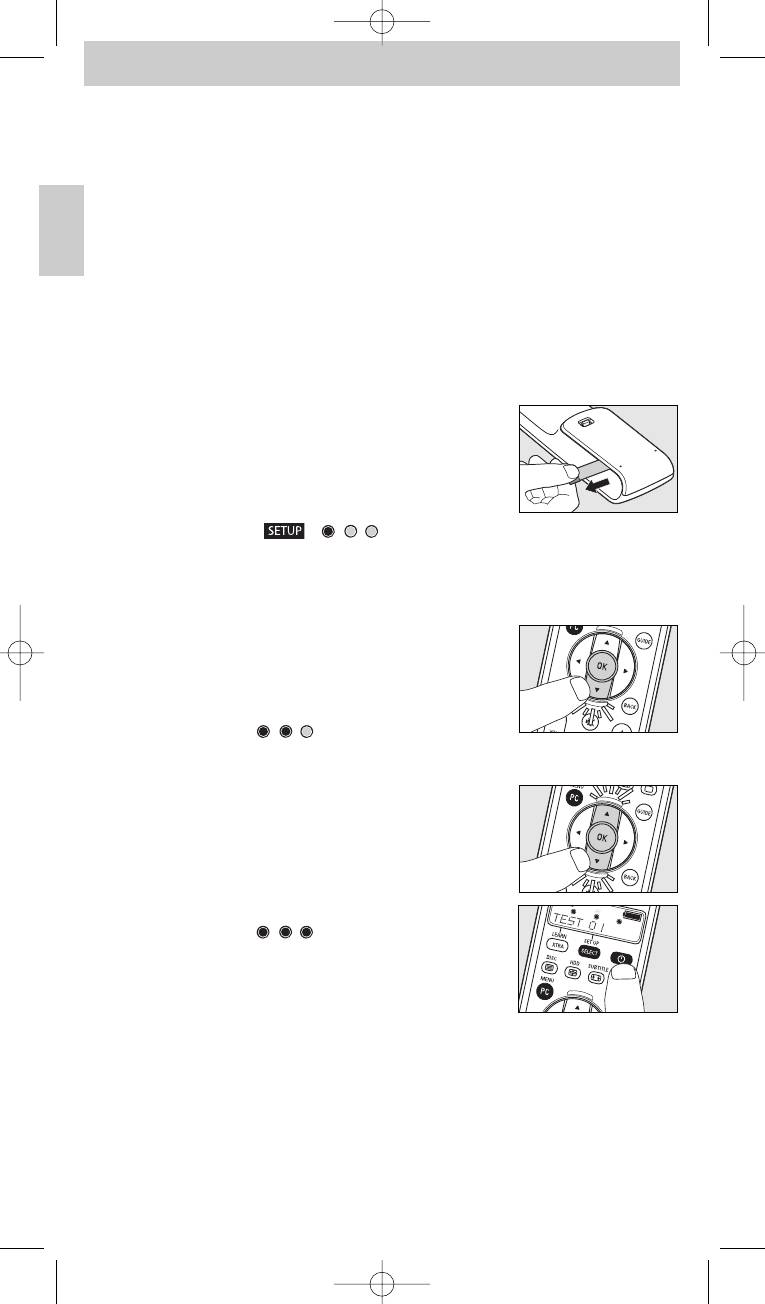
2 Pull out the protective strip from the battery
compartment to activate the batteries.
• If the strip does not come out easily, open the battery
compartment to get better access to the strip.
– The remote control will immediately enter setup mode:
- the display shows ‘ ’,‘ ’ and ’TV?’;
- the backlight turns on;
- the keys that can be used are blinking.
– The remote control is now ready to be set up for operating your TV.
3 Use 4 to select the device you wish to set up
the remote control for (see table on previous page).
4 Confirm with OK.
– The display shows ‘ ’ and ’PHILIPS?’.
The keys that can be used are blinking.
5 Use 4 and 3 to select the brand of your device.
• If the brand of your device is not on the list, you can select
any other brand.
6 Confirm with OK.
7 Keep
yy
pressed until the device responds.
– The display shows ‘ ’.
8 Point the remote control at the device.
– The remote control now starts emitting all known ‘off
(standby)’ codes, one by one. Each time a code is sent,
this is shown on the display: ’TEST 01, 02, 03’, etc.
5
Manual_SRU5170_87 24-04-2007 15:50 Pagina 5
Instructions for use
English
9 When the device responds, immediately release
yy
.
– The remote control has now found a code that works for your device.
’SETUP OK’ appears on the display.
– If the device does not respond and ’LIST END’ appears, no code was found for
the device. In order to operate the device with the remote control, it should learn
the original remote control functions key by key.
For this, see ‘Learning key functions’ under 4. ’Extra possibilities’.
10 Check if you can operate all device functions with the remote control.
– If this is the case, the remote control is ready to operate the device.
The backlight turns off.
• If this is not the case, continue with step 11.
• If you wish to set up the remote control for operating other devices,
continue with step 11.
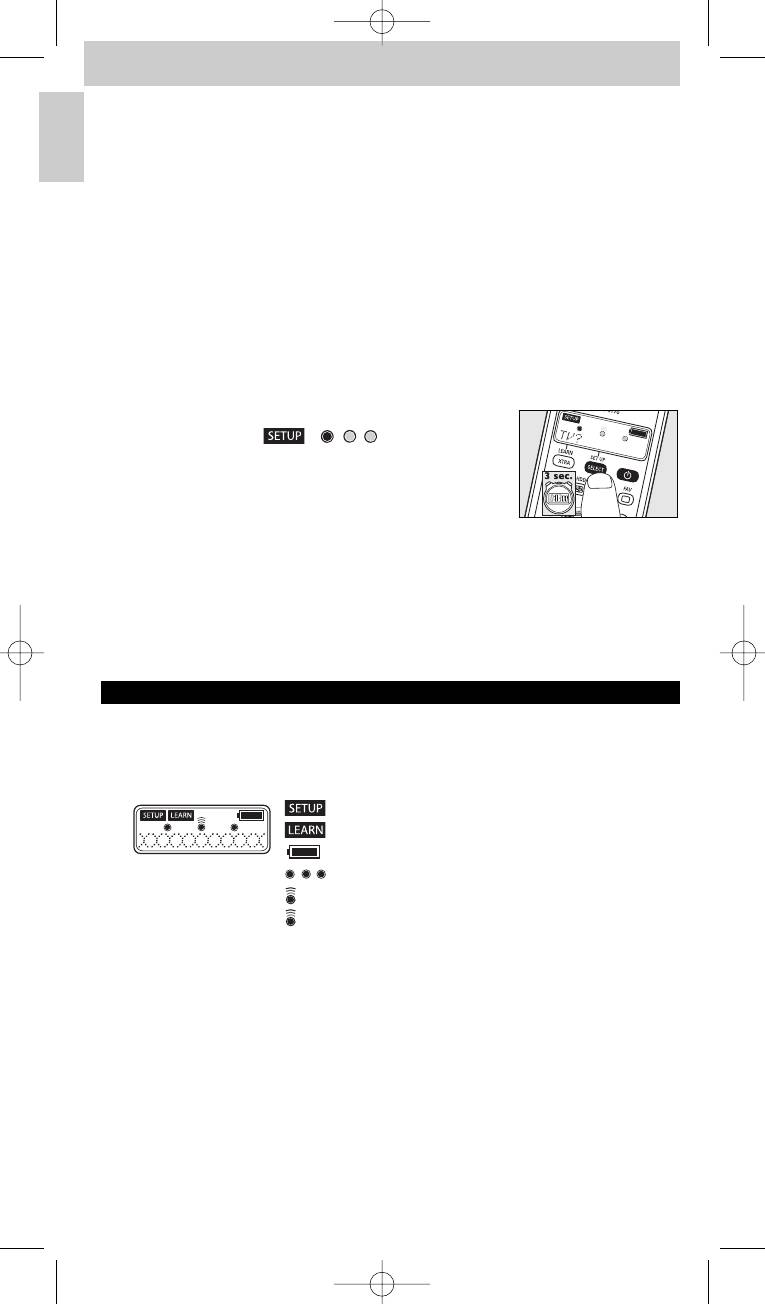
11 Keep SELECT pressed for three seconds:
– - the display shows ‘ ’,‘ ’ and ’TV?’.
- the backlight turns on.
- the keys that can be used are blinking.
– The remote control is now in setup mode.
12 Continue setup from step 3.
• If, after several times trying, a device still does not respond at all or not
properly to all key commands, the remote control cannot find a code for the
device. In order to operate the device with the remote control, it should
learn the original remote control functions key by key.
For this, see ‘Learning key functions’ under 4. ’Extra possibilities’.
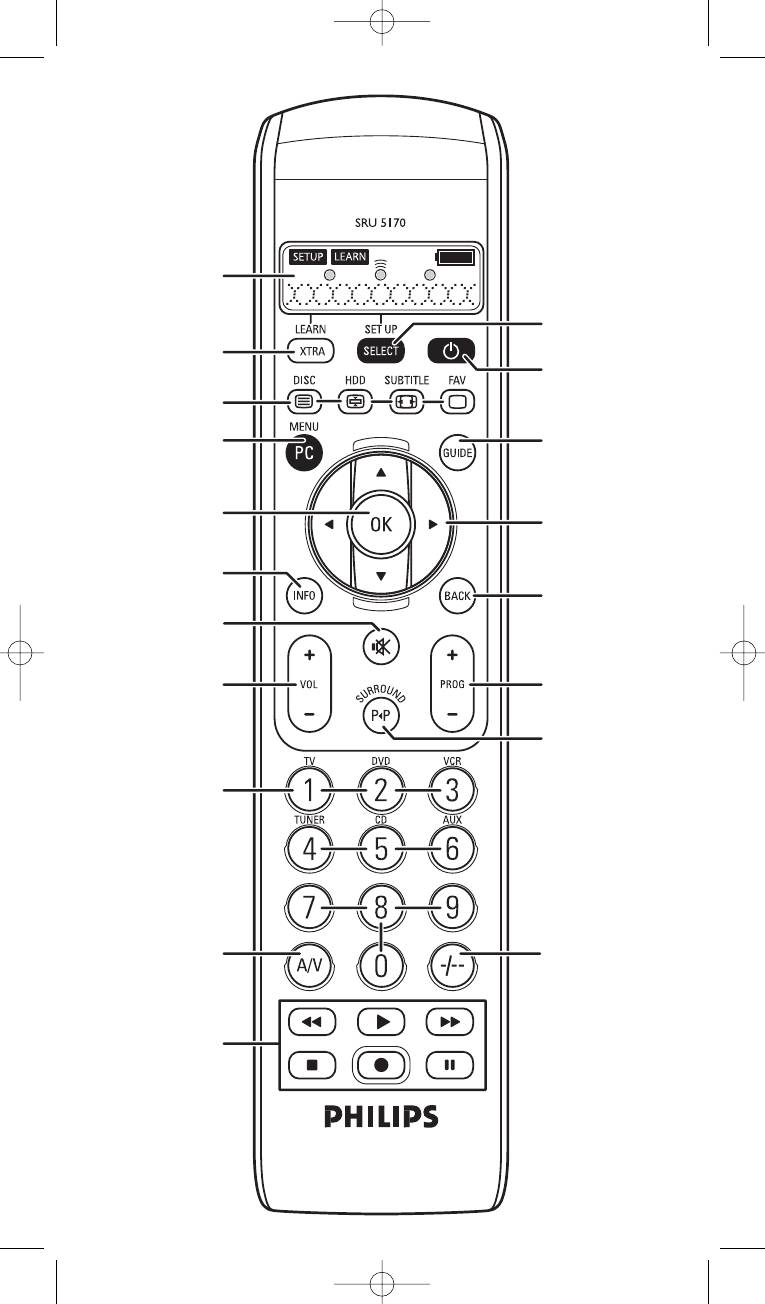
3. Using the remote control
Keys and functions
The illustration on page 3 gives an overview of all keys and their functions.
1 Display information screen. Shows current remote control status.
: remote control in setup or advanced function mode.
: remote control in learn mode.
: battery status. Blinks when battery power is low.
: light up in setup, learn, and advanced function mode.
: lights up when the remote control sends out a signal.
: lights up when the remote control receives a signal in
learn or advanced function mode.
TV: selected device.
PHILIPS: selected brand.
2 LEARN. . . . . . . . . . . . . - switches the remote control into learn mode.
XTRA . . . . . . . . . . . . . . - turns on the backlight (if enabled).
- displays extra (advanced) functions for the selected device.
6
Manual_SRU5170_87 24-04-2007 15:50 Pagina 6

Instructions for use
3 / DISC . . . . . . . . . . - TV mode: teletext on/off.
- DVD mode: disc menu.
/ HDD. . . . . . . . . . . - TV mode: text hold.
English
- DVD-R mode: Hard Disk Drive menu.
/ SUBTITLE . . . . - TV mode: wide screen TV.
- DVD mode: subtitles.
/ FAV(ourites) . . . . - TV mode: text off.
- SAT mode: list of favourite channels.
4 PC . . . . . . . . . . . . . . . . . activates / de-activates multimedia PC.
MENU. . . . . . . . . . . . . . turns menu on and off.
5 OK . . . . . . . . . . . . . . . . . confirms your selection.
6 INFO. . . . . . . . . . . . . . . displays on-screen channel information.
7
ss
. . . . . . . . . . . . . . . . . . . mutes sound of TV.
8 - VOL +. . . . . . . . . . . . . adjusts TV volume.
9 Digit keys . . . . . . . . . . - TV mode: direct choice of channels and other functions.
- AMP mode: source selection keys
(TV, DVD,VCR,TUNER, CD, AUX).
0 AV . . . . . . . . . . . . . . . . . switches between external inputs of your equipment.
! 5 . . . . . . . . . . . . . . . . . . - TV mode: red teletext key*.
- VCR/DVD mode: rewind.
2 . . . . . . . . . . . . . . . . . . . - TV mode: index.
- VCR/DVD mode: play.
6 . . . . . . . . . . . . . . . . . . - TV mode: blue teletext key*.
- VCR/DVD mode: wind.
9 . . . . . . . . . . . . . . . . . . . - TV mode: green teletext key*.
- VCR/DVD mode: stop.
0 . . . . . . . . . . . . . . . . . . . - VCR/DVD mode: record.
; . . . . . . . . . . . . . . . . . . . - TV mode: yellow teletext key*.
- VCR/DVD mode: pause.
@ -/--. . . . . . . . . . . . . . . . . . selects between one- and two-figure channel numbers.
#
22
. . . . . . . . . . . . . . . . . . - selects previous programme / channel.
SURROUND . . . . . . . - selects surround modes.
$ - PROG +. . . . . . . . . . . selects previous or next channel.
% BACK . . . . . . . . . . . . . . jumps back one level in menu or turns off menu.
^ Cursor keys . . . . . . . . cursor up, down, left, right in a menu.
& GUIDE . . . . . . . . . . . . . STB mode: opens electronic TV programme guide.
*
yy
(Standby) . . . . . . . . . . switches TV, DVD,VCR, AMP, CD or STB on or off.
( SETUP . . . . . . . . . . . . . - switches the remote control into setup mode.
SELECT. . . . . . . . . . . . - turns on the backlight (if enabled).
- selects device modes. Only devices for which the remote
control is set up can be selected.
* Note: If you wish to use the colour keys as colour selection keys in DVDR-HDD mode,
you should learn the colour selection functions to the extra function key XTRA.
For this, see ‘Adding extra functions’ under 4. ’Extra possibilities’.
Extra functions
For each device, the remote control is set up for, extra (advanced) functions can be added
to the remote control. For this see ‘Adding extra functions’ hereafter.
For an overview of extra (advanced) functions for the various devices,
see the ‘Extra functions’ list at the back of this booklet.
7
Manual_SRU5170_87 24-04-2007 15:50 Pagina 7
Instructions for use
English
4. Extra possibilities
Adding extra functions
Note: Only functions that are available on the original device remote controls can be added.
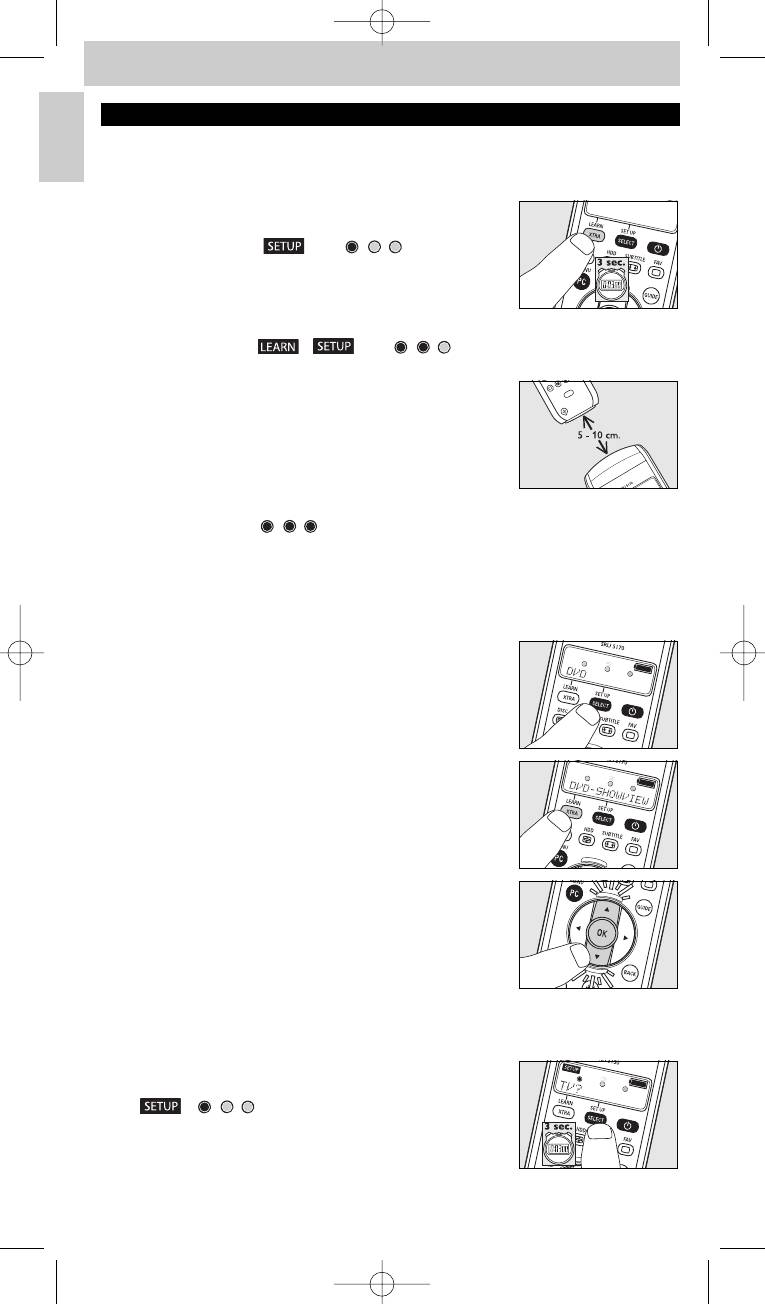
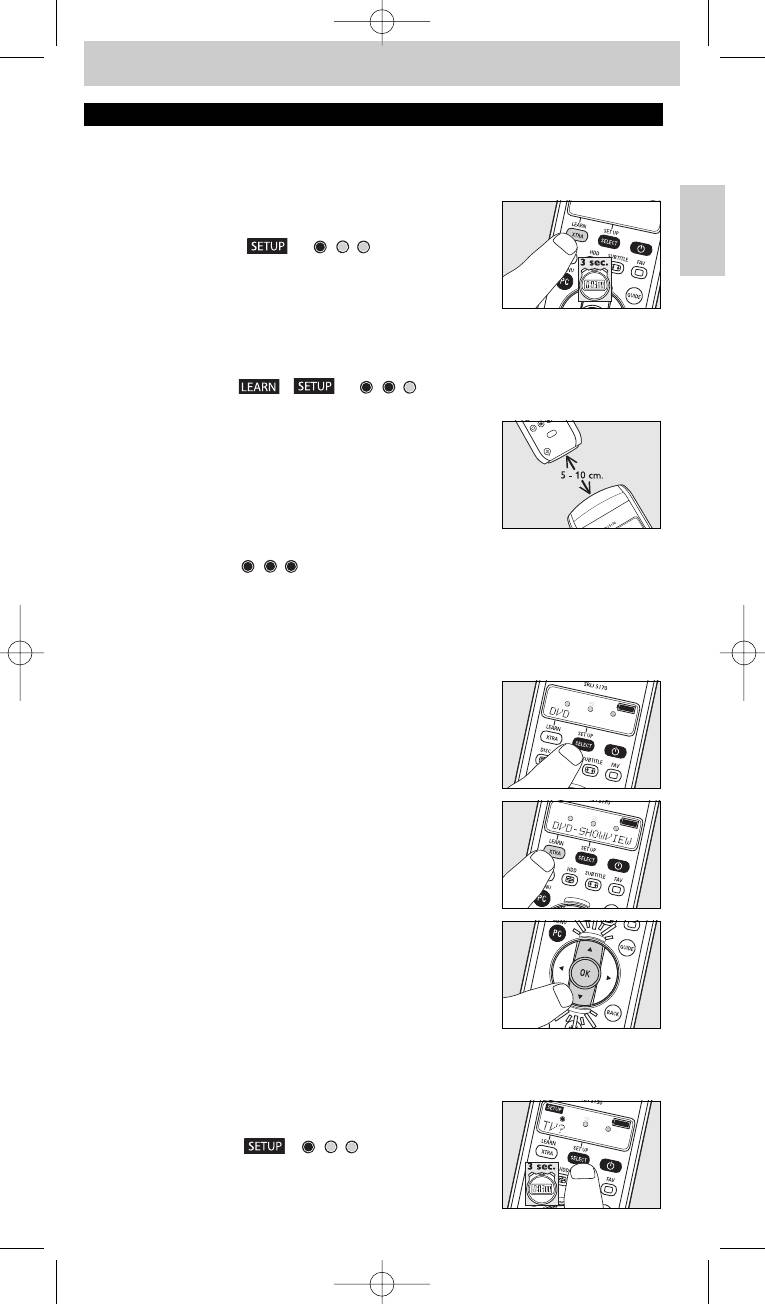
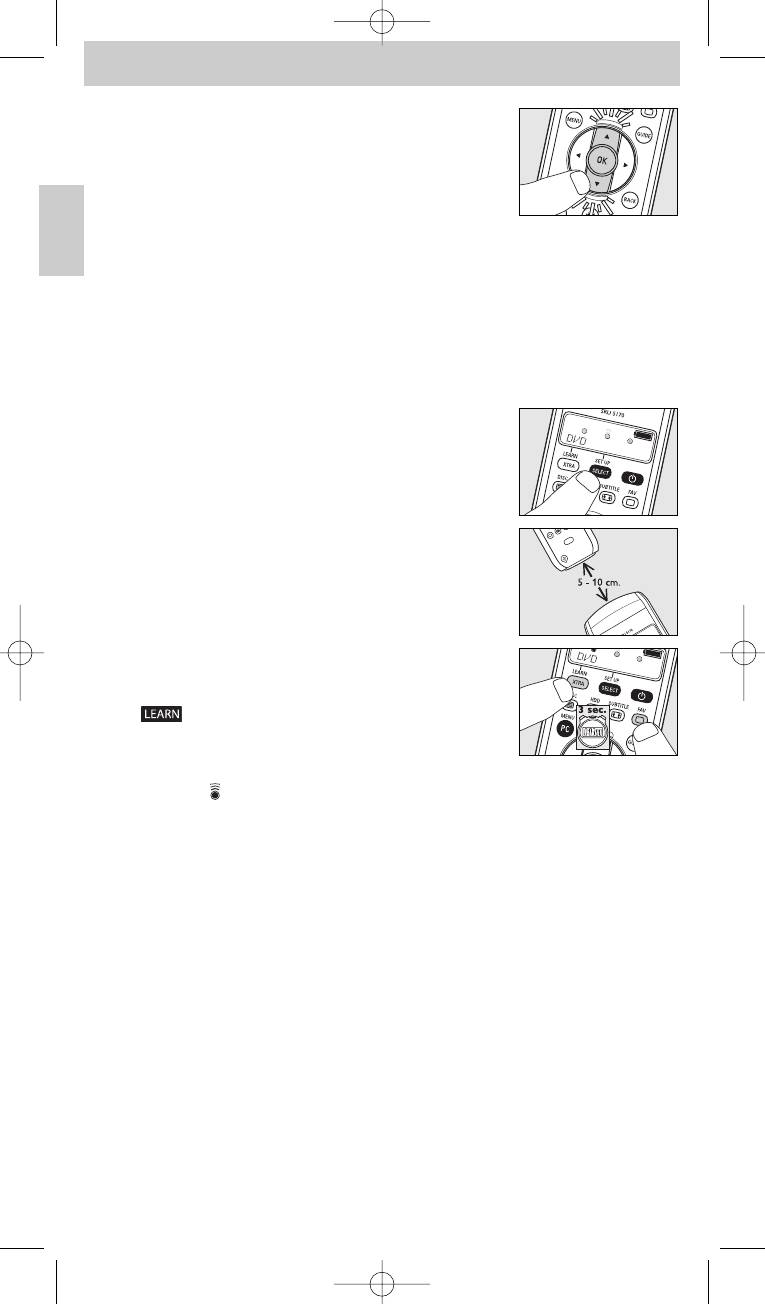
1 Keep XTRA pressed for 3 seconds:
– - the backlight (if enabled) turns on.
- the display shows ‘ ’ and ‘ ’.
- the keys that can be used are blinking.
2 Use 3 and 4 to select the extra function you wish to add
or change. Confirm with OK.
– The display shows ‘ ’,‘ ’ and ‘ ’ together with ‘LEARNING‘.
3 Place both remote controls on a flat surface (like a
coffee table) and aim them head-to-head with about
5 - 10 cm in between.
4 Press the function key on the original remote control
(e.g. the AMBILIGHT key on your TV remote control) or
press 1 if you wish to return to step 2.
– The display shows ‘ ’ together with e.g. ‘TV-AMBILIGHT LEARN OK‘.
The extra function has been added successfully.
– If the display shows ‘ERROR‘ or ‘MEM FULL’, start again from step 1.
Also see ‘Troubleshooting’ under 6.‘Support’.
Activating / using an extra (advanced) function
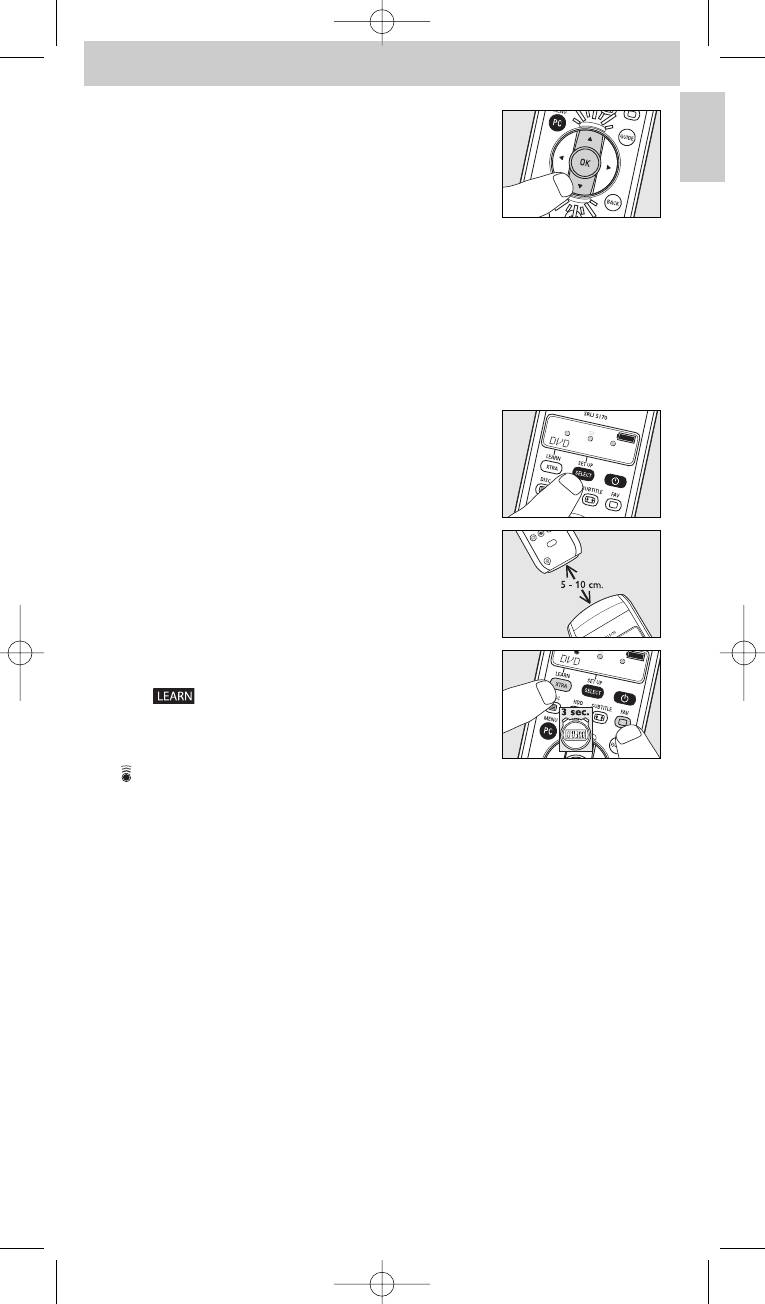
1 Use SELECT to select the desired device. E.g. DVD.
– Confirm with OK.
2 Press XTRA.
– The last selected function for the device appears on the
display. E.g. DVD-SHOWVIEW.
The keys that can be used are blinking.
3 Use 3 and 4 to select the function you wish to activate.
E.g. DVD-ZOOM. Press OK to activate the function.
4 Press XTRA again to go back to normal operation mode.
Delete devices
Example of TV:
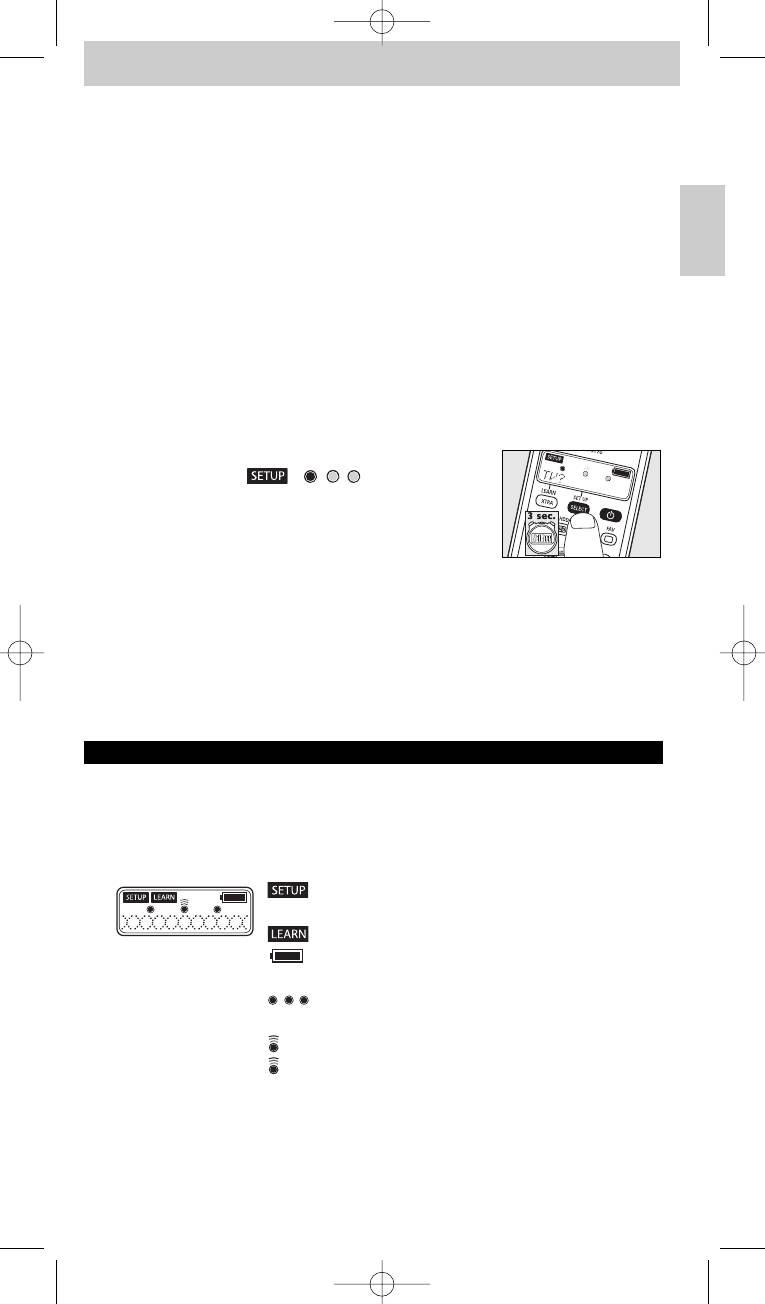
1 Keep SETUP pressed for 3 seconds:
– the backlight (if enabled) turns on.
– ‘ ’,‘ ’ and ’TV?’
– the keys that can be used are blinking.
8
Manual_SRU5170_87 24-04-2007 15:50 Pagina 8
Instructions for use
2 Use 3 and 4 to select ’DELETE TV’ at the bottom
of the list.
3 Press OK to delete the TV device mode.
English
– The display shows ’DEVICE DELETED’.
– The TV device mode has been deleted.
Learning key functions
If you miss certain functions from your original remote control on the SRU 5170, it can
learn these functions from the original remote control.You can store a function under any
of the available keys on the SRU 5170, except XTRA (LEARN) and SELECT (SETUP).
Any function already stored under a key will be deleted.
1 Make sure you have the original remote control at hand.
2 Use SELECT to select the desired device. E.g. DVD.
3 Place both remote controls on a flat surface (like a
coffee table) and aim them head-to-head with about
5 - 10 cm in between.
4 Keep LEARN and the key you wish to learn on the
SRU 5170 pressed simultaneously for 3 seconds,
until ‘ ’ lights up, together with ’LEARNING’.
5 Press the key you wish to copy on the original
remote control.
– lights up.The remote control is now learning the function.
– When the remote control has learned the function, the display shows ’LEARN OK’
to confirm that the signal is stored.
– If the display shows ‘ERROR‘ or ‘MEM FULL’, start again from step 1.
Also see ‘Troubleshooting’ under 6.‘Support’.
9
Manual_SRU5170_87 24-04-2007 15:50 Pagina 9
Instructions for use
English
Activating / de-activating the backlight function
The backlight illuminates the display so you can clearly see all display messages, even in a
dimly lit room. As the backlight consumes additional power, the battery lifetime will reduce
when the backlight is used frequently.Therefore it is possible to de-activate the backlight
function.
De-activating the backlight function
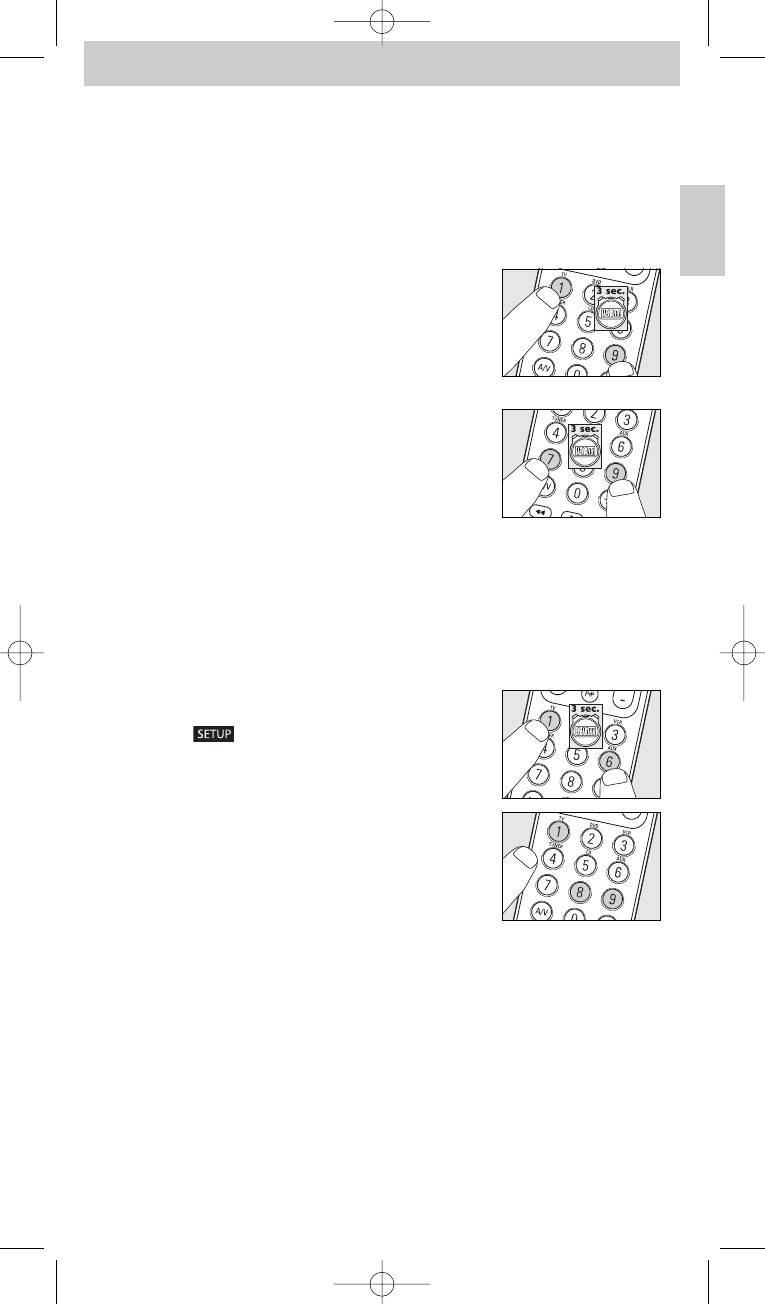
• Keep digit keys 1 and 9 pressed simultaneously for
three seconds.
– The backlight function is now de-activated and the backlight
cannot be turned on.
Activating the backlight function
• Keep digit keys 7 and 9 pressed simultaneously for
three seconds.
– The backlight function is now activated and the backlight
can be turned on.
Restoring the original functions of the remote control
In some cases it could be useful to restore the original functions of the remote control.
E.g. if the remote control memory is full while you wish to set it up for a specific device or
learn an extra key function to it.The remote control will then be reset to the default
factory settings and all user settings will be deleted.
1 Keep digit keys 1 and 6 pressed simultaneously for
three seconds.
– ‘ ’ lights up.
The remote control is now in setup mode.
2 Press digit keys 9, 8 and 1, in that order.
– ‘981 - WAIT’ appears on the display.
All original functions have now been restored and
any extra functions have been deleted.
10
Manual_SRU5170_87 24-04-2007 15:50 Pagina 10
Instructions for use
5. Replacing the batteries
When the battery status indicator ( ) on the display starts blinking, battery power is
English
low and you should replace the batteries. All user settings will be retained when the old
batteries are removed.
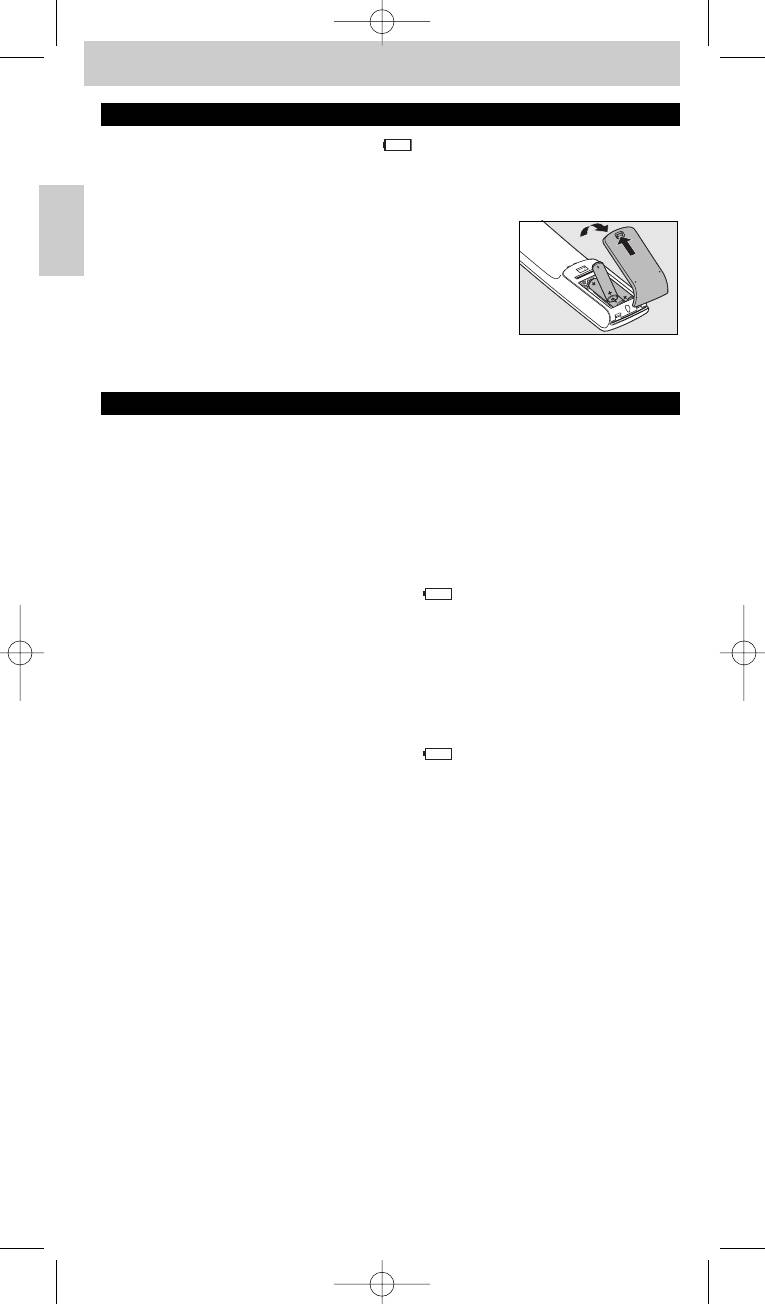
1 Press the cover inward, slide it in the direction of the
arrow and remove the cover.
2 Insert 3 AAA/R03 batteries noting the + and -
configuration inside the battery compartment.
3 Place the cover back and click it firmly into place.
6. Support
Troubleshooting
• Problem
– Possible cause / solution
• The device you want to operate does not respond at all when a key is pressed.
– Point the remote control at the device and make sure that there are no obstructions
between the remote control and the device.
– Make sure the function you wish to operate is available on the device.
– Check if the battery status indicator ()on the display blinks (low battery power).
If this is the case, insert new batteries.
• The device you want to operate does not respond properly when a key is pressed.
– Maybe the wrong code is programmed for the device during setup.
Try setting up the remote again. If the device still does not respond, call our helpline.
– Check if the battery status indicator ()on the display blinks (low battery power).
If this is the case, insert new batteries.
• The teletext keys do not work.
– Find out whether your TV is equipped with teletext.
• You have difficulties operating all of the functions on your device.
– Maybe the remote control has to be adapted to the model of the device.
Call our helpline for details.
• ERROR appears on the display while adding an extra (advanced) function or when
trying to learn a key.
– No signal from the original remote control is received for 20 seconds and the SRU 5170
stopped the adding / learning process. Start again from step 1.
– An SRU 5170 key is pressed before a signal is detected and the SRU 5170 stopped the
adding/learning process. Start again from step 1.
– The function you try to add is not available on the original remote control.
– Make sure the original remote control is working properly.
– Make sure the remote controls are properly aligned.
– The IR signal of your original device is out of range.The SRU 5170 can only learn IR signals
with a carrier signal of 30-60kHz.
11
Manual_SRU5170_87 24-04-2007 15:50 Pagina 11
Instructions for use
English
• MEM FULL appears on the display while adding an extra (advanced) function or
when trying to learn a key.
– No more functions can be added for the selected device or the SRU 5170 memory is full.
Restore all the original functions of your remote control in order to create memory space.
For this, see ‘Restoring the original functions of your remote control’ under 4.
‘Extra possibilities’.All user settings will then be deleted.
• The remote control does not enter setup mode after pressing SELECT.
– Check if the battery status indicator ()on the display blinks (low battery power).
If this is the case, insert new batteries.
• Only 7 devices can be selected during setup.
– The maximum number of devices (7) for the SRU 5170 is already set up.
Other device types cannot be selected unless you clear the entire memory. For this,
see ‘Restoring the original functions of the remote control’ under 4. ‘Extra possibilities’.
All user settings will then be deleted.
Need help?
If you have any questions about the SRU 5170, you can always contact us.
You will find our contact details after the extra functions list at the back of this manual.
Read this manual carefully before you make a call.You can solve most of the problems
yourself. When you call our helpline, make sure the device is at hand so that our operators
can help you determine whether your remote control is working properly.
The model number of your Philips universal remote control is SRU 5170/86.
Date of purchase: ......../ ......../ ........
(day/month/year)
12
Manual_SRU5170_87 24-04-2007 15:50 Pagina 12
Instruzioni per l'uso
Indice
1. Introduzione . . . . . . . . . . . . . . . . . . . . . . . . . . . . . . . . . . . . . . . . . . . . . . . . . . . . . . . . . . 13
2. Impostazione del telecomando . . . . . . . . . . . . . . . . . . . . . . . . . . . . . . . . . . . . . 13-15
3. Utilizzo del telecomando . . . . . . . . . . . . . . . . . . . . . . . . . . . . . . . . . . . . . . . . . . . 15-16
Tasti e funzioni . . . . . . . . . . . . . . . . . . . . . . . . . . . . . . . . . . . . . . . . . . . . . . . . . . . . . . . . 15-16
Funzioni supplementari . . . . . . . . . . . . . . . . . . . . . . . . . . . . . . . . . . . . . . . . . . . . . . . . . . . 16
4. Possibilità supplementari . . . . . . . . . . . . . . . . . . . . . . . . . . . . . . . . . . . . . . . . . . . 17-19
Italiano
Aggiunta di funzioni supplementari . . . . . . . . . . . . . . . . . . . . . . . . . . . . . . . . . . . . . . . . . 17
Elimina dispositivi . . . . . . . . . . . . . . . . . . . . . . . . . . . . . . . . . . . . . . . . . . . . . . . . . . . . . . 17-18
Funzioni di apprendimento dei tasti . . . . . . . . . . . . . . . . . . . . . . . . . . . . . . . . . . . . . . . . . 18
Attivazione/disattivazione della funzione di retroilluminazione . . . . . . . . . . . . . . . . . . . 19
Ripristino delle funzioni originali del telecomando . . . . . . . . . . . . . . . . . . . . . . . . . . . . . 19
5. Sostituzione delle batterie . . . . . . . . . . . . . . . . . . . . . . . . . . . . . . . . . . . . . . . . . . . . 19
6. Supporto . . . . . . . . . . . . . . . . . . . . . . . . . . . . . . . . . . . . . . . . . . . . . . . . . . . . . . . . . . . 20-21
Risoluzione dei problemi . . . . . . . . . . . . . . . . . . . . . . . . . . . . . . . . . . . . . . . . . . . . . . . 20-21
Occorre assistenza? . . . . . . . . . . . . . . . . . . . . . . . . . . . . . . . . . . . . . . . . . . . . . . . . . . . . . . 21
Elenco funzioni supplementari . . . . . . . . . . . . . . . . . . . . . . . . . . . . . . . . . . . . . . . . . . . . . 76
Informazioni per l’utente . . . . . . . . . . . . . . . . . . . . . . . . . . . . . . . . . . . . . . . . . . . . . . . . . . 77
1. Introduzione
Complimenti per l’acquisto del telecomando universale Philips SRU 5170.
Il telecomando SRU 5170 è in grado di agire su 7 dispositivi diversi. Durante
l’impostazione, è possibile indicare su quali dispositivi agire (vedere la tabella di seguito).
Nel capitolo 2 ‘Impostazione del telecomando’ è possibile trovare informazioni su come
preparare all’uso il telecomando SRU 5170.
2. Impostazione del telecomando
È possibile impostare il telecomando affiché agisca sui 7 seguenti dispositivi:
Dispositivo Indicazione display
Televisore TV
Secondo televisore TV2
Videoregistratore VCR
Secondo videoregistratore VCR2
Videoregistratore portatile PVR
Combi televisore-videoregistratore TV-VCR
Combi televisore-DVD TV-DVD
Combi DVD-videoregistratore DVD-VCR
Amplificatore AMPLIFIER
Sistema Home Theatre HTS
Sistema audio AUDIO-SET
Sintonizzatore TUNER
Digital Media Receiver DMR
Set Top Box STB
Ricevitore satellitare SAT
Apparecchio DVB-T
(trasmissione video digitale terrestre) DVB-T
Decoder via cavo CABLE
Lettore CD CD
Mini Disk MD
Lettore DVD DVD
Registratore DVD DVDR
Console giochi GAME
Registratore DVD con disco rigido DVDR-HDD
PC multimediale PC
13
Manual_SRU5170_87 24-04-2007 15:50 Pagina 13
Instruzioni per l'uso
Note:
– Le batterie sono già inserite nel telecomando.
– Se si desidera impostare il telecomando per il controllo del proprio televisore,
saltare il punto 3.
– Se il proprio dispositivo è Philips, saltare il punto 5.
Italiano
– Si può uscire dalla modalità di impostazione in qualsiasi momento tenendo premuto
SETUP per tre secondi.
– Una volta installato, non è possibile eliminare un dispositivo dall’elenco. È possibile
modificare solo la marca (ad esempio, se si desidera agire su un dispositivo di marca
diversa). Per eliminare un dispositivo, è necessario cancellare l’intera memoria. A tal fine,
vedere ‘Ripristino delle funzioni originali del telecomando’ su 4. ‘Possibilità supplementari’.
1 Accendere il dispositivo per il quale si desidera impostare il telecomando. Se si tratta
di un lettore/registratore DVD, inserire un disco o nastro ed avviare la riproduzione.
2 Estrarre la linguetta protettiva dal vano batterie per
attivare le batterie.
• In caso di difficoltà nell’estrarre la linguetta, aprire il vano
batterie per una maggiore facilità di accesso.
– Il telecomando entra immediatamente in modalità di
impostazione:
- sul display appare ‘ ’,‘ ’ e ’TV?’;
- si accende la retroilluminazione;
- i tasti utilizzabili lampeggiano.
– Il telecomando è pronto ad essere impostato per il controllo place televisore.
3 Usare 4 per selezionare il dispositivo per cui si desidera
impostare il telecomando (vedere la tabella nella pagina
precedente).
4 Confermare con OK.
– Sul display appare ‘ ’ e ’PHILIPS?’.
I tasti utilizzabili lampeggiano.
5 Usare 4 e 3 per selezionare la marca del dispositivo.
• Se la marca non si trova nell’elenco, selezionarne un’altra.
6 Confermare con OK.
7 Tenere premuto
yy
finché il dispositivo non risponde.
– Sul display appare ‘ ’.
8 Puntare il telecomando verso il dispositivo.
– Il telecomando inizia ad emettere tutti i codici ‘off (standby)’
conosciuti, uno per uno. Ogni volta che si invia un codice,
sul display appare quanto segue: ’TEST 01, 02, 03’, ecc.
14
Manual_SRU5170_87 24-04-2007 15:50 Pagina 14
Instruzioni per l'uso
9 Quando il dispositivo risponde, rilasciare immediatamente
yy
.
– Il telecomando ha rilevato un codice utile per il dispositivo.
Sul display appare ’SETUP OK’.
– Se il dispositivo non risponde ed appare ’LIST END’, non viene rilevato alcun
codice per il dispositivo. Per poter agire sul dispositivo con il telecomando, è
necessario eseguire il trasferimento delle funzioni di ciascun tasto del telecomando
originale. A tal fine, vedere ‘Funzioni di apprendimento dei tasti’
su 4. ’Possibilità supplementari’.
Italiano
10 Verificare se è possibile utilizzare tutte le funzioni place dispositivo con il
telecomando.
– In tal caso, il telecomando è pronto ad agire sul dispositivo.
Si spegne la retroilluminazione.
• In caso contrario, procedere al punto 11.
• Se si desidera impostare il telecomando per il controllo di altri dispositivi,
procedere al punto 11.
11 Tenere premuto SELECT per tre secondi:
– - sul display appare ‘ ’,‘ ’ e ’TV?’.
- si accende la retroilluminazione.
- i tasti utilizzabili lampeggiano.
– Il telecomando si trova quindi in modalità di impostazione.
12 Continuare l’impostazione dal punto 3.
• Se, nonostante vari tentativi, il dispositivo non risponde per niente o non in
maniera adeguata a tutti i comandi dei tasti, il telecomando non riesce a
trovare il codice adeguato per il dispositivo. Per poter agire sul dispositivo
con il telecomando, è necessario eseguire il trasferimento delle funzioni di
ciascun tasto del telecomando originale. A tal fine, vedere
‘Funzioni di apprendimento dei tasti’ su 4. ’Possibilità supplementari’.
3. Utilizzo del telecomando
Tasti e funzioni
L’illustrazione a pagina 3 offre una vista generale di tutti i tasti e delle loro funzioni.
1 Display schermata informativa.
Visualizza lo stato attuale del telecomando.
: telecomando in modalità di impostazione o di
funzione avanzata.
: telecomando in modalità di apprendimento.
: stato delle batterie.
Lampeggia quando le batterie sono quasi scariche.
: si accende in modalità di impostazione, di
apprendimento o di funzione avanzata.
: si accende quando il telecomando invia un segnale.
: si accende quando il telecomando riceve un segnale in
modalità di apprendimento o di funzione avanzata.
TV: dispositivo selezionato.
PHILIPS: marca selezionata.
2 LEARN. . . . . . . . . . . . . - porta il telecomando in modalità di apprendimento.
XTRA . . . . . . . . . . . . . . - accende la retroilluminazione (se attivata).
- visualizza le funzioni supplementari (avanzate) del dispositivo
selezionato.
15
Manual_SRU5170_87 24-04-2007 15:50 Pagina 15
Instruzioni per l'uso
3 / DISC . . . . . . . . . . - modalità TV: televideo attivato/disattivato.
- modalità DVD: menu del disco.
/ HDD. . . . . . . . . . . - modalità TV: blocco pagina.
- modalità DVD-R: menu disco rigido.
/ SUBTITLE . . . . - modalità TV:TV a schermo ampio.
Italiano
- modalità DVD: sottotitoli.
/ FAV(preferiti) . . . - modalità TV: testo disattivato.
- modalità SAT: elenco dei canali preferiti.
4 PC . . . . . . . . . . . . . . . . . attiva / disattiva il PC multimediale.
MENU. . . . . . . . . . . . . . attiva o disattiva il menu.
5 OK . . . . . . . . . . . . . . . . . conferma la selezione.
6 INFO. . . . . . . . . . . . . . . visualizza le informazioni su schermo del canale.
7
ss
. . . . . . . . . . . . . . . . . . . disattiva l’audio del televisore.
8 - VOL +. . . . . . . . . . . . . regola il volume del televisore.
9 Tasti numerici . . . . . . - modalità TV: selezione diretta di canali e altre funzioni.
- modalità AMP: tasti di selezione fonte
(TV, DVD,VCR,TUNER, CD, AUX).
0 AV . . . . . . . . . . . . . . . . . alterna gli ingressi esterni dell’apparecchio.
! 5 . . . . . . . . . . . . . . . . . . - modalità TV: tasto rosso del televideo*.
- modalità VCR/DVD: riavvolgimento.
2 . . . . . . . . . . . . . . . . . . . - modalità TV: indice.
- modalità VCR/DVD: riproduzione.
6 . . . . . . . . . . . . . . . . . . - modalità TV: tasto blu del televideo*.
- modalità VCR/DVD: avanzamento.
9 . . . . . . . . . . . . . . . . . . . - modalità TV: tasto verde del televideo*.
- modalità VCR/DVD: arresto.
0 . . . . . . . . . . . . . . . . . . . - modalità VCR/DVD: registrazione.
; . . . . . . . . . . . . . . . . . . . - modalità TV: tasto giallo del televideo*.
- modalità VCR/DVD: interruzione.
@ -/--. . . . . . . . . . . . . . . . . . seleziona tra numeri di canale ad una e due cifre.
#
22
. . . . . . . . . . . . . . . . . . - seleziona un programma/canale precedente.
SURROUND . . . . . . . - seleziona modalità surround.
$ - PROG +. . . . . . . . . . . seleziona il canale precedente o successivo.
% BACK . . . . . . . . . . . . . . salta indietro di un livello nel menu o lo disattiva.
^ Tasti cursore . . . . . . . su, giù, sinistra e destra nel menu.
& GUIDE . . . . . . . . . . . . . modalità STB: apre la guida elettronica dei programmi TV.
*
yy
(Standby) . . . . . . . . . . attiva o disattiva TV, DVD,VCR, AMP, CD o STB.
( SETUP . . . . . . . . . . . . . - porta il telecomando in modalità di impostazione.
SELECT. . . . . . . . . . . . - accende la retroilluminazione (se attivata).
- seleziona le modalità del dispositivo. È possibile selezionare
solo i dispositivi per i quali si è impostato il telecomando.
* Nota: Per utilizzare l’opzione dei tasti colorati in modalità DVDR-HDD, è necessario trasferire
le funzioni di selezione del colore sul tasto XTRA relativo alle funzioni supplementari.
A tal fine, vedere ‘Aggiunta di funzioni supplementari’ su 4. ’Possibilità supplementari’.
Funzioni supplementari
Per ciascun dispositivo per cui si è impostato il telecomando, è possibile aggiungere una
funzione supplementare (avanzata) sul telecomando.
A tal fine, vedere ‘Aggiunta di funzioni supplementari’ di seguito.
Per una panoramica delle funzioni supplementari (avanzate) per i vari dispositivi,
vedere l’elenco ‘Funzioni supplementari’ nella parte posteriore del presente manuale.
16
Manual_SRU5170_87 24-04-2007 15:50 Pagina 16
Instruzioni per l'uso
4. Possibilità supplementari
Aggiunta di funzioni supplementari
Nota: È possibile aggiungere solo le funzioni disponibili nel telecomando originale del dispositivo.
1 Tenere premuto XTRA per 3 secondi:
– - si accende la retroilluminazione (se attivata).
- sul display appare ‘ ’ e ‘ ’.
Italiano
- i tasti utilizzabili lampeggiano.
– Il telecomando si trova quindi in modalità di funzione
avanzata.
2 Usare 3 e 4 per selezionare la funzione supplementare che si desidera aggiungere o
modificare. Confermare con OK.
– Sul display appare ‘ ’,‘ ’ e ‘ ’ oltre a ‘LEARNING‘.
3 Collocare entrambi i telecomandi su una superficie piana
(ad esempio un tavolino) e puntarli uno verso l’altro ad una
distanza tra 5 e 10 cm.
4 Premere il tasto di funzione del telecomando originale
(ad esempio, il tasto AMBILIGHT del telecomando del
televisore) o premere 1 se si desidera tornare al punto 2.
– Sul display appare ‘ ’ oltre a ad esempio ‘TV-AMBILIGHT LEARN OK‘.
Le funzioni supplementari sono state aggiunte correttamente.
– Se sul display appare ‘ERROR‘ o ‘MEM FULL’, iniziare di nuovo dal punto 1.
Vedere anche ‘Risoluzione dei problemi’ su 6.‘Supporto’.
Attivazione/utilizzo di una funzione supplementare (avanzata)
1 Usare SELECT per selezionare il dispositivo desiderato.
Ad esempio, DVD.
– Confermare con OK.
2 Premere XTRA.
– Sul display appare l’ultima funzione selezionata per il
dispositivo. Ad esempio, DVD-SHOWVIEW.
I tasti utilizzabili lampeggiano.
3 Usare 3 e 4 per selezionare la funzione che si
desidera attivare. Ad esempio, DVD-ZOOM.
Premere OK per attivare la funzione.
4 Premere di nuovo XTRA per tornare alla modalità di
funzionamento normale.
Elimina dispositivi
Esempio di TV:
1 Tenere SETUP premuto per 3 secondi:
– la retroilluminazione (se abilitata) si attiva.
– il display visualizza ‘ ’,‘ ’ e ’TV?’
– i tasti che possono essere utilizzati lampeggiano.
17
Manual_SRU5170_87 24-04-2007 15:50 Pagina 17
Instruzioni per l'uso
2 Utilizzare i tasti su 3 o giù 4 per selezionare
’DELETE TV’ (ELIMINA TV) in fondo all'elenco.
3 Premere OK per eliminare la modalità dispositivo TV.
– Il display visualizza ’DEVICE DELETED’ (DISPOSITIVO
ELIMINATO).
Italiano
– La modalità dispositivo TV è stata eliminata.
Funzioni di apprendimento dei tasti
Se non si dispone di alcune funzioni del telecomando originale sul telecomando SRU 5170,
è possibile apprenderle da quello originale. È possibile memorizzare una funzione su
ciascun tasto disponibile del telecomando SRU 5170, ad eccezione di XTRA (LEARN) e
SELECT (SETUP).Vengono eliminate tutte le funzioni già memorizzate su un tasto.
1 Assicurarsi di tenere a portata di mano il telecomando originale.
2 Usare SELECT per selezionare il dispositivo desiderato.
Ad esempio, DVD.
3 Collocare entrambi i telecomandi su una superficie piana
(ad esempio un tavolino) e puntarli uno verso l’altro ad una
distanza tra 5 e 10 cm.
4 Tenere premuti LEARN e il tasto che si desidera
apprendere sul telecomando SRU 5170
contemporaneamente per 3 secondi, finché non si accende
‘ ’ oltre a ’LEARNING’.
5 Premere il tasto che si desidera copiare sul telecomando
originale.
– Si accende . Il telecomando apprende quindi la funzione.
– Una volta appresa la funzione, sul display appare ’LEARN OK’ a confermare la
memorizzazione del segnale.
– Se sul display appare ‘ERROR‘ o ‘MEM FULL’, iniziare di nuovo dal punto 1.
Vedere anche ‘Risoluzione dei problemi’ su 6.‘Supporto’.
18
Manual_SRU5170_87 24-04-2007 15:50 Pagina 18
Instruzioni per l'uso
Attivazione/disattivazione della funzione di
retroilluminazione
La retroilluminazione illumina il display in modo da poter osservare chiaramente tutti i
messaggi, perfino in ambienti con poca luce. Poiché la retroilluminazione consuma corrente
supplementare, la durata delle batterie si riduce se si usa tale funzione con frequenza.
È quindi possibile disattivare la funzione di retroilluminazione.
Disattivazione della funzione di retroilluminazione
Italiano
• Tenere premuti i tasti numerici 1 e 9 contemporaneamente
per tre secondi.
– La funzione di retroilluminazione viene quindi disattivata e
non può essere utilizzata.
Attivazione della funzione di retroilluminazione
• Tenere premuti i tasti numerici 7 e 9 contemporaneamente
per tre secondi.
– La funzione di retroilluminazione viene quindi attivata e può
essere utilizzata.
Ripristino delle funzioni originali del telecomando
In alcuni casi, potrebbe essere utile ripristinare le funzioni originali del telecomando.
Ad esempio, se la memoria del telecomando è piena, ma lo si desidera impostare per un
dato dispositivo o si desidera che apprenda un funzione supplementare.Vengono quindi
ripristinate le impostazioni predefinite del telecomando, eliminando tutte le impostazioni
dell’utente.
1 Tenere premuti i tasti numerici 1 e 6 contemporaneamente
per tre secondi.
– Si accende ‘ ’.
Il telecomando si trova quindi in modalità di impostazione.
2 Premere i tasti numerici 9, 8 e 1 nell’ordine seguente.
– Sul display appare ‘981 - WAIT’.
Vengono quindi ripristinate tutte le funzioni originali ed
eliminate le funzioni supplementari.
19
Manual_SRU5170_87 24-04-2007 15:50 Pagina 19
Instruzioni per l'uso
5. Sostituzione delle batterie
Se l’indicatore dello stato delle batterie sul ( ) display inizia a lampeggiare, le batterie
sono quasi scariche e devono essere sostituite. Quando si estraggono le batterie scariche,
vengono conservate tutte le impostazioni dell’utente.
Italiano
1 Premere il coperchio all’interno, farlo scorrere nella
direzione della freccia e rimuovere il coperchio.
2 Inserire 3 batterie AAA/R03 osservando la configurazione
+ e – all’interno del vano batterie.
3 Riposizionare il coperchio e farlo scattare in posizione.
6. Supporto
Risoluzione dei problemi
• Problema
– Possibile causa/soluzione
• Il dispositivo su cui si desidera agire non risponde quando si preme il tasto.
– Puntare il telecomando verso il dispositivo ed assicurarsi che non vi siano ostacoli tra il
telecomando ed il dispositivo.
– Assicurarsi che la funzione che si desidera utilizzare sia disponibile sul dispositivo.
– Verificare che l’indicatore di stato delle batterie ()sul display non lampeggi
(batterie quasi scariche). In tal caso, inserire nuove batterie.
• Il dispositivo su cui si desidera agire non risponde correttamente quando si preme
il tasto.
– Probabilmente si è programmato un codice errato per il dispositivo durante l’impostazione.
Impostare nuovamente il telecomando. Se il dispositivo continua a non rispondere, chiamare
il nostro numero verde.
– Verificare che l’indicatore di stato delle batterie ()sul display non lampeggi
(batterie quasi scariche). In tal caso, inserire nuove batterie.
• I tasti del televideo non funzionano.
– Verificare che il televisore sia dotato di televideo.
• Si hanno difficoltà nell’utilizzo delle funzioni sul dispositivo.
– Probabilmente il telecomando deve essere adattato al modello del dispositivo.
Per dettagli, chiamare il nostro numero verde.
• Sul display appare ERROR mentre si aggiunge una funzione supplementare
(avanzata) o si cerca di copiare le funzioni di un tasto.
– Non si è ricevuto alcun segnale dal telecomando originale per 20 secondi e il telecomando
SRU 5170 ha arrestato il processo di aggiunta/apprendimento. Iniziare di nuovo dal punto 1.
– Si è premuto un tasto del telecomando SRU 5170 prima di aver rilevato il segnale e il
telecomando SRU 5170 ha arrestato il processo di aggiunta/apprendimento.
Iniziare di nuovo dal punto 1.
– La funzione che si cerca di aggiungere non è disponibile sul telecomando originale.
– Assicurarsi che il telecomando originale funzioni correttamente.
– Assicurarsi che I telecomandi siano allineati correttamente.
– Il segnale IR del dispositivo originale è fuori gamma. Il telecomando SRU 5170 è in grado di
apprendere solo segnali IR con un segnale portante di 30-60kHz.
20
Manual_SRU5170_87 24-04-2007 15:50 Pagina 20
