Philips 9305 125 2477.5: инструкция
Раздел: Профоборудование
Тип: Аппарат
Инструкция к Аппарату Philips 9305 125 2477.5
HowTo_Int_RW_Nero7-033.qxd 05-06-2007 15:48 Pagina 1
How to... for Internal S-ATA Drives
EN
Install Guide 3+24
DE
Installationsanleitung 3+25
FR
Guide d'installation 3+26
IT
Guida d'installazione 3+27
NL
Installatiegids 3+28
ES
Guía de instalación 11+29
PT
Guia de Instalação 11+30
TR
Kurulum Kılavuzu 11+31
PL
Instrukcja montażu 11+32
SV
Installationsguide 11+33
SC
17+34
RU
Инструкция по инсталляции 17+36
DK
Installationsvejledning 17+37
TC
17+38

HowTo_Int_RW_Nero7-033.qxd 05-06-2007 15:48 Pagina 2
HowTo_Int_RW_Nero7-033.qxd 05-06-2007 15:48 Pagina 3
How to install?
Einbau des Laufwerks
Comment installer?
Come installare
Hoe installeren?
EN
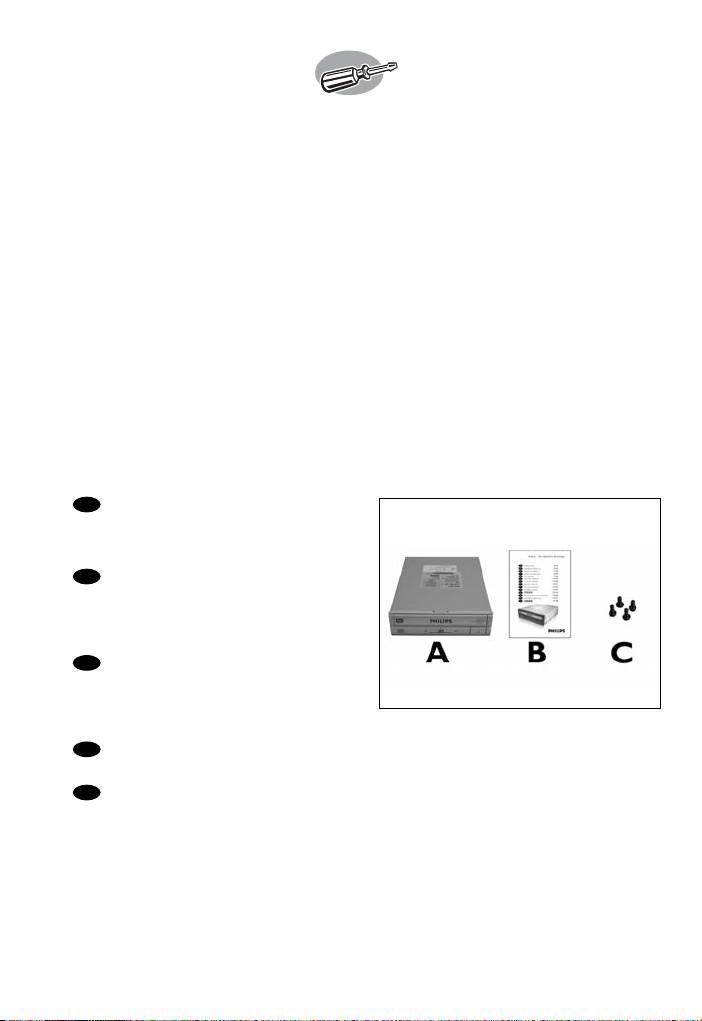
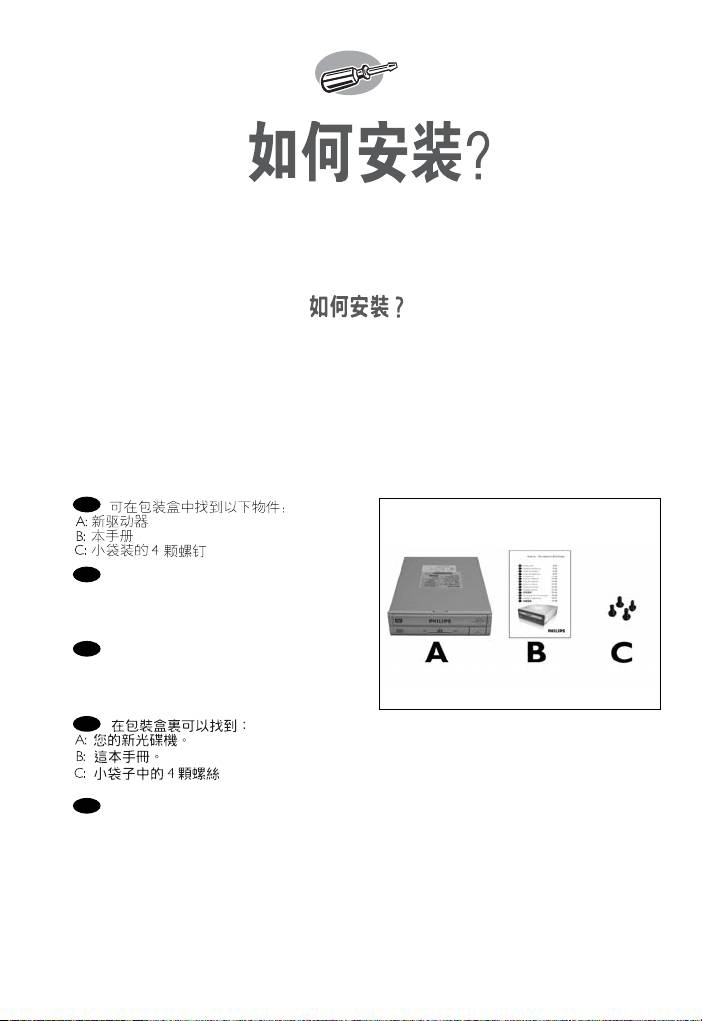
This can be found in the box:
1
A: Your new drive
B: This manual
C: 4 screws in a small bag
DE
Verpackungsinhalt:
A: Ein neues Laufwerk
B: Dieses Handbuch
C: 4 Schrauben in einem kleinen Beutel
FR
Le coffret d'emballage contient les éléments
suivants :
A : Votre nouveau lecteur
B : Ce mode d'emploi
C : 4 vis dans un petit sachet
IT
Contenuto della confezione:
A: La nuova unità B: Questo manuale C: 4 viti in un sacchetto piccolo
NL
Dit zit er in de doos:
A: Uw nieuwe station B: Deze handleiding C: 4 schroeven in een zakje
3
HowTo_Int_RW_Nero7-033.qxd 05-06-2007 15:48 Pagina 4
EN
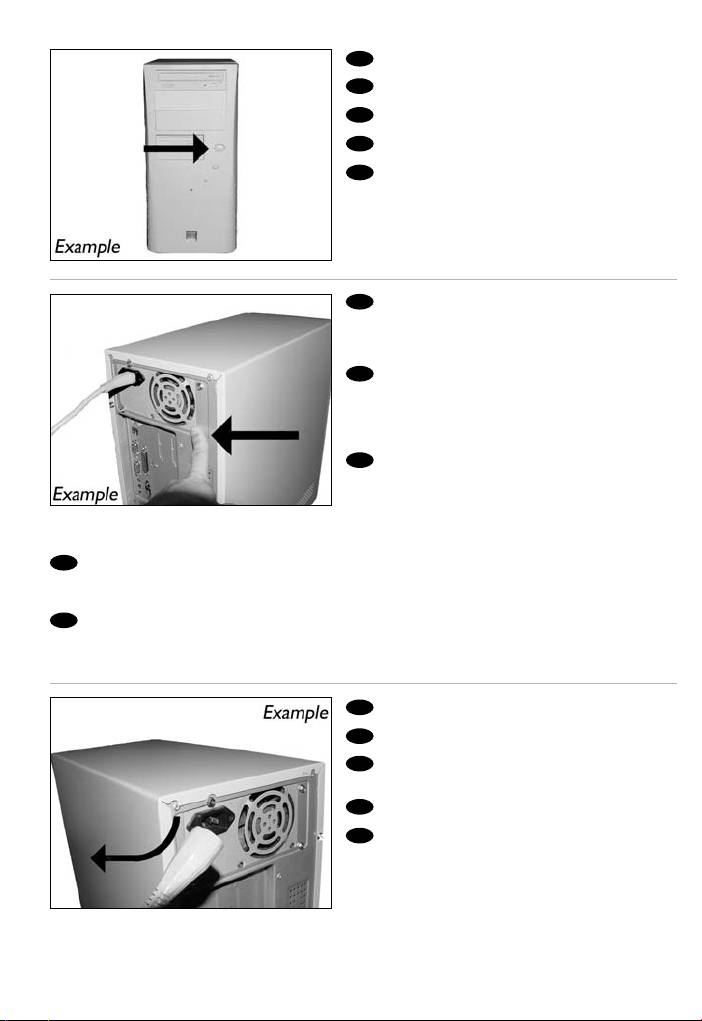
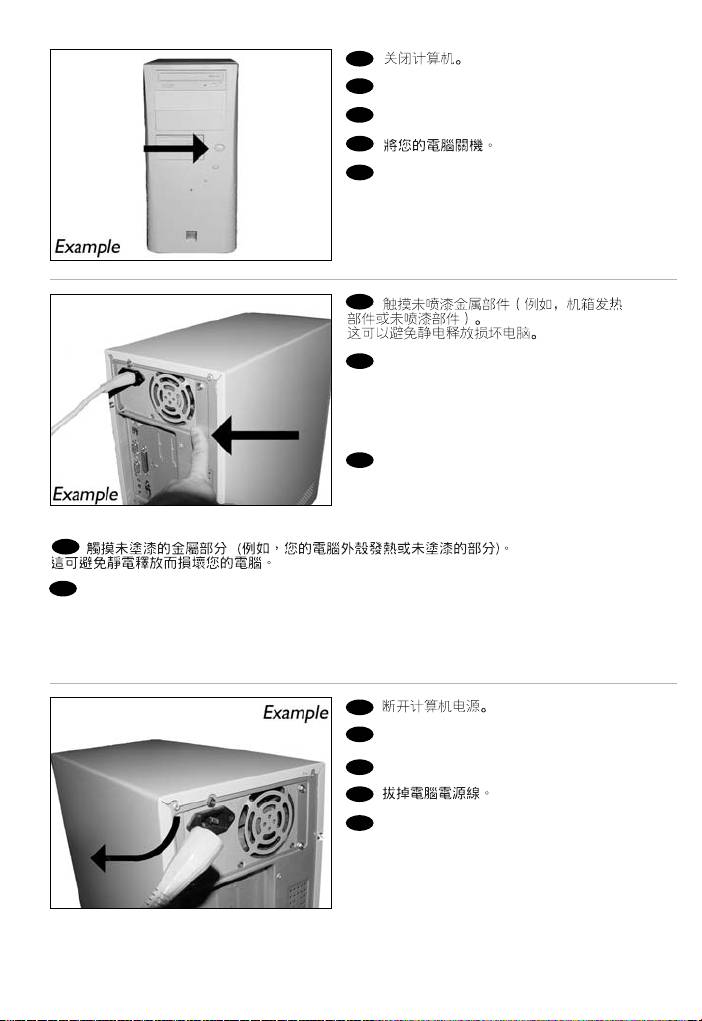
Switch your computer off.
2
DE
Schalten Sie Ihren Computer aus.
FR
Éteignez l’ordinateur.
IT
Spegnere il computer.
NL
Zet de computer uit.
EN
Touch an unpainted metal part (eg. your
3
heating or an unpainted part of your computer case).
This will avoid any damage to your computer by
electrostatic discharge.
DE
Berühren Sie ein unlackiertes Metallteil
(z.B. Ihre Heizung oder ein unlackiertes Teil Ihres
Computergehäuses).
Das verhindert Schäden an Ihrem Computer
aufgrund von elektrostatischer Entladung.
FR
Touchez une partie métallique non peinte
(p. ex. un radiateur ou une partie non peinte du
boîte de l'ordinateur).
Ce contact permettra d'éviter tout
endommagement de l'ordinateur par décharge
d'électricité statique.
IT
Toccare un elemento di metallo non verniciato (p.es. l’elemento riscaldante o uno non verniciato del
case del computer).
In questo modo si eviteranno danni al computer dovuti a scariche elettrostatiche.
NL
Raak een ongelakt metalen object aan (b.v. de verwarming of een ongelakt deel van de computer-
behuizing).
Op deze manier voorkomt u dat de computer beschadigd raakt als gevolg van elektrostatische ontlading.
EN
Disconnect the power cable from the PC.
4
DE
Ziehen Sie das Netzkabel vom Computer ab.
FR
Débranchez le câble d’alimentation de
l’ordinateur.
IT
Disconnettere il cavo di alimentazione dal PC.
NL
Trek de netstekker uit de PC.
4
HowTo_Int_RW_Nero7-033.qxd 05-06-2007 15:48 Pagina 5
EN
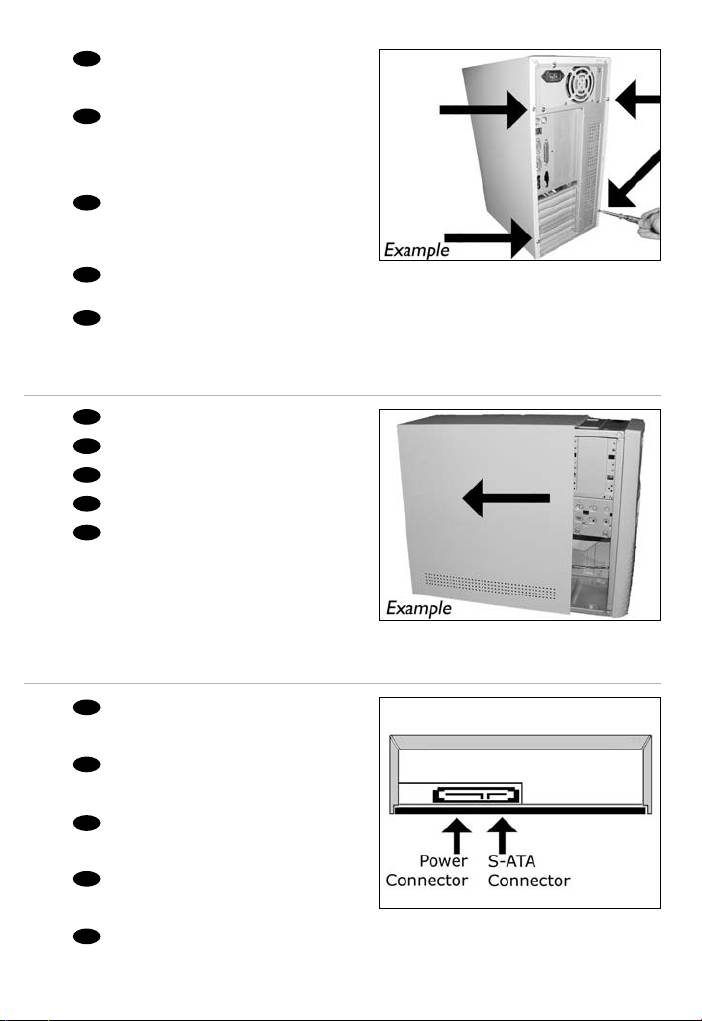
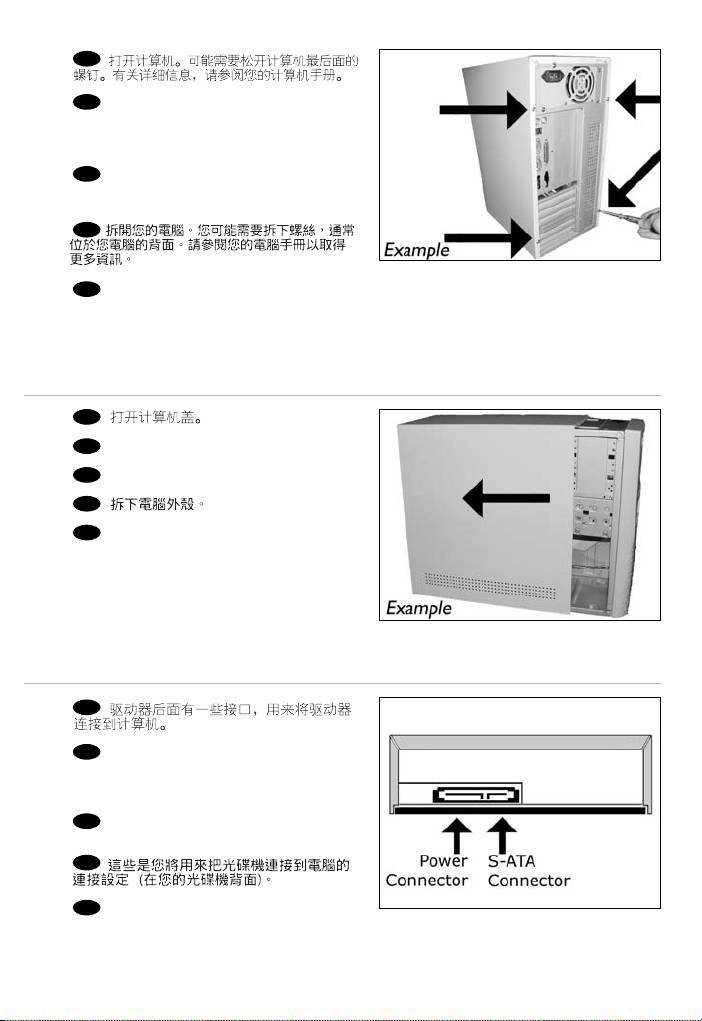
Open your computer. You may have to unleash
5
screws which are mostly located at the back of your
computer. See your computer manual for more details.
DE
Öffnen Sie Ihren Computer. Eventuell müssen Sie
hierzu Schrauben herausdrehen, die sich meistens an der
Rückseite Ihres Computers befinden.
Weitere Informationen hierzu finden Sie in Ihrem
Computerhandbuch.
FR
Ouvrez l’ordinateur. Pour cela, il peut être nécessaire
de desserrer une ou plusieurs vis à l’arrière de l’ordinateur.
Pour plus de détail, reportez-vous au mode d’emploi de
l’ordinateur.
IT
Aprire il computer. È possibile che si dovranno svitare delle viti che in genere si trovano sul pannello posteriore del
computer. Per ulteriori informazioni fare riferimento al manuale del computer.
NL
Maak uw computer open. Meestal moet u de schroeven aan de achterkant van uw computer losschroeven.
Raadpleeg de handleiding van uw PC voor details over het openen van de PC.
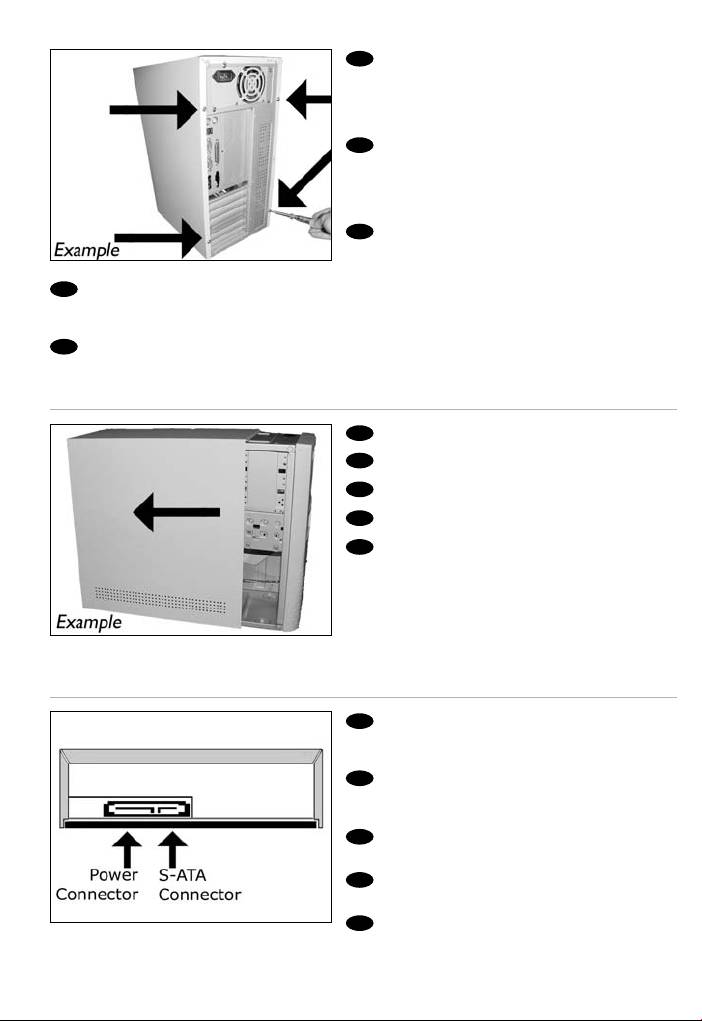
EN
Take off the cover of the computer.
6
DE
Nehmen Sie die Abdeckung des Computers ab.
FR
Retirez le capot de l’ordinateur.
IT
Togliere il coperchio del computer.
NL
Verwijder de kast van de computer.
EN
These are the connections (on the back of
7
your drive) you will have to use for connecting the
drive to the computer.
DE
Das sind die Anschlüsse (an der Rückseite
Ihres Laufwerks), die Sie für den Anschluss Ihres
Laufwerks an den Computer verwenden müssen.
FR
Ce sont les connecteurs (à l’arrière de votre
appareil) que vous devrez utiliser pour raccorder
l’unité à l’ordinateur.
IT
Queste sono le connessioni (sul retro
dell'unità) che dovranno essere utilizzate per
collegare l'unità al computer.
NL
Dit zijn de aansluitingen (op de achterkant van het station) die u gebruikt om het station op de
computer aan te sluiten.
5
HowTo_Int_RW_Nero7-033.qxd 05-06-2007 15:48 Pagina 6
EN
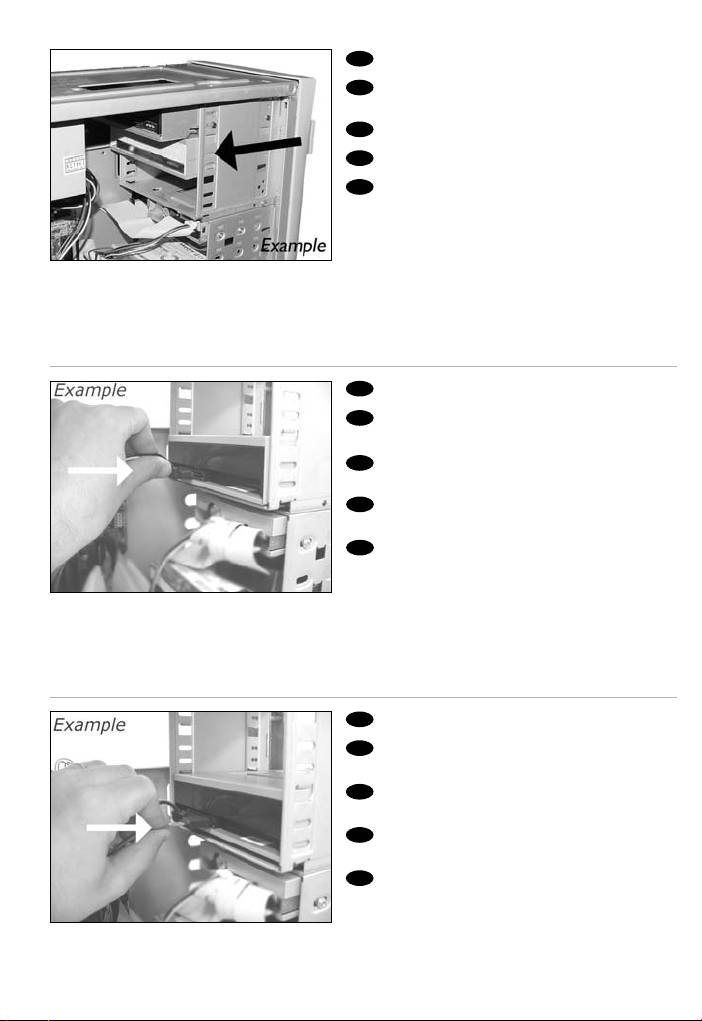
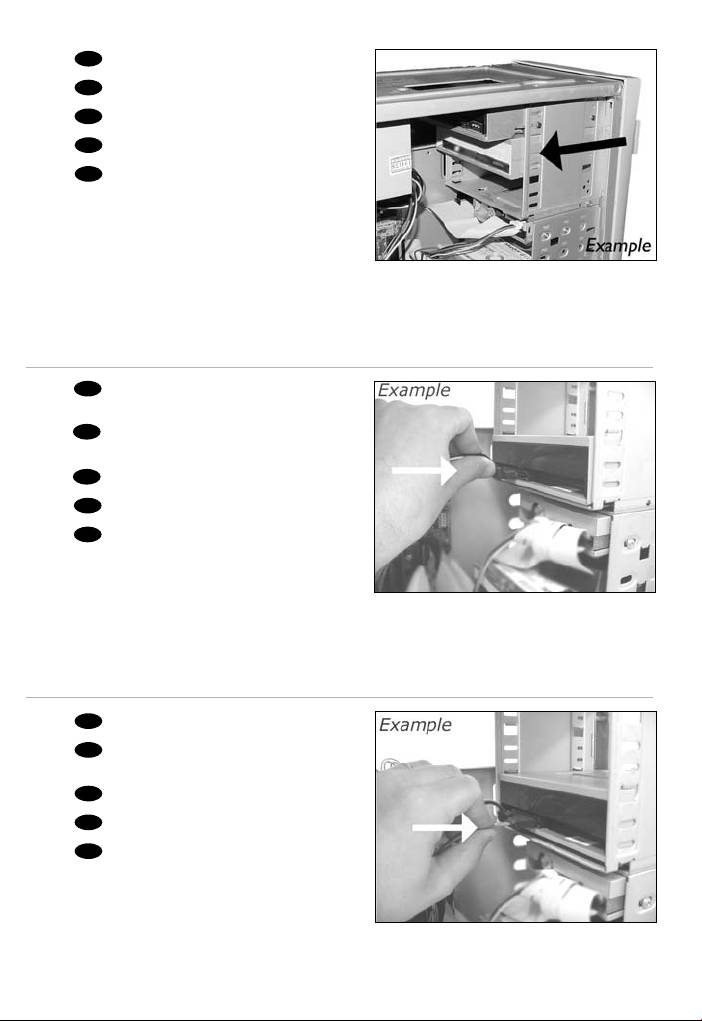
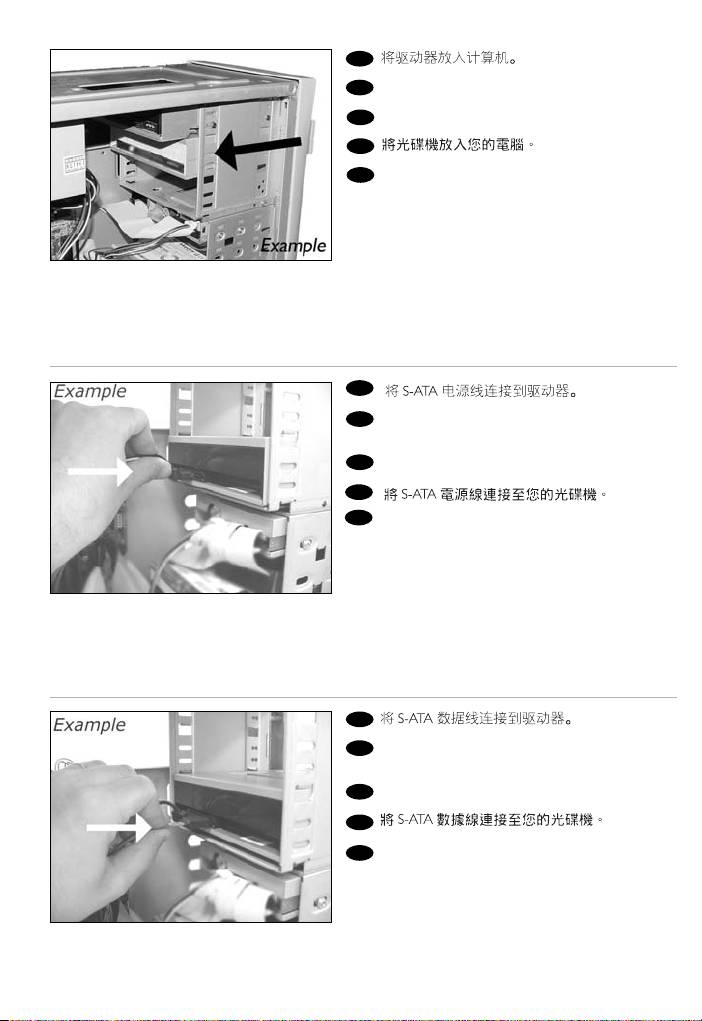
Put the drive into your computer.
8
DE
Schieben Sie das Laufwerk in Ihren
Computer.
FR
Montez l’appareil dans l’ordinateur.
IT
Mettere l'unità nel computer.
NL
Schuif het station in uw computer.
EN
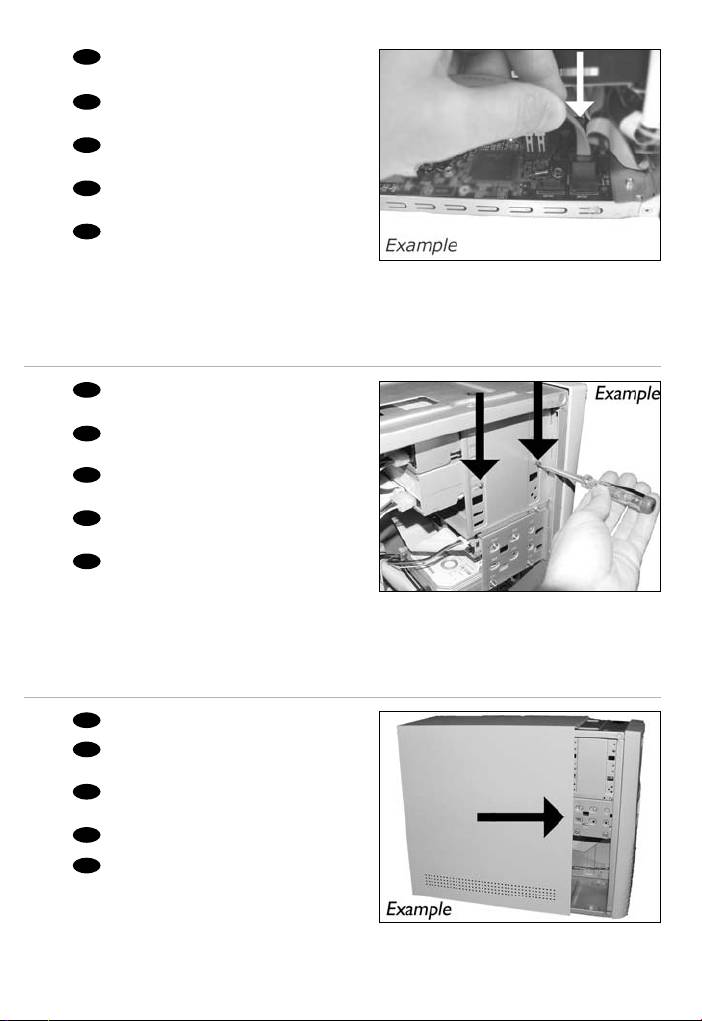
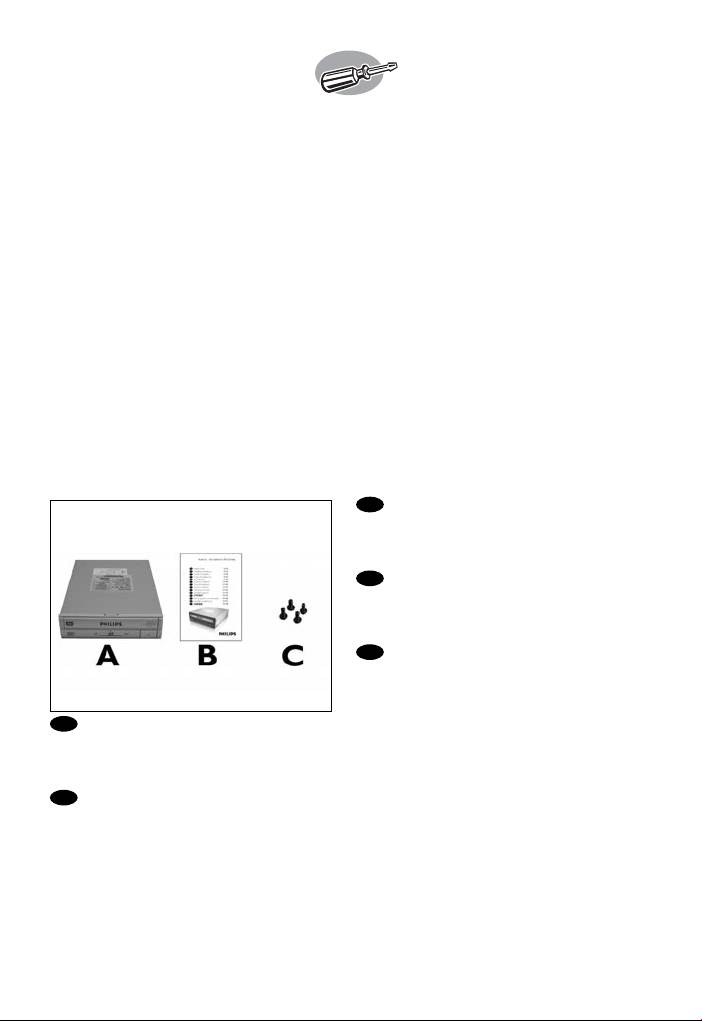
Attach a S-ATA Power Cable to your drive.
9
DE
Schließen Sie ein S-ATA-Stromkabel an Ihr
Laufwerk an.
FR
Branchez un câble d’alimentation S-ATA
à votre lecteur.
IT
Collegare un cavo di alimentazione S-ATA
alla propria unità.
NL
Sluit een S-ATA-stroomkabel aan op uw
station.
EN
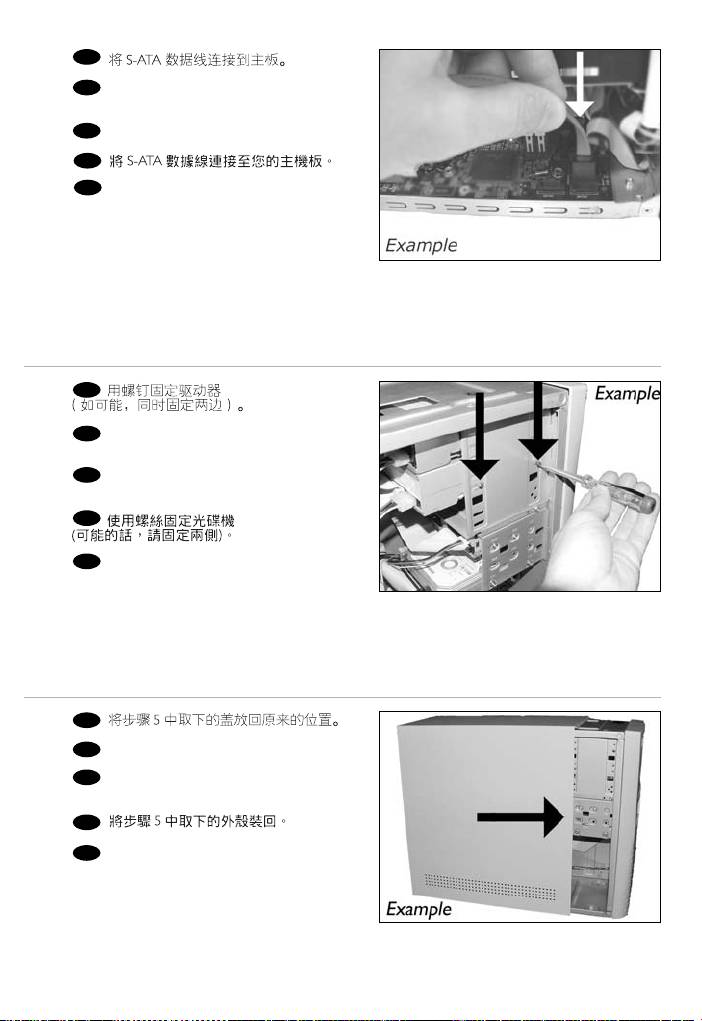
Attach the S-ATA data cable to your drive.
10
DE
Schließen Sie das S-ATA-Datenkabel an Ihr
Laufwerk an.
FR
Branchez le câble de données S-ATA à votre
lecteur.
IT
Collegare un cavo dati S-ATA alla propria
unità.
NL
Sluit de S-ATA-gegevenskabel aan op uw
station.
6
HowTo_Int_RW_Nero7-033.qxd 05-06-2007 15:48 Pagina 7
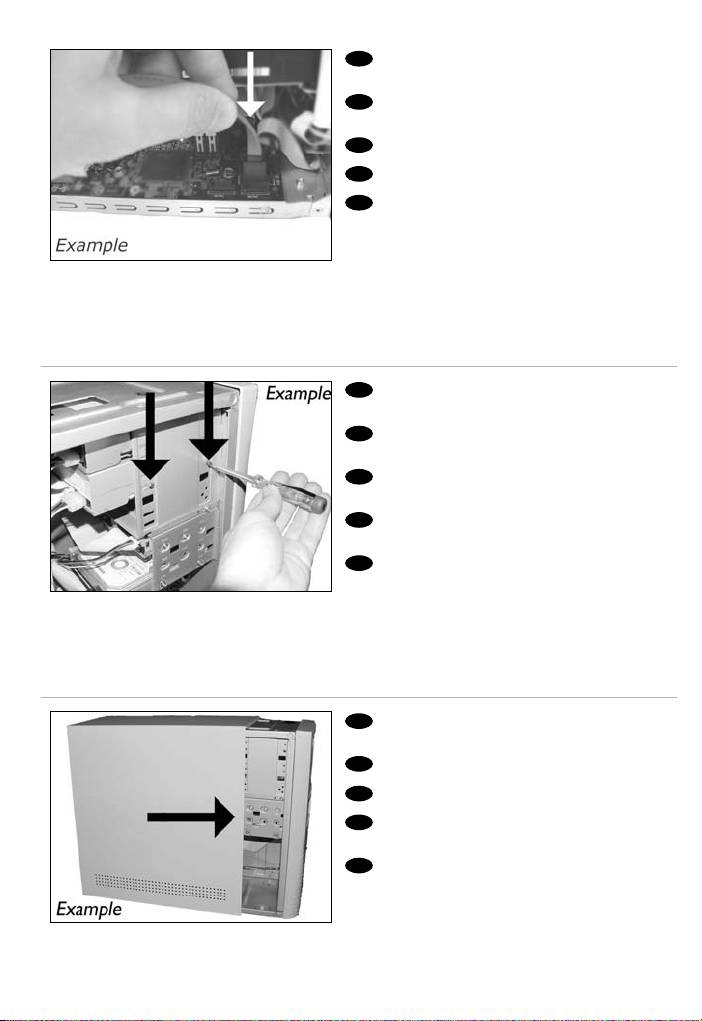
EN
Connect the S-ATA data cable to your
11
motherboard.
DE
Schließen Sie das S-ATA-Datenkabel an Ihre
Hauptplatine an.
FR
Connectez le câble de données S-ATA sur la
carte mère.
IT
Collegare il cavo dati S-ATA alla propria
scheda madre.
NL
Sluit de S-ATA-gegevenskabel aan op uw
moederbord.
EN
Secure the drive with the screws
12
(if possible on both sides).
DE
Befestigen Sie das Laufwerk mit den
Schrauben (wenn möglich an beiden Seiten).
FR
Fixez l’appareil à l’aide des vis
(si possible des deux côtés).
IT
Fissare l'unità con le viti
(se possibile su entrambi i lati).
NL
Schroef het station vast
(zo mogelijk aan beide zijden).
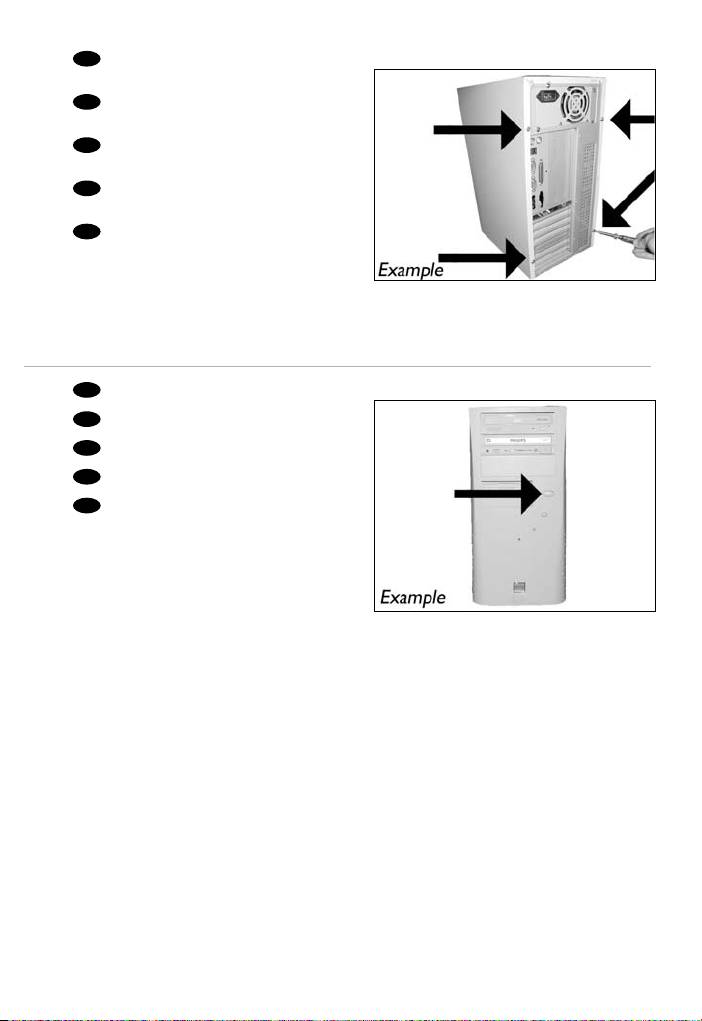
EN
Put the cover you took off in step 5 back on.
13
DE
Setzen Sie die in Schritt 5 abgenommene
Abdeckung wieder auf.
FR
Replacez le capot que vous avez retiré à
l’étape 5.
IT
Rimettere il coperchio tolto al punto 5.
NL
Plaats de in stap 5 verwijderde kast weer terug.
7

HowTo_Int_RW_Nero7-033.qxd 05-06-2007 15:48 Pagina 8
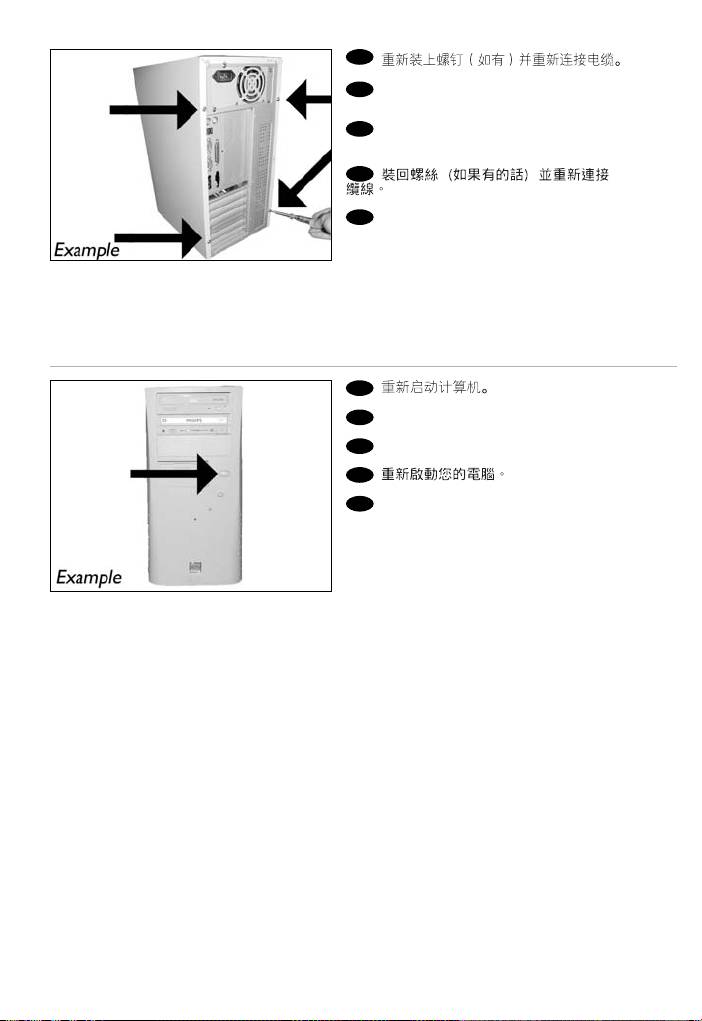
EN
Put the screws (if there were any) back in
14
and reconnect the cables.
DE
Schrauben Sie die Schrauben (sofern welche
vorhanden waren) wieder ein und schließen Sie die
Kabel wieder an.
FR
Resserrez la ou les vis, le cas échéant,
et rebranchez les câbles.
IT
Riavvitare le viti (se presenti) e ricollegare
i cavi.
NL
Plaats de schroeven terug (als die er waren)
en sluit de kabels weer aan.
EN
Restart your computer.
15
DE
Starten Sie Ihren Computer neu.
FR
Allumez l’ordinateur.
IT
Riavviare il computer.
NL
Start uw computer opnieuw op.
8

HowTo_Int_RW_Nero7-033.qxd 05-06-2007 15:48 Pagina 9
9
HowTo_Int_RW_Nero7-033.qxd 05-06-2007 15:48 Pagina 10
¿Cómo instalarlo?
Como instalar?
Nasıl kurulur?
Instalacja
Hur går installationen till?
ES
Contenido de la caja:
A: Su nueva
1
B: Este manual
C: 4 tornillos en una bolsa pequeña
PT
Os seguintes itens estão contidos na caixa:
A: Sua nova
B: Este manual
C: 4 parafusos em uma pequena embalagem
TR
Bu, kutu içinde bulunabilir:
A: Yeni sürücünüz
B: Bu kılavuz
C: Küçük bir torba içinde 4 vida
PL
W opakowaniu znajduje się:
A: Nowy napęd
B: Niniejsza instrukcja
C: 4 śrubki w małym woreczku
SV
Innehållet i lådan:
A: Din nya drivenhet
B: Den här bruksanvisningen
C: 4 skruvar i en liten påsel
10
HowTo_Int_RW_Nero7-033.qxd 05-06-2007 15:48 Pagina 11
ES
Apague el ordenador.
2
PT
Desligue o seu computador.
TR
Bilgisayarınızı kapatın.
PL
Wyłącz komputer.
SV
Stäng av datorn.
ES
Toque una parte metálica no pintada
3
(por ejemplo, radiador o cualquier parte no pintada
de las carcasa de su ordenador).
Esto evitará cualquier daño en su ordenador
debido a una descarga eléctrica.
PT
Toque em alguma parte metálica que não
esteja pintada (por exemplo, sua ventoinha ou
alguma parte que não).
Esteja pintada na carcaça do seu computador).
TR
Boyanmayan metal kısma dokunun
(örn. ısıtıcınız veya bilgisayarınızın kasasının
boyanmayan kısmı).
Bu, elektrostatik deşarj nedeniyle bilgisayarınıza
zarar vermesini engelleyecektir.
PL
Dotknij niepomalowanego metalowego elementu (np. grzejnika lub niepomalowanej części
obudowy komputera).
Zapobiegnie to uszkodzeniu komputera przez wyładowanie elektrostatyczne.
SV
Rör vid en omålad metalldel (t.ex. en värmeledning eller en omålad del av datorns hölje).
Då undviker du att datorn skadas av elektrostatisk urladdning.
ES
Desconecte el cable de alimentación del PC.
4
PT
Desligue o cabo de alimentação do PC.
TR
Güç kablosunu bilgisayardan çıkarın.
PL
Odłącz kabel zasilający od komputera.
SV
Dra ut nätsladden från datorn.
11
HowTo_Int_RW_Nero7-033.qxd 05-06-2007 15:48 Pagina 12
ES
Abra el ordenador. Tendrá que quitar los
5
tornillos que suelen ir colocados en la parte posterior
del ordenador.
Consulte el manual del ordenador donde econtrará
más detalles.
PT
Abra o computador. Pode ter que desapertar
parafusos que, na sua maioria, se encontram na parte
de trás do computador.
Para obter mais informações, consulte o manual do
computador.
TR
Bilgisayarınız açın. Çoğunlukla bilgisayarınızın
arkasında bulunan vidaları gevşetmeniz gerekebilir.
Ayrıntılar için bilgisayarınızın el kitabına bakın.
PL
Otwórz komputer. Prawdopodobnie konieczne będzie odkręcenie śrub, które zazwyczaj znajdują się
z tyłu komputera.
Więcej informacji można znaleźć w instrukcji obsługi komputera.
SV
Öppna datorn. Du kan behöva lossa skruvar, oftast på datorns baksida.
Mer information finns i datorns handbok.
ES
Quite la carcasa del ordenador.
6
PT
Retire a cobertura do computador.
TR
Bilgisayarın kapağını çıkarın.
PL
Zdejmij obudowę komputera.
SV
Avlägsna datorns hölje.
ES
Estas son las conexiones (en la parte posterior
7
de la unidad) que tendrá que utilizar para desconectar
la unidad del ordenador.
PT
Estas são as ligações (parte de trás da unidade)
que é preciso utilizar para ligar a unidade ao
computador.
TR
Bunlar, sürücüyü bilgisayara bağlamak için
kullanacağınız bağlantılardır (sürücünüzün arkasında).
PL
Oto złącza (z tyłu napędu), które należy
wykorzystać do podłączenia napędu do komputera.
SV
Detta är de anslutningar (på enhetens baksida)
som används för att ansluta enheten till datorn.
12
HowTo_Int_RW_Nero7-033.qxd 05-06-2007 15:48 Pagina 13
ES
Ponga la unidad en el ordenador.
8
PT
Coloque a unidade no computador.
TR
Sürücüyü bilgisayarınıza yerleştirin.
PL
Włóż napęd do komputera.
SV
Sätt i enheten i datorn.
ES
Conecte un cable de alimentación S-ATA
9
al equipo.
PT
Conecte um cabo de alimentação S-ATA em
sua unidade.
TR
Sürücünüze bir S-ATA Güç Kablosu bağlayın.
PL
Podłącz kabel zasilający S-ATA do napędu.
SV
Anslut en S-ATA-nätkabel till enheten.
ES
Conecte el cable de datos S-ATA al equipo.
10
PT
Conecte o cabo de dados S-ATA em sua
unidade.
TR
Sürücünüze S-ATA veri kablosunu bağlayın.
PL
Podłącz kabel danych S-ATA do napędu.
SV
Anslut S-ATA-datakabeln till din enhet.
13
HowTo_Int_RW_Nero7-033.qxd 05-06-2007 15:48 Pagina 14
ES
Conecte el cable de datos S-ATA a la tarjeta
11
principal.
PT
Conecte o cabo de dados S-ATA em sua
placa-mãe.
TR
Ana kartınıza S-ATA veri kablosunu bağlayın.
PL
Podłącz kabel danych S-ATA do płyty głównej.
SV
Anslut S-ATA-datakabeln till ditt moderkort.
ES
Asegure la unidad con los tornillos (si es
12
posible en ambos lados).
PT
Utilize os parafusos para fixar a unidade
(se possível, de ambos os lados).
TR
Sürücüyü vidalarla iyice sıkıştırın (mümkünse
her iki tarafı).
PL
Przymocuj napęd śrubami (jeżeli jest to
możliwe, obustronnie).
SV
Säkra enheten med skruvar, om möjligt på båda
sidorna.
ES
Vuelva a instalar la carcasa que quitó en el
13
paso 5.
PT
Recoloque a cobertura que tirou no passo 5.
TR
5. adımda çıkardığınız kapağı yerine takın.
PL
Nałóż z powrotem obudowę, zdjętą w
punkcie 5.
SV
Sätt tillbaka höljet du avlägsnade i steg 5.
14
HowTo_Int_RW_Nero7-033.qxd 05-06-2007 15:48 Pagina 15
ES
Ponga los tornillos (si hay alguno) en la parte
14
posterior y vuelva a conectar los cables.
PT
Coloque os parafusos (se havia algum) de
volta no lugar e reconecte os cabos.
TR
Vidaları (eğer varsa) yerine koyun ve
kabloları tekrar bağlayın.
PL
Wkręć śrubki (jeśli zostały wykręcone) i
podłącz kable.
SV
Sätt tillbaka skruvarna (om sådana finns) och
återanslut kablarna.
ES
Reinicie el ordenador.
15
PT
Reinicie o computador.
TR
Bilgisayarınız yeniden başlatın.
PL
Uruchom ponownie komputer.
SV
Starta datorn.
15

HowTo_Int_RW_Nero7-033.qxd 05-06-2007 15:48 Pagina 16
16
HowTo_Int_RW_Nero7-033.qxd 05-06-2007 15:48 Pagina 17
Как выполнить инсталляцию?
Comment installer?
How to install?
SC
1
RU
Это можно найти в окне:
A: Ваш новый дисковод
B: Данное руководство
C: 4 винта в компактный пакет
DK
Dette findes i kassen:
A: Dit nye drev
B: Denne manual
C: 4 skruer i en lille pose
TC
EN
This can be found in the box:
A: Your new drive
B: This manual
C: 4 screws in a small bag
17
HowTo_Int_RW_Nero7-033.qxd 05-06-2007 15:48 Pagina 18
SC
2
RU
Выключите ваш компьютер.
DK
Sluk for din computer.
TC
EN
Switch your computer off.
SC
3
RU
Прикоснитесь к любой неокрашенной
металлической части (например: к батарее
отопления или к неокрашенной части корпуса
компьютера).
Таким образом, можно избежать повреждения
компьютера в результате статического разряда.
DK
Rør ved en umalet metalting (fx radiatoren
eller en umalet del af computerens indkapsling).
Dermed undgår du beskadigelse af computeren som
følge af elektrostatiske udladninger.
TC
EN
Touch an unpainted metal part (eg. your heating or an unpainted part of your computer case).
This will avoid any damage to your computer by electrostatic discharge.
SC
4
RU
Отсоедините кабель питания от вашего PC.
DK
Tag strømkablet fra computeren ud.
TC
EN
Disconnect the power cable from the PC.
18
HowTo_Int_RW_Nero7-033.qxd 05-06-2007 15:48 Pagina 19
SC
5
RU
Откройте компьютер. Для этого нужно
отпустить винты, расположенные чаще всего на задней
стенке компьютера. Более подробно см. в руководстве
по компьютеру.
DK
Åbn computeren. Du skal muligvis løsne nogle
skruer, der ofte sidder bag på computeren. Find mere
information i manualen til din computer.
TC
EN
Open your computer. You may have to unleash screws which are mostly located at the back of your computer.
See your computer manual for more details.
SC
6
RU
Снимите крышку компьютера.
DK
Tag dækslet af computeren.
TC
EN
Take off the cover of the computer.
SC
7
RU
Здесь находятся соединения (на задней
стенке вашего дисковода), которые должны
использоваться для подключения дисковода к
компьютеру.
DK
Dette er de forbindelser (bag på drevet), som
du skal bruge, når drevet skal tilsluttes computeren.
TC
EN
These are the connections (on the back of
your drive) you will have to use for connecting the
drive to the computer.
19
HowTo_Int_RW_Nero7-033.qxd 05-06-2007 15:48 Pagina 20
SC
8
RU
Вставьте дисковод в ваш компьютер.
DK
Sæt drevet ind i computeren.
TC
EN
Put the drive into your computer.
SC
9
RU
Присоедините кабель питания S-ATA к
вашему дисководу.
DK
Tilslut et S-ATA strømkabel til drevet.
TC
EN
Attach a S-ATA Power Cable to your drive.
SC
10
RU
Присоедините кабель данных S-ATA к
вашему дисководу.
DK
Forbind S-ATA datakablet til drevet.
TC
EN
Attach the S-ATA data cable to your drive.
20
HowTo_Int_RW_Nero7-033.qxd 05-06-2007 15:48 Pagina 21
SC
11
RU
Присоедините кабель данных S-ATA к
материнской плате вашего компьютера.
DK
Forbind S-ATA datakablet til bundkortet.
TC
EN
Connect the S-ATA data cable to your
motherboard.
SC
12
RU
Закрепите дисковод винтами
(по возможности с обеих сторон).
DK
Fastgør drevet med skruerne
(om muligt på begge sider).
TC
EN
Secure the drive with the screws
(if possible on both sides).
SC
13
RU
Установите крышку, снятую вами на шаге 5.
DK
Sæt det dækslet på igen (det du tog af under
pkt. 5).
TC
EN
Put the cover you took off in step 5 back on.
21
HowTo_Int_RW_Nero7-033.qxd 05-06-2007 15:48 Pagina 22
SC
14
RU
Вставьте винты (если требуется) и
присоедините кабели.
DK
Skru eventuelle skruer i igen og tilslut
kablerne igen.
TC
EN
Put the screws (if there were any) back in
and reconnect the cables.
SC
15
RU
Запустите ваш компьютер.
DK
Genstart computeren.
TC
EN
Restart your computer.
22

HowTo_Int_RW_Nero7-033.qxd 05-06-2007 15:48 Pagina 23
Оглавление
- How to... for Internal S-ATA Drives
- More info or help needed
- Weitere Informationen oder Hilfe erforderlich
- Vous avez besoin d'aide ou de plus d'informations ?
- Per ulteriori informazioni o assistenza
- Meer informatie of hulp nodig
- Si necesita más información o ayuda
- São necessárias mais informações ou ajuda
- Daha fazla bilgi veya yardım gereklidir
- Potrzebna pomoc lub dodatkowe informacje
- Mer information eller hjälp behövs
- Нужна дополнительная информация или помощь
- Mere information og hjælp
- More info or help needed
