Philips SRU510: инструкция
Раздел: Бытовая, кухонная техника, электроника и оборудование
Тип: Универсальный Пульт Ду
Инструкция к Универсальному Пульту Ду Philips SRU510
SBC RU 510/00U
SRU 510/87
GB
Instructions for use 4
I
Instruzioni per l'uso 10
Instrucciones
E
16
de manejo
P
Manual de utilização 22
GR
28
Инструкции по
RU
34
использованию
CZ
Návod k použití 40
PL
Instrukcja obsługi 46
Quick, Clean & Easy Setup
www.philips.com/urc
SRU510_87_v6.qxd 26-04-2005 14:03 Pagina 1

SRU510_87_v6.qxd 26-04-2005 14:03 Pagina 2
SRU510_87_v6.qxd 26-04-2005 14:03 Pagina 3
1
^
2
3
%
4
5
$
6
#
7
@
8
!
9
0

Instructions for use
English
Contents
1. Introduction . . . . . . . . . . . . . . . . . . . . . . . . . . . . . . . . . . . . . . . . . . . . . 4
2. Installing the remote control . . . . . . . . . . . . . . . . . . . . . . . . . . . . 4-6
Inserting the batteries . . . . . . . . . . . . . . . . . . . . . . . . . . . . . . . . . . . . . . . 4
Testing the remote control . . . . . . . . . . . . . . . . . . . . . . . . . . . . . . . . . . . 4
Setting the remote control . . . . . . . . . . . . . . . . . . . . . . . . . . . . . . . . . . . 5
3. Keys and functions . . . . . . . . . . . . . . . . . . . . . . . . . . . . . . . . . . . . . . . 7
4. Extra possibilities . . . . . . . . . . . . . . . . . . . . . . . . . . . . . . . . . . . . . . . . 8
Adding a function to the remote control . . . . . . . . . . . . . . . . . . . . . . . . 8
Restoring the original functions of your remote control . . . . . . . . . . . . 8
5. Troubleshooting . . . . . . . . . . . . . . . . . . . . . . . . . . . . . . . . . . . . . . . . . . 8
6. Need help? . . . . . . . . . . . . . . . . . . . . . . . . . . . . . . . . . . . . . . . . . . . . . . 9
Code list of all brands / equipment . . . . . . . . . . . . . . . . . . . . . . . . . 52-58
1. Introduction
Congratulations on your purchase of the Philips SRU510 universal remote
control. After installing the remote control it can operate the most-used
functions of almost any brand of TV.
You can find information about how to prepare this remote control for use in
the chapter ‘Installing the remote control’.
2. Installing the remote control
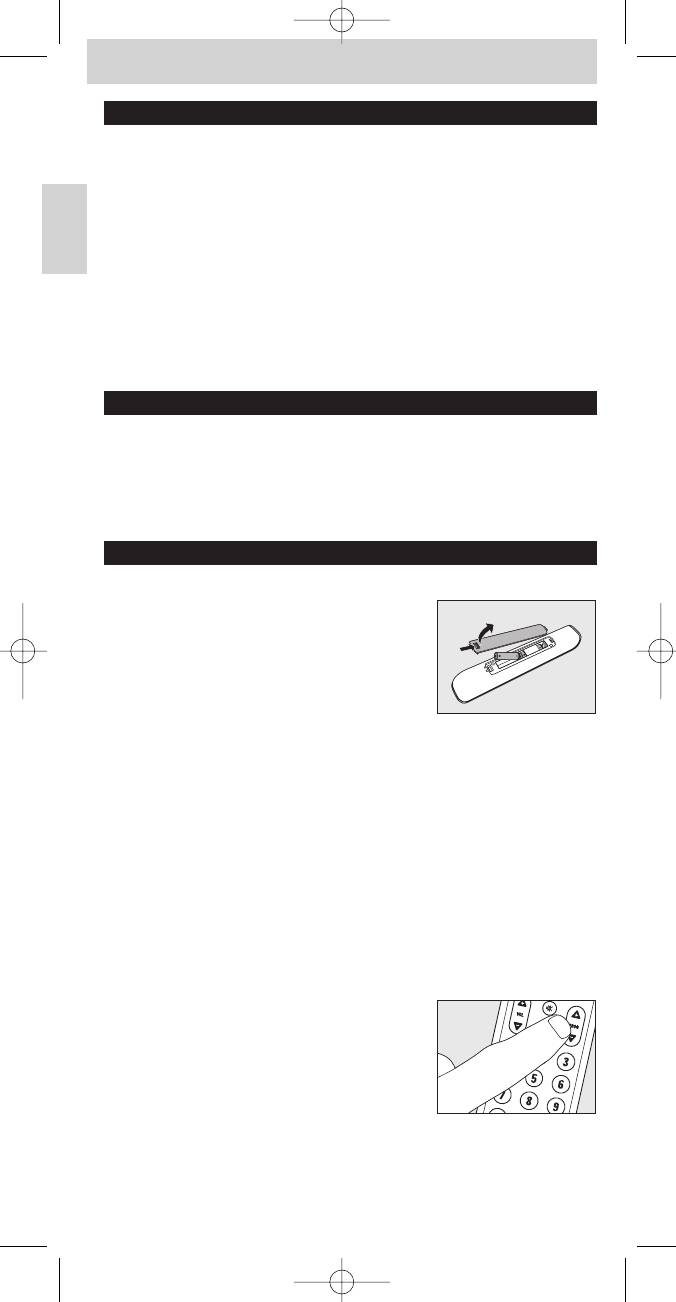
Inserting the batteries
1 Press the cover inwards and slide it in
the direction of the arrow.
2 Place two AAA type batteries into the
battery compartment, as shown.
3 Slide the cover back and click it firmly into
place.
Note: If the LED blinks four times after every key press, the remote control is indicating
that its batteries are running low. Replace the old batteries with two new AAA
batteries.
Testing the remote control
The remote control has been programmed to operate the most-used
functions of almost any brand of TV. Because the SRU510 may use different
signals for each make and even for different models of the same brand, it is
advisable to test whether your TV responds to the SRU510.
The example below instructs you how to do this.
1 Turn your TV on manually or use the original remote control.
Tune to channel 1.
2 Check whether all the keys are working
For an overview of the keys and their
functions see ‘3. Keys and functions’.
– If the TV responds as it should to all of the
key commands the SRU510 is ready for use.
• If the TV does not respond at all or not to all of the
key commands, follow the instructions under
‘Setting the remote control’, or for online setup go to:
www.philips.com/urc.
4
SRU510_87_v6.qxd 26-04-2005 14:03 Pagina 4
Instructions for use
Setting the remote control
This is only necessary if your TV does not respond to the SRU510.
If that is the case, the SRU510 does not recognize the brand and/or model of
English
your TV and you need to program the remote control to do so.
You can set the remote control either automatically or manually.
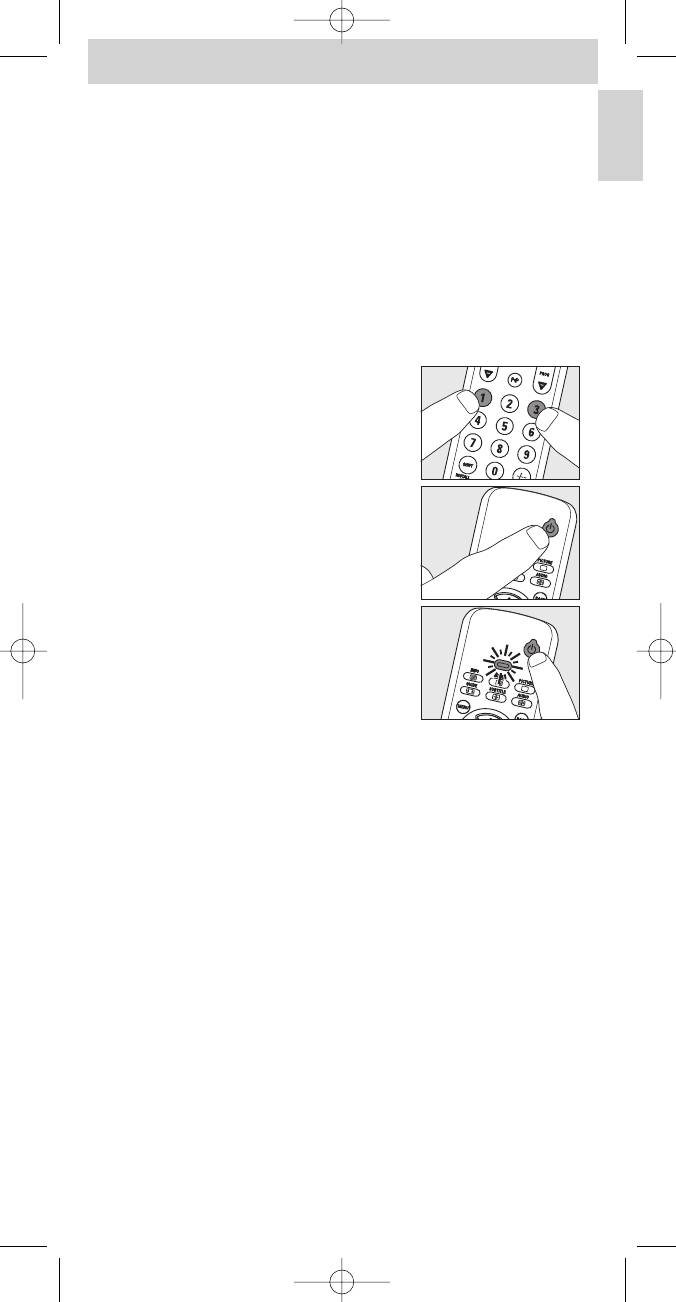
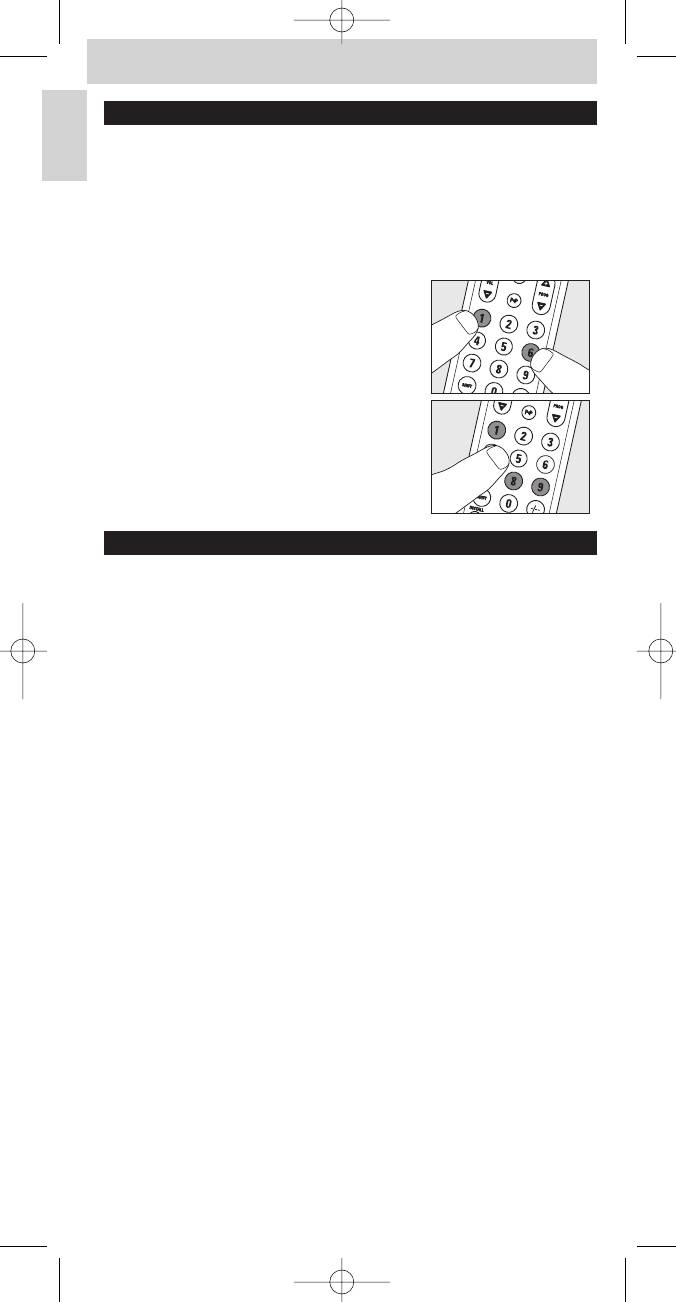
Automatically setting the remote control
The remote control will now automatically search for the right code for your
device.
1 Make sure the TV is switched on and select a channel using the original
remote control or the keys on the TV (for example channel 1).
The SRU510 emits the ‘switch off TV’ signal for all models of TV that are
stored in the memory.
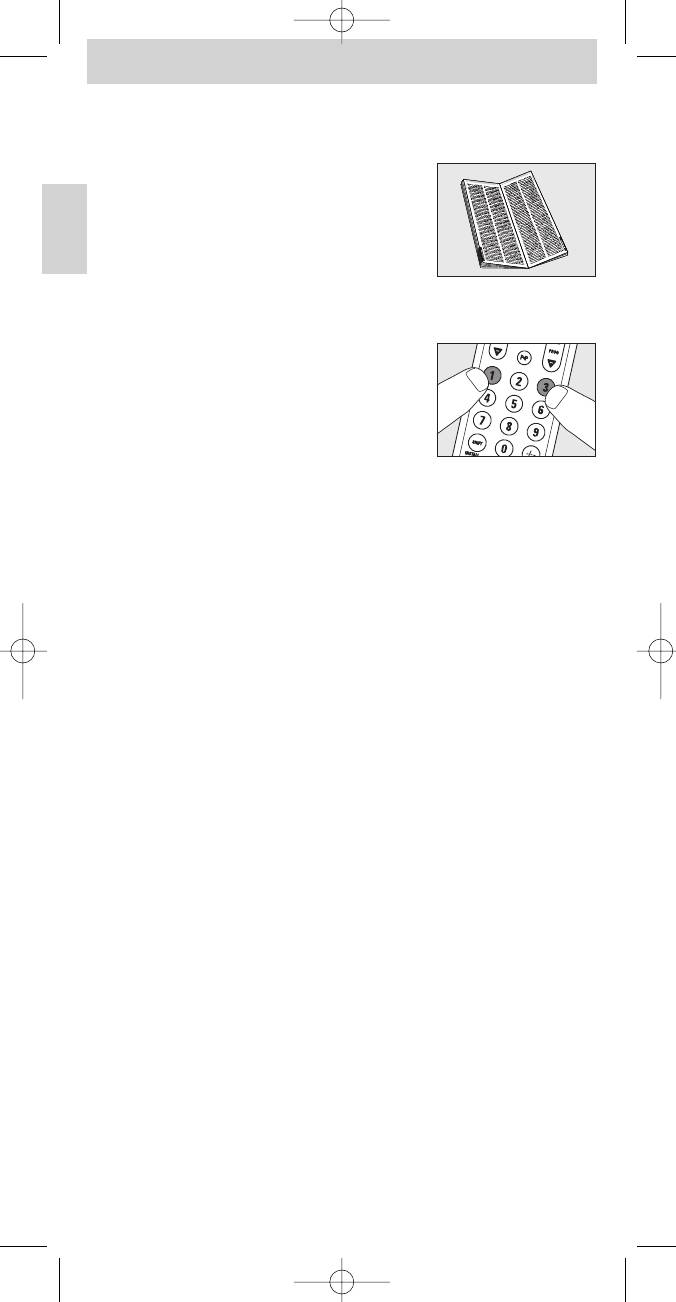
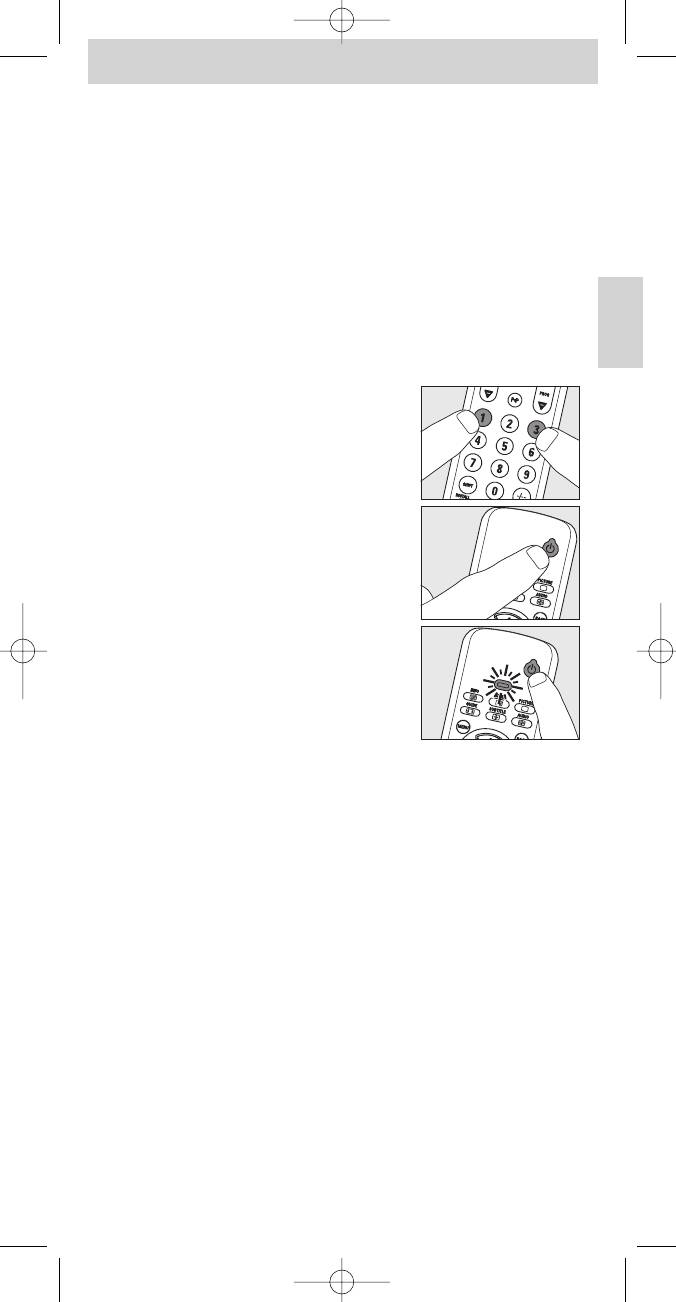
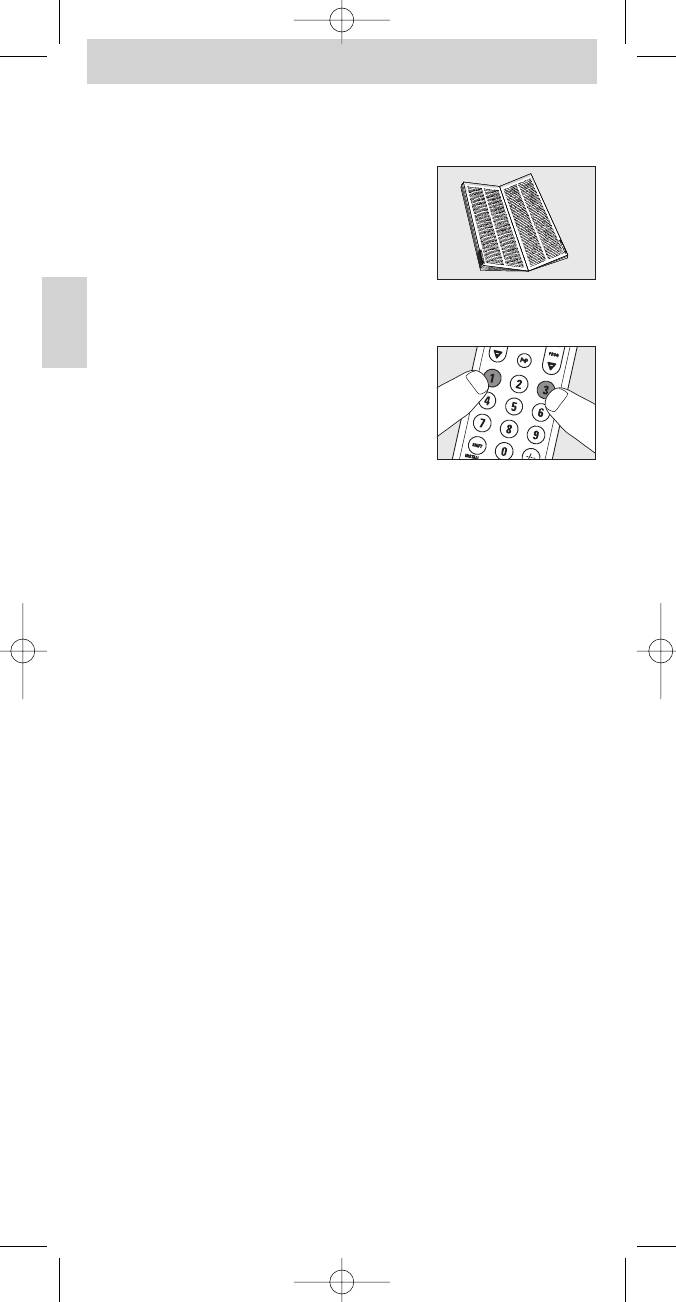
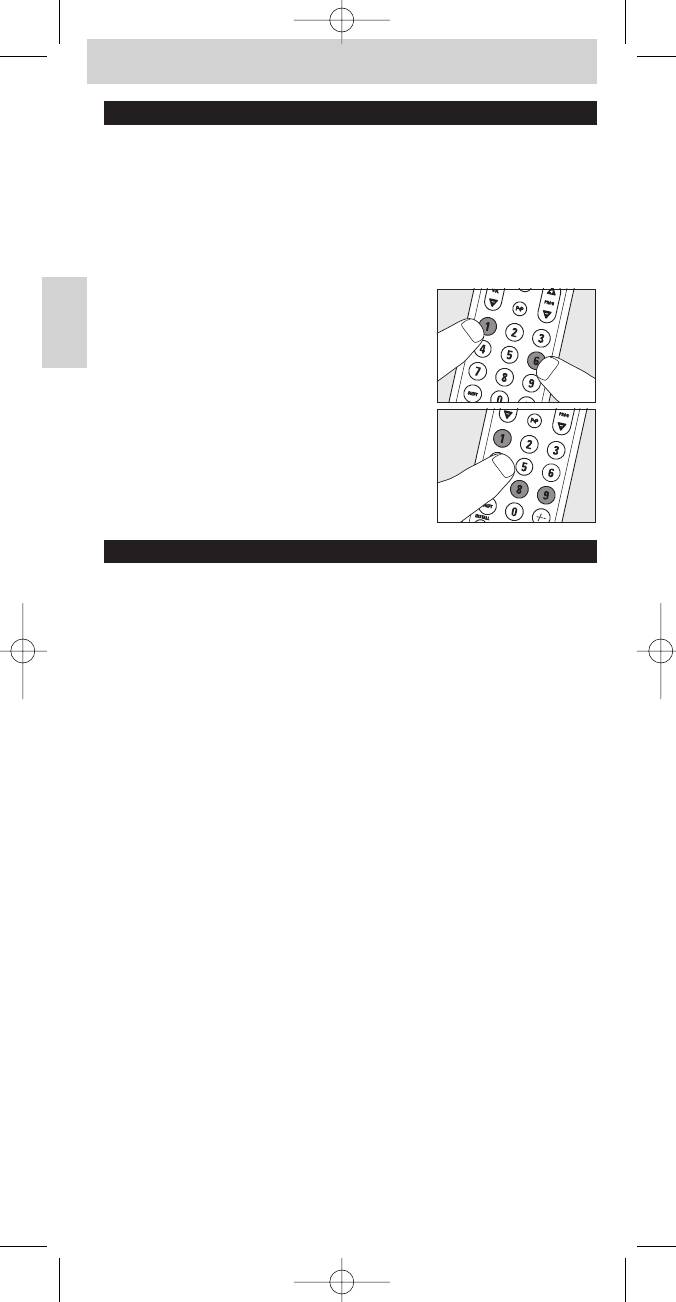
2 Then keep keys 1 and 3 on the SRU510
pressed simultaneously for three seconds,
until the LED flashes twice and then remains
lit.
3 Press and hold the Standby key
of the SRU510.
– The SRU510 now starts emitting all known
‘TV off’ signals, one by one.
Each time a code is sent, the LED
lights up
4 When your TV switches off (stand-by), release the Standby key of the
SRU510 immediately.
– The SRU510 has now found a code that works on your TV.
5 Check if you can operate all functions on your TV with the SRU510.
• If this is not the case, you can redo the automatic setting.
The SRU510 will then search for a code that works better.
– After the SRU510 has run through all the known codes,
the search will stop automatically and the LED will stop flashing.
– Automatic programming of a TV takes a maximum of 5 minutes.
5
SRU510_87_v6.qxd 26-04-2005 14:03 Pagina 5
Instructions for use
English
Manually setting the remote control
1 Turn on the TV manually or use the original remote control.
Tune in to channel 1.
2 Look up the brand of your TV in the
code list at the back of this manual. One or
more four-figure codes are shown for each
brand. Note the first code.
On our website www.philips.com/urc you can directly select your device
typenumber to find the right code.
3 Keep keys 1 and 3 pressed simultaneously
for three seconds until the LED
flashes twice and then remains lit
4 Then enter the code noted in step 2 using the digit keys.
– The LED will now flash twice and then remains lit.
The code has now been stored in the memory of the SRU510.
If the LED flashes once for an extended period, the code has not been
entered properly or the wrong code has been entered.
Start again from step 2.
5 Point the SRU510 at the TV and check that it responds as it should.
– If the TV responds to all of the key commands, the SRU510 is ready for
use. Do not forget to note your code.
• If the TV does not respond at all, or not to all of the
key commands, start again from step 2 and try the next code
from the list.
6
SRU510_87_v6.qxd 26-04-2005 14:03 Pagina 6
Instructions for use
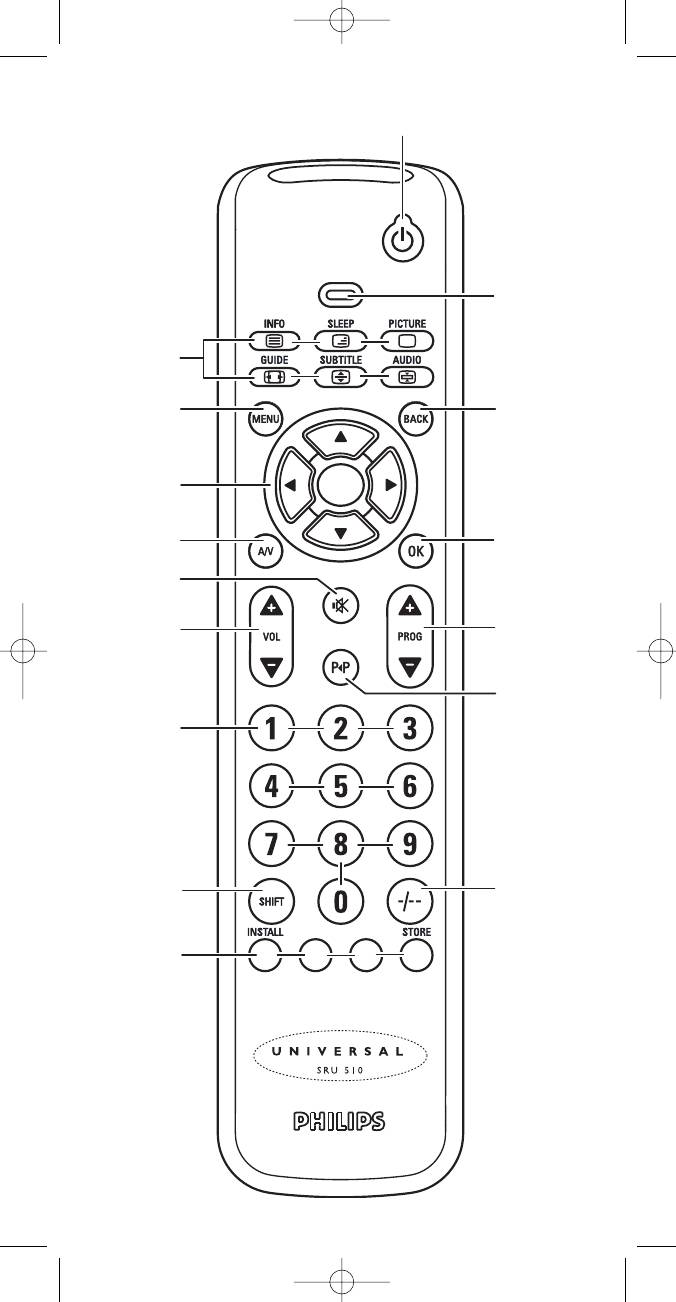
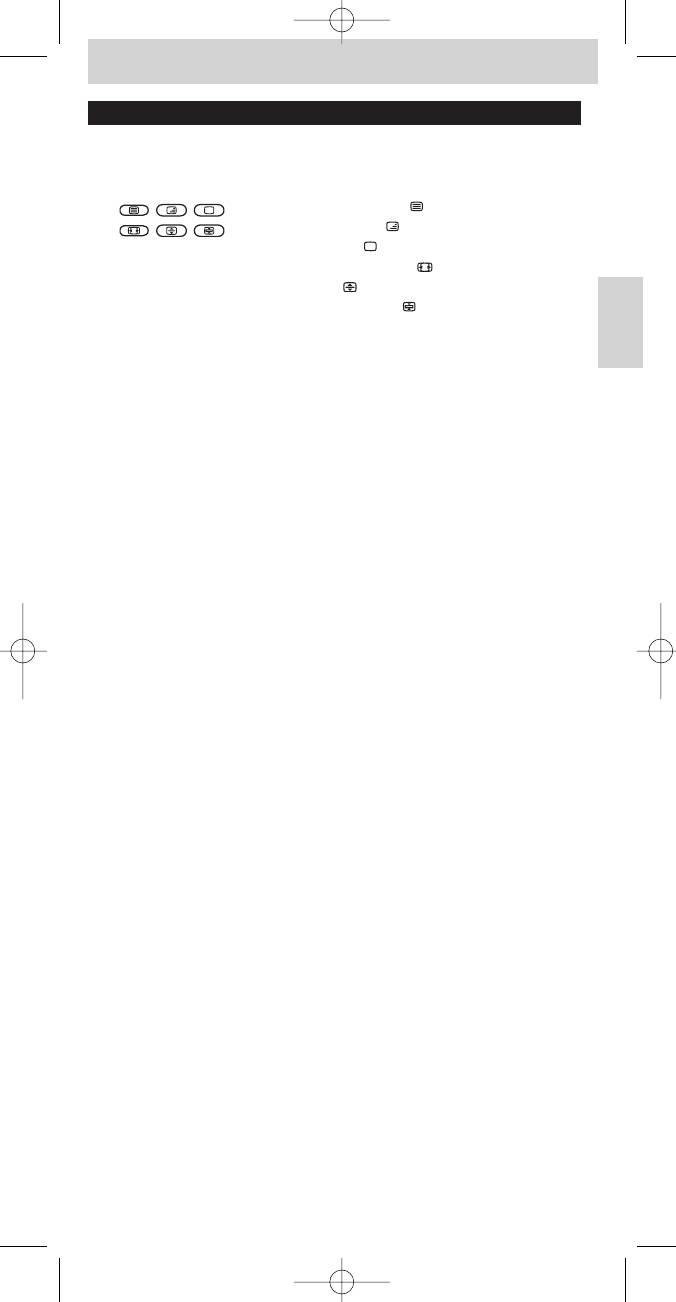
3. Keys and functions
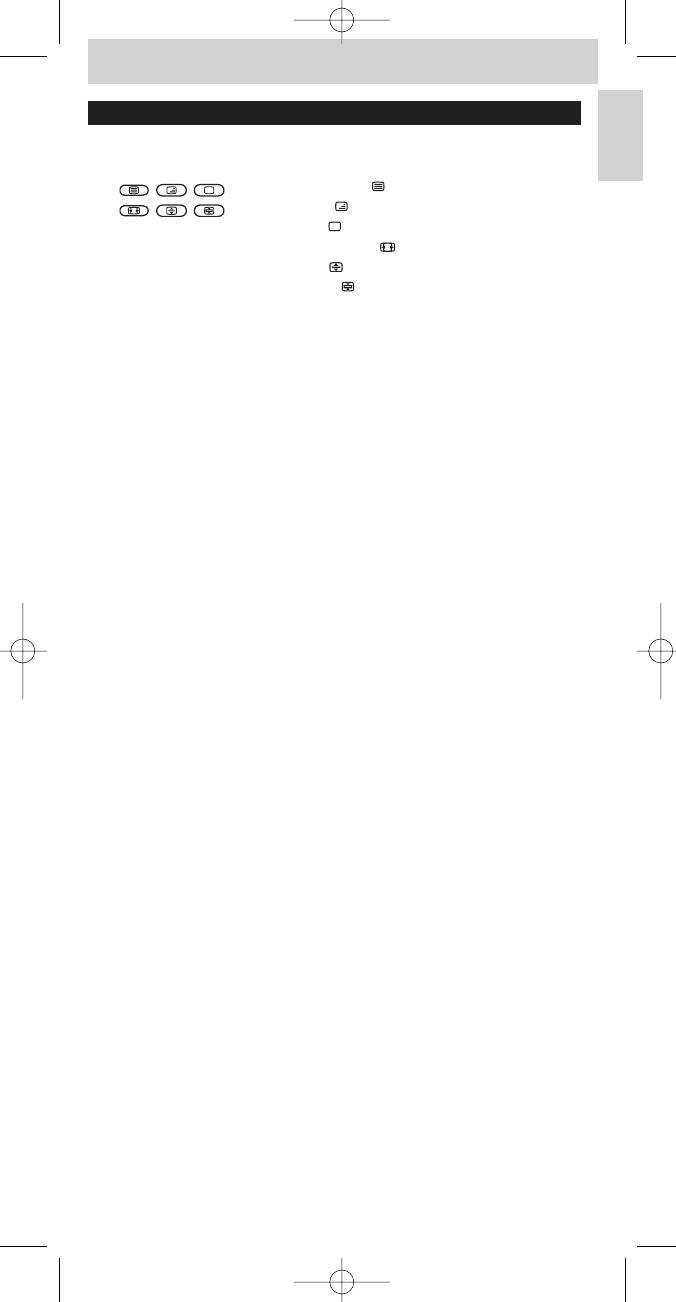
The illustration on page 3 gives an overview of all keys and their functions.
English
1 y Standby . . . . . . . . switches the TV on or off.
2 . . . - teletext on/off ( );
- text mix ( );
- text off ( );
- wide screen TV ( );
- enlarge ( );
- text hold ( ).
3 MENU . . . . . . . . . . . turns the menu on and off.
4 Cursor keys . . . . . . cursor up, down, left, right in a menu.
5 A/V . . . . . . . . . . . . . . switches between external inputs of your
equipment.
6 s . . . . . . . . . . . . . . . . mutes the sound of the TV.
7 - VOL +. . . . . . . . . . . adjusts the TV volume.
8 Digit keys . . . . . . . . direct choice of channels and other functions.
9 SHIFT . . . . . . . . . . . for extra functions.When pressed at the same
time as a second key, the second key will get
another function. All blue labelled keys can be used
together with SHIFT. For example:
SHIFT + INSTALLinstalls your TV
SHIFT + STORE. . stores TV settings
Tr y out other combinations with the SHIFT-key on your TV in order to find
out which functions are available.
Only functions featured on the original remote control are available.
0 Red, green, yellow and blue teletext keys
! / . . . . . . . . . . . . . . . selects between one- and two-figure channel
numbers.
@
22
. . . . . . . . . . . . . . . selects previous programme/channel.
# - PROG + . . . . . . . . selects a previous or following channel.
$ OK. . . . . . . . . . . . . . . confirms your selection.
% BACK. . . . . . . . . . . . jumps back one level in the menu or turns off the
menu.
^ LED
If you use the (fi) 'memory off' key to get to the next teletext page on your
Philips TV, you can press the OK key for this. Also see ‘Troubleshooting’.
• If the device does not respond at all, or not to all of the key
commands, follow the instructions under ‘Setting the remote
control’. It is possible that you must enter another code for the
device.
7
SRU510_87_v6.qxd 26-04-2005 14:03 Pagina 7
Instructions for use
English
4. Extra possibilities
Adding a function to the remote control
If you want to add a function to the SRU510, you can contact the
Philips service line for Universal Remote Control to ask for the 5-figure code
for the extra function.
Restoring the original functions of your remote
control
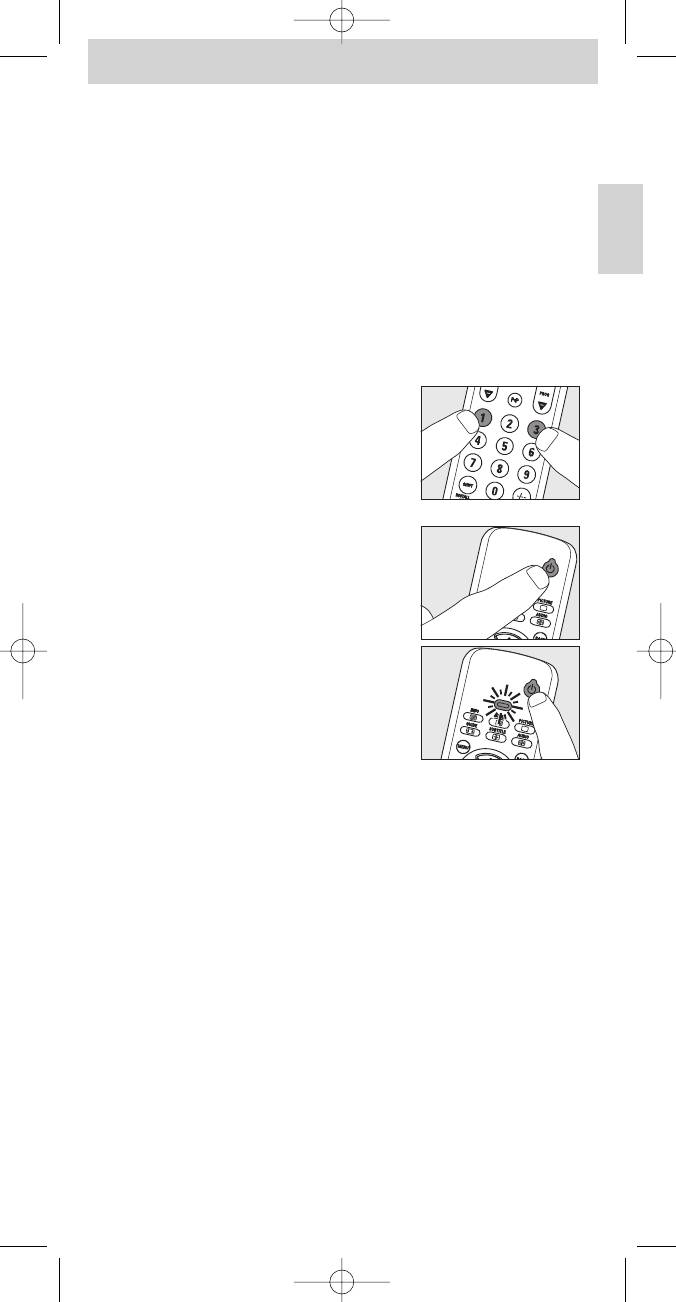
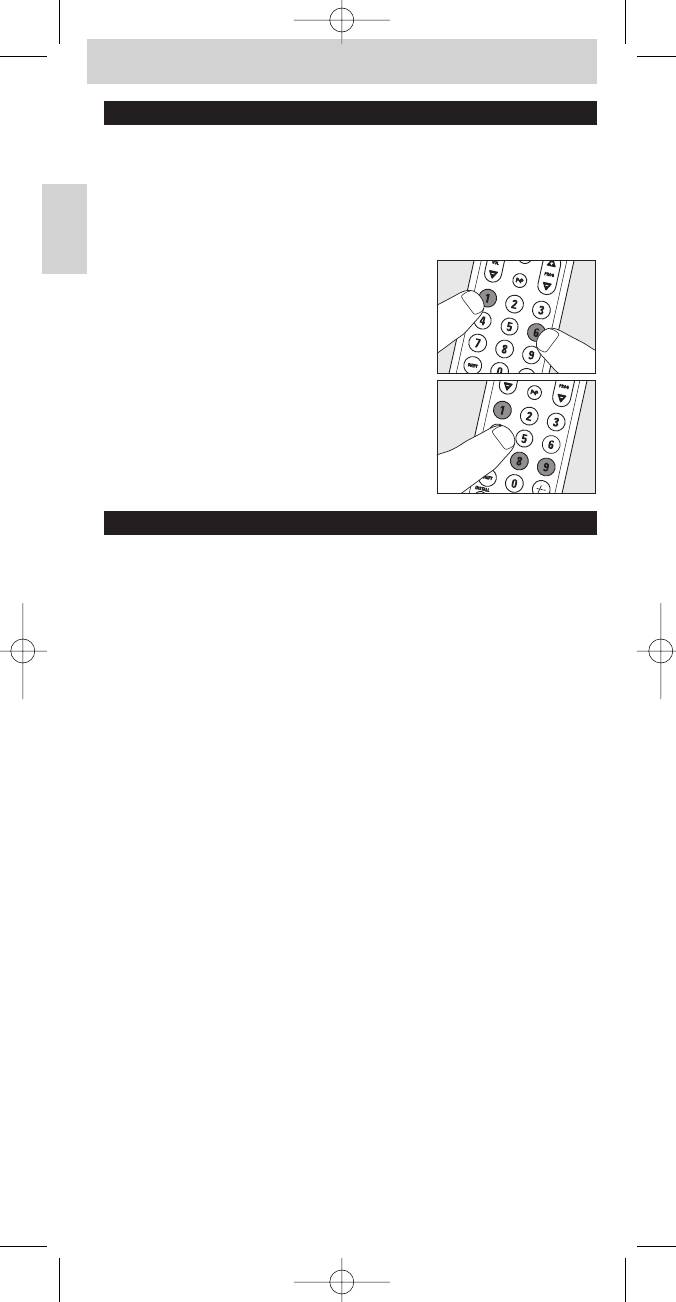
1 Keep keys 1 and 6 on the SRU510
pressed simultaneously for three seconds,
until the LED flashes twice and then remains
lit.
2 Press keys 9, 8 and 1, in that order
– The LED flashes twice.
All original functions have now been restored
and any extra functions have been deleted.
5. Troubleshooting
• Problem
– Solution
•
The LED blinks four times after every key press.
–
The remote control is indicating that its batteries are running low. Replace the old
batteries with two new
1.5 Volt,
AAA batteries.
• The TV does not respond and the LED does not flash when you press a
key.
– Replace the old batteries with two new 1.5 Volt, AAA batteries.
• The TV does not respond but the LED does flash when a key is pressed.
–Point the SRU510 at the device and make sure that there are no
obstructions between the SRU510 and the device.
• The SRU510 does not respond properly to commands.
– Maybe you are using the wrong code.Try programming the RU510 again
using another code, which is mentioned under the brand of your device, or
reset for automatic search to find the right code.
If the TV still does not respond, call our helpline.
• The Teletext keys do not work.
– Find out whether your TV is equipped with Teletext.
•You have difficulties operating all of the functions on your device.
– Maybe the SRU510 has to be adapted to the model of the device.
Call our helpline for details.
•Your brand of device is not in the code list.
– Try to set the SRU510 automatically.
See ‘Automatically setting the remote control’.
• None of the codes works during manual setting of the remote control.
– If that is the case, follow the instructions under
‘Automatically setting the remote control’.
8
SRU510_87_v6.qxd 26-04-2005 14:03 Pagina 8

Instructions for use
6. Need help?
If you have any questions about the SRU510, you can always contact us.
English
You will find our contact details after the code list at the back of this manual.
Read this manual carefully before you make a call.You can solve most of the
problems yourself. If you cannot find any answers to your problems, write
down the details of your device shown in the code list at the back of this
manual.This will help our operators to assist you better and more quickly.
Look up the numbers of the models in the instructions accompanying the
device or on the back of your device.When you call our helpline, make sure
the device is to hand so that our operators can help you determine whether
your remote control is working properly.
The model number of your Philips universal remote control is SRU510/87.
Date of purchase: ......../......../........
(day/month/year)
9
SRU510_87_v6.qxd 26-04-2005 14:03 Pagina 9
Instruzioni per l’uso
Instruzioni per l’uso
Sommario
1. Introduzione . . . . . . . . . . . . . . . . . . . . . . . . . . . . . . . . . . . . . . . . . . . . 10
2. Installazione del telecomando . . . . . . . . . . . . . . . . . . . . . . . . 10-12
Inserimento delle batterie . . . . . . . . . . . . . . . . . . . . . . . . . . . . . . . . . . . 10
Italiano
Collaudo del telecomando . . . . . . . . . . . . . . . . . . . . . . . . . . . . . . . . . . 10
Configurazione del telecomando . . . . . . . . . . . . . . . . . . . . . . . . . . . . . . 11
3. Tasti e funzioni . . . . . . . . . . . . . . . . . . . . . . . . . . . . . . . . . . . . . . . . . . 13
4. Funzioni aggiuntive . . . . . . . . . . . . . . . . . . . . . . . . . . . . . . . . . . . . . 14
Aggiungere una funzione al telecomando . . . . . . . . . . . . . . . . . . . . . . . 14
Ripristino delle funzioni originali del telecomando . . . . . . . . . . . . . . . . 14
5. Risoluzione di problemi . . . . . . . . . . . . . . . . . . . . . . . . . . . . . . . . . 14
6. Problemi? . . . . . . . . . . . . . . . . . . . . . . . . . . . . . . . . . . . . . . . . . . . . . . . 15
Lista dei codici per tutte le marche / apparecchi . . . . . . . . . . . . . . 52-58
1. Introduzione
Congratulazioni per l’acquisto del telecomando universale Philips SRU510.
Dopo la configurazione, il telecomando potrà controllare le funzioni
maggiormente utilizzate dei TV di qualsiasi marca.
Nel capitolo ‘Installazione del telecomando’ troverete le informazioni
necessarie per preparare il telecomando all’uso.
2. Installazione del telecomando
Inserimento delle batterie
1 Premete sul coperchio e fatelo scorrere
nella direzione della freccia.
2 Inserite due batterie AAA nel vano batterie,
come illustrato.
3 Richiudete il coperchio
(scatta in posizione con un clic).
Nota: Se il LED lampeggia quattro volte dopo ogni volta che si preme un tasto, il
telecomando indica che le batterie si stanno scaricando. Sostituite le batterie con
due nuove del tipo AAA.
Collaudo del telecomando
Il telecomando è stato programmato per controllare le funzioni maggiormente
utilizzate dei TV di qualsiasi marca. Poiché l’SRU510 potrebbe utilizzare segnali
differenti per ciascuna marca e modello, è opportuno verificare se il TV
risponde ai comandi inviati dall’SRU510. L’esempio che segue descrive la
procedura per il collaudo.
1 Accendete il televisore direttamente o tramite il suo telecomando
originale. Sintonizzate il canale 1.
2 Controllate se funzionano tutti i tasti.
Per una panoramica sui tasti e le relative
funzioni, consultate ‘3.Tasti e funzioni’.
– Se il TV risponde correttamente a tutti i
comandi abbinati ai tasti, l’SRU510 è pronto
per l’uso.
• Se l’apparecchio non risponde del tutto od ignora alcuni
comandi, passate alle istruzioni descritte in ‘Configurazione del
telecomando’, oppure per l’impostazione in linea andate al sito:
www.philips.com/urc.
10
SRU510_87_v6.qxd 26-04-2005 14:03 Pagina 10
Instruzioni per l’uso
Configurazione del telecomando
Questa procedura va svolta solo se il TV non risponde ai comandi inviati
dall’SRU510. Se ciò accade significa che l’SRU510 non riconosce la marca e/o
il modello di TV ed è quindi necessario programmare il telecomando in base
alle specifiche dell’apparecchio. Potete programmare il telecomando sia
automaticamente che manualmente.
Impostazione automatica del telecomando
Italiano
Il telecomando ora effettuerà la ricerca automatica del corretto codice per il
vostro apparecchio.
1 Assicuratevi che il TV sia acceso e selezionate un canale mediante il suo
telecomando originale, od i tasti del pannello del televisore (ad esempio
il canale 1). L’SRU510 procederà con l’invio del segnale di ‘spegnimento
TV’ di tutti i modelli di televisore presenti nella sua memoria.
2 Quindi tenete i tasti 1 e 3 sull’SRU510
premuti contemporaneamente per tre
secondi fino a quando il LED lampeggia due
volte e poi rimane acceso.
3 Premete e tenete premuto il tasto
dell’SRU510.
–L’SRU510 inizia ad inviare tutti i segnali noti
di ‘spegnimento TV’, uno alla volta.
Ogni volta che viene inviato un codice, il LED
si illumina.
4 Quando il televisore si spegne (standby), rilasciate immediatamente il
tasto standby del telecomando SRU510.
–L’SRU510 ha quindi trovato un codice adatto al vostro TV.
5 Verificate se l’SRU510 è in grado di controllare tutte le funzioni del
televisore.
• Nel caso contrario, potete ripetere l’impostazione.
L’SRU510 quindi ricercherà un codice che funziona meglio.
– Quando l’SRU510 ha inviato tutti i codici noti, la ricerca si arresta
automaticamente ed il LED cessa di lampeggiare.
– La programmazione automatica di un TV richiede fino a 5 minuti.
11
SRU510_87_v6.qxd 26-04-2005 14:03 Pagina 11
Instruzioni per l’uso
Impostazione manuale del telecomando
1 Accendete il televisore direttamente o tramite il suo telecomando
originale. Sintonizzate il canale 1.
2 Individuate la marca del vostro TV nella
lista dei codici inclusa alla fine di questa guida.
Italiano
Per ciascuna marca sono elencati uno o più
codici a quattro cifre. Annotate il primo
codice.
Sul nostro sito www.philips.com/urc potete selezionare direttamente il
numero dell’apparecchio per trovare il codice giusto.
3 Tenere i tasti 1 e 3 premuti
contemporaneamente per tre secondi fino a
quando il LED lampeggia due volte e poi
rimane acceso.
4 A questo punto inserite il codice annotato al punto 2, mediante i tasti
numerici.
–A questo punto il LED lampeggia due volte e poi rimane acceso.
Il codice ora è stato inserito nella memoria dell’SRU510.
Se la spia lampeggia una volta per un prolungato periodo di tempo,
il codice non è stato inserito correttamente, oppure si tratta di un
codice errato. Ripetete la procedura a partire dal punto 2.
5 Puntate l’SRU510 in direzione del TV e verificate se l’apparecchio
risponde correttamente ai comandi inviati.
– Se il TV risponde a tutti i comandi abbinati ai tasti, l’SRU510 è pronto
per l’uso. Non scordate di annotare il codice.
• Se il TV non risponde del tutto od ignora alcuni comandi,
ripetete la procedura a partire dal punto 2 inserendo il secondo
codice elencato nella lista.
12
SRU510_87_v6.qxd 26-04-2005 14:03 Pagina 12

Instruzioni per l’uso
3. Tasti e funzioni
L’illustrazione a pagina 3 fornisce una panoramica di tutti i tasti e le relative
funzioni.
1 y Standby . . . . . . . . accende o spegne la TV.
2 . . . - attivazione/disattivazione televideo ( );
- mix televideo ( );
- disattivazione televideo ( );
Italiano
- TV schermo largo ( );
- ingrandimento ( );
- arresto pagina ( ).
3 MENU . . . . . . . . . . . attiva o disattiva il menu.
4 Tasti cursore . . . . . cursore su, giù, a sinistra, a destra in un menu.
5 A/V . . . . . . . . . . . . . . seleziona a rotazione tra gli ingressi esterni
dell’apparecchio.
6 s abbassa completamente il volume audio del TV.
7 - VOL +. . . . . . . . . . . regola il volume del TV.
8 Tasti numerici . . . . selezione di retta dei canali e di altre funzioni.
9 SHIFT . . . . . . . . . . . rende disponibili funzioni aggiuntive. Se premuto
simultaneamente ad un altro tasto, il secondo tasto
attiva la seconda funzione associata.Tutti i tasti
etichettati in blu possono essere utilizzati con SHIFT.
Ad esempio:
SHIFT + INSTALL installa la TV
SHIFT + STORE. . memorizza le impostazioni della TV
Provate altre combinazioni del tasto Shift con il vostro apparecchio per
verificare le funzioni disponibili. Sono disponibili sono le funzioni presenti nel
telecomando originale.
0 Tasti televideo rosso, verde, giallo e blu
! -/-- . . . . . . . . . . . . . . . seleziona tra numeri di canale ad una e due cifre.
@
22
. . . . . . . . . . . . . . . seleziona il programma/canale precedente.
# - PROG + . . . . . . . . seleziona il canale precedente o successivo.
$ OK. . . . . . . . . . . . . . . conferma la selezione.
% BACK. . . . . . . . . . . . salta all’indietro di un livello nel menu e disattiva il
menu.
^ LED
Se utilizzate il tasto (fi) ‘memoria off’ per accedere alla successiva pagina
teletext sul vostro TV Philips, potete premere il tasto OK.
Vedi anche ‘Risoluzione di problemi’.
• Se l’apparecchio non risponde del tutto od ignora alcuni
comandi, passate alle istruzioni descritte in ‘Configurazione del
telecomando’. Può essere necessario inserire un altro codice per
l’apparecchio.
13
SRU510_87_v6.qxd 26-04-2005 14:03 Pagina 13
Instruzioni per l’uso
4. Funzioni aggiuntive
Aggiungere una funzione al telecomando
Per aggiungere una funzione all’SRU510, contattate il servizio di assistenza
Philips per i telecomandi universali per richiedere il codice a 5 cifre riservato
Italiano
alle funzioni aggiuntive.
Ripristino delle funzioni originali del telecomando
1 Mantiene i tasti 1 e 6 sull’SRU510 premuti
contemporaneamente per tre secondi fino a
quando il LED lampeggia due volte e poi
rimane acceso.
2 Premete i tasti 9, 8 e 1, in questo ordine.
– Il LED lampeggia due volte.
Le funzioni originali sono state ripristinate e
tutte le funzioni aggiuntive sono state
eliminate.
5. Risoluzione di problemi
• Problema
– Soluzione
•
Il LED lampeggia
lampeggia quattro volte dopo ogni volta che si preme il
tasto.
– Il telecomando indica che le batterie si stanno scaricando.
Sostituite le batterie
con due batterie AAA da 1,5 Volt nuove.
• La TV non risponde ed il LED non lampeggia alla pressione di un tasto.
– Sostituite le batterie con due batterie AAA da 1,5 Volt nuove.
• La TV non risponde ma il LED lampeggia quando si preme un tasto.
– Puntate l’SRU510 in direzione dell’apparecchio ed assicuratevi che non vi
siano ostacoli tra l’SRU510 e l’apparecchio.
•L’SRU510 non risponde correttamente ai comandi.
– Forse state utilizzando il codice errato. Provate a riprogrammare l’SRU510
con un altro codice, tra quelli elencati sotto alla marca del vostro
apparecchio, oppure azzerate la configurazione svolgendo la ricerca
automatica del codice corretto. Se il TV non risponde ancora ai comando,
contattate la nostra helpline.
•I tasti Teletext non funzionano.
–Verificate se il TV include la funzione Teletext.
•L’utilizzo di tutte le funzioni dell’apparecchio è difficoltoso.
– Probabilmente è necessario adattare l’SRU510 al modello dell’apparecchio.
Per maggiori dettagli contattate la nostra helpline.
• La marca dell’apparecchio non è elencata nella lista dei codici.
– Provate a configurare automaticamente l’SRU510. Fate riferimento a
‘Configurazione automatica del telecomando’.
• Nessuno dei codici funziona durante la configurazione manuale del
telecomando.
– In questo caso, seguite le istruzioni riportate sotto a
‘Configurazione automatica del telecomando’.
14
SRU510_87_v6.qxd 26-04-2005 14:03 Pagina 14

Instruzioni per l’uso
6. Problemi?
Se avete dei quesiti sull’SRU510, ci potete sempre contattare.Troverete i
dettagli per contattarci dopo la lista dei codici infine al presente manuale.
Prima di richiedere assistenza, leggete attentamente questo manuale.
Certamente sarete in grado di risolvere la maggioranza delle difficoltà
personalmente. Se non trovate risposta ai vostri problemi, annotate i dettagli
relativi al vostro apparecchio nella lista dei codici presente alla fine di questo
Italiano
manuale. In questo modo i nostri operatori saranno in grado di assistervi con
maggiore rapidità, offrendovi un servizio di migliore qualità.
Individuate i numeri di modello nelle istruzioni allegate o impresse sul retro
dell’apparecchio. Prima di chiamare la nostra helpline verificate di poter
accedere all’apparecchio in modo che i nostri operatori possano aiutarvi a
verificare se il telecomando funziona correttamente.
Il codice del vostro telecomando universale Philips è SRU510/87.
Data di acquisto: ......../......../........
(giorno/mese/anno)
15
SRU510_87_v6.qxd 26-04-2005 14:03 Pagina 15

Instrucciones de manejo
Contenido
1. Introducción . . . . . . . . . . . . . . . . . . . . . . . . . . . . . . . . . . . . . . . . . . . . 16
2. Instalación del mando a distancia . . . . . . . . . . . . . . . . . . . . . 16-18
Inserción de las pilas . . . . . . . . . . . . . . . . . . . . . . . . . . . . . . . . . . . . . . . . 16
Verificación del mando a distancia . . . . . . . . . . . . . . . . . . . . . . . . . . . . . 16
Configuración del mando a distancia . . . . . . . . . . . . . . . . . . . . . . . . . . . 17
3. Teclas y funciones . . . . . . . . . . . . . . . . . . . . . . . . . . . . . . . . . . . . . . . 19
4. Funciones adicionales . . . . . . . . . . . . . . . . . . . . . . . . . . . . . . . . . . . 20
Cómo agregar una función al mando a distancia . . . . . . . . . . . . . . . . . 20
Español
Restauración de la configuración inicial del mando a distancia . . . . . . 20
5. Solución de problemas . . . . . . . . . . . . . . . . . . . . . . . . . . . . . . . . . . 20
6. Ayuda . . . . . . . . . . . . . . . . . . . . . . . . . . . . . . . . . . . . . . . . . . . . . . . . . . 21
Lista de códigos de todas las marcas o equipos . . . . . . . . . . . . . . . 52-58
1. Introducción
Enhorabuena por la adquisición del mando a distancia universal
Philips SRU510. Una vez instalado el mando a distancia, éste puede controlar
las funciones más utilizadas de casi todas las marcas de TV.
Para obtener más información sobre la configuración de este mando a
distancia, consulte el capítulo ‘Instalación del mando a distancia’.
2. Instalación del mando a distancia
Inserción de las pilas
1 Empuje la cubierta hacia dentro
desplazándola en la dirección de la flecha.
2 Coloque dos pilas de tipo AAA en el
compartimiento de las pilas, tal como se
muestra.
3 Vuelva a introducir la cubierta hasta que
haga clic y esté bien encajada.
Nota: El LED parpadea cuatro veces después de cada pulsación de tecla, el mando a
distancia indica que las pilas se están agotando. Cambie las pilas viejas por dos
pilas nuevas tipo AAA.
Verificación del mando a distancia
El mando a distancia está programado para controlar las funciones más
utilizadas de casi todas las marcas de TV. Como el modelo SRU510 puede
utilizar diferentes señales para cada marca e incluso para modelos diferentes
de la misma marca, se recomienda que verifique si el TV responde al mando
SRU510. En el ejemplo siguiente se explica cómo realizar esta verificación.
1 Encienda el televisor manualmente o utilice el mando a distancia
original. Sintonice el canal 1.
2 Compruebe que todas las teclas funcionan.
Para obtener una descripción de las teclas
y sus funciones, consulte la sección
‘3.Teclas y funciones’.
– Si el televisor responde correctamente a
todos los comandos de tecla, el mando
a distancia SRU510 se puede utilizar.
• Si el dispositivo no responde a ninguno o sólo a algunos
comandos de tecla, siga las instrucciones de la sección
‘Configuración del mando a distancia’, o para configuración en
línea, vaya a: www.philips.com/urc.
16
SRU510_87_v6.qxd 26-04-2005 14:04 Pagina 16
Instrucciones de manejo
Configuración del mando a distancia
Este proceso sólo es necesario si el TV no responde al mando a distancia
SRU510. Si es así, el mando SRU510 no reconoce la marca y/o el modelo del
TV en cuestión y debe programarlo para que lo reconozca. Puede configurar
el mando a distancia automáticamente o manualmente.
Configuración automática del mando a distancia
Ahora el mando a distancia buscará automáticamente el código correcto
para el dispositivo.
1 Asegúrese de que el televisor está encendido y seleccione un canal con
el mando a distancia original o las teclas del televisor
(por ejemplo, el canal 1).
Español
El mando a distancia SRU510 emite la señal de ‘apagar TV’ para todos
los modelos de televisor almacenados en la memoria.
2 Seguidamente, mantenga las teclas 1 y 3
del SRU510 pulsadas simultáneamente
durante tres segundos, hasta que el LED
parpadee dos veces y permanezca encendido.
3 Mantenga pulsada la tecla de espera
del SRU510.
– El mando a distancia SRU510 comienza a
emitir todas las señales conocidas de ‘apagar
TV’, una por una. Cada vez que se envía un
código, el LED se enciende.
4 Cuando su televisor se apague (pase a modo de espera), deje de pulsar
inmediatamente la tecla de espera del SRU510.
– El mando a distancia SRU510 ha encontrado el código que funciona
con el televisor.
5 Compruebe que todas las funciones del televisor funcionan con el
mando a distancia SRU510.
• Si no es así, repita el proceso de configuración automática.
El mando a distancia SRU510 buscará un código que funcione
mejor.
– Una vez que el mando a distancia SRU510 ha verificado todos los
códigos conocidos, la búsqueda se detiene automáticamente y el LED
deja de parpadear.
– La programación automática de un televisor lleva como máximo
5 minutos.
17
SRU510_87_v6.qxd 26-04-2005 14:04 Pagina 17
Instrucciones de manejo
Configuración manual del mando a distancia
1 Encienda el televisor manualmente o utilice el mando a distancia
original. Sintonice el canal 1.
2 Busque la marca del televisor en la lista de
códigos que se encuentra al dorso de este
manual. A cada marca le corresponde uno o
más códigos de cuatro cifras.Tome nota del
primer código.
Español
En nuestro sitio web www.philips.com/urc puede seleccionar directamente el
número de tipo de su dispositivo para encontrar el código correcto.
3 Mantenga las teclas 1 y 3 pulsadas
simultáneamente durante tres segundos,
hasta que el LED parpadee dos veces y
permanezca encendido
4 A continuación, introduzca el código anotado en el paso 2 mediante las
teclas digitales.
– Ahora el LED parpadea dos veces y permanece encendido.
Ahora el código ha sido almacenado en la memoria del SRU510.
Si parpadea un LED durante un período largo de tiempo, el código no
se ha introducido correctamente o se ha introducido un código
incorrecto.Vuelva a empezar desde el paso 2.
5 Apunte el mando a distancia SRU510 al televisor y verifique que
responde.
– Si el televisor responde a todos los comandos de teclas, el mando a
distancia SRU510 se puede utilizar. No olvide anotar el código.
• Si el TV no responde a ninguno o sólo a algunos comandos de
tecla, vuelva a empezar desde el paso 2 y pruebe con el
siguiente código de la lista.
18
SRU510_87_v6.qxd 26-04-2005 14:04 Pagina 18
Instrucciones de manejo
3. Teclas y funciones
La ilustración de la página 3 proporciona una descripción de todas las teclas y
sus funciones.
1 y Espera . . . . . . . . . enciende o apaga el TV.
2 . . . - teletexto act./desact. ( );
- mezcla de texto ( );
- texto desact. ( );
- pantalla amplia de TV ( );
- aumentar ( );
- retención de texto ( ).
3 MENU . . . . . . . . . . . activa y desactiva el menú.
4 Teclas del cursor. . .desplazan el cursor hacia arriba, abajo, izquierda,
Español
derecha en un menú.
5 A/V . . . . . . . . . . . . . . selecciona alternativamente las entradas externas
del equipo.
6 s . . . . . . . . . . . . . . . . silencia el sonido del televisor.
7 - VOL +. . . . . . . . . . . ajusta el volumen del televisor.
8 Teclas digitales . . . selección directa de canales y otras funciones.
9 SHIFT . . . . . . . . . . . funciones adicionales. Si se pulsa al mismo tiempo
que otra tecla, la segunda tecla adquiere otra
función.Todas las teclas etiquetadas de color azul
pueden utilizarse junto con SHIFT. Por ejemplo:
SHIFT + INSTALL instala su TV
SHIFT + STORE. . almacena los ajustes del TV
Pruebe otras combinaciones con la tecla Shift del dispositivo para saber qué
funciones están disponibles. Sólo estarán disponibles las funciones del mando
a distancia original.
0 Teclas de teletexto roja, verde, amarilla y azul
! -/-- . . . . . . . . . . . . . . . selecciona entre números de canales de una y dos
cifras.
@
22
. . . . . . . . . . . . . . . selecciona programa/canal anterior.
# - PROG + . . . . . . . . selecciona un canal anterior o siguiente.
$ OK. . . . . . . . . . . . . . . confirma la selección.
% BACK. . . . . . . . . . . . retrocede un nivel en el menú o desactiva el
menú.
^ LED
Si utiliza la tecla de ‘memoria desactivada’ (fi) para pasar a la página siguiente
del teletexto de su televisor Philips, puede pulsar el botón OK para ello.
Consulte también ‘Solución de problemas’.
• Si el dispositivo no responde a ninguno o sólo a algunos
comandos de tecla, siga las instrucciones de la sección
‘Configuración del mando a distancia’. Es posible que tenga que
introducir otro código para el dispositivo.
19
SRU510_87_v6.qxd 26-04-2005 14:04 Pagina 19
Instrucciones de manejo
4. Funciones adicionales
Cómo agregar una función al mando a distancia
Si desea agregar una función al mando a distancia SRU510, puede llamar a la
línea de servicios de Philips para mandos a distancia universales y solicitar el
código de 5 cifras para la función adicional.
Restauración de la configuración inicial del mando a
distancia
Español
1 Mantenga las teclas 1 y 6 del SRU510
pulsadas simultáneamente durante tres
segundos, hasta que el LED parpadee dos
veces y permanezca encendido.
2 Pulse las teclas 9, 8 y 1, en este orden.
– El LED parpadea dos veces.
Se restauran todas las funciones originales y
se borran las funciones adicionales.
5. Solución de problemas
• Problema
– Solución
•
El LED parpadea
cuatro
veces
después de cada pulsación de tecla.
– El mando a distancia indica que las pilas se están agotando.
Cambie las pilas
antiguas por 2 pilas nuevas AAA de 1,5 voltios.
• El TV no responde y el LED no parpadea cuando pulsa un botón.
– Cambie las pilas antiguas por 2 pilas nuevas AAA de 1,5 voltios.
• El televisor no responde pero el LED parpadea cuando se pulsa una tecla.
– Apunte el mando a distancia SRU510 al dispositivo y asegúrese de que no
hay obstáculos entre el mando y el dispositivo.
• El mando a distancia SRU510 no responde correctamente a los comandos.
– Puede que esté utilizando el código incorrecto.Vuelva a programar el mando a
distancia SRU510 con otro de los códigos indicados para la marca del
dispositivo, o configure la búsqueda automática para encontrar el código
adecuado. Si el TV sigue sin responder, llame a nuestra línea de ayuda.
• Las teclas del teletexto no funcionan.
–Averigüe si su televisor está equipado con la función de teletexto.
• Tiene problemas para utilizar todas las funciones del dispositivo.
– Puede que el mando a distancia SRU510 tenga que adaptarse al modelo
del dispositivo. Llame a nuestra línea de ayuda.
• La marca del dispositivo no está en la lista de códigos.
– Configure automáticamente el mando a distancia SRU510.
Consulte la sección ‘Configuración automática del mando a distancia’.
• Ningún código funciona con la configuración manual del mando a distancia.
– Si es así, siga las instrucciones de la sección
‘Configuración automática del mando a distancia’.
20
SRU510_87_v6.qxd 26-04-2005 14:04 Pagina 20
