Philips HX1515: инструкция
Раздел: Бытовая, кухонная техника, электроника и оборудование
Тип: Зубная щетка
Инструкция к Зубной щетке Philips HX1515

sensiflex
power toothbrush

2
3
4

5
ENGLISH 6
POLSKI 16
ROMÂNĂ 27
РУССКИЙ 37
ČESKY 49
MAGYAR 59
SLOVENSKY 69
УКРАЇНСЬКА 79
HRVATSKI 89
EESTI 99
LATVISKI 109
LIETUVIŠKAI 119
SLOVENŠČINA 129
БЪЛГАРСКИ 139
SRPSKI 150
HX2585, HX2538,HX1526, HX1515,
HX1514, HX1513, HX1511, HX1510

ENGLISH6
Introduction
This unique electric toothbrush removes plaque
better than a normal, manual toothbrush. It also
helps to protect your gums.When you exert too
much pressure while brushing, the brush head will
automatically flex back. Because of this clear signal,
you will quickly adopt the right brushing force.
Clinical tests have shown that, thanks to this
system, brushing with the Philips Sensiflex results
in a better and safer brushing technique.
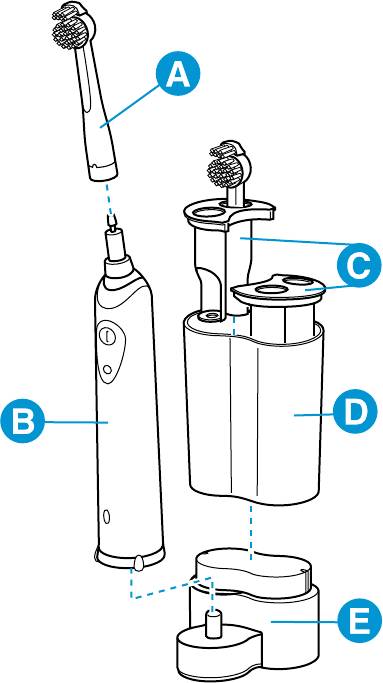
General description
A Brush attachment
B Handle
C Holder for 2 brush attachments
D Storage container
E Charger
Important
Read these instructions for use carefully before
using the appliance and save them for future
reference.
◗ The cord of the charging unit cannot be
replaced. If the cord is damaged, the charging
unit must be discarded.
◗ Make sure the socket is live when you
recharge the toothbrush.The electricity
supply to sockets in mirror cabinets over
washbasins or shaver sockets in bathrooms
may be cut off when the light is turned off.
ENGLISH 7
◗ Noise level HX1526, HX1511, HX1510:
- Lc = 67dB(A)
◗ Noise level HX2585, HX2538
- Lc = 66 dB(A)
Preparing for use
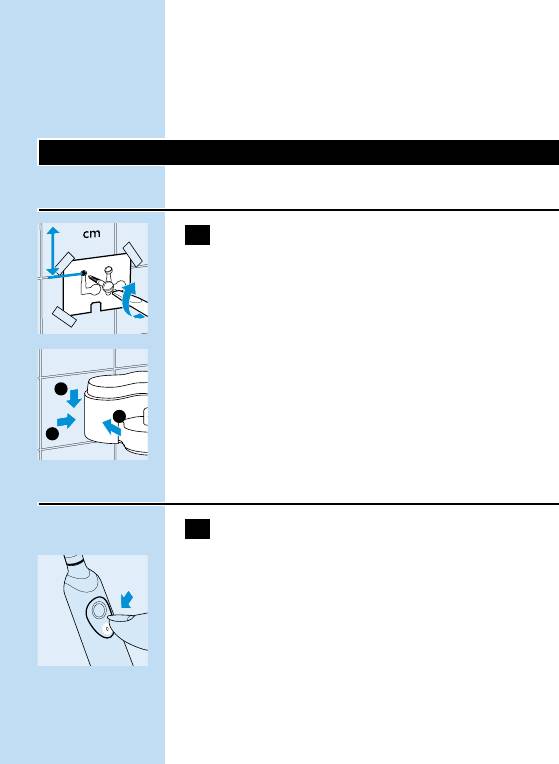
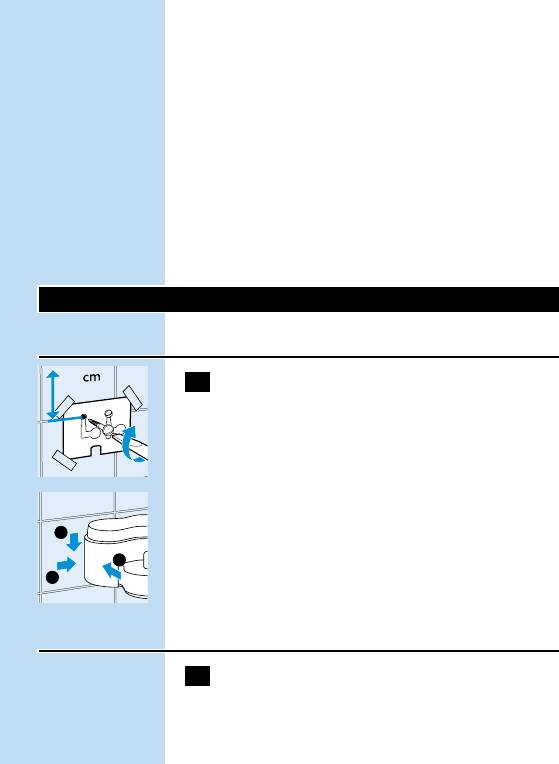
Mounting the appliance to the wall
1 Mount the charging unit to the wall, using
C
2 screws (3.0x30mm) and 2 wall plugs (S5)
(not included).
◗ To drill the holes in the right places, you can
C
use the drilling stencil on the last page of
these instructions for use.
Charging the appliance
1 Charge the appliance for at least 16 hours
before using it for the first time.
◗ Make sure the appliance is switched off when
C
you start charging it.
◗ You can put the toothbrush in the stand and
let it charge continuously.
However, when you first start using the appliance,
it is recommended that you use it until the
battery is empty.To do so, use the appliance in the
15,6
3
1
2
ENGLISH8
normal way without recharging it between the
brushing sessions. Recharge the appliance when
the motor almost stops running. Repeat this
procedure 3 times in a row.
To extend the lifetime of the battery, repeat this
procedure every 6 months.
◗ Types HX2585, HX2538 and HX1526 only:
C
when the battery is being charged, the green
pilot light is on.
◗ You can put the toothbrush in the stand and
let it charge continuously.
Using the appliance
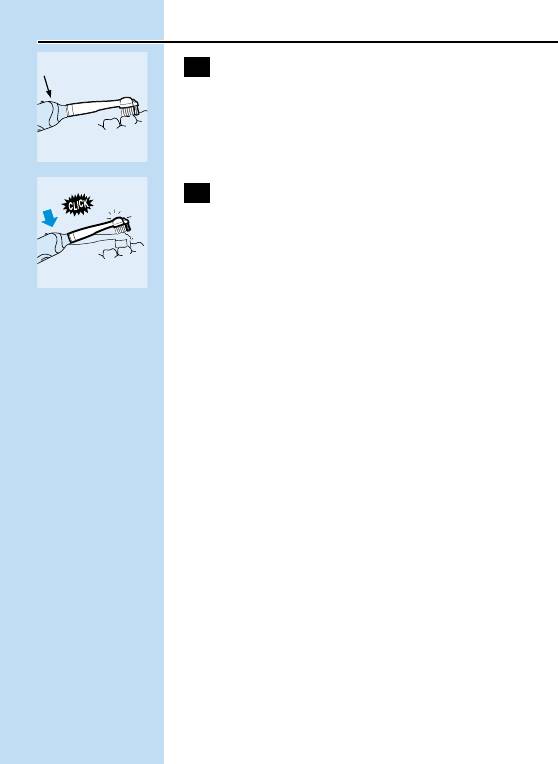
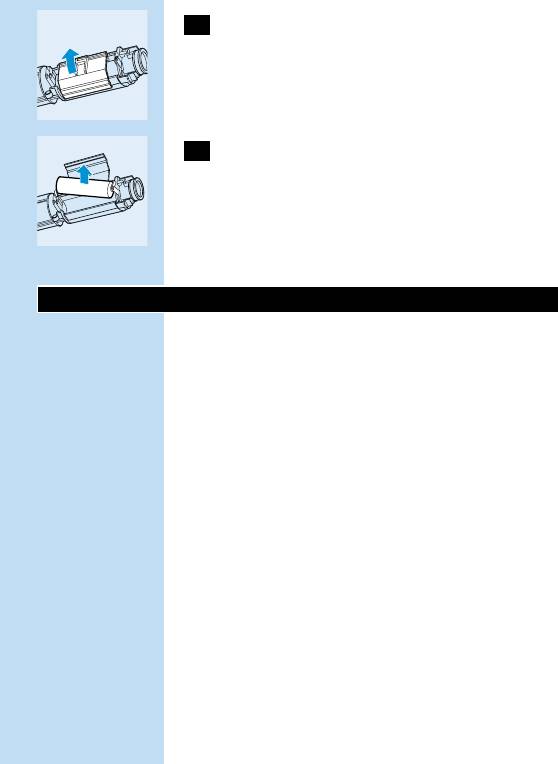
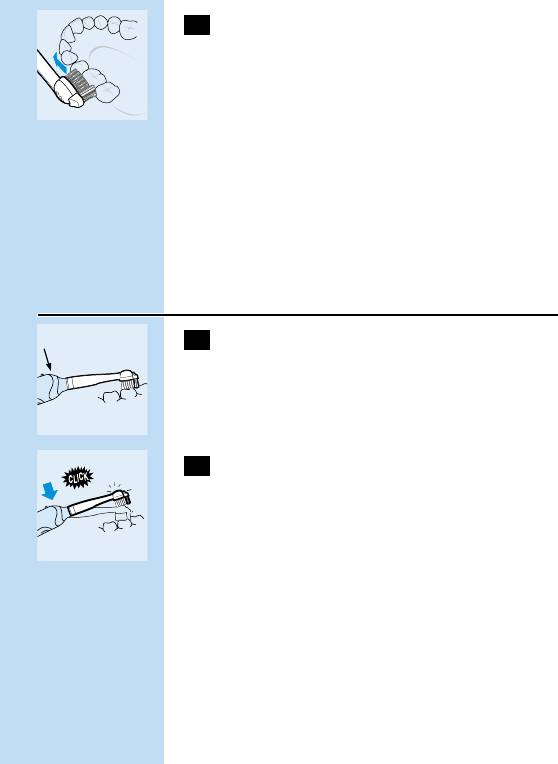
1 Mount the brush attachment onto the
C
toothbrush by inserting it into the bayonet
catch and turning it clockwise a quarter of
a turn.
This will make it impossible for the brush
attachment to become detached due to vibration.
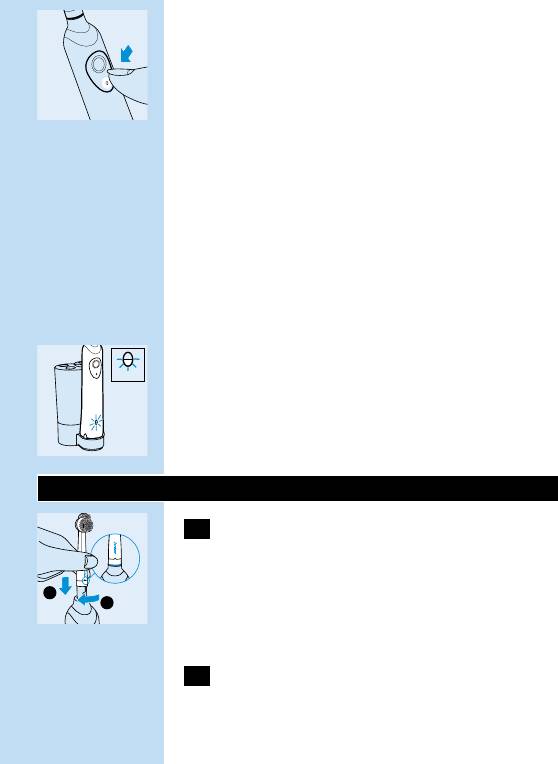
2 Put toothpaste on the brush head.
3 Place the brush head in your mouth.
C
4 Switch the appliance on by pressing the
C
button and start brushing your teeth.
◗ For the best brushing method, minimal
brushing time and brushing functions of the
appliance, see the 'Brushing tips' section
below.
16 hrs
1
2
ENGLISH 9
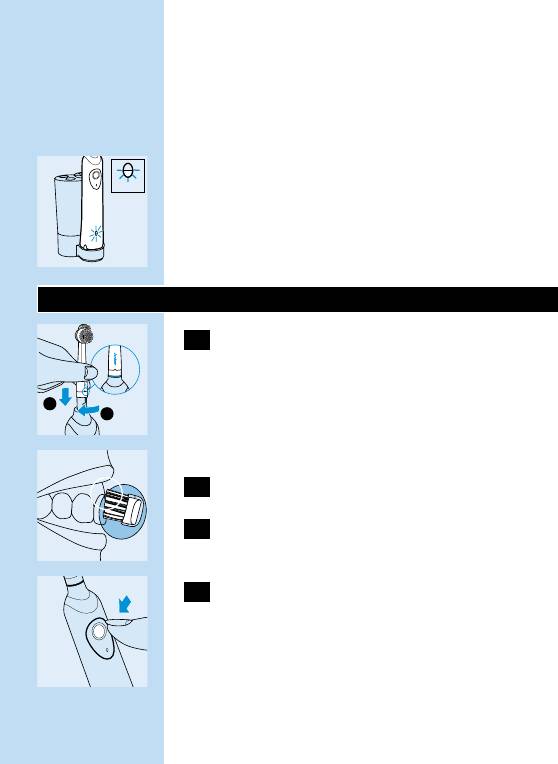
Brushing Tips
Brushing
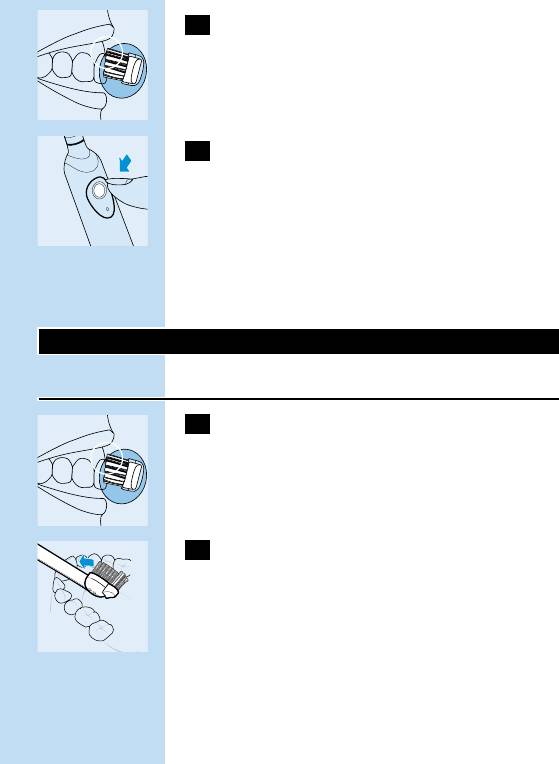
1 Place the brush head against the tooth in
C
such a way that it covers the surface of the
tooth as well as the gum line.
2 Hold the brush head in this position for a
C
few seconds and then move on to the next
tooth.
The round brush head removes plaque from the
teeth and beneath the gum line.
The individually moving Active Tip cleans between
the teeth.
3 Guide the brush head carefully along the
C
teeth and molars.
◗ Make sure you clean all surfaces of the teeth
(inside, outside and chewing surface) as well
as the gum line properly.A fixed brushing
pattern will prevent you from skipping certain
areas.
◗ You will also find brushing instructions on our
Web site: www.philips.com.
ENGLISH10
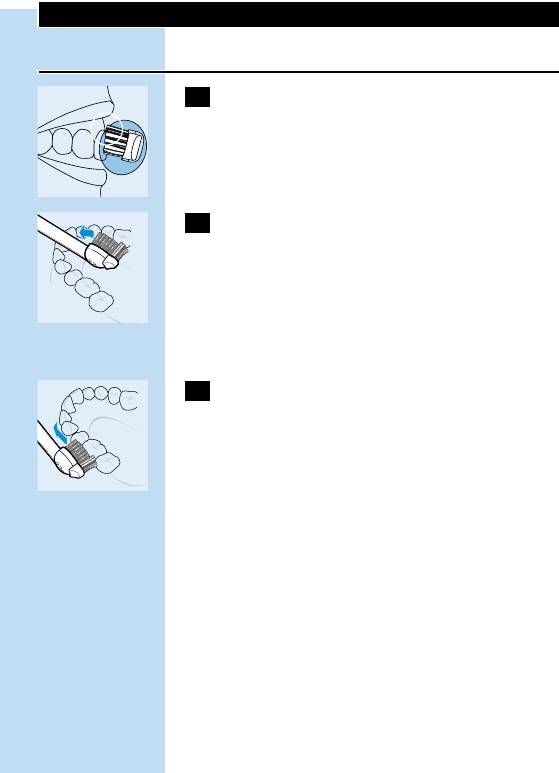
Gum Protection system
1 The Gum Protection system guarantees
C
that you do not exert too much pressure
on the teeth and gums.
2 If you exert too much pressure on the
C
toothbrush, you will feel and hear the
brush head flexing backwards.As soon as
you reduce the pressure, the brush head
will return to its normal position.This will
protect your gums.
This will probably happen a few times when you
first start using the toothbrush. After some time
you will have discovered the optimal brushing
pressure and the brush head will flex backwards
less often.
Tip: If plaque is removed properly, the gums will
have a pink colour and will firmly surround the
teeth. Healthy gums do not bleed when you eat
or brush your teeth (see also the section
'Optimal dental hygiene'). If, nevertheless, your
gums bleed slightly the first few times you use the
brush, this bleeding will generally stop after a few
days. If it does not, consult your dentist or dental
hygienist.
ENGLISH 11
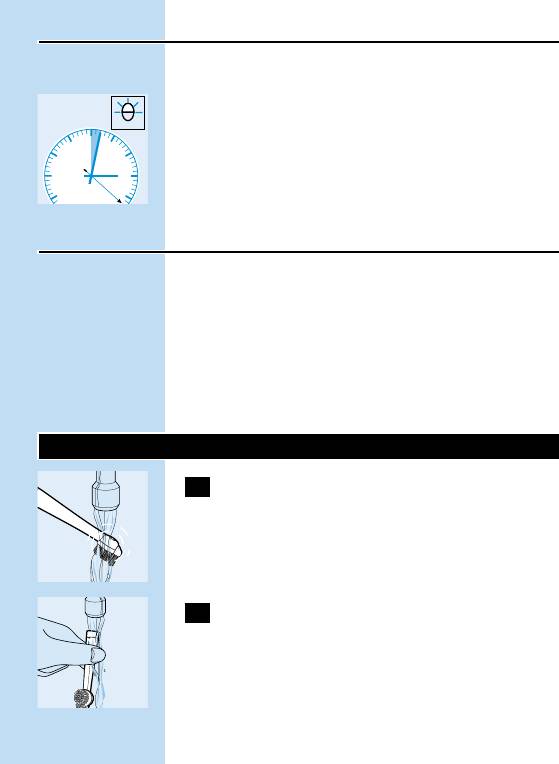
Minimum brushing time: 2 minutes
In general, 2 minutes will be enough to clean your
teeth properly. Naturally, you can also brush
longer than 2 minutes.
◗ A red pilot light will blink to indicate that 2
C
minutes have passed (types HX2585, HX2538
and HX1526 only).
Optimal dental hygiene
For optimal dental hygiene, it is recommended to
use dental floss and toothpicks in addition to the
electric toothbrush.
You will find more information about Philips Oral
Healthcare products and other Philips products
on our Web site: www.philips.com.
Cleaning and storage
1 Switch the toothbrush on and rinse the
C
brush attachment under the tap with
lukewarm water (max. 60cC).
2 Switch the toothbrush off. Detach the
C
brush attachment and rinse the inside.
ENGLISH12
3 Switch the toothbrush on again and rinse
C
the drive shaft under the tap to wash a
away toothpaste residues.
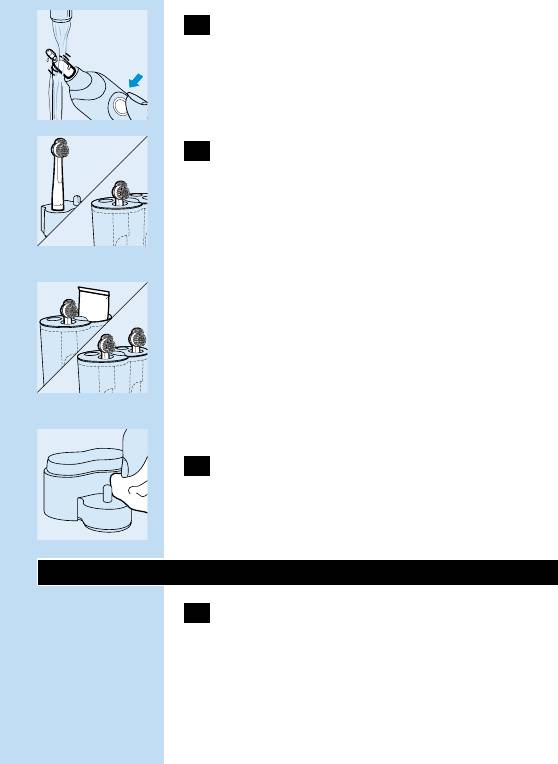
4 Types HX1526, HX1515, HX1514,
C
HX1513, HX1511 and HX1510 only: store
the brush attachment on the pin on the
charging unit.Types HX2585 and HX2538
only: store the brush attachments (max. 4)
in the storage container.
◗ Types HX2585 and HX2538 only: you can also
C
remove one of the brush holders to be able
to store a toothpaste tube in the storage
container.
The storage container and the brush holders can
be removed from the charging unit and cleaned in
the dishwasher.
5 Clean the charging unit with a moist cloth.
C
Unplug the charging unit before you start cleaning
it.
Replacement
1 Replace the brush attachment every 3
months for the best brushing results.
◗ The brush attachment should also be replaced
when the bristles start to bend outwards.
ENGLISH 13
You can obtain new brush attachments from the
shop in which you purchased the toothbrush.
All round Philips replacement brush attachments
can be used.
Environment
When you discard the appliance in due course,
remove the battery and dispose of it in an
environmentally safe way.
◗ You can also take the appliance to a Philips
service centre, which will remove the battery
for you and will dispose of it in an
environmentally safe way.
1 The battery must be completely empty
when you remove it.You should therefore
let the appliance run until it stops before
removing the battery.
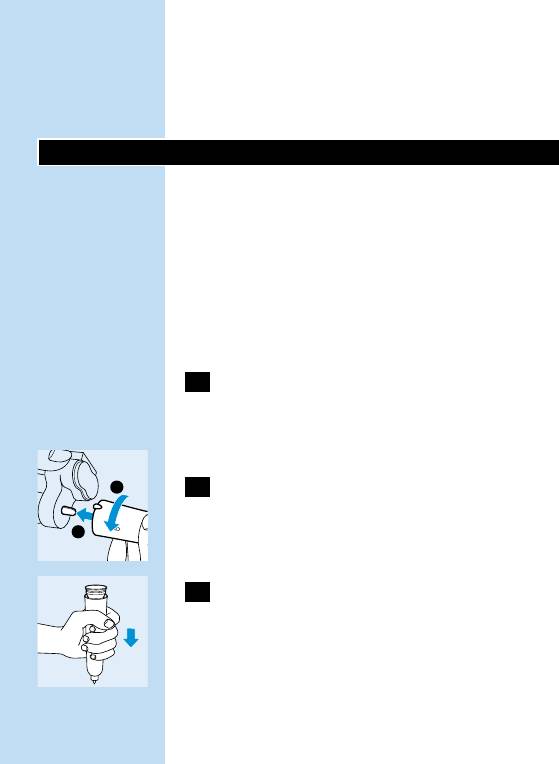
2 Pick up the charging unit and place the
C
toothbrush on the pin.Turn the
toothbrush anti-clockwise to unscrew the
bottom of the toothbrush.
3 Turn the toothbrush upside down and
C
press it down on a hard surface to remove
the battery holder.
2
1
ENGLISH14
4 Open the lid of the battery holder by hand
C
or by means of a screwdriver.
5 Lift the battery out of the battery holder
C
by means of a screwdriver.
After the bottom has been unscrewed, the
appliance may not be watertight anymore and the
guarantee will become invalid.
Guarantee & service
If you need information or if you have a problem,
please visit the Philips Web site at
www.philips.com or contact the Philips Customer
Care Centre in your country (you will find its
phone number in the worldwide guarantee
leaflet). If there is no Customer Care Centre in
your country, turn to your local Philips dealer or
contact the Service Department of Philips
Domestic Appliances and Personal Care BV.

ENGLISH 15
Troubleshooting
If you are unable to solve your problem by means of the
troubleshooting guide below, please contact the nearest Philips
service centre, the Philips Customer Care Centre in your country or
contact us online at www.philips.com.
Problem
Solution
The toothbrush does not
Make sure that the plug of the charging unit has
work at all, although it has
been properly inserted into the wall socket.
been in the charging unit
overnight.
Make sure the socket is live (see also the section
'Important').
Make sure the toothbrush is switched off and
recharge it for at least 16 hours.
The motor of the
Check if the brush attachment has been properly
toothbrush works, but the
connected to appliance (see also the section 'Using
brush head doesn't.
the appliance').
The brushing power of the
The toothbrush must be recharged. If you normally
appliance has greatly
leave the toothbrush in the charging unit
decreased.
continuously, you may have to revive the battery as
described in the section 'Charging'.
The teeth-cleaning
Remove the brush attachment and start using a
performance of the
new one.
toothbrush is not optimal
anymore.

POLSKI16
Wstęp
Ta unikalna, elektryczna szczoteczka do zębów
usuwa osad nazębny lepiej niż tradycyjna
szczoteczka ręczna. Chroni ona również twoje
dziąsła. Gdy wywierasz zbyt duży nacisk na
szczoteczkę, głowica automatycznie odsuwa się
do tyłu. Dzięki temu wyraźnemu sygnałowi
możesz szybko dobrać właściwą siłę nacisku
podczas szczotkowania.Testy kliniczne dowiodły,
że dzięki temu systemowi mycie zębów z
wykorzystaniem szczoteczki Philips Sensiflex
pozwala wykształcić lepszą i bezpieczniejszą
technikę czyszczenia zębów.
Opis ogólny
A Nasadka szczoteczki
B Rączka
C Uchwyt na dwie nasadki szczoteczki
D Pojemnik do przechowywania szczoteczek-
nasadek
E Ładowarka
Ważne
Przed pierwszym użyciem urządzenia zapoznaj się
dokładnie z instrukcją jego obsługi i zachowaj ją na
przyszłość, do ewentualnej konsultacji.
◗ Przewód zasilający ładowarki nie podlega
wymianie.W przypadku uszkodzenia tego
przewodu należy pozbyć się całej ładowarki.
◗ Gdy ładujemy szczoteczkę należy sprawdzić,
POLSKI 17
czy w gniazdku znajduje się napięcie. Zasilanie
elektryczne do gniazdek znajdujących się w
oprawie luster nad umywalkami lub do
gniazdek przeznaczonych do golarek w
łazienkach może być odłączone przy
wyłączonym świetle.
◗ Poziom hałasu dla modeli: HX1526, HX1511,
HX1510:
- Lc = 67dB(A)
◗ Poziom hałasu dla modeli: HX2585, HX2538
- Lc = 66 dB(A)
Przygotowanie do użycia
Montaż urządzenia na ścianie
1 Ładowarkę należy zamocować na ścianie
C
za pomocą dwóch śrub (3,0 x 30 mm)
oraz dwóch ściennych zatyczek (S5),
których nie ma w zestawie.
◗ Aby wywiercić otwory w odpowiednich
C
miejscach, można posłużyć się wzorcem
narysowanym na ostatniej stronie niniejszej
instrukcji obsługi.
Ładowanie urządzenia
1 Przed pierwszym użyciem należy ładować
urządzenie przez co najmniej16 godzin.
15,6
3
1
2
POLSKI18
◗ Przed rozpoczęciem ładowania należy
C
sprawdzić czy urządzenie jest wyłączone.
◗ Szczoteczkę można pozostawić w swoim
stanowisku, pozwalając na jej ciągłe ładowanie.
Jednak gdy korzystamy z urządzenia po raz
pierwszy, zaleca się wykorzystanie go aż do
momentu wyczerpania się baterii.W tym celu
należy normalnie korzystać z urządzenia, nie
ładując go pomiędzy kolejnymi czynnościami
szczotkowania zębów. Ładowanie urządzenia
należy rozpocząć dopiero wtedy, gdy silnik niemal
zatrzymuje się. Procedurę tę należy powtórzyć
trzy razy pod rząd.
Aby przedłużyć żywotność baterii powtarzaj tę
czynność co 6 miesięcy.
◗ Wyłącznie dla typów: HX2585, HX2538 oraz
C
HX1526: Podczas ładowania baterii świeci się
zielona lampka sygnalizacyjna.
◗ Szczoteczkę można pozostawić w swoim
stanowisku, pozwalając na jej ciągłe ładowanie.
Korzystanie z urządzenia
1 Załóż nasadkę szczoteczki na jej trzonek,
C
wciskając ją w uchwyt bagnetowy i
obracając nią o ćwierć obrotu w kierunku
zgodnym z ruchem wskazówek zegara.
Uniemożliwi to odłączenie się nasadki, co mogłyby
spowodować drgania.
2 Nałóż pastę na szczoteczkę.
16 hrs
1
2
POLSKI 19
3 Umieść głowicę szczoteczki w ustach.
C
4 Włącz urządzenie wciskając przycisk i
C
rozpocznij szczotkowanie zębów.
◗ Informacje o najlepszym sposobie czyszczenia
zębów, najkrótszym czasie czyszczenia oraz o
funkcjach czyszczących urządzenia
zamieszczone są w poniższym rozdziale pt.
"Wskazówki dotyczące czyszczenia".
Wskazówki dotyczące czyszczenia
Czyszczenie
1 Ustaw głowicę szczoteczki naprzeciwko
C
zęba tak, aby przykrywała ona
powierzchnię zęba oraz linię dziąseł.
2 Przez kilka sekund trzymaj głowicę
C
szczoteczki w tej pozycji, a następnie
przesuń ją do następnego zęba.
Okrągła głowica szczoteczki usuwa osad z zębów
oraz z powierzchni znajdujących się poniżej linii
dziąseł.
Poruszająca się niezależnie aktywna końcówka
czyści obszary pomiędzy zębami.
POLSKI20
3 Kieruj głowicę szczoteczki ostrożnie
C
wzdłuż zębów przednich i zębów
trzonowych.
◗ Sprawdź czy dokładnie oczyściłeś
powierzchnię zębów - wewnątrz, z zewnątrz
oraz powierzchnie miażdżące - jak również
linię dziąseł. Dzięki ustalonemu wzorcowi
czyszczenia nie ominiesz żadnego z obszarów.
◗ Instrukcje czyszczenia znajdziesz również w
naszej witrynie internetowej:
www.philips.com.
System ochrony dziąseł
1 System ochrony dziąseł gwarantuje
C
optymalną siłę nacisku na zęby i dziąsła.
2 Gdy wywierasz zbyt duży nacisk na
C
szczoteczkę, wtedy czujesz i słyszysz, że
głowica szczoteczki odsuwa się do tyłu. Z
chwilą zmniejszenia nacisku głowica
szczoteczki powróci do swojego
normalnego położenia. Mechanizm ten
chroni twoje dziąsła.
Rozpoczynając korzystanie ze szczoteczki spotkasz
się z tym zjawiskiem prawdopodobnie
kilkakrotnie. Po pewnym czasie ustalisz optymalny
nacisk szczoteczki i głowice szczoteczki będą
rzadziej odchylać się do tyłu.
