Philips HP 4696: инструкция
Раздел: Красота, здоровье, спорт. туризм, хобби
Тип: Фен-Щетка
Характеристики, спецификации
Инструкция к Фену-Щетке Philips HP 4696
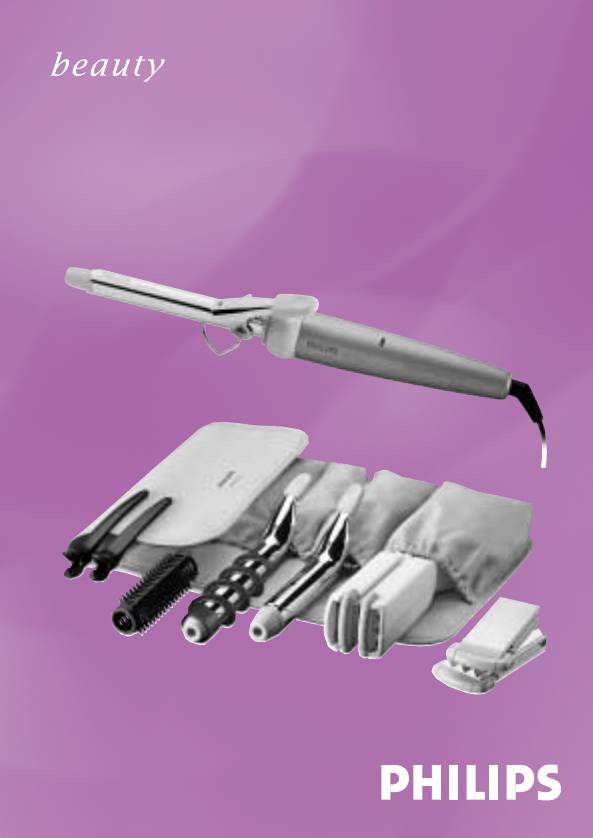
Geometricks
8-in-1 Multistyler
HP4696

2

3
ENGLISH 4
POLSKI 10
ROMÂNĂ 17
РУССКИЙ 23
ČESKY 31
MAGYAR 37
SLOVENSKY 44
УКРАЇНСЬКІЙ 50
HRVATSKI 57
EESTI 63
LATVISKI 69
LIETUVIŠKAI 75
SLOVENŠČINA 81
БЪЛГАРСКИ 87
SRPSKI 94
HP4696

ENGLISH4
Important
◗ Check if the voltage indicated on the
appliance corresponds to the local mains
voltage before you connect the appliance.
◗ Keep this appliance away from water! Do not
use this product near or over water
contained in baths, washbasins, sinks etc.
When used in a bathroom, unplug the
appliance after use since the proximity of
water presents a risk, even when the
hairstyler is switched off.
◗ For additional protection, we advise you to
install a residual current device (RCD) with a
rated residual operating current not exceeding
30mA in the electrical circuit supplying the
bathroom.Ask your installer for advice.
◗ The styling attachments and insert plates of
the appliance will become hot during use.
Prevent contact with the skin. Do not allow
the mains cord to touch any hot parts.
◗ Keep the appliance away from children.
◗ By washing your hair or using the 'Flat Plate'
of the Crimper / Straightener attachment,
waves and curls will disappear again.
◗ If the mains cord is damaged, it must be
replaced by Philips, a service centre
authorised by Philips or similarly qualified
persons in order to avoid a hazard.
Before using the appliance
With the Geometrics styling appliance you can
create curls, waves, ringlets, crimps and a sleek
look.
ENGLISH 5
◗ Before you start styling, comb or brush the
hair so that it is untangled and smooth.
◗ A setting lotion may be applied after washing
the hair.
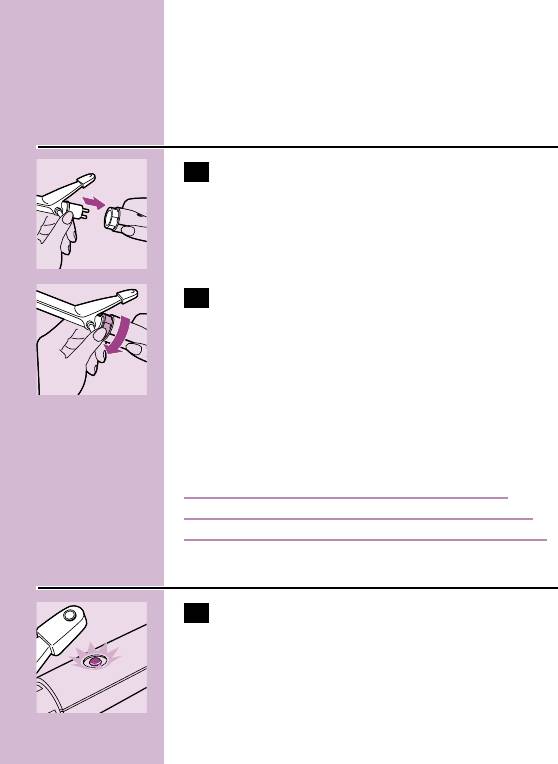
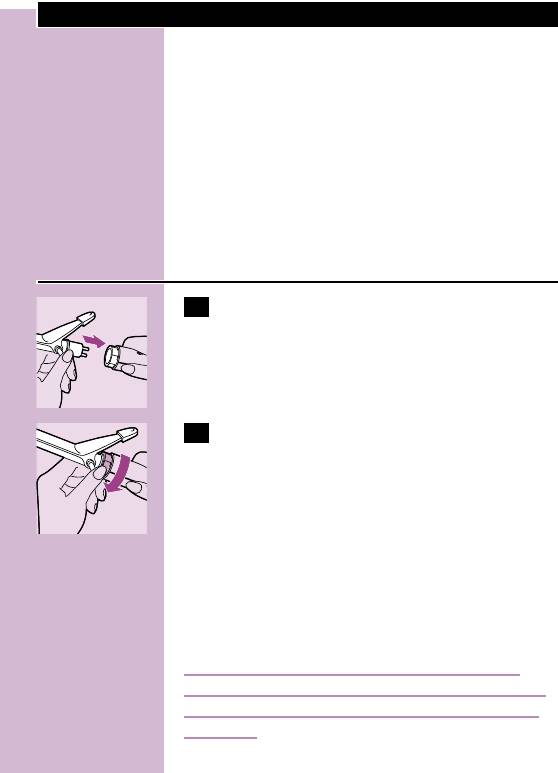
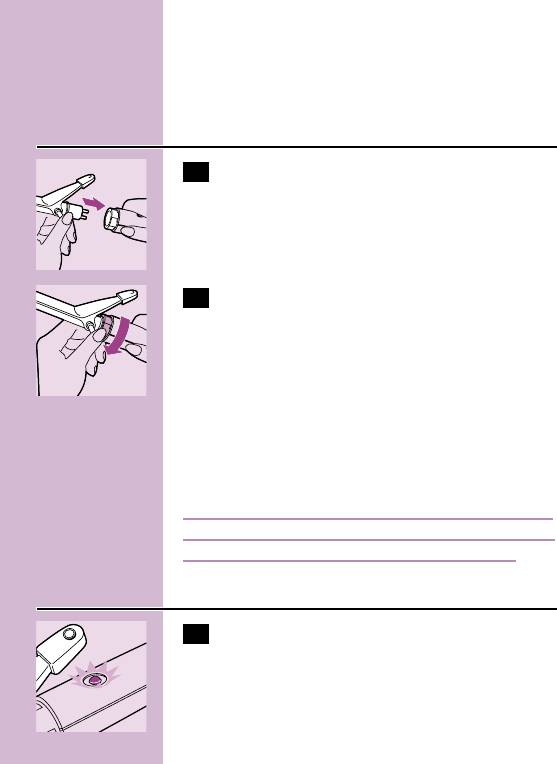
Connecting the attachments
1 Place one of the attachments into the main
C
unit.
2 Turn the lock ring on power handle
C
clockwise until the bold arrows are in line.
Ensure that the heel rest is at the
underside.The attachment is now secured
with the main unit.
◗ Follow this procedure for all attachments.To
detach the attachments, follow the procedure
in opposite direction.
When removing or changing an attachment
unplug the appliance and only touch the plastic
parts of the attachment.The metal parts are hot.
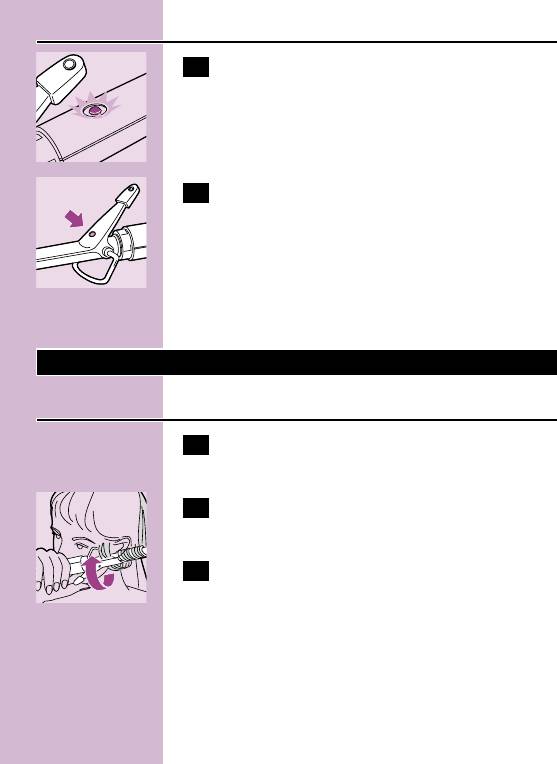
Using the attachments
1 After having connected the attachment to
C
the main unit, place the styler on its heel
and put the mains plug in the wall socket.
The 'On'-light will come on and the
attachment will heat up.
ENGLISH6
2 Start styling when the ready dot has
C
changed color.
◗ Always ensure that the hair ends are wrapped
smoothly around the barrel of any
attachment.This will avoid bent ends.
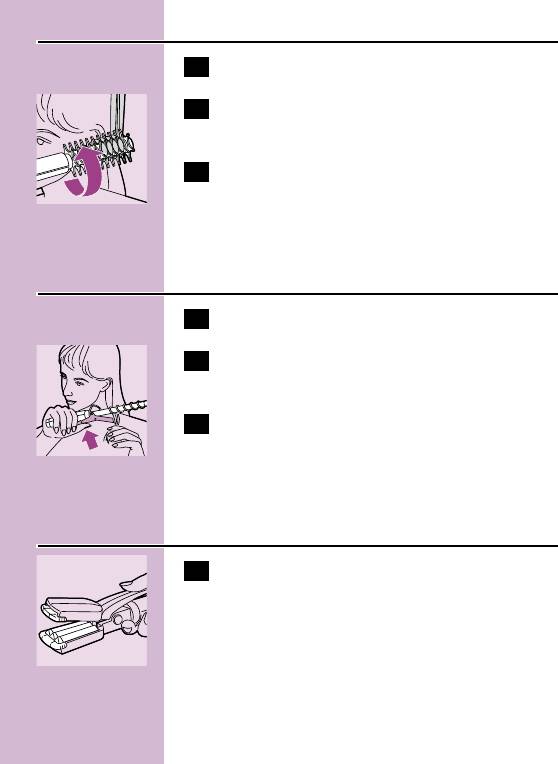
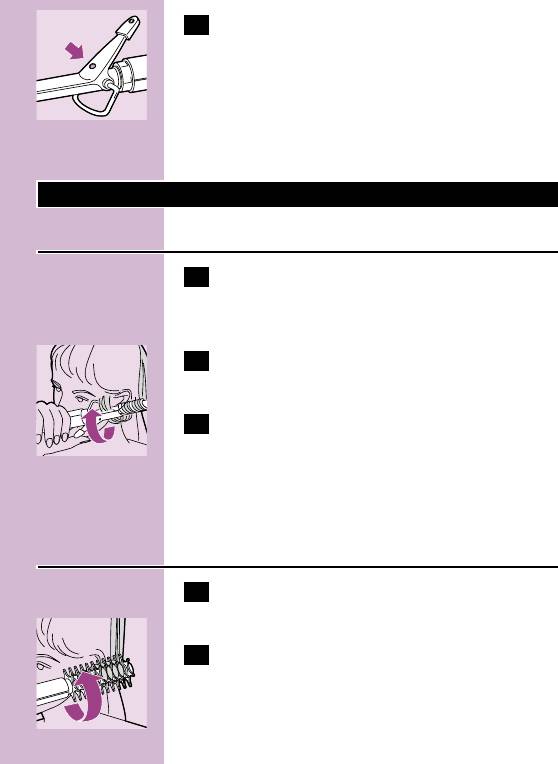
Styling
Large or tight curls
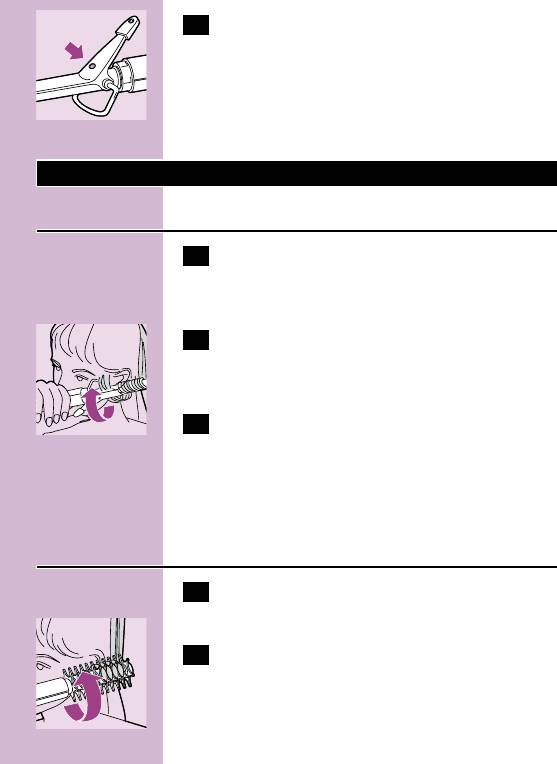
1 Connect the Curling tong with the main
unit. Ensure that the heel rest is at the
underside.
2 Fix the end of a tress with the clip and
C
wind the tress around the barrel towards
the head.
3 Open the clip after 5 - 10 seconds and
remove the barrel from the hair.
◗ You can divide the curls with your fingers to
add volume.
Waves
1 Slide the bristle brush over the Curling
tong.
2 Take the ends of a tress and wind it
C
around the bristle brush towards the head.
ENGLISH 7
3 After 5 - 10 seconds remove the bristle
brush from the hair. Leave the waves to
cool down before finishing by combing,
brushing or finger combing the hair into its
final style.
Spirals
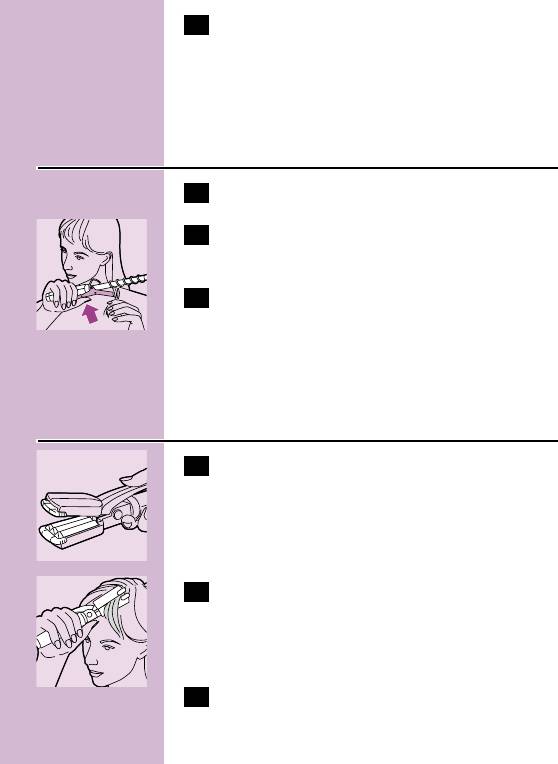
1 Connect the Spiral with the main unit.
2 Wind a tress towards the head following
C
the spiral profile on the Spiral.
3 After 5 - 10 seconds remove the Spiral
from the hair. Leave the spirals to cool
down before finishing by combing, brushing
or finger combing the hair into its final
style.
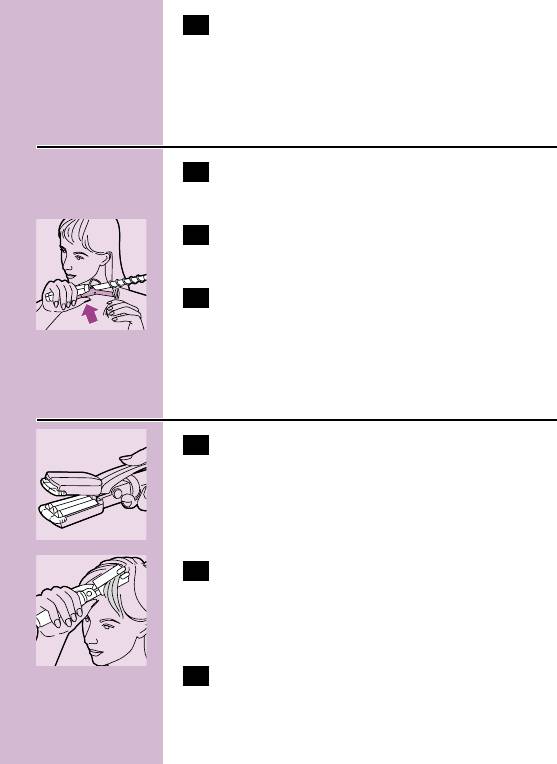
Crimps
1 Connect the Crimper with the main unit.
C
2 Take a tress of hair of max. 5 -6 cm or
C
2 inches thick and place it between the
plates of the Crimper. Start styling at the
root end of the hair.
3 Keep the plates locked for 5 - 10 seconds.
You may press the two parts of the

ENGLISH8
Crimper together by using your fingers
(do not touch the plates!).
4 Open the Crimper and place a lower part
of the same tress of hair between the
plates. Ensure there is a overlap. Continue
until you have reached the end of the
tress.
5 Leave the crimps to cool down before
finishing by combing, brushing or finger
combing the hair into its final style.
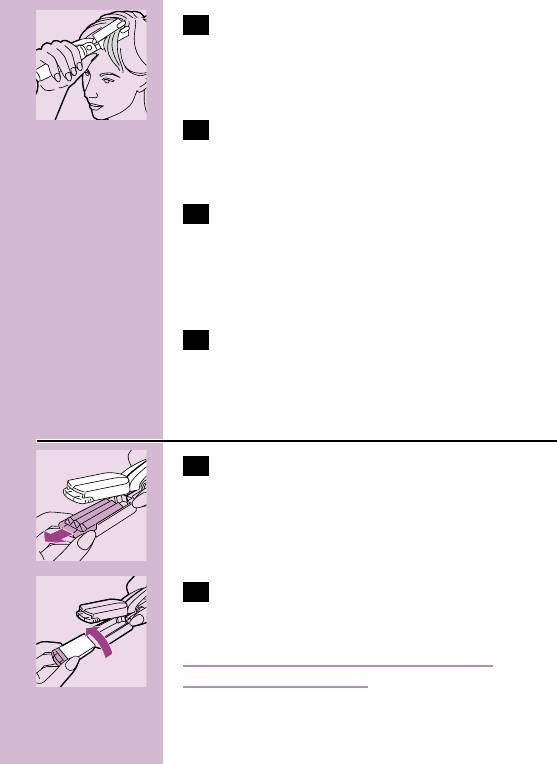
Sleek look
1 Open the Crimper.Take the plates one by
C
one by the cool tips at the front site and
pull them out of the housing.
2 Turn the plates and replace them in the
C
housing.
Ensure that the protrusions at the sides enter the
runners correctly.
3 Connect the now created Straightener
with the main unit and follow the same
styling procedures as for the Crimper.
4 Leave the sleek hair to cool down before
finishing by combing or brushing the hair.

ENGLISH 9
Storing
After use remove the mains plug from the wall
socket. Place the appliance with the stand
downwards on a safe place and allow it to cool
down.
Replacement
Always return the appliance to a service centre
authorised by Philips for examination or repair.
Repair by unqualified people could cause an
extremely hazardous situation for the user.
Guarantee & service
If you need information or if you have a
problem, please visit the Philips Web site at
www.philips.com or contact the Philips Customer
Care Centre in your country (you will find its
phone number in the worldwide guarantee
leaflet). If there is no Customer Care Centre in
your country, turn to your local Philips dealer or
contact the Service Department of Philips
Domestic Appliances and Personal Care BV.

POLSKI10
Ważne
◗ Przed podłączeniem urządzenia upewnij się,
czy napięcie podane na urządzeniu jest zgodne
z napięciem w sieci elektrycznej.
◗ Chroń urządzenie przed kontaktem z wodą!
Nie używaj lokówki w pobliżu wody ani nad
wodą znajdującą się w wannie, umywalce,
zlewie, itd. Jeżeli korzystasz z urządzenia w
łazience, po użyciu zawsze wyciągaj przewód z
sieci, ponieważ bliskość wody stanowi
zagrożenie, nawet gdy lokówka jest wyłączona.
◗ Jako dodatkowe zabezpieczenie radzimy
zainstalować w obwodzie elektrycznym
zasilającym gniazda bezpiecznik RCD o
znamionowym prądzie zerowym nie
przekraczającym 30 mA. Porozum się w tej
sprawie z wykwalifikowanym elektrykiem.
◗ Nasadki i wewnętrzne płyty nagrzewają się w
trakcie używania. Uważaj, by nie dotknąć nimi
skóry. Nie pozwól, by przewód zasilający
stykał się z gorącymi elementami.
◗ Trzymaj urządzenie w miejscu niedostępnym
dla dzieci.
◗ Po umyciu włosów lub po użyciu płaskiej
strony karbownicy/ nasadki prostującej fale
lub loki rozprostują się.
◗ Jeśli przewód zasilający ulegnie uszkodzeniu,
musi zostać wymieniony w autoryzowanym
punkcie serwisowym firmy Philips, co pozwoli
uniknąć ewentualnego niebezpieczeństwa.
POLSKI 11
Przed użyciem urządzenia
Dzięki urządzeniu Geometrics możesz ułożyć fale,
loki, pierścienie, karbowane falki lub uzyskać
jedwabiście gładkie włosy.
◗ Przed przystąpieniem do modelowania,
rozczesz włosy grzebieniem lub szczotką, tak
aby były niesplątane i gładkie.
◗ Po umyciu włosów możesz zastosować płyn
do układania.
Zakładanie nasadek
1 Umieść jedną z nasadek na części głównej.
C
2 Przekręć pierścień zabezpieczający na
C
uchwycie zasilającym w kierunku zgodnym
z ruchem wskazówek zegara aż strzałki
znajdą się w jednej linii. Upewnij się, czy
podpórka znajduje się pod spodem.
Nasadka jest teraz zamocowana na części
głównej.
◗ W taki sam sposób postępuj z innymi
nasadkami.Aby zdjąć nasadkę postępuj
odwrotnie.
Przy zmianie lub zdejmowaniu nasadki wyłącz
wtyczkę z gniazdka ściennego i dotykaj wyłącznie
plastikowych części nasadki. Metalowe elementy
są gorące.
POLSKI12
Używanie nasadek
1 Po podłączeniu nasadki do części głównej,
C
ustaw lokówkę na podpórce i włóż
wtyczkę do gniazdka ściennego. Zaświeci
się wówczas lampka kontrolna, a
urządzenie zacznie nagrzewać.
2 Lampka kontrolna informująca o
C
gotowości urządzenia do pracy zmieniła
kolor.
◗ Zawsze sprawdzaj, czy końcówki włosów są
gładko owinięte wokół wałka.W ten sposób
unikniesz pozaginanych końców.
Modelowanie
Luźne i ciasne loki
1 Załóż lokówkę na część główną. Sprawdź,
czy podpórka znajduje się pod spodem.
2 Chwyć pasemko włosów szczypcami i
C
owiń je wokół wałka w kierunku głowy.
3 Po 5 -10 sekundach otwórz szczypce i
wyjmuj wałek z włosów.
◗ Możesz podzielić loki palcami, by nadać
fryzurze większą objętość.
POLSKI 13
Fale
1 Nałóż włosianą szczotkę na lokówkę.
2 Weź końcówki pasemka i owiń wokół
C
szczotki w kierunki głowy.
3 Po 5 - 10 sekundach wyjmij szczotkę z
włosów. Odczekaj, aż fale ostygną, zanim
nadasz fryzurze ostateczny kształt za
pomocą grzebienia, szczotki lub palców.
Spiralki
1 Załóż spiralę na część główną.
2 Owiń pasemko wokół spirali w kierunku
C
głowy.
3 Po 5 - 10 sekundach wyjmij spiralę z
włosów. Poczekaj aż spiralki, ostygną zanim
nadasz fryzurze ostateczny kształt za
pomocą szczotki, grzebienia lub palców.
Karbowane falki
1 Podłącz karbownicę do części głównej.
C
POLSKI14
2 Weź pasemko o szerokości maksymalnie
C
5-6 cm. i umieść je pomiędzy płytami
karbownicy. Zacznij modelowanie od
nasady włosów.
3 Trzymaj zamknięte płyty przez 5-10
sekund. Możesz ścisnąć dwie części
karbownicy palcami (nie dotykaj płyt!).
4 Otwórz karbownicę i umieść między
płytami dolną część tego samego pasemka.
Sprawdź, czy zachodzą na siebie. Kontynuuj
w ten sposób, aż dojdziesz do końca
pasemka.
5 Odczekaj aż karbowane falki ostygną,
zanim ułożysz fryzurę grzebieniem,
szczotką lub palcami.
Jedwabiście gładkie włosy
1 Otwórz karbownicę.Wyjmij kolejno z
C
obudowy płyty, trzymając za zimny przedni
koniec.
2 Odwróć płyty i włóż je z powrotem do
C
obudowy.
Upewnij się, że wypustki po bokach trafiły
dokładnie w wyżłobienia.
POLSKI 15
3 Połącz utworzoną w ten sposób nasadkę
prostującą z częścią główną i postępuj tak
samo jak z karbownicą.
4 Odczekaj, aż włosy ostygną, zanim je
rozczeszesz.
Przechowywanie
Po użyciu urządzenia wyjmij wtyczkę z gniazdka
ściennego. Odłóż lokówkę na podpórce w
bezpieczne miejsce i odczekaj aż ostygnie.
Wymiana
W sprawie przeglądu lub naprawy urządzenia,
zawsze zgłaszaj się do autoryzowanego punktu
serwisowego firmy Philips. Naprawy przez osoby
niewykwalifikowane mogą prowadzić do
poważnego zagrożenia dla użytkownika
urządzenia.

POLSKI16
Gwarancja i serwis
Jeśli potrzebujesz dodatkowych informacji lub
zetknąłeś się z jakimś problemem skontaktuj się z
Działem Obsługi Klienta firmy Philips (numer
telefonu znajdziesz w karcie gwarancyjnej) lub z
najbliższym punktem serwisowym sprzętu AGD
autoryzowanym przez firmę Philips.

ROMÂNĂ 17
Important
◗ Înainte de a conecta aparatul la priză,
asiguraţi-vă ca tensiunea indicată pe aparat să
corespundă tensiunii locale.
◗ Feriţi aparatul de apă! Nu folosiţi acest aparat
lângă sau deasupra apei din căzi, chiuvete, etc.
Când folosiţi aparatul în baie, scoateţi-l din
priză după utilizare, întrucât apa reprezintă un
risc chiar şi când uscătorul de păr este oprit.
◗ Pentru protecţie suplimentară, vă sfătuim să
instalaţi un dispozitiv de curent rezidual
(RCD) cu un curent rezidual nominal de
funcţionare ce nu depăşeşte 30mA în circuitul
electric din baie. Cereţi părerea instalatorului.
◗ Accesoriile de coafare şi plăcuţele aparatului
se vor încinge în timpul utilizării. Evitaţi
contactul cu pielea. Nu atingeţi cablul de
componentele încinse.
◗ Nu lăsaţi la îndemâna copiilor.
◗ Dacă vă spălaţi părul sau folosiţi "Plăcuţa
Netedă" a accesoriului Gofrare/Netezire,
buclele şi onduleurile vor dispărea.
◗ Daca cordonul de alimentare este defect,
inlocuirea lui va fi executată la un centru
service autorizat Philips sau de catre o
persoana autorizată
Înainte de utilizarea aparatului
Cu aparatul de coafat Geometrics puteţi crea
bucle, onduleuri, cârlionţi, sau puteţi conferi
părului un aspect gofrat sau neted.
ROMÂNĂ18
◗ Înainte de a începe coafarea, pieptănaţi-vă
pentru a vă descurca părul.
◗ După spălarea părului puteţi aplica o loţiune
de fixare.
Conectarea accesoriilor
1 Fixaţi un accesoriu în unitatea principală.
C
2 Răsuciţi inelul de bocare de pe mânerul de
C
activare până ce săgeţile sunt aliniate.
Asiguraţi-vă că suportul de sprijin se află
pe partea inferioară.Accesoriul este acum
bine fixat pe unitatea principală.
◗ Urmaţi aceeaşi procedură pentru toate
accesoriile. Pentru a demonta accesoriile,
urmaţi aceeaşi procedură în ordine inversă.
Când scoateţi sau schimbaţi un accesoriu, scoateţi
aparatul din priză şi atingeţi doar părţile din plastic
ale accesoriului. Părţile metalice sunt fierbinţi.
Utilizarea accesoriilor
1 După ce aţi conectat accesoriul pe
C
unitatea principală, aşezaţi styler-ul pe
suportul de sprijin şi introduceţi ştecherul
în priză. Ledul "Pornire" se va aprinde şi
accesoriul va începe să se încălzească.
ROMÂNĂ 19
2 Ledul şi-a schimbat culoarea.
C
◗ Asiguraţi-vă întotdeauna că extremităţile
şuviţelor sunt corect înfăşurate în jurul barei
metalice.Veţi evita astfel îndoirea capetele
şuviţelor.
Coafare
Bucle mari sau strânse
1 Fixaţi cleştele pentru ondulare pe unitatea
principală.Asiguraţi-vă că suportul de
sprijin este pe partea inferioară.
2 Fixaţi capătul şuviţei cu clema şi răsuciţi
C
şuviţa în jurul barei metalice spre cap.
3 Deschideţi clema după 5 - 10 secunde şi
scoateţi bara metalică din păr.
◗ Puteţi separa buclele cu degetele pentru un
plus de volum.
Onduleuri
1 Culisaţi peria cu peri pe cleştele de
ondulare.
2 Răsuciţi capătul şuviţei în jurul periei cu
C
peri spre cap.
ROMÂNĂ20
3 După 5 - 10 secunde scoateţi peria din păr.
Lăsaţi onduleurile să se răcească înainte de
a finisa coafura cu peria, pieptenul sau
aranjând şuviţele cu degetele.
Spirale
1 Conectaţi accesoriul Spirală pe unitatea
principală.
2 Răsuciţi o şuviţă de păr spre cap urmărind
C
forma Spiralei.
3 După 5 - 10 secunde scoateţi Spirala din
păr. Lăsaţi spiralele să se răcească înainte
de a finisa coafura cu peria, pieptenul sau
aranjând şuviţele cu degetele.
Şuviţe gofrate
1 Conectaţi fierul de gofrare pe unitatea
C
principală.
2 Luaţi o şuviţă de păr de maxim 5-6 cm
C
grosime şi fixaţi-o între plăcuţele fierului
de gofrare. Începeţi coafarea de la rădăcină
spre vârfuri.
3 Ţineţi plăcuţele lipite 5-10 secunde. Puteţi
presa cu mâna cele părţi ale fierului de
gofrare cu degetele (nu atingeţi plăcuţele!).

