Philips HI 570: инструкция
Раздел: Бытовая, кухонная техника, электроника и оборудование
Тип: Утюг
Характеристики, спецификации
Инструкция к Утюгу Philips HI 570
Azur Cordless
HI575, HI571, HI570

2
3

4

ENGLISH 6
POLSKI 17
ROMÂNĂ 29
РУССКИЙ 41
ČEŠTINA 53
MAGYAR 64
SLOVENSKY 75
LIETUVIŠKAI 87
HI575, HI571, HI570

ENGLISH6
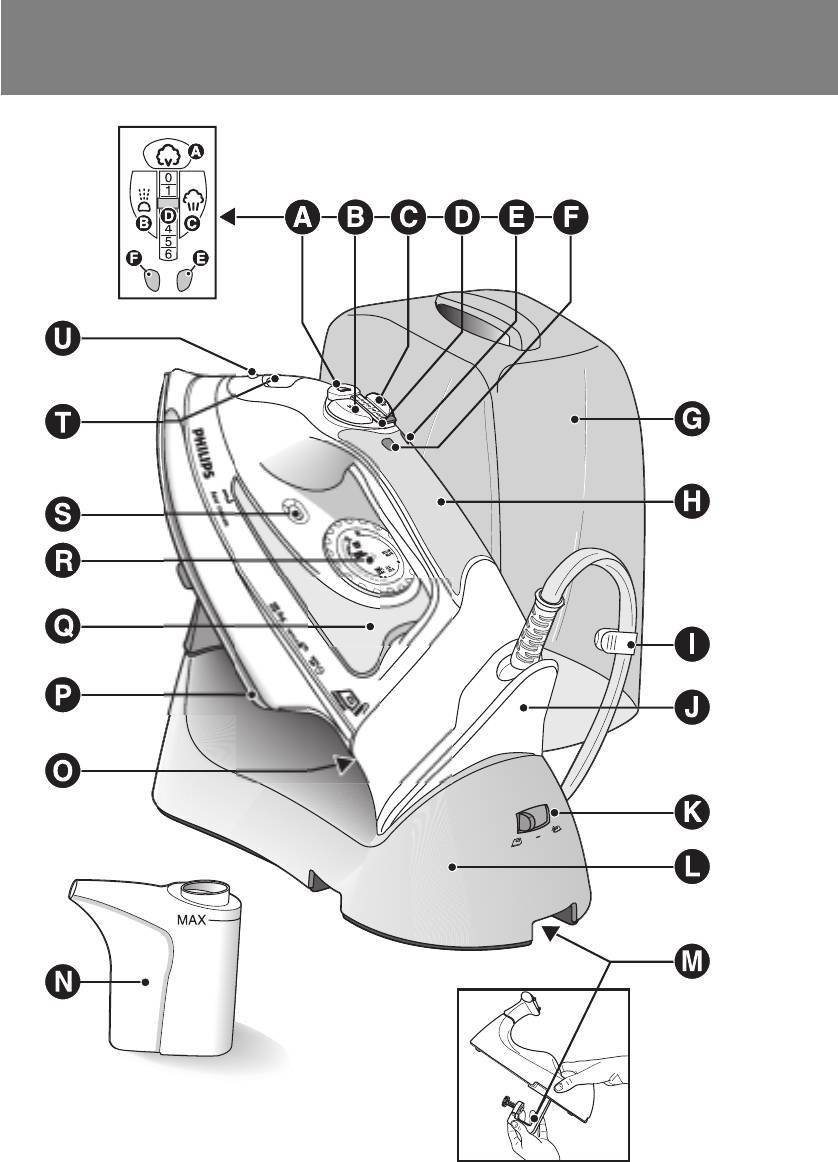
General description (fig. 1)
A Turbo steam button 0 (HI575 only)
B Spray button T
C Shot-of-steam button 9
D Steam control
0= no steam
1= minimum steam
6= maximum steam
E Auto shut-off light (HI575 only)
F Temperature light
G Carry case (HI575/571 only)
H Soft-touch handgrip (HI575 only)
I Cord clip
J Power unit
K Mode switch
∫ = cordless ironing
π = storage position
ª= corded ironing
L Stand
M Stand clamp
N Filling cup
O Typeplate
P Soleplate
Q Water level window
R Temperature dial
S Calc-Clean button for cleaning/descaling
T Filling opening with cap
U Spray nozzle
Important
Read these instructions for use carefully before using the appliance and
save them for future reference.
◗ Check if the voltage indicated on the type plate corresponds to
the local mains voltage before you connect the appliance.
◗ Only connect the appliance to an earthed wall socket.
◗ Do not use the appliance if the plug, the cord or the appliance
itself shows visible damage, or if the appliance has been dropped
or is leaking.
◗ Check the cord regularly for possible damage.
◗ If the mains cord is damaged, it must be replaced by Philips, a
service centre authorised by Philips or similarly qualified persons
in order to avoid a hazard.
◗ Never leave the appliance unattended when it is connected to the
mains.
◗ Never immerse the iron and the stand, if provided, in water.
◗ Keep the appliance out of the reach of children.
◗ The soleplate of the iron can become extremely hot and may
cause burns if touched.

ENGLISH 7
◗ Do not allow the cord to come into contact with the soleplate
when it is hot.
◗ When you have finished ironing, when you clean the appliance,
when you fill or empty the water tank and also when you leave
the iron even for a short while: set the steam control to position
O, put the iron on its heel and remove the mains plug from the
wall socket.
◗ Only use this iron with the stand supplied.
◗ Always place and use the iron and the stand, if provided, on a
stable, level and horizontal surface.
◗ Do not put perfume, vinegar, starch, descaling agents, ironing aids
or other chemicals in the water tank.
◗ This appliance is intended for household use only.
Before first use
1 Release the carry case (HI575/571 only).
C
2 Remove the carry case (HI575/571 only).
C
3 Remove any sticker or protective foil from the soleplate and
clean the soleplate with a soft cloth.
4 Fully unwind the mains cord.
C
M
X
A
C
I
L
A
T
T
O
L
N
N
L
I
H
E
MIN
O
O
N
G
O
D
N
O
W
O
O
L
A
S
K
L
N
A
S
E
Y
L
O
N
N
I
N
L
O
L
I
N
A
D
X
M
A
L
A
T
O
C
I
H
L
N
E
N
I
MIN
T
N
O
L
O
O
O
N
D
G
Y
N
O
L
W
O
O
L
N
I
LO
I
N
E
S
K
L
S
N
A
L
A
N
A
D
M
A
X
L
I
N
E
I
M
N
H
T
O
C
O
N
A
IL
O
T
LG
O
N
D
O
N
L
I
N
N
O
L
Y
N
N
O
O
W
L
A
A
N
L
O
K
I
S
S
L
A
D
E
ENGLISH8
Preparing for use
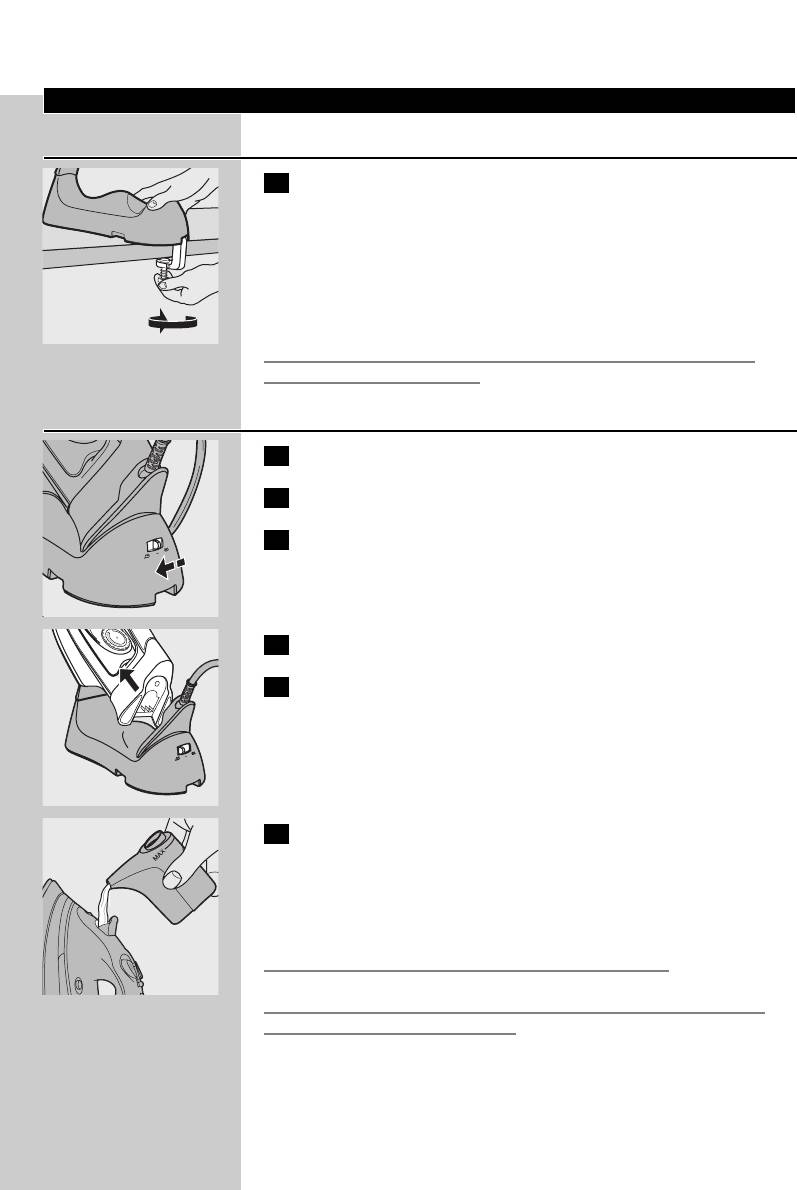
Fastening the stand clamp
1 Fold out the clamp on the bottom of the stand and fix the
C
stand clamp to the ironing board or to another stable surface,
such as a tabletop.
The rubber feet on the bottom prevent the stand from slipping.
◗ You can also place the stand on the ironing board without using
the clamp.The clamp can then remain folded in.
Do not place the stand close to the table edge, as the stand could
accidentally be knocked over.
Filling the water tank
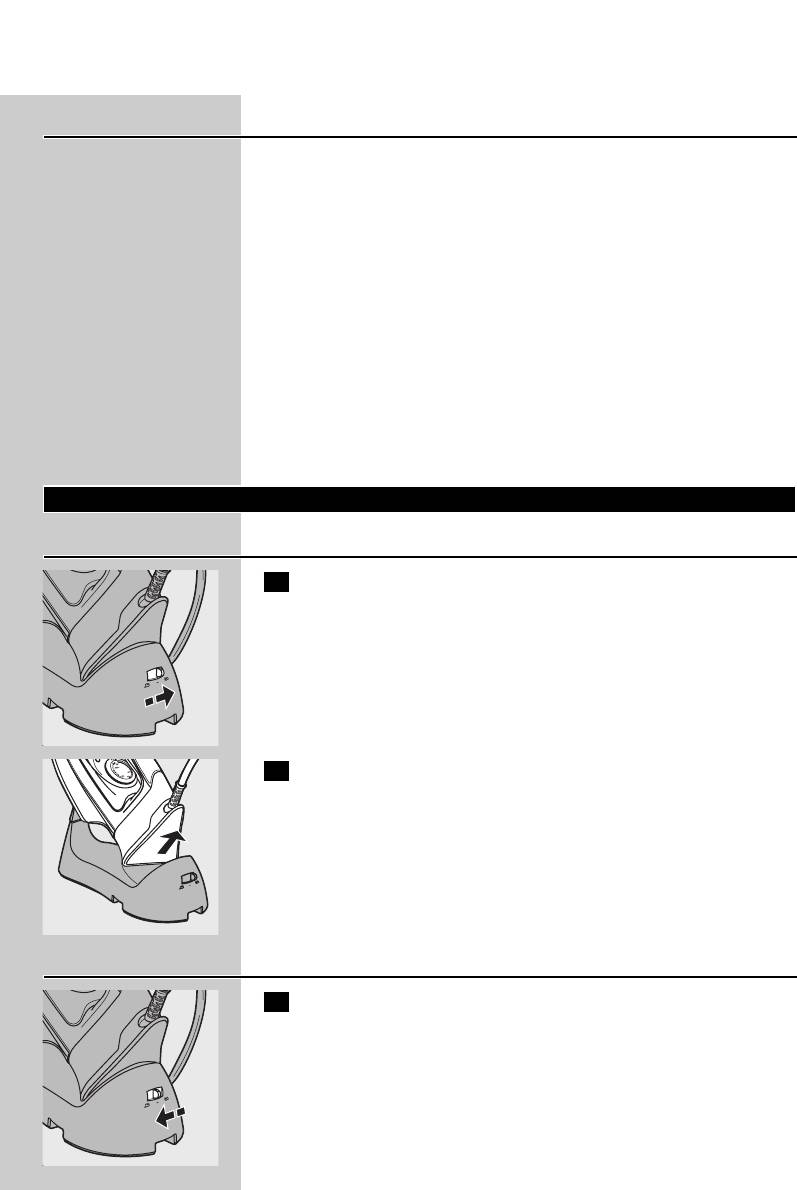
1 Remove the mains plug from the wall socket.
2 Set the steam control to 0 (no steam).
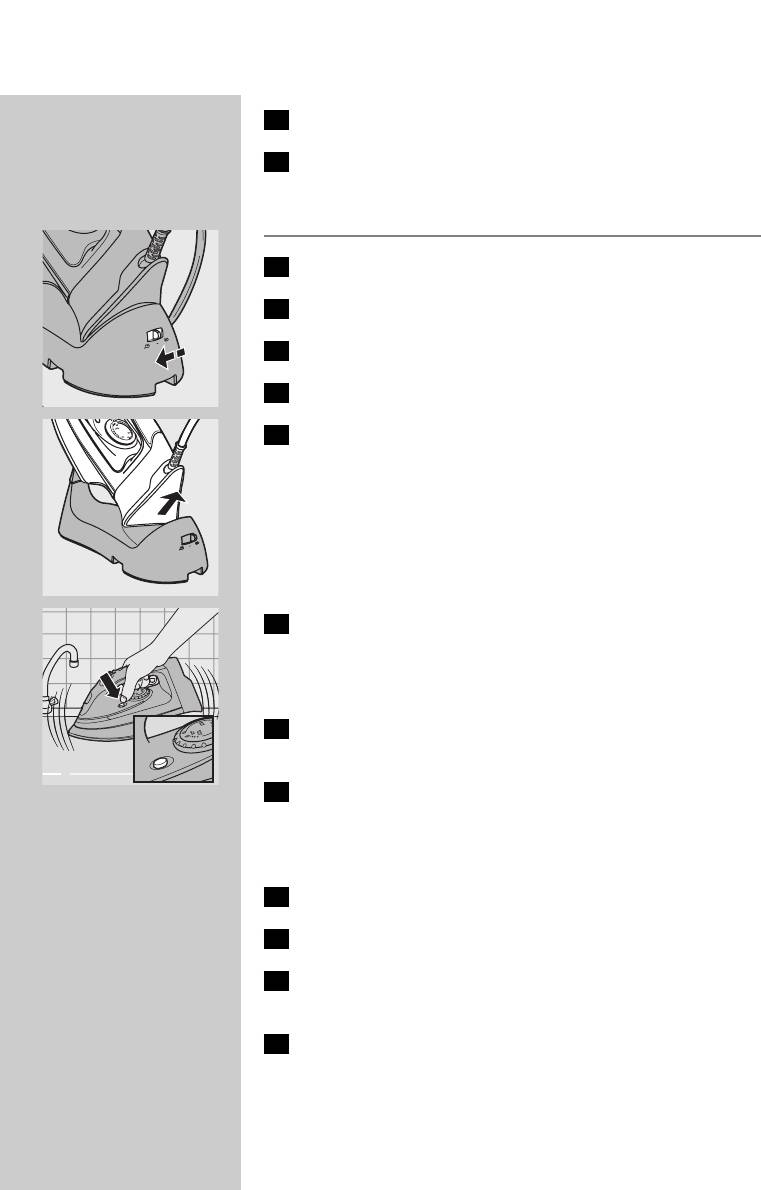
3 Set the mode switch to ∫ (cordless ironing).
C
4 Take the iron from the stand.
C
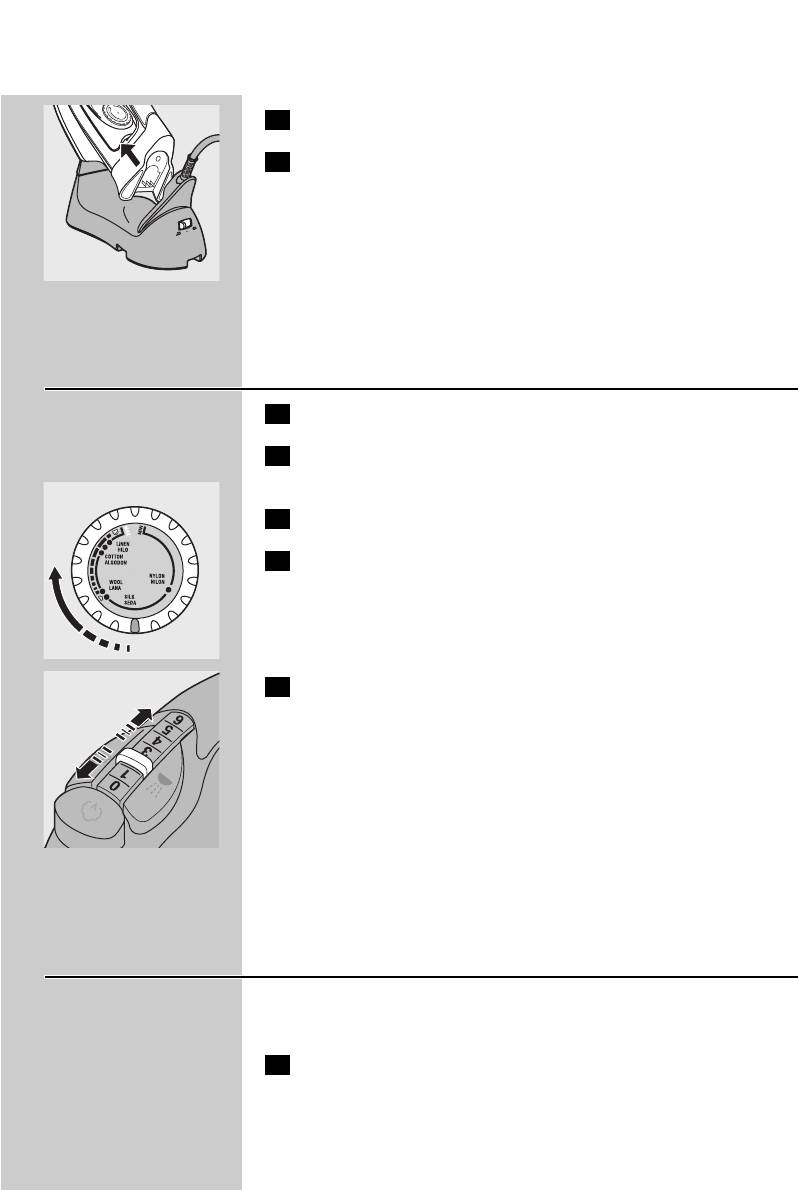
5 Place the iron on its heel and open the cap of the filling
opening.
6 Use the filling cup to pour water into the water tank and close
C
the cap of the filling opening afterwards.
If the tap water in your area is very hard, we advise you to mix it with
an equal amount of distilled water or to use distilled water only.
Do not fill the water tank beyond the MAX indication.
Do not put perfume, vinegar, starch, descaling agents, ironing aids or
other chemicals in the water tank.
A
M
X
I
I
O
C
L
N
M
O
L
E
N
O
A
HI
G
L
T
T
N
D
O
O
N
NY
O
L
I
N
N
O
L
N
L
O
W
A
A
N
OL
I
E
S
K
L
S
A
D
N
ENGLISH 9
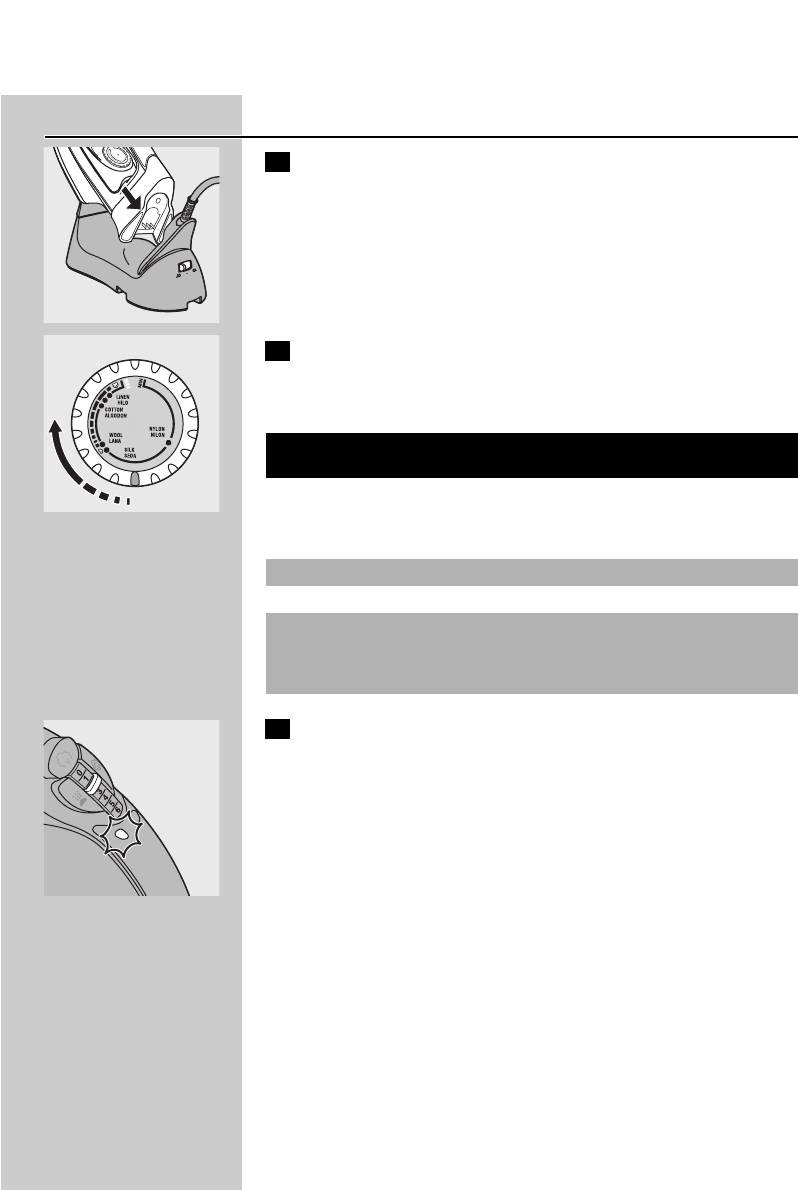
Setting the temperature
1 Put the iron on the iron stand.
C
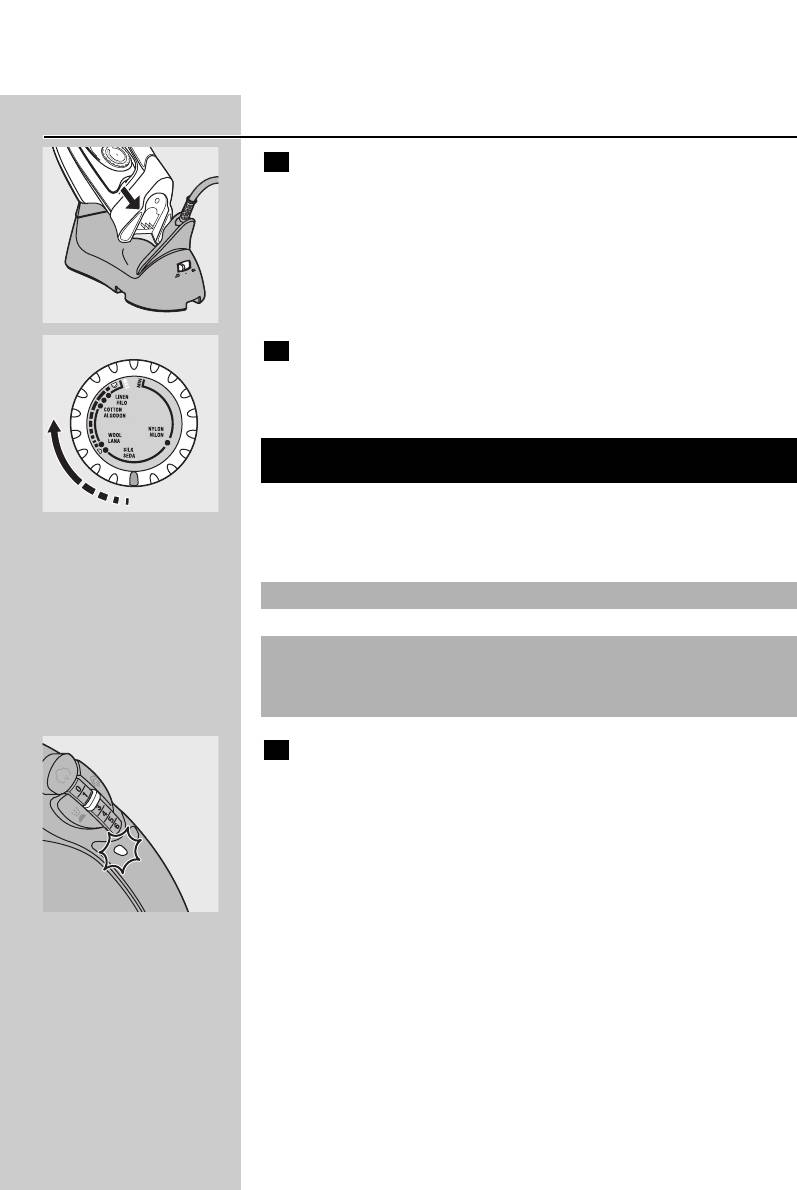
2 Set the required ironing temperature by turning the
C
temperature dial to the appropriate position (see section 'Tips'
for extra information).
Check the laundry care label for the required ironing temperature:
3 Put the mains plug in an earthed wall socket.The temperature
C
light goes on to indicate that the iron is heating up.
◗ The iron is hot enough when the temperature light goes out.
◗ During ironing the temperature light goes on from time to time.
This indicates that the iron is heating up to the right temperature.
◗ If you have been ironing at a high temperature and subsequently
set the temperature dial to a lower setting, wait until the
temperature light goes on again before you continue ironing.This
will prevent damage to your fabrics.
◗ Some parts of the iron have been lightly greased.This may cause
the iron to give off some smoke when you switch it on for the
first time.After a short while, however, this will cease.
A
M
X
I
I
O
C
L
N
M
HI
O
T
L
L
O
A
T
O
N
E
G
D
N
O
N
N
O
L
NY
O
N
L
I
N
L
O
W
A
N
OL
A
I
S
A
D
E
S
K
L
N
Symbol on laundry
Type of fabric
Temperature
Steam setting
care label
setting
B
Synthetic fabrics (e.g.
1
0 (see 'Ironing
acetate, acrylic,
without steam')
viscose, polyamide,
polyester) and silk
C
Wool
2
1-2
D
Cotton, linen
3 to MAX
3-6
Z
Please note that Z
on the label means
that the article
cannot be ironed.
ENGLISH10
Tips
- If the fabric consists of various kinds of fibres, always select the
temperature required by the most delicate fibre, i.e. the lowest
temperature. For example: if an article consists of 60% polyester and
40% cotton, it should be ironed at the temperature indicated for
polyester (2) and without steam.
- If you do not know what kind or kinds of fabric an article is made of,
determine the right ironing temperature by ironing a part that will
not be visible when you wear or use the article.
- Silk, woollen and synthetic materials: iron the reverse side of the
fabric to prevent shiny patches.
- Velvet and other fabrics that tend to acquire shiny patches should be
ironed in one direction only (along with the nap) while applying very
little pressure.
- Start ironing the articles that require the lowest ironing temperature,
such as those made of synthetic fibres.
Using the appliance
Corded ironing
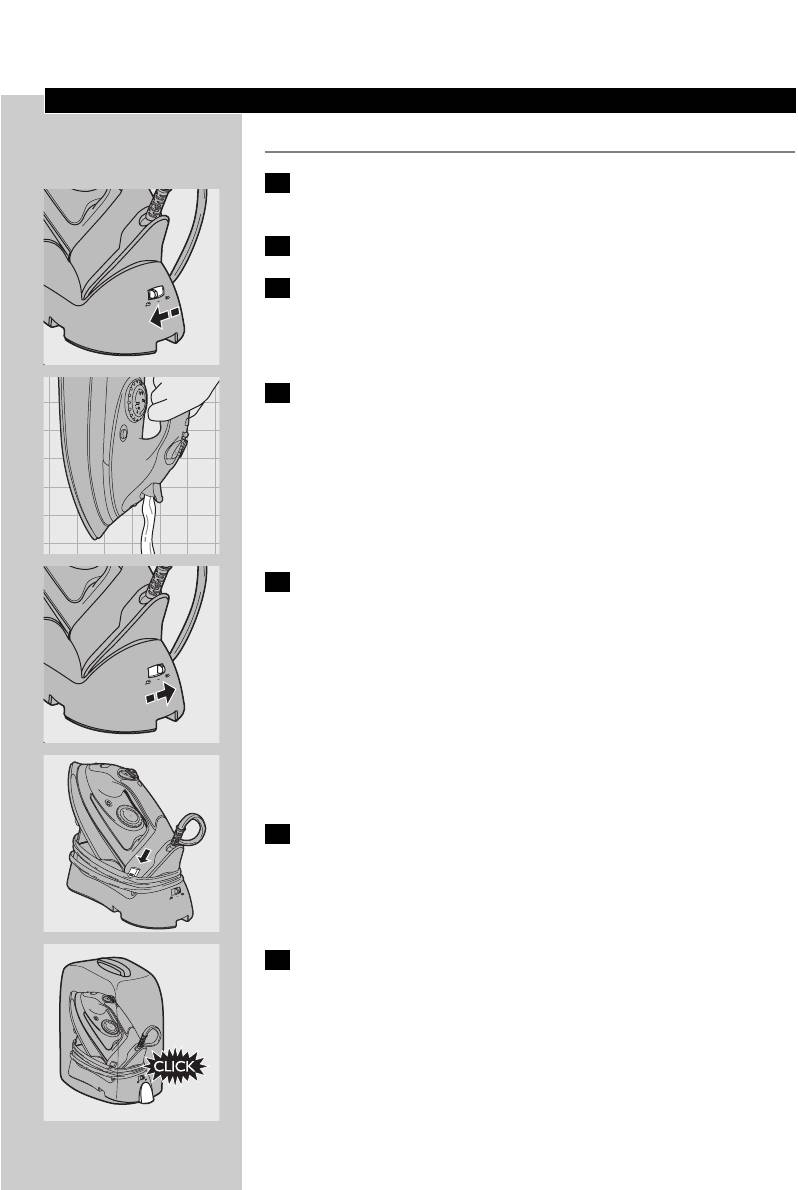
1 Set the mode switch to position ª (corded ironing).
C
2 Take the iron from the stand.
C
◗ When you stop ironing for a while, you can put the iron on the
stand or on its heel.
Cordless ironing
1 Set the mode switch to position ∫ (cordless ironing).
C
ENGLISH 11
2 Take the iron from the stand.
C
3 HI575 only: put the iron back on the stand when the
temperature light starts blinking.This indicates that the iron
has cooled down below the set temperature.
◗ When you stop ironing for a while, always put the iron on the
stand to allow it to heat up again.
◗ When you use the shot-of-steam or turbo-steam function, the
iron may cool down rather quickly.We advise you to iron in
corded mode when using these functions.
Steam ironing
1 Make sure that there is enough water in the water tank.
2 Select the recommended ironing temperature (see section
'Setting the temperature').
3 Put the iron on the stand.
4 Put the mains plug in the wall socket.
C
The iron starts heating up.
◗ As soon as the water in the water tank is hot enough for steam
ironing, the temperature light goes out.
5 Set the steam control to the required position to start steam
C
ironing.
◗ Steam ironing is only possible at higher ironing temperatures
(temperature settings 2 to MAX).
◗ Select the recommended steam setting:
B
1 - 2 for moderate steam (temperature settings 2)
B
3 - 6 for maximum steam (temperature settings 3 to MAX)
◗ During steam ironing the temperature light goes on from time to
time.This indicates that the iron is heating up to the set
temperature.
Ironing without steam
◗ To iron without steam, proceed as described for steam ironing but
set the steam control to position 0 (no steam).
1 Select the recommended ironing temperature (see section
'Setting the temperature').
A
M
X
I
I
O
C
L
N
M
HI
O
T
L
L
O
A
T
O
N
E
G
D
N
O
N
N
O
L
NY
O
N
L
I
N
L
O
W
A
N
OL
A
I
S
A
D
E
S
K
L
N
ENGLISH12
Features
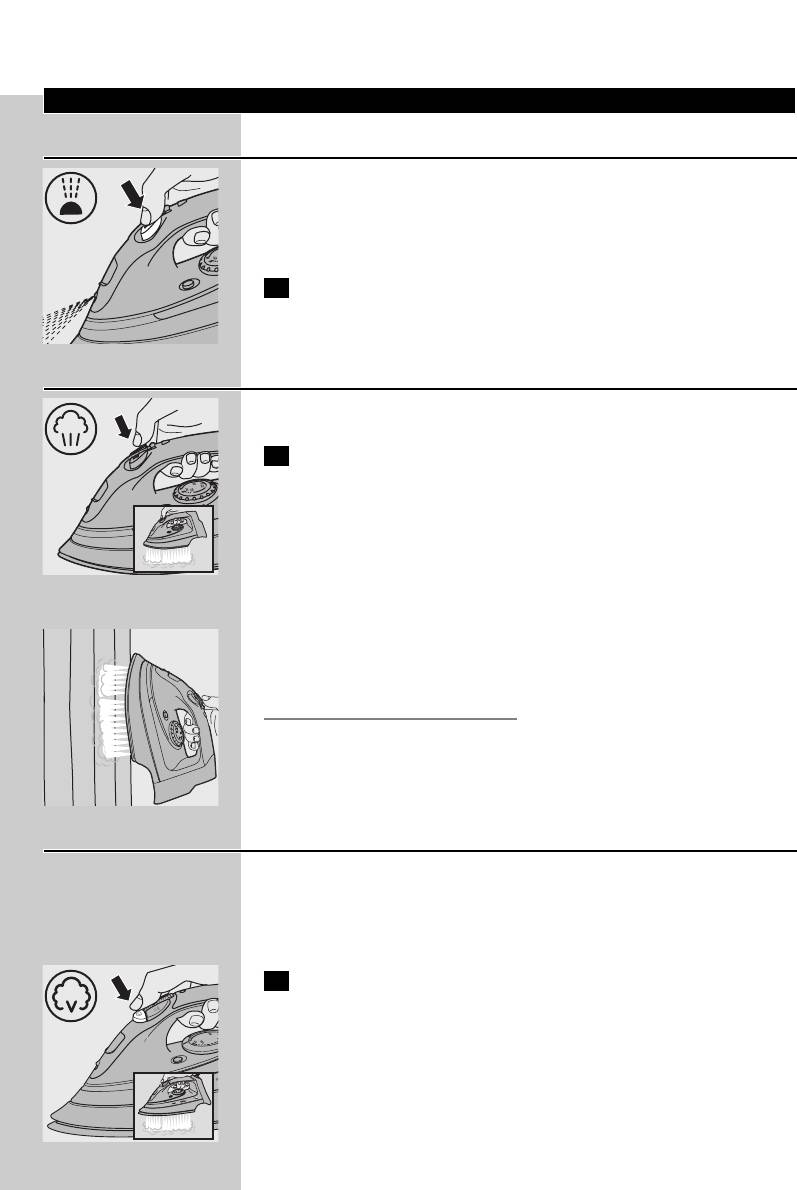
Spray function
You can use the spray function to remove stubborn creases at any
temperature.
◗ Make sure that there is enough water in the water tank.
1 Press the spray button several times to moisten the article to
C
be ironed.
Shot of steam
A powerful shot of steam helps remove stubborn creases.
1 Press and hold the shot-of-steam button for a few seconds.
C
Then release the button.
◗ The shot-of-steam function can only be used at temperature
settings between 2 and MAX.
Vertical shot of steam
◗ The shot-of-steam function can also be used when you hold the
C
iron in vertical position.
This is useful for removing creases from hanging clothes, curtains etc.
Never direct the steam at people.
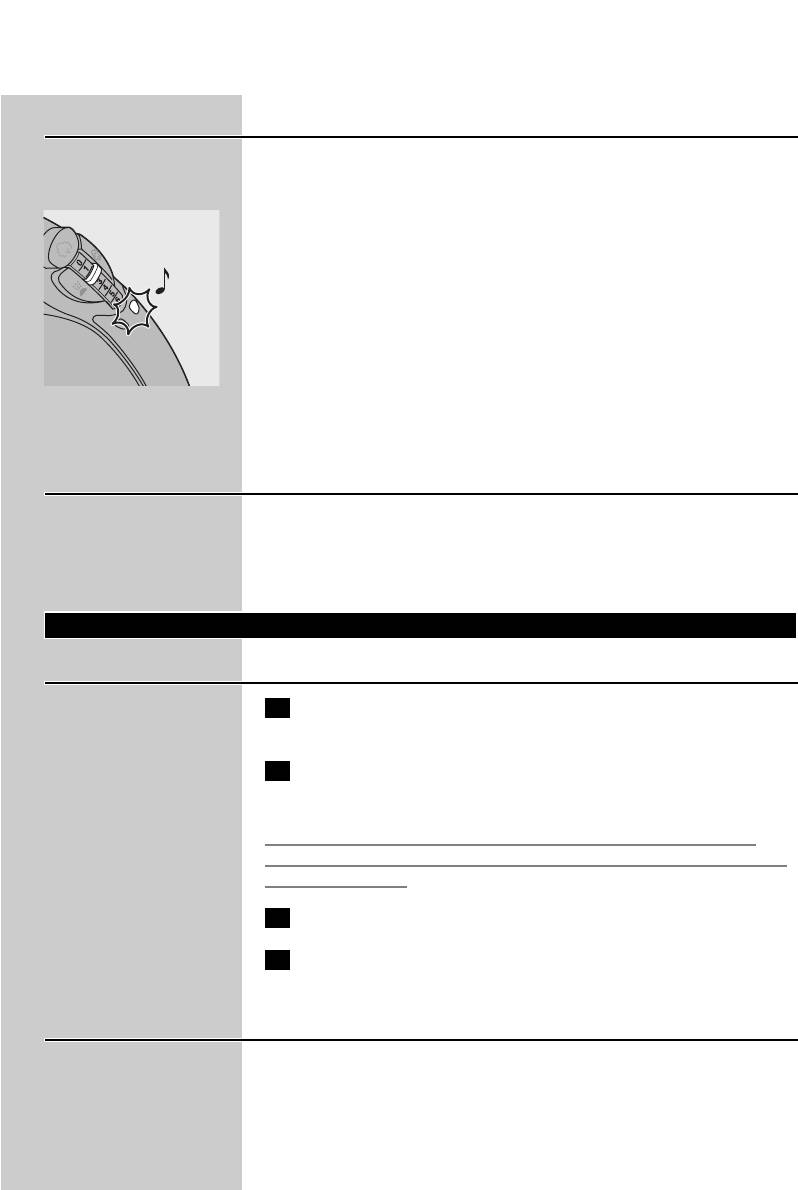
Turbo steam (HI575 only)
The turbo-steam function helps remove difficult creases.
◗ The turbo-steam function can only be used at temperature
settings between 3 and MAX.
1 Press and hold the turbo-steam button for a few seconds.Then
C
release the button.
Do not keep the button pressed for more than 10 seconds.Wait at
least one minute before using the turbo-steam function again to let the
iron heat up again.The iron is hot enough when the temperature light
goes out.
ENGLISH 13
Electronic safety shut-off function (HI575 only)
The electronic safety shut-off function automatically switches the iron
off if it has not been moved for a while.
◗ To indicate that the heating element has been switched off, the
C
auto-off light will start blinking and you will hear an audible signal.
- In horizontal position, this will happen after 30 seconds.
- In vertical position, this will happen after 8 minutes.
◗ To let the iron heat up again:
- Pick up the iron or move it slightly.
- The auto-off light goes out and the audible signal stops.
- Put the iron back on its stand.The iron will heat up again.
- When the temperature light has gone on and goes out again, the
iron is ready for use.
Drip stop
This iron is equipped with a drip-stop function to prevent water
dripping out of the soleplate: the iron automatically stops producing
steam when the temperature is too low. When this happens you may
hear a click.
Cleaning and maintenance
After ironing
1 Remove the mains plug from the wall socket and let the iron
cool down.
2 Wipe scale and any other deposits off the soleplate with a
damp cloth and a non-abrasive (liquid) cleaning agent.
To keep the soleplate smooth, you should avoid hard contact with
metal objects. Never use a scouring pad, vinegar or other chemicals to
clean the soleplate.
3 Clean the upper part of the iron with a damp cloth.
4 Regularly rinse the water tank with water. Empty the water
tank after cleaning.
Calc-Clean function
Use the Calc-Clean function once every two weeks to remove scale
and impurities from the soleplate. If the water in your area is very hard
(i.e. when flakes come out of the soleplate during ironing), you should
use the Calc-Clean function more frequently.
ENGLISH14
1 Set the steam control to position 0.
2 Open the cap of the filling opening and fill the water tank up to
the maximum level.Then close the cap again.
Do not pour vinegar or other descaling agents into the water tank.
3 Put the iron on its stand.
4 Set the temperature dial to MAX.
5 Put the mains plug in the wall socket.
6 Set the mode switch to position ∫ (cordless).
C
7 Wait until the temperature light goes out and then remove the
C
iron from the stand.
8 Hold the iron over the sink, press and hold the Calc-Clean
C
button and gently shake the iron to and fro.
Steam and boiling water will come out of the soleplate. Scale (if any)
will be flushed out.
9 Release the Calc-Clean button after one minute or when the
water tank is empty.
10 Repeat the Calc-Clean process if the water coming out of the
iron still contains a lot of scale particles.
After the Calc-Clean process
1 Put the iron back on the stand to let the soleplate dry.
2 Unplug the iron when the light has gone out.
3 Move the iron gently over a piece of used cloth to remove any
water stains that may have formed on the soleplate.
4 Let the iron cool down before you store it.
ENGLISH 15
Storage
Make sure the iron has cooled down sufficiently before you put it away.
1 Remove the mains plug from the wall socket and let the iron
cool down.
2 Set the steam control to position 0 (no steam).
3 Set the mode switch to position ∫ (cordless).
C
4 Empty the water tank.
C
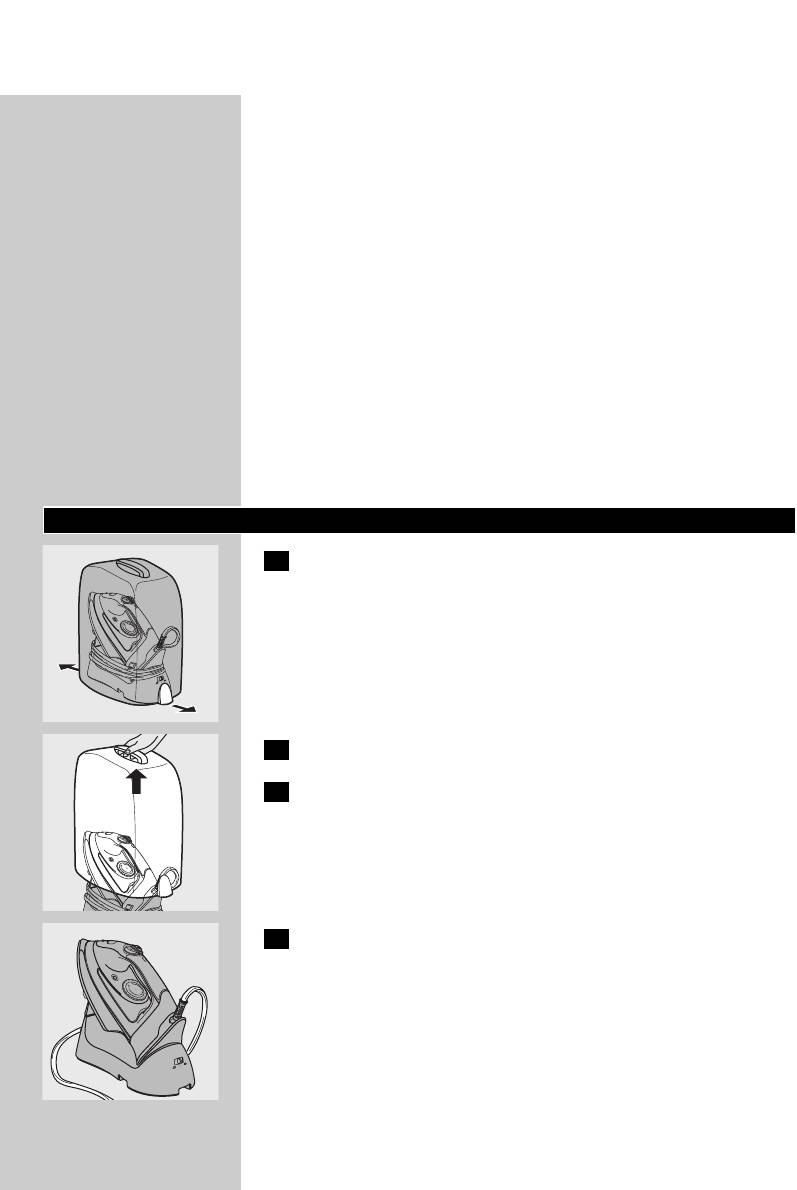
5 Put the iron on the stand and set the mode switch to the
C
storage position (-).
The iron, the power unit and the stand are then locked together.
◗ You can wind the cord round the stand and fix the end of the
C
cord with the cord clip.
6 Place the carry case over the stand (HI575/571 only).
7 Press on the case to lock it onto the stand ('click') (HI575/571
C
only).
MA
X
L
MIN
T
A
L
C
O
I
N
I
H
E
O
T
O
N
N
G
O
L
D
O
N
NY
L
N
I
LO
O
N
N
L
O
W
A
N
A
S
L
O
I
L
K
S
E
D
A
X
A
M
C
L
A
T
T
O
I
L
L
N
E
I
H
N
O
O
N
MIN
O
G
D
O
N
N
O
W
N
O
L
Y
N
L
N
A
L
O
O
A
S
D
K
S
E
L
I
N
L
I
A
ENGLISH16
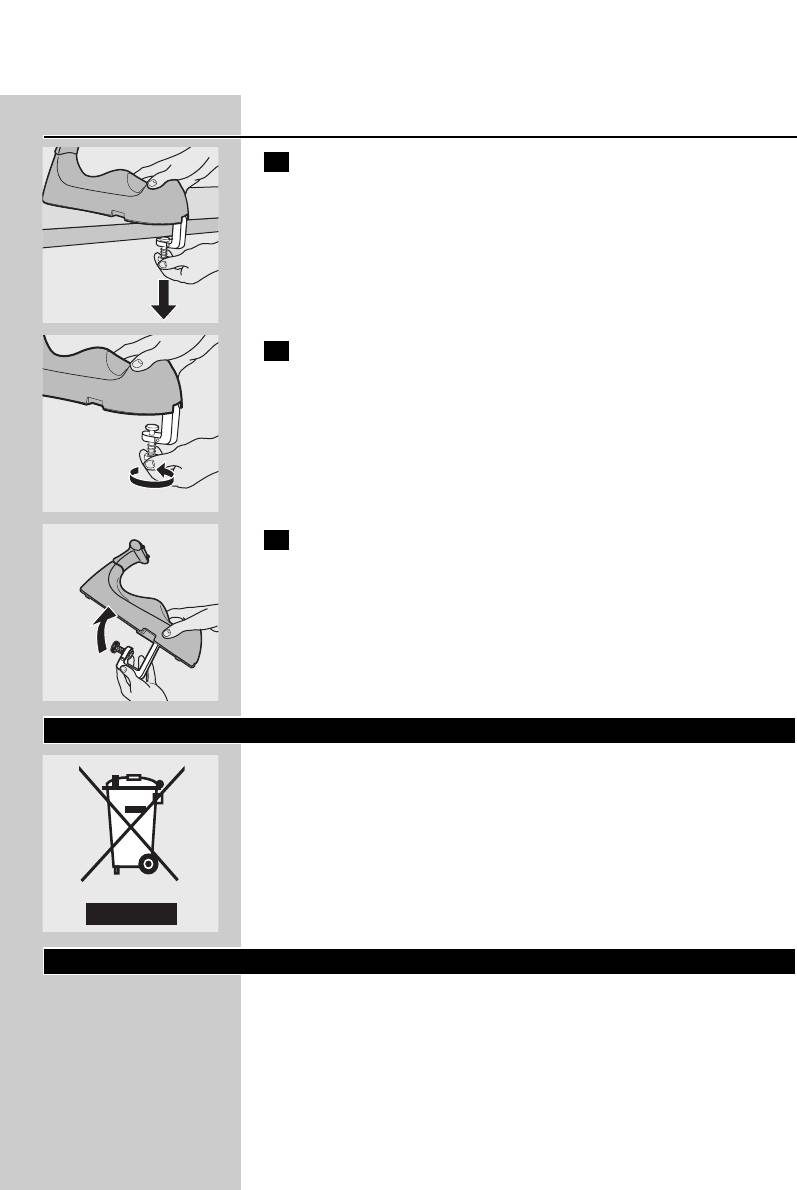
Storing the stand clamp
1 Unlock the stand clamp.
C
2 Screw in the fixing screw completely.
C
3 Fold the stand clamp into the stand.
C
Environment
◗ Do not throw the appliance away with the normal household
C
waste at the end of its life, but hand it in at an official collection
point for recycling. By doing this you will help to preserve the
environment.
Guarantee & service
If you need information or if you have a problem, please visit the Philips
website at www.philips.com or contact the Philips Customer Care
Centre in your country (you will find its phone number in the
worldwide guarantee leaflet). If there is no Customer Care Centre in
your country, turn to your local Philips dealer or contact the Service
Department of Philips Domestic Appliances and Personal Care BV.

POLSKI 17
Opis ogólny (rys. 1)
A Przycisk turbo 0 (tylko model HI575)
B Przycisk spryskiwacza T
C Przycisk silnego uderzenia pary 9
D Regulator pary
0= brak pary
1= minimalna ilość pary
6= maksymalna ilość pary
E Wskaźnik automatycznego wyłączania (tylko model HI575)
F Wskaźnik temperatury
G Futerał (tylko do modeli HI575/571)
H Miękki uchwyt (tylko model HI575)
I Zacisk do przewodu sieciowego
J Moduł zasilający
K Przełącznik trybu pracy
∫ = prasowanie bez użycia przewodu sieciowego
π = pozycja przechowywania
ª = prasowanie z użyciem przewodu sieciowego
L Podstawa
M Zacisk podstawy
N Miarka
O Tabliczka znamionowa
P Stopa
Q Wskaźnik poziomu wody
R Pokrętło regulatora temperatury
S Przycisk funkcji Calc-Clean do usuwania kamienia
T Otwór wlewowy wody z nasadką
U Dysza spryskiwacza
Ważne
Przed pierwszym użyciem urządzenia zapoznaj się dokładnie z jego
instrukcją obsługi i zachowaj ją na wypadek konieczności użycia w
przyszłości.
◗ Przed podłączeniem urządzenia upewnij się, czy napięcie podane
na tabliczce znamionowej jest zgodne z napięciem w sieci
elektrycznej.
◗ Podłączaj urządzenie wyłącznie do uziemionego gniazdka
elektrycznego.
◗ Nie korzystaj z urządzenia, jeśli uszkodzona jest wtyczka, przewód
sieciowy lub samo urządzenie, albo jeśli urządzenie zostało
upuszczone bądź przecieka.
◗ Regularnie sprawdzaj, czy przewód sieciowy nie jest uszkodzony.
◗ Ze względów bezpieczeństwa oddaj uszkodzony przewód
sieciowy do wymiany do autoryzowanego centrum serwisowego
firmy Philips lub odpowiednio wykwalifikowanej osobie.
◗ Nie pozostawiaj urządzenia bez uwagi, gdy jest ono podłączone do
sieci.
18
POLSKI
◗ Nigdy nie zanurzaj w wodzie żelazka ani podstawki (jeśli jest
dołączona).
◗ Przechowuj urządzenie w miejscu niedostępnym dla dzieci.
◗ Stopa żelazka może być bardzo rozgrzana i dotknięcie jej może
spowodować poparzenia.
◗ Nie dopuszczaj do kontaktu przewodu z rozgrzaną stopą żelazka.
◗ Po zakończeniu prasowania ustaw regulator pary w położeniu „0”,
postaw żelazko w pionie i wyjmij wtyczkę przewodu sieciowego z
gniazdka w przypadku: czyszczenia urządzenia, napełniania lub
opróżniania zbiorniczka wody, odstawienia żelazka nawet na
krótką chwilę.
◗ Korzystaj wyłącznie z podstawki dostarczonej do żelazka.
◗ Zawsze korzystaj z żelazka i podstawki (jeśli jest dołączona) na
stabilnej i równej poziomej powierzchni.
◗ Nie wlewaj do zbiorniczka wody perfum, octu, krochmalu,
środków do usuwania kamienia, ułatwiających prasowanie ani
żadnych innych środków chemicznych.
◗ Urządzenie to jest przeznaczone wyłącznie do użytku domowego.
Przed pierwszym użyciem
1 Zwolnij blokadę futerału (tylko modele HI575/571)
C
2 Zdejmij futerał (tylko modele HI575/571)
C
3 Usuń wszystkie nalepki i folię ochronną ze stopy żelazka oraz
przetrzyj ją miękką szmatką.
4 Całkowicie rozwiń przewód sieciowy.
C
M
L
X
A
IN
C
N
M
T
T
O
D
A
L
O
I
O
G
E
N
N
H
I
L
O
N
O
W
O
N
L
S
Y
A
N
L
O
N
A
N
O
L
O
N
L
I
A
L
K
S
E
I
D
M
C
L
A
X
L
A
T
N
O
T
O
O
G
L
D
I
I
N
E
H
N
O
MIN
O
N
W
O
O
L
Y
N
N
A
LO
A
L
S
I
L
N
O
L
K
S
E
N
I
D
A
N
M
AX
L
I
N
I
M
N
O
H
A
C
T
O
LG
T
O
O
IL
N
E
D
N
N
O
N
L
N
O
Y
N
O
L
N
I
L
O
W
A
N
A
L
O
I
S
A
D
E
S
LK

19POLSKI
Przygotowanie do użycia
Mocowanie zacisku podstawy
1 Rozłóż zacisk znajdujący się w dolnej części podstawy i
C
przymocuj go do deski do prasowania lub do innej stabilnej
powierzchni, na przykład do blatu stołu.
Gumowa stopa na spodzie podstawy zapobiega jej ześlizgnięciu się.
◗ Można również postawić podstawę na desce do prasowania bez
przytwierdzania jej zaciskiem. Zacisk wtedy może pozostać
złożony.
Nie umieszczaj podstawy blisko krawędzi stołu, gdyż można ją wówczas
przypadkowo zrzucić.
Napełnianie zbiorniczka na wodę.
1 Wyjmij wtyczkę przewodu sieciowego z gniazdka
elektrycznego.
2 Ustaw regulator pary w położeniu „0” (brak pary).
3 Ustaw przełącznik trybu pracy w pozycji ∫ (prasowanie bez
C
użycia przewodu sieciowego).
4 Zdejmij żelazko z podstawy.
C
5 Ustaw żelazko w pozycji pionowej i otwórz nasadkę
zamykającą otwór wlewowy wody.
6 Wlej wodę do zbiorniczka, używając dołączonego pojemniczka,
C
po czym zatkaj otwór wlewowy nasadką.
Jeśli woda kranowa w Twojej okolicy jest bardzo twarda, zaleca się
wymieszanie jej w równych proporcjach z wodą destylowaną lub
stosowanie samej wody destylowanej.
Nie napełniaj zbiorniczka wody powyżej oznaczenia „MAX”.
Nie wlewaj do zbiorniczka wody perfum, octu, krochmalu, środków do
usuwania kamienia, ułatwiających prasowanie ani żadnych innych
środków chemicznych.
A
M
X
I
I
O
C
L
N
M
HI
O
T
L
L
O
A
T
O
N
E
G
D
N
O
N
N
O
L
NY
O
N
L
I
N
L
O
W
A
N
OL
A
I
S
A
D
E
S
K
L
N
20
POLSKI
Ustawianie temperatury
1 Postaw żelazko na podstawie.
C
2 Ustaw żądaną temperaturę prasowania, obracając pokrętło
C
regulatora temperatury do odpowiedniego położenia
(dodatkowe informacje można znaleźć w części „Wskazówki”).
Sprawdź zaznaczoną na metce wymaganą temperaturę prasowania.
3 Włóż wtyczkę przewodu sieciowego do uziemionego gniazdka
C
elektrycznego. Zaświeci się wskaźnik temperatury wskazujący,
że żelazko rozgrzewa się.
◗ Gdy zgaśnie wskaźnik temperatury, oznacza to, że żelazko jest
wystarczająco nagrzane.
◗ Podczas prasowania wskaźnik temperatury będzie od czasu do
czasu zapalał się. Oznacza to, że żelazko podgrzewa się do
odpowiedniej temperatury.
◗ Jeśli na początku prasowania żelazko było ustawione na wysoką
temperaturę,a następnie zmieniono ustawienie temperatury na
niższe, przed wznowieniem prasowania należy poczekać, aż
wskaźnik temperatury ponownie się zaświeci, aby uniknąć
uszkodzenia prasowanej tkaniny.
◗ Niektóre części żelazka zostały fabrycznie lekko nasmarowane. Z
tego powodu przy pierwszym użyciu z żelazka może wydobywać
się niewielka ilość dymu. Po krótkiej chwili zjawisko to ustanie.
A
M
X
I
I
O
C
L
N
M
O
L
E
N
O
A
HI
G
L
T
T
N
D
O
O
N
NY
O
L
I
N
N
O
L
N
L
O
W
A
N
OL
A
I
E
S
K
L
S
A
D
N
Symbol na metce
Rodzaj tkaniny
Ustawienie
Ustawienie pary
temperatury
B
Tkaniny sztuczne (np. z
1
0 (patrz:
włókien octanowych,
„Prasowanie bez
akrylowych, wiskozy,
pary”)
poliamidu, poliestru) i
jedwab
C
Wełna
2
1-2
D
Bawełna, len
3 do MAX
3-6
Z
Symbol Z na metce
oznacza, że danego
ubrania nie można
prasować.


