Philips Nero 7: инструкция
Раздел: Профоборудование
Тип: Аппарат
Инструкция к Аппарату Philips Nero 7
How to... for Internal ReWriters
using Nero 7
EN
Install Guide
DE
Installationsanleitung
FR
Guide d'installation
IT
Guida d'installazione
NL
Installatiegids
ES
Guía de instalación
PT
Guia de Instalação
TR
Kurulum Kılavuzu
PL
Instrukcja montażu
SV
Installationsguide
SC
RU
Инструкция по инсталляции
DK
Installationsvejledning
TC
EN
Contents
How to install? 5
Up to date? 15
How to make a video disc? 19
How to make a data or audio disc? 27
How to copy a disc? 31
More info or help needed 34
DE
Inhalt
Einbau des Laufwerks 5
Sind Sie auf dem neuesten Stand? 15
Erstellen einer Video-Disc 19
Erstellen einer Audio- oder Daten-Disc 27
Kopieren einer Disc 31
Weitere Informationen oder Hilfe erforderlich 35
FR
Table des matières
Comment installer? 5
Vos logiciels sont-ils à jour ? 15
Comment créer un disque vidéo ? 19
Comment créer un disque audio ou de données ? 27
Comment copier un disque ? 31
Vous avez besoin d'aide ou de plus d'informations ? 36
IT
Indice
Come installare 5
Aggiornamento 15
Guida alla creazione di un video disc 19
Guida alla creazione di un disco audio o di un disco dati 27
Guida alla copia di un disco 31
Per ulteriori informazioni o assistenza 37
NL
Inhoud
Hoe installeren? 5
Up to date? 15
Hoe maak ik een video-cd? 19
Hoe maak ik een audio- of data-cd? 27
Hoe kopieer ik een cd? 31
Meer informatie of hulp nodig 38
2
ES
Índice
¿Cómo instalarlo? 39
¿Actualizar? 49
¿Cómo crear DVD de vídeo? 53
¿Cómo crear un disco de datos o audio? 61
¿Cómo copiar un disco? 65
Si necesita más información o ayuda 68
PT
Índice
Como instalar? 39
Atualizado? 49
Como criar um disco de vídeo? 53
Como criar um disco de áudio ou dados? 61
Como copiar um disco? 65
São necessárias mais informações ou ajuda 69
TR
İçindekiler
Nasıl kurulur? 39
Güncel mi? 49
Video diski nasıl oluşturulur? 53
Bzir ses veya veri diski nasıl oluşturulur? 61
Bir disk nasıl kopyalanır? 65
Daha fazla bilgi veya yardım gereklidir 70
PL
Spis treści
Instalacja 39
Aktualizacja 49
Tworzenie płyty wideo 53
Nagrywanie płyt audio lub danych 61
Kopiowanie płyt 65
Potrzebna pomoc lub dodatkowe informacje 71
SV
Innehåll
Hur går installationen till? 39
Uppdaterad? 49
Hur går det till att göra en videoskiva? 53
Hur går det till att göra en ljud- eller dataskiva? 61
Hur går det till att kopiera en skiva? 65
Mer information eller hjälp behövs 72
3
SC
Содержание
RU
Как выполнить инсталляцию? 73
Актуализировать? 83
Как создать видеодиск? 87
Как создать диск данных или аудиодиск? 95
Как создать копию диска? 99
Нужна дополнительная информация или помощь 104
Indhold
DK
Installation 73
Opdatering 83
Sådan laves en videodisc 87
Sådan laves en data- eller lyddisc 95
Sådan kopieres en disc 99
Mere information og hjælp 105
TC
Contents
EN
How to install? 73
Up to date? 83
How to make a video disc? 87
How to make a data or audio disc? 95
How to copy a disc? 99
More info or help needed 107
4
How to install?
Einbau des Laufwerks
Comment installer?
Come installare
Hoe installeren?
EN DE FR
Please refer to your PC manual or
Weitere Informationen finden Sie im
Pour plus d'informations, reportez-vous
contact your local dealer for more
PC-Handbuch bzw. können Sie bei
au mode d’emploi de l'ordinateur ou
information.
Ihrem Händler erfragen.
contactez votre revendeur.
IT NL
Fare riferimento al manuale del PC o
Zie de handleiding bij uw PC of neem
contattare il proprio rivenditore locale
contact op met uw lokale leverancier
per ulteriori informazioni.
voor meer informatie.
5

EN
This can be found in the box:
A: Your new drive C: The Nero software disc
1
B: This manual D: 4 screws in a small bag
DE
Verpackungsinhalt:
A: Ein neues Laufwerk C: Die Nero Software-CD
B: Dieses Handbuch D: 4 Schrauben in einem
kleinen Beutel
FR
Le coffret d'emballage contient les éléments suivants :
A : Votre nouveau lecteur C : Le disque du logiciel Nero
B : Ce mode d'emploi D : 4 vis dans un petit sachet
IT
Contenuto della confezione:
A: La nuova unità C: Il disco del software Nero
B: Questo manuale D: 4 viti in un sacchetto piccolo
NL
Dit zit er in de doos:
A: Uw nieuwe station C: De software-disk van Nero
B: Deze handleiding D: 4 schroeven in een zakje
EN
Switch your computer off.
2
DE
Schalten Sie Ihren Computer aus.
FR
Éteignez l’ordinateur.
IT
Spegnere il computer.
NL
Zet de computer uit.
EN
Touch an unpainted metal part (eg. your
3
heating or an unpainted part of your computer case).
➤ This will avoid any damage to your computer by
electrostatic discharge.
DE
Berühren Sie ein unlackiertes Metallteil
(z.B. Ihre Heizung oder ein unlackiertes Teil Ihres
Computergehäuses).
➤ Das verhindert Schäden an Ihrem Computer
aufgrund von elektrostatischer Entladung.
FR
Touchez une partie métallique non peinte
(p. ex. un radiateur ou une partie non peinte du
boîte de l'ordinateur).
➤ Ce contact permettra d'éviter tout
endommagement de l'ordinateur par décharge
d'électricité statique.
IT
Toccare un elemento di metallo non verniciato (p.es. l’elemento riscaldante o uno non verniciato del
case del computer).
➤ In questo modo si eviteranno danni al computer dovuti a scariche elettrostatiche.
NL
Raak een ongelakt metalen object aan (b.v. de verwarming of een ongelakt deel van de computer-
behuizing).
➤ Op deze manier voorkomt u dat de computer beschadigd raakt als gevolg van elektrostatische ontlading.
6
EN
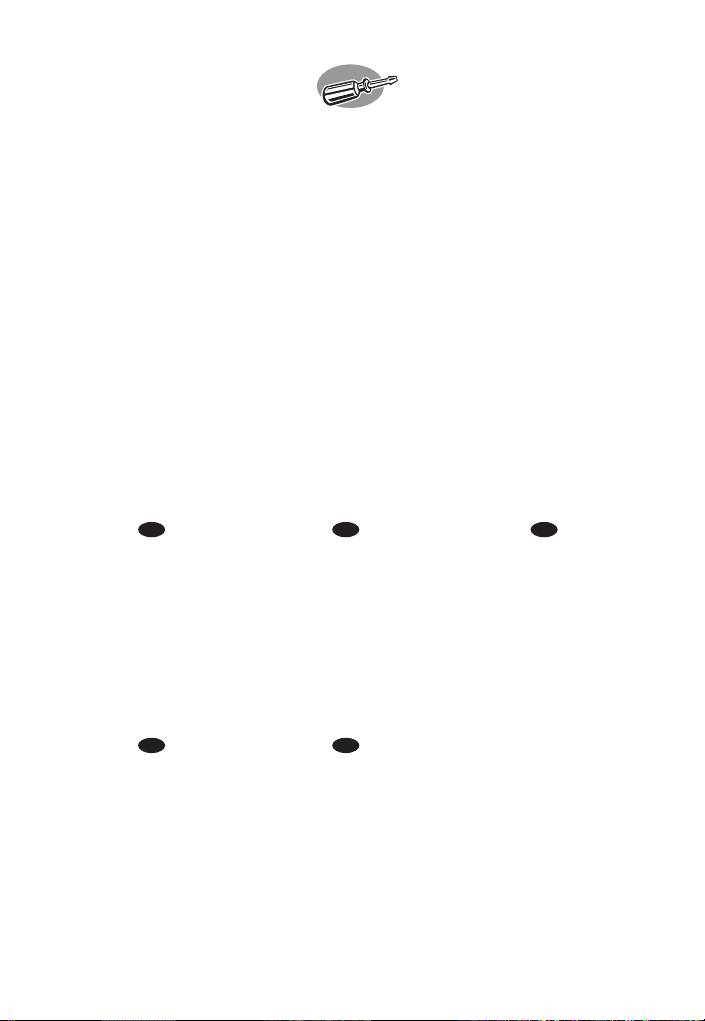
Disconnect the power cable from the PC.
4
DE
Ziehen Sie das Netzkabel vom Computer ab.
FR
Débranchez le câble d’alimentation de l’ordinateur.
IT
Disconnettere il cavo di alimentazione dal PC.
NL
Trek de netstekker uit de PC.
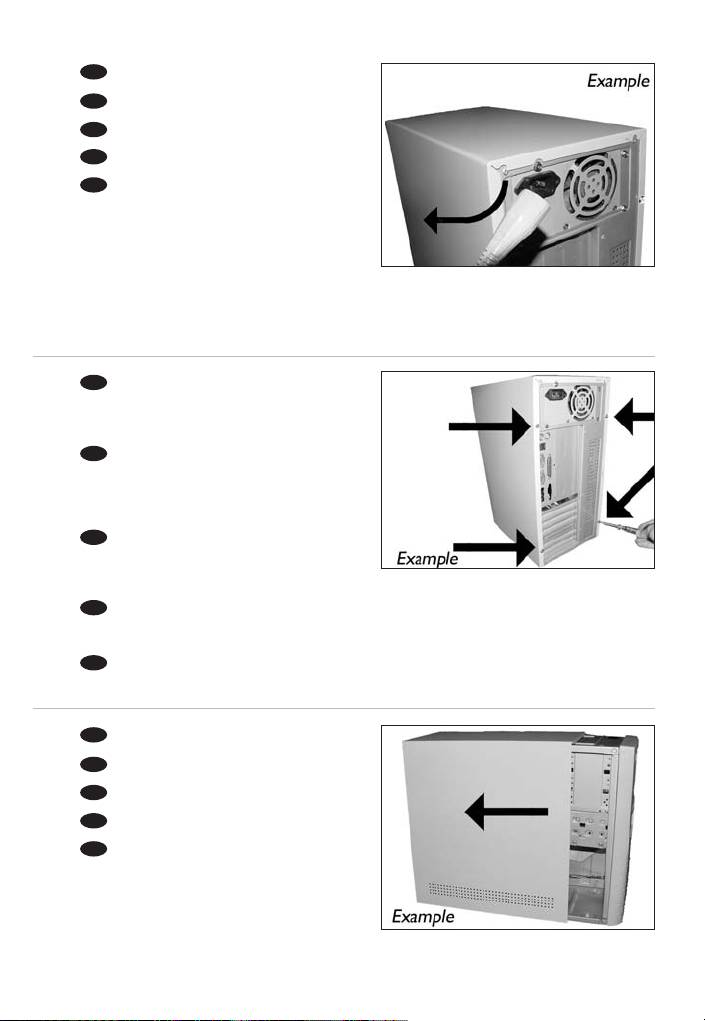
EN
Open your computer. You may have to unleash
5
screws which are mostly located at the back of your
computer.
➤ See your computer manual for more details.
DE
Öffnen Sie Ihren Computer. Eventuell müssen Sie
hierzu Schrauben herausdrehen, die sich meistens an der
Rückseite Ihres Computers befinden.
➤ Weitere Informationen hierzu finden Sie in Ihrem
Computerhandbuch.
FR
Ouvrez l’ordinateur. Pour cela, il peut être nécessaire
de desserrer une ou plusieurs vis à l’arrière de l’ordinateur.
➤ Pour plus de détail, reportez-vous au mode d’emploi de
l’ordinateur.
IT
Aprire il computer. È possibile che si dovranno svitare delle viti che in genere si trovano sul pannello posteriore del
computer.
➤ Per ulteriori informazioni fare riferimento al manuale del computer.
NL
Maak uw computer open. Meestal moet u de schroeven aan de achterkant van uw computer losschroeven.
➤ Raadpleeg de handleiding van uw PC voor details over het openen van de PC.
EN
Take off the cover of the computer.
6
DE
Nehmen Sie die Abdeckung des Computers ab.
FR
Retirez le capot de l’ordinateur.
IT
Togliere il coperchio del computer.
NL
Verwijder de kast van de computer.
7
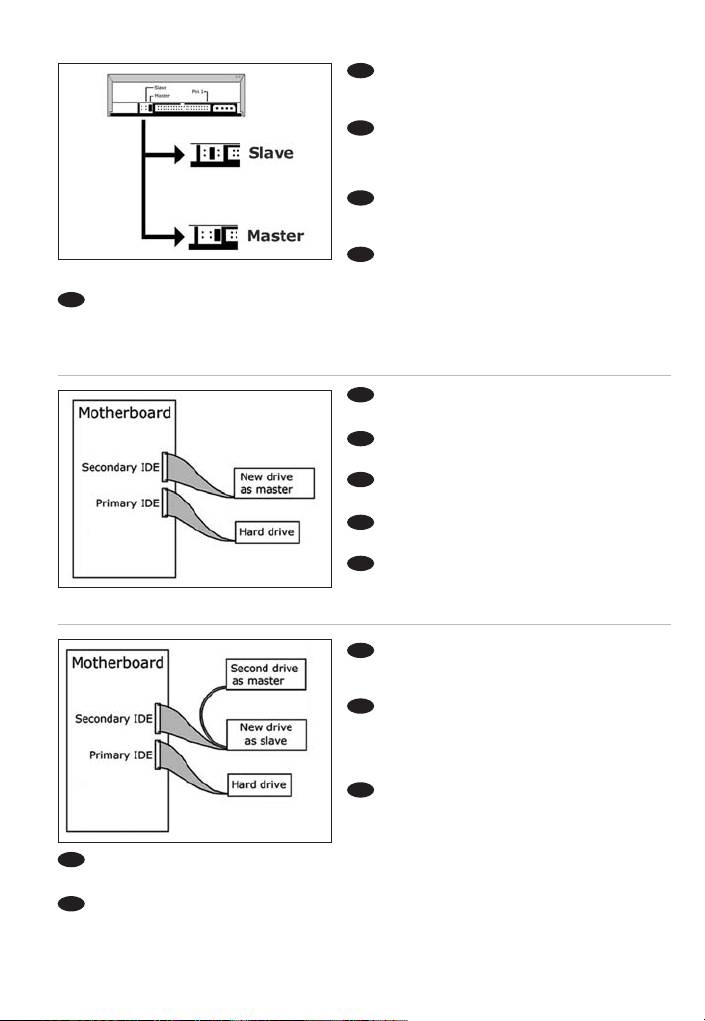
EN
If you replace a drive, take it out and check
7
which setting it has ("Master" or "Slave").
Remember this setting and go to step 10.
DE
Wenn Sie ein Laufwerk ersetzen, bauen Sie
es aus und überprüfen Sie seine Einstellung
("Master" oder "Slave"). Merken Sie sich diese
Einstellung und gehen Sie zu Schritt 10.
FR
Si vous remplacez un lecteur, sortez-le et
vérifiez ses réglages ("Maître" ("Master") ou "Esclave"
("Slave")). Notez ces réglages et passez à l'étape 10.
IT
In caso di sostituzione di un'unità, estrarla e
verificarne le impostazioni ("Master" o "Slave").
Annotare l'impostazione e andare al punto 10.
NL
Als u een station gaat vervangen moet u hem verwijderen en kijken welke instelling het had ("Master"
of "Slave"). Onthoud deze instelling en ga naar stap 10.
EN
If you have no drive installed, remember
"Master" and go to step 10.
8
DE
Wenn noch kein Laufwerk installiert ist,
merken Sie sich "Master" und gehen Sie zu Schritt 10.
FR
Si aucun lecteur n'est encore installé, notez
"Maître" ("Master") et passez à l'étape 10.
IT
Se non è installata alcuna unità, annotare
l'impostazione "Master" e andare al punto 10.
NL
Als er geen station geïnstalleerd is, moet u
"Master" onthouden en naar stap 10 gaan.
EN
If you add a drive, check the drive has which
9
remains in the PC ("Master" or "Slave", see step 11),
remember the OTHER setting.
DE
Wenn Sie ein Laufwerk hinzufügen,
überprüfen Sie die Einstellung des bereits
vorhandenen Laufwerks im PC ("Master" oder
"Slave", siehe auch Schritt 11) und merken Sie sich
die ANDERE Einstellung.
FR
Si vous ajoutez un lecteur, vérifiez les
réglages du lecteur qui se trouve dans l'ordinateur
("Maître" ("Master") ou "Esclave" ("Slave"), voir
l'étape 11) et notez l'AUTRE réglage.
IT
In caso di integrazione di un'unità, controllare l'impostazione dell'unità che resta nel PC ("Master"
o "Slave", vedere il punto 11) e annotare l'ALTRA impostazione.
NL
Als u een station toevoegt, moet u het station controleren dat in de PC blijft ("Master" of "Slave",
zie stap 11), onthoud de ANDERE instelling.
8
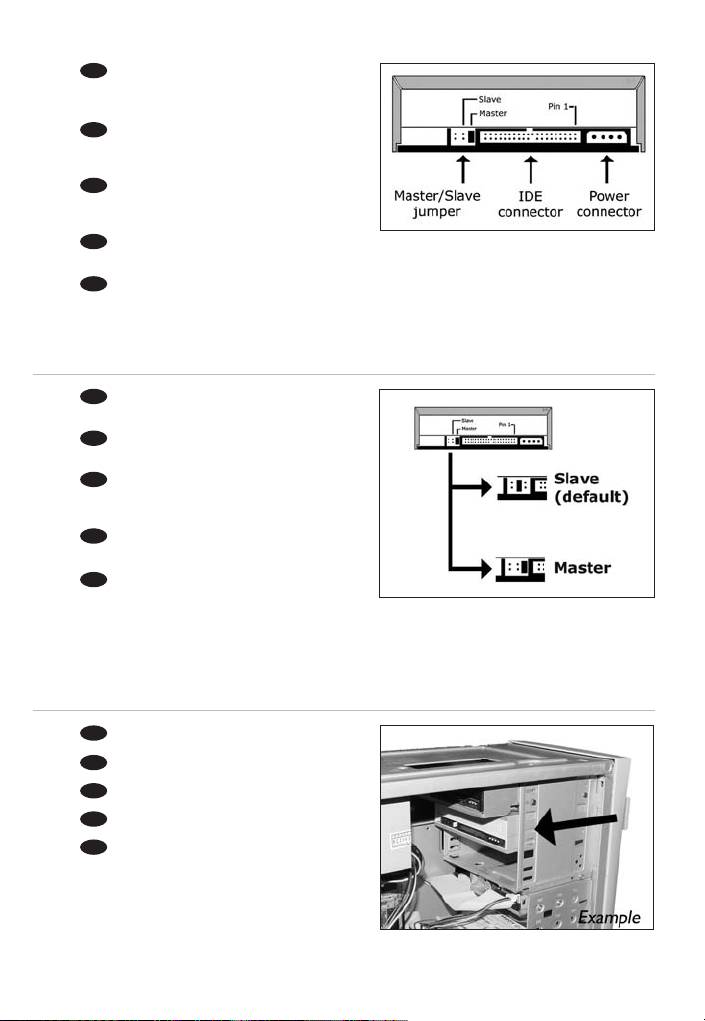
EN
These are the connections (on the back of
10
your drive) you will have to use for connecting the
drive to the computer.
DE
Das sind die Anschlüsse (an der Rückseite
Ihres Laufwerks), die Sie für den Anschluss Ihres
Laufwerks an den Computer verwenden müssen.
FR
Ce sont les connecteurs (à l’arrière de votre
appareil) que vous devrez utiliser pour raccorder
l’unité à l’ordinateur.
IT
Queste sono le connessioni (sul retro dell'unità) che dovranno essere utilizzate per collegare l'unità
al computer.
NL
Dit zijn de aansluitingen (op de achterkant van het station) die u gebruikt om het station op de
computer aan te sluiten.
EN
Choose "Master" or "Slave" for the jumper,
11
as seen in steps 7, 8 or 9.
DE
Wählen Sie "Master" oder "Slave" für den
Jumper, wie in den Schritten 7, 8 oder 9 gezeigt.
FR
Choisissez le réglage "Maître" ("Master") ou
"Esclave" ("Slave") avec le cavalier, selon ce qui a été
défini aux étapes 7, 8 ou 9.
IT
Scegliere "Master" o "Slave" per il ponticello,
come indicato nei punti 7, 8 o 9.
NL
Kies "Master" of "Slave" voor de jumper, zoals te
zien in stap 7, 8 of 9.
EN
Put the drive into your computer.
12
DE
Schieben Sie das Laufwerk in Ihren Computer.
FR
Montez l’appareil dans l’ordinateur.
IT
Mettere l'unità nel computer.
NL
Schuif het station in uw computer.
9
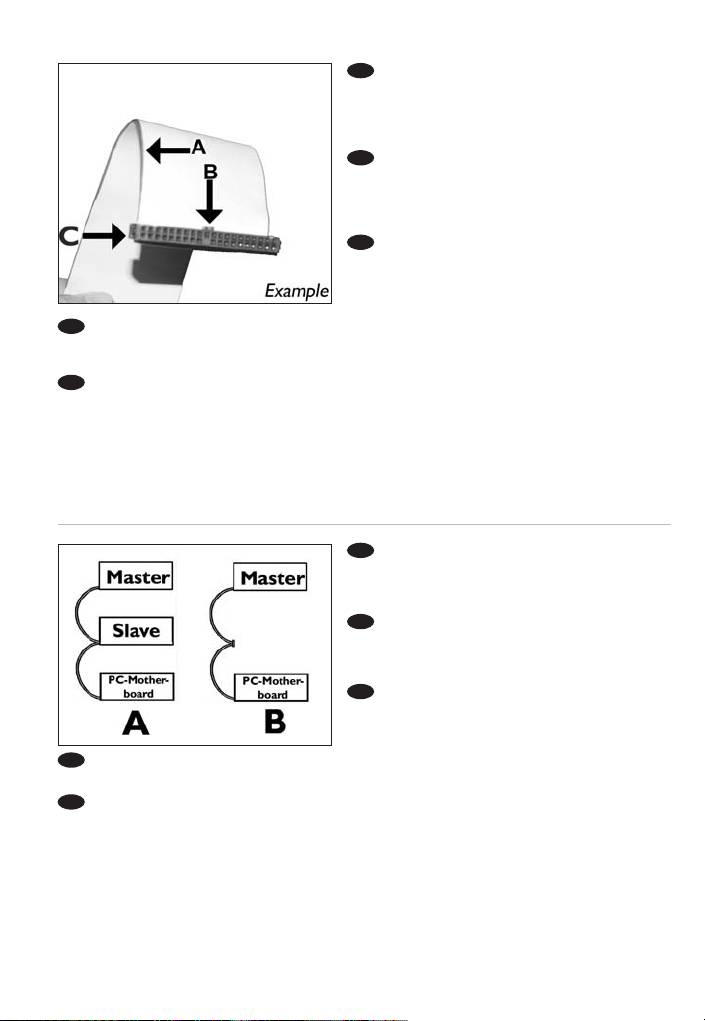
EN
Find the IDE-cable which may look like this
13
example:
A: Coloured line.
B: Notch and closed hole.
C: Pin1.
DE
Suchen Sie das IDE-Kabel, das
möglicherweise wie in diesem Beispiel aussieht:
A: Farbige Leitung.
B: Kerbe und geschlossenes Loch.
C: Pin1.
FR
Identifiez le câble IDE. Celui-ci doit
ressembler à celui présenté dans l’illustration :
A : Ligne de couleur
B : Encoche et trou bouché
C : Broche 1
IT
Individuare il cavo IDE, che potrebbe mostrare A: Linea colorata.
questi segni distintivi: B: Tacca e foro chiuso.
C: Piedino 1.
NL
Zoek de IDE-kabel die lijkt op dit voorbeeld: A: Gekleurde lijn.
B: Nokje plus ontbrekend gat.
C: Pin 1.
EN
Connect the IDE cable like in A (2 devices)
or B (only 1 device).
14
Do not choose 2 "Master" or 2 "Slave" devices on
1 cable.
DE
Schließen Sie das IDE-Kabel wie in A
(2 Geräte) oder B (nur 1 Gerät) an.
Wählen Sie keine 2 "Master"- oder 2 "Slave"-Geräte
an einem Kabel.
FR
Raccordez le câble IDE comme dans A
(deux lecteurs) ou dans B (un seul lecteur).
Faites en sorte qu'il n'y ait pas 2 "Maîtres" ("Master")
ou 2 "Esclaves" ("Slave") sur 1 câble.
IT
Collegare il cavo IDE come per A (2 dispositivi) o B (solo 1 dispositivo). Non scegliere 2 dispositivi
"Master" o "Slave" per lo stesso cavo.
NL
Sluit de IDE-kabel aan zoals bij A (2 apparaten) of B (slechts 1 apparaat). Kies geen 2 "Master"- of
2 "Slave"-apparaten op 1 kabel.
10
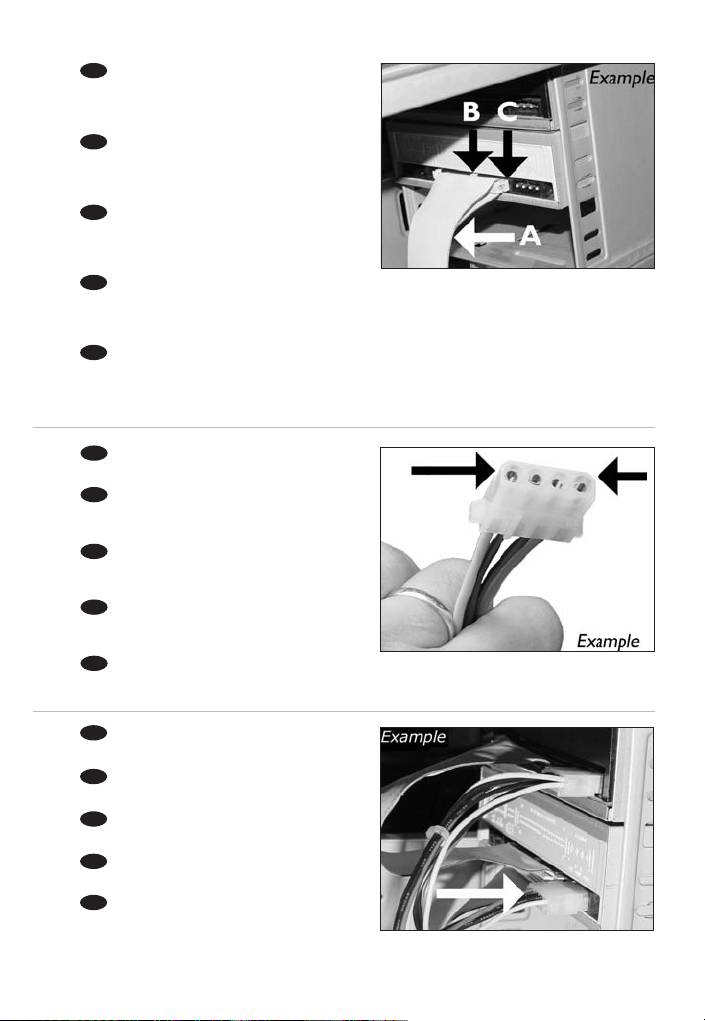
EN
Connect the IDE cable
15
A: Coloured line.
B: Notch and closed hole.
C: Pin1.
DE
Schließen Sie das IDE-Kabel an.
A: Farbige Leitung.
B: Kerbe und geschlossenes Loch.
C: Pin1.
FR
Raccordez le câble IDE
A : Ligne de couleur
B : Encoche et trou bouché
C : Broche 1
IT
Collegare il cavo IDE
A: Linea colorata.
B: Tacca e foro chiuso.
C: Piedino 1.
NL
De IDE-kabel aansluiten
A: Gekleurde lijn.
B: Nokje plus ontbrekend gat.
C: Pin 1.
EN
Find a free power cable like this example.
16
Please note the edges of the connector.
DE
Suchen Sie ein freies Stromversorgungskabel,
das häufig wie in diesem Beispiel gezeigt aussieht.
Die Kanten des Anschlusses sind abgerundet.
FR
Recherchez un câble d’alimentation disponible,
comme dans cet exemple.
Notez la position des bords du connecteur.
IT
Individuare un cavo di alimentazione
disponibile, come quello nell'esempio.
Notare i bordi del connettori.
NL
Zoek een vrije stroomkabel, zoals die in de afbeelding.
Let op de afgeschuinde hoekjes van de stekker.
EN
Connect the power cable into your drive
17
(the edges from step 16 will be on top).
DE
Schließen Sie das Netzkabel am Laufwerk an
(die Kanten von Schritt 16 sind oben).
FR
Raccordez le câble d'alimentation au lecteur
(les bords à partir de l'étape 16 sont au-dessus).
IT
Collegare il cavo di alimentazione all'unità
(i bordi indicati nel punto 16 saranno in alto).
NL
Sluit het stroomsnoer aan op uw station
(de randen van stap 16 bevinden zich aan de
bovenkant).
11
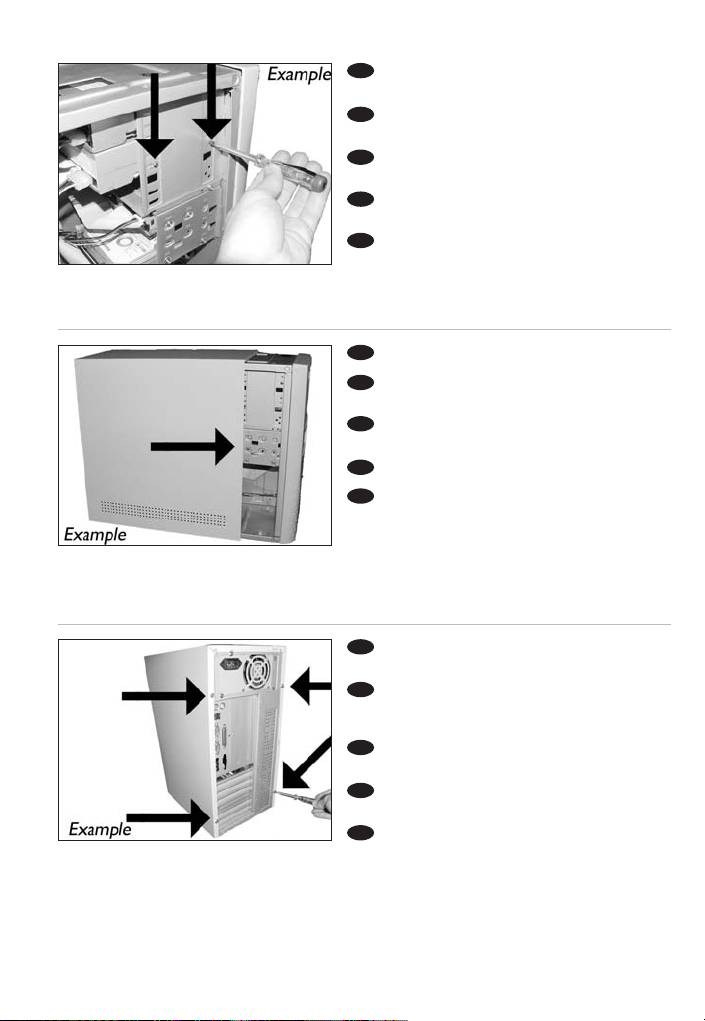
EN
Secure the drive with the screws
18
(if possible on both sides).
DE
Befestigen Sie das Laufwerk mit den
Schrauben (wenn möglich an beiden Seiten).
FR
Fixez l’appareil à l’aide des vis
(si possible des deux côtés).
IT
Fissare l'unità con le viti
(se possibile su entrambi i lati).
NL
Schroef het station vast
(zo mogelijk aan beide zijden).
EN
Put the cover you took off in step 5 back on.
19
DE
Setzen Sie die in Schritt 5 abgenommene
Abdeckung wieder auf.
FR
Replacez le capot que vous avez retiré à
l’étape 5.
IT
Rimettere il coperchio tolto al punto 5.
NL
Plaats de in stap 5 verwijderde kast weer terug.
EN
Put the screws (if there were any) back in
20
and reconnect the cables.
DE
Schrauben Sie die Schrauben (sofern welche
vorhanden waren) wieder ein und schließen Sie die
Kabel wieder an.
FR
Resserrez la ou les vis, le cas échéant, et
rebranchez les câbles.
IT
Riavvitare le viti (se presenti) e ricollegare i
cavi.
NL
Plaats de schroeven terug (als die er waren)
en sluit de kabels weer aan.
12
EN
Restart your computer.
21
DE
Starten Sie Ihren Computer neu.
FR
Allumez l’ordinateur.
IT
Riavviare il computer.
NL
Start uw computer opnieuw op.
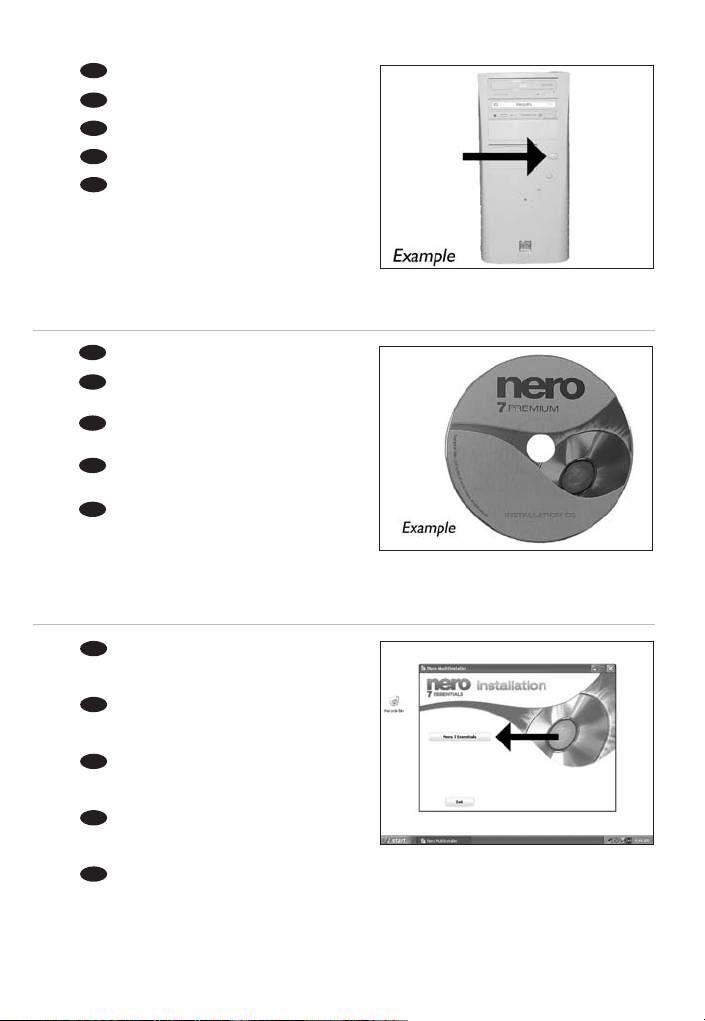
EN
Insert the Nero disc when Windows is loaded.
22
DE
Legen Sie die Nero CD ein, wenn Windows
geladen ist.
FR
Insérez le disque Nero une fois que Windows a
démarré.
IT
Inserire il disco Nero dopo il caricamento di
Windows.
NL
Plaats de Nero-disc nadat Windows is gestart.
EN
Choose "Nero 7 Essentials" and follow the
23
instructions on the screen. When finished, continue
with the next chapter.
DE
Wählen Sie "Nero 7 Essentials" und befolgen
Sie die Anweisungen auf dem Bildschirm. Wenn Sie
fertig sind, fahren Sie mit dem nächstem Kapitel fort.
FR
Choisissez "Nero 7 Essentials" et suivez les
instructions à l'écran. Lorque vous avez terminé,
passez au chapitre suivant.
IT
Selezionare "Nero 7 Essentials" e seguire le
istruzioni a schermo. Quando si è terminato,
continuare con il capitolo successivo.
NL
Kies "Nero 7 Essentials" en volg de aanwijzingen op het scherm. Ga, als u klaar bent,
verder met het volgende hoofdstuk.
13

14
