Philips Upgrade-Kit für 3D Fernseher: инструкция
Раздел: Аудиотехника и DJ оборудование
Тип:
Инструкция к Philips Upgrade-Kit für 3D Fernseher
Register your product and get support at …
EN 3D Upgrade kit 3
DE 3D Upgrade kit 5
www.philips.com/welcome
FR Kit de mise à niveau 3D 7
NL 3D-upgradeset 9
ES Kit de actualización de 3D 11
IT Kit di aggiornamento 3D 13
PT Kit de actualização 3D 15
GR Κιτ αναβάθμισης 3D 17
SE 3D-uppgraderingssats 19
NO 3D-oppgraderingssett 21
DK 3D-opgraderingssæt 23
FI 3D-päivityspaketti 25
RU Комплект обновления 3D 27
PL Zestaw rozszerzający 3D 29
HU 3D frissítőkészlet 31
CZ Rozšiřující sada pro 3D 33
SK 3D nadstavbová súprava 35
SL Komplet za nadgradnjo na 3D 37
TR 3D Yükseltme seti 39
SR Komplet za nadogradnju na 3D 41
RO Kit de actualizare 3D 43
UK Пакет оновлення 3D 45
BG Комплект за 3D 47
HR Komplet za nadogradnju na 3D 49
ET 3D-uuenduskomplekt 51
LV 3D jaunināšanas komplekts 53
LT 3D atnaujinimo rinkinys 55
KK 3D жетілдіру жинағы 57
PT-BZ Kit de atualização 3D 59
ES-LT Kit de actualización para
contenido 3D 61
ZH 3D 升级套装 63
TH
3D 65
PTA02
292892_Brochure_3D.indd 1 31-05-2010 18:56:27
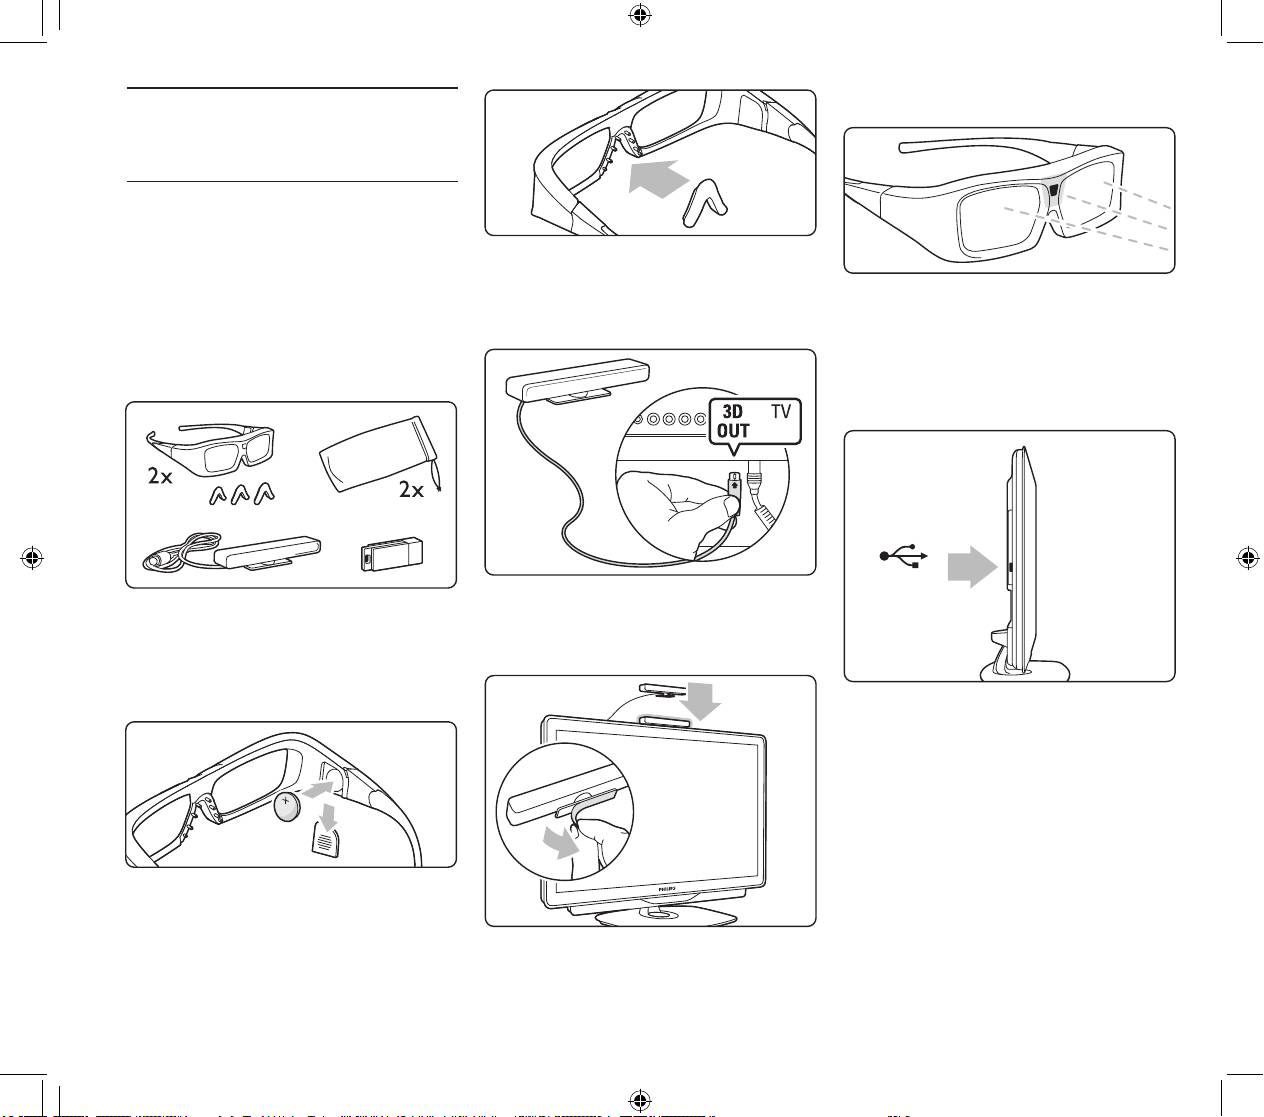
The small window in the middle of the glasses
receives the 3D signals from the transmitter.
Welcome to the exciting world of 3D TV at
home!
Installation
What’s in the box
Installation
- 2x Active 3D glasses
1 Switch off the TV.
- 2x microber pouch
2 Connect the 3D transmitter to the 3D con-
Update the TV software
- a range of 3 nose bridge pieces for each pair
nection 3D Out on the back of the TV.
To prepare your TV for 3D watching, you must
of glasses
update the TV software.
- 3D transmitter
1 Switch on the TV.
- USB device with a TV software update
2 Plug in the USB device in the USB connection
at the side of the TV.
3 Install the 3D transmitter on the top or at
Prepare the 3D glasses
the bottom of the TV. Make sure to point the
1 Pull and remove the plastic strip to activate
transmitter directly to where you sit to watch TV.
the battery inside. Or alternatively open the small
battery cover of the 3D glasses and insert the
battery - type CR2032.
3 The software update will start automatically
and during the update the TV might switch off
and on again. Do not press any key on the
remote control and wait until the message
‘Operation Successful’ appears.
4 Unplug the USB device and switch the TV off
and back on again.
Your TV is ready to watch 3D.
2 Mount the nose bridge on the glasses that ts
you best.
2
USB
PTA02
292892_Brochure_3D.indd 2 31-05-2010 18:56:28
English
Watch 3D
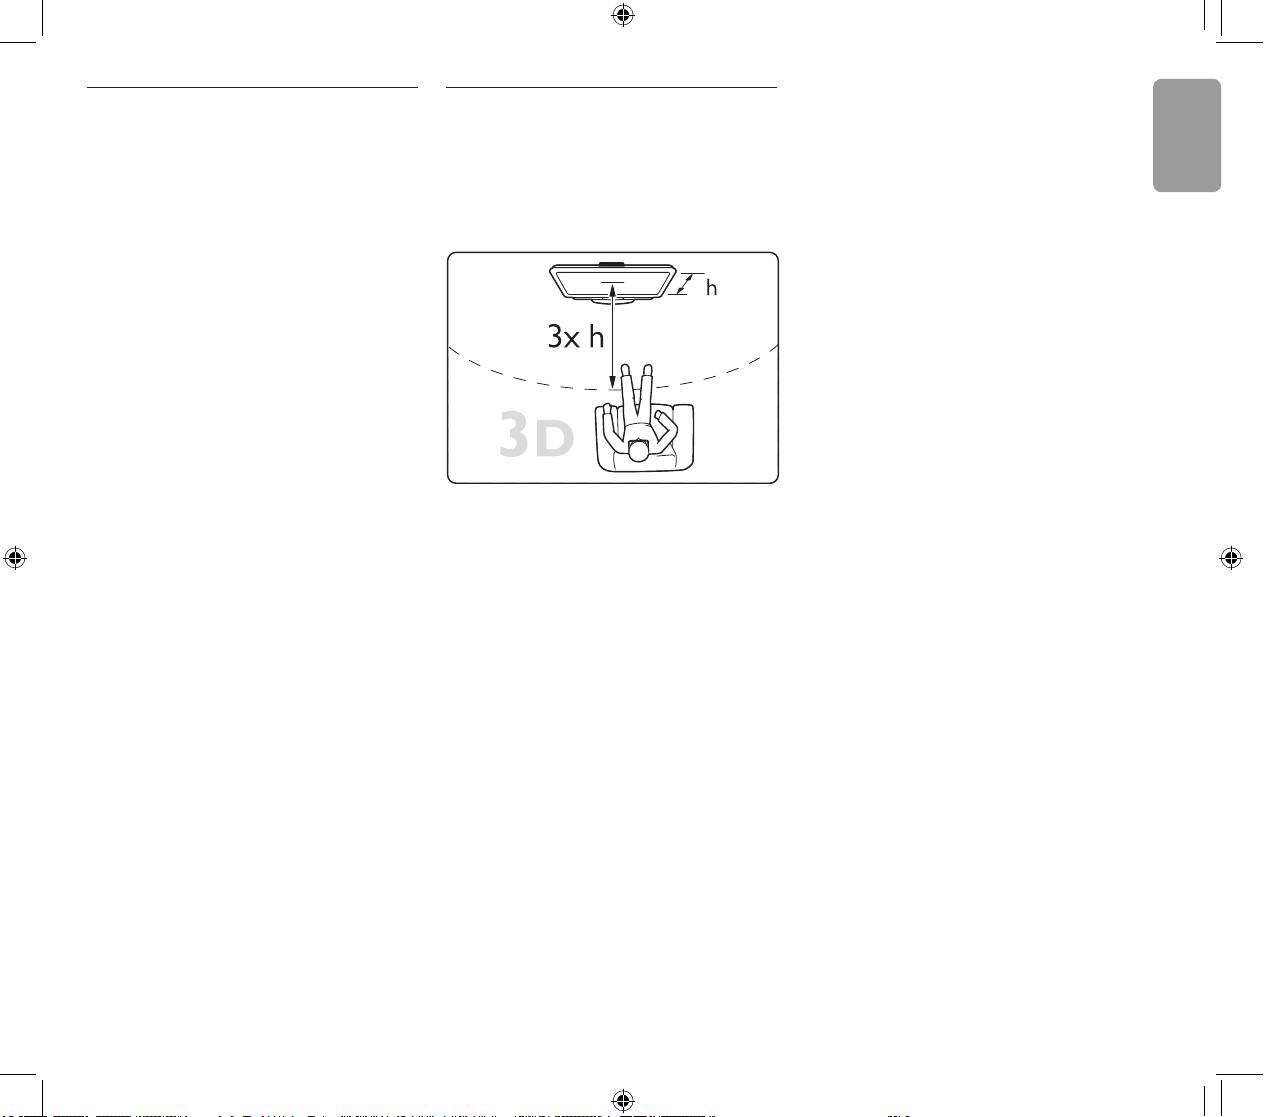
Optimal 3D viewing
Select a 3D disc or program
For an optimal 3D viewing experience, we
• Parents should monitor their children during
To enjoy a 3D movie or program, insert a 3D
recommend that you:
3D viewing and ensure they do not experience
movie in a 3D Blu-ray Disc player or tune to a TV
• sit at least 3 times the height of the TV screen
any discomfort as mentioned above. Watching
channel that broadcasts programs in 3D.
away from the TV, but no further than 6 me-
3D is not recommended for children under 6
Press h (Home) and select the 3D Blu-ray
ters away.
years of age as their visual system is not fully
Disc player or select Watch TV and tune to the
developed yet.
TV channel.
• Do not use the 3D glasses for any purpose
other than watching 3D TV.
Start 3D
• CHOKING HAZARD - Do not let children
The TV will inform you when 3D is available. If
under 3 years of age play with the 3D glasses,
you select Start 3D to watch 3D, put on the 3D
they could choke on the battery lid or battery.
glasses. The glasses need some seconds to adjust
to the 3D signal from the 3D transmitter.
Care for the glasses
• Do not expose the 3D glasses to direct
If a 3D broadcast is shown as a double image
sunlight, heat, re or water. This may result in a
on your screen, select the type of double image
product malfunction or re.
to correct the 3D picture. Press s (Adjust),
• Do not drop, bend or apply force to the lenses
select 3D format and select Side by side or Top/
of the 3D glasses.
bottom according to the double image positions.
• avoid uorescent lighting (such as TL lighting or
• Use a clean soft cloth (microber or cotton
certain energy saving light bulbs which operate
annel) to clean the lenses to avoid scratching
Stop 3D
on a low frequency) and direct sunlight as they
them. Never spray cleaner directly on the 3D
If you want to stop watching 3D, press
may interfere with the 3D experience.
glasses. This may damage the electronics.
s (Adjust) and select 2D in the 2D-3D menu.
• Do not use cleaning chemicals containing alco-
This menu item is only shown when 3D signals
Health warning
hol, solvent, surfactant, or wax, benzene, thinner,
are available.
• If you or your family has a history of epilepsy
mosquito repellant or lubricant. Using these
or photosensitive seizures, consult a medical
chemicals can cause discoloration or cracks.
If there is no 3D signal from the transmitter,
professional before exposing yourself to ash-
the 3D glasses switch off automatically after 5
ing light sources, rapid image sequences or 3D
Specications
seconds.
viewing
3D system : Active 3D glasses
• To avoid discomfort such as dizziness, head-
Battery type : CR2032
Low battery
ache or disorientation, we recommend not
Transmission system : IR (Infra Red)
When the lenses icker for 2 seconds at the 3D
watching 3D for extended periods of time. If
Max. Signal Distance : 6m
start-up, the battery of these glasses is nearly
you experience any discomfort, stop watching
Operation temperature : 5° to 40°C
empty. Replace them before watching the next
3D and do not immediately engage in any po-
movie or program.
tentially hazardous activity (for example driving
Additional Active 3D glasses (Philips PTA03) sold
a car) until your symptoms have disappeared. If
separately.
symptoms persist, do not resume watching 3D
without consulting a medical professional rst.
3
292892_Brochure_3D.indd 3 31-05-2010 18:56:28
