Philips SCF215: инструкция
Раздел: Бытовая, кухонная техника, электроника и оборудование
Тип: Водонагреватель
Инструкция к Водонагревателю Philips SCF215
SCF215

2
3

4

ENGLISH 6
POLSKI 12
ROMÂNĂ 18
РУССКИЙ 24
ČEŠTINA 31
MAGYAR 37
SLOVENSKY 43
УКРАЇНСЬКА 49
HRVATSKI 56
EESTI 62
LATVIEŠU 68
LIETUVIŠKAI 74
SLOVENŠČINA 80
БЪЛГАРСКИ 86
SRPSKI 93
99
SCF215

ENGLISH6
Introduction
Congratulations on your purchase of the Philips Baby Bottle Warmer.
The Philips Baby Bottle Warmer is designed to heat food quickly and to
keep it warm. It is fitted with a new temperature control system (PTC)
that meets the highest safety requirements.The click-step control knob
allows you to always set the correct food temperature.Thanks to its
unique design the Philips Baby Bottle Warmer fits all bottles and jars of
baby food.The Philips Baby Bottle Warmer is a high-performance
product that warms both bottles and jars of baby food, and belongs to
a complete range of Philips Baby-Care products.
Philips Baby-Care,Taking Care Together!
These instructions for use are applicable for two Philips Baby Bottle
Warmer models:
Model SCF205; For use at home.
Model SCF215; For use at home and in the car (with extra car adapter).
Note: Please read these instructions carefully and retain for future
reference.
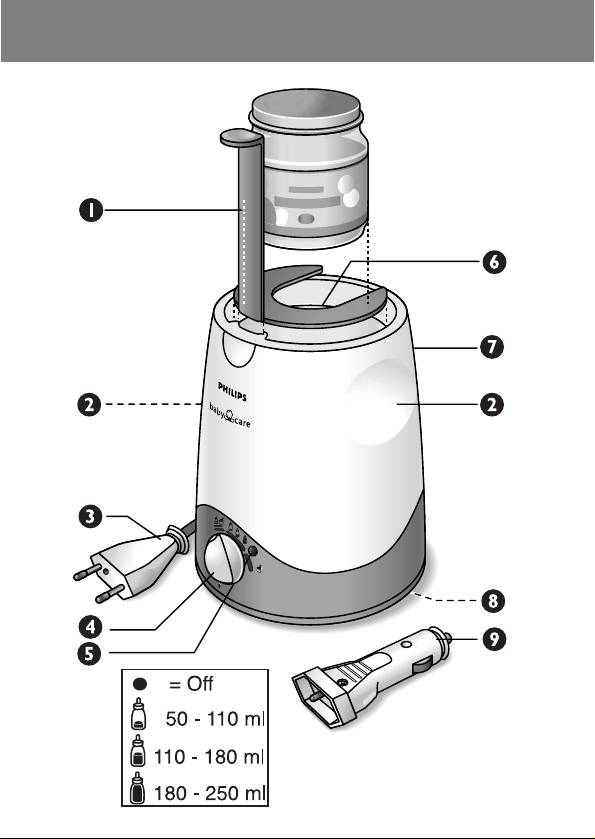
General description
1 Bottle and jar lifter
2 Hand grips
3 Mains plug
4 Click-step control knob
5 Indicator lamp
6 Rim
7 Container
8 Cable reservoir
9 j43333Car adapter
Installation
For use at home
Before connecting the Baby Bottle Warmer to the mains, check to
ensure that the mains outlet is 230V AC.

ENGLISH 7
1 Place the Baby Bottle Warmer out of the reach of children and
on a dry, non-slip, horizontal surface.
2 Turn the click-step control knob 4 to the "." position.
3 Unreel the required cable length from the cable reservoir 8 and
plug into the mains outlet.
For use in the car
1 Place the Baby Bottle Warmer out of the reach of children and
on a dry, non-slip horizontal surface.
2 Turn the click-step control knob 4 to the "." position.
3 Connect the car adapter 9 to the mains plug 3.
4 Unreel the required length of cable from the cable reservoir 8
and connect the car adapter to the cigarette lighter socket of the
car. (12V DC).
Notes:
- Never use the Baby Bottle Warmer when the car is in motion.
- Never use the Baby Bottle Warmer without water in it.
- Only use the Baby Bottle Warmer when the ambient temperature
is between +7cC and +37cC.
Caution: Change the water in the bottle warmer often for hygienic
reasons.
Operation
Warming of baby bottles
1 Turn the click-step control knob 4 to the "." position.
2 Place the bottle in the container 7 and fill the space between
the bottle and the inner container with water up to two
centimeters from the rim 6. For smaller bottles fill up to just
above the milk line in the bottle.

ENGLISH8
3 Set the required temperature using the click-step control knob.
The indicator lamp lights to indicate the heating operation.
After approximately 8 minutes the milk will have reached just the right
temperature for your baby.The indicator lamp goes out.The indicator
lamp then switches on and off intermittently to indicate the thermostat
is controlling the temperature of the water.
4 Remove the bottle from the container and turn the control knob
to the "." position.
5 Shake the bottle a little to distribute the heat evenly before you
allow your baby to drink.
Notes:
- Always check that the contents of the bottle are at the correct
temperature by pouring a few drops on the back of your hand.
- The heating of baby food depends not only on the temperature
setting but also on the initial temperature of the food and water,
the wall thickness of the glass and the amount and consistency of
the food.The symbol "BOTTLE" is an indication for rapid warming
up. After a short while you will find the best setting to obtain the
ideal temperature for your baby's food. Our information is based
on warming 200ml milk from 20cC up to 37cC.
Warming of baby food jars
1 Remove the label and lid from the jar.
2 Turn the click-step control knob 4 to the "." position.
3 Place the jar in the container 7 using the lifter and fill the space
between the jar and the inner container with water up to two
centimetres from the rim 6. For small jars fill-up to just below
the top of the jar.
4 Set the click-step control knob to the "jar" symbol.
The indicator lamp lights to indicate that the thermostat is working.
5 Use the lifter to stir the contents of the jar frequently for more
rapid distribution of heat.

ENGLISH 9
After approximately 12-15 minutes (depending on the consistency of
food) the food will have reached just the right temperature for your
baby.The indicator lamp goes out.
6 Remove the jar from the container and turn the control knob to
the "." position.
Note: Always check that the contents of the jar are at the correct
temperature, by testing some on the back of your hand.
Keeping warm
With the Baby Bottle Warmer you can also keep the bottles and jars
warm for a short time.To do this set the control knob to position
v.
The thermostat ensures that the set temperature is maintained. For
microbiological and hygienic reasons baby food should never be kept
warm for longer than one hour.
Operation in the car
Follow the same instructions as mentioned above.
Note: For quickly warming up baby food in bottles and jars, adjust the
click-step control knob to the "jar" symbol. Because the car battery is
now being used instead of the mains supply, the time required for
warming up may be slightly longer.
Warning: Prolonged use of the Baby Bottle Warmer (several hours) can
weaken your car battery.
Maintenance
Cleaning
Disconnect the Baby Bottle Warmer from the mains (or the cigarette
lighter socket) and allow it to cool down. Clean the container and the
outside of the Baby Bottle Warmer with a damp cloth.
Notes:
- Never immerse the Baby Bottle Warmer in water.

ENGLISH10
- Do not use cleaning or scouring agents.
The type plate is located at the bottom of the product.
Warning: If a fault occurs, consult your dealer or Philips' service centre.
Under no circumstances should you try to repair the unit yourself, as
this would invalidate the warranty.
Guarantee & service
If you need information or if you have a problem, please visit the Philips
website at www.philips.com or contact the Philips Customer Care
Centre in your country (you will find its phone number in the
worldwide guarantee leaflet). If there is no Customer Care Centre in
your country, turn to your local Philips dealer or contact the Service
Department of Philips Domestic Appliances and Personal Care BV.
Technical Specifications
Model SCF205
Model SCF215
Power supply (mains)
230V AC
230V AC
Power consumption (mains)
100 Watts
90 Watts
Power supply (car battery)
-
12V DC
Power consumption (car battery)
-
Power consumption
(car battery)
Operational ambient temperature
between +7cC
between +7cC and
and +37cC
+37cC

ENGLISH
11
Trouble shooting
Comments
Solutions
Overflow of water
You have put too much water into the
inner container
Temperature too low
Continue heating for a few seconds
after the indicator light has switched
off, or increase the adjustment setting
Temperature too high
Lower the adjustment setting
The jar has not heated correctly
Stir the contents from time to time
while heating. Check that the click-step
control knob is in the "jar" position
The indicator light switches on and off
This is normal; it may turn on or off
while keeping warm
while heating

POLSKI12
Wprowadzenie
Gratulujemy zakupu podgrzewacza do butelek firmy Philips.
Podgrzewacz ten służy do szybkiego podgrzewania jedzenia i
utrzymywania jego temperatury. Jest on wyposażony w nowy system
regulacji temperatury (PTC), który spełnia najsurowsze wymogi
bezpieczeństwa. Skokowe pokrętło regulacji temperatury umożliwia
ustawienie odpowiedniej temperatury pokarmu. Dzięki wyjątkowej
konstrukcji podgrzewacz pasuje do wszystkich butelek i słoików z
pokarmem dla dzieci. Podgrzewacz do butelek i słoików firmy Philips to
produkt o dużej wydajności należący do szerokiej gamy produktów dla
dzieci Philips Baby-Care.
Philips Baby-Care — zawsze pod czułą opieką!
Niniejsza instrukcja opisuje dwa modele podgrzewaczy do butelek firmy
Philips:
Model SCF205; do używania w domu.
Model SCF215; do używania w domu i w samochodzie (z dodatkowym
zasilaczem samochodowym).
Uwaga: Prosimy o dokładne zapoznanie się z instrukcją obsługi i
zachowanie jej na przyszłość.
Opis ogólny
1 Podnośnik na butelki i słoiki
2 Uchwyty
3 Wtyczka przewodu sieciowego
4 Skokowe pokrętło regulacji temperatury
5 Lampka sygnalizacyjna
6 Krawędź pojemnika
7 Pojemnik
8 Schowek na przewód sieciowy
9 Zasilacz samochodowy

POLSKI 13
Instalacja
Używanie w domu
Przed podłączeniem podgrzewacza do butelek upewnij się, czy napięcie
w sieci elektrycznej wynosi 230 V.
1 Ustaw podgrzewacz do butelek w miejscu niedostępnym dla
dzieci na suchej, nieśliskiej i poziomej powierzchni.
2 Ustaw pokrętło regulacji temperatury 4 w pozycji „.”.
3 Wysuń przewód ze schowka na przewód 8 na żądaną długość i
podłącz go do gniazdka elektrycznego.
Używanie w samochodzie
1 Ustaw podgrzewacz do butelek w miejscu niedostępnym dla
dzieci na suchej, nieśliskiej i poziomej powierzchni.
2 Ustaw pokrętło regulacji temperatury 4 w pozycji „.”.
3 Podłącz wtyczkę przewodu sieciowego 3 do zasilacza
samochodowego 9.
4 Wysuń przewód ze schowka na przewód 8 na żądaną długość i
podłącz zasilacz samochodowy do gniazda zapalniczki
samochodowej (12 V).
Uwagi:
- Nigdy nie używaj podgrzewacza do butelek podczas jazdy.
- Nigdy nie używaj podgrzewacza do butelek bez wody w środku.
- Korzystaj z podgrzewacza do butelek jedynie wtedy, gdy
temperatura otoczenia wynosi od +7cC do +37cC.
Uwaga: Dla zachowania właściwej higieny w podgrzewaczu należy
często zmieniać wodę.

POLSKI14
Obsługa
Podgrzewanie butelek
1 Ustaw pokrętło regulacji temperatury 4 w pozycji „.”.
2 Umieść butelkę w pojemniku 7 i nalej wody do poziomu dwóch
centymetrów poniżej krawędzi pojemnika (6).W przypadku
mniejszych butelek poziom wody powinien minimalnie
przekraczać poziom mleka w butelce.
3 Ustaw żądaną temperaturę za pomocą pokrętła regulacji
temperatury.
Zapalenie się lampki sygnalizującej oznacza włączenie podgrzewania.
Po około 8 minutach mleko osiągnie temperaturę odpowiednią dla
dziecka. Lampka sygnalizacyjna zgaśnie.Termostat będzie utrzymywał
stałą temperaturę wody, o czym będzie informowała zapalająca się i
gasnąca lampka sygnalizacyjna.
4 Wyjmij butelkę z pojemnika i ustaw pokrętło regulacji
temperatury w pozycji „.”.
5 Przed podaniem pokarmu dziecku lekko wstrząśnij butelką, aby
równomiernie rozprowadzić ciepło.
Uwagi:
- Zawsze sprawdzaj, czy zawartość butelki ma odpowiednią
temperaturę, wylewając kilka kropel na zewnętrzną część dłoni.
- Czas podgrzewania pokarmu dla dzieci zależy od ustawienia
temperatury, a także od początkowej temperatury pokarmu i wody,
grubości szkła oraz od ilości i konsystencji pożywienia. Symbol
„BUTELKI” jest wskaźnikiem szybkiego podgrzewania. Po krótkim
czasie korzystania z urządzenia znajdziesz optymalne ustawienie dla
uzyskania idealnej temperatury pokarmu dla dzieci. Niniejsze
informacje dotyczą podgrzewania 200 ml mleka z temperatury
20cC do 37cC.
