Philips 36PW8719: инструкция
Раздел: Бытовая, кухонная техника, электроника и оборудование
Тип: Телевизор
Инструкция к Телевизору Philips 36PW8719

tv

MODEL :
PROD. NO :
GB
Please note the reference numbers
ES
Anote las referencias de su televisor
for your TV set located on the
que se encuentran en el embalaje o
packaging or on the back of the set.
en la parte trasera del aparato.
FR Veuillez noter les références de
PT
Anote as referências do seu
votre téléviseur situées sur
televisor localizadas na embalagem
l’emballage ou au dos de l’appareil.
ou na parte de trás do aparelho.
NL Let op de referenties van uw
GR ™ËÌÂÈÒÛÙ ÙȘ Ô‰ËÁ›Â˜ ¯Ú‹Û˘
televisietoestel die op de
Ù˘ ÙËÏÂfiÚ·Û‹˜ Û·˜ Ô˘
verpakking of op de achterkant
‚Ú›ÛÎÔÓÙ·È ÛÙË Û˘Û΢·Û›· ‹
van het toestel staan.
ÛÙÔ ›Ûˆ ̤ÚÔ˜ Ù˘ Û˘Û΢‹˜
DE
TR Ambalaj›n üzerinde ya da aletin
Notieren Sie die
arkas›nda bulunan referanslar›
Referenznummern Ihres
baflka bir yere not edin.
Fernsehgeräts, die sich auf der
HU Kérjük vegye figyelembe az Ön
Verpackung bzw. auf der
televíziójának a hátoldalán és a
Rückseite des Geräts befinden.
csomagoláson feltüntetett
IT Notare i riferimenti del vostro
katalógusszámokat.
televisore situati sull’imballaggio o
RU
á‡Ô˯ËÚ ÌÓÏ ÏÓ‰ÂÎË
sul retro dell’apparecchio.
‚‡¯Â„Ó ÚÂ΂ËÁÓ‡, ÍÓÚÓ˚È
DK Bemærk de oplysninger om dit
Û͇Á‡Ì ̇ ÛÔ‡ÍÓ‚Ó˜ÌÓÈ
TV, der findes på kassen eller
ÍÓÓ·Í ËÎË Ì‡ Á‡‰ÌÂÈ
bagsiden af TV-apparatet.
ÒÚÓÓÌ ‡ÔÔ‡‡Ú‡.
NO Noter deg referansen for TV-
PL Prosimy o zanotowanie oznaczeń
apparatet, som du finner på
telewizora umieszczonych na
emballasjen eller på baksiden av
opakowaniu lub tylnej części
apparatet.
urządzenia.
SU Notera de uppgifter om er TV
CZ
Poznamenejte si typové údaje Vašeho
som återfinns på kartongen eller
televizoru umístěné na obalu nebo
baksidan av TV-apparaten.
na zadní straně přístroje.
SF Lue myös television
SK
Poznačte si typové údaje Vášho
myyntipakkauksessa tai television
televízora nachádzajúce sa na obale
takana olevat merkinnät.
alebo na zadnej strane prístroja.

Introduction
EnglishEspañolPortuguêsMagyarPyccÍËÈ
Thank you for purchasing this television set.
This handbook has been designed to help you install and operate your TV set.
We would strongly recommend that you read it thoroughly.
Ta b le of Contents
Installation
Installing your television set . . . . . . . . . . . . . . . . . . . . . . . . . . . . . . . . . . . . . . . . . .2
The keys on the TV set . . . . . . . . . . . . . . . . . . . . . . . . . . . . . . . . . . . . . . . . . . . . . .2
Remote control keys . . . . . . . . . . . . . . . . . . . . . . . . . . . . . . . . . . . . . . . . . . . . . . .3
Quick installation . . . . . . . . . . . . . . . . . . . . . . . . . . . . . . . . . . . . . . . . . . . . . . . . . .4
Program sort . . . . . . . . . . . . . . . . . . . . . . . . . . . . . . . . . . . . . . . . . . . . . . . . . . . . . .4
Program name . . . . . . . . . . . . . . . . . . . . . . . . . . . . . . . . . . . . . . . . . . . . . . . . . . . . .4
Manual store . . . . . . . . . . . . . . . . . . . . . . . . . . . . . . . . . . . . . . . . . . . . . . . . . . . . . .5
Favourite Programmes . . . . . . . . . . . . . . . . . . . . . . . . . . . . . . . . . . . . . . . . . . . . . .5
Other settings in the Install menu . . . . . . . . . . . . . . . . . . . . . . . . . . . . . . . . . . . . .5
Operation
Picture settings . . . . . . . . . . . . . . . . . . . . . . . . . . . . . . . . . . . . . . . . . . . . . . . . . . . .6
Sound adjustments . . . . . . . . . . . . . . . . . . . . . . . . . . . . . . . . . . . . . . . . . . . . . . . . .6
Feature settings . . . . . . . . . . . . . . . . . . . . . . . . . . . . . . . . . . . . . . . . . . . . . . . . . . . .6
Timer function . . . . . . . . . . . . . . . . . . . . . . . . . . . . . . . . . . . . . . . . . . . . . . . . . . . .7
TV lock . . . . . . . . . . . . . . . . . . . . . . . . . . . . . . . . . . . . . . . . . . . . . . . . . . . . . . . . . .7
Teletext . . . . . . . . . . . . . . . . . . . . . . . . . . . . . . . . . . . . . . . . . . . . . . . . . . . . . . . . . .8
16:9 Formats . . . . . . . . . . . . . . . . . . . . . . . . . . . . . . . . . . . . . . . . . . . . . . . . . . . . . .9
Using PIP . . . . . . . . . . . . . . . . . . . . . . . . . . . . . . . . . . . . . . . . . . . . . . . . . . . . . . . . .9
Polski
Peripherals
Video recorder . . . . . . . . . . . . . . . . . . . . . . . . . . . . . . . . . . . . . . . . . . . . . . . . . . .10
Other equipment . . . . . . . . . . . . . . . . . . . . . . . . . . . . . . . . . . . . . . . . . . . . . . . . .10
To select connected equipment . . . . . . . . . . . . . . . . . . . . . . . . . . . . . . . . . . . . .10
Sides connections . . . . . . . . . . . . . . . . . . . . . . . . . . . . . . . . . . . . . . . . . . . . . . . . .11
Video recorder or DVD keys . . . . . . . . . . . . . . . . . . . . . . . . . . . . . . . . . . . . . . . .11
Čeština
Practical information
Tips . . . . . . . . . . . . . . . . . . . . . . . . . . . . . . . . . . . . . . . . . . . . . . . . . . . . . . . . . . . .12
Glossary . . . . . . . . . . . . . . . . . . . . . . . . . . . . . . . . . . . . . . . . . . . . . . . . . . . . . . . .12
SlovenčinaTürkçe
Recycling
The materials used in your set are either reusable or can be recycled.
To minimise environmental waste, specialist companies collect used appliances
°
and dismantle them after retrieving any materials that can be used again (ask
your dealer for further details).
1
&
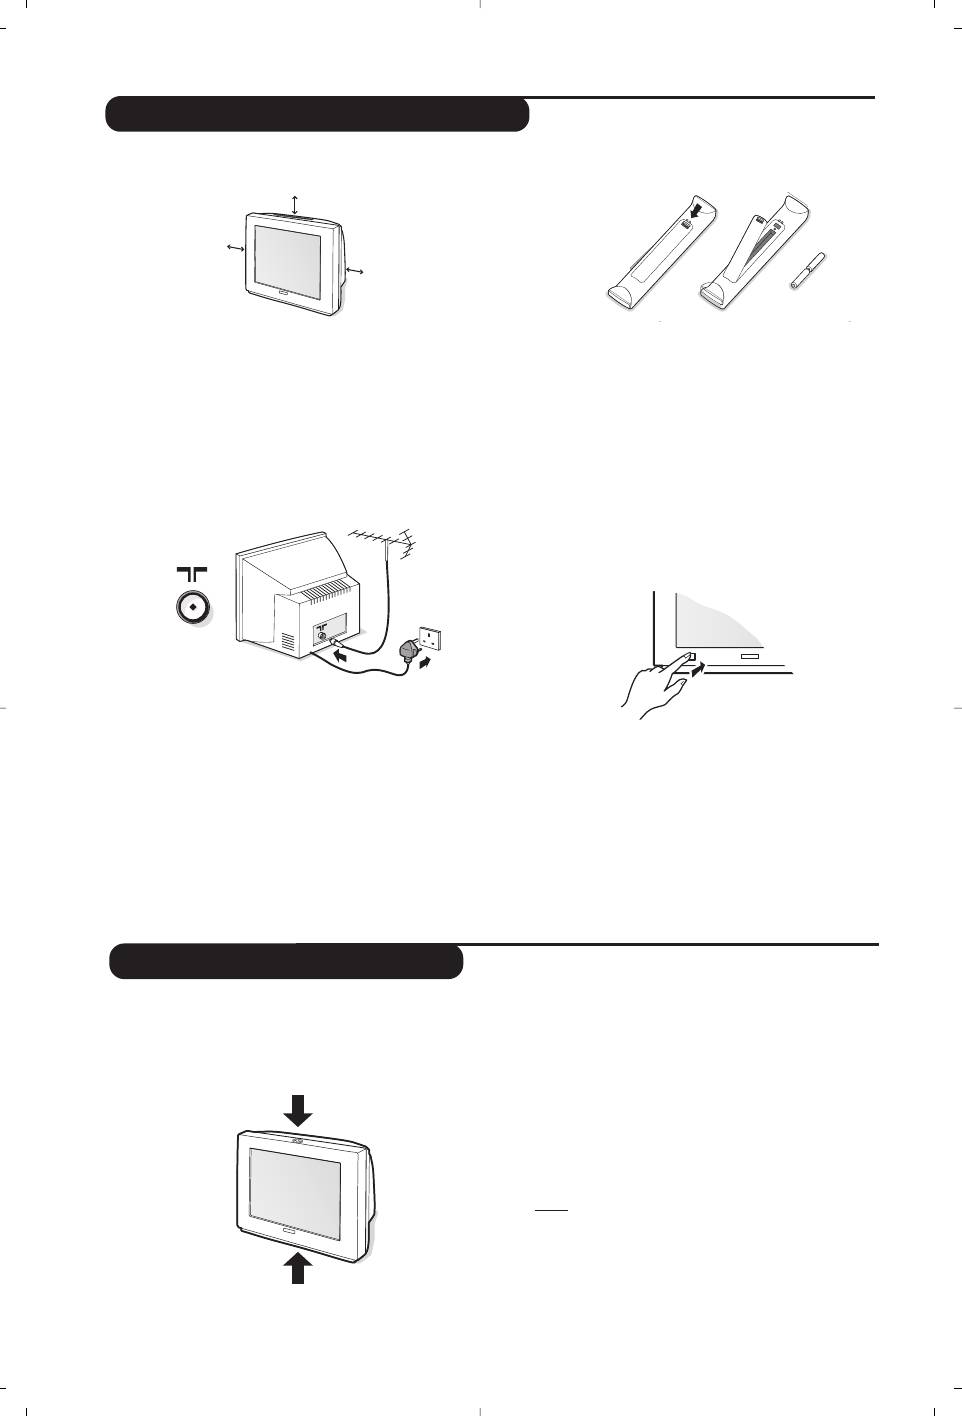
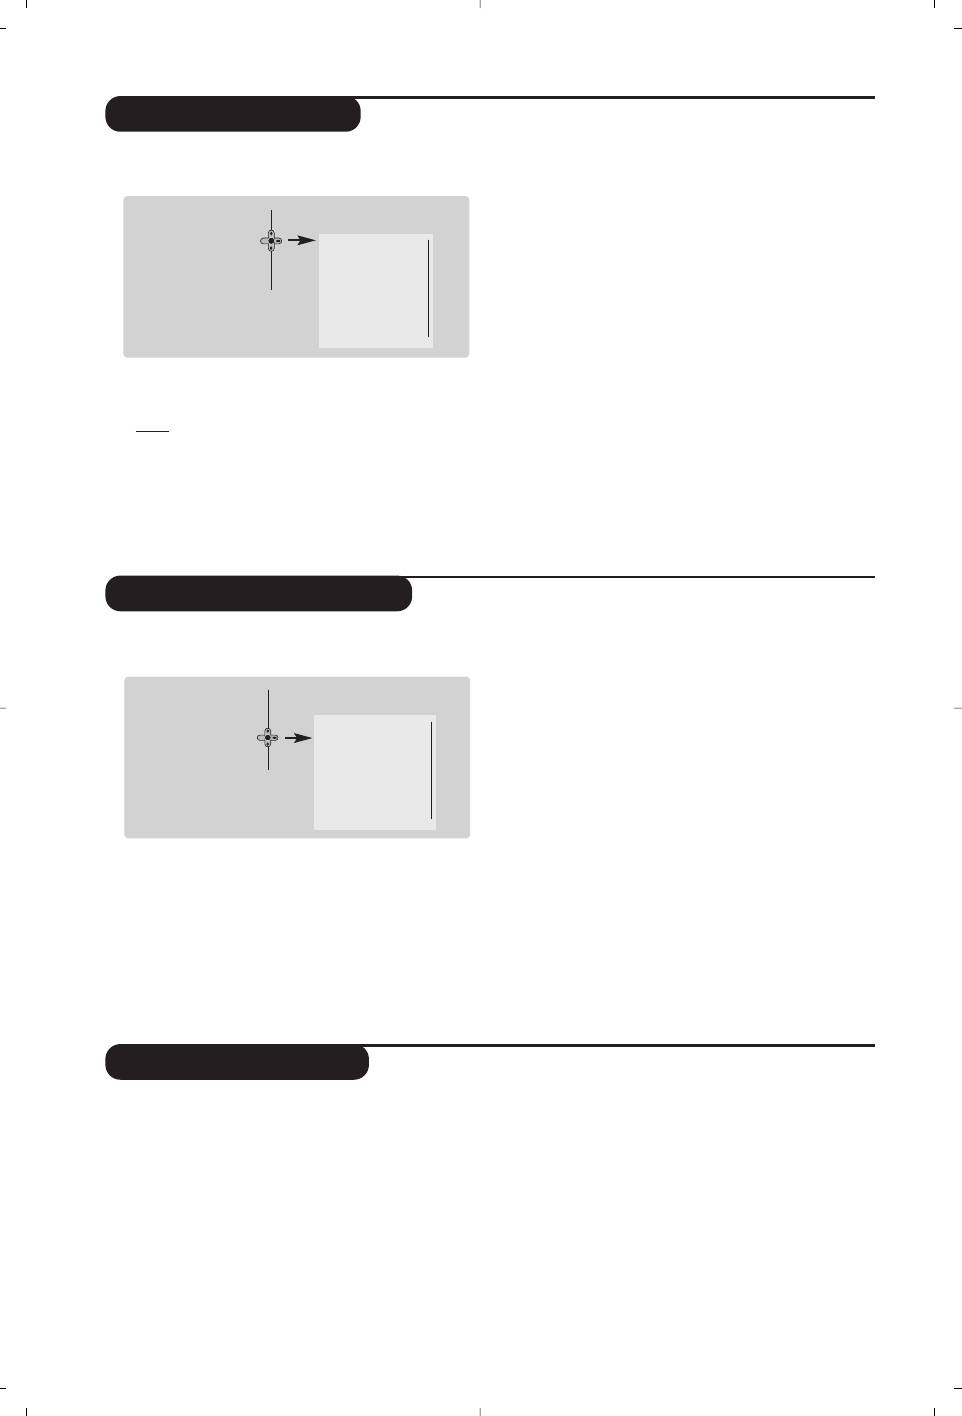
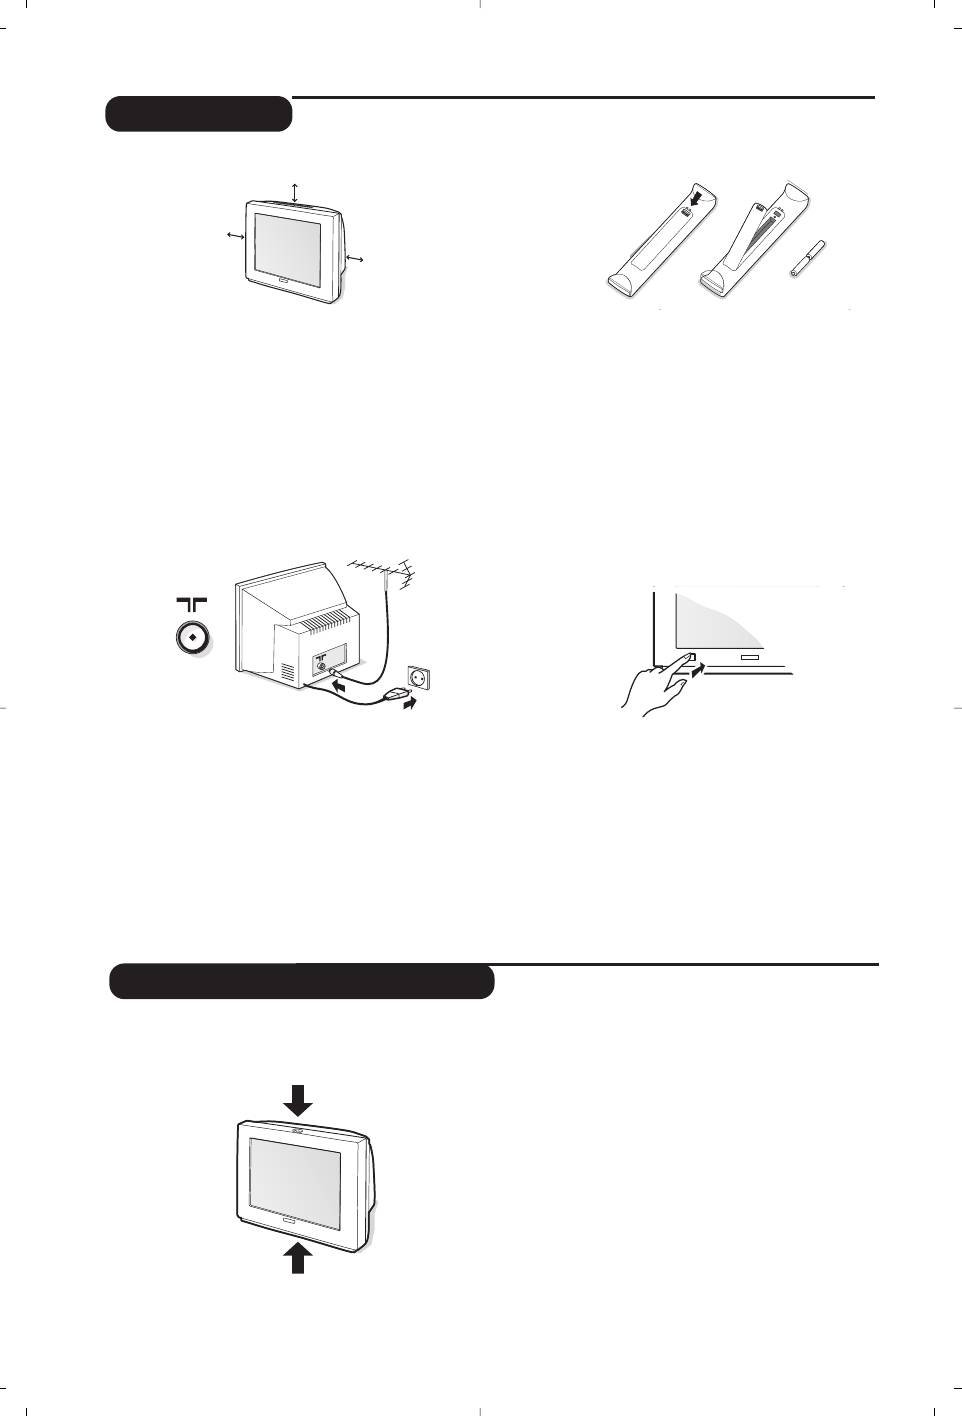
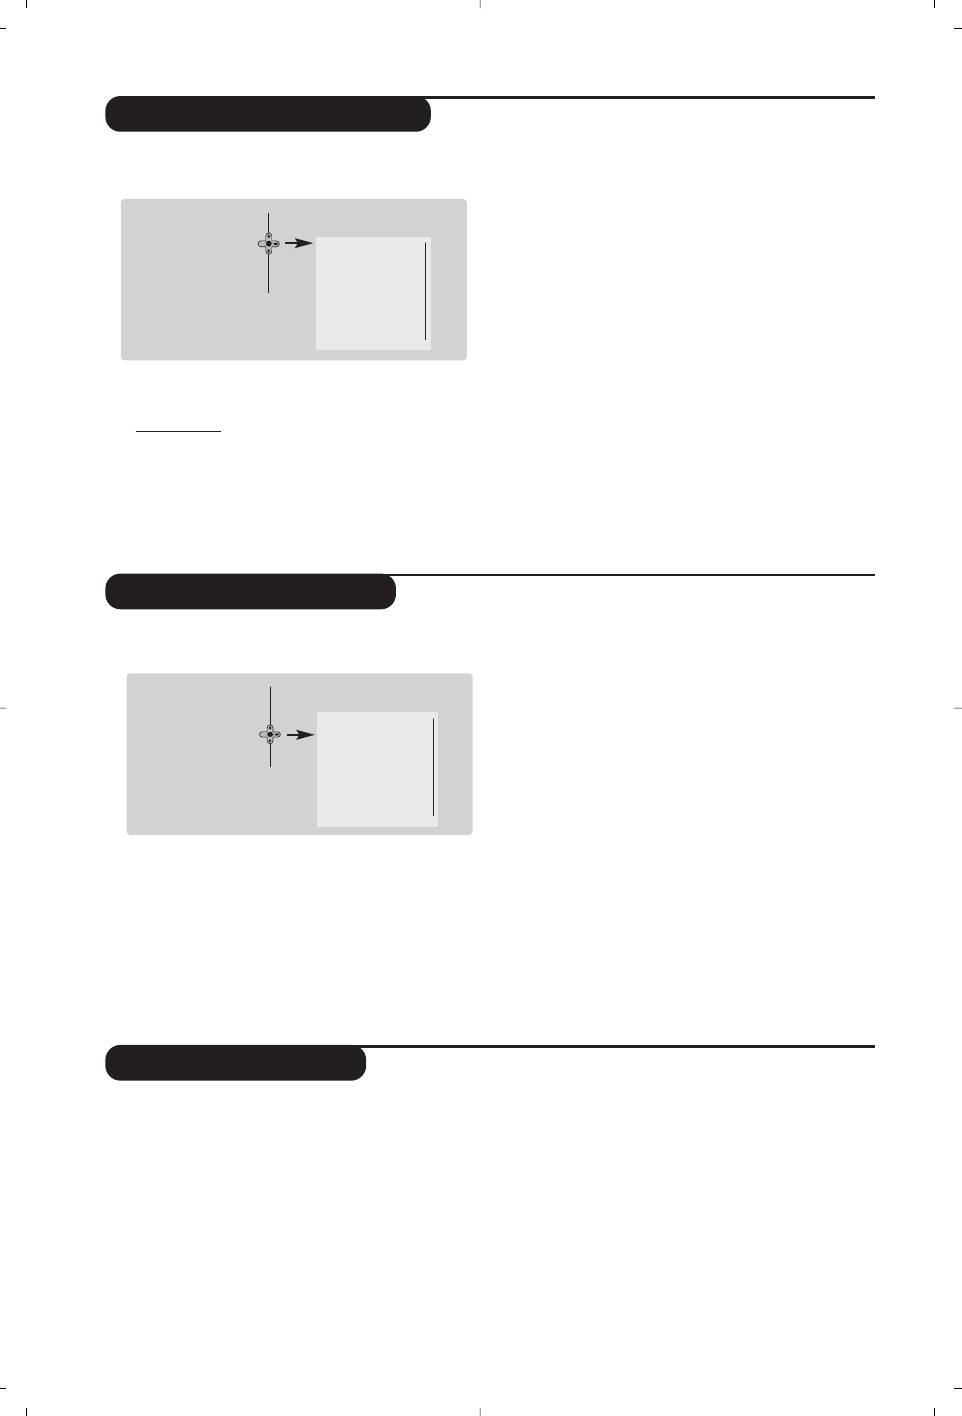
Positioning the television set
“
Remote control
Place your TV on a solid, stable surface, leaving
Insert the two R6-type batteries (supplied)
a space of at least 5 cm around the appliance.
making sure that they are the right way round.
To avoid accidents, do not put anything on the
Check that the mode selector is set to TV.
set such as a cloth or cover, a container full of
The batteries supplied with this appliance do
liquid (vase) or a heat source (lamp).
not contain mercury or nickel cadmium.
The set must not be exposed to water.
If you have access to a recycling facility, please
do not discard your used batteries (if in
é
Connections
doubt, consult your dealer).When the
batteries are replaced, use the same type.
‘
Switching on
• Insert the aerial plug into the : socket at
the rear of the set.
To switch on the set, press the on/off key.
If you are using an indoor aerial, reception may be
A red indicator comes on and the screen
difficult in certain conditions.You can improve
lights up. Go straight to the chapter Quick
reception by rotating the aerial. If the reception
installation on page 4.
remains poor, you will need to use an external aerial.
If the television remains in standby mode,
• Insert the mains plug into a wall socket
press
P # on the remote control.
(220-240 V / 50 Hz).
The indicator will flash when you use the
remote control.
The television set has 4 or 5 keys which are
adjust sound levels.The PROGRAM - + (-
P +)
located on the front or the top of the set
keys are used to select the required programmes.
depending on the model.
To access the menus, simultaneously hold down
The VOLUME - + (- ” +) keys are used to
the
” - and ” + keys (or MENU key).
The PROGRAM - + keys may then be used to
select an adjustment and the -
” + keys to
make that adjustment.
To exit from the menus, hold down the 2
” -
and
” + keys (or MENU key).
Note : when the Child Lock function is activated,
these keys are unavailable (refer to
Features
menu on page 7).
2
5 cm
5 cm
5 cm
Installing your television set
The keys on the TV set
3
VCR DVD SAT AMP CD
¢
Ÿ
Y
Select
†
·
¢
Ê
Æ
œ
π
‡
Œ
OK
MENU
”
[
P
1
2
3
4
5
6
7
8
9
Ë
0
ù
ACTIVE
`
K
SMART
CONTROL
SMART
-
ª
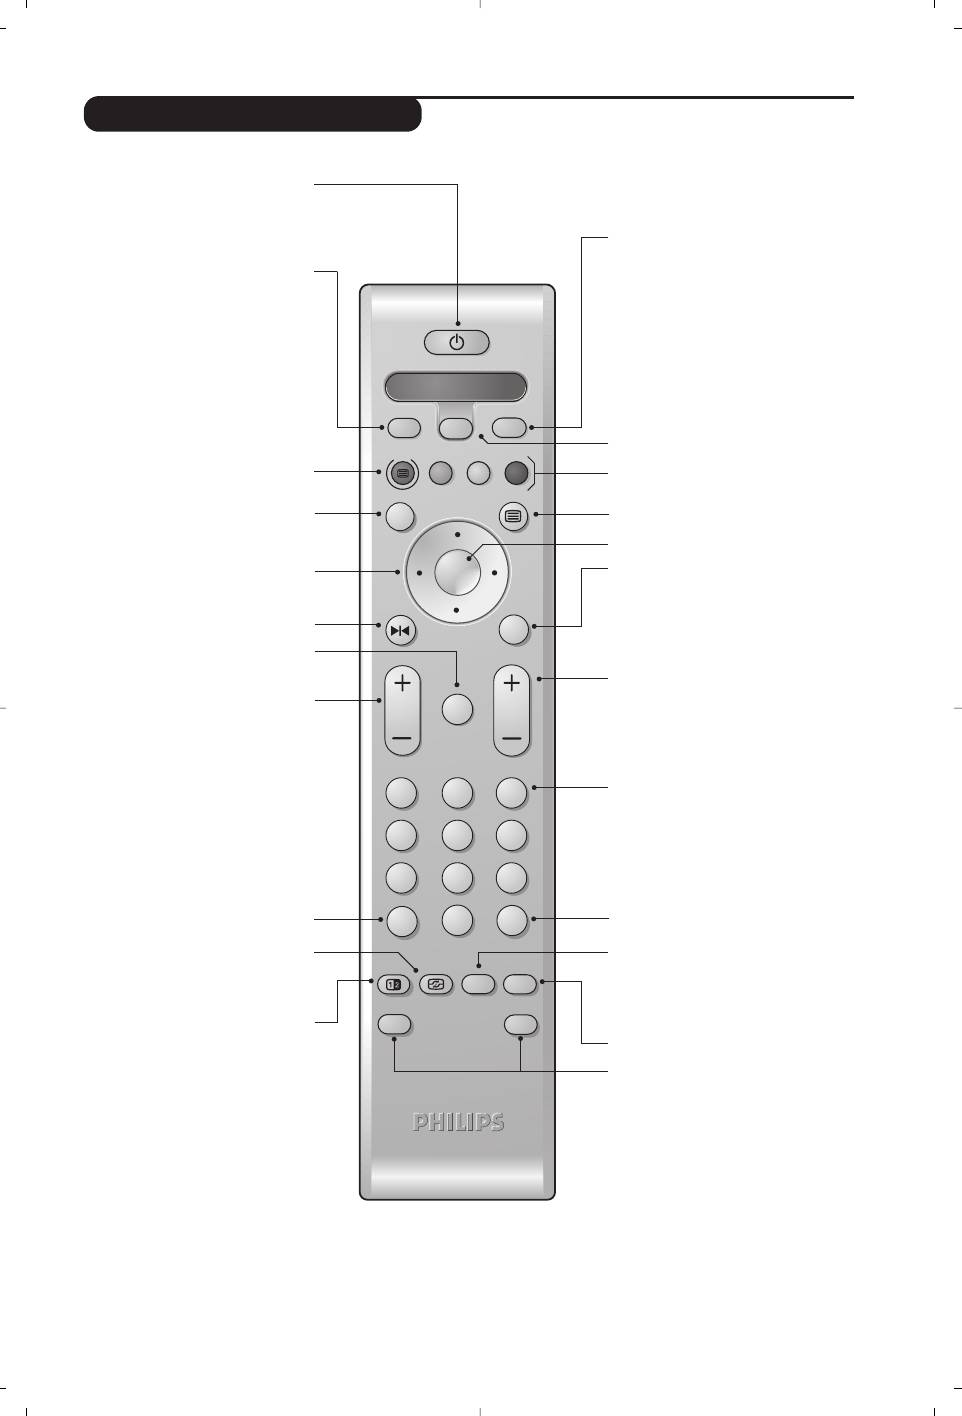
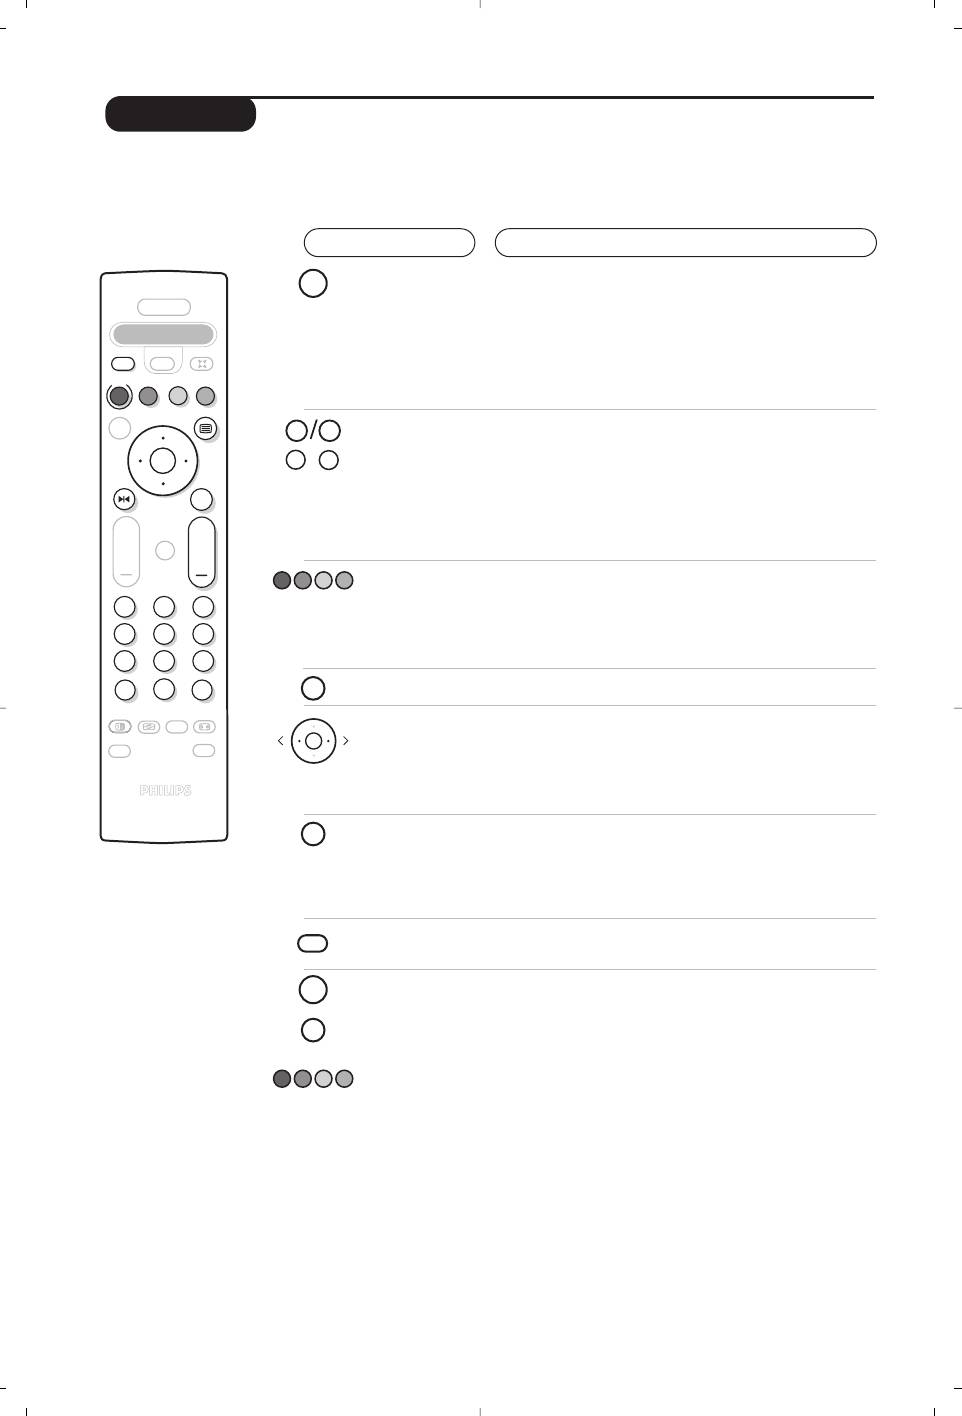
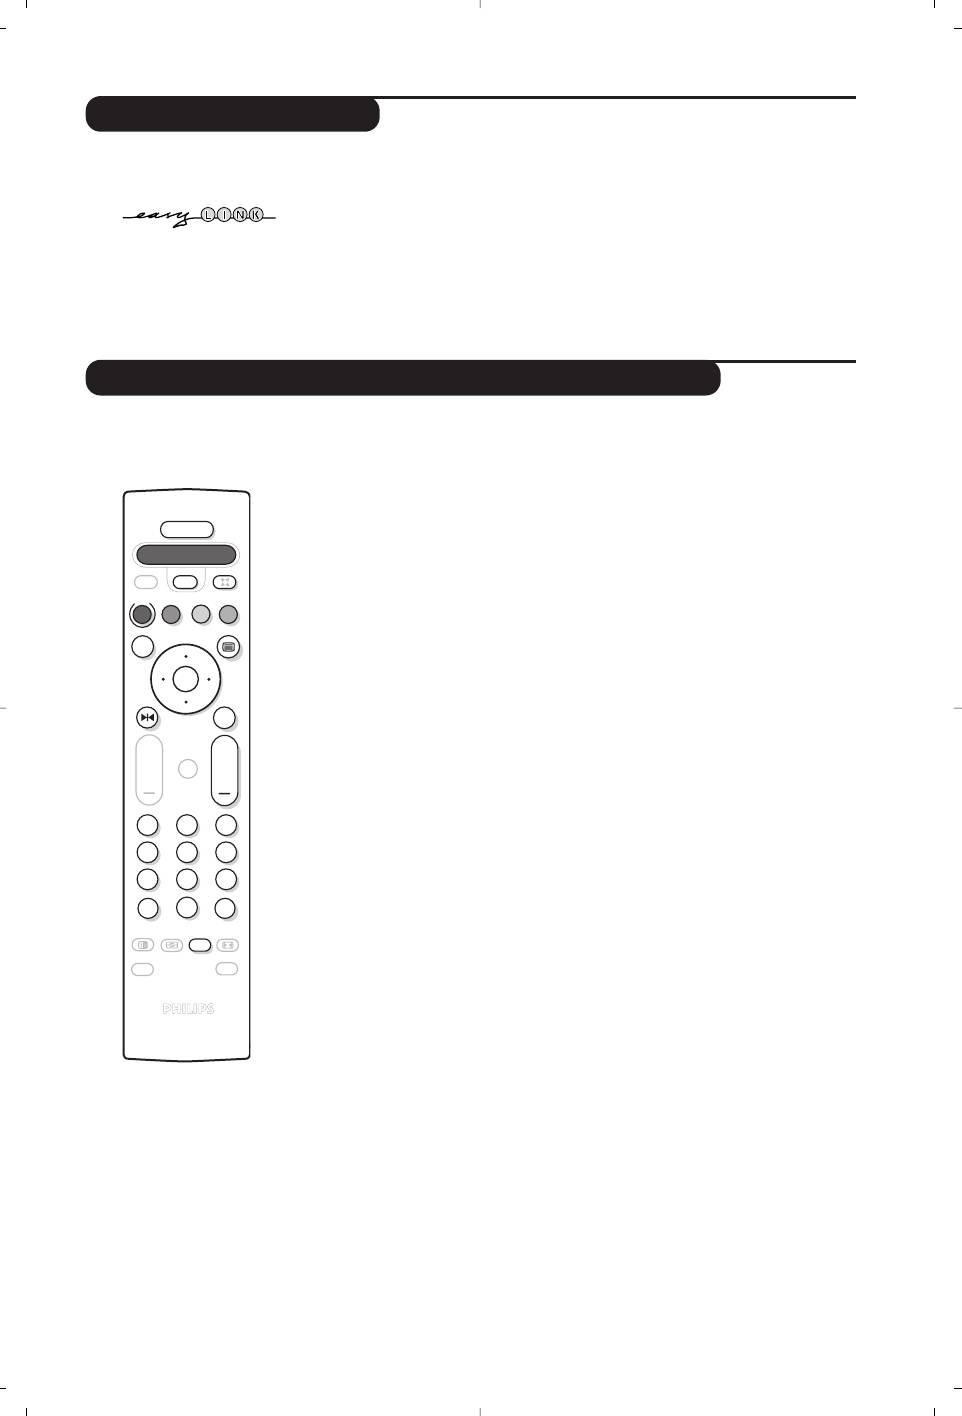
Remote control keys
Standby
To set the TV to standby mode.
To switch the TV set on again,
press
b,P @#or 09.
Surround Sound
To activate / deactivate the surround
Select peripherals (p.10)
sound effect. In stereo, this gives the
Press several times to select the
impression that the speakers are
required EXT connector.
further apart. For models equipped
with Virtual Dolby Surround*, you
can experience Dolby Surround Pro
List of programmes
Logic sound effects.
To display/clear the list of
programmes.
Use the <> cursor to
Mode selector (p. 11)
select a programme and the ≥
To activate the remote control in TV,
cursor to display it.
VCR, DVD, SAT,AMP or CD mode.
The symbol + is displayed alongside
all programmes which are locked (p.7).
Teletext keys (p. 8)
or VCR / DVD (p.11).
NEXTVIEW:
refer to the separate booklet (only
Teletext (p. 8).
available on certain models).
unused key.
Cursor
Menu
These 4 keys are used to move
To call up or exit the menus.
around the menus
(
<>≤≥)
.
Freeze the picture
Programme selection
To access the next or previous TV
Mute
channel from the list of Favourite
To mute or restore the sound.
Programmes (see p. 5).
Volume
Digit keys
To adjust the sound level.
Direct access to the programmes.
Screen information
For a 2 digit programme, enter the
To display / remove the programme
2nd digit before the dash
number, the name (if it exists), the
disappears.
time, the sound mode and the time
Sound mode
remaining on the timer.Hold down
Used to force programmes in
for 5 seconds to permanently display
Stereo and Nicam Stereo to Mono
the programme number on the
or, for bilingual programmes, to
screen.The volume level and the
choose between Dual I or Dual II.
smart control adjustments are then
The
Mono indication is red when in
displayed each time they are used.
forced position.
Active Control (according to the version)
Sleeptimer
Optimizes the quality of the picture
To select the length of time before the
according to the quality of reception.
set automatically switches to standby
(from 0 to 240 minutes).
Dual screen
(according to the version)
To activate/disable the display on
16:9 Format (p. 9).
2 screens. The second screen
Smart picture and sound
displays teletext.
Used to access a series of predefined
picture and sound settings.
The personal position relates to
settings selected from the menus.
* Manufactured under license from Dolby Laboratories.
“Dolby” and the double-D symbols are trademarks of Dolby Laboratories.
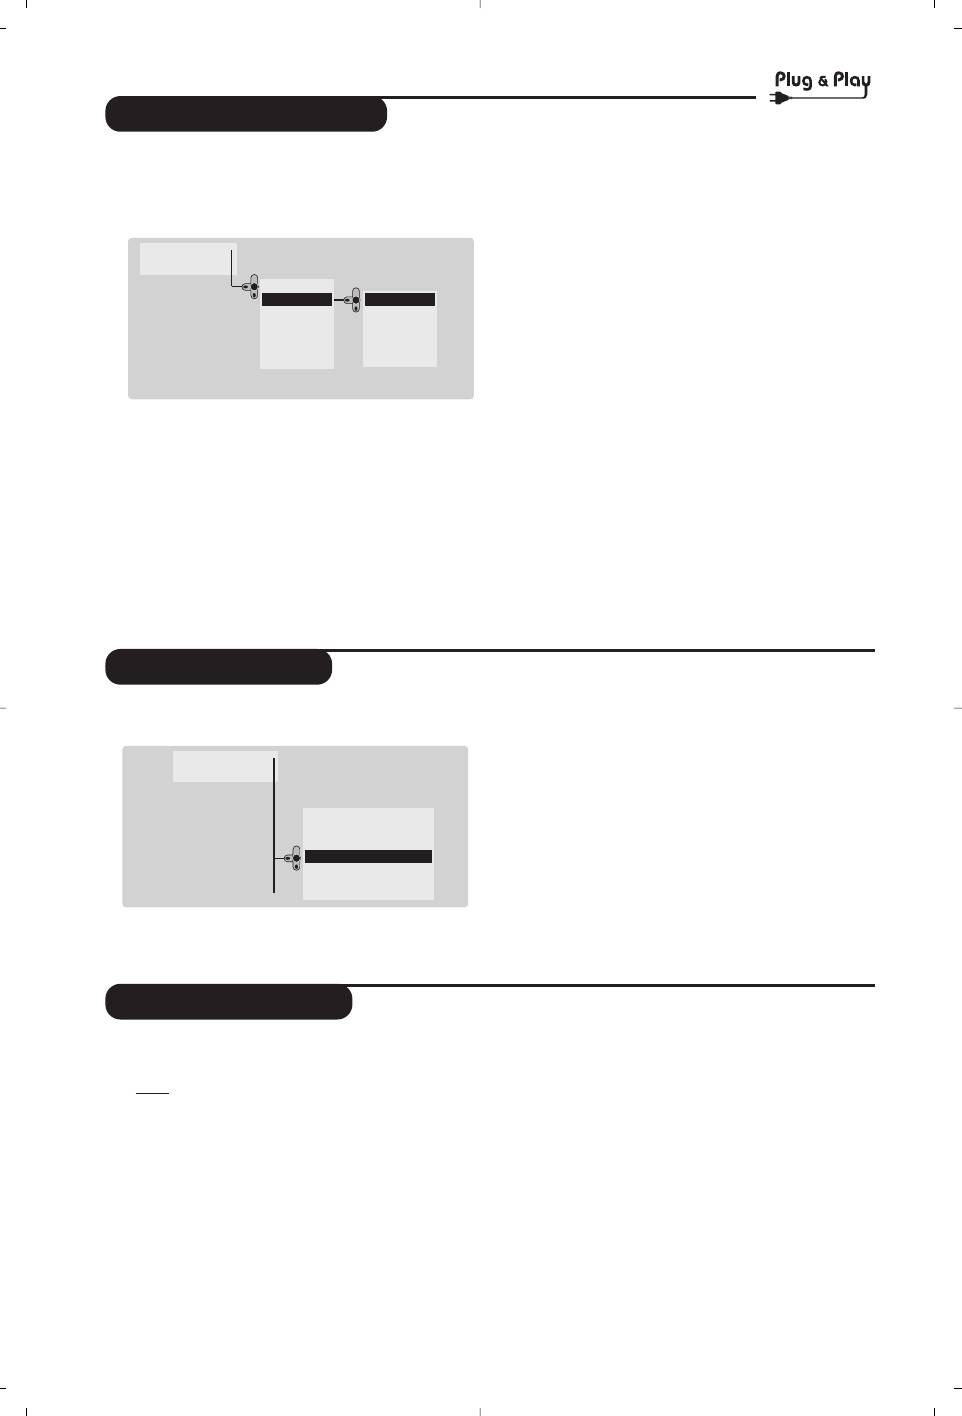
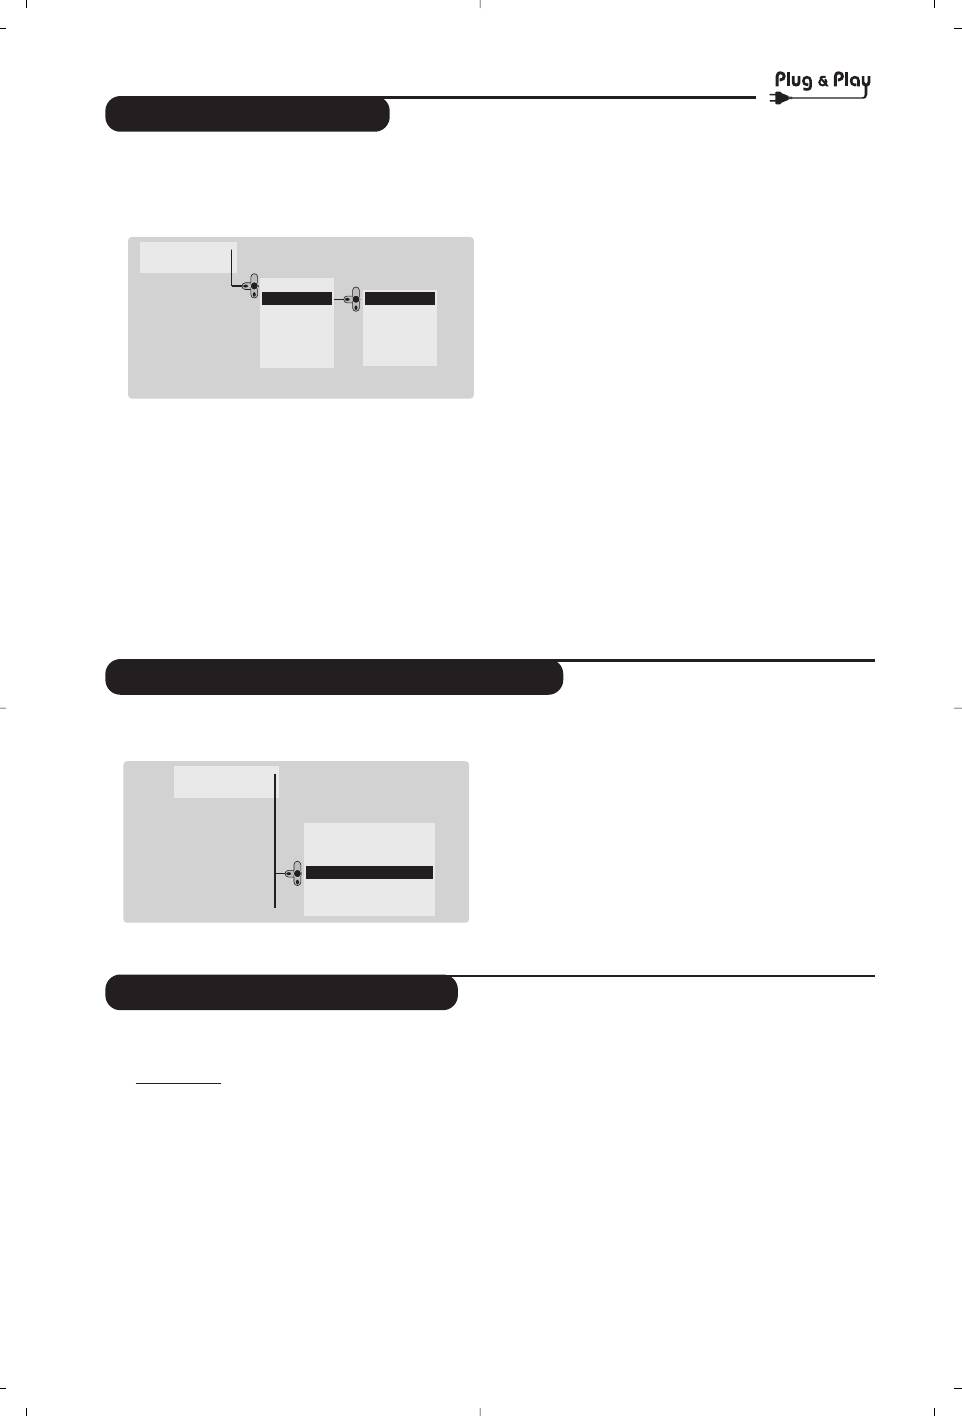
Quick installation
When you turn on the TV set for the first
“ The search starts automatically.All the
time, a menu is displayed on screen.
available TV programmes will be stored.
This menu prompts you to select the country
This operation takes a few minutes.
and language for the menus :
The display shows the progress of the search
Main •
and the number of programs found. At the
Install •
end of the search, the menu disappears.
Country •
DK
To exit or interrupt the search, press H. If no
GB
English
F
French
programme is found, consult the possible solutions p. 12.
DE
Deutsch
‘ If the transmitter or cable network sends the
SF
...
...
automatic sort signal, the programs will be
numbered correctly. In this case, the
installation is complete.
If the menu is not displayed, press and hold down
( If this is not the case, you need to use the
Sort
the
”- and ”+ keys on the TV set for
menu to number the programs correctly.
5 seconds to display the menu.
Some transmitters or cable networks broadcast
& Use the <> cursor on the remote control to
their own sort parameters (region, language, etc.).
select your country and validate with ≥.
In this case, indicate your choice using the <>
If your country does not appear in the list, select
cursor and validate with ≥.
choice “. . .”
é Next select your language using the <>
cursor and validate with ≥.
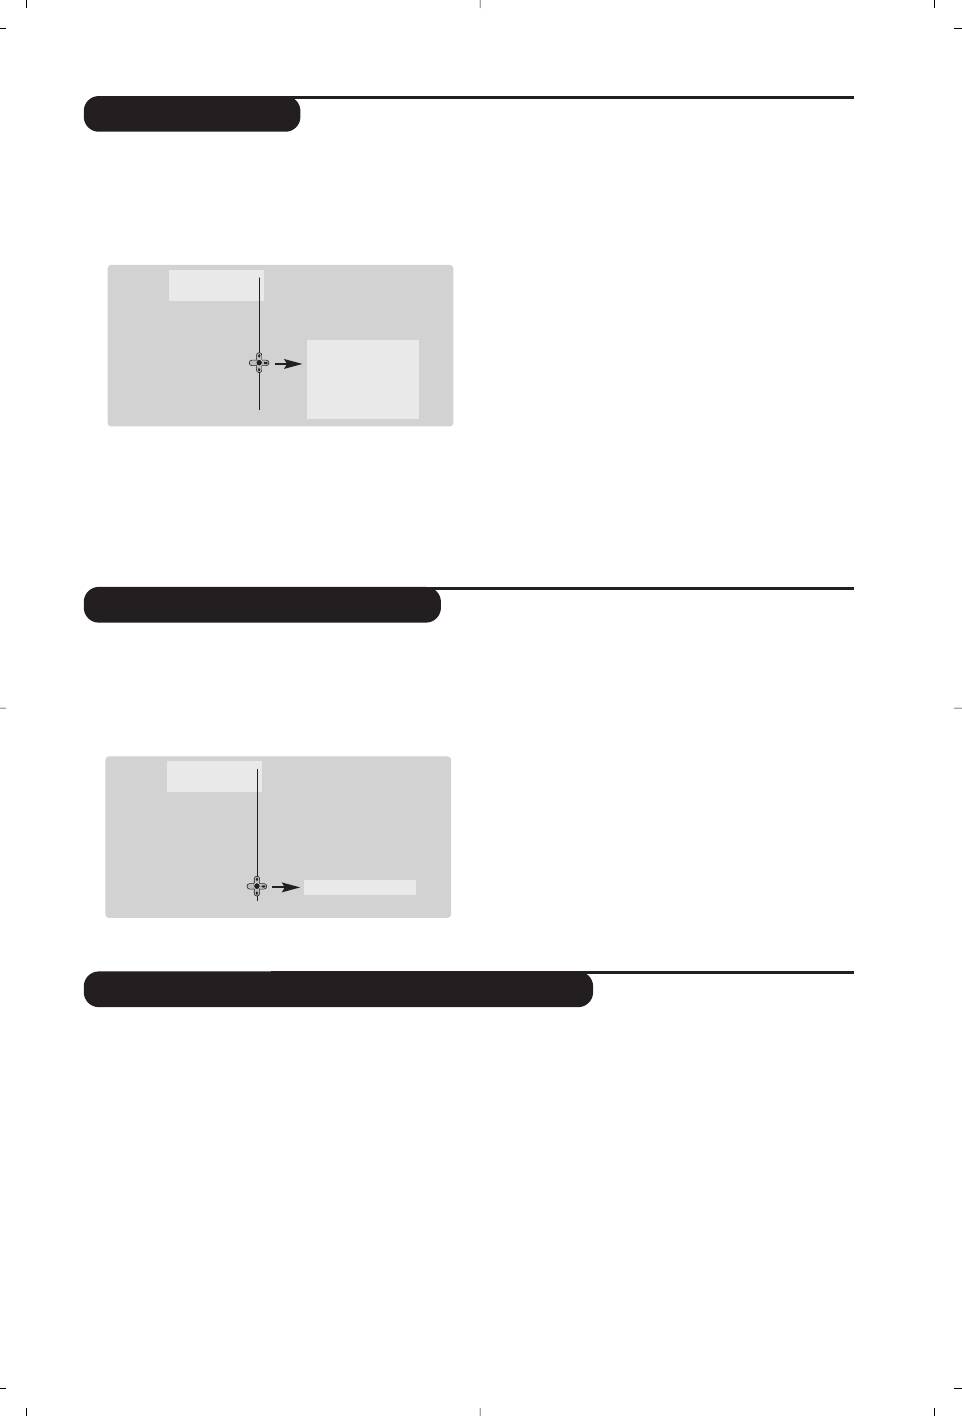
Program sort
& Press key H.The Main menu is displayed on
é With the cursor, select the
Install menu
the screen.
followed by the
Sort menu.
Main •
“ Select the programme you want to move using
Install •
the <> cursor and press ≥.
Language •
‘ Then use the <> cursor to select the new
Country •
00
number and validate with ≤.
Auto Store •
01 BBC1
Manuel Store •
02 BBC2
( Repeat steps “ and ‘ for each program you
Sort •
03
Æ
ANGLI
wish to renumber.
Program •
04 CH4
05 CH5
Name
§ To quit the menus, press
d.
•
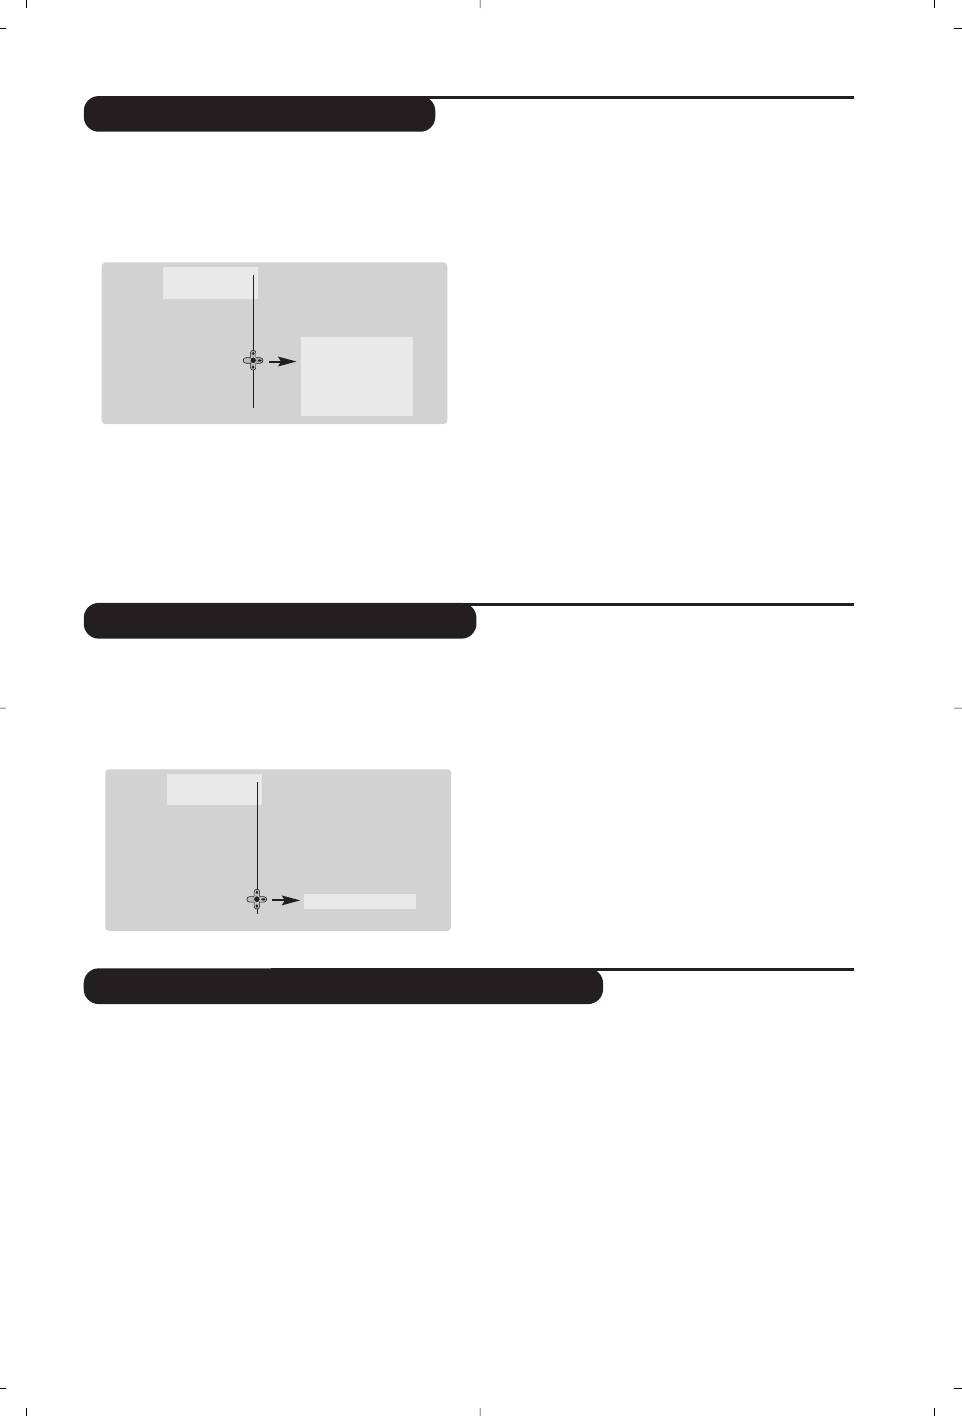
Program name
If required, you can give a name to the
‘ Use the ≤≥ cursor to move around the
programmes and external connectors.
name display area (5 characters) and the <>
Note
: on installation, the programs are named
cursor to select the characters.
automatically when an identification signal is sent.
( When the name has been entered, use the ≤
& Press the
H key.
cursor to exit.The name is stored.
é With the cursor, select the
Install menu, then
§ Repeat steps “ to ( for each programme
Name.
you wish to name.
“ Use the @ P # keys to select the
è To quit the menus, press
d.
programme to name or rename.
4
Manual store
This menu is used to store the programmes
choice
France.
one at a time.
‘
Search : press ≥.The search starts. Once a
& Press the
H key.
programme is found, the scanning stops and its
é With the cursor, select the
Install menu then
name is displayed (when available). Go to the
Manual store :
next step. If you know the frequency of the
required programme, this can be entered
Main •
directly using the
0 to 9 keys.
Install •
If no picture is found, consult the possible solutions (p. 12).
Language •
Country •
( Program No. : enter the required number with
Auto Store •
System •
the ≤≥ or
0 to 9 keys. Example : program
Manuel Store
Search •
Sort •
Program No. •
1, enter
01.
Program •
Fine Tune •
§
Fine Tune : if the reception is not satisfactory,
Name
•
Store •
adjust using the ≤≥ cursor.
“
System: select Europe (automatic detection*)
è
Store : press ≥.The program is stored.
or
Western Europe (BG standard), Eastern
! Repeat steps ‘ to è for each programme to
Europe (DK standard), United Kingdom
store.
(I standard) or France (LL’ standard).
ç To quit the menus, press d.
* Except for France (LL’ standard), you must select
Favourite programmes
This menu allows you to select the programmes
The list of favourite programmes is displayed.
to be accessed with the
@ P # key.
The programmes that were stored at
& Press the
H key.
installation will automatically appear on this
é With the cursor, select the
Install menu then
list.
Favourite Progr. and press ≥.
“ Use the up/down cursor to select the
required programme.
Main •
Install •
‘ Use the left/right cursor to add or remove a
Language •
programme from the list.
Country •
( Run through steps “ and ‘ for each
Auto Store •
programme to be added or removed from the
Manuel Store •
Sort •
list.
Favourite Progr.
2 •
§ To exit, press
d several times.
Name
•
Other settings in the Install menu
automatic sort signal, the programmes will be
& Press the H key and select the Install menu:
numbered correctly. If this is not the case, you
é
Language : to change the display language for
need to use the Sort menu to renumber the
the menus.
programmes (see p. 4).
“
Country : to select your country (GB for
Some transmitters or cable networks broadcast
Great Britain).
their own sort parameters (region, language, etc.).
This setting is used for the search, automatic
In this case, indicate your choice using the <>
programme sort and teletext display. If your
cursor and validate with ≥.To quit or interrupt the
country does not appear in the list, select “. . .”
search, press
H. If no picture is found, consult the
‘
Auto Store : to start automatic search for all
possible solutions (p. 12).
programmes available in your region. If the
( To quit the menus, press
d.
transmitter or cable network sends the
5
Picture settings
• Colour : this changes the intensity of the colour.
& Press H then ≥ cursor.The Picture menu is
• Contrast : this changes the difference
displayed :
between the light and dark tones.
Main
•
•
Sharpness : this changes the picture definition.
Picture
Brightness •
• Colour Temp.: this changes the colour
Sound
•
Colour •
rendering:
Cold (bluer), Normal (balanced)
Features
•
Contrast •
Install
•
Sharpness •
or
Warm (redder).
Colour Temp. •
•
Digital Options :
Digital Options •
- 100 Hz : 100 Hz processing.
Store •
-
Digital Scan (according to the version) : reduces
line flicker which is visible on some pictures.
é Use the <> cursor to select a setting and the
- Double lines
:
doubling of vertical resolution
≤≥ cursor to adjust.
which removes visible picture lines.
Note
: during the picture adjustment, only the
selected line remains displayed. Press <> to
Advised for NTSC (60Hz) pictures.
display the menu again.
“ Once the adjustments have been made, select
Description of the adjustments :
Store and press ≥ to store them.
• Brightness : this changes picture brilliance.
Press
d to exit.
Sound adjustments
•
Balance : this balances the sound on the left
& Press H, select Sound (>) and press ≥.The
and right speakers.
Sound menu is displayed :
•
Delta Volume : this is used to compensate
Main •
any volume discrepancies between the
Picture •
Treble •
different programs or EXT sockets.
Sound
Bass •
This setting is available for programs 0 to 40
Features •
Balance •
Install
•
Delta Volume •
and the EXT sockets.
AVL •
•
AVL (Automatic Volume Leveller) : this is
HP Volume •
used to limit increases in sound, especially on
Store •
program change or advertising slots.
•
HP Volume : allows you to adjust the
é Use the <> cursor to select a setting and the
headphones volume independently from the
≤≥ cursor to adjust.
loud-speakers on the TV set.
Description of the settings :
“ Once the adjustments have been made, select
•
Treble : this alters the high frequency sounds.
Store and press ≥ to store these changes.
•
Bass : this alters the low frequency sounds.
‘ To quit the menus, press
d.
Feature settings
terrestrial magnetic field variations.
& Press H, select Features (>) and press ≥.
This setting is used to compensate for this by
You can adjust :
adjusting the picture rotation.
é
Timer, Child Lock and Parental Cont.:
(
Dynamic Contrast (according to the version) :
see next page
Min, Med (optimum position), Max or Off.
“
Dynamic NR: Min, Med (optimum position),
Enhances the contrast of details in lighter,
Max or Off : attenuates picture noise (snow)
average and darker areas.
in difficult reception conditions.
§ To quit the menus, press
d.
‘
Rotation (only available on very large screen
sets) : large screen sets are sensitive to
6

Timer function
This menu lets you use the TV set as an alarm.
‘ Start Time : enter the start time.
& Press the
H key.
(
Stop Time : enter the standby time.
é With the cursor, select the
Features menu
§
Program No. : enter the number of the
then
Timer :
programme for the wake-up alarm.
Main •
è
Activate : the settings include:
•
Once for a single alarm,
Picture •
•
Daily for each day,
Sound •
Features
Timer •
Time
•
Stop to cancel.
Install
•
Child Lock •
Start Time
! Press b to put the TV set in standby.
Parental control •
Stop Time
Dynamic NR •
Program No.
It will automatically come on at the time
Activate
programmed. If you leave the TV set on, it will
just change programmes at the time entered
“ Time : enter the current time.
(and will go to standby mode at the
Stop Time).
Note : the time is updated automatically each time
By combining the TV lock and Timer functions,
the TV set is switched on via the teletext information
you can restrict the period during which the TV set
on programme 1. If this program does not have
is used, for example by your children.
teletext, the update will not take place.
TV lock
You can block certain programs or inhibit use
twice and then enter your new code choice.
of the TV set completely by locking the keys.
The menu is displayed.
“
Parental Cont. : Use the <> cursor to select
Child lock
the TV programme required and validate with
& Press H.
≥.The
+ symbol will be displayed opposite
é With the cursor, select the
Features menu
the programmes or sockets that are locked.
and position
Child Lock to On.
From now on, to view a locked programme,
Main •
you must enter your secret code, otherwise
the screen will stay blank.
Picture •
Sound •
Timer •
The access to the
Install menu is also locked.
Features
Child Lock •
On • Off •
Caution, for encrypted programs using an external
Install
•
Parental control •
decoder, you must lock the corresponding EXT
Dynamic NR •
socket.
‘
Change code : this allows you to enter a new
4 digit code. Confirm your new code by
“ Turn off the TV set and hide the remote
entering it a second time.
control.The TV set cannot be used (except via
If you have forgotten your secret code, enter the
the remote control).
universal code 0711 twice.
‘ To cancel : position
Child Lock to Off.
(
Unlock all : this is used to unlock all locked
programmes.
Parental control
§
Lock All : this is used to lock all the TV
& Press the H key, select the Features menu
programmes and EXT connectors.
then
Parental Cont.:
è Press the
d key to quit.
é You must enter your secret access code.
The first time you enter this, enter code 0711
7
Teletext
Teletext is an information system broadcast by certain channels which can be consulted like a
newspaper. It also offers access to subtitles for viewers with hearing problems or who are not familiar
with the transmission language (cable networks, satellite channels, etc.).
Press :
You will obtain :
8
¤
POWER
.
VCR DVD SAT AMP CD
Ÿ
¢
Y
Select
·
¢
Ê
Æ
¤
œ
π
‡
Œ
0 9
OK
-
P
+
MENU
+
+
”
[
P
213
546
879
Ë
0
ù
Ë
ACTIVE
`
SMART
CONTROL
SMART
OK
-
ª
ù
Ÿ
Y
MENU
Ë
Teletext call
This is used to call teletext, change to transparent mode
and then exit.The summary appears with a list of items
that can be accessed. Each item has a corresponding
3 digit page number.
If the channel selected does not broadcast teletext, the
indication 100 will be displayed and the screen will remain
blank (in this case, exit teletext and select another channel).
Selecting a
Enter the number of the page required using the
0 to 9
page
or @ P # keys. Example: page 120, enter 120.The
number is displayed top left, the counter turns and then
the page is displayed. Repeat this operation to view
another page.
If the counter continues to search, this means that the page is
not transmitted. Select another number.
Direct access
Coloured areas are displayed at the bottom of the screen.
to the items
The 4 coloured keys are used to access the items or
corresponding pages.
The coloured areas flash when the item or the page is not yet
available.
Contents
This returns you to the contents page (usually page 100).
Direct
Certain pages contain sub-pages (for example, page 120
selection of
contains sub-pages
1/3, 2/3 and 3/3). If this is the case, the
sub-pages
page number is displayed in green, preceded by the symbol
Æ, Í or ÍÆ. Use the ≤≥ cursor to directly access
the sub-pages of your choice.
Double page
To activate or deactivate the double page teletext display
teletext
mode.The active pa
ge is di
splayed on the left and the
(only available
following page is displayed on the right. Press
i
if you want
on certain
to hold a page (i.e. the contents page).The active page is then
versions)
displayed on the right.To return to normal mode, press
e
.
Hidden
To display or hide the concealed information (games
information
solutions).
Favourite
Instead of the standard coloured areas displayed at the bottom
pages
of the screen, you can store 4 favourite pages on the first
40 channels which can then be accessed using the coloured
keys (red, green, yellow, blue). Once set, these favourite pages
will become the default every time tetetext is selected.
& Press the H key to change to favourite pages mode.
é Display the teletext page that you want to store.
“ Press the coloured key of your choice for 3 seconds.
The page is now stored.
‘ Repeat the operation with the other coloured keys.
( Now when you consult teletext, your favourite pages
will appear in colour at the bottom of the screen.
To temporaly retrieve the standard items, press H.
To clear everything, and return the standard items as the
default, press
d for 5 seconds.
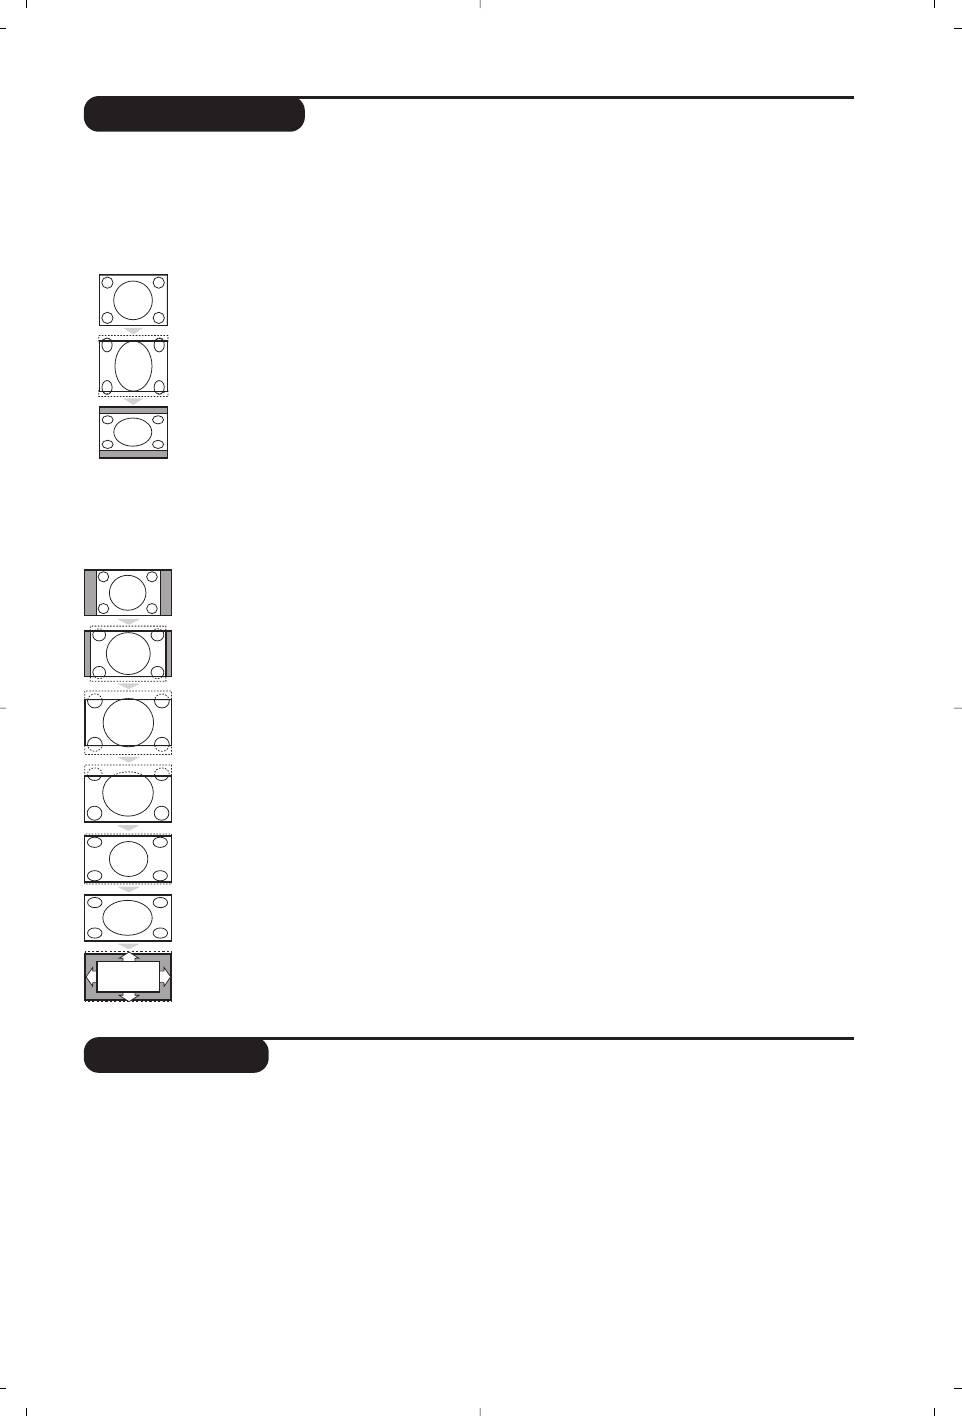
16:9 Formats
The pictures you receive may be transmitted in 16:9 format (wide screen) or 4:3 format
(conventional screen). 4:3 pictures sometimes have a black band at the top and bottom of the screen
(letterbox format).This function allows you to optimise the picture display on screen.
If your television is equipped with a 4:3 screen.
Press the p key (or <> cursor) to select the different modes:
4:3
The picture is reproduced in 4:3 format.
Expand 4:3
The picture is enlarged vertically.This mode is used to cancell the black bands
when watching a programme in letterbox format.
Compress 16:9
The picture is compressed vertically into 16:9 format.
If your television is equipped with a 16:9 screen.
Press the p key (or ≤≥ cursor) to select the different modes:
This TV set is also equipped with automatic switching which will select the correct-screen format, provided the
specific signals are transmitted with the programmes.
4:3 The picture is reproduced in 4:3 format and a black band is displayed on either
side of the picture.The picture may be progressively enlarged using the
<>
cursor.
Zoom 14:9
The picture is enlarged to 14:9 format,a thin black band remains on both sides of the
picture.The <> cursor allow you to compress and move the image vertically to view
the top or bottom of the picture (subtitles).
Zoom 16:9
The picture is enlarged to 16:9 format.This mode is recommended when displaying pictures
which have black bands at the top and bottom (letterbox format).Use the <> cursor if you
wish to compress and move the image vertically to view the top or bottom of the picture.
Subtitle Zoom
This mode is used to display 4:3 pictures using the full surface of the screen leaving
the sub-titles visible. Use the <> cursor to increase or decrease the compression
at the bottom of the screen.
Super Wide
This mode is used to display 4:3 pictures using the full surface of the screen by
enlarging the sides of the picture.The <> cursor allow you to scroll the image up
or down the screen.
Widescreen
This mode restores the correct proportions of pictures transmitted in 16:9 using
full screen display.
Automatic
(only available on certain versions). The format of the picture is automatically adjusted
to fill as much of the screen as possible.
Using PIP
(only available on certain versions)
This feature enables you to display a small
“ Press the
œ key again to change the size of
superimposed window.You can display in this
the window then make it disappear.
window the picture from an appliance connected
‘ Use the
π key if you want to hide the
to the TV (e.g. video recorder,DVD, ...).
window.You can also shift it progressively by
& Press the
œ key to display the PIP screen.
using the cursor.
A small superimposed window appears in the
( Use the
‡ key if you want to swap the
main screen.
2 pictures.
é Use the
µ key to select a picture from the
appliance connected to the TV.
9
10
*
AUDIO
VIDEO
S•
VIDEO
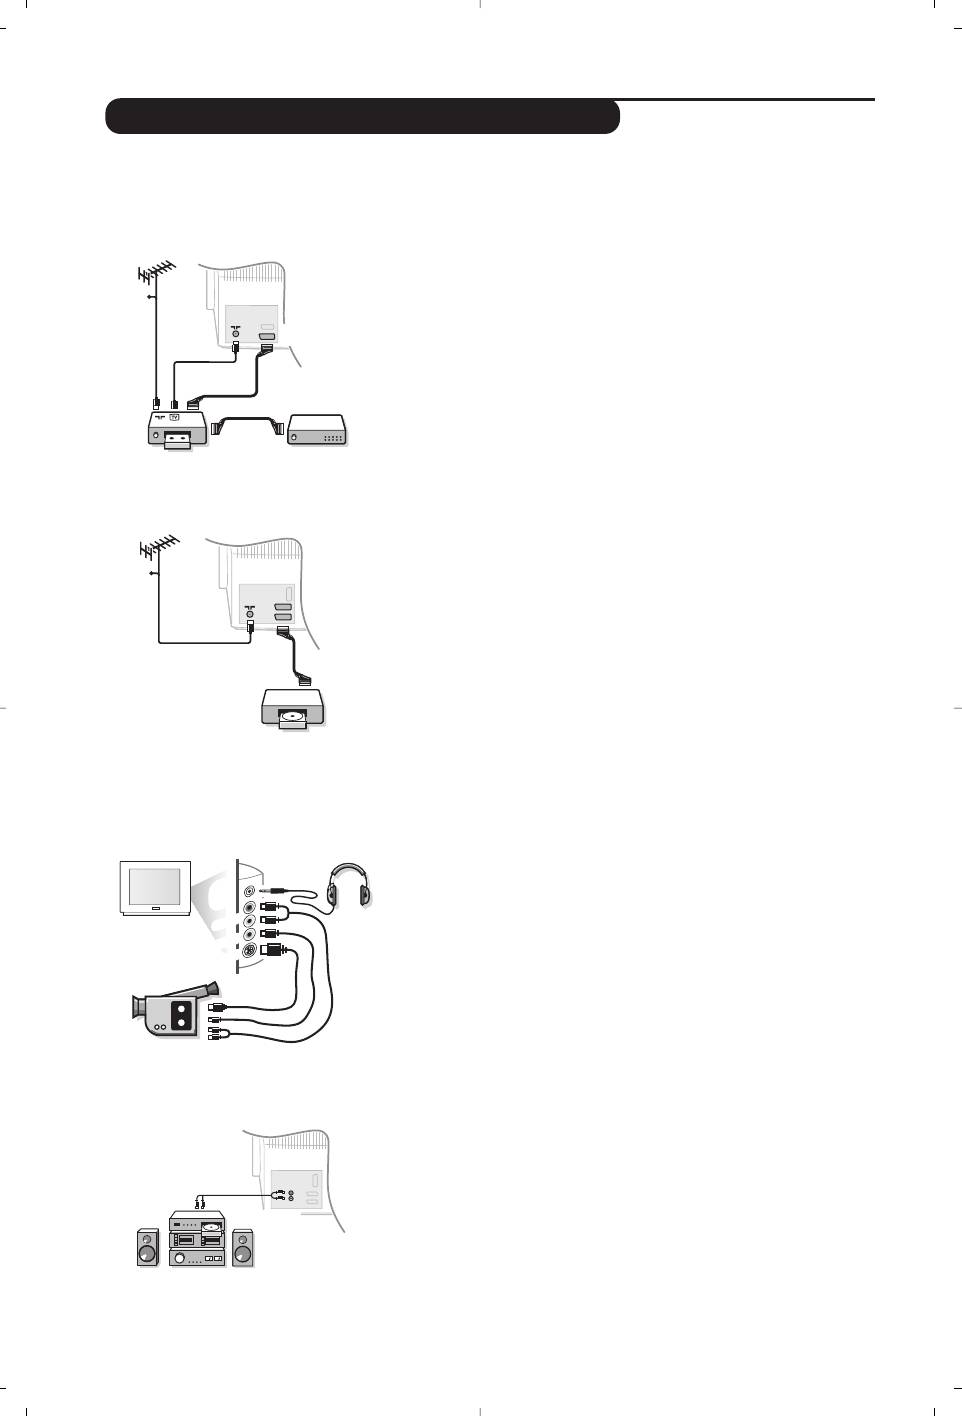
Connecting peripheral equipment
The television has 2 external sockets situated at the back of the set (EXT1 and EXT2).
The EXT1 socket has audio, CVBS/RGB inputs and audio, CVBS outputs.
The EXT2 socket has audio, CVBS/S-VHS inputs and audio, CVBS outputs.
Video recorder
Carry out the connections shown opposite, using a good quality
euroconnector cable.
If your video recorder does not have a euroconnector socket, the only
connection possible is via the aerial cable.You will therefore need to
tune in your video recorder's test signal and assign it programme
number 0 (refer to manual store, p. 5).
To reproduce the video recorder picture, press
0.
Video recorder with decoder
Connect the decoder to the second euroconnector socket of
the video recorder.You will then be able to record scrambled
transmissions.
Other equipment
Satellite receiver, decoder, CDV, games, etc.
Carry out the connections shown opposite.
To optimise picture quality, connect the equipment which
produces the RGB signals (digital decoder, games, etc.) to EXT1,
and the equipment which produces the S-VHS signals (S-VHS and
Hi-8 video recorders, certain DVD drives) to EXT2 and all other
equipment to either EXT1 or EXT2.
To select connected equipment
Press the
µ key to select EXT1, EXT2, S-VHS2 (S-VHS signals
from the EXT2 socket) and
EXT3 for connections on the front
panel.
Most equipment (decoder, video recorder) carries out the switching
itself.
Side connections
Make the connections as shown opposite.
With the
µ key, select EXT3.
For a mono set, connect the sound signal to the AUDIO L (or AUDIO
R) input.The sound automatically comes out of the left and right
speakers of the set.
Headphones
Press the
m key to mute the sound on the TV set (see also
sound settings, page 6).
The headphone impedance must be between 32 and 600 Ohms.
Amplifier
(only available on certain versions)
CABLE
EXT 2
VCR
CABLE
AUDIO
To connect to a hi-fi system, use an audio connection cable and
connect the “L” and “R” outputs on the TV set to the “AUDIO
IN” “L” and “R” input on your hi-fi amplifier.
EasyLink Function
If your video recorder has an EasyLink function, during installation, the
language, country and available channels are automatically transmitted to
the video recorder. Equally, when the video recorder is in standby,
pressing the
· key on the remote control will start the recording of the
same programme displayed on the TV set.
The video recorder must be connected to the EXT2 connector (see p. 10).
Video recorder or DVD, SAT,AMP, CD keys
The remote control lets you control the main functions of the VCR or DVD.
Press the Select key to select the required mode : VCR, DVD, SAT, AMP
or CD.The remote control indicator lights up to display the selected
mode. It switches off automatically after 20 seconds if left idle.
The remote control automatically returns to TV mode.
The following keys are operational, depending on the equipment :
. standby,
¢ fast rewind,
∫ fast forward,
· recording,
Ê stop,
Æ play,
i pause,
c DVD : subtitling language
o DVD : subtitle selection
VCR : tape list function,
H menu,
cursor navigation and adjustments,
u validation,
09 digit keys,
@ P # programme selection,
e audio selection.
d OSD menu,
% VCR timer.
The remote control is compatible with all video recorders using the RC5
standard and all DVDs using the RC6 standard.
11
POWER
.
VCR DVD SAT AMP CD
Ÿ
¢
Y
Select
·
¢
Ê
Æ
¤
œ
π
‡
Œ
OK
MENU
+
+
”
[
P
213
54
6
879
Ë
0
ù
ACTIVE
`
SMART
CONTROL
SMART
-
ª
(only available on certain versions)

Tips
Poor reception
No sound
The proximity of mountains or high buildings
If on certain channels you receive a picture
may be responsible for ghost pictures,
but no sound, this means that you do not
echoing or shadows. In this case, try manually
have the correct TV system. Modify the
adjusting your picture: see
Fine Tuning (p.5)
System setting (p. 5).
or modify the orientation of the outside
Teletext
aerial.
Are certain characters not displayed
Does your antenna enable you to receive
correctly? Check that the
Country setting has
broadcasts in this frequency range (UHF or
been positioned correctly (p.5).
VHF band)?
Remote control
In the event of difficult reception (snowy
The TV set does not react to the remote
picture) switch the
Dynamic NR on the
control; the indicator on the set no longer
Features menu to ON.(p.6).
flashes when you use the remote control?
No picture
Replace the batteries.
If the television does not switch on, please
Standby
press the standby key
b (located on the
When you switch the TV set on it remains in
remote control) twice.
standby mode and the indication
Locked is
Have you connected the aerial socket properly?
displayed when you use the keys on the TV
Have you chosen the right system? (p. 5).
set?
Poorly connected euroconnector cables or
The Child Lock function is switched On (p.7).
aerial sockets are often the cause of picture or
If the set receives no signal for 15 mins, it
sound problems (sometimes the connectors
automatically goes into standby mode.
can become half disconnected if the TV set is
To save power, your set is fitted with components
moved or turned). Check all connections.
that give it a very low power consumption when
Peripheral equipment gives a black and
in standby mode (less than 1 W).
white picture
Still no results ?
To play a video cassette, check that it has
If your TV set breaks down, never attempt to
been recorded under the same standard
repair it yourself: contact your dealer's after-
(PAL, SECAM, NTSC) which can be replayed
sales service.
by the video recorder.
Cleaning the set
The remote control no longer works
Only use a clean, soft and lint-free cloth to
Check that the mode selector on the side of
clean the screen and the casing of your set.
the remote control is set to TV.
Do not use alcohol-based or solvent-based
products.
Glossary
RGB Signals : These are 3 Red, Green and Blue video signals which directly drive the red, green and
blue emitters in the cathode ray tube. Using these signals provides better picture quality.
NICAM sound : Process by which digital sound can be transmitted.
System : Television pictures are not broadcast in the same way in all countries.There are different
standards: BG, DK, I, and L L’.The SYSTEM setting (p. 6) is used to select these different standards.
This is not to be confused with PAL or SECAM colour coding. Pal is used in most countries in
Europe, Secam in France, Russia and most African countries.The United States and Japan use a
different system called NTSC.
100Hz : Conventional televisions (50 Hz) produce a visible image flicker.Thanks to 100 Hz technology,
the scanning frequency is doubled. It is visually more comfortable and the flickering effect is
reduced.
16:9 : Refers to the ration between the length and height of the screen.
Wide screen televisions have a ration of 16/9, conventional screen TV sets have a ration of 4/3.
12

Introducción
Le agradecemos la adquisición de este televisor. Este manual ha sido preparado para
ayudarle a instalar y a hacer funcionar su televisor. Le aconsejamos que lo lea atentamente.
Objeto de esta declaración, cumple con la normativa siguiente :
• Reglamento Técnico del Servicio de Difusión de Televisión y del Servicio Portador
soporte del mismo (Real Decreto 1160/1989) Articulo 9.2
•
Reglamento sobre Perturbaciones Radioeléctricas (Real Decreto 138/1989) Anexo V.
Español
Indice
Instalación
Instalación . . . . . . . . . . . . . . . . . . . . . . . . . . . . . . . . . . . . . . . . . . . . . . . . . . . . . . . .2
Los botones del televisor . . . . . . . . . . . . . . . . . . . . . . . . . . . . . . . . . . . . . . . . . . . .2
Las teclas del mando a distancia . . . . . . . . . . . . . . . . . . . . . . . . . . . . . . . . . . . . . . .3
Instalación rápida . . . . . . . . . . . . . . . . . . . . . . . . . . . . . . . . . . . . . . . . . . . . . . . . . .4
Clasificación de los programas . . . . . . . . . . . . . . . . . . . . . . . . . . . . . . . . . . . . . . . .4
Nombre del programa . . . . . . . . . . . . . . . . . . . . . . . . . . . . . . . . . . . . . . . . . . . . . .4
Memorización manual . . . . . . . . . . . . . . . . . . . . . . . . . . . . . . . . . . . . . . . . . . . . . . .5
Programas preferenciales . . . . . . . . . . . . . . . . . . . . . . . . . . . . . . . . . . . . . . . . . . . .5
Otros ajustes del menú Instalación . . . . . . . . . . . . . . . . . . . . . . . . . . . . . . . . . . . .5
Utilización
Ajustes de la imagen . . . . . . . . . . . . . . . . . . . . . . . . . . . . . . . . . . . . . . . . . . . . . . . .6
Ajustes del sonido . . . . . . . . . . . . . . . . . . . . . . . . . . . . . . . . . . . . . . . . . . . . . . . . .6
Ajuste de varios . . . . . . . . . . . . . . . . . . . . . . . . . . . . . . . . . . . . . . . . . . . . . . . . . . .6
Función despertador . . . . . . . . . . . . . . . . . . . . . . . . . . . . . . . . . . . . . . . . . . . . . . .7
Bloqueo del televisor . . . . . . . . . . . . . . . . . . . . . . . . . . . . . . . . . . . . . . . . . . . . . . .7
Teletexto . . . . . . . . . . . . . . . . . . . . . . . . . . . . . . . . . . . . . . . . . . . . . . . . . . . . . . . . .8
Función 16:9 . . . . . . . . . . . . . . . . . . . . . . . . . . . . . . . . . . . . . . . . . . . . . . . . . . . . . .9
Utilización de PIP . . . . . . . . . . . . . . . . . . . . . . . . . . . . . . . . . . . . . . . . . . . . . . . . . . .9
Periféricos
Vídeo . . . . . . . . . . . . . . . . . . . . . . . . . . . . . . . . . . . . . . . . . . . . . . . . . . . . . . . . . . .10
Otros aparatos . . . . . . . . . . . . . . . . . . . . . . . . . . . . . . . . . . . . . . . . . . . . . . . . . . .10
Para seleccionar los aparatos conectados . . . . . . . . . . . . . . . . . . . . . . . . . . . . . . .10
Conexiones laterales . . . . . . . . . . . . . . . . . . . . . . . . . . . . . . . . . . . . . . . . . . . . . .11
Tecla VCR o DVD . . . . . . . . . . . . . . . . . . . . . . . . . . . . . . . . . . . . . . . . . . . . . . . . .11
Información práctica
Consejos . . . . . . . . . . . . . . . . . . . . . . . . . . . . . . . . . . . . . . . . . . . . . . . . . . . . . . . .12
Glosario . . . . . . . . . . . . . . . . . . . . . . . . . . . . . . . . . . . . . . . . . . . . . . . . . . . . . . . .12
Directiva para el reciclado
Su televisor está fabricado con materiales reutilizables o que pueden ser reciclados.
Para reducir al mínimo el vertido de residuos que pueden afectar al medio
°
ambiente, hay empresas especializadas que recuperan los aparatos usados para
desmontarlos y recolectar los materiales reutilizables (consulte a su proveedor).
1
&
Instalación del televisor
“
Mando a distancia
Coloque su televisor sobre una superficie
Introduzca las 2 pilas de tipo R6 suministradas,
sólida y estable, dejando un espacio libre de al
respetando las polaridades.Verificar que el
menos 5 cm. alrededor del aparato. Para evitar
selector de modo está bien en posición T V.
cualquier situación peligrosa, no coloque sobre
Las pilas que se entregan con el aparato no
el televisor objetos que cubran (tapete), llenos
contienen mercurio ni cadmio níquel, debido a
de líquido (florero) o que desprendan calor
nuestra preocupación por respetar el entorno.
(lámpara).Además, el televisor no debe estar
Le rogamos que no arroje sus pilas usadas sino
expuesto a proyecciones de agua.
que utilice los medios de reciclaje puestos a su
disposición (consulte a su proveedor). En caso de
é
Conexiones
remplazo, utilice pilas del mismo tipo.
‘
Puesta en marcha
• Introduzca la clavija de antena en la toma
Para encender el televisor, pulse el botón
: situada en la parte de atrás.
Encendido-Apagado. Se enciende un piloto
Con las antenas de interior, la recepción puede ser
rojo y se ilumina la pantalla.Vaya directamente
difícil en algunas condiciones. Puede mejorarla
al capítulo Instalación rápida en la página 4.
girando la antena. Si la recepción sigue siendo
Si el televisor permanece en modo standby,
mediocre, se debe utilizar una antena exterior.
pulse el botón P
# del mando a distancia.
• Conecte el cable de alimentación al enchufe
El piloto parpadea cuando usted utiliza el mando
(220-240 V / 50 Hz).
a distancia.
El televisor posee 4 o 5 botones colocados en la
Los botones VOLUME - + (- ” +) permiten
parte delantera o superior del aparato según el
ajustar el sonido. Los botones PROGRAM - +
modelo.
(- P +) permiten seleccionar los programas
deseados. Para acceder a los menús, mantenga
pulsados los 2 botones
” - y ” + (o el
botón MENU). Los botones PROGRAM - +
pueden entonces ser utilizados para
seleccionar un ajuste y los botones
” - +
para efectuarlo. Para salir de los menús,
mantenga pulsados los 2 botones
” - y ”
+ (o el botón MENU).
Nota: cuando está activada la función
Bloqueo
Infantil
estos botones no están disponibles (ver p. 7).
2
5 cm
5 cm
5 cm
Instalación
Los botones del televisor

3
VCR DVD SAT AMP CD
¢
Ÿ
Y
Select
†
·
¢
Ê
Æ
œ
π
‡
Œ
OK
MENU
”
[
P
1
2
3
4
5
6
7
8
9
Ë
0
ù
ACTIVE
`
K
SMART
CONTROL
SMART
-
ª
Las teclas del mando a distancia
Standby
Para poner el televisor en modo
standby. Para encenderlo de
nuevo, pulse b,P @#o 09.
Sonido Surround
Para activar / desactivar el efecto de
Selección de las tomas EXT (p.10)
ampliación del sonido. En estéreo, los
Pulse varias veces para seleccionar el
altavoces parecen más distantes.
aparato conectado.
Para las versiones equipadas con
Virtual Dolby Surround*, se obtienen
Lista de programas
los efectos sonoros traseros del
Para visualizar / borrar la lista de
Dolby Surround Pro Logic.
programas.Utilice el cursor <> para
seleccionar un programa y el cursor
≥
Selector de modo (p.11)
para visualizarlo.
Para activar el mando a distancia en
El símbolo + aparece delante de los
modo TV,VCR, DVD, SAT,AMP o CD.
programas que están bloqueados (p.7).
Botones teletexto (p. 8)
nexTView:
o VCR / DVD (p.11).
(guía de programación TV)
Consultar el folleto respectivo
Acceso al teletexto (p. 8).
(disponible sólo en ciertos modelos).
tecla no utilizada.
Cursor
Menú
Estas 4 teclas permiten desplazarse en
Para acceder o salir de los menús.
los menús
(
<>≤≥)
.
Parada de la imagen.
Programa precedente
Corte del sonido
Para acceder al programa
Para suprimir o restablecer el sonido.
visualizado precedentemente.
Volumen
Teclas numéricas
Para ajustar el nivel sonoro.
Acceso directo a los programas.
Para un programa de 2 cifras, se
Información en pantalla
debe añadir la 2a cifra antes de que
Para hacer aparecer o desaparecer
desaparezca el guión.
el número de programa, el nombre
Modo de sonido
(si existe), la hora, el modo de
Permite forzar las emisiones
Estéreo
sonido y el tiempo restante en el
y Nicam Estéreo en Mono o, para las
programador. Manténgalo pulsado
emisiones bilingües, elegir entre Dual
durante 5 segundos para visualizar
I
o Dual II.
permanentemente el número de
La indicación Mono aparece en rojo
programa en la pantalla.
cuando se trata de una posición forzada.
Active control (según la versión)
Sleeptimer
Mejora la calidad de imagen en
Para determinar el periodo después
función de la calidad de receptión.
del cual el televisor pasará
automáticamente a la situación de
Pantalla dual (según la versión)
standby (de 0 a 240 minutos).
Para activar / desactivar la
Formato 16:9 (p. 9).
visualización en 2 pantalla.
La segunda pantalla permite
Preajustes de imagen y sonido
visualizar el teletexto.
Permite acceder a una serie de
preajustes de la imagen y del sonido.
La posición
Personal
corresponde a
los ajustes efectuados en los menús.
* Fabricado con licencia de Dolby Laboratories.
”Dolby” y el símbolo doble-D son marcas de Dolby Laboratories.
Instalación rápida
La primera vez que enciende el televisor,
“ La búsqueda se inicia automáticamente.
aparece un menú en la pantalla. Este menú le
Todos los programas de TV disponibles se
invita a elegir el país así como el idioma de los
memorizan. La operación toma algunos
menús :
minutos. La visualización muestra la progresión
Menu •
de la búsqueda y la cantidad de programas
Instalacion •
encontrados. Al final desaparece el menú.
Pais •
DK
Para salir o interrumpir la búsqueda, pulse en H.
ES
Español
GB
English
Si no se encuentra ningún programa, remítase al
DE
Français
capítulo de consejos p. 12.
SF
...
‘ Si la emisora o la red cableada transmite la
...
señal de clasificación automática, los
programas se numerarán correctamente.
Si no aparece el menú, mantenga pulsadas por
La instalación se ha terminado.
5 segundos las teclas
”- y ”+ del televisor,
( Si no es el caso, debe utilizar el menú
para hacerlo aparecer.
Clasificación para renumerarlos.
& Utilice el cursor <> del telemando para
Algunas emisoras o redes cableadas difunden sus
elegir su país, y luego valide con ≥.
propios parámetros de clasificación (región, idioma,
Si su país no aparece en la lista, seleccione la
etc.). En este caso, debe indicar su elección con el
opción “. . .”
cursor <> y luego validar con ≥.
é Luego seleccione su idioma con
el cursor
<> y
luego valide con ≥.
Clasificación de los programas
& Pulse la tecla H. El Menú Principal aparece en
é Con el cursor, seleccione el menú
Instalación
la pantalla.
y luego el menú Ordenar.
“ Seleccione el programa que desee desplazar
Menu •
Instalacion •
con el cursor <> y pulse en ≥.
Idioma •
‘ Utilice luego el cursor <> para elegir el
Pais •
00
nuevo número y valide con ≤.
Autostore •
01 TVE1
( Vuelva a iniciar las etapas “ y ‘ tantas veces
Sinto. Manual •
02 TVE2
Ordenar •
03
Æ
A3
como haya programas por renumerar .
Prog. Preferidos •
04 CAN+
05 TV5
§ Para salir de los menús, pulse en
d.
Nombre
•
Nombre del programa
Si lo desea, puede dar un nombre a los
‘ Utilice el cursor ≤≥ para desplazarse en la
programas y tomas exteriores.
zona de visualización del nombre
Obser
vación: durante la instalación, los programas
(5 caracteres) y el cursor <> para elegir los
se nombran automáticamente cuando se
caracteres.
transmite la señal de identificación.
( Una vez introducido el nombre, utilice la tecla
& Pulse la tecla
H.
≤ para salir. El nombre se ha memorizado.
é Con el cursor, seleccione el menú
Instalación,
§ Vuelva a comenzar las etapas “ a ( para
y luego
Nombre.
cada programa por nombrar.
“ Utilice las teclas
@ P # para elegir el
è Para salir de los menús, pulse en
d.
programa por nombrar o modificar.
4
Memorización manual
Este menú permite memorizar los programas
‘
Búsqueda : pulse en ≥. La búsqueda comienza.
uno por uno.
En cuanto se encuentra un programa, se
& Pulse la tecla
H.
detiene el desplazamiento y aparece el nombre
é Con el cursor, seleccione el menú
Instalación
del programa (si está disponible).Vaya a la
y luego Sinto. Manual. :
siguiente etapa. Si conoce la frecuencia del
programa deseado, escriba directamente su
Menu •
Instalacion •
número con las teclas
0 a 9.
Idioma •
Si no se encuentra ninguna imagen, ver los consejos
Pais •
(p. 12).
Autostore •
Sistema •
Sinto. Manual.
(
Num. Programa : introducir el número
Busqueda •
Ordenar •
Num. Programa •
deseado con las teclas ≤≥ o
0 a 9.
Prog. Preferidos •
Sint. Fina •
Ejemplo : programa 1, escriba
01.
Nombre
•
Memorizar •
§
Sint. Fina : si la recepción no es satisfactoria,
“ Sistema : seleccione Europa (detección
ajuste con el cursor ≤≥.
automática*) o
Europa Oeste (norma BG),
è
Memorizar : pulse en ≥. El programa se
Europa Este (norma DK), Reino Unido
memoriza.
(norma I) o Francia (norma LL’ ).
! Repita las etapas ‘ a è tantas veces como
* Salvo para Francia (norma LL’ ), se debe
haya programas por memorizar.
seleccionar obligatoriamente la opción
Francia.
ç Para salir de los menús, pulse en
d.
Programas preferenciales
Este menú permite elegir los programas a los
Aparece la lista de programas preferenciales.
que se accederá mediante la tecla
@ P #.
Se activa automáticamente en esta lista los
& Pulse la tecla
H.
programas encontrados durante la instalación.
é Con el cursor, seleccione el menú
Instalación
“ Utilice el cursor arriba/abajo para seleccionar
y luego Prog. Preferidos y pulse ≥.
el programa que desee.
‘ Utilice el cursor izquierda/derecha para añadir
Menu •
Instalacion •
o retirar el programa de la lista.
Idioma •
( Repita las etapas “ y ‘ tantas veces cuantos
Pais •
programas desee añadir o retirar de la lista.
Autostore •
Sinto. Manual. •
§ Para salir, pulse varias veces
d.
Ordenar •
Prog. Preferidos
2 •
Nombre
•
Otros ajustes del menú Instalación
transmite la señal de clasificación automática,
&
Pulse la tecla H y seleccione el menú
los programas se numerarán correctamente.
Instalación :
Si no es el caso, debe utilizar el menú
é Idioma : para modificar el idioma de
Clasificación para renumerarlos (ver p. 4).
visualización de los menús.
Algunas emisoras o redes cableadas difunden sus
“
País : para elegir su país.
propios parámetros de clasificación (región, idioma,
Este ajuste interviene en la búsqueda, la
etc.). En este caso, debe indicar su elección con el
clasificación automática de los programas y la
cursor <> y luego validar con ≥.Para salir o
visualización del teletexto. Si su país no aparece en
interrumpir la búsqueda, pulse en
la lista, seleccione la opción “. . .”
H
. Si no se
encuentra ninguna imagen, ver los consejos (p. 12).
‘
Autostore : para ejecutar una búsqueda
( Para salir de los menús, pulse en
d.
automática de todos los programas disponibles
en su región. Si la emisora o la red cableada
5
Ajustes de la imagen
•
Color : actúa sobre la intensidad del color.
& Pulse la tecla H y luego en ≥. El menú
•
Contraste : actúa sobre la diferencia entre los
Imagen aparece:
tonos claros y los tonos oscuros.
Menu General
•
•
Realce : actúa sobre la nitidez de la imagen.
Imagen
Brillo •
•
Matiz : actúa sobre la calidad de los colores :
Sonido
•
Color •
Frío (más azul), Normal (equilibrado) o
Varios
•
Contraste •
Caliente (más rojo).
Instalacion
•
Realce •
Matiz •
•
Opciones Digitales :
Opciones Digita. •
- 100 Hz : procesamiento 100 Hz.
Memorizar •
-
Digital Scan (según la versión) : permite reducir el
efecto de centelleo visible en ciertas imágenes.
é Utilice el cursor <> para seleccionar un ajuste
-
Doblador de Líneas : duplicación de la
y el cursor ≤≥ para ajustar.
resolución vertical que elimina las líneas visibles.
Obser
vación: durante el ajuste de la imagen, sólo
permanece visualizada la línea seleccionada.
Importante para imágenes NTSC (60 Hz).
Pulse en <> para hacer reaparecer el menú.
“ Una vez efectuados los ajustes, seleccione la
Descripción de los ajustes:
opción
Memorizar y pulse en ≥ para grabarlos.
•
Brillo : actúa sobre la luminosidad de la imagen.
Pulse en
d para salir.
Ajustes del sonido
•
Delta Volumen : permite compensar las
& Pulse en H, seleccionar Sonido (>) y pulse
diferencias de volumen que existen entre los
en ≥.Aparece el menú
Sonido :
diferentes programas o las tomas EXT.
Menu General •
Este ajuste sólo funciona para los programas
Imagen •
Agudos •
0 a 40 y las tomas EXT.
Sonido
Graves •
•
AVL (Automatic Volume Leveler) : control
Varios •
Balance •
Instalacion
•
Delta Volumen •
automático del volumen que permite limitar
AVL •
los aumentos de sonido, en particular durante
Vol. Auricular. •
los cambios de programas o publicidades.
Memorizar •
•
Volumen Auriculares : Permite ajustar el
volumen de los auriculares independientemente
é Utilice el cursor <> para seleccionar un
del volumen de los altavoces del televisor.
ajuste y el cursor ≤≥ para ajustar.
“ Una vez efectuados los ajustes, seleccione la
Descripción de los ajustes :
opción
Memorizar y pulse en ≥ para
•
Agudos : actúa en las frecuencias altas del sonido.
grabarlos.
• Graves : actúa en las frecuencias bajas.
‘ Para salir de los menús, pulse en
d.
•
Balance : para equilibrar el sonido en los
altavoces izquierdo y derecho.
Ajuste de varios
son sensibles a las variaciones del campo
& Pulse en H, seleccionar Varios (
>
) y pulse en
magnético terrestre. Este ajuste permite
≥. Puede ajustar :
compensar su influencia ajustando la
é
Timer, Bloqueo para niños y Bloqueo Prog. :
inclinación de la imagen.
ver página siguiente
(
Dynamic Contrast (según la versión) :
“
Dynamic NR : Min, Med (posición óptima),
Min
, Med (posición óptima), Max o Parada.
Max o Parada : atenúa el ruido de la imagen
Permite activar los circuitos de ajuste
(la nieve), en caso de recepción difícil.
automático del contraste.
‘
Rotacion (disponible únicamente en las pantallas
§ Para salir de los menús, pulse en
d.
de gran tamaño) : las pantallas de gran tamaño
6

