Philips GC8080: инструкция
Раздел: Бытовая техника
Тип: Парогенератор
Инструкция к Парогенератору Philips GC8080
Intellicare
GC8080

2
3

4

ENGLISH 6
POLSKI 17
ROMÂNĂ 30
РУССКИЙ 41
SLOVENSKY 54
УКРАЇНСЬКА 66
SLOVENŠČINA 79
SRPSKI 90
GC8080

ENGLISH6
Introduction
Thank you for buying the Intellicare GC8080, the new intelligent steam-
ironing system from Philips.
The iron offers non-stop ironing and also has a detachable water tank
that can be refilled at any moment.
The iron has a constant high steam output, which is a unique feature
for steam-ironing systems with unlimited autonomy.This gives you a
constant and fast ironing result.
The Intellicare GC8080 is equipped with intelligent electronic
temperature control with fabric-specific settings. It has an easy-to-use
programmable interface with audio feedback and an Iron-off function
that automatically switches the soleplate off when the iron has not
been used for several minutes for extra safety and to save energy.
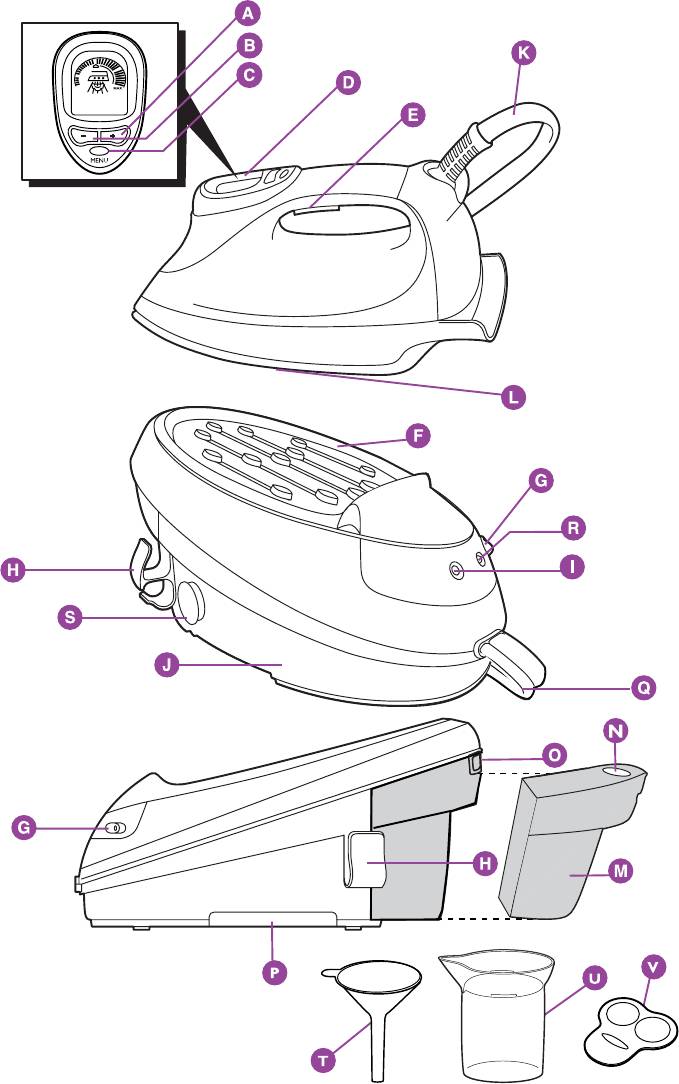
General description
A Temperature button (+)
B Temperature button (-)
C Menu button
D Display
E Steam activator
F Iron stand
G Power on/off switch with pilot light
H Cord storage facility for mains cord & supply hose
I Steam tank pilot light
J Steam tank
K Supply hose
L Soleplate
M Detachable water tank
N Filling opening
O Water tank release lever
P Transport handgrip
Q Mains cord
R 'Water tank refill' indicator light
S Calc-Clean rinsing cap & plug
T Funnel
U Cup
V Key (for removing Calc-Clean plug)
Important
Read these instructions for use carefully before using the appliance and
save them for future reference.
◗ Check if the voltage indicated on the type plate corresponds to
the local mains voltage before you connect the appliance.
◗ Only connect the appliance to an earthed wall socket.

ENGLISH 7
◗ Do not use the appliance if the plug, the cord, the supply hose or
the appliance itself shows visible damage, or if the appliance has
been dropped or is leaking.
◗ Check the cord and the supply hose regularly for possible
damage.
◗ If the mains cord or the supply hose is damaged, it must be
replaced by Philips, a service centre authorised by Philips or
similarly qualified persons in order to avoid a hazard.
◗ Never leave the appliance unattended when it is connected to the
mains.
◗ Never immerse the iron or the steam tank in water.
◗ Keep the appliance out of the reach of children.
◗ Always place and use the iron and the steam tank on a stable,
level and horizontal surface. Do not put the steam tank on the
soft part of the ironing board.
◗ Do not allow the mains cord and supply hose to come into
contact with the soleplate when it is hot.
◗ The iron stand and the soleplate of the iron can become
extremely hot and may cause burns if touched. If you want to
move the steam tank, do not touch the stand.
◗ When you have finished ironing, when you clean the appliance,
when you fill or empty the water tank and also when you leave
the iron even for a short while: set the steam control to position
O, put the iron on its heel and remove the mains plug from the
wall socket.
◗ Do not put perfume, vinegar, starch, descaling agents, ironing aids
or other chemicals in the water tank.
◗ If steam escapes from under the steam tank cap when the
appliance is heating up, switch the appliance off and tighten the
steam tank cap. If steam continues to escape when the appliance is
heating up, switch the appliance off and contact a service centre
authorised by Philips.
◗ Never remove the Calc-Clean rinsing cap and unscrew the Calc-
Clean rinsing plug when the steam tank is hot.
◗ This appliance is intended for household use only.
Before first use
B
The iron may give off some smoke when you use it for the first time.This
is normal and will stop after a short while.
B
White particles may come out of the soleplate when you use the iron for
the first time.This is normal; the particles are harmless and will stop
coming out of the iron after a short while.
B
When you switch the appliance on, the steam tank may produce a
pumping sound.This is normal; the sound tells you that water is being
pumped into the steam tank.
1 Remove any sticker or protective foil from the soleplate and
clean the soleplate with a soft cloth.
ENGLISH8
2 Place the steam tank on a stable and level surface, i.e. on the
C
ironing board or on a table.
Preparing for use
Filling the detachable water tank
If the tap water in your area is very hard, we advise you to mix the tap
water with an equal amount of demineralised water.
Do not put perfume, vinegar, starch, descaling agents, ironing aids, other
chemicals or 100 percent distilled water in the water tank.
1 Remove the detachable water tank from the steam tank.
C
2 Fill the water tank with water up to the MAX indication.
3 Slide the water tank back into the steam tank.
◗ The water tank can be refilled at any time during use.
◗ This appliance has a built-in water level sensor.When the
minimum level in the detachable water tank has been reached, the
'water tank refill' indicator light goes on.
Steam ironing will not be possible!
B
Note:When you use the appliance for the first time or after Calc Clean,
a lot of water will be pumped from the detachable water tank into the
steam tank. Refill the water tank, if necessary.
◗ The message "Water low, refill tank" is shown on the display and
you will hear two short beeps.
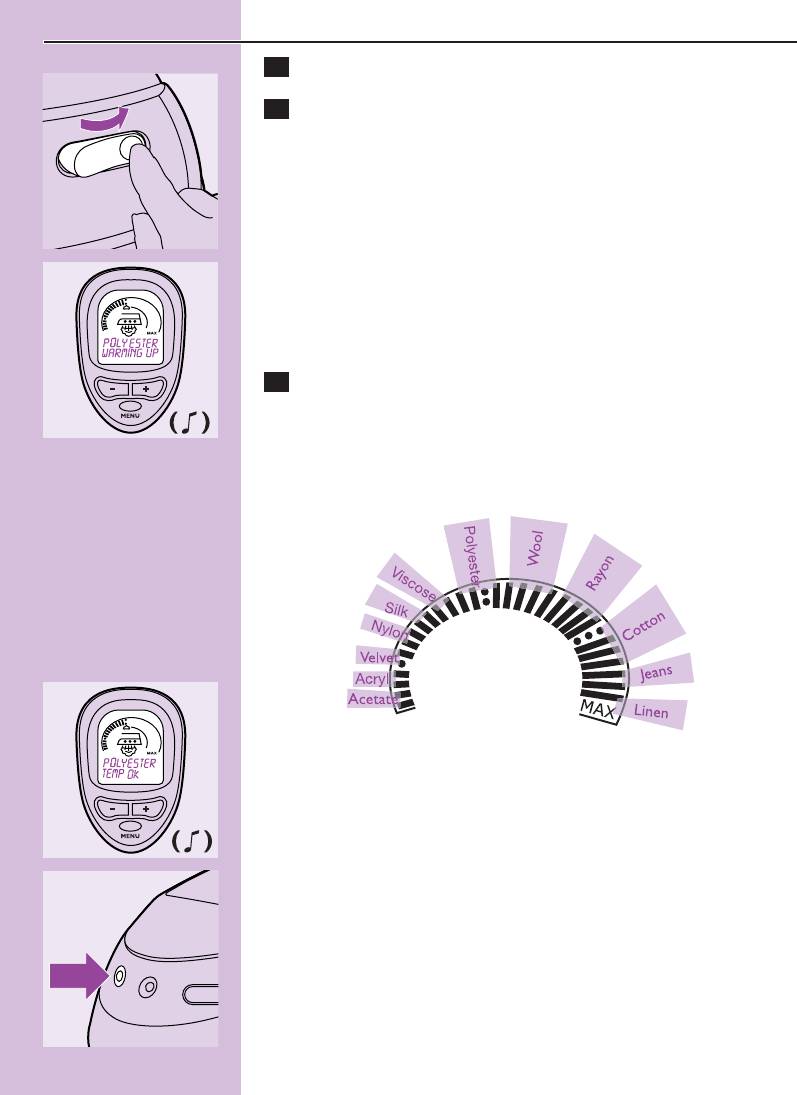
Setting the temperature
1 Check the garment label for the required ironing temperature.
2 Switch the appliance on
C
Put the mains plug in an earthed wall socket and switch the appliance
on by pressing the on/off switch on the steam tank.
◗ The display lights up and you will hear a short beep.The following
message moves across the display:
"Welcome to Philips - Checking Sensor - Warming Up".
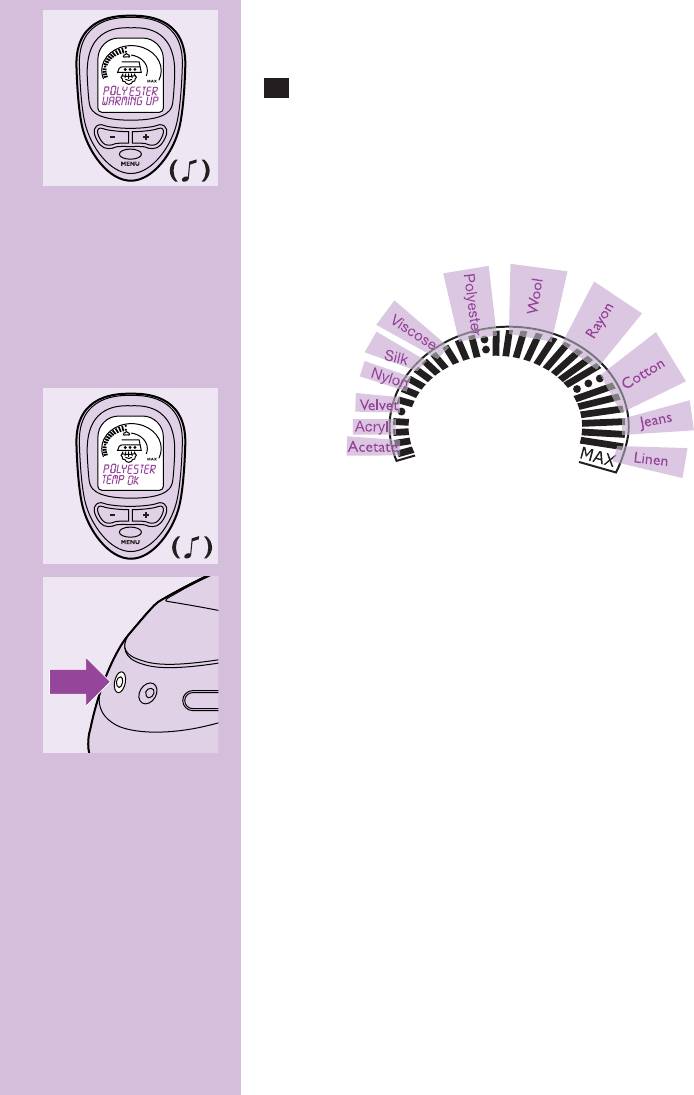
ENGLISH 9
◗ When you switch the appliance on, it will automatically heat up to
C
temperature setting 2.
3 Press temperature button + or - (hotter or colder) to set the
required ironing temperature/fabric type.
◗ The display shows the type of fabric for which the selected
temperature is most suitable.
◗ The display indicates that the iron is heating up or cooling down
C
to the selected temperature.
A double beep and a message on the display indicate that the soleplate
has reached the selected temperature.
◗ As soon as the steam tank has reached its maximum pressure
C
level and is ready for steam ironing, the steam tank pilot light goes
out.
Tips
- If the article consists of various kind of fibres, always select the
temperature required by the most delicate fibre, i.e. the lowest
temperature. If, for example, the fabric consists of 60% polyester and
40% cotton, it should be ironed at the temperature indicated for
polyester (2).
- If you do not know what kind of fabric(s) the article is made of,
determine the right ironing temperature by ironing a part that will
not be visible when you wear or use the article.
- Silk, woolen and synthetic materials : iron the reverse side of the
fabric to prevent shiny patches.
- Fabrics that tend to acquire shiny patches should be ironed in one
direction only (along with the nap) while applying very little pressure.
ENGLISH10
- Start ironing the articles that require the lowest ironing temperature,
i.e. those made of synthetic materials.
◗ To make the iron cool down faster, simply apply steam or iron a
piece of cloth.
Display menu
B
For an explanation of the English terms on the display, see the table at
the end of these instructions for use.
The GC8080 offers 3 functions that allow you to adjust the settings of
the appliance to your own preferences.
◗ These functions are listed in a menu.You can use the menu by
C
pressing the menu button and the + & - buttons.
◗ The menu structure of these functions is:
- Language: (several language possibilities)
- Sound: (on)/off
- Iron off: 5/(10)/15/20 minutes
Note: default settings are shown between ( ).
To select your preferred settings:
1 Press the menu button for 1 second.
2 Use the + and - buttons to scroll through the available settings.
3 When you have reached the setting of your choice, press the
menu button again.The message "Selection Confirmed"
appears on the display.
4 To exit the menu, wait 3 seconds.
Using the appliance
Steam ironing
The supply hose may become hot during a long ironing session.
B
The system may occasionally produce a pumping sound during steam
ironing.This is normal and tells you that water is being pumped into the
steam tank.
1 Make sure there is enough water in the water tank.
◗ Steam ironing is only possible at higher ironing temperatures
(higher than 2).
2 Press the steam activator to start steam ironing.
C
ENGLISH 11
◗ During steam ironing, the 'steam tank heating up' pilot light goes
on from time to time to indicate that the steam tank is heating up
to maintain the right temperature and pressure.
◗ The opening and closing of the steam valve in the steam tank will
cause a clicking sound.This is perfectly normal.
◗ The steam function is controlled automatically and it is linked to
C
the selected temperature.The steam symbol is shown on the
display when the temperature of the iron is high enough for steam
ironing.
- 2: visible wet steam
- MAX: invisible dry steam
◗ The steam function will be automatically disabled at ironing
temperatures that are not suitable for steam ironing.
Ironing without steam
1 Start ironing without pressing the steam activator.
Features
Vertical steaming
Never direct the steam at people.
◗ You can steam iron hanging curtains and clothes (jackets, suits,
C
coats) by holding the iron in vertical position and pressing the
steam activator.
Iron-off function
The iron-off function automatically switches off the soleplate when the
steam activator has not been pressed for a particular number of
minutes, depending on the iron-off time you have selected.
You can select an iron-off time of 5, 10, 15 or 20 minutes (see section
'Display menu').
1 The display will show the text "Iron off" and you will hear an
intermittent beep.
2 If you want to start ironing again, press any button on the iron.
The soleplate will then start heating up again.
B
NB: the Iron-off function switches off the soleplate but does not switch
off the steam tank. If you intend to stop ironing, you should switch the
appliance off and unplug the steam tank.
ENGLISH12
After Ironing
1 Put the iron on the stand.
C
2 Switch the appliance off.
C
3 Remove the mains plug from the wall socket and let the iron
cool down.
Cleaning and maintenance
After each use
Never immerse the iron in water nor rinse it under the tap.
1 Clean the iron with a damp cloth.
2 Wipe scale and any other deposits off the soleplate with a
damp cloth and a non-abrasive cleaning agent.
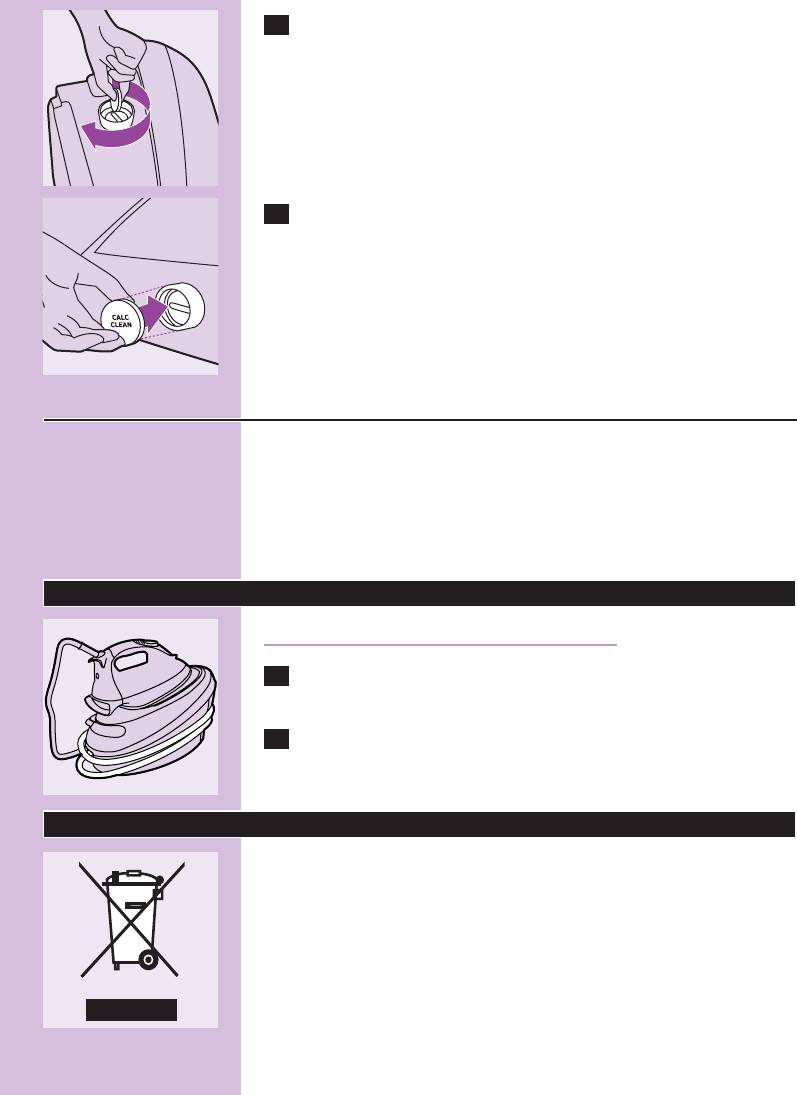
Calc Clean
Never remove the Calc-Clean rinsing cap and unscrew the Calc-Clean
rinsing plug when the steam tank is hot.
VERY IMPORTANT: Rinse the steam tank once a month or after every
10 times of use to prevent damage to your iron.
B
The scale that develops inside the steam tank will not deposit onto the
walls. Just calc-clean the steam tank once or twice a month to keep your
Intellicare in good condition.
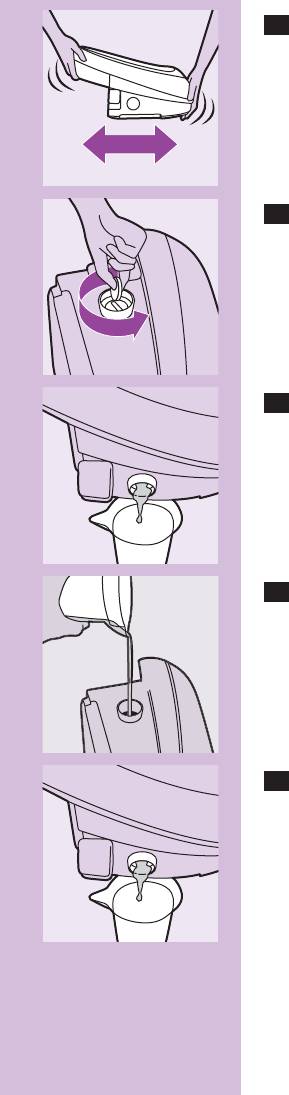
1 Make sure that the steam tank has been unplugged for more
than 2 hours and is not hot.
2 Remove the detachable water tank.
C
ENGLISH 13
3 Hold the steam tank with both hands and shake well.
C
4 Turn the steam tank on its side and remove the Calc-Clean
C
rinsing cap & rinsing plug with the special key supplied or with
a coin.
5 Empty the steam tank by pouring out the water into the cup or
C
into the sink.
6 Fill the steam tank with fresh water by means of the cup and
C
funnel and shake again.
7 Empty the steam tank by pouring out the water into the cup or
C
into the sink.
Repeat steps 6 & 7 twice to obtain the best result.
ENGLISH14
8 Put the Calc-Clean rinsing plug back into the steam tank and
C
tighten it with the special key supplied or with a coin.
9 Put the Calc-Clean rinsing cap back onto the steam tank.
C
Calc-Clean reminder
When the display shows the following message:
"SWITCH IRON OFF - CALC-CLEAN STEAM TANK"
You are advised to calc-clean the steam tank as described above in
steps 1 to 9.
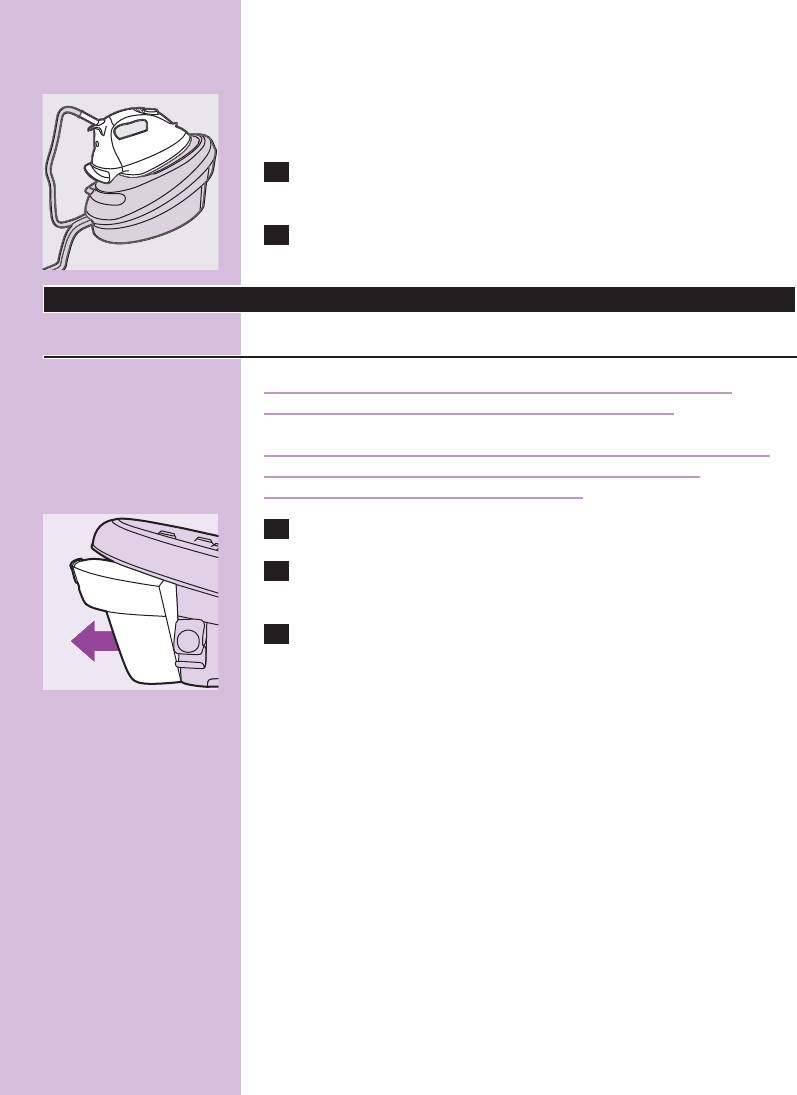
Storage
Always let the iron cool down before storing it.
1 Empty the water tank and store the supply hose and the mains
C
cord.
2 There are handgrips on the either side of the steam tank for
easy transport.
Environment
◗ Do not throw the appliance away with the normal household
C
waste at the end of its life, but hand it in at an official collection
point for recycling. By doing this you will help to preserve the
environment.

ENGLISH 15
Troubleshooting
This chapter summarises the most common problems you could encounter with your iron. Please
read the different sections for more details. If you are unable to solve the problem, please contact the
Philips Customer Care Centre in your country.
Problem
Possible cause(s)
Solution
The appliance does not become hot.
There is a connection problem.
Check the mains cord, the plug and
the wall socket.
The steam tank has not been switched
Set the on/off switch to 'on'.
on.
The Iron-off function has switched the
Press any button on the iron to
soleplate off.
deactivate the Iron-off function.The
soleplate will then start heating up
again.
Smoke comes out of my new iron
Some parts of the appliance have
This phenomenon is perfectly normal
when I switch it on.
been lightly greased in the factory and
and will cease after a short while.
may initially give off some smoke when
heated.
The iron does not produce any steam.
There is not enough water in the
Fill the water tank (see 'Preparing for
water tank.
use', section 'Filling the detachable
water tank').
The steam tank pilot light is still on.
Wait until the pilot light goes out.
The selected ironing temperature is
Set the temperature to 2 or higher.
too low for steam ironing.
The water tank has not been properly
Attach the water tank to the steam
attached to the steam tank.
tank properly (you will hear a click).
When the iron has been set to a very
Set the iron to a lower temperature,
high temperature, the steam produced
e.g. 2, to check if the iron is actually
is dry and hardly visible. It will be even
producing steam.
less visible when the ambient
temperature is relatively high and it will
be entirely invisible when the
temperature has been set to MAX.
Flakes and impurities come out of the
Impurities or chemicals present in the
Clean the soleplate with a damp cloth.
soleplate or the soleplate is dirty.
water have deposited in the steam
vents and/or on the soleplate.
"Error" has appeared on the display
A sensor failure has been detected.
Contact an authorised Philips service
and the iron beeps continuously.
centre.
The appliance produces a pumping
Water is being pumped into the steam
This is normal.
sound.
tank.
The pumping sound does not stop.
Unplug the iron immediately and
contact an authorised Philips service
centre.
Dirty water comes out of the
Too much scale and minerals have
Rinse the steam tank. See chapter
soleplate.
accumulated inside the steam tank.
'Cleaning and maintenance'.

ENGLISH16
Explanation of display
Action
Option
TranslationMessage in English
Switching the appliance on
WELCOME TO PHILIPS -
CHECKING SENSORS -
CHECKING WATER
Using the menu button
LANGUAGE
Choosing a language
ENGLISH - DUTCH -
FRENCH - GERMAN -
CONFIRMED
Switching the sound on or
SOUND - << OFF >> -
off
>> ON << -
CONFIRMED
Setting the auto shut-off
IRON OFF - 5 MIN - 10
time
MIN - 15 MIN - 20 MIN -
CONFIRMED
Iron switches off after the
IRON OFF - STANDBY -
auto shut-off time has
PRESS ANY KEY TO
elapsed
RESUME
Pressing the + and - buttons
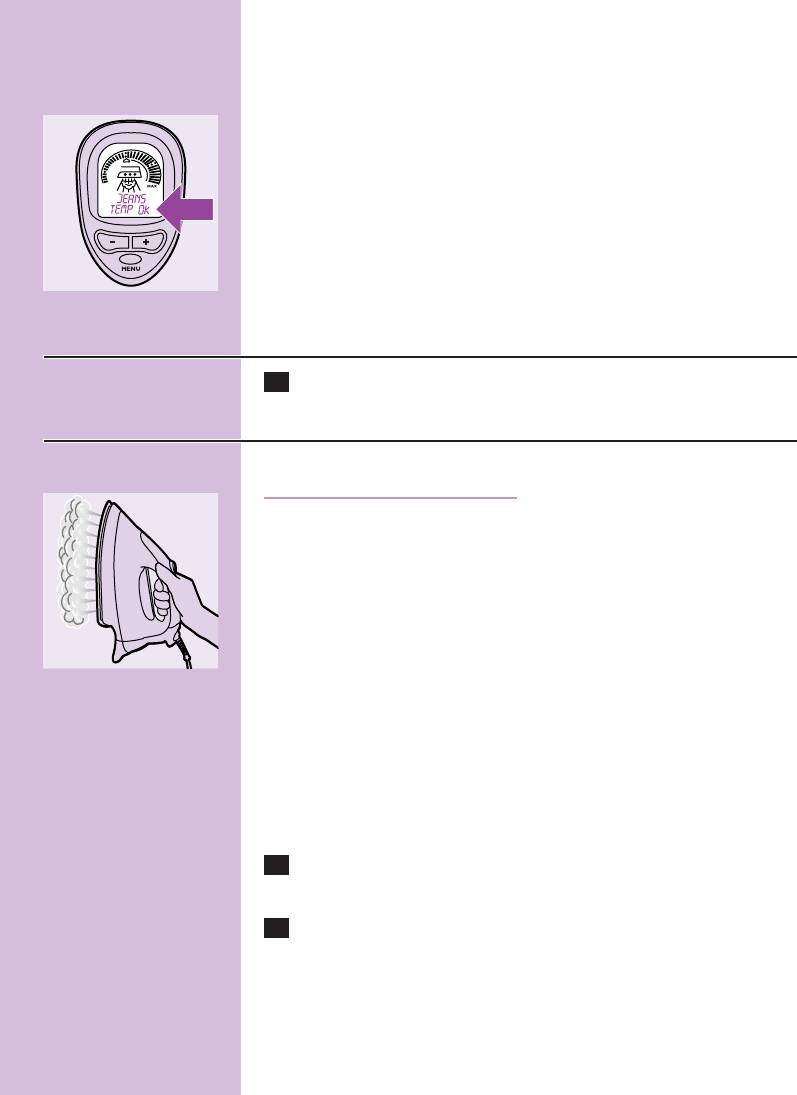
Choosing the type of fabric
ACETATE - ACRYLIC -
VELVET - NYLON - SILK -
VISCOSE - POLYESTER -
WOOL - RAYON -
COTTON - JEANS - LINEN
Iron warming up because
WARMING UP
different type of fabric has
been selected
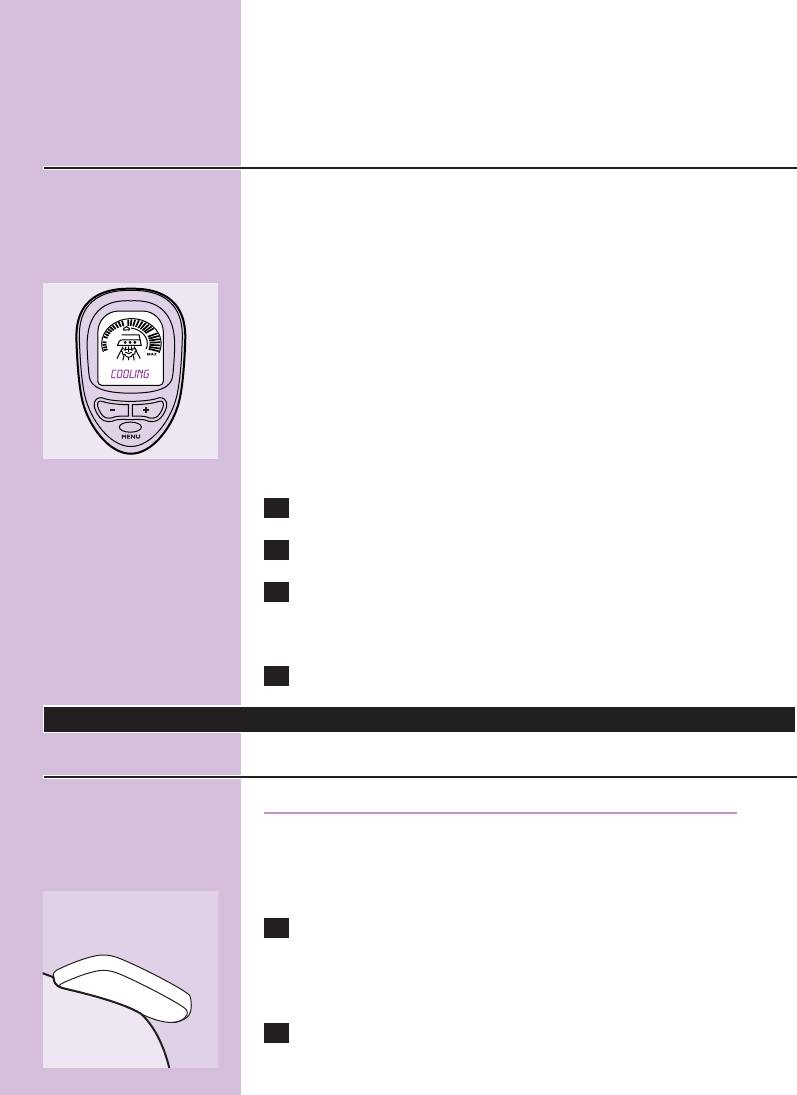
Iron cooling down because
COOLING
different type of fabric has
been selected
Correct temperature for
TEMP OK
selected type of fabric has
been reached
Water tank is empty or has
WATER LOW - REFILL
not been placed (properly)
WATERTANK
Iron has been used 10 times:
SWITCH OFF IRON -
rince the steam tank
CALC-CLEAN STEAM
TANK
Iron should not be used
ERROR 01
Guarantee & service
If you need information or if you have a problem, please visit the Philips website at www.philips.com or
contact the Philips Customer Care Centre in your country (you will find its phone number in the
worldwide guarantee leaflet). If there is no Customer Care Centre in your country, turn to your local
Philips dealer or contact the Service Department of Philips Domestic Appliances and Personal Care BV.

POLSKI 17
Wstęp
Dziękujemy za zakup nowego, inteligentnego systemu prasowania na
parę Intellicare GC8080, produkcji firmy Philips.
Żelazko to oferuje prasowanie non stop, dysponuje również
oddzielnym zbiornikiem na wodę, który można napełnić w dowolnym
momencie.
Żelazko wytwarza stały strumień pary, co jest unikalną funkcją
charakteryzującą niezależne systemy sterowania na parę. Zapewnia on
doskonałe i błyskawiczne rezultaty prasowania.
Żelazko Intellicare GC8080 wyposażone jest w inteligentne
elektroniczne sterowanie temperaturą z ustawieniami odpowiednimi
dla różnych rodzajów tkaniny. Posiada ono łatwy w obsłudze
programowany interfejs z informacją dźwiękową i automatyczną funkcją
wyłączania podgrzewania płyty żelazka, gdy przez kilka minut bez
przerwy nie było ono używane, co służy dodatkowemu bezpieczeństwu
i umożliwia oszczędzanie energii.
Opis urządzenia
A Przycisk temperatury (+)
B Przycisk temperatury (-)
C Przycisk menu
D Wyświetlacz
E Przycisk włączania pary
F Podstawa żelazka
G Przełącznik on/off zasilania oraz lampka kontrolna
H Magazynek na przewód zasilający oraz wąż dopływu pary
I Lampka kontrolna zbiornika na parę
J Zbiornik na parę
K Wąż dopływu pary
L Stopa prasująca
M Oddzielny zbiornik na wodę
N Otwór napełniania wodą
O Dźwignia zwalniająca zbiornik na wodę
P Uchwyt ułatwiający przenoszenie
Q Przewód zasilający
R Lampka kontrolna napełnienia zbiornika na wodę
S Kapturek oraz korek układu płukania Calc-Clean
T Lejek
U Miarka
V Klucz (do zdejmowania korka Calc-Clean)
Ważne
Przed pierwszym użyciem urządzenia zapoznaj się dokładnie z
instrukcją jego obsługi i zachowaj ją na przyszłość, do ewentualnej
konsultacji.

POLSKI18
◗ Przed podłączeniem urządzenia upewnij się, czy napięcie podane
na tabliczce znamionowej jest zgodne z napięciem w sieci
elektrycznej.
◗ Podłączaj urządzenie wyłącznie do gniazdka z uziemieniem.
◗ Nie używaj żelazka, jeśli wtyczka, przewód zasilający, wąż
elastyczny urządzenia lub samo urządzenie ma widoczne znaki
uszkodzenia, albo jeśli urządzenie zostało upuszczone lub
przecieka.
◗ Regularnie kontroluj przewód zasilający i wąż elastyczny w celu
upewnienia się, że nie mają żadnych uszkodzeń.
◗ Jeśli przewód zasilający lub wąż elastyczny urządzenia ulegnie
uszkodzeniu, musi zostać wymieniony w autoryzowanym punkcie
serwisowym firmy Philips lub przez osobę o odpowiednich
kwalifikacjach, co pozwoli uniknąć ewentualnego niebezpieczeństwa.
◗ Nie pozostawiaj urządzenia bez uwagi, gdy jest ono podłączone do
sieci.
◗ Nigdy nie zanurzaj w wodzie żelazka ani zbiornika parowego.
◗ Przechowuj urządzenie w miejscu niedostępnym dla małych dzieci.
◗ Zawsze ustawiaj i używaj żelazka oraz zbiornika na parę na
stabilnej, równej i poziomej powierzchni. Nie kładź zbiornika na
parę na miękkiej części deski do prasowania.
◗ Nie pozwól, aby przewód i wąż elastyczny stykały się z rozgrzaną
stopą żelazka.
◗ Podstawa oraz stopa żelazka mogą się bardzo nagrzewać, a przy
dotknięciu mogą powodować oparzenia. Jeśli chcesz przesunąć
zbiornik parowy, nie dotykaj podstawy żelazka.
◗ Po skończeniu prasowania, podczas czyszczenia żelazka, podczas
napełniania lub opróżniania zbiornika na wodę, a także gdy
zostawiasz żelazko choćby na krótką chwilę: ustaw regulator pary
na pozycję O, ustaw żelazko w pozycji pionowej i wyjmij wtyczkę
z gniazdka ściennego.
◗ Do zbiornika na wodę nie wlewaj perfum, octu, krochmalu,
środków odwapniających, środków ułatwiających prasowanie ani
żadnych innych środków chemicznych.
◗ Jeśli podczas rozgrzewania się urządzenia spod nakretki na
zbiorniku pary ulatnia się para, należy wyłączyć urządzenie i
skontaktować się z autoryzowanym centrum serwisowym firmy
Philips. Jeśli podczas rozgrzewania się urządzenia ze zbiornika na
parę w dalszym ciągu ulatnia się para, należy wyłączyć urządzenie i
skontaktować się z autoryzowanym centrum serwisowym firmy
Philips.
◗ Gdy zbiornik na parę jest rozgrzany, nigdy nie zdejmuj kapturka
układu płukania Calc-Clean ani nie odkręcaj jego korka.
◗ Urządzenie to przeznaczone jest wyłącznie do użytku domowego.
Przed pierwszym użyciem
B
Podczas korzystania z żelazka po raz pierwszy możesz zauważyć
wydobywający się z niego dym. Zjawisko to jest normalne i po krótkim
czasie zanika.
POLSKI 19
B
Podczas pierwszego użycia ze stopy nowego żelazka mogą spadać białe
cząstki. Zjawisko to jest normalne; Cząstki te są nieszkodliwe i po
krótkim czasie przestaną pojawiać się.
B
Podczas włączania urządzenia zbiornik na parę może wytwarzać dźwięk
charakterystyczny dla pompowania. Zjawisko to jest normalne; dźwięk
ten oznacza, że do zbiornika na parę pompowana jest woda.
1 Usuń wszelkie naklejki lub folię ochronną ze stopy żelazka i
wymyj ją miękką ściereczką.
2 Umieść zbiornik na parę na stabilnej i równej powierzchni, na
C
przykład na desce do prasowania lub na stole.
Przygotowanie do użycia
Napełnianie zdejmowanego zbiornika na wodę.
Jeśli w twojej okolicy woda z kranu jest bardzo twarda, radzimy
zmieszać ją w proporcji 1:1 z wodą zdemineralizowaną.
Do zbiornika na wodę nie wlewaj perfum, octu, krochmalu, środków
odwapniających, ułatwiających prasowanie, innych środków
chemicznych ani 100% wody destylowanej.
1 Odłącz zbiornik na wodę od zbiornika na parę.
C
2 Napełnij zbiornik wodą do poziomu oznaczonego symbolem
MAX.
3 Nasuń ponownie zbiornik na wodę na zbiornik na parę.
◗ Zbiornik na wodę można podczas działania urządzenia, w
dowolnej chwili, uzupełniać.
◗ To urządzenie ma wbudowany czujnik poziomu wody. Kiedy
minimalny poziom w wyjmowanym pojemniku na wodę zostanie
osiągnięty, lampka wskazująca napełnienie pojemnika z wodą
będzie się świeciła.
Prasowanie na parę nie będzie wtedy możliwe!
B
Uwaga: Gdy korzystasz z urządzenia po raz pierwszy lub korzystasz z
niego po użyciu funkcji Calc-Clean, do zbiornika na parę zostanie
przepompowana ze zbiornika na wodę duża ilość wody.W razie
potrzeby ponownie napełnij zbiornik na wodę.
◗ Na wyświetlaczu ukaże się komunikat: "Water low, refill tank"
(mało wody, napełnij zbiornik) i rozlegną dwa krótkie sygnały
dźwiękowe.
POLSKI20
Ustawianie temperatury
1 Sprawdź informacje na temat prasowania na metce ubrania.
2 Włącz urządzenie.
C
Wetknij wtyczkę do uziemionego gniazdka ściennego i włącz
urządzenie, naciskając na przełącznik on/off znajdujący się na zbiorniku
na parę.
◗ Zaświeci się wyświetlacz i rozlegnie się krótki sygnał dźwiękowy.
Na wyświetlaczu pojawi się następujący komunikat:
"Welcome to Philips - Checking Sensor - Warming Up". (Philips wita-
Sprawdzanie czujnika - Rozgrzewanie się urządzenia).
◗ Włączone urządzenie zacznie automatycznie rozgrzewać się do
C
temperatury 2.
3 Aby wybrać temperaturę prasowania odpowiednią dla danego
rodzaju materiału, wciśnij przycisk temperatury + lub -
(zwiększ lub zmniejsz temperaturę).
◗ Na wyświetlaczu ukaże się rodzaj materiału, dla którego wybrana
temperatura jest najbardziej odpowiednia.
◗ Wyświetlacz informuje o podgrzewaniu się lub schładzaniu żelazka
C
do wybranej temperatury.
Dwukrotny sygnał dźwiękowy i komunikat na wyświetlaczu informują,
że stopa żelazka osiągnęła już wybraną temperaturę.
◗ W momencie gdy tylko zbiornik na parę osiągnie swój
C
maksymalny poziom ciśnienia i żelazko będzie gotowe do
prasowania parowego, zgaśnie lampka kontrolna zbiornika na parę.

