Philips Kit de mise à niveau pour téléviseur 3D: инструкция
Раздел: Видеотехника
Тип:
Инструкция к Philips Kit de mise à niveau pour téléviseur 3D
Register your product and get support at …
EN 3D Upgrade kit 3
DE 3D Upgrade kit 5
www.philips.com/welcome
FR Kit de mise à niveau 3D 7
NL 3D-upgradeset 9
ES Kit de actualización de 3D 11
IT Kit di aggiornamento 3D 13
PT Kit de actualização 3D 15
GR Κιτ αναβάθμισης 3D 17
SE 3D-uppgraderingssats 19
NO 3D-oppgraderingssett 21
DK 3D-opgraderingssæt 23
FI 3D-päivityspaketti 25
RU Комплект обновления 3D 27
PL Zestaw rozszerzający 3D 29
HU 3D frissítőkészlet 31
CZ Rozšiřující sada pro 3D 33
SK 3D nadstavbová súprava 35
SL Komplet za nadgradnjo na 3D 37
TR 3D Yükseltme seti 39
SR Komplet za nadogradnju na 3D 41
RO Kit de actualizare 3D 43
UK Пакет оновлення 3D 45
BG Комплект за 3D 47
HR Komplet za nadogradnju na 3D 49
ET 3D-uuenduskomplekt 51
LV 3D jaunināšanas komplekts 53
LT 3D atnaujinimo rinkinys 55
KK 3D жетілдіру жинағы 57
PT-BZ Kit de atualização 3D 59
ES-LT Kit de actualización para
contenido 3D 61
ZH 3D 升级套装 63
TH
3D 65
PTA02
292892_Brochure_3D.indd 1 31-05-2010 18:56:27
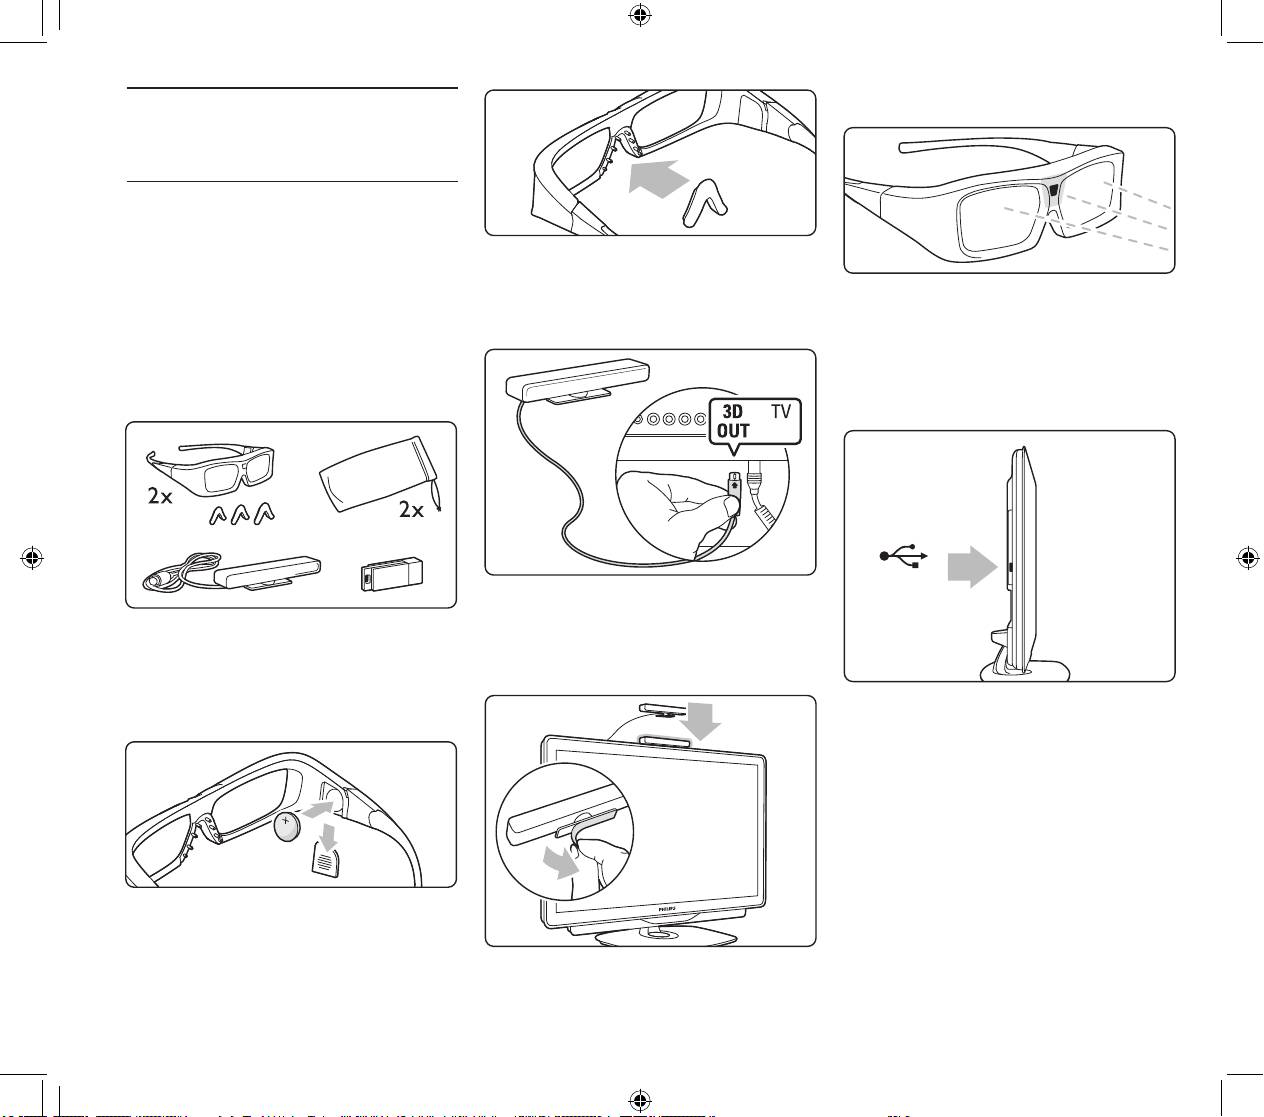
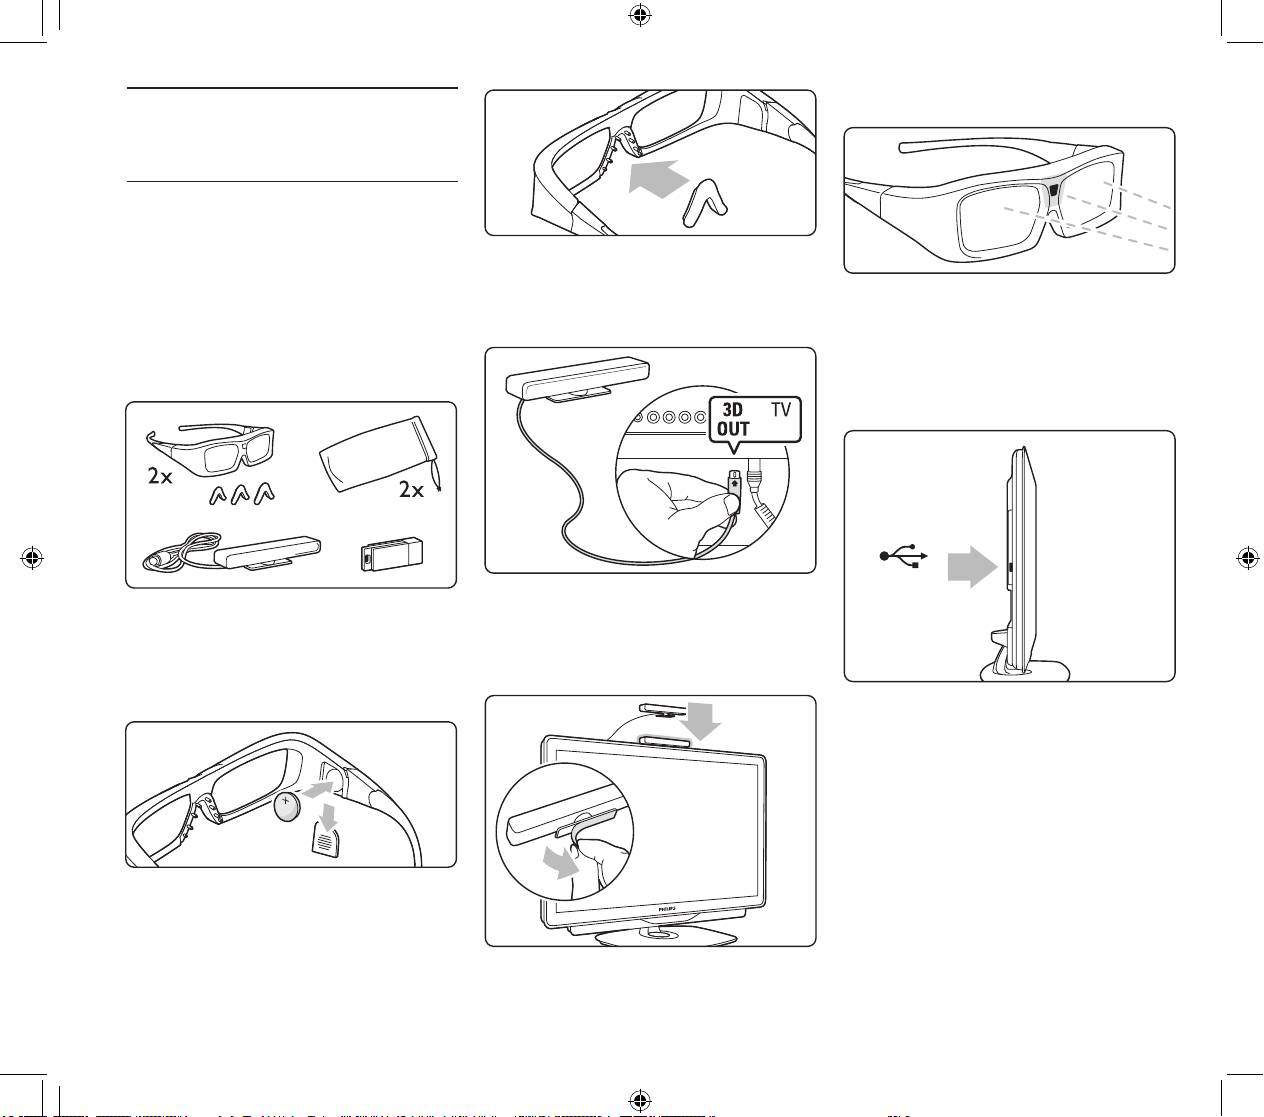
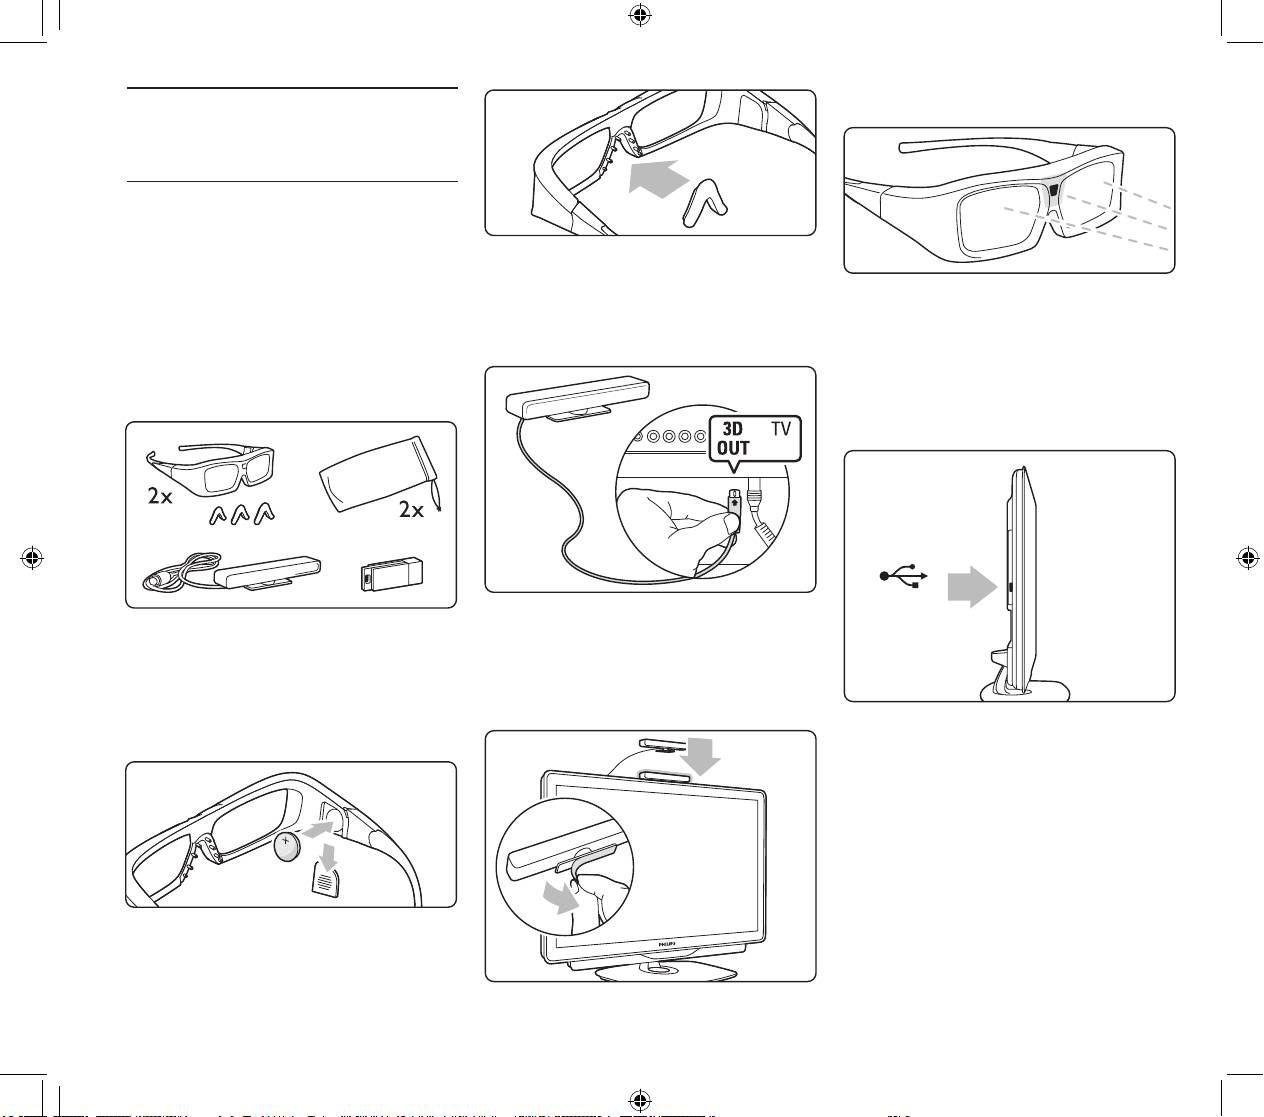
The small window in the middle of the glasses
receives the 3D signals from the transmitter.
Welcome to the exciting world of 3D TV at
home!
Installation
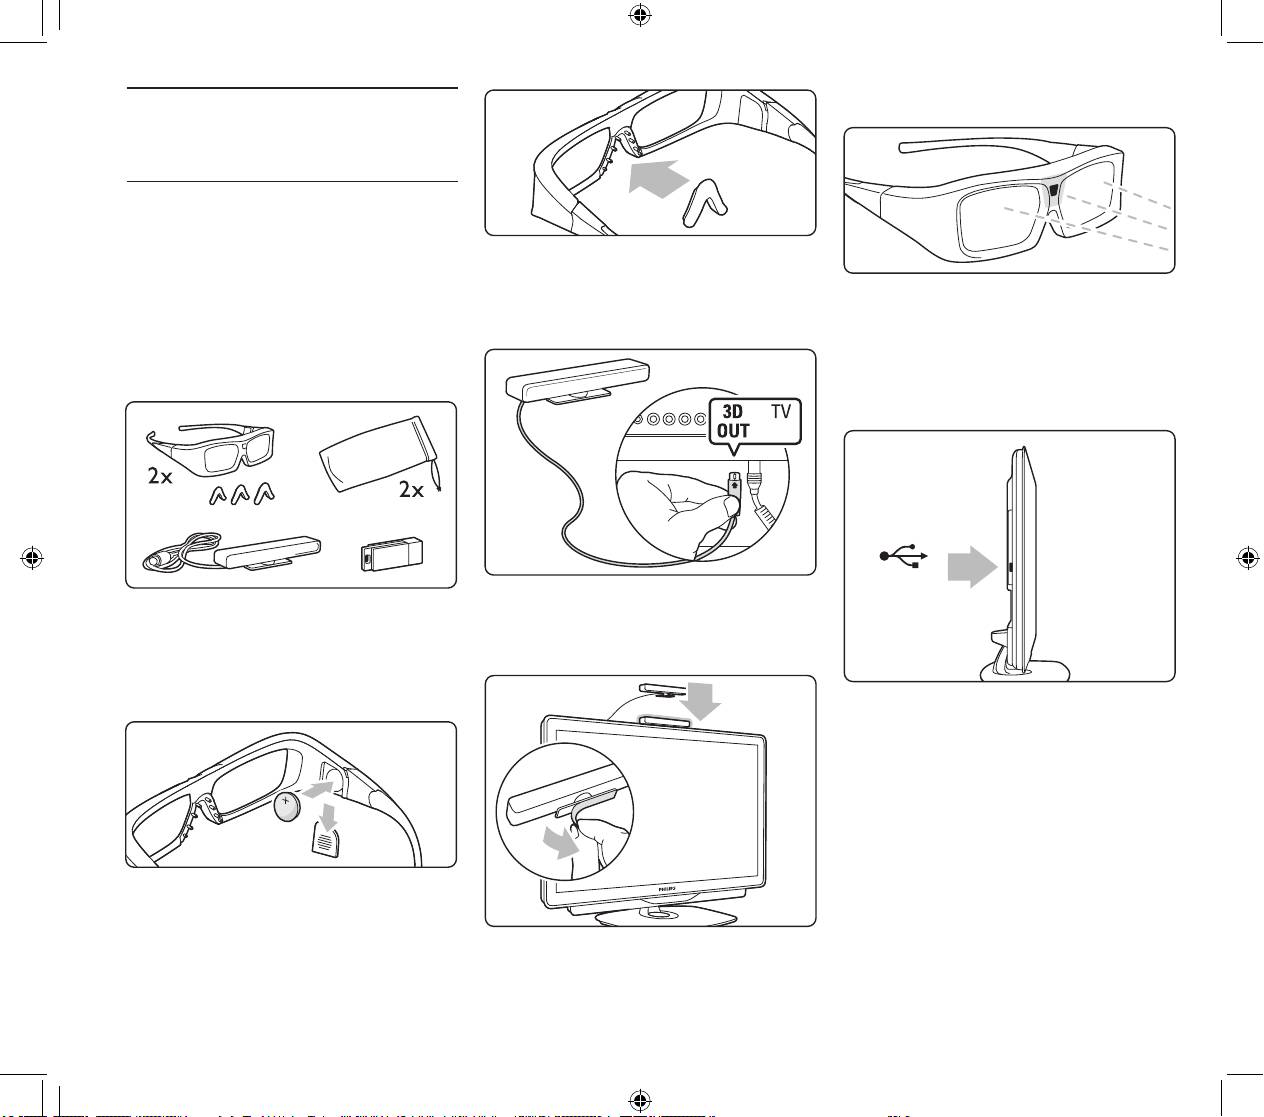
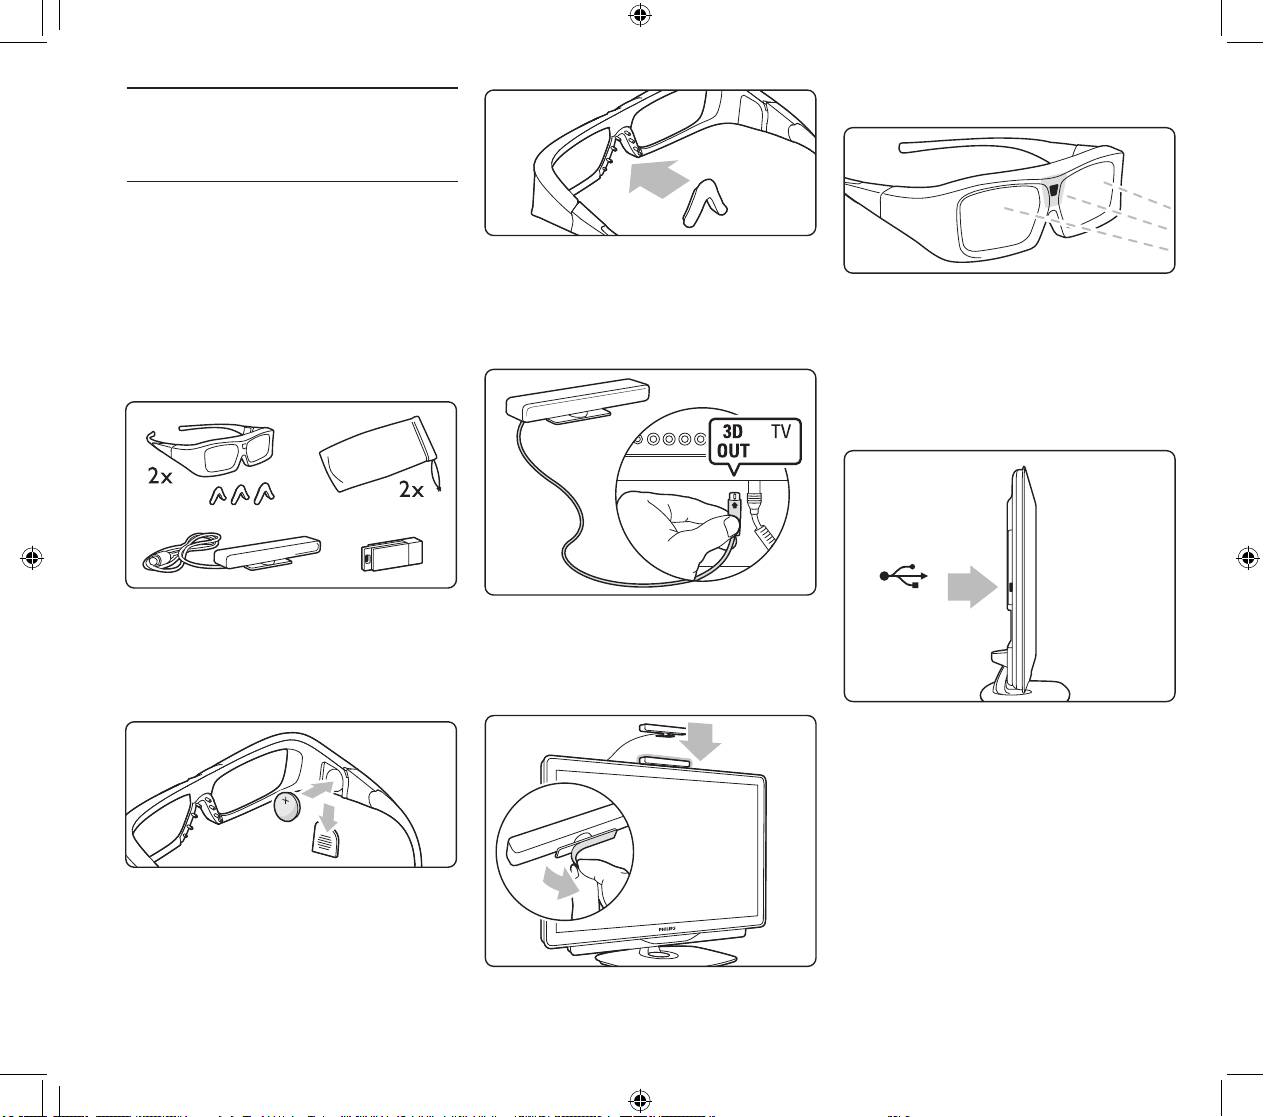
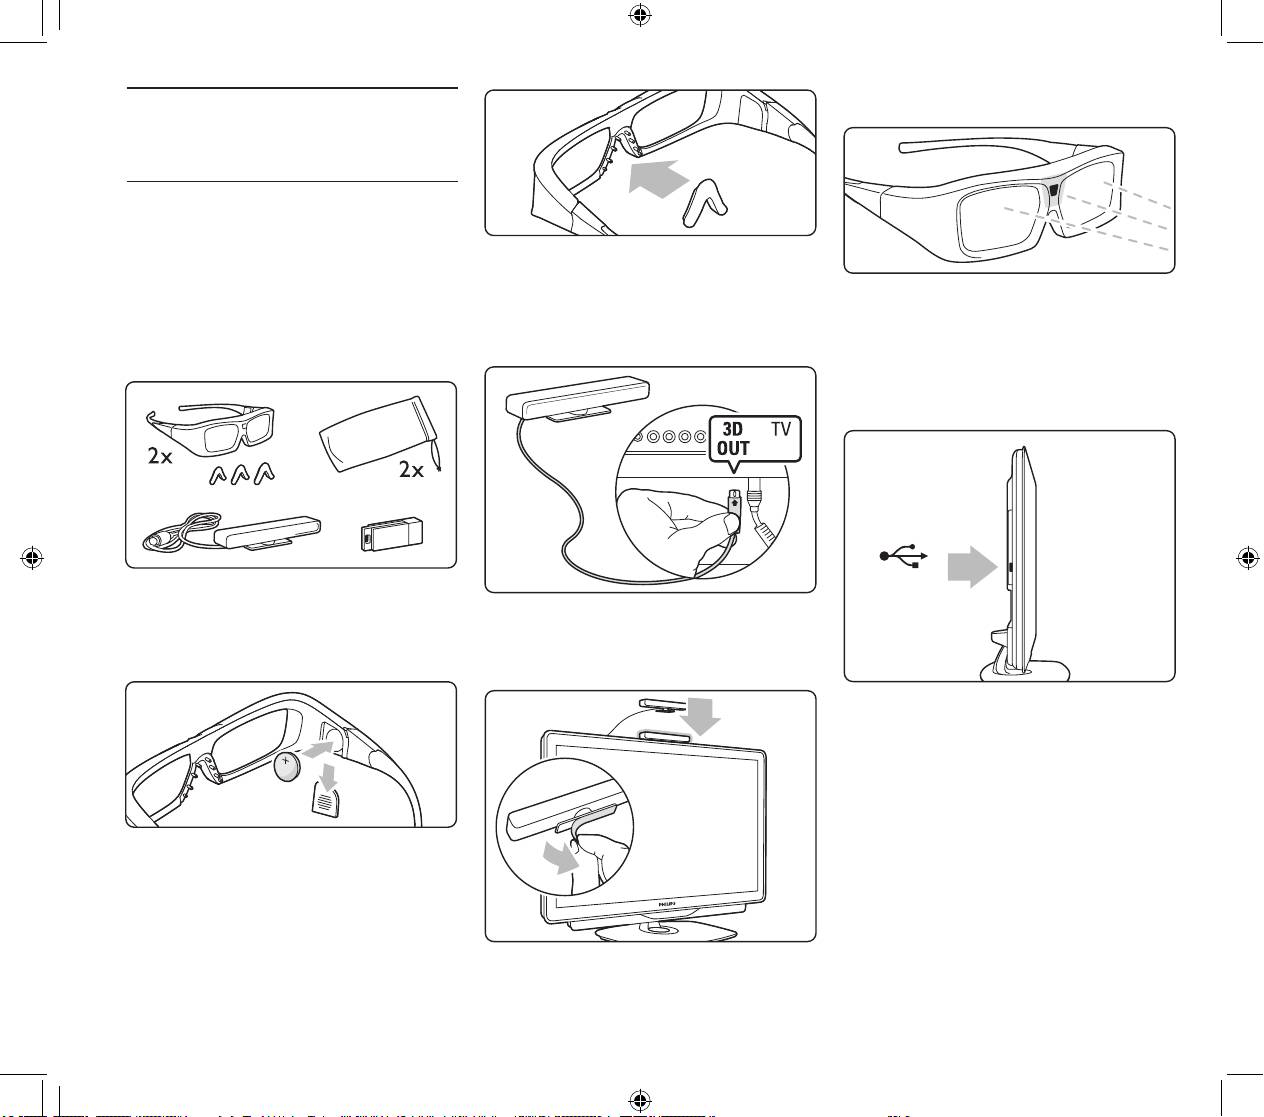
What’s in the box
Installation
- 2x Active 3D glasses
1 Switch off the TV.
- 2x microber pouch
2 Connect the 3D transmitter to the 3D con-
Update the TV software
- a range of 3 nose bridge pieces for each pair
nection 3D Out on the back of the TV.
To prepare your TV for 3D watching, you must
of glasses
update the TV software.
- 3D transmitter
1 Switch on the TV.
- USB device with a TV software update
2 Plug in the USB device in the USB connection
at the side of the TV.
3 Install the 3D transmitter on the top or at
Prepare the 3D glasses
the bottom of the TV. Make sure to point the
1 Pull and remove the plastic strip to activate
transmitter directly to where you sit to watch TV.
the battery inside. Or alternatively open the small
battery cover of the 3D glasses and insert the
battery - type CR2032.
3 The software update will start automatically
and during the update the TV might switch off
and on again. Do not press any key on the
remote control and wait until the message
‘Operation Successful’ appears.
4 Unplug the USB device and switch the TV off
and back on again.
Your TV is ready to watch 3D.
2 Mount the nose bridge on the glasses that ts
you best.
2
USB
PTA02
292892_Brochure_3D.indd 2 31-05-2010 18:56:28

English
Watch 3D
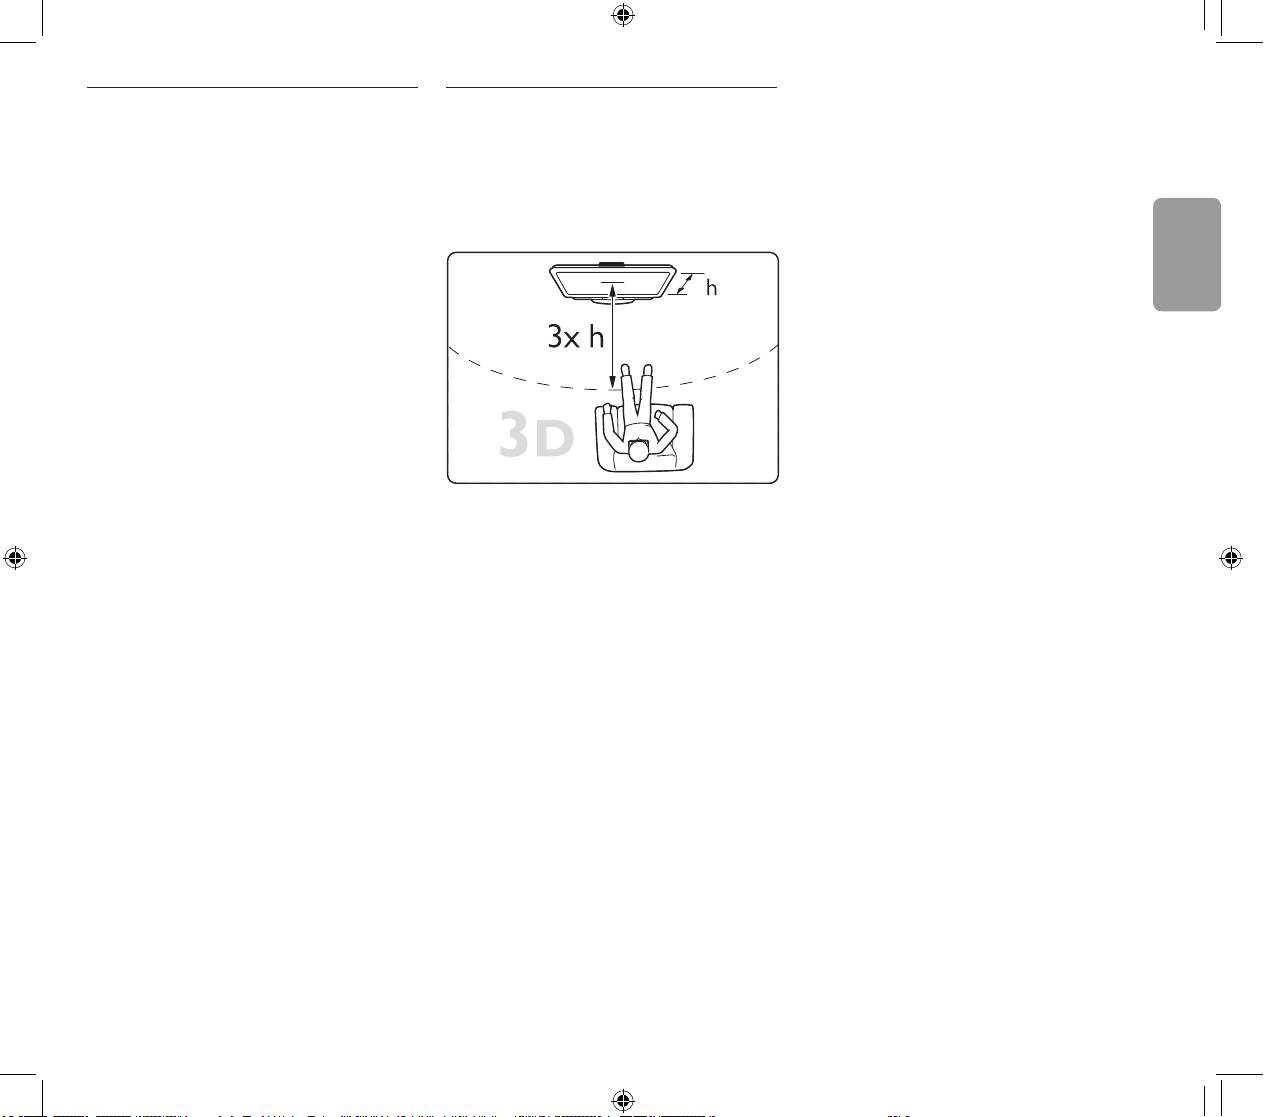
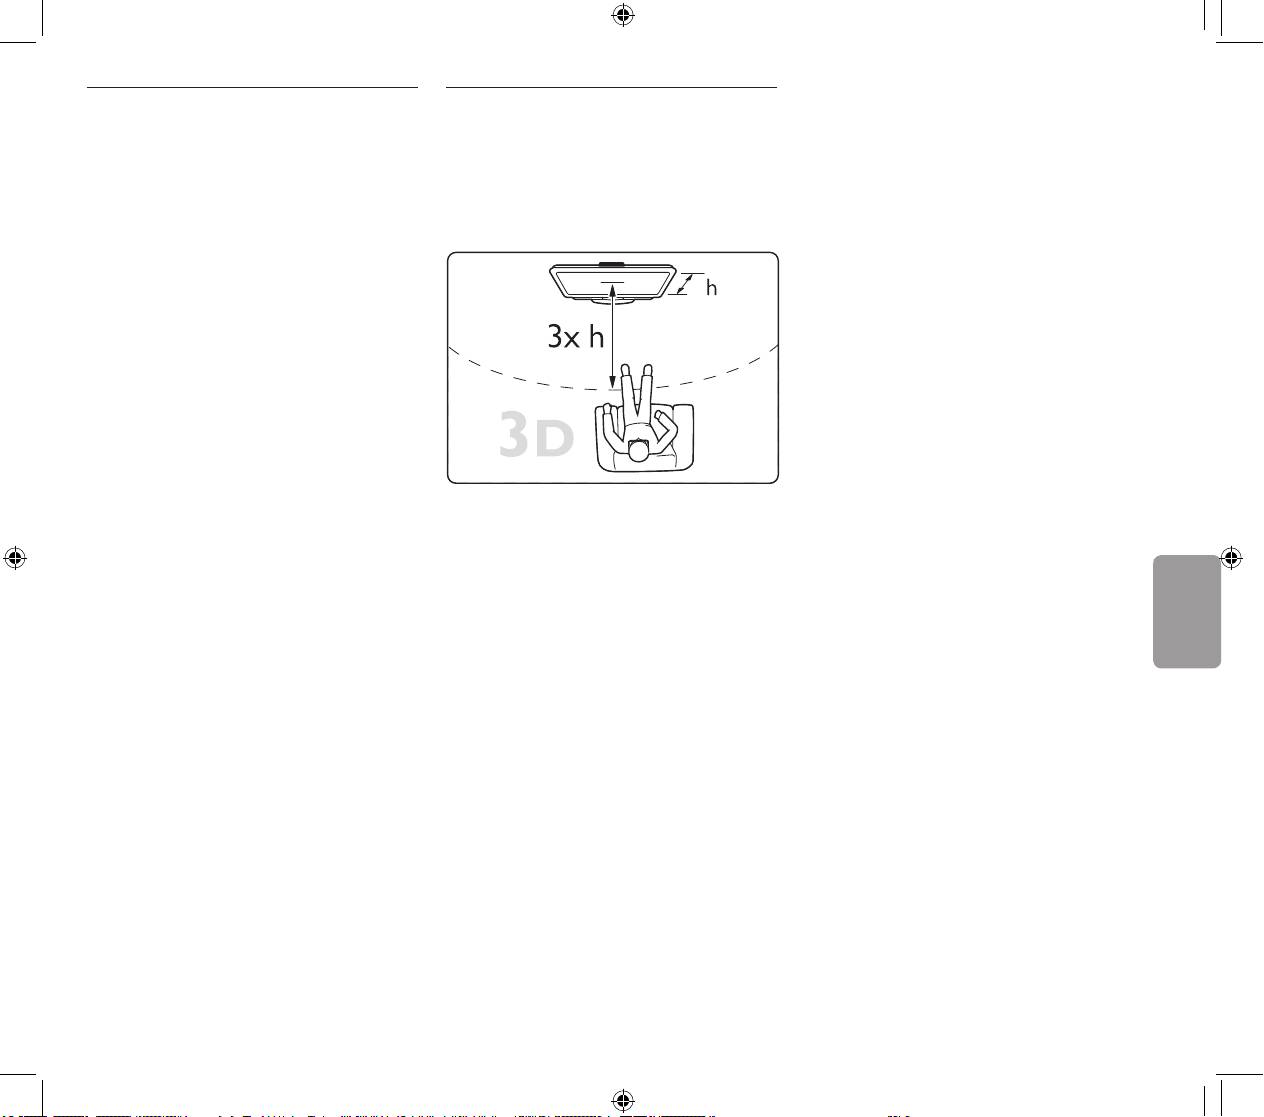
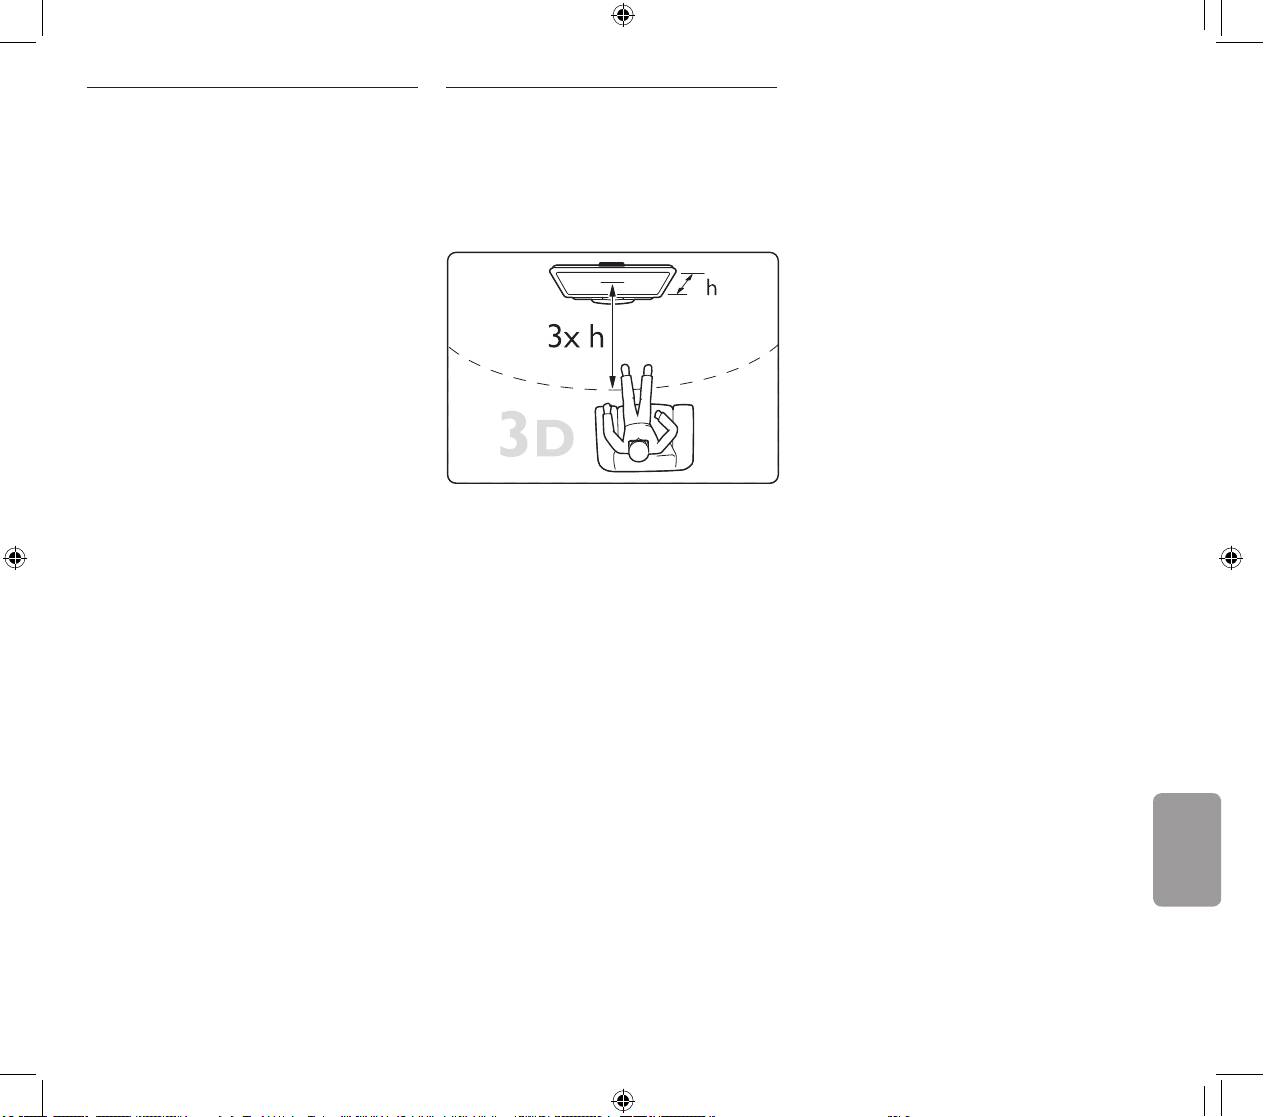
Optimal 3D viewing
Select a 3D disc or program
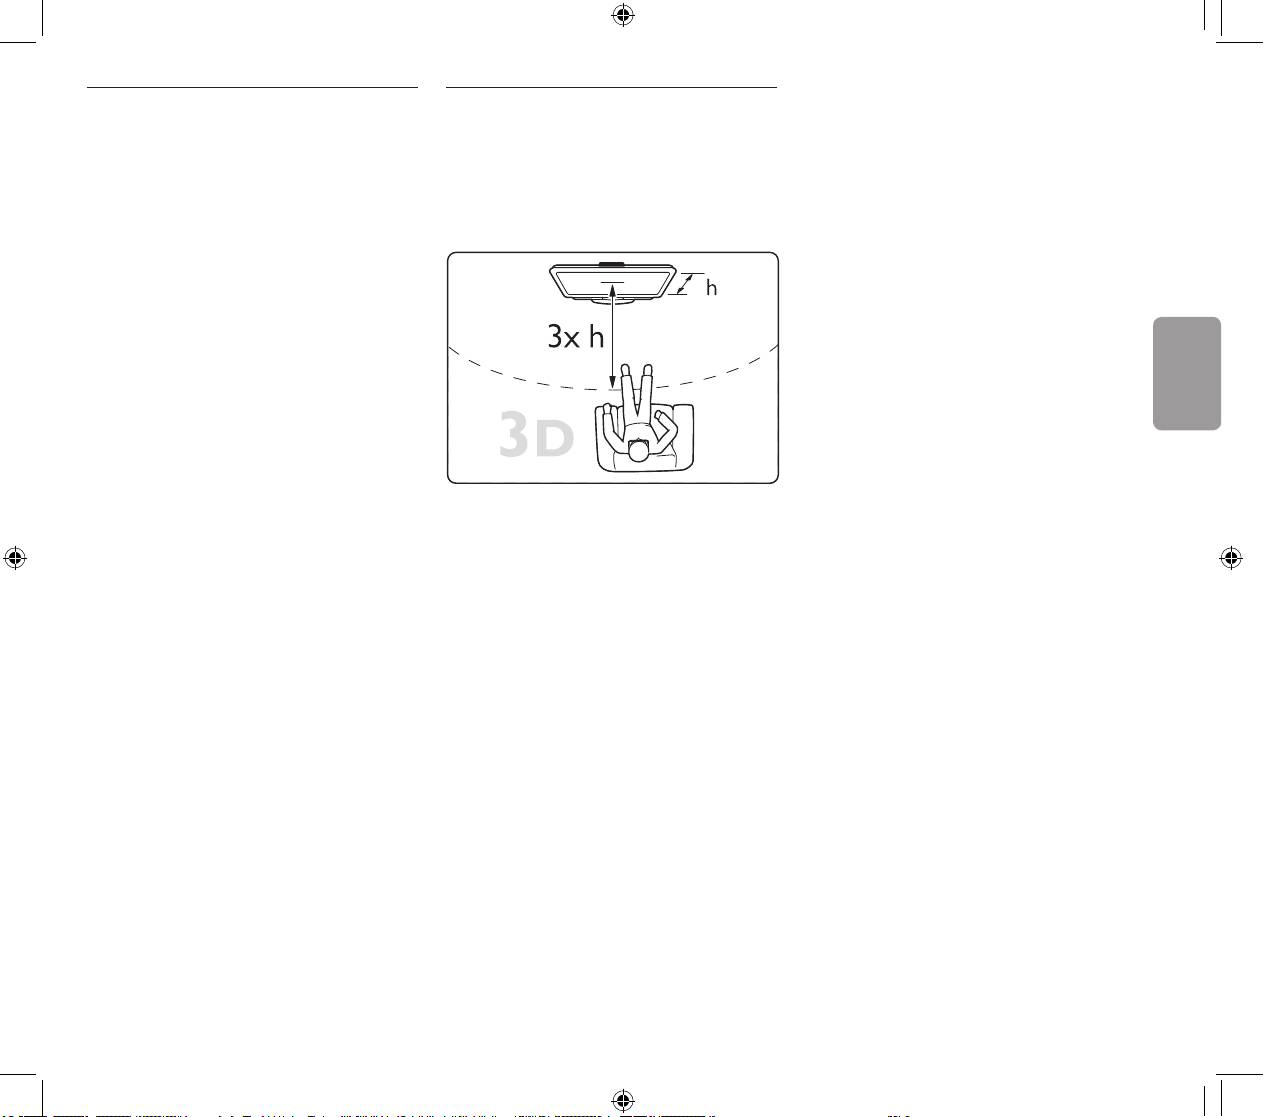
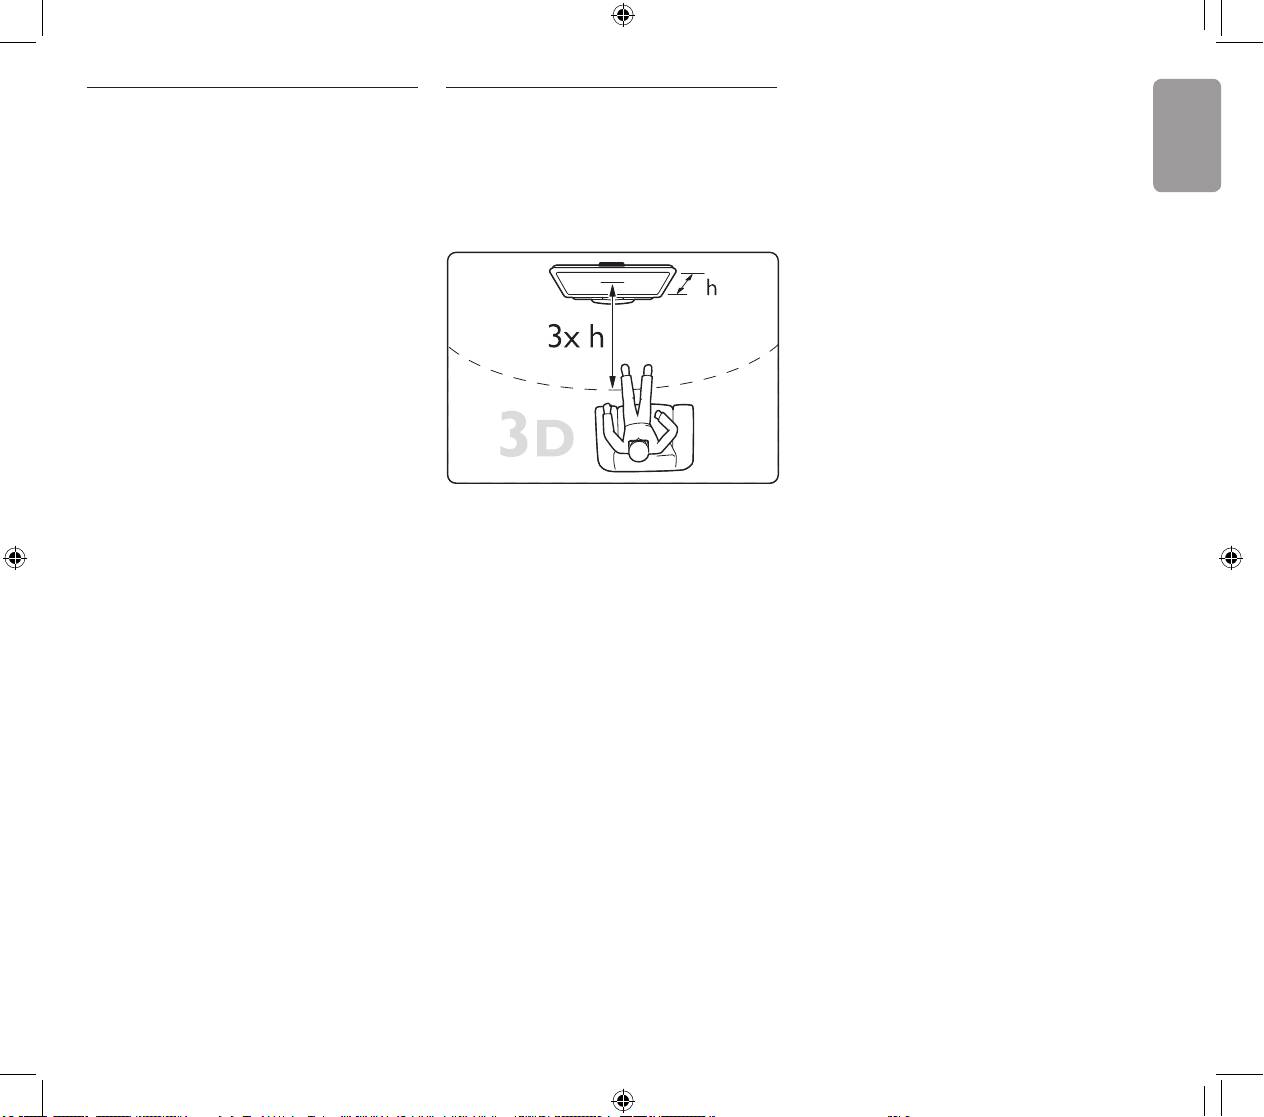
For an optimal 3D viewing experience, we
• Parents should monitor their children during
To enjoy a 3D movie or program, insert a 3D
recommend that you:
3D viewing and ensure they do not experience
movie in a 3D Blu-ray Disc player or tune to a TV
• sit at least 3 times the height of the TV screen
any discomfort as mentioned above. Watching
channel that broadcasts programs in 3D.
away from the TV, but no further than 6 me-
3D is not recommended for children under 6
Press h (Home) and select the 3D Blu-ray
ters away.
years of age as their visual system is not fully
Disc player or select Watch TV and tune to the
developed yet.
TV channel.
• Do not use the 3D glasses for any purpose
other than watching 3D TV.
Start 3D
• CHOKING HAZARD - Do not let children
The TV will inform you when 3D is available. If
under 3 years of age play with the 3D glasses,
you select Start 3D to watch 3D, put on the 3D
they could choke on the battery lid or battery.
glasses. The glasses need some seconds to adjust
to the 3D signal from the 3D transmitter.
Care for the glasses
• Do not expose the 3D glasses to direct
If a 3D broadcast is shown as a double image
sunlight, heat, re or water. This may result in a
on your screen, select the type of double image
product malfunction or re.
to correct the 3D picture. Press s (Adjust),
• Do not drop, bend or apply force to the lenses
select 3D format and select Side by side or Top/
of the 3D glasses.
bottom according to the double image positions.
• avoid uorescent lighting (such as TL lighting or
• Use a clean soft cloth (microber or cotton
certain energy saving light bulbs which operate
annel) to clean the lenses to avoid scratching
Stop 3D
on a low frequency) and direct sunlight as they
them. Never spray cleaner directly on the 3D
If you want to stop watching 3D, press
may interfere with the 3D experience.
glasses. This may damage the electronics.
s (Adjust) and select 2D in the 2D-3D menu.
• Do not use cleaning chemicals containing alco-
This menu item is only shown when 3D signals
Health warning
hol, solvent, surfactant, or wax, benzene, thinner,
are available.
• If you or your family has a history of epilepsy
mosquito repellant or lubricant. Using these
or photosensitive seizures, consult a medical
chemicals can cause discoloration or cracks.
If there is no 3D signal from the transmitter,
professional before exposing yourself to ash-
the 3D glasses switch off automatically after 5
ing light sources, rapid image sequences or 3D
Specications
seconds.
viewing
3D system : Active 3D glasses
• To avoid discomfort such as dizziness, head-
Battery type : CR2032
Low battery
ache or disorientation, we recommend not
Transmission system : IR (Infra Red)
When the lenses icker for 2 seconds at the 3D
watching 3D for extended periods of time. If
Max. Signal Distance : 6m
start-up, the battery of these glasses is nearly
you experience any discomfort, stop watching
Operation temperature : 5° to 40°C
empty. Replace them before watching the next
3D and do not immediately engage in any po-
movie or program.
tentially hazardous activity (for example driving
Additional Active 3D glasses (Philips PTA03) sold
a car) until your symptoms have disappeared. If
separately.
symptoms persist, do not resume watching 3D
without consulting a medical professional rst.
3
292892_Brochure_3D.indd 3 31-05-2010 18:56:28
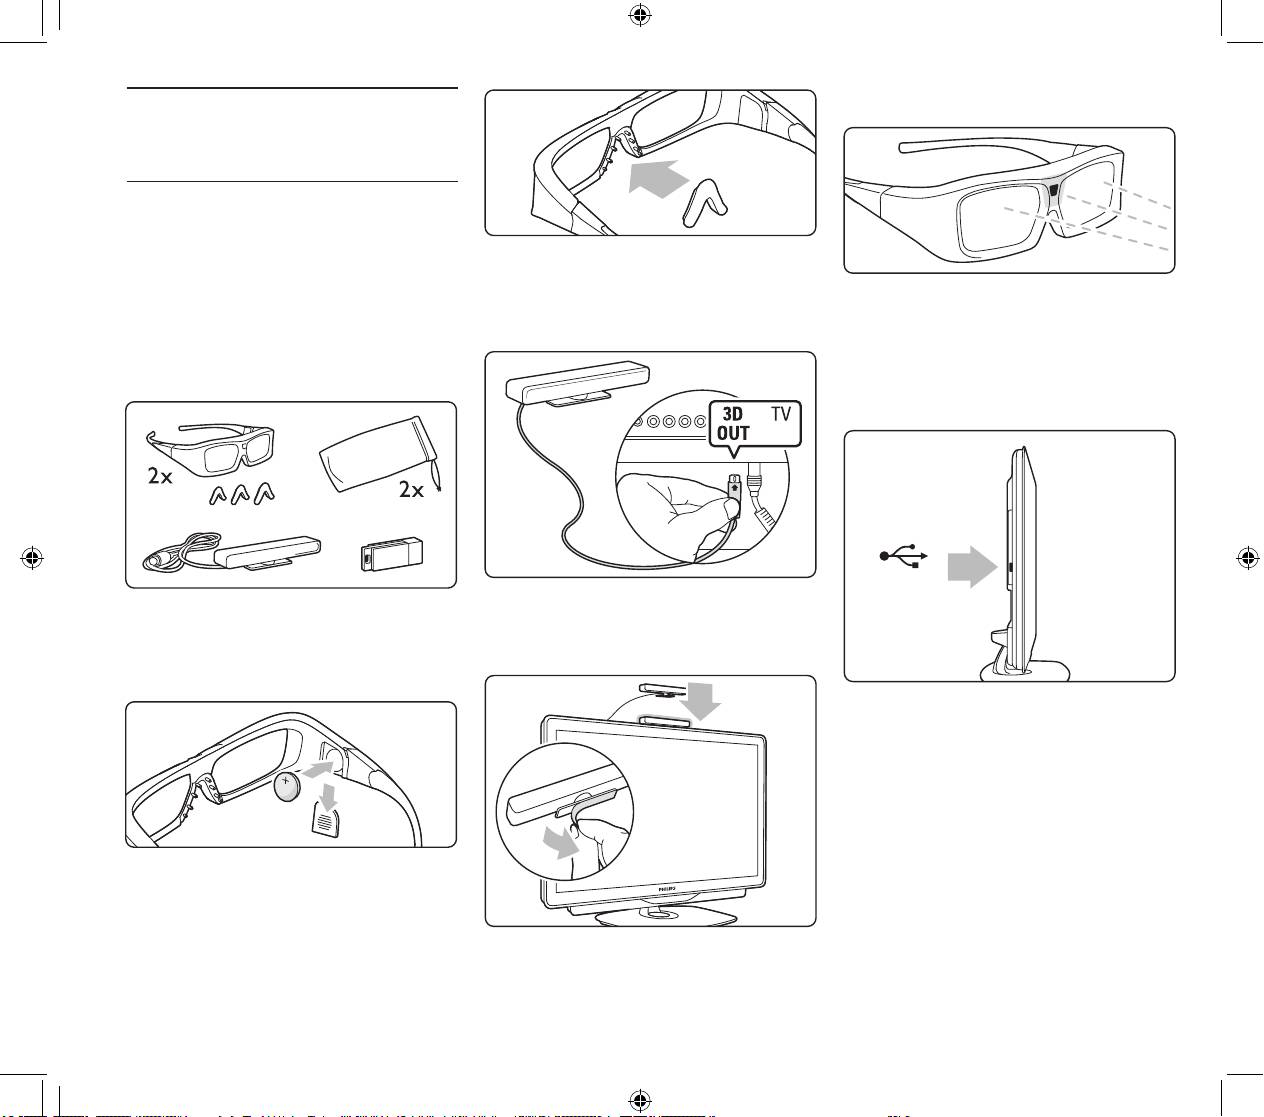
Das kleine Fenster in der Mitte der Brille
empfängt die 3D-Signale vom Transmitter.
Willkommen in der aufregenden Fernsehwelt in
3D! Bei Ihnen auf dem Sofa!
Installation
Was ist im Lieferumfang?
Installation
- 2 Active 3D-Brillen
1 Schalten Sie das Fernsehgerät aus.
- 2 Mikrofasertaschen
2 Schließen Sie den 3D-Transmitter am
Aktualisieren der Software des Fernsehgeräts
- 3 Stege unterschiedlicher Größe pro Brille
3D-Stecker 3D Out auf der Rückseite des
Um das Fernsehgerät für die Wiedergabe von
- 3D-Transmitter
Fernsehgeräts an.
3D vorzubereiten, müssen Sie die Software des
- USB-Gerät mit Softwareaktualisierung für das
Geräts aktualisieren.
Fernsehgerät
1 Schalten Sie das Fernsehgerät ein.
2 Schließen Sie das USB-Gerät am
USB-Anschluss an der Seite des Fernsehgeräts an.
Vorbereiten der 3D-Brille
3 Stellen Sie den 3D-Transmitter über oder
1 Ziehen Sie den Kunststoffstreifen heraus, um
unter dem Fernsehgerät auf. Stellen Sie sicher,
die eingelegte Batterie zu aktivieren. Oder öffnen
dass er direkt auf die Stelle zeigt, von der aus Sie
Sie die kleine Abdeckung auf der 3D-Brille, und
fernsehen.
legen Sie eine Batterie vom Typ CR2032 ein.
3 Die Softwareaktualisierung wird automatisch
gestartet. Während der Aktualisierung wird das
Fernsehgerät ggf. öfter ein- und ausgeschaltet.
Drücken Sie keine Tasten auf der Fernbedienung,
bis die Meldung “Operation Successful” (Vorgang
erfolgreich) angezeigt wird.
4 Ziehen Sie das USB-Gerät ab. Schalten Sie das
Fernsehgerät dann aus und wieder ein.
2 Befestigen Sie den Steg, der am besten auf Ihre
Nun können Sie auf Ihrem Gerät 3D-Inhalte
Nase passt, an der Brille.
wiedergeben.
4
USB
PTA02
292892_Brochure_3D.indd 4 31-05-2010 18:56:30
3D-Wiedergabe
Optimale 3D-Wiedergabe
Auswählen von 3D-Datenträgern oder -Sendungen
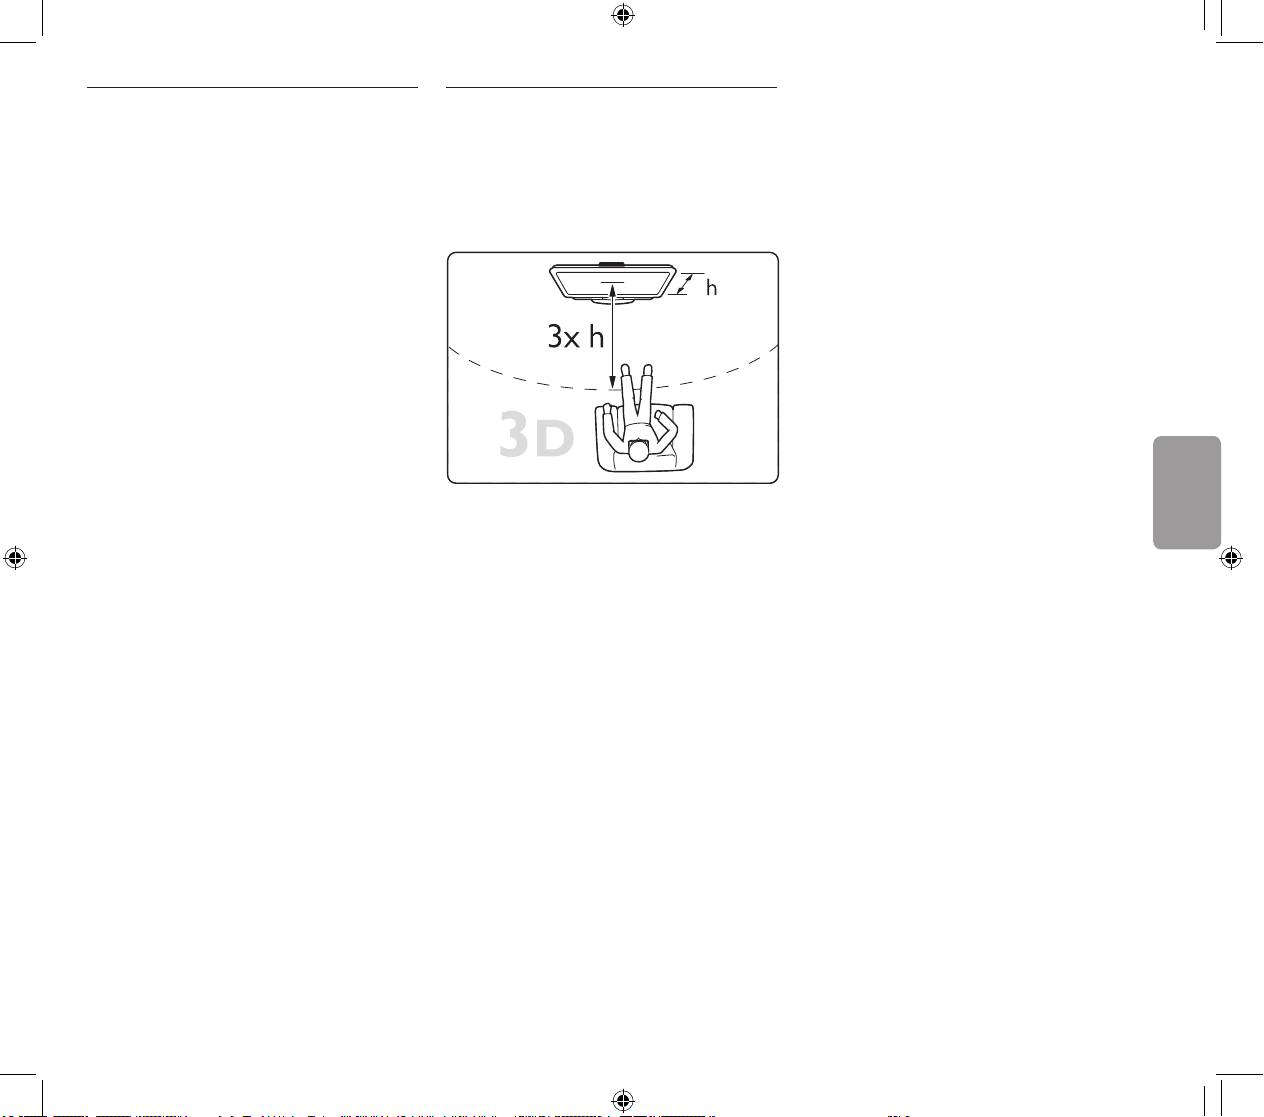
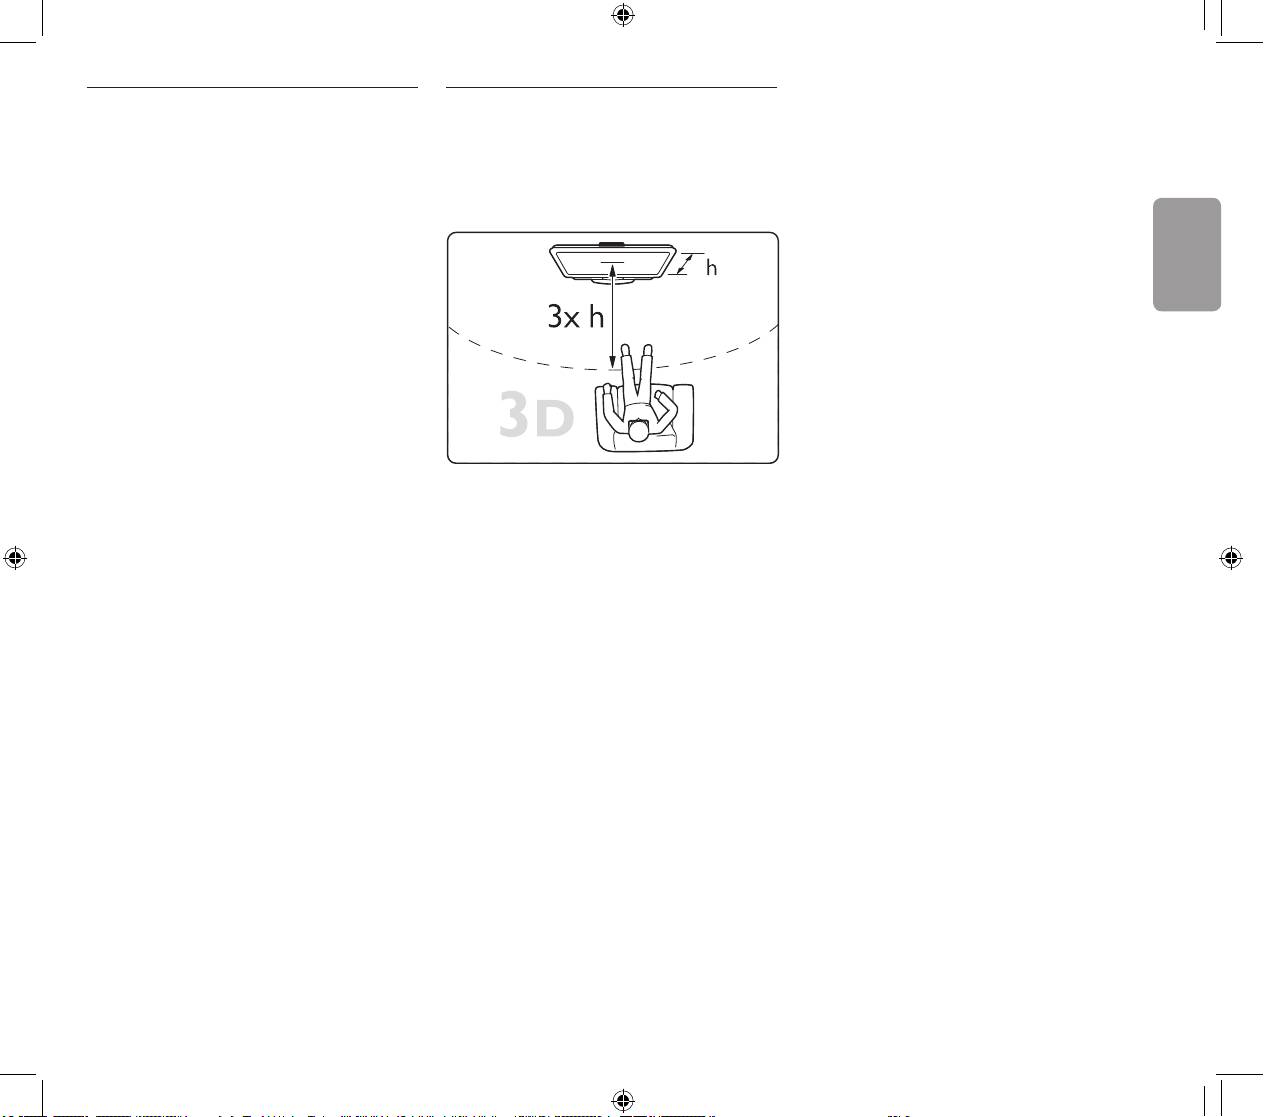
Um ein optimale 3D-Erlebnis zu erzielen, sollten
• Eltern sollten während der 3D-Wiedergabe
Um einen 3D-Film oder eine 3D-Sendung
Sie Folgendes beachten:
ihre Kinder überwachen und sicherstellen,
wiederzugeben, legen Sie einen 3D-Datenträger
• Sitzen Sie mindestens dreimal so weit vom
dass sie sich nicht unwohl fühlen (wie oben
in einen Blu-ray-Player ein, oder schalten Sie einen
Bildschirm entfernt wie dieser hoch ist, jedoch
beschrieben). Die Wiedergabe von 3D wird
Deutsch
Fernsehsender ein, der Sendungen in 3D überträgt.
nicht weiter als sechs Meter.
nicht für Kinder unter sechs Jahren empfohlen,
Drücken Sie auf h (Home), und wählen Sie
da ihr visuelles System noch nicht vollständig
den 3D-Blu-ray-Player aus. Oder wählen Sie
ausgebildet ist.
"Fernsehen", und schalten Sie den gewünschten
• Verwenden Sie die 3D-Brille nur, um 3D-
Fernsehsender ein.
Inhalte auf dem Fernsehgerät zu sehen.
• ERSTICKUNGSGEFAHR: Lassen Sie
3D starten
Kinder unter drei Jahren nicht mit der 3D-Brille
Das Fernsehgerät informiert Sie, wann 3D zur
spielen, da sie die Batterieabdeckung oder die
Verfügung steht. Wenn Sie "3D starten" wählen, um
Batterie verschlucken könnten.
3D-Inhalt wiederzugeben, müssen Sie die 3D-Brille
aufsetzen. Die Brille benötigt einige Sekunden, um
Aufbewahrung der Brille
das 3D-Signale vom 3D-Transmitter korrekt zu
• Bewahren Sie die 3D-Brille nicht in direktem
empfangen.
Sonnenlicht, nahe einer Wärmequelle, nahe
Flammen oder Wasser auf. Dadurch könnte sie
Wenn eine 3D-Sendung als doppeltes Bild auf dem
• Vermeiden Sie uoreszierendes Licht (z. B.
beschädigt werden oder Feuer fangen.
Bildschirm angezeigt wird, wählen Sie den richtigen
Neonlicht oder bestimmte Energiesparlampen,
• Lassen Sie die Brille nicht fallen, und verbiegen
Typ aus, um das 3D-Bild zu korrigieren. Drücken Sie
die mit niedrigen Frequenzen betrieben
Sie die Gläser nicht.
auf s (Anpassen), wählen Sie das 3D-Format und
werden) sowie direktes Sonnenlicht, da dies
• Nutzen Sie ein weiches Tuch (Mikrofaser oder
anschließend Side by side (Nebeneinander) oder
das 3D-Erlebnis beeinträchtigen kann.
Baumwollanell), um die Gläser ohne Kratzer-
Top/bottom (Oben/unten), um die richtige Position
bildung zu reinigen. Sprühen Sie niemals Reini-
des doppelten Bildes festzulegen.
Hinweise zu Gesundheitsrisiken
gungsüssigkeit auf die 3D-Brille, da dadurch
• Falls Sie oder ein Familienmitglied unter Epilep-
die Elektronik beschädigt werden kann.
3D beenden
sie oder fotosensitiver Epilepsie leiden, sollten
• Verwenden Sie keine chemischen Reiniger mit
Wenn Sie die 3D-Wiedergabe beenden möchten,
Sie sich an einen Arzt wenden, bevor Sie sich
Alkohol, Lösungsmitteln, Tensiden oder Wachs,
drücken Sie auf s (Anpassen), und wählen
blinkenden Lichtquellen, schnellen Bildfolgen
Benzol, Verdünnungsmittel, Insektenschutzspray
Sie im Menü 2D-3D die Option 2D aus. Dieses
oder 3D-Bildern aussetzen.
oder Schmiermittel, da diese Chemikalien zu
Menüelement wird nur angezeigt, wenn 3D-Signale
• Um ein Unwohlsein mit Schwindel,
Verfärbungen oder Rissen führen können.
verfügbar sind.
Kopfschmerzen oder Orientierungsschwierig-
keiten zu vermeiden, wird empfohlen, 3D-Pro-
Technische Daten
Wenn kein 3D-Signal vom Transmitter empfangen
gramme nicht über einen zu langen Zeitraum
3D-System: Active 3D-Brille
wird, wird die 3D-Brille nach fünf Sekunden
anzusehen. Wenn Ihnen unwohl wird, beenden
Batterietyp: CR2032
automatisch ausgeschaltet.
Sie die 3D-Wiedergabe, und warten Sie eine
Übertragungssystem: IR (Infrarot)
gewisse Zeit, bevor Sie möglicherweise gefährli-
Max. Signalentfernung: 6 m
Niedrige Batteriestand
che Handlungen vornehmen (z. B. Autofahren),
Betriebstemperatur: 5 bis 40 °C
Wenn die Gläser beim Starten von 3D zwei
bis die Symptome abgeklungen sind. Wenn die
Sekunden lang blinken, sind die Batterien in der
Symptome nicht abklingen, sollten Sie sich an
Zusätzliche Active 3D-Brillen (Philips PTA03) sind
Brille fast leer. Tauschen Sie sie aus, bevor Sie den
einen Arzt wenden, bevor Sie erneut 3D-Bilder
separat erhältlich.
nächsten Film bzw. die nächste Sendung starten.
ansehen.
5
292892_Brochure_3D.indd 5 31-05-2010 18:56:31
La petite fenêtre située au milieu des lunettes
reçoit les signaux 3D de l'émetteur.
Le monde merveilleux de la télévision en 3D
s'invite chez vous !
Installation
Contenu de l’emballage
Installation
- 2 paires de lunettes Active 3D
1 Mettez le téléviseur hors tension.
- 2 sacs en microbre
2 Connectez l’émetteur 3D à la prise 3D Out
Mise à jour du logiciel du téléviseur
- Choix de 3 pince-nez pour chaque paire de
située à l’arrière de votre téléviseur.
Pour préparer votre téléviseur à la 3D, vous
lunettes
devez mettre à jour le logiciel du téléviseur.
- Émetteur 3D
1 Allumez le téléviseur.
- Périphérique USB avec une mise à jour du
2 Branchez le périphérique USB dans la prise
logiciel pour le téléviseur
USB sur le côté du téléviseur.
3 Installez l’émetteur 3D au dessus ou en des-
sous du téléviseur. Veillez à orienter l’émetteur en
Préparation des lunettes 3D
direction de l’endroit où vous allez vous installer
1 Retirez la bande en plastique pour activer la
pour regarder la télévision.
pile à l’intérieur. Vous pouvez également ouvrir
le couvercle du compartiment de la pile des
3 La mise à jour du logiciel démarre automa-
lunettes 3D et insérer la pile (modèle CR2032).
tiquement et il est possible que votre téléviseur
s’éteigne et se rallume pendant la mise à jour.
N’appuyez sur aucune touche de la télécom-
mande et attendez que le message « Operation
Successful » (Opération réussie) s’afche.
4 Débranchez le périphérique USB puis éteignez
votre téléviseur et rallumez-le.
Votre téléviseur est prêt pour la 3D.
2 Placez sur les lunettes le pince-nez le plus
adapté à votre visage.
6
USB
PTA02
292892_Brochure_3D.indd 6 31-05-2010 18:56:33
Visionnage en 3D
Visionnage en 3D optimisé
Sélectionnez un disque ou un programme en
Pour une expérience 3D optimisée, quelques
• Les parents doivent surveiller leurs enfants
3D
conseils :
pendant le visionnage en 3D et s’assurer
Pour lire un lm ou un programme en 3D,
• installez-vous à une distance équivalente à au
qu’ils ne présentent aucun des symptômes
insérez un lm 3D dans un lecteur de disques
moins 3 fois la hauteur de l’écran du téléviseur
mentionnés ci-dessous. La 3D n’est pas recom-
Blu-ray 3D ou allumez une chaîne TV qui diffuse
et à 6 mètres maximum de votre téléviseur.
mandée pour les enfants de moins de 6 ans,
des programmes en 3D.
leur système visuel n’étant pas complètement
Appuyez sur h (Accueil) et sélectionnez le
développé.
lecteur de disques Blu-ray 3D ou sélectionnez
• N’utilisez pas les lunettes 3D dans un autre but
Regarder TV puis passez sur la chaîne souhaitée.
que pour regarder la télévision en 3D.
• RISQUE D’ÉTOUFFEMENT - Ne laissez pas
Français
Lancer le visionnage en 3D
les enfants de moins de 3 ans jouer avec les
Votre téléviseur vous informe lorsque la 3D
lunettes 3D, ils risqueraient de s’étouffer avec
est disponible. Si vous sélectionnez Lancer
le couvercle du compartiment à piles ou avec
3D pour regarder le lm ou l'émission en 3D,
les piles elles-mêmes.
mettez vos lunettes 3D. Les lunettes mettent
quelques secondes à se régler sur le signal 3D de
Entretien des lunettes
l'émetteur 3D.
• Protégez les lunettes 3D de la lumière directe
du soleil, du feu et de l’eau. L’appareil pourrait
Si une diffusion 3D s'afche avec une double
• évitez les lumières uorescentes (telles que
s’en trouver endommagé et il existe un risque
image à l'écran, sélectionnez le type de double
les lampes TL ou encore certaines ampoules à
d’incendie.
image pour corriger l'image 3D. Appuyez sur
économie d’énergie qui fonctionnent à basse
• Évitez de laisser tomber, de plier ou d’exercer
s (Réglages), sélectionnez le format 3D puis
fréquence) et la lumière directe du soleil, elles
une force sur les lentilles des lunettes 3D.
sélectionnez Côte à côte ou Superposition selon
pourraient provoquer des interférences avec
• Utilisez un chiffon doux et propre (en micro-
la position de la double image.
votre expérience 3D.
bre ou en anelle) pour nettoyer les lentilles
an d’éviter de les rayer. Ne vaporisez jamais
Arrêt du visionnage en 3D
Avertissement santé
de détergent directement sur les lunettes 3D.
Si vous souhaitez arrêter le visionnage en 3D,
• Si vous ou l’un des membres de votre famille
Cela pourrait endommager les composants
appuyez sur s (Réglages) puis sélectionnez 2D
avez des antécédents d’épilepsie ou de crise
électroniques.
dans le menu 2D-3D. Cette option de menu
photosensible, demandez l’avis de votre médecin
• N’utilisez pas de produits nettoyants à base
s'afche uniquement lorsque des signaux 3D
avant de vous exposer aux sources de lumière
d’alcool, de solvant, de tensioactif, de cire, de
sont disponibles.
clignotante, aux séquences d’images rapides ou
benzène, de diluant, de répulsif anti-moustiques
au visionnage 3D
ou de lubriant. L’utilisation de ces produits
Si l'émetteur 3D n'envoie pas de signal 3D, les
• An d’éviter les sensations pénibles telles que les
chimiques peut provoquer une décoloration
lunettes 3D s'éteignent automatiquement après
vertiges, les maux de tête ou la perte de repères,
ou des ssures.
5 secondes.
nous vous recommandons de ne pas visionner de
contenus en 3D pendant une période prolon-
Caractéristiques
Niveau faible des piles
gée. Si vous ressentez la moindre gêne, arrêtez
Système 3D : lunettes Active 3D
Lorsque les lentilles clignotent pendant 2
le visionnage en 3D et ne vous lancez pas dans
Type de piles : CR2032
secondes au lancement du visionnage en 3D, cela
une activité potentiellement dangereuse (par
Système de transmission : IR (infrarouge)
signie que les piles des lunettes sont presque
exemple conduire une voiture) jusqu’à ce que les
Distance maximale du signal : 6 m
vides. Remplacez-les avant de regarder le
symptômes disparaissent. Si les symptômes per-
Température de fonctionnement : 5 à 40 °C
prochain lm ou programme.
sistent, consultez un médecin avant de visionner à
nouveau des contenus en 3D.
Lunettes Active 3D supplémentaires
(Philips PTA03) vendues séparément.
7
292892_Brochure_3D.indd 7 31-05-2010 18:56:33
Het kleine venster in het midden van de bril
ontvangt de 3D-signalen van de transmitter.
Welkom in de spannende wereld van 3D-TV
thuis!
Installatie
De inhoud van de doos
Installatie
- 2x Active 3D-bril
1 Schakel de TV uit.
- 2x microvezel opbergzakje
2 Sluit de 3D-transmitter aan op de 3D-aansluit-
De software van de TV bijwerken
- een set van 3 brugstukken voor elke bril
ing 3D Out aan de achterkant van de TV.
Om uw TV voor te bereiden op 3D-weergave,
- 3D-transmitter
moet u de software van de TV bijwerken.
- USB-apparaat met een update voor de TV-
1 Schakel de TV in.
software
2 Sluit het USB-apparaat aan op de USB-poort
aan de zijkant van de TV.
3 Installeer de 3D-transmitter boven op of
De 3D-bril voorbereiden
onder de TV. Richt de transmitter rechtstreeks
1 Trek de plastic strip weg om de batterij te
naar het punt waar u zit als u TV-kijkt.
activeren. Of: open de kleine batterijklep van de
3D-bril en plaats de batterij, type CR2032.
3 De software-update start automatisch en
tijdens de update kan de TV worden in- en
uitgeschakeld. Druk niet op de knoppen van de
afstandsbediening en wacht tot de melding
‘Operation Successful’ (Bewerking succesvol)
verschijnt.
4 Koppel het USB-apparaat los en schakel de TV
uit en vervolgens weer in.
2 Plaats het brugstuk dat u het beste past op
Uw TV is nu klaar voor 3D.
de bril.
8
USB
PTA02
292892_Brochure_3D.indd 8 31-05-2010 18:56:35
3D-weergave
Optimale 3D-weergave
Als u van een 3D-lm of -programma wilt
Voor een optimale 3D-kijkervaring raden we u
• Ouders moeten hun kinderen in de gaten
genieten, plaatst u een 3D-lm in een 3D Blu-ray
het volgende aan:
houden tijdens het 3D kijken en ervoor zorgen
Disc-speler of stemt u af op een TV-kanaal dat
• Ga op een afstand van minimaal 3 keer de
dat ze niet te maken krijgen met de ongemak-
programma's uitzendt in 3D.
hoogte van het TV-scherm van de TV zitten,
ken die hierboven zijn beschreven. 3D kijken
Druk op h (Home) en selecteer de 3D Blu-ray
maar niet verder weg dan 6 meter.
wordt niet aanbevolen voor kinderen onder
Disc-speler of selecteer Watch TV (TV-kijken)
de 6 jaar, omdat hun visuele systeem nog niet
en stem af op een TV-kanaal.
volledig is ontwikkeld.
• Gebruik de 3D-glazen niet voor een ander
3D starten
doel dan 3D TV-kijken.
Op de TV wordt aangegeven wanneer 3D
• VERSTIKKINGSGEVAAR: laat kinderen jonger
gereed is. Als u Start 3D selecteert om 3D
dan 3 jaar niet met de 3D-brillen spelen. Ze
te kijken, zet u de 3D-bril op. Het duurt enige
kunnen stikken in de batterijklep of de batterij.
seconden voordat de bril zich heeft aangepast
aan het 3D-signaal van de 3D-transmitter.
Onderhoud van de brillen
• Stel de 3D-brillen niet bloot aan direct zonlicht,
Nederlands
Als een 3D-uitzending wordt getoond als
hitte, vuur of water. Dit kan leiden tot storingen
dubbel beeld op uw scherm, selecteert u het
of brand.
type om het 3D-beeld aan te passen. Druk op
• Laat de glazen van de 3D-bril niet vallen, buig
s (Aanpassen), selecteer de 3D-indeling en
• Voorkom uorescentielicht (zoals TL-verlichting
ze niet en oefen er geen kracht op uit.
selecteer Side by side (Naast elkaar) of Top/
of bepaalde energiebesparende lampen die
• Gebruik een zachte doek (microvezel of
bottom (Boven/onder), afhankelijk van de posities
werken met een lage frequentie) en direct
katoenanel) om de glazen schoon te maken,
van de dubbele beelden.
zonlicht. Deze kunnen een negatieve invloed
zonder krassen te veroorzaken. Spuit nooit
hebben op de 3D-ervaring.
rechtstreeks een schoonmaakmiddel op de
3D stoppen
3D-brillen. Dit kan leiden tot schade aan de
Als u de 3D-weergave wilt stoppen, drukt
Gezondheidswaarschuwing
elektronische onderdelen.
u op s (Aanpassen) en selecteert u 2D
• Als u of uw gezinsleden een voorgeschiedenis
• Gebruik geen chemische reinigingsmiddelen
in het menu 2D-3D. Dit menu-item wordt
hebben van epilepsie of lichtgevoelige aanval-
met alcohol, oplosmiddelen, oppervlakte-
alleen weergegeven wanneer er 3D-signalen
len, raadpleegt u een arts voordat u zichzelf
actieve stoffen of was, benzeen, thinner, in-
beschikbaar zijn.
blootstelt aan knipperende lichtbronnen, snel
sectwerende middelen of smeermiddelen.
opeenvolgende beelden of 3D-beelden.
Wanneer u deze middelen gebruikt, kunnen er
Als er geen 3D-signaal wordt gegeven door
• Om ongemak zoals duizeligheid, hoofdpijn of
verkleuringen of scheuren ontstaan.
de transmitter, schakelen de 3D-brillen na 5
desoriëntatie te voorkomen, raden we u aan
seconden automatisch uit.
om niet gedurende lange tijd achtereen 3D te
Specicaties
kijken. Als u een van deze ongemakken voelt
3D-systeem: actieve 3D-brillen
Batterij bijna leeg
opkomen, stopt u de 3D-weergave en gaat
Batterijtype: CR2032
Wanneer de glazen 2 seconden knipperen bij
u niet direct verder met potentieel gevaar-
Overdrachtssysteem: IR (infrarood)
het starten van 3D, is de batterij van de bril bijna
lijke handelingen (bijvoorbeeld autorijden),
Max. signaalafstand: 6 m
leeg. Vervang de batterij voordat u de volgende
totdat uw symptomen zijn verdwenen. Als de
Bedrijfstemperatuur: 5 tot 40 °C
lm of het volgende programma gaat kijken.
symptomen zich blijven voordoen, stopt u de
3D-weergave en raadpleegt u eerst een arts.
Extra Active 3D-brillen (Philips PTA03) worden
afzonderlijk verkocht.
9
292892_Brochure_3D.indd 9 31-05-2010 18:56:36
La ventana pequeña en el centro de las gafas
recibe las señales 3D del transmisor.
Bienvenido/a al emocionante mundo de la
televisión 3D en casa.
Instalación
Contenido de la caja
Instalación
- 2 gafas con 3D activo
1 Apague el televisor.
- 2 fundas de microbra
2 Conecte el transmisor 3D en la conexión 3D
Actualización del software del televisor
- Gama de tres puentes para cada par de gafas
3D Out de la parte posterior del televisor.
Para preparar el televisor para la visualización en
- Transmisor 3D
3D, debe actualizar el software del televisor.
- Dispositivo USB con actualización de software
1 Encienda el televisor.
para el televisor
2 Conecte el dispositivo USB en la toma USB de
la parte lateral del televisor.
3 Instale el transmisor 3D en la parte superior
Preparación de las gafas 3D
o en la parte inferior del televisor. Asegúrese de
1 Tire de la tira de plástico y retírela para activar
que el transmisor apunta directamente al sitio en
la pila del interior. O bien, abra la tapa pequeña
el que se sienta para ver la televisión.
de la pila de las gafas 3D e introduzca la pila tipo
CR2032.
3 La actualización de software comenzará
automáticamente y durante la misma el televisor
puede apagarse y encenderse de nuevo. No
pulse ningún botón y espere hasta que aparezca
el mensaje “Operation Successful” (Operación
realizada correctamente).
4 Desconecte el dispositivo USB y apague y
encienda el televisor otra vez.
Su televisor ya está preparado para el 3D.
2 Coloque el puente que mejor se adapte a su
nariz en las gafas.
10
USB
PTA02
292892_Brochure_3D.indd 10 31-05-2010 18:56:38
Visualización de 3D
Visualización óptima de 3D
Seleccione un disco o programa en 3D
Para una visualización de 3D óptima, le
• Los padres deben vigilar a sus hijos durante
Para disfrutar de una película o un programa
recomendamos que:
la visualización en 3D y asegurarse de que no
en 3D, introduzca una película en 3D en un
• Se siente frente al televisor al menos a una
experimentan ninguna molestia de las descritas
reproductor de Blu-ray Disc con 3D o sintonice
distancia del triple de la altura del televisor,
anteriormente. La visualización en 3D no es
un canal de televisión que emita programas en
pero que no supere los 6 metros.
recomendable para niños de menos de 6 años,
3D.
ya que su sistema visual aún no se ha desarrol-
Pulse h (Inicio) y seleccione el reproductor
lado por completo.
de Blu-ray Disc con 3D, o bien seleccione Ver
• No utilice gafas 3D para otro propósito dis-
televisión y sintonice el canal de televisión.
tinto de la visualización de la televisión en 3D.
• PELIGRO DE ASFIXIA: No deje que los niños
Iniciar 3D
menores de 3 años jueguen con las gafas 3D,
El televisor le informará cuando el 3D esté
ya que podrían atragantarse con la tapa de la
disponible. Si selecciona Iniciar 3D para ver en
pila o la pila.
3D, póngase las gafas 3D. Las gafas necesitan unos
segundos para ajustar la señal 3D del transmisor
Cuidado de las gafas
3D.
• No exponga las gafas 3D a luz solar directa,
al calor, al fuego o al agua, ya que esto podría
Si se muestra una emisión en 3D como una
dañar el producto o provocar un incendio.
imagen doble en la pantalla, seleccione el tipo
• Evite la iluminación uorescente (como las
• No deje caer, doble ni fuerce los cristales de las
de imagen doble para corregir la imagen en 3D.
lámparas uorescentes o algunas bombillas
gafas 3D.
Pulse s (Ajustar), seleccione el formato 3D
de bajo consumo que funcionan a una baja
• Utilice un paño limpio y suave (de microbra
y después Lado por lado o Superior / inferior
frecuencia) y la luz solar directa, ya que podría
o franela) para limpiar los cristales y evitar que
Español
según las posiciones de las imágenes dobles.
interferir con la experiencia 3D.
se rallen. No aplique el limpiador directamente
en las gafas 3D, ya que esto podría dañar el
Detener el 3D
Advertencia de salud
sistema electrónico.
Si desea detener la visualización de 3D, pulse
• Si usted o algún miembro de su familia ha
• No utilice productos de limpieza químicos
s (Ajustar) y seleccione 2D en el menú 2D-3D.
sufrido ataques epilépticos o fotosensibles,
que contengan alcohol, disolvente, surfactante
Este elemento del menú sólo se muestra cuando
consulte con un médico antes de exponerse
o cera, benceno, disolvente, repelente de
las señales 3D están disponibles.
a fuentes de luz que parpadean, secuencias de
mosquitos o lubricante. La utilización de estas
imagen rápidas o la visualización 3D.
sustancias químicas puede provocar decolo-
Si no hay señal 3D del transmisor, las gafas 3D se
• Para evitar molestias como mareos, dolores
ración o grietas.
apagan automáticamente tras 5 segundos.
de cabeza o desorientación, le recomendamos
que no vea imágenes en 3D durante largos
Accesorios
Batería baja
períodos de tiempo. Si experimenta cual-
Sistema 3D: gafas con 3D activo
Cuando los cristales parpadeen durante 2
quier molestia, detenga el 3D y no participe
Tipo de pila: CR2032
segundos al iniciar la visualización de 3D, la
inmediatamente después en cualquier actividad
Sistema de transmisión: IR (infrarrojos)
pila de las gafas estará a punto de agotarse.
que entrañe algún riesgo (como conducir un
Distancia máxima de la señal: 6 m
Sustitúyalas antes de ver la siguiente película o
vehículo) hasta que los síntomas desaparezcan.
Temperatura de funcionamiento: de 5° a 40 °C
programa.
Si los síntomas persisten, no vuelva a visualizar
3D sin consultar a un médico previamente.
Las gafas con 3D activo adicionales
(Philips PTA03) se venden por separado.
11
292892_Brochure_3D.indd 11 31-05-2010 18:56:38

La nestra piccola al centro degli occhiali riceve i
segnali 3D dal trasmettitore.
Benvenuto nell'entusiasmante mondo della TV
3D a casa tua!
Installazione
Contenuto della confezione
- 2 paia di occhiali Active 3D
Installazione
- 2 custodie in microbra
1 Spegnere il televisore.
Aggiornamento del software del televisore
- 3 ponti con naselli per ogni paio di occhiali
2 Collegare il trasmettitore 3D alla presa 3D 3D
Per preparare il TV alla visione in 3D, è necessario
- Trasmettitore 3D
Out sul retro del TV.
aggiornare il software del TV.
- Dispositivo USB con aggiornamento software
1 Accendere il TV.
del TV
2 Inserire il dispositivo USB nella relativa porta
sul retro del TV.
Preparazione degli occhiali 3D
3 Installare il trasmettitore 3D sulla parte supe-
1 Tirare e rimuovere il rivestimento protettivo
riore o inferiore del TV. Assicurarsi di puntare il
in plastica per attivare la batteria. In alternativa
trasmettitore direttamente verso il punto da cui
aprire il piccolo coperchio del vano batteria degli
si guarda la televisione.
occhiali 3D e inserire la batteria stessa (tipo
3 L’aggiornamento software inizierà automatica-
CR2032).
mente; durante tale processo il TV si potrebbe
spegnere per poi riaccendersi. Non premere
alcun pulsante sul telecomando e attendere no
a che non compare il messaggio “Operation
Successful”.
4 Scollegare il dispositivo USB e spegnere il TV
per poi riaccenderlo nuovamente.
Il TV è pronto per la riproduzione in 3D.
2 Montaggio del ponte con naselli più adatto
sugli occhiali.
12
USB
PTA02
292892_Brochure_3D.indd 12 31-05-2010 18:56:40

Visione in 3D
Visione in 3D ottimale
Selezionare un disco o un programma in 3D
Per una visione in 3D ottimale, si consiglia di:
• I genitori devono tenere sotto controllo i
Per guardare un lm o un programma in 3D,
• sedersi a una distanza pari ad almeno 3 volte
propri bambini durante la visione in 3D e
inserire un lm in 3D in un lettore di dischi Blu-
l’altezza dello schermo del TV (ma non oltre 6
vericare che non mostrino i sopraccitati. La
ray 3D oppure sintonizzarsi su un canale TV che
metri dal televisore).
visione in 3D non è consigliata ai bambini di
trasmette programmi in 3D.
età inferiore ai 6 anni poiché il loro sistema
Premere h (Home) e selezionare il lettore di
visivo non è ancora totalmente sviluppato.
dischi Blu-ray 3D oppure selezionare Visione
• Utilizzare gli occhiali 3D solo per la visione
prog. TV e sintonizzarsi sul canale televisivo.
della TV in 3D.
• PERICOLO DI ASFISSIA - Non lasciare che
Avvio della visione in 3D
i bambini al di sotto dei 3 anni giochino con
Il TV informa l'utente quando sono disponibili
gli occhiali 3D, per evitare il pericolo di asssia
contenuti in 3D. Se si seleziona Avvio 3D
legato all’ingestione del coperchio della batteria
per visualizzare contenuti in 3D, indossare gli
o della batteria stessa.
occhiali 3D. Gli occhiali impiegano alcuni secondi
per regolare il segnale 3D proveniente dal
Manutenzione degli occhiali
trasmettitore.
• Non esporre gli occhiali 3D alla luce diretta del
sole, calore, amme o acqua per evitare danni
Se una trasmissione 3D viene visualizzata come
• evitare luci uorescenti (ad esempio quelle
al prodotto o il pericolo di incendi.
un insieme di immagini doppie sullo schermo,
termoluminescenti o la luce diffusa da alcune
• Non far cadere, piegare o applicare forza ec-
selezionare il tipo di immagine che viene
lampadine a risparmio energetico che funzio-
cessiva sulle lenti degli occhiali 3D.
riprodotta per la correzione in formato 3D.
nano a bassa frequenza) e la luce diretta del
• Utilizzare un panno morbido e pulito (in
Premere s (Regola), selezionare il formato 3D
sole che potrebbero interferire con la visione
microbra o in anella di cotone) per pulire
e selezionare Fianco a anco o Parte superiore/
in 3D.
le lenti senza grafarle. Non spruzzare mai
inferiore a seconda della posizione delle
del detergente direttamente sugli occhiali 3D.
immagini doppie.
Precauzioni per la salute
Questo potrebbe danneggiare i componenti
• Se in famiglia ci sono casi di epilessia o di attac-
elettronici.
Interruzione della visione in 3D
chi legati alla sensibilità alla luce, consultare un
• Non utilizzare detergenti chimici che conten-
Se non si desidera più visualizzare le immagini in
medico professionista prima dell’esposizione a
gono alcol, solventi, tensioattivi, cera, benzene,
Italiano
3D, premere s (Regola) e selezionare 2D dal
sorgenti di luce intermittenti, sequenze rapide
diluenti, repellenti per zanzare o lubricanti.
menu 2D-3D. Questa voce di menu viene visual-
di immagini o alla visione in 3D
L’utilizzo di questi prodotti chimici può causare
izzata solo quando sono disponibili dei segnali 3D.
• Per evitare effetti negativi quali stordimenti, mal
perdita di colore e crepe.
di testa o disorientamento, si consiglia di non
Se il trasmettitore non invia segnali 3D, gli oc-
procedere alla visione di contenuti 3D per pe-
Speciche
chiali 3D si spengono automaticamente dopo 5
riodi di tempo prolungati. In caso di problemi,
Sistema 3D: occhiali Active 3D
secondi.
interrompere la visione ed evitare di intrapren-
Tipo di batteria: CR2032
dere subito attività potenzialmente pericolose
Sistema di trasmissione: IR (a raggi infrarossi)
Batteria scarica
(non mettersi ad esempio alla guida) no a
Distanza massima segnale: 6 m
Quando dalle lenti viene visualizzato uno sfarfallio
che i sintomi non sono scomparsi. Se i sintomi
Temperatura di funzionamento: da 5 a 40 °C
di 2 secondi all’avvio della riproduzione 3D, la
persistono, non continuare la visione in 3D
batteria degli occhiali è quasi scarica. Sostituirla
senza consultare prima un medico.
Occhiali Active 3D (Philips PTA03) aggiuntivi,
prima di guardare il lm o il programma succes-
venduti separatamente.
sivo.
13
292892_Brochure_3D.indd 13 31-05-2010 18:56:40

A janela pequena no meio dos óculos recebe os
sinais 3D do transmissor.
Bem-vindo ao excitante mundo da TV 3D em
sua casa!
Instalação
Conteúdo da embalagem
- 2 óculos Active 3D
Instalação
- 2 bolsas em microbra
1 Desligue o televisor.
Actualizar o software do televisor
- um conjunto de 3 pontes para cada par de
2 Ligue o transmissor 3D à ligação 3D 3D Out
Para preparar o seu televisor para a apresentação
óculos
na parte traseira do televisor.
em 3D, tem de actualizar o software do televisor.
- transmissor 3D
1 Ligue o televisor.
- dispositivo USB com uma actualização do
2 Ligue o dispositivo USB à entrada USB na
software de TV
parte lateral do televisor.
3 Instale o transmissor 3D em cima ou em baixo
Preparação dos óculos 3D
do televisor. Certique-se de que direcciona o
1 Puxe e remova a tira de plástico para activar
transmissor directamente para o local onde se
a bateria no interior. Ou, em alternativa, abra a
senta a ver televisão.
tampa pequena do compartimento da pilha dos
3 A actualização do software é iniciada
óculos 3D e insira a bateria - tipo CR2032.
automaticamente e, durante a actualização, o
televisor poderá desligar-se e voltar a ligar. Não
prima nenhum botão no telecomando até ser
apresentada a mensagem “Operation Successful”
(Operação bem sucedida).
4 Retire o dispositivo USB, desligue o televisor e
volte a ligá-lo.
O seu televisor está pronto para apresentar em
3D.
2 Monte a ponte mais adequada para si nos
óculos.
14
USB
PTA02
292892_Brochure_3D.indd 14 31-05-2010 18:56:42
• Os pais devem supervisionar os seus lhos,
Apresentação em 3D
Visualização 3D perfeita
enquanto estes assistem a 3D e garantir que
não sentem nenhum desconforto, conforme
Seleccionar um disco ou programa em 3D
Para um visualização 3D perfeita, recomendamos
mencionado acima. A visualização de 3D não é
Para desfrutar de um lme ou programa em 3D,
que:
recomendada a crianças com idade inferior a
insira um lme em 3D num leitor de discos Blu-
• se sente, no mínimo, a uma distância do televi-
6 anos, visto que o seu sistema visual não está
ray 3D ou sintonize um canal de TV que emita
sor igual ao triplo da altura do ecrã, mas sem
totalmente desenvolvido.
programas em 3D.
ultrapassar os 6 metros.
• Não utilize óculos 3D para outra nalidade,
Prima h (Início) e seleccione o leitor de
excepto ver televisão em 3D.
discos Blu-ray 3D ou seleccione Ver televisão e
• PERIGO DE ASFIXIA - Não permita que
sintonize o canal de TV.
crianças com idade inferior a 3 anos brinquem
com os óculos 3D, estes podem asxiar-se
Iniciar 3D
com a tampa do compartimento da pilha ou a
O televisor informa-lo-á quando o 3D
pilha.
estiver disponível. Se seleccionar Iniciar 3D
para assistir a 3D, coloque os óculos 3D. Os
Cuidados com os óculos
óculos necessitam de alguns segundos para se
• Não exponha os óculos 3D à luz directa do
adaptarem ao sinal 3D do transmissor 3D.
sol, calor, fogo ou água. Isto pode provocar
num mau funcionamento do produto ou um
Se uma emissão 3D for apresentada no seu
incêndio.
ecrã com uma imagem dupla, seleccione o tipo
• Não deixe cair, dobre ou aplique força nas
de imagem dupla para corrigir a imagem 3D.
• evite iluminação uorescente (como lâmpadas
lentes dos óculos 3D.
Prima s (Ajustar), seleccione o formato 3D e
TL ou determinadas lâmpadas economizadoras
• Utilize um pano macio limpo (microbra
seleccione Lado a lado ou Frente/trás de acordo
que operam a baixa frequência) e luz solar di-
ou anela de algodão) para limpar as lentes
com as posição da imagem dupla.
recta, pois estas podem inuenciar a experiên-
para evitar riscos. Nunca pulverize líquido de
cia 3D.
limpeza directamente para os óculos 3D. Isto
Parar 3D
pode danicar o sistema electrónico.
Se quiser parar a apresentação em 3D, prima
Aviso de saúde
• Não utilize produtos de limpeza químicos que
s (Ajustar) e seleccione 2D no menu 2D-
• Se sofrer, ou viver antecedentes familiares, de
contenham álcool, solventes, agentes tensio-
3D. Este item de menu é apresentado apenas
epilepsia ou de crises epilépticas fotossensíveis,
activos, cera, benzina, diluentes, repelente de
quando estão disponíveis sinais em 3D.
consulte um médico antes de se expor a fon-
insectos ou lubricante. A utilização destes
tes de luz intermitente, sequências de imagens
químicos pode causar descoloração ou fendas.
Se não houver um sinal 3D do transmissor, os
rápidas ou visualização 3D
óculos 3D desligam-se automaticamente após 5
• Para evitar desconforto, como tonturas, dores
Especicações
segundos.
de cabeça ou desorientação, recomenda-
Sistema 3D: Óculos 3D activos
mos que não assista a apresentações em 3D
Tipo de pilha: CR2032
Português
Pouca carga
durante períodos de tempo prolongados. Se
Sistema de transmissão: IV (infravermelhos)
Quando as lentes cam intermitentes durante
sentir algum desconforto, pare de assistir a 3D
Distância máx. do sinal: 6 m
2 segundos ao iniciar o 3D, a pilha dos óculos
e não inicie de imediato actividades potencial-
Temperatura de funcionamento: 5° a 40° C
está quase vazia. Substitua-a antes de assistir ao
mente perigosas (por exemplo, conduzir), até
próximo lme ou programa.
os sintomas desaparecerem. Se os sintomas
Óculos Active 3D adicionais (Philips PTA03)
persistirem, não volte a assistir a 3D sem con-
vendidos em separado.
sultar previamente um médico.
15
292892_Brochure_3D.indd 15 31-05-2010 18:56:42
Το μικρό παράθυρο στο μέσον των γυαλιών
λαμβάνει τα σήματα 3D από τον πομπό.
Καλώς ήρθατε στο συναρπαστικό κόσμο της
τηλεόρασης 3D στο σπίτι!
Εγκατάσταση
Τι περιέχεται στη συσκευασία
- 2 3D ενεργά γυαλιά
Εγκατάσταση
- 2 θήκες από μικροΐνες
1 Απενεργοποιήστε την τηλεόραση.
Ενημέρωση του λογισμικού της τηλεόρασης
- 3 διαφορετικά στηρίγματα μύτης για κάθε
2 Συνδέστε τον πομπό 3D στη σύνδεση 3D
Για να προετοιμάσετε την τηλεόρασή σας για
ζευγάρι γυαλιά
3D Out στο πίσω μέρος της τηλεόρασης.
παρακολούθηση 3D, πρέπει να ενημερώσετε
- Πομπός 3D
το λογισμικό της.
- Συσκευή USB με ενημέρωση για το λογισμικό
1 Ενεργοποιήστε την τηλεόραση.
της τηλεόρασης
2 Συνδέστε τη συσκευή USB στη σύνδεση USB
στο πλάι της τηλεόρασης.
3 Εγκαταστήστε τον πομπό 3D στο επάνω ή
Προετοιμασία των γυαλιών 3D
στο κάτω μέρος της τηλεόρασης. Βεβαιωθείτε
1 Τραβήξτε και αφαιρέστε την πλαστική
ότι ο πομπός είναι στραμμένος απευθείας
ταινία για να ενεργοποιήσετε την μπαταρία
προς το σημείο όπου κάθεστε για να
στο εσωτερικό. Εναλλακτικά, ανοίξτε το μικρό
παρακολουθήσετε τηλεόραση.
κάλυμμα της μπαταρίας των γυαλιών 3D και
3 Η ενημέρωση λογισμικού θα ξεκινήσει
τοποθετήστε την μπαταρία - τύπου CR2032.
αυτόματα και κατά τη διάρκεια της
ενημέρωσης, η τηλεόραση ενδέχεται να
απενεργοποιηθεί και να ενεργοποιηθεί ξανά.
Μην πατήσετε κανένα πλήκτρο στο
τηλεχειριστήριο και περιμένετε μέχρι να
εμφανιστεί το μήνυμα ‘Operation Successful’.
4 Αποσυνδέστε τη συσκευή USB και, στη
συνέχεια, απενεργοποιήστε και ενεργοποιήστε
ξανά την τηλεόραση.
2 Τοποθετήστε το στήριγμα μύτης στα γυαλιά
Η τηλεόρασή σας είναι έτοιμη για να
που σας βολεύουν περισσότερο.
παρακολουθήσετε 3D.
16
USB
PTA02
292892_Brochure_3D.indd 16 31-05-2010 18:56:44
• Οι γονείς πρέπει να παρακολουθούν τα παιδιά
Ελλάδα
Παρακολούθηση 3D
Βέλτιστη παρακολούθηση 3D
τους ενώ βλέπουν τηλεόραση σε λειτουργία
3D και να βεβαιώνονται ότι δεν παρουσιάζουν
Επιλέξτε ένα δίσκο ή πρόγραμμα 3D
Για βέλτιστη κινηματογραφική εμπειρία 3D,
καμία από τις παραπάνω ενοχλήσεις. Η
Για να απολαύσετε μια ταινία ή ένα πρόγραμμα
συνιστούμε να:
παρακολούθηση 3D δεν συνιστάται για παιδιά
3D, εισαγάγετε μια ταινία 3D σε ένα 3D Blu-ray
• κάθεστε σε απόσταση τουλάχιστον 3 φορές
κάτω των 6 ετών, καθώς το οπτικό τους
Disc player ή συντονιστείτε σε ένα τηλεοπτικό
το ύψος της οθόνης της τηλεόρασης, αλλά όχι
σύστημα δεν είναι πλήρως ανεπτυγμένο.
κανάλι που αναμεταδίδει προγράμματα σε 3D.
μεγαλύτερη από 6 μέτρα.
• Μην χρησιμοποιείτε τα γυαλιά 3D για κανένα
Πατήστε το πλήκτρο h (Αρχική) και
άλλο σκοπό εκτός από την παρακολούθηση
επιλέξτε το 3D Blu-ray Disc player ή επιλέξτε
τηλεόρασης 3D.
Παρακολούθηση TV και συντονιστείτε στο
• ΚΙΝΔΥΝΟΣ ΣΤΡΑΓΓΑΛΙΣΜΟΥ - Μην αφήνετε
τηλεοπτικό κανάλι.
παιδιά κάτω από 3 ετών να παίζουν με τα
γυαλιά 3D, καθώς θα μπορούσαν να πνιγούν με
Έναρξη 3D
το καπάκι της μπαταρίας ή την μπαταρία.
Η τηλεόραση θα σας ενημερώσει όταν το 3D
είναι διαθέσιμο. Εάν επιλέξετε Έναρξη 3D για
Φροντίδα των γυαλιών
να παρακολουθήσετε 3D, βάλτε τα γυαλιά 3D.
• Μην εκθέτετε τα γυαλιά 3D σε άμεσο ηλιακό
Τα γυαλιά χρειάζονται κάποια δευτερόλεπτα
φως, θερμότητα, φωτιά ή νερό. Αυτό ενδέχεται
για να προσαρμοστούν στο σήμα 3D από τον
να έχει ως αποτέλεσμα τη δυσλειτουργία του
πομπό 3D.
προϊόντος ή την πρόκληση πυρκαγιάς.
• Μην ρίχνετε, λυγίζετε ή ασκείτε δύναμη στους
Εάν η αναμετάδοση 3D εμφανίζεται ως διπλή
• αποφεύγετε το φωτισμό φθορισμού (όπως
φακούς των γυαλιών 3D.
εικόνα στην οθόνη σας, επιλέξτε τον τύπο της
φωτισμό TL ή ορισμένους λαμπτήρες
• Χρησιμοποιήστε ένα καθαρό μαλακό πανί
διπλής εικόνας για να διορθώσετε την εικόνα
εξοικονόμησης ενέργειας που λειτουργούν σε
(από μικροΐνες ή βαμβακερή φανέλα) για τον
3D. Πατήστε το πλήκτρο s (Ρύθμιση), επιλέξτε
χαμηλή συχνότητα) και το άμεσο ηλιακό φως,
καθαρισμό των φακών, προκειμένου να μην τους
τη μορφή 3D και επιλέξτε Πλάι-πλάι ή Πάνω/
καθώς ενδέχεται να προκαλέσουν παρεμβολές
γρατζουνίσετε. Μην ψεκάζετε ποτέ καθαριστικό
κάτω ανάλογα με τις θέσεις της διπλής εικόνας.
στην παρακολούθηση 3D.
απευθείας επάνω στα γυαλιά 3D, καθώς
ενδέχεται να προκληθεί βλάβη στο ηλεκτρονικό
Διακοπή 3D
Προειδοποίηση σχετικά με την υγεία
σύστημα.
Εάν θέλετε να σταματήσετε να παρακολουθείτε
• Εάν εσείς ή η οικογένειά σας έχετε ιστορικό
• Μην χρησιμοποιείτε χημικά καθαριστικά
3D, πατήστε το πλήκτρο s (Ρύθμιση)
επιληψίας ή κρίσεων φωτοευαισθησίας,
που περιέχουν αλκοόλη, διαλύτες,
και επιλέξτε 2D στο μενού 2D-3D. Αυτό
συμβουλευθείτε γιατρό πριν από την έκθεση
επιφανειοδραστικές ουσίες ή κερί, βενζόλιο,
το στοιχείο μενού εμφανίζεται μόνο όταν
σε πηγές φωτός που αναβοσβήνουν, ταχεία
αραιωτικά, εντομοαπωθητικά ή λιπαντικά.
υπάρχουν διαθέσιμα σήματα 3D.
εναλλαγή εικόνων ή παρακολούθηση 3D
Η χρήση αυτών των χημικών μπορεί να
• Για να αποφύγετε ενοχλήσεις όπως ζάλη,
προκαλέσει αποχρωματισμό ή ρωγμές.
Εάν δεν υπάρχει κάποιο σήμα 3D από τον
πονοκέφαλο ή αποπροσανατολισμό, συνιστούμε
πομπό, τα γυαλιά 3D απενεργοποιούνται
να μην παρακολουθείτε τηλεόραση σε
Προδιαγραφές
αυτόματα μετά από 5 δευτερόλεπτα.
λειτουργία 3D για μεγάλα χρονικά διαστήματα.
Σύστημα 3D: 3D ενεργά γυαλιά
Εάν παρουσιάσετε κάποια ενόχληση, σταματήστε
Τύπος μπαταρίας: CR2032
Χαμηλή μπαταρία
να παρακολουθείτε 3D και μην ασχοληθείτε
Σύστημα μετάδοσης: IR (υπέρυθρες)
Όταν οι φακοί τρεμοπαίζουν για 2
άμεσα με οποιαδήποτε δυνητικά επικίνδυνη
Μέγ. απόσταση σήματος: 6 μέτρα
δευτερόλεπτα κατά την έναρξη 3D, η
δραστηριότητα (για παράδειγμα, οδήγηση
Θερμοκρασία λειτουργίας: 5° έως 40°C
μπαταρία των γυαλιών είναι σχεδόν άδεια.
αυτοκινήτου) μέχρι τα συμπτώματα να
Αντικαταστήστε την πριν παρακολουθήσετε την
εξαφανιστούν. Εάν τα συμπτώματα παραμένουν,
Συμπληρωματικά 3D ενεργά γυαλιά
επόμενη ταινία ή πρόγραμμα.
μην συνεχίσετε να παρακολουθείτε 3D χωρίς να
(Philips PTA03) πωλούνται ξεχωριστά.
επικοινωνήσετε πρώτα με γιατρό.
17
292892_Brochure_3D.indd 17 31-05-2010 18:56:44
Det lilla fönstret i glasögonens mitt tar emot
3D-signaler från sändaren.
Välkommen till den spännande 3D TV-världen
hemma!
Installation
Vad nns i förpackningen?
- 2x aktiva 3D-glasögon
Installation
- 2x mikroberfodral
1 Stäng av TV:n.
Uppdatera TV:ns programvara
- 3 näsbryggor till varje glasögonpar
2 Anslut 3D-sändaren till 3D-anslutningen 3D
Om du vill förbereda TV:n för att kunna titta på
- 3D-sändare
Out på TV:ns baksida.
3D, måste du uppdatera TV:ns programvara.
- USB-enhet med uppdatering av TV-programvara
1 Slå på TV:n.
2 Anslut USB-enheten i USB-uttaget på TV:ns
sida.
Förbereda 3D-glasögonen
1 Dra bort plastremsan för att aktivera batteriet
3 Installera 3D-sändaren högst upp eller längst
inuti. Eller öppna den lilla batteriluckan på 3D-
ned på TV:n. Se till att sändaren pekar direkt mot
glasögonen och sätt i batteriet av typen CR2032.
den plats där du sitter och tittar på TV.
3 Programvaruuppdateringen startar automatiskt
och under tiden kan TV:n slås av och på igen.
Tryck inte på någon knapp på fjärrkontrollen och
vänta tills meddelandet Operation Successful
visas.
4 Dra ur kontakten till USB-enheten och slå av
TV:n och på igen.
2 Fäst den näsbrygga som passar dig bäst på
Du kan börja titta på 3D på TV:n.
glasögonen.
18
USB
292892_Brochure_3D.indd 18 31-05-2010 18:56:46
Titta på 3D
Optimal 3D-visning
Välj en 3D-skiva eller ett 3D-program
För att du ska få bästa möjliga
• Föräldrar bör övervaka sina barn när de tittar
Om du vill titta på en 3D-lm eller ett
3D-visningsupplevelse rekommenderar vi att du:
på 3D så att de inte upplever något av ovan-
3D-program sätter du i en 3D-lm i en 3D
• sitter på ett avstånd som är minst 3 gånger
stående obehag. 3D-tittande rekommenderas
Blu-ray Disc-spelare eller slår på en TV-kanal som
TV:ns höjd, men inte längre än 6 meter bort.
inte för barn under 6 år eftersom deras syn
Svenska
visar program i 3D.
inte är fullt utvecklad ännu.
Tryck på h (hem) och välj 3D Blu-ray
• Använd inte 3D-glasögonen i något annat syfte
Disc-spelaren eller välj Titta på TV och slå på
än att titta på 3D TV.
TV-kanalen.
• KVÄVNINGSRISK – Låt inte barn under 3
år leka med 3D-glasögonen, de kan kvävas av
Starta 3D
batterilocket eller batteriet.
TV:n informerar dig när 3D är tillgängligt. Om du
väljer Starta 3D för att titta på 3D sätter du på
Skötsel av glasögonen
dig 3D-glasögonen. Det tar några sekunder för
• Utsätt inte 3D-glasögonen för direkt solljus,
glasögonen att anpassa sig till 3D-signalen från
värme, eld eller vatten. Det kan göra att
3D-sändaren.
produkten inte fungerar eller att den tar eld.
• Tappa inte, böj inte och bruka inte våld på 3D-
Om en 3D-sändning visas som en dubbel bild
glasögonen.
på skärmen väljer du typ av dubbel bild för att
• undviker lysrörsbelysning (t.ex. TL-belysning
• Använd en mjuk trasa (mikrober eller bo-
korrigera 3D-bilden. Tryck på s (Justera) för att
och vissa energieffektiva lampor som fungerar
mullsanell) för att rengöra glasen så att de inte
välja 3D-format och välj Sida vid sida eller Högst
på låg frekvens) och direkt solljus eftersom det
blir repiga. Spruta aldrig rengöringsmedel direkt
upp/längst ned beroende på de dubbla bildernas
kan störa 3D-upplevelsen.
på 3D-glasögonen. Det kan skada elektroniken.
placering.
• Använd inte rengöringsmedel som innehåller
Hälsovarning
alkohol, lösningsmedel, ytaktiva medel eller vax,
Stoppa 3D
• Om du eller någon i din familj har epilepsi eller
bensen, thinner, myggmedel eller glidmedel.
Om du vill sluta titta på 3D trycker du på
är ljuskänslig, bör du rådfråga sjukvårdspersonal
Sådana kemikalier kan orsaka missfärgning eller
s (Justera) och väljer 2D i 2D-3D-menyn. Det
innan du utsätter dig för blinkande ljuskällor,
sprickor.
här menyalternativet visas bara när 3D-signalerna
snabba bildsekvenser och 3D-visning
är tillgängliga.
• För att undvika obehag som yrsel, huvudvärk
Specikationer
och desorientering rekommenderar vi att du
3D-system: Aktiva 3D-glasögon
Om det inte kommer någon 3D-signal från
inte tittar på 3D under längre perioder. Om du
Batterityp: CR2032
sändaren stängs 3D-glasögonen av automatiskt
upplever något obehag bör du sluta att titta på
Ljudöverföringssystem: IR (infrarött)
efter 5 sekunder.
3D och inte börja med någon potentiellt riskfull
Max signalavstånd: 6 m
aktivitet (till exempel köra bil) förrän symp-
Drifttemperatur: 5° till 40°C
Svagt batteri
tomen har försvunnit. Om symptomen kvarstår
När linserna imrar i 2 sekunder vid 3D-starten
bör du inte titta på 3D igen, utan att först ha
Ytterligare aktiva 3D-glasögon (Philips PTA03)
är glasögonens batteri nästan slut. Byt ut det
rådfrågat sjukvårdspersonal.
säljs separat.
innan du tittar på nästa lm eller program.
19
292892_Brochure_3D.indd 19 31-05-2010 18:56:46

Det lille vinduet i midten av brillene mottar
3D-signalene fra senderen.
Velkommen til den spennende verdenen med
3D-TV hjemme!
Installasjon
Innholdet i esken
Installasjon
- 2 x Active 3D-briller
1 Slå av TVen.
- 2 x mikroberpose
2 Koble 3D-senderen til 3D-kontakten 3D Out
Oppdatere TV-programvare
- tre nesebroer for hvert par briller
på baksiden av TVen.
Du må oppdatere TV-programvaren for å
- 3D-sender
klargjøre TVen for 3D.
- USB-enhet med programvareoppdatering til
1 Slå på TVen.
TVen
2 Koble USB-enheten til USB-kontakten på siden
av TVen.
3 Plasser 3D-senderen oppå eller under TVen.
Klargjør 3D-brillene
Sørg for at senderen peker direkte mot der du
1 Trekk ut og fjern plaststripen for å aktivere
sitter for å se på TV.
batteriet. Du kan også åpne det lille batteridekse-
let på 3D-brillene og sette inn batteriet – type
CR2032.
3 Programvareoppdateringen starter automatisk.
Under oppdateringen kan det hende at TVen slår
seg av og på igjen. Ikke trykk på noen taster på
fjernkontrollen, og vent til meldingen Operation
Successful vises.
4 Koble fra USB-enheten og slå TVen av og
deretter på igjen.
TVen er klar for visning i 3D.
2 Monter nesebroen på brillene som passer deg
best.
20
USB
PTA02
292892_Brochure_3D.indd 20 31-05-2010 18:56:48
