Philips HI 558: инструкция
Раздел: Бытовая, кухонная техника, электроника и оборудование
Тип: Утюг
Характеристики, спецификации
Инструкция к Утюгу Philips HI 558
HI 569/568/559/558
Azur Excel Plus
'Cord/Cordless'

Lietuvißkai Puslapis 55
English Page 4
∑ Skaitydami ßias prietais¨ naudojimo instrukcijas,
• Keep page 3 open when reading these
prieß save tur∂kite atverstå 3-å puslap^.
operating instructions.
Український Стор. 61
J´zyk polski Strona 10
∑ Пiд час читання цiєї iнструкцiї з експлуатацiї
• Prosz´ przeczytaç instrukcj´ obs∏ugi podanà
тримайте вiдкритою стор. 3.
na stronie 3.
Hrvatski Stranica 68
âesky Strana 17
• Stranicu 3 dræite otvorenom tijekom Ëitanja
• Vyhledejte na stranû 3 a ãtûte návod k pouÏití.
ovih uputa za uporabu.
Slovensky Strana 23
SSlloovveenn{{~~iinnaa SSttrraann 7744
• Vyhadajte na strane 3 a ãítajte návod k pouÏitiu.
* Ob branju teh navodil za uporabo imejte
odprto stran 3.
Magyar 29. oldal
• A használati utasítás olvasása közben lapozzon
RRoommâânniiaa PPaaggiinnaa 8800
a 3. oldalra.
• Ţineţi manualul deschis la pagina 3 cind citiţi
aceste instrucţiuni de operare.
Russkij Stranica 36
• Smotrite pri htenii nastoäwej
instrukcii str. 3.
БЪЛГАРСКИ Cтраница 86
• Дръжте страница 3 отворена, докато
Eesti Lehekülg 43
четете инструкциите за употреба.
• Kasutusjuhendit lugedes hoidke lahti lehekülg 3.
Latviski 49. lappuse
SRPSKI Stranicu 92
∑ Kad lasiet lietoßanas pamåcîbu, ielükojieties
• Dok čitate ova uputstva, držite otvorenu stranicu 3.
3. lappusé.
2
3
1
HI 568/69
HI 569/69
C O HED F
G
HI 559/69
U
B
HI 568/569
N
I
A
J
T
M
P
K
R
Q
MAX
S
L
HI 558/59
HI 568/69
F
0
0
1
1
4
4
3
BB
3
CC
EE
4
4
5
5
6
6
H
O
H

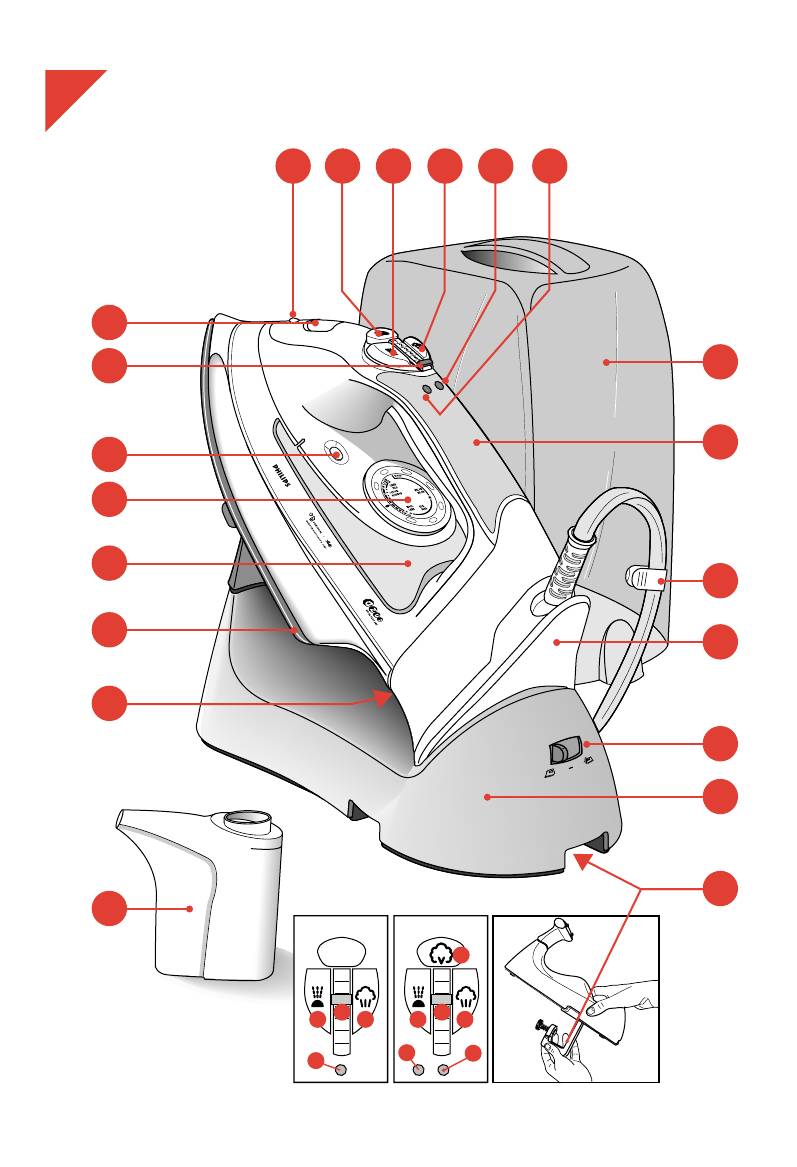
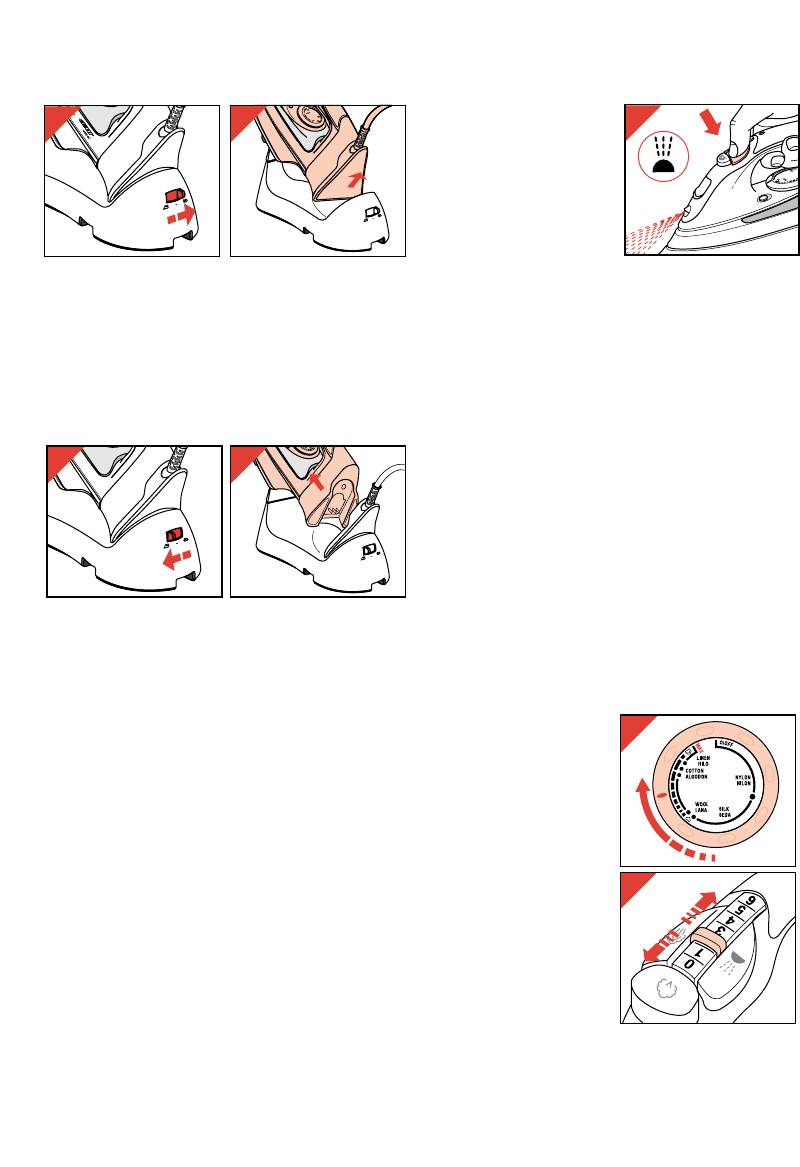
General description (fig. 1)
English
A Temperature control (rotate)
B Steam control (slide)
Important
0 = no steam
1 = minimum steam output
• Please read these instructions in
6 = maximum steam output
conjunction with the illustrations before
C Spray button T (press)
using the appliance.
D Spray nozzle
• Before using for the first time, check if
E Shot of Steam button 9 (press)
the voltage rating on the typeplate
F Turbo Steam button 0 (press) (types
corresponds to the mains voltage in your
HI 568/69)
home.
G Filling funnel for filling with water without
• Never use the appliance if it is damaged
spillage
in any way.
H Temperature pilot light (amber)
• Before using for the first time remove
I “Self clean” button for automatic cleaning /
any sticker or protective foil from the
descaling (press)
soleplate. Clean the soleplate with a soft
J Water window
cloth.
K Type plate
• When you have finished ironing, and also
L Measuring beaker
when leaving the iron even for a short
M Sole plate
while:
N Soft hand grip (types HI 568/69)
- set the steam control to position O;
O “Auto Stop” pilot light (red) (types
- place the iron on the stand;
HI 568/69)
- remove the mains plug from the wall
P Power unit
socket.
Q Stand
• Take care that children cannot touch the
R 3-positions switch
iron when hot and that they cannot pull
∫ = cordless ironing
the mains cord.
- = storage position
• Remove the mains plug from the wall
ª = corded ironing
socket before filling the iron with water
S Stand clamp
or pouring out the remaining water after
T Cord clip
use.
U Carry case (types HI 559 and HI 569 only)
• Never immerse the iron or the stand in
water.
Making ready for use
• Some parts of the iron have been slightly
greased and as a result the iron may
slightly smoke when switched on for the
first time. This (harmless) phenomenon
will cease after a short while.
• Do not put vinegar or other descaling
agents into the water reservoir.
• Do not use chemically descaled water.
• The cordset should not be allowed to
touch the soleplate when it is hot.
• Regularly check if the mains cord is still
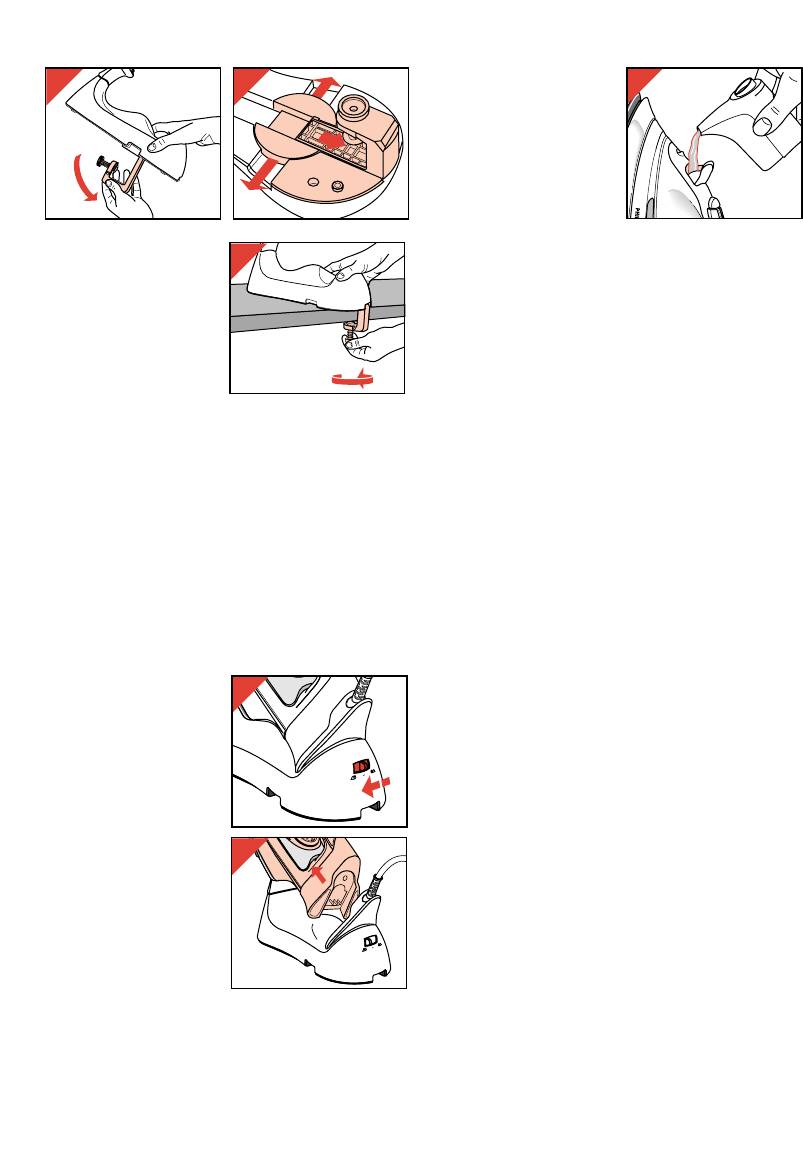
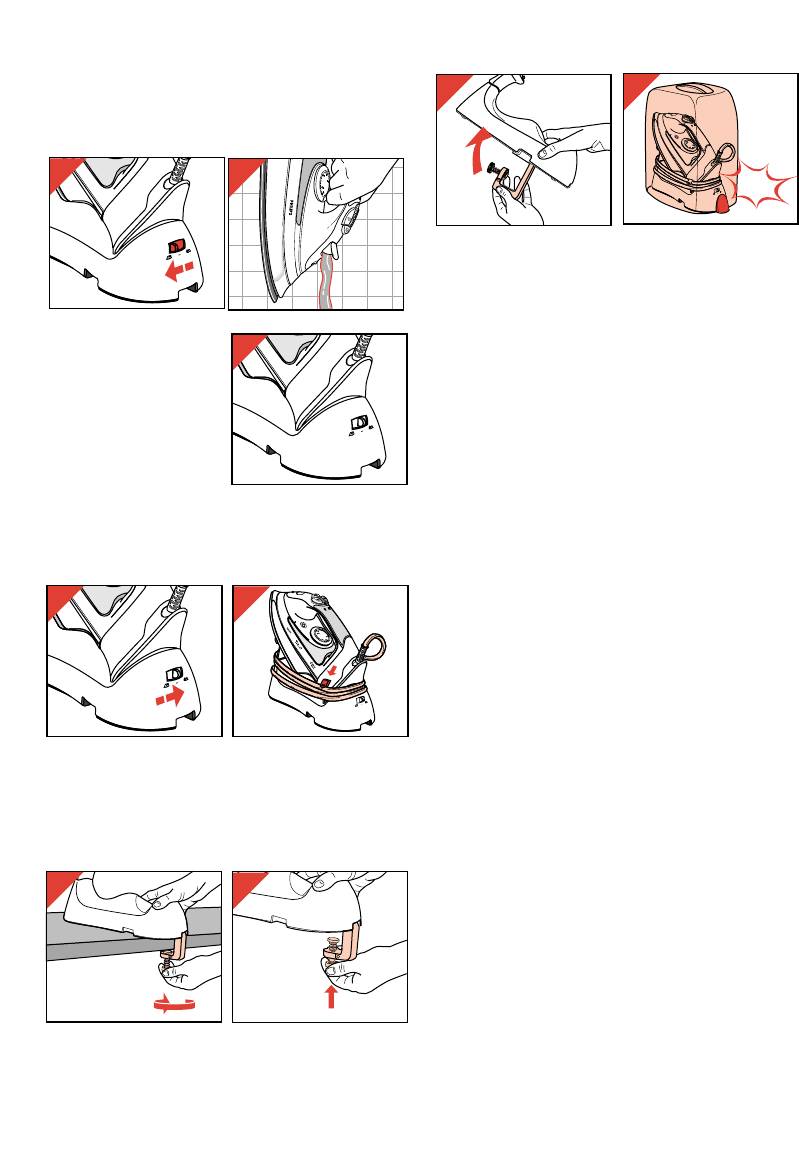
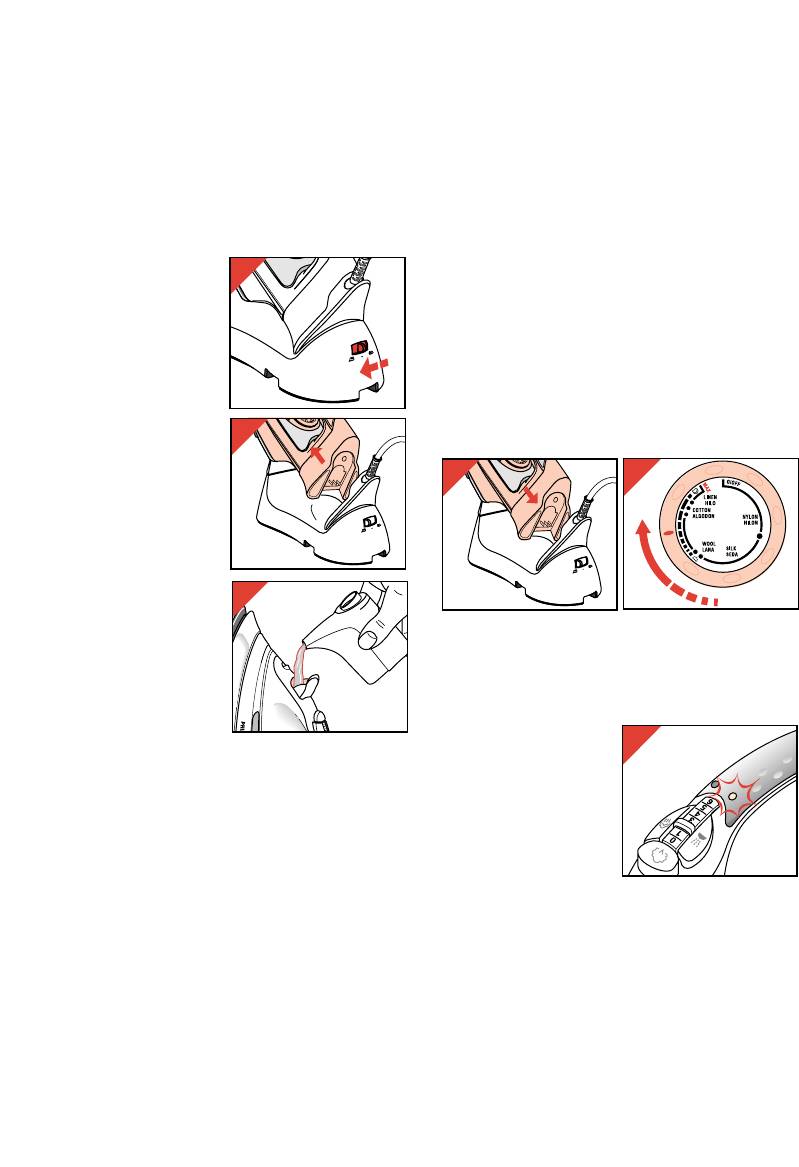
- (Types HI 559 and HI 569 only:) Release (fig.
in a good and safe condition.
2) and take off (fig. 3) the carry case.
If the mains cord of this appliance is
damaged, it must be replaced by the
original type only. Please apply to your
Philips dealer or to the Philips
organisation in your country for
replacement.
• The ejected steam is hot and therefore
hazardous. Never direct the steam
towards people.
- Unwind the mains cord completely (fig. 4 and 5).
4
4
5
2
3
It is also possible to just place the stand on e.g.
a table top. The clamp can remain folded.
The rubber feet on the bottom of the stand
prevent slipping. However, we advise you not to
place the stand close to the table edge, as the
stand could accidentally be knocked over.
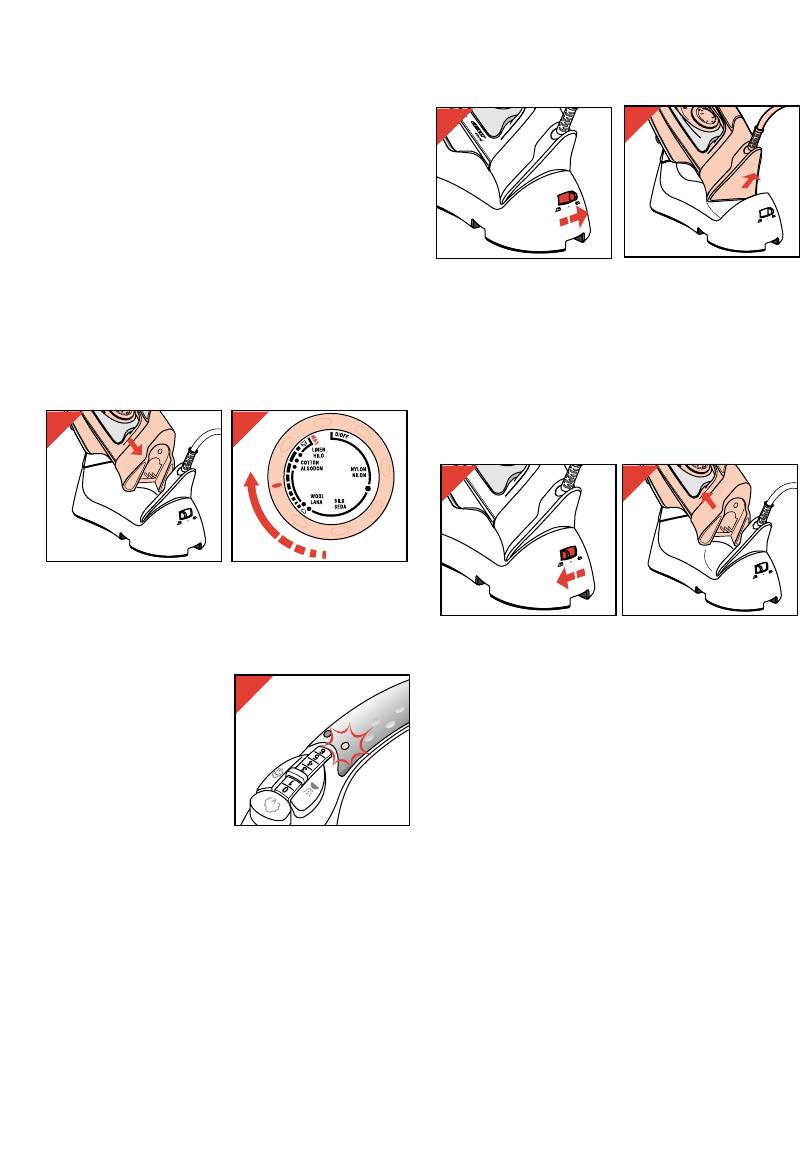
- Fix the stand clamp to
the ironing board (or
other suitable
surface) (fig. 6, 7, 8).
5
6
7
8
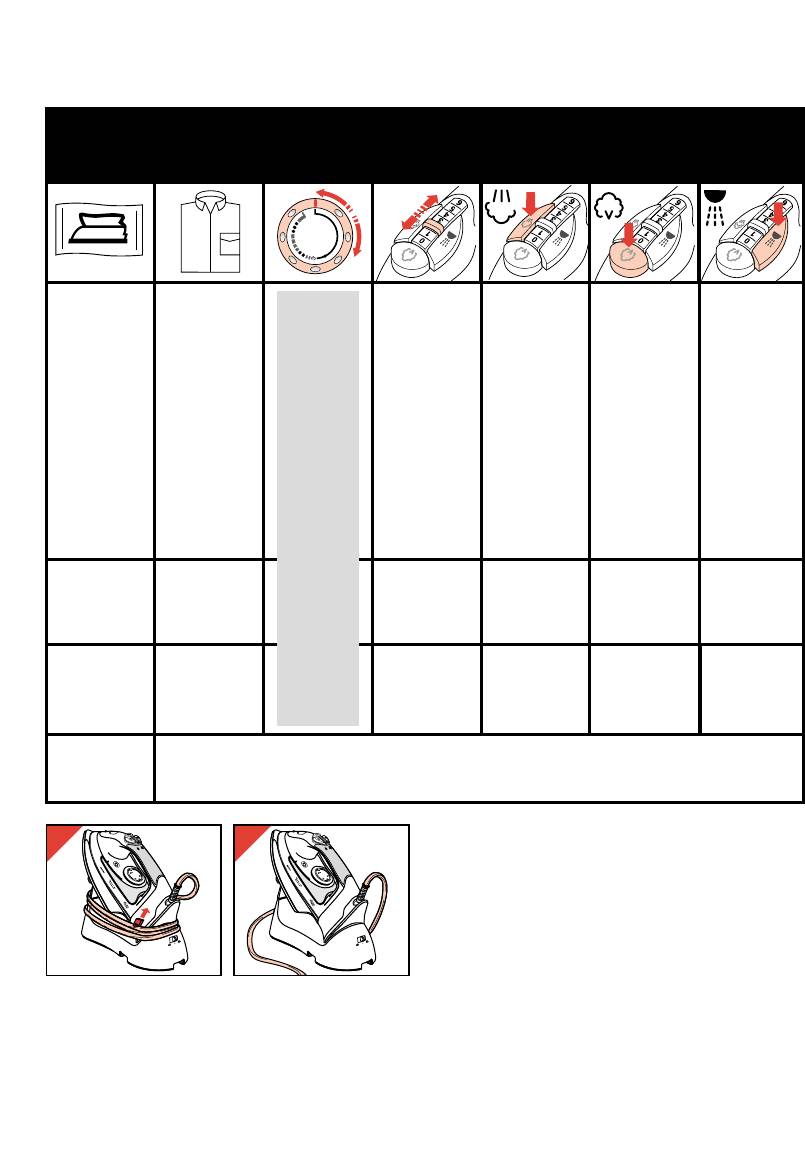
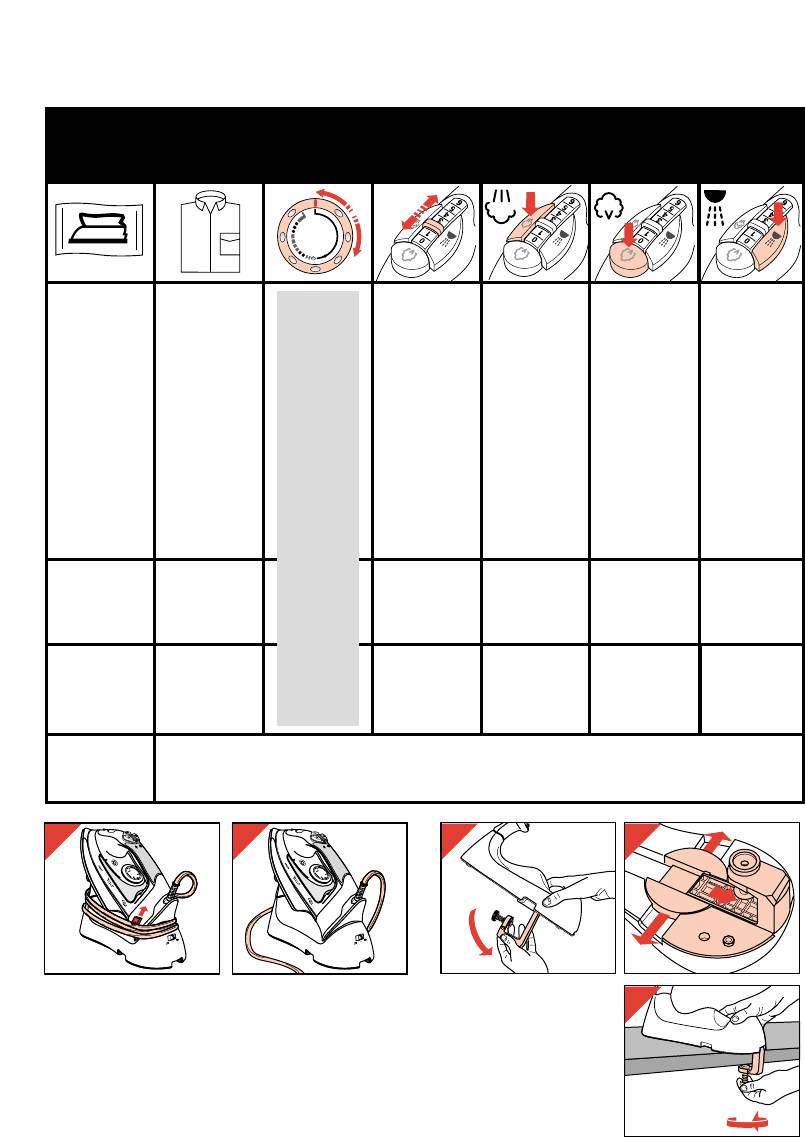
Fabric table
Instructions
Fabric Temperature
Steam control Shot of steam Turbo steam Spray
on label
control
MIN
Synthetic
0
fibres, e.g.
AA
acryl,
AA
viscose,
11
polyamide
B
(nylon),
AA
T
9
XX
0
polyester
AA
AA
AA
Silk
AA
AA
22
Wool
C
1 - 2
AA
T
9
X
0
AA
33
Cotton
D
MAX
3 - 6
Linen
T
9
0
Please note that Z on the label means:
Z
“This article cannot be ironed!”
O
|
O
F
F
A
X
M
HILO
LINEN
COTONE
ALGODON
NYLON
LANA
NYLON
LANA
SETA
SEDA
Filling with water (for steam-ironing and
If you do not know the kind(s) of fabric(s) the
spraying)
article has been made from, find a spot which
will be invisible when wearing or using the
• You can fill this iron
article. Try out the ironing temperature which is
with normal tap
most suitable there. (Start at a relatively low
water.
temperature.)
- Remove the mains
• Pure woollen fabrics (100% wool) may be
plug from the wall
pressed with the iron set to a steam position.
socket before filling
Preferably set the steam control to maximum
the iron with water.
position and use a dry pressing cloth.
- Set the steam control
When steam-ironing woollen fabrics, shining of
(B) to position O (= no
the fabric may occur. This can be prevented by
steam).
turning the article inside out and ironing the
- Set the 3-positions
reverse side.
switch to position ∫
• Velvet and other textures which rapidly acquire
(fig. 9) and take the
shiny spots should be ironed in one direction
cordless iron from the
only (with the nap) applying light pressure.
stand (fig. 10).
Always keep the iron moving.
- Stand the iron upright
• Silk and other fabrics likely to become shiny
and open the filling
should be ironed on the reverse side. To
funnel. Pour water
prevent staining do not use the spray on silk or
into the filling funnel
other delicate fabrics.
to a maximum of 230
ml (fig. 11). Use the
measuring beaker
Setting the temperature
with spout for this
purpose.
- Close the filling
funnel.
Ironing temperature
• Always check first to see whether a label with
ironing instructions is attached to the article to
be ironed. (See table.)
- Place the iron on the stand (fig. 12).
Follow these ironing instructions in all cases.
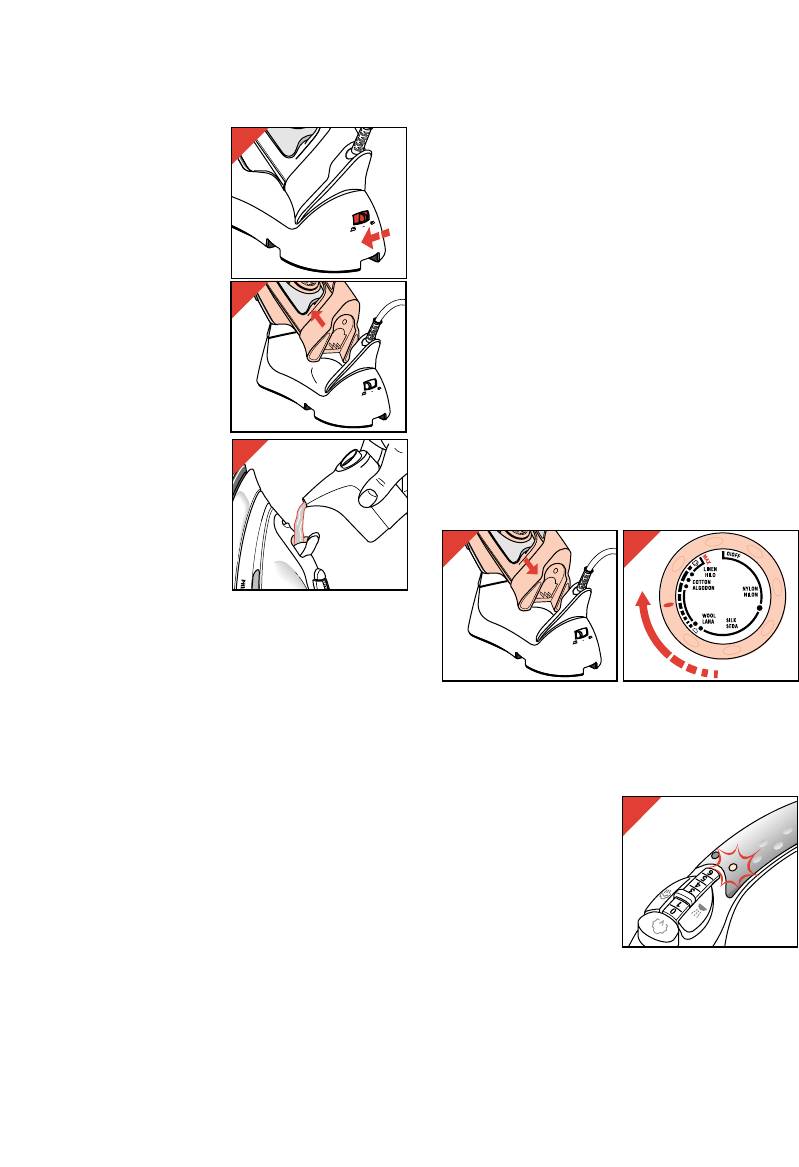
- Set the appropriate ironing temperature
• If ironing instructions are missing but you know
indicated in the ironing instructions or in the
the kind of fabric, then refer to the fabric table.
fabric table by means of the temperature dial
• The fabric table is valid for the materials only
(fig. 13).
and is not applicable to any applied finish,
- Insert the mains plug
gloss etc.
into the wall socket.
Fabric to which some kind of finish has been
Pilot light (H) will now
applied (gloss, wrinkle, relief etc.) can best be
come on (fig. 14).
ironed at lower temperatures.
- When the amber pilot
• Sort the laundry out according to ironing
light (H) has gone out
temperature first: wool with wool, cotton with
and has come on
cotton, etc.
again you can start
• The iron heats up quicker than it cools down.
ironing.
Therefore, start ironing the articles requiring
• The amber pilot light (H) will come on from time
the lowest temperature such as those made of
to time during corded ironing.
synthetic fibres.
• If you set the temperature control to a lower
• If the fabric consists of various kinds of fibres,
setting after ironing at a high temperature, do
you must always select the lowest ironing
not recommence ironing before the amber pilot
temperature for the composition of those fibres.
light (H) first has come on and then has gone
(E.g. an article consisting of “60% polyester and
out again.
40% cotton” should be ironed at the temperature
indicated for polyester (1) and without steam.)
6
9
10
MAX
11
12
13
14
HI 568/69
Corded ironing
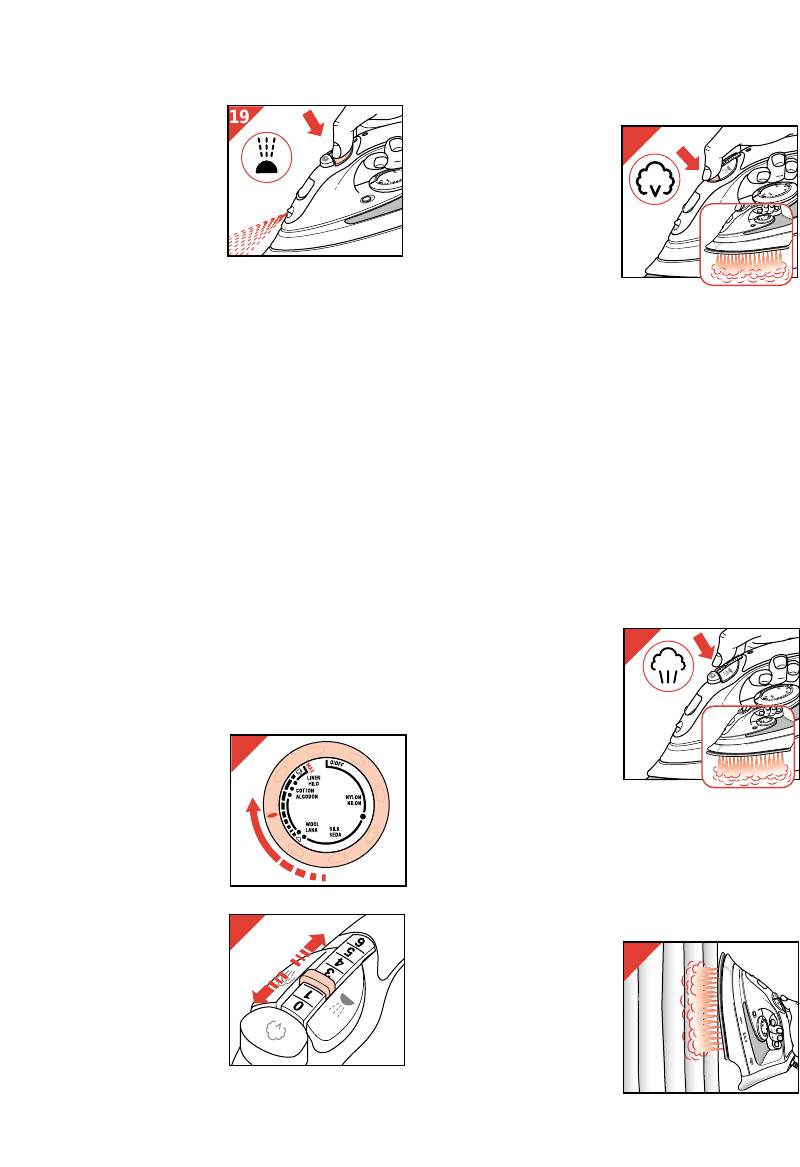
Spraying T
At any temperature by
pushing on the spray
button (C) T a couple of
times the laundry can be
damped down (fig. 19).
Ensure that there is
enough water in the
water reservoir.
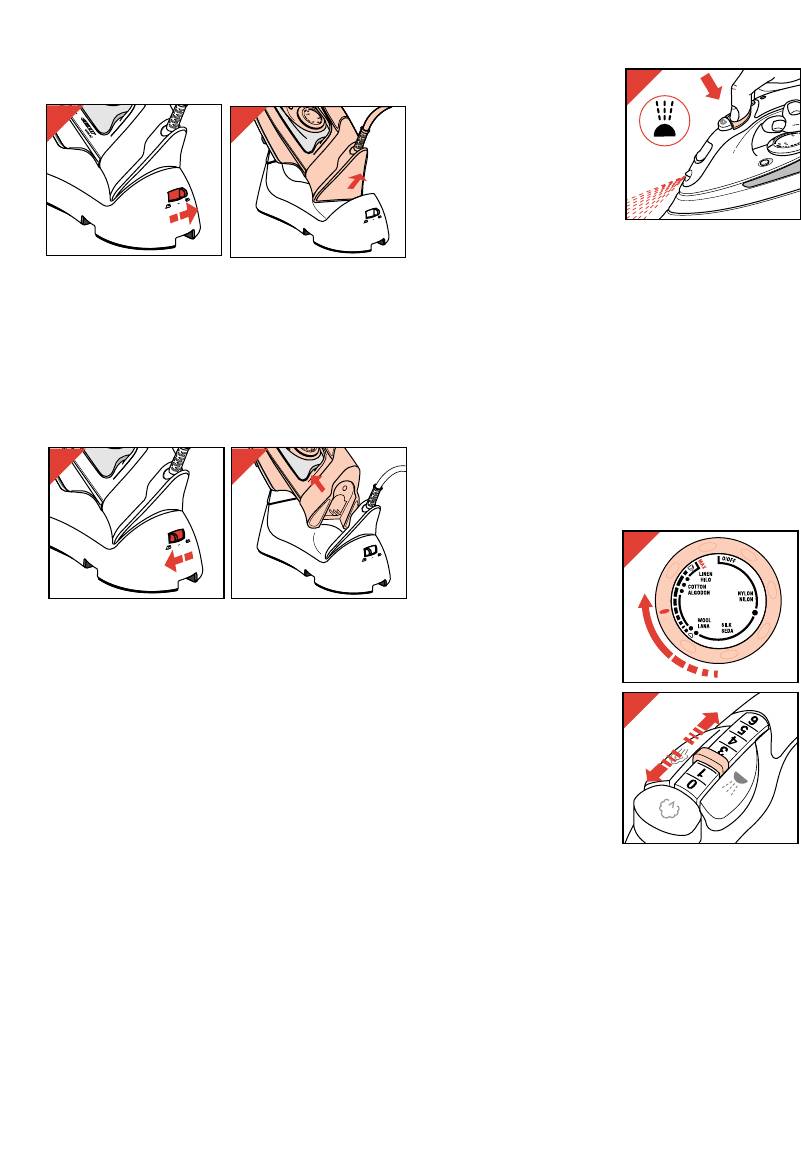
- Set the 3-positions switch to position ª
(fig. 15).
Steam-ironing
- Take the iron (with power unit) from the stand
(fig. 16).
• As indicated on the temperature control (A) and
- Either place iron (with power unit) on heel rest
the table, steam-ironing is only possible at
or on the stand.
higher ironing temperatures:
2 or 3 for moderate steam
3 for maximum steam.
Cordless ironing
• With conventional steam irons, water may leak
from the soleplate if a too low temperature has
been selected. This will then cause stains.
However, your new steam iron features “Drip
Stop” steam shut-off:
the iron will automatically stop steaming at too
low temperatures.
When this happens, you can hear “Click”.
Set the temperature control (A) to the advised
position.
Steaming will recommence as soon as the
- Set the 3-positions switch in position ∫
appropriate (higher) temperature has been
(fig. 17).
reached.
- Take the iron (without power unit) from the
• Ensure that there is enough water in the water
stand (fig. 18).
reservoir.
- Always replace the iron on the stand when you
- Put the iron on its stand.
interrupt ironing.
- Set the temperature
• (Types HI 568/69 only) The user may continue
control (A) at the
ironing as long as there is no lamp indication.
required position
However, if the pilot lamp starts to flash, it
within the "steam
indicates that the iron has cooled down below
area" (2 or 3)
the set temperature. For optimal ironing
(fig. 20).
performance the iron should be replaced to the
- Insert the mains plug
stand for heating up to the set temperature.
into the wall socket.
• When cordless steam-ironing for a
- After the amber
considerable time and when applying a number
temperature pilot light
of “shots of steam” or “turbo steam” the
(H) first has gone out
soleplate might cool down more than required.
and has come on
For that reason we advise you to always use
again, you may start
the iron in the corded mode if you intend to
ironing.
steam iron for a considerable time.
- Slide the steam
control (B) to the
required position
(fig. 21).
7
15
16
17
18
19
20
21
Turbo steam
0
element will switch off automatically.
(types HI 568/69 only)
To indicate that the iron has shut off, the red
“Auto Stop” pilot light (O) will start blinking and a
This feature provides
sound signal will be
extra steam to remove
audible (fig. 25).
stubborn creases. The
In a horizontal position,
extra steam works as
this will happen after 30
long as the Turbo steam
seconds.
button 0 (F) is kept
In a vertical position, this
pressed in.
will happen after
- Press and hold the Turbo steam button 0 (F)
8 minutes.
for a couple of seconds (fig. 22). Then release
the button.
- When picking up the iron again, the red “Auto
• Do not keep the button pressed-in for more
Stop” pilot light (O) will go out.
than 10 seconds without interruption.
The amber temperature pilot light (H) will come
Allow at least one minute interval before
on. This indicates that the iron is heating up
applying Turbo Steam again.
again.
If the amber temperature pilot light (H) comes
- Wait for the amber pilot light to go out. Then
on, this indicates that the iron is heating up
you can recommence ironing.
again.
- Wait for the amber pilot light to go out. Then
you can recommence ironing.
Maintenance
• It is important to apply "self-cleaning" at least
Shot of steam 9
every two weeks to remove scale etc.
• The harder the water the more the iron should
By pressing button 9
be self-cleaned.
(E) an intense “shot” of
steam is emitted from
- Set the steam control (B) to position O.
the soleplate (fig. 23).
- Open the filling funnel and fill the water
This can be very useful
reservoir up to the MAX indication.
e.g. when removing
- Close the filling funnel.
stubborn creases.
- Put the iron on its stand.
The “shot” of steam
- Set the temperature control (A) to MAX.
facility can be used only while ironing with high
- Insert the mains plug into the wall socket.
ironing temperature (2 or 3).
- Allow the iron to heat up until the amber
temperature pilot light (H) first goes out and
Vertical position
then comes on again.
“Shot of steam” can also
- Set the 3-positions switch in position ∫ (fig.
be applied when holding
17) and remove the iron (without power unit)
the iron in a vertical
from the stand (fig. 18).
position (fig. 24). This is
- Hold the iron horizontally over the sink.
useful for removing
- Press button "Self
creases from hanging
clean" (I) (fig. 26).
clothes, curtains, etc.
Boiling water and
steam will now be
ejected from the
holes in the
Ironing without steam
soleplate.
Impurities and scale
For ironing without steam proceed as described
(if any) are washed
for steam-ironing. However, the steam control (B)
away with it.
should remain in position O (= no steam).
- Move the iron forwards and backwards while
this happens.
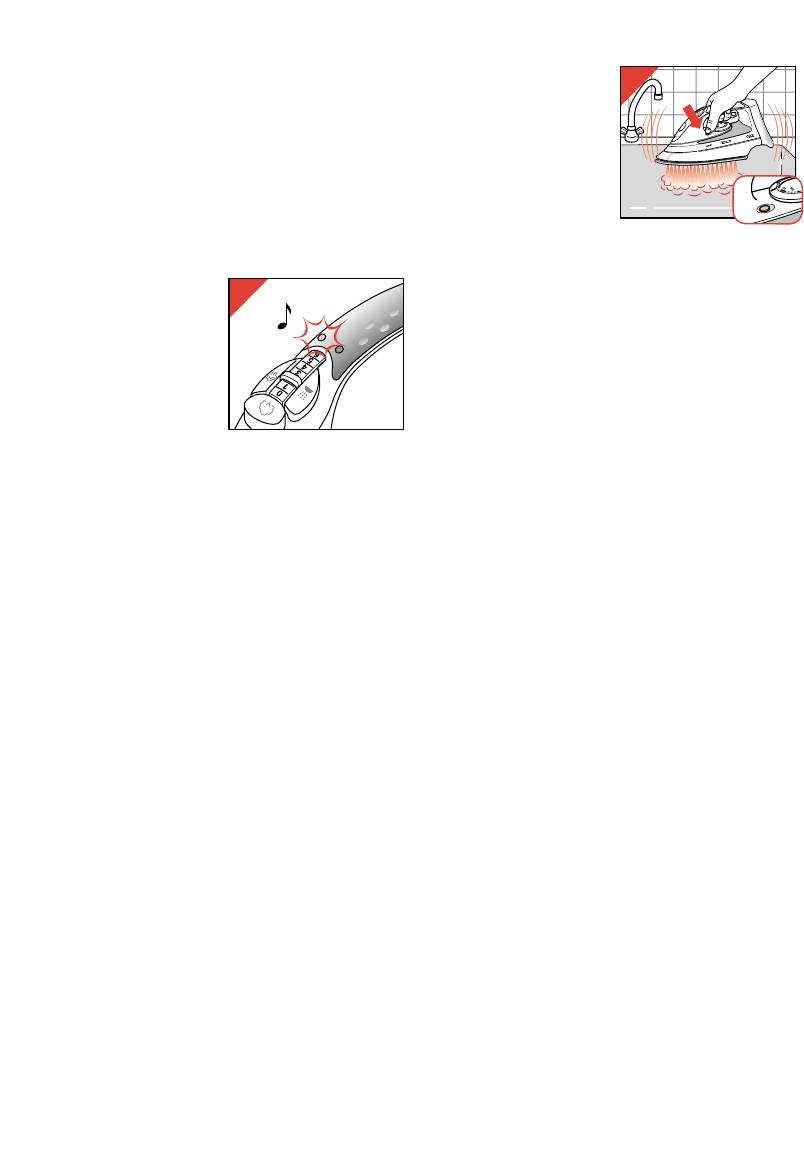
“Auto stop” (automatic safety shut-off)
- Release button "Self clean" after one minute or
(types HI 568/69 only)
when the water reservoir has become empty.
If (only in the corded mode) the iron is left
- Repeat self-cleaning if you notice that much
motionless for more than 30 seconds, the heating
impurity and/or scale has been washed out.
8
11
22
23
24
;
;
25
26
- Put the iron back on its stand. Let it heat up
again until the amber pilot light goes out.
- Remove the iron from the stand and move it
over a (preferably) old piece of cloth.
This is to ensure that the soleplate will be dry
during storage.
- Unplug and allow the iron to cool down before
storing it on the stand.
- Set the 3-positions switch to the storage
Cleaning
position - (fig. 30).
The iron, the power unit and the stand are then
- Before cleaning remove the mains plug from
locked together.
the wall socket and allow the iron to cool down
- You can wind the cord around the stand. With
sufficiently.
the cord clip you can fix the end of the cord
- Scale and other setting can be wiped off the
(fig. 31).
soleplate with a damp cloth and some non-
scratching (fluid) abrasive.
Keep the soleplate smooth: avoid hard
contact with metal objects.
- The upper part of the appliance can be cleaned
with a damp cloth.
- From time to time clean the inside of the water
reservoir by filling with water and shaking.
Then pour the water back out.
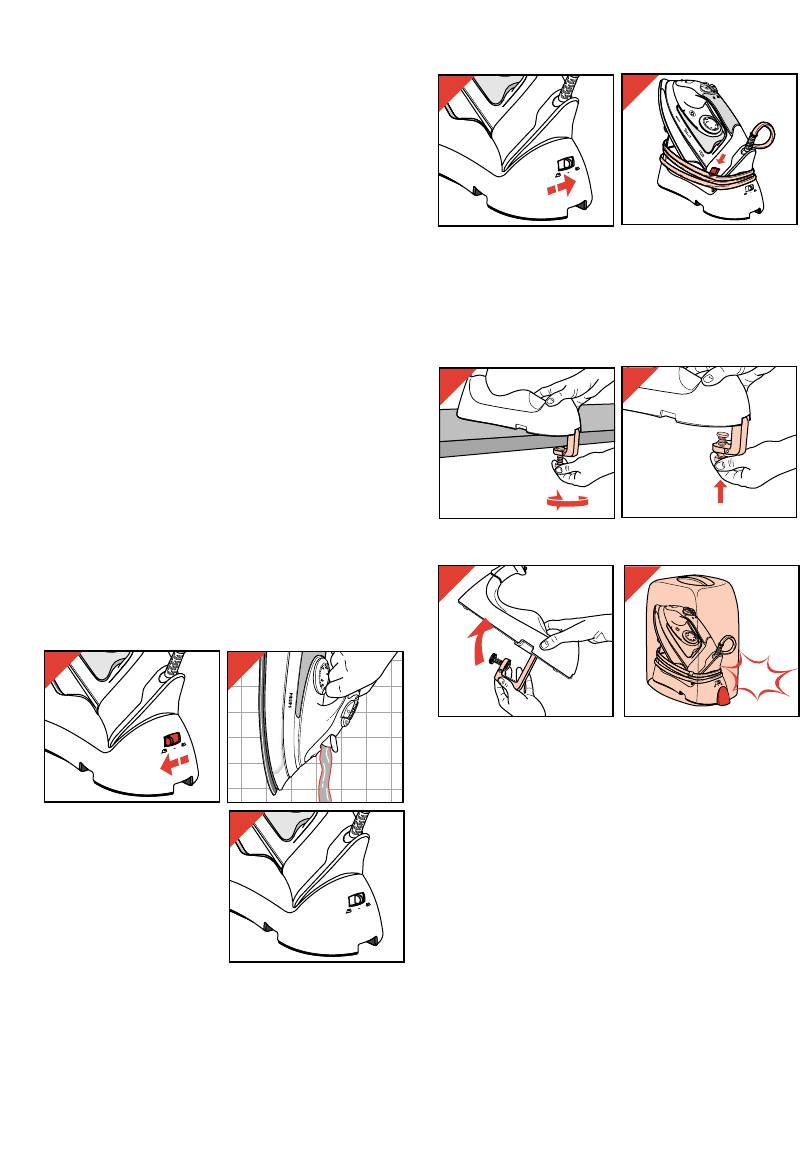
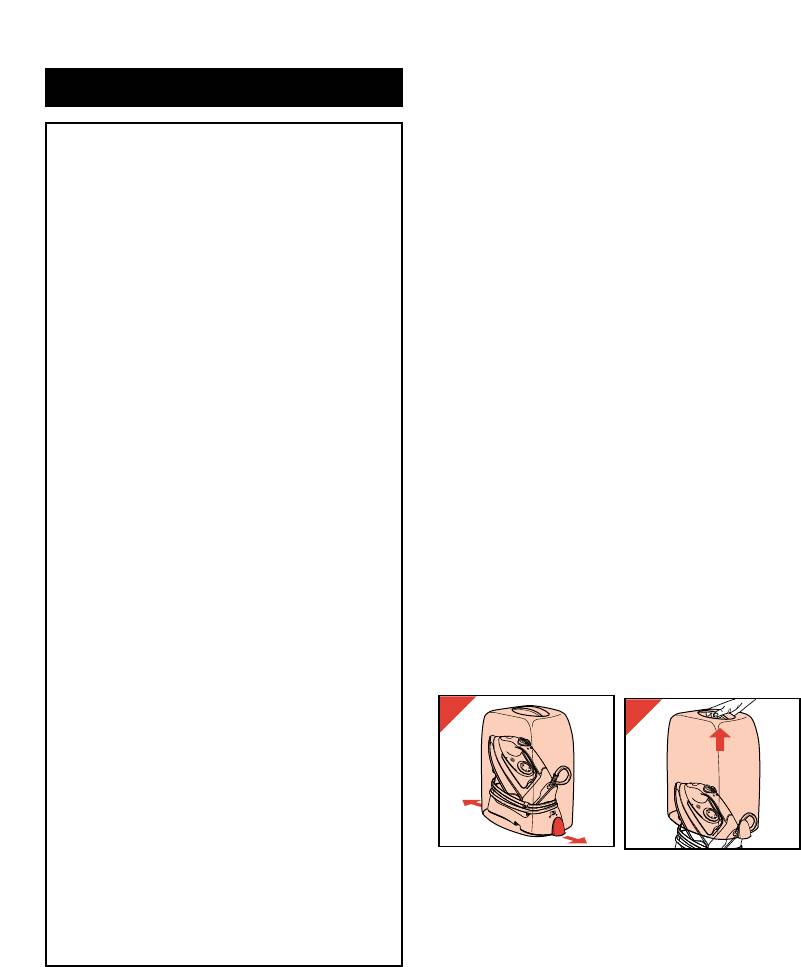
- Unlock the stand clamp (S) (fig. 32).
- Screw in the fixing screw completely (fig. 33).
Storage
• Always store the iron on the stand to prevent
damage to the soleplate.
- Remove the mains plug from the wall socket.
- Fold the stand clamp into the stand (fig. 34).
- (Types HI 556/66 only:) First allow the iron to
cool down. Then place the carry case over the
stand.
Press onto the case to lock it to the stand
- Set the steam control
(“Click!”) (fig. 35).
(B) to position O (= no
steam).
- Set the 3-positions
switch to position ∫
(fig. 27).
- Take the iron from the
stand. Open the filling
funnel and pour the
remainder of the water out (fig. 28).
- Place the iron back on the stand to cool down
(fig. 29).
9
27
28
29
30
31
32
33
34
35
CLICK
Opis ogólny (rys. 1)
polski
A Regulator temperatury (obrotowy)
B Regulator pary (suwakowy):
Uwaga
0 = bez pary
1 = minimalne ciÊnienie pary
• Przed w∏àczeniem ˝elazka po raz
6 = maksymalne ciÊnienie pary
pierwszy nale˝y dok∏adnie przeczytaç
C Spryskiwacz T (przycisk)
instrukcj´ obs∏ugi oraz zapoznaç si´ z
D Dysza spryskiwacza
ilustracjami.
E Uderzenie parowe 9 (przycisk)
• Nale˝y sprawdziç, czy napi´cie w
F Zwi´kszona iloÊç pary 0 (przycisk)- Turbo
instalacji elektrycznej Paƒstwa domu
steam typ HI 568/69)
jest identyczne z napi´ciem podanym
G Otwór do nape∏niania zbiornika wodà
na tabliczce znamionowej ˝elazka.
H Lampka kontrolna - temperatura ˝elazka
• Nigdy nie u˝ywaç uszkodzonego
(kolor pomaraƒczowy)
˝elazka.
I Przycisk samoczyszczenia “Self clean” -
• Przed pierwszym prasowaniem nale˝y
do automatycznego oczyszczania, a tak˝e
usunàç wszelkie naklejki i foli´
usuwania kamienia
zabezpieczajàcà ze stopy ˝elazka.
J Okienko zbiornika na wod´
Stop´ ˝elazka wyczyÊciç mi´kkà
K Tabliczka znamionowa
szmatkà.
L Pojemniczek do nalewania wody
• Po zakoƒczeniu prasowania lub
M Stopa prasujàca
podczas nawet najkrótszej przerwy w
N Mi´kki uchwyt (typ HI 568/69)
prasowaniu:
O Lampka kontrolna “Auto Stop” (czerwona)
- nastawiç regulator pary na pozycj´
(typ HI 568/69)
“O”;
P CzeÊç zasilajàca ˝elazka
- umieÊciç ˝elazko na podstawce;
Q Podstawka
- wy∏àczyç przewód zasilajàcy z
R Trzypozycyjny prze∏àcznik
gniazdka Êciennego.
∫ = prasowanie bez przewodu
• Zwracaç bacznà uwag´, by dzieci nie
- = pozycja do przechowywania ˝elazka
dotkn´∏y goràcego ˝elazka ani nie
ª = prasowanie z przewodem
ciàgn´∏y za przewód zasilajàcy.
S Uchwyt mocujàcy
• Podczas nape∏niania ˝elazka wodà lub
T Klips do spinania przewodu
wylewania wody pozosta∏ej po
U Skrzynka do przenoszenia ˝elazka (tylko
prasowaniu nale˝y wy∏àczyç
typ HI 558 i HI 569)
urzàdzenie z sieci.
• ˚elazka ani podstawki nie zanurzaç w
wodzie.
Przygotowanie do u˝ycia
• Niektóre elementy ˝elazka sà lekko
naoliwione, co mo˝e byç przyczynà
niewielkiego dymienia w czasie
pierwszego prasowania; dymienie
zanika jednak po krótkim czasie.
• Nie wlewaç do zbiornika octu ani
innych Êrodków usuwajàcych kamieƒ.
• Nie u˝ywaç wody zmi´kczonej
chemicznie.
• Nale˝y uwa˝aç, by przewód nie dotyka∏
nagrzanej stopki ˝elazka.
- (Tylko typ HI 559 i HI 569) Zwolniç zaczepy
• Regularnie sprawdzaç, czy przewód nie
(rys. 2) i zdjàç skrzynk´ do przenoszenia
jest uszkodzony. Je˝eli dojdzie do
(rys. 3).
takiej sytuacji, trzeba go wymieniç na
oryginalny przewód firmy Philips. W
tym celu nale˝y zwróciç si´ do punktu
serwisowego firmy Philips.
• Wytwarzana przez ˝elazko para jest
goràca. Nigdy nie nale˝y kierowaç jej
strumienia w stron´ ludzi.
10
2
3
Tabelka
Temperatura
Rodzaj
Pokr´t∏o
Regulator
Uderzenie
Uderzenie
Spryskiwacz
podana na
tkaniny
termostatu
pary
parowe
parowe
metce
"turbo"
Tkaniny
MIN
syntetyczne
0
np.
A
octanowe
A
akryl,
1
wiskoza
B
poliamidowe
A
T
9
XX
0
(nylony),
A
poliester,
A
A
Jedwab
A
A
2
We∏na
C
1 - 2
A
T
9
X
0
A
3
Bawe∏na
D
MAX
3 - 6
T
Len
9
0
Uwaga: Z na metce oznacza: "Tej cz´Êci garderoby nie
Z
prasowaç!"
- Rozwinàç ca∏kowicie przewód zasilajàcy
(rys. 4, 5).
11
O
O
|
F
F
A
X
M
HILO
LINEN
COTONE
ALGODON
NYLON
LANA
NYLON
LANA
SETA
SEDA
4
5
- Postawiç ˝elazko
pionowo i otworzyç
otwór wlewowy. Wlaç
maksymalnie 230 ml
wody (rys. 11). By
zapobiec
rozchlapywaniu wody
- u˝yç pojemniczka
do nape∏niania.
- Przymocuj uchwyt
- Zamknàç otwór wlewowy.
do deski do
prasowania (lub
innej odpowiedniej
Temperatura prasowania
powierzchni)
(rys. 6,7,8).
• Przed prasowaniem nale˝y zawsze
Podstaw´ ˝elazka
sprawdziç, czy odzie˝ przygotowywana do
mo˝na tak˝e
prasowania ma wszytà metk´ z temperaturà
przykr´ciç na
prasowania (patrz tabelka).
przyk∏ad do blatu sto∏u. Uwaga: uchwyt
Nale˝y zawsze przestrzegaç tych
mo˝e pozostawiaç wgniecenia. Gumowa
wskazówek.
powierzchnia na spodzie podstawy
• Je˝eli nie ma takiej metki, ale znacie
zapobiega Êlizganiu. Zaleca si´ jednak nie
Paƒstwo rodzaj materia∏u, z którego zosta∏a
montowaç podstawy ˝elazka tu˝ przy
uszyta odzie˝, to pokr´t∏o termostatu
kraw´dzi sto∏u, poniewa˝ mo˝e ona byç
prosimy ustawiç w zalecanej w tabeli pozycji.
przypadkowo stràcona.
• Dane podane w tabeli obowiàzujà tylko dla
materia∏ów czystych. Tkaniny apreturowane,
tkaniny b∏yszczàce, gremplowane, nie
Nape∏nianie zbiornika wodà (do prasowania
mnàce si´ itp.) nale˝y prasowaç w ni˝szej
z parà i spryskiwania)
temperaturze.
• Przed prasowaniem odzie˝ nale˝y
• Do nape∏niania zbiornika mo˝na u˝yç
posegregowaç wed∏ug temperatury
wody z kranu (w przypadku wody bardzo
prasowania: we∏n´ z we∏nà, bawe∏n´ z
z∏ej jakoÊci, lepiej u˝ywaç jest wody
bawe∏nà itd.
destylowanej).
• ˚elazko szybciej si´ nagrzewa ni˝ stygnie,
- Przed wlaniem wody
dlatego te˝ prasowanie nale˝y rozpoczynaç
do ˝elazka nale˝y
od wyrobów uszytych z materia∏ów, które
wyciàgnàç przewód
mo˝na prasowaç tylko w niskich
zasilajàcy z gniazdka
temperaturach, np. od tkanin syntetycznych.
sieciowego.
• W przypadku tkanin mieszanych, pokr´t∏o
- Prze∏àczyç regulator
termostatu nale˝y nastawiç na temperatur´
pary (B) na pozycj´
odpowiednià dla tych w∏ókien, które trzeba
O (= bez pary).
prasowaç w najni˝szej temperaturze.
- Nastawiç
Przyk∏adowo, je˝eli tkanina sk∏ada si´ w
trzypozycyjny
60% z poliestru i 40% bawe∏ny, to nale˝y
prze∏àcznik na
prasowaç jà przy termostacie ustawionym w
pozycj´ ∫ (rys. 9),
pozycji (1), która przewidziana jest dla
a od∏àczone od
poliestru i bez pary.
cz´Êci zasilajàcej i
Je˝eli nie znamy rodzaju prasowanej
przewodu ˝elazko
tkaniny, to najodpowiedniejszà temperatur´
podnieÊç z podstawy
prasowania sprawdzamy w miejscu
(rys. 10).
niewidocznym w czasie noszenia. Próby
zaczynaç zawsze od temperatury najni˝szej.
• Czystà we∏n´ mo˝na prasowaç z parà.
Zaleca si´ stosowanie maksymalnego
przep∏ywu pary i prasowanie przez suchà
szmatk´.
12
9
10
MAX
11
6
7
8
Podczas prasowania parowego tkaniny
Prasowanie z przewodem
we∏niane mogà nabraç po∏ysku. Dlatego
nale˝y prasowaç je po lewej stronie.
• Zamsz i inne tkaniny, które w czasie
prasowania szybko zaczynajà si´ b∏yszczeç,
powinny byç prasowane tylko w jednym
kierunku (“z w∏osem”); ˝elazko nale˝y
delikatnie przyciskaç do tkaniny. ˚elazko
utrzymywaç w ciàg∏ym ruchu.
• Jedwab i inne tkaniny podatne na nabranie
po∏ysku prasowaç po lewej stronie;
zapobiega to b∏yszczeniu si´ materia∏u. Przy
- Ustawiç trzypozycyjny prze∏àcznik na
prasowaniu jedwabiu lub innych delikatnych
pozycj´ ª (rys. 15).
tkanin nie nale˝y w∏àczaç pary, gdy˝ mo˝e
- PodnieÊç ˝elazko (wraz z cz´Êcià zasilajàcà)
to poplamiç tkanin´.
z podstawy (rys. 16).
- ˚elazko postawiç albo na jego tylnej cz´Êci
(razem z cz´Êcià zasilajàcà ) albo na
Ustawianie temperatury
podstawie.
Prasowanie bez przewodu
- Ustawiç ˝elazko na podstawie (rys. 12).
- Ustawiç pokr´t∏em termostatu odpowiednià
temperatur´, bioràc pod uwag´ wskazówki
umieszczone na metkach lub w tabeli
- Ustawiç trzypozycyjny prze∏àcznik na
(rys. 13).
pozycj´ ∫ (rys. 17).
- Pod∏àczyç przewód
- PodnieÊç ˝elazko (bez cz´Êci zasilajàcej) z
do gniazdka
podstawy (rys. 18).
sieciowego. Wtedy
- Podczas przerw w prasowaniu zawsze
zapali si´ lampka
odstawiaç ˝elazko na podstaw´.
kontrolna (H)
• (Wy∏àcznie typy HI 568/69) Prasowaç mo˝na
(rys. 14).
tak d∏ugo a˝ zaÊwieci si´ lampka kontrolna.
- Gdy ˝ó∏ta lampka
Gdy lampka kontrolna zaÊwieci si´, oznacza
kontrolna (H)
to, ˝e temperatura ˝elazka spad∏a poni˝ej
zgaÊnie, a nast´pnie
ustawionej. Aby osiàgnàç optymalny efekt
ponownie si´ zapali,
prasowania, ˝elazko nale˝y odstawiç na
mo˝na zaczàç prasowanie.
podstaw´, aby stopa nagrza∏a si´ do
- Podczas prasowania z przewodem ˝ó∏ta
odpowiedniej temperatury.
lampka kontrolna mo˝e si´ od czasu do
• Podczas d∏u˝szego prasowania ˝elazkiem
czasu zapalaç.
bez przewodu, przy wielokrotnym
• JeÊli ustawiasz termostat na ni˝szà
stosowaniu “ uderzenia parowego” i
temperatur´ po prasowaniu przy wy˝szej,
“zwi´kszonej iloÊci pary” stopa prasujàca
przystàp do ponownego prasowania dopiero
mo˝e stygnàç szybciej ni˝ jest to
po zapaleniu si´ i zgaÊni´ciu lampki.
przewidziane. Dlatego przy d∏u˝szym
prasowaniu z u˝yciem pary nale˝y u˝ywaç
˝elazka pod∏àczonego do przewodu.
13
15
16
17
18
12
13
14
HI 568/69
Spryskiwanie T
Zwi´kszona iloÊç pary (Turbo Steam -
wy∏àcznie typy HI 568/69) 0
Bielizn´ mo˝na
spryskiwaç przy
Jest to mo˝liwoÊç
ka˝dej temperaturze
uzyskania wi´kszej
˝elazka - po
iloÊci pary wodnej dla
kilkakrotnym
usuni´cia uporczywych
naciÊni´ciu przycisku
za∏amków. Dodatkowa
spryskiwacza (C)T -
para wodna jest
(rys. 19). Nale˝y si´
wytwarzana tak d∏ugo,
upewniç, czy w
jak d∏ugo przyciska si´
pojemniku jest dostateczna iloÊç wody.
guzik turbo.
- Wcisnàç i przytrzymaç przycisk 0 (F) przez
kilka sekund (rys. 22). Nast´pnie zwolniç
Prasowanie z parà
przycisk.
- Nie nale˝y przyciskaç tego przycisku bez
• Zgodnie ze wskazaniami na termostacie (A) i
przerwy przez wi´cej ni˝ 10 sekund. Zrobiç
w tabeli prasowanie parowe jest mo˝liwe
pomi´dzy jednym a drugim zastosowaniem
jedynie przy temperaturach wysokich:
tej funkcji co najmniej jednominutowà
2 lub 3 - Êrednie ciÊnienie pary
przerw´. JeÊli zapali si´ pomaraƒczowa
3 - wysokie ciÊnienie pary
lampka kontrolna (H), oznacza to, ˝e
• W konwencjonalnych rozwiàzaniach
˝elazko nagrza∏o si´ ponownie do
stosowanych w ˝elazkach parowych w
odpowiednio wysokiej temperatury.
przypadku, gdy nastawiona jest za niska
- Odczekaç, a˝ pomaraƒczowa lampka
temperatura, woda mo˝e skapywaç z
kontrolna zgaÊnie, by ponownie przystàpiç
otworów w stopie ˝elazka. W ten sposób na
do prasowania.
prasowanej bieliênie mogà powstaç zacieki.
Jednak nowe ˝elazka parowe z systemem
“Drip Stop” automatycznie przestajà
“Uderzenie parowe” 9
wytwarzaç par´, jeÊli temperatura jest za
niska. W takim przypadku mo˝na us∏yszeç
Przez naciÊni´cie
dêwi´k “klik”. Trzeba wtedy nastawiç
przycisku uderzenia
pokr´t∏o termostatu (A) na odpowiednià
parowego 9 (E) spod
temperatur´. Para zacznie byç wytwarzana,
stopy prasujàcej
jak tylko ˝elazko odpowiednio si´ rozgrzeje.
wydobywa si´ du˝a
• Upewniç si´, czy jest odpowiednio du˝o
iloÊç goràcej pary
wody w zbiorniku.
(rys. 23).
- Ustawiç ˝elazko na
Mo˝e byç to bardzo
podstawie.
pomocne, na przyk∏ad
- Nastawiç pokr´t∏o
przy prasowaniu
termostatu (A) na
zagnieceƒ, których nie mo˝na rozprasowaç
˝àdanà temperatur´
przy normalnym zwil˝aniu tkaniny. Uderzenie
w przedziale
pary mo˝na wytworzyç tylko przy bardzo
“prasowanie
goràcym ˝elazku (termostat ustawiony w
parowe”. (2 lub
pozycji 2 lub 3).
3) (rys. 20).
- W∏àczyç przewód do
Prasowanie w pozycji pionowej
gniazdka Êciennego.
Uderzenie parowe
- Gdy ˝ó∏ta lampka
mo˝e byç tak˝e
kontrolna (H) zapali
zastosowane przy
si´, a nast´pnie
˝elazku trzymanym
zgaÊnie, mo˝na
pionowo (rys. 24). Jest
przystàpiç do
to bardzo wygodne,
prasowania.
jeÊli trzeba usunàç
- Przesunàç suwak
zagniecenia z zas∏on,
regulatora pary (B)
kotar, itp.
na ˝àdanà pozycj´ (rys. 21).
14
11
22
23
24
;
;
19
20
21
Prasowanie na sucho
- Wcisnàç przycisk
“Self Clean” (I) -
W czasie prasowania na sucho (bez pary),
(rys. 26).
nale˝y post´powaç jak podczas prasowania z
Z otworów w stopie
parà, z tym, ˝e regulator pary (B) ustawiony
˝elazka zacznie si´
jest w pozycji O (= prasowanie bez pary).
wydobywaç para i
goràca woda wraz z
zanieczyszczeniami
Automatyczny wy∏àcznik “Auto Stop” -
i kamieniem.
(wy∏àcznie typy HI 568/69)
- Nale˝y przy tym poruszaç ˝elazkiem do
przodu i do ty∏u.
JeÊli pod∏àczone do
- Po up∏ywie minuty, gdy zbiorniczek na wod´
przewodu ˝elazko jest
jest pusty, zwolniç przycisk “Self Clean”.
pozostawione w
- JeÊli wyp∏uka∏o si´ du˝o zanieczyszczeƒ i
nieruchomej pozycji
kamienia, nale˝y ponowiç oczyszczanie.
przez okres d∏u˝szy ni˝
- ˚elazko ustawiç na podstawce. Poczekaç,
30 sekund zaczyna
a˝ ˝elazko ponownie nagrzeje si´ i zgaÊnie
migaç czerwona
pomaraƒczowa lampka kontrolna.
lampka kontrolna (O),
- Zdjàç ˝elazko z podstawy i przeprasowaç
s∏ychaç sygna∏
niepotrzebny kawa∏ek tkaniny.
dêwi´kowy i ˝elazko
Resztki wody, znajdujàce si´ w ˝elazku,
wy∏àcza si´ automatycznie (rys. 25).
wyparujà przez otwory w stopie prasujàcej.
JeÊli ˝elazko znajduje si´ w pozycji poziomej
- Wy∏àczyç ˝elazko z sieci i odczekaç, a˝
automatyczny wy∏àcznik zadzia∏a po up∏ywie
ostygnie przed odstawieniem na podstawk´.
30 sekund, jeÊli ˝elazko znajduje si´ w pozycji
pionowej - po up∏ywie 8 minut.
Czyszczenie
- Po podniesieniu ˝elazka czerwona lampka
kontrolna (O) gaÊnie, a zapala si´
- Przed przystàpieniem do czyszczenia
pomaraƒczowa lampka kontrolna (H).
wtyczk´ wyjàç z kontaktu i poczekaç, a˝
˚elazko nagrzewa si´ ponownie.
˝elazko wystygnie.
- Gdy pomaraƒczowa lampka kontrolna
- Resztki osadu i brudu na stopie prasujàcej
zgaÊnie, mo˝na wznowiç prasowanie.
mo˝na usunàç wilgotnà Êciereczkà z
delikatnym Êrodkiem czyszczàcym.
Uwa˝aç, ˝eby powierzchnia stopy
Konserwacja
prasujàcej by∏a zawsze g∏adka; w czasie
prasowania uwa˝aç na metalowe cz´Êci
• Automatyczne oczyszczanie ˝elazka z
garderoby.
kamienia (funkcja “self-cleaning”), nale˝y
- Górnà cz´Êç ˝elazka mo˝na wyczyÊciç
przeprowadzaç co najmniej dwa razy w
wilgotnà Êciereczkà.
miesiàcu.
- Od czasu do czasu nale˝y wyczyÊciç
• Im twardsza woda stosowana do nape∏niania
zbiorniczek na wod´. W tym celu nalaç do
˝elazka, tym cz´Êciej trzeba je czyÊciç.
niego wody i potrzàsaç nim. Nast´pnie wylaç
- Regulator pary (B) ustawiç w pozycji O.
wod´.
- ˚elazko postawiç w pozycji pionowej i
nape∏niç zbiorniczek do maksymalnej
obj´toÊci.
- Zamknàç zbiorniczek.
- Ustawiç ˝elazko na podstawce.
- Termostat (A) ustawiç w pozycji MAX.
- W∏o˝yç wtyczk´ do gniazdka Êciennego.
- Poczekaç, a˝ ˝elazko nagrzeje si´, a
pomaraƒczowa lampka kontrolna (H)
zgaÊnie i zapali si´ ponownie.
- Ustawiç trzypozycyjny prze∏àcznik na
pozycj´ ∫ (rys. 17) i zdjàç ˝elazko z
cz´Êcià zasilajàcà z podstawy (rys. 18).
- ˚elazko trzymaç nad zlewem w pozycji
poziomej.
25
26
15
Przechowywanie
- Przechowywaç ˝elazko na podstawce, aby
uniknàç uszkodzenia stopy prasujàcej.
- Wtyczk´ wyjàç z kontaktu.
- Przygiàç uchwyt do podstawy (rys. 34).
- Wy∏àcznie typy HI558/69: Odczekaç a˝
˝elazko ostygnie.
Nast´pnie za∏o˝yç skrzynk´ do
przenoszenia na podstaw´. Przycisnàç
- Wylaç ze zbiorniczka
skrzynk´ tak, by si´ zamkn´∏a
resztki wody (rys. 9).
(charakterystyczny dêwi´k “klik”) - (rys. 35.)
- Regulator pary (B)
ustawiç w pozycji O
(bez pary).
- Ustawiç
trzypozycyjny
prze∏àcznik na
pozycj´ ∫ (rys. 27).
- Zdjàç ˝elazko z
podstawki. Otworzyç otwór do nape∏niania
zbiornika i wylaç pozosta∏à wod´ (rys. 28).
- ˚elazko postawiç z powrotem na podstawce
i poczekaç, a˝ ostygnie (rys. 29).
- Ustawiç trzypozycyjny prze∏àcznik na
pozycj´ do przechowywania (rys. 30).
˚elazko, cz´Êç zasilajàca i podstawka sà
teraz zamkni´te razem.
- Przewód mo˝na owinàç wokó∏ podstawki i
spiàç klipsem (rys. 31).
- Odblokowaç uchwyt mocujàcy (S) (rys. 32).
- Odkr´ciç Êrubk´ (rys. 33).
16
27
28
29
30
31
32
33
34
35
CLICK
V‰eobecn˘ popis (obr. 1)
âesky
A Regulátor teploty (otoãn˘).
B Regulátor páry (posuvn˘)
DÛleÏitá upozornûní
0 = bez páry,
1 = minimum páry,
• Dfiíve neÏ svÛj nov˘ pfiístroj pouÏijete,
6 = maximum páry.
proãtûte podrobnû cel˘ návod a sledujte
C Tlaãítko postfiiku vodou T.
pfiíslu‰ná vyobrazení.
D Vodní tryska.
• NeÏ Ïehliãku pfiipojíte do sítû, pfiesvûdãte
E Tlaãítko parního impulsu 9.
se, zda napûtí, uvedené na jejím typovém
F Tlaãítko parního impulsu „turbo” 0 (u typu
‰títku, souhlasí s napûtím ve va‰í
HI 568/69).
svûtelné síti.
G Otvor pro nalévání vody.
• Pokud by byla Ïehliãka jakkoli
H Kontrolka ohfievu (jantarová).
po‰kozena, nezapínejte ji.
I Tlaãítko k samoãi‰tûní (Self Clean).
• Pfied prvním zapnutím Ïehliãky odstraÀte
J Kontrolní okénko stavu vody.
z jejího dna pfiípadné ochranné nebo
K Typov˘ ‰títek.
instrukãní nálepky. Dno Ïehliãky otfiete
L Odmûrka na vodu.
mûkk˘m hadfiíkem.
M Dno Ïehliãky.
• KdyÏ ukonãíte Ïehlení:
N RukojeÈ „Soft Hand” (u typu HI 568/69).
- nastavte regulátor páry do polohy O,
O Kontrolka funkce „Auto Stop” (ãervená)
- postavte Ïehliãku na její podstavec,
(u typu HI 568/69).
- vytáhnûte síÈovou zástrãku ze zásuvky.
P Napájecí jednotka.
• ZabraÀte dûtem v pfiístupu k horké
Q Podstavec.
Ïehliãce a dbejte na to, aby ji nemohly
R Tfiípolohov˘ pfiepínaã:
strhnout za pfiívodní kabel na zem.
∫ = Ïehlení bez pfiívodního kabelu,
• KdyÏ Ïehliãku plníte vodou nebo vodu
- = poloha pro uchovávání Ïehliãky,
vyléváte, vÏdy ji nejprve odpojte od sítû
ª = Ïehlení s pfiívodním kabelem.
a nechte vychladnout.
S Pfiíchytka podstavce.
• Îehliãku ani její podstavec nesmíte nikdy
T Pfiíchytka pfiívodního kabelu.
ponofiit do vody.
U Transportní obal (u typu HI 558 a HI 569).
• Nûkteré díly Ïehliãky jsou z v˘roby
potfieny ochrann˘m tukem. Proto mÛÏe
Ïehliãka po prvním zapnutí trochu koufiit.
Pfiíprava k pouÏití
Tento jev v‰ak zakrátko zmizí.
• Do zásobníku vody nikdy nenalévejte
ocet nebo jin˘ pfiípravek k odstranûní
vodního kamene.
• NepouÏívejte chemicky zmûkãovanou
vodu.
• Dbejte na to, aby se pfiívodní kabel nikdy
nedot˘kal hork˘ch ãástí Ïehliãky.
• Pravidelnû kontrolujte stav pfiívodního
kabelu. Pokud byste zjistili, Ïe je tento
kabel jakkoli po‰kozen, obraÈte se na
- Pouze pro typy HI 559 a HI 569:
autorizovanou opravnu nebo na servis
- Uvolnûte zaji‰tûní (obr. 2) a sejmûte transportní
firmy Philips.
obal (obr. 3).
• Vystfiikující proud páry je velmi hork˘.
Nikdy jím nemifite smûrem k osobám.
17
2
3
- Pfiívodní kabel odviÀte v celé jeho délce
- Podstavec pfiipevnûte
(obr. 4 a 5).
na Ïehlicí prkno nebo
na jinou vhodnou
podloÏku
(obr. 6, 7 a 8)
a zajistûte ho
pfiíchytkou.
6
7
8
Tabulka teplot
Informace
Druh textilie Nastavení
Nastavení
Parní impuls Parní impuls
Postfiik
Nastavení
regulátoru
regulátoru
„turbo”
vodou
teploty
teploty
MIN
Syntetika
0
A
akryl,
A
viskóza,
1
polyamid,
B
A
T
nylon,
9
XX
0
A
polyestér.
A
Hedvábí
A
A
A
2
Vlna
C
1 - 2
A
T
9
X
0
A
Bavlna
3
D
MAX
3 - 6
T
Plátno
9
0
Z
Pokud je ná‰ivce informace Z znamená to, Ïe se textilie nesmí Ïehlit.
O
O
|
F
F
A
X
M
HILO
LINEN
COTONE
ALGODON
NYLON
LANA
NYLON
LANA
SETA
SEDA
4
5
18
Podstavec lze téÏ postavit na povrch stolu.
teplotu pro polyestér (1) a Ïehlit bez páry.
PryÏové dno podstavce brání jeho sklouznutí.
Pokud Ïehlenou textilii neznáte, vyzkou‰ejte
Nedoporuãujeme v‰ak v tomto pfiípadû
vhodnou teplotu na místû, které není viditelné.
umísÈovat podstavec tûsnû u hrany stolu,
Zaãnûte vÏdy nejniωí teplotou a tu pak
abyste Ïehliãku i s podstavcem neshodili na
postupnû zvy‰ujte.
zem.
• âistû vlnûné tkaniny (100 % vlna) Ïehlete
s parou a navíc pouÏijte such˘ hadfiík.
• U vlnûn˘ch tkanin vznikají ãasto pfii Ïehlení
Plnûní zásobníku vodou (pro Ïehlení a postfiik)
lesklá místa. Tyto textilie proto doporuãujeme
Ïehlit po rubové stranû.
• Pro plnûní
• Sametové textilie, které jsou rovnûÏ náchylné
zásobníku mÛÏete
na vytváfiení leskl˘ch ploch, Ïehlete vÏdy jen
pouÏívat vodu
jedním smûrem („po vlase”) a na Ïehliãku
z vodovodu.
netlaãte.
- Pfied plnûním
• Syntetické tkaniny a hedvábí Ïehlete pokud
zásobníku vodou
moÏno téÏ z rubové strany a nepouÏívejte
vytáhnûte síÈovou
Ïádné spreje, které by mohly na tkaninû
zástrãku ze zásuvky.
vytváfiet neÏádoucí skvrny.
- Regulátor páry (B)
nastavte do polohy
O (bez páry).
Nastavení teploty
- Tfiípolohov˘ pfiepínaã
(R) nastavte do
polohy ∫ (obr. 9)
a sejmûte Ïehliãku
z podstavce (obr. 10).
- Îehliãku postavte do
svislé polohy a otevfite
plnicí otvor. Do
zásobníku nalejte
nejv˘‰e 230 ml vody
(obr. 11). PouÏijte
- Postavte Ïehliãku na její podstavec (obr. 12).
odmûrku.
- Regulátor teploty (A) nastavte na poÏadovanou
- Plnicí otvor uzavfiete.
teplotu podle instrukcí na ná‰ivce nebo podle
údajÛ v tabulce (obr. 13).
- ZasuÀte síÈovou zástrãku do zásuvky.
Nastavení teploty
Kontrolka ohfievu (H)
(jantarové barvy) se
• Nejprve se pfiesvûdãte, zda na Ïehlené textilii
rozsvítí (obr. 14).
není ná‰ivka s pokyny k Ïehlení. Tyto pokyny
- KdyÏ kontrolka (H)
vÏdy respektujte.
zhasne a znovu se
• Pokud ná‰ivku nenajdete, mÛÏete pouÏít
rozsvítí, mÛÏete zaãít
tabulku v tomto návodu.
s Ïehlením.
• Pokyny v tabulce platí pro základní materiály,
• Kontrolka teploty (H)
nikoli pro jejich aplikace (povrchy s leskem
se v prÛbûhu Ïehlení
nebo s reliéfy apod). V tûchto pfiípadech volte
stfiídavû rozsvûcí a opût zhasíná. To je
niωí teplotu.
dokladem správné funkce termostatu.
• Pfied Ïehlením textilie roztfiiìte podle toho,
• Pokud byste v prÛbûhu Ïehlení sníÏili teplotu
jakou teplotu k Ïehlení vyÏadují. To znamená
regulátorem (A), vyãkejte, aÏ se kontrolka (H)
vlnu k vlnû, bavlnu k bavlnû apod.
znovu rozsvítí. Teprve pak má Ïehliãka novû
• ProtoÏe se Ïehliãka daleko rychleji ohfiívá neÏ
nastavenou teplotu.
se chladí, zaãnûte nejprve Ïehlit textilie, které
vyÏadují niωí teplotu a postupnû teplotu
zvy‰ujte.
• Pokud se textilie skládá z kombinace rÛzn˘ch
materiálÛ, volte teplotu pro nejchoulostivûj‰í
sloÏku. JestliÏe se textilie skládá napfiíklad ze
40 % polyestéru a 60 % bavlny, je tfieba volit
9
10
MAX
11
12
13
14
HI 568/69
19
Îehlení s pfiívodním kabelem
Postfiik vodou T
Stisknutím tlaãítka T(C)
mÛÏete Ïehlenou textilii
postfiíkat vodou bez
ohledu na to, jakou
teplotu jste na regulátoru
teploty nastavili
(obr. 19).
Dbejte jen na to, aby byl v zásobníku dostatek
- Tfiípolohov˘ pfiepínaã nastavte do polohy ª
vody.
(obr. 15).
- Sejmûte Ïehliãku z podstavce (s napájecí
jednotkou) (obr. 16).
Îehlení s parou
- Postavte Ïehliãku bud’ do svislé polohy nebo
na její podstavec.
• Oznaãení na regulátoru teploty (A) i v tabulce
teplot upozorÀují, Ïe lze Ïehlit s parou pouze pfii
nastaven˘ch vy‰‰ích teplotách Ïehliãky.
Îehlení bez pfiívodního kabelu
2 nebo 3 znamená stfiední mnoÏství páry,
3 znamená maximum páry.
• U bûÏn˘ch Ïehliãek mÛÏe pfii nastavené men‰í
teplotû ze dna vytékat voda. Tato Ïehliãka je
vybavena funkcí „Drip Stop”, která tomuto jevu
zabraÀuje a pfii niωí nastavené teplotû v˘stup
páry uzavfie.
Pokud by tento stav
nastal, ozve se
klapnutí.
• Pfiesvûdãte se, Ïe je
- Tfiípolohov˘ pfiepínaã nastavte do polohy ∫
v zásobníku dostatek
(obr. 17).
vody.
- Sejmûte Ïehliãku z podstavce (bez napájecí
- Postavte Ïehliãku na
jednotky) (obr. 18).
podstavec.
- VÏdy, kdyÏ Ïehlení pfieru‰íte, postavte Ïehliãku
- Nastavte regulátor
zpût na podstavec.
teploty (A) do polohy
• (Pouze u typÛ HI 568/69) Îehlit mÛÏete tak
pro Ïehlení s parou
dlouho, dokud se nerozsvítí indikaãní
(2 nebo 3)
kontrolka.
(obr. 20).
Jakmile kontralka zaãne blikat, znamená to, Ïe
- ZasuÀte síÈovou
jiÏ teplota Ïehliãky poklesla pod nastavenou
zástrãku do zásuvky.
úroveÀ. V takovém pfiipadû doporuãujeme
- Vyãkejte aÏ kontrolka
postavit Ïehliãku na její podstavec, aby se opût
(H) zhasne a opût se
ohfiála na poÏadovanou teplotu.
rozsvítí.
• JestliÏe Ïehlíte tûωí textilie nebo pouÏíváte
- Nastavte regulátor páry (B) do vhodné polohy
ãastûji parní impulsy, mÛÏe se dno Ïehliãky
(obr. 21).
ochlazovat pfiíli‰ rychle. V takovém pfiípadû
doporuãujeme Ïehlit s pfiipojen˘m pfiívodním
kabelem.
20
15
16
17
18
19
20
21

