Philips Grind & Brew Kaffeemaschine: инструкция
Раздел: Аксессуары для дома
Тип:
Инструкция к Philips Grind & Brew Kaffeemaschine
HD7762
EN User manual 2
KO 사용설명서 107
DA Brugervejledning 17
NL Gebruiksaanwijzing 121
DE Benutzerhandbuch 31
NO Brukerhåndbok 137
FI Käyttöopas 47
RU Руководствопользователя 152
FR Mode d’emploi 61
SV Användarhandbok 168
IT Manuale utente 77
UK Посібниккористувача 183
KK Қолданушының нұсқасы 92
ZH-CN 用户手册 199

3.1 Danger
1 Introduction
• Never immerse the appliance in water or any
other liquid, nor rinse it under the tap.
Congratulations on your purchase and welcome
to Philips! To fully benet from the support
3.2 Warning
that Philips offers, register your product at
• Check if the voltage indicated on the bottom
www.philips.com/welcome.
of the appliance corresponds to the local
mains voltage before you connect the
appliance.
• If the mains cord is damaged, you must have it
2 General description
replaced by Philips, a service centre authorised
by Philips or similarly qualied persons in
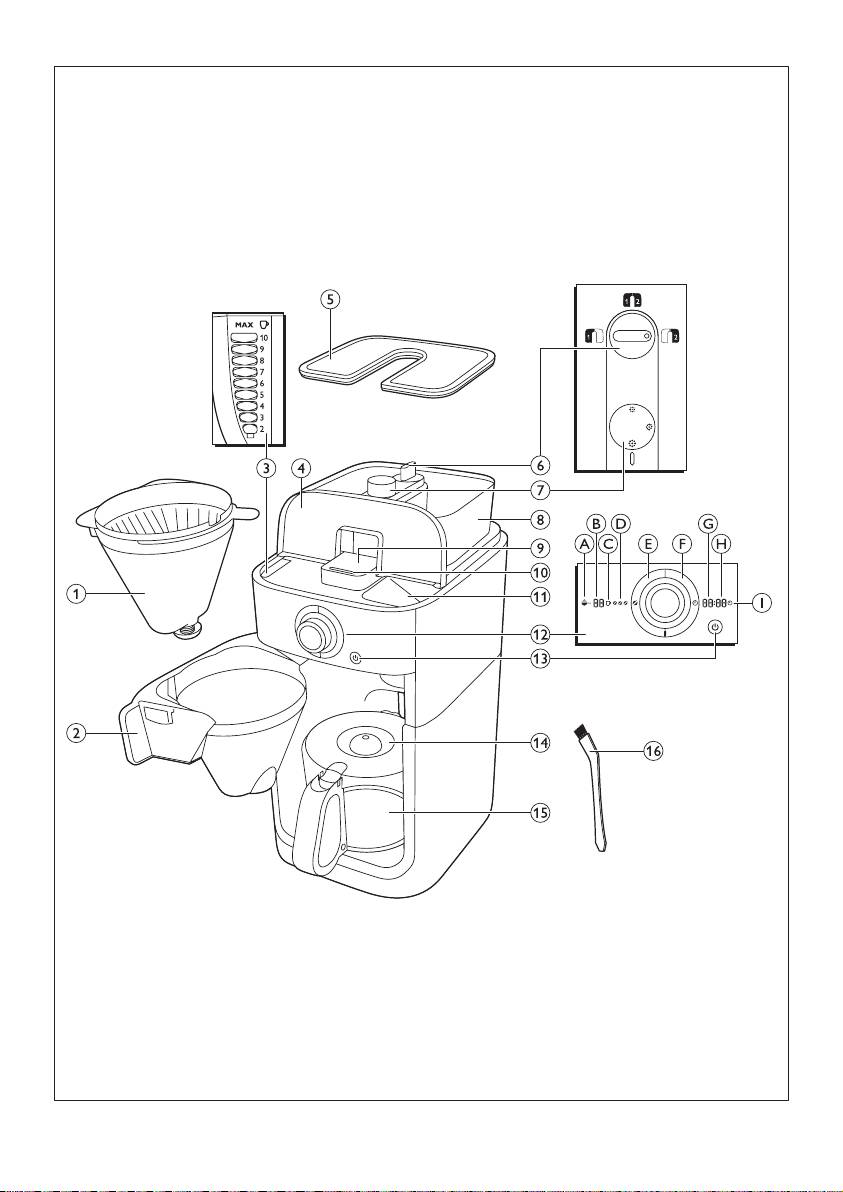
1 Filter basket
order to avoid a hazard.
2 Filter basket holder
• This appliance can be used by children aged
3 Water level indicator
from 8 years and above and by persons
4 Water reservoir lid
with reduced physical, sensory or mental
5 Bean container lid
capabilities or lack of experience and
6 Container selector
knowledge if they have been given supervision
7 Coarseness knob
or instruction concerning use of the appliance
8 Duo coffee bean container
in a safe way and if they understand the
9 Lid of coffee bean chute
hazards involved.
10 Coffee bean chute ejector
• Cleaning and user maintenance shall not be
11 Water lling hole
made by children unless they are older than
12 Display
8 and supervised.
A Pre-ground coffee icon
• Keep the appliance and its cord out of the
B Number of cups
reach of children aged less than 8 years.
C Coffee cup icon
• Children should be supervised to ensure that
D Strength select coffee bean icon
they do not play with the appliance.
E Strength select button
• Do not let the mains cord hang over the
F Timer button
edge of the table or worktop on which the
G Hour indication
appliance stands.
H Minute indication
• Do not touch the grinding burrs of the
I Timer icon
appliance, especially when the appliance is
13 On/off button
connected to the mains.
14 Glass jug lid
• Keep the packaging materials (plastic bags,
15 Glass jug
cardboard buffers, etc.) out of the reach of
16 Cleaning brush
children, as they are not a toy.
• Do not touch the hot surfaces of the
appliance when it operates.
• This appliance is designed to grind beans and
3 Important
make coffee. Use it correctly and with care to
avoid scalding by hot water and steam.
Read this user manual carefully before you use the
• Do not empty the water reservoir by tilting
appliance and save it for future reference.
the appliance, it can damage the appliance.
Only empty the water reservoir by following
the ush instruction.
2
3
• Do not use the appliance if the plug, the mains
cord or the appliance itself is damaged.
4 Beforerstuse
• If a problem occurs that you cannot solve
by means of this user manual, contact the
Consumer Care Centre in your country. If the
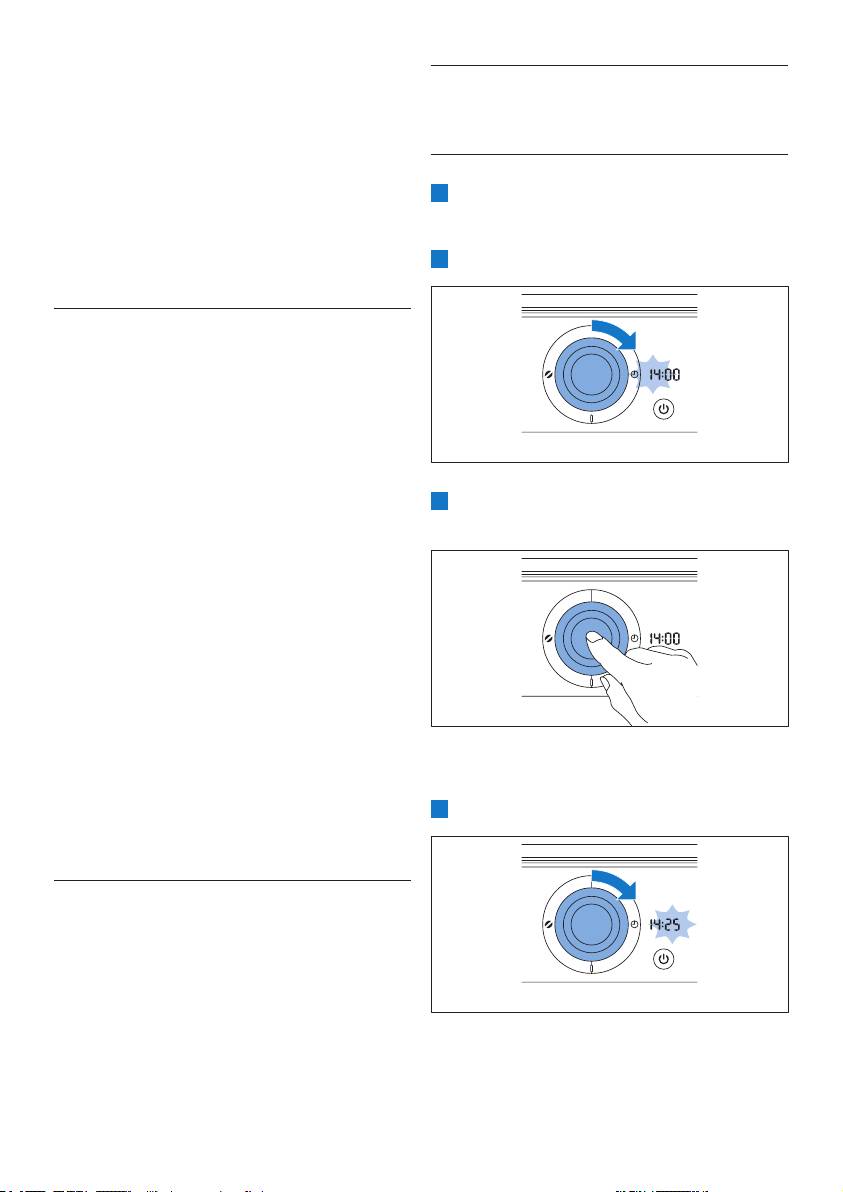
4.1 Setting the clock
problem cannot be solved, take the appliance
1 Put the mains plug in the wall socket.
to a service centre authorised by Philips for
• 00:00 ashes on the display to indicate
examination or repair. Do not attempt to
that you have to set the clock time.
repair the appliance yourself, otherwise your
2 Turn the knob to set the hour.
guarantee becomes invalid.
3.3 Caution
• Do not place the appliance on a hot surface
and prevent the mains cord from coming into
contact with hot surfaces.
• Unplug the appliance if problems occur during
grinding or brewing and before you clean it.
• Do not move the appliance while it is
operating.
• The appliance becomes hot during use.
3 Press in the centre of the knob to conrm
Let the appliance cool down before you
the hour.
store it.
• During brewing, the lower part of the
appliance and the bottom of the jug
become hot.
• After you have unpacked the appliance, make
sure it is complete and undamaged. If in doubt,
do not use the appliance but contact the
Consumer Care Centre in your country.
• This appliance is intended for normal
household use only. It is not intended for
use in environments such as staff kitchens
• The minutes start to ash to indicate that
of shops, ofces, farms or other work
you have to set the minutes.
environments. Nor is it intended to be used
4 Turn the knob to set the minutes.
by clients in hotels, motels, bed and breakfasts
and other residential environments.
3.4
Electromagneticelds(EMF)
This Philips appliance complies with all standards
regarding electromagnetic elds (EMF). If handled
properly and according to the instructions in this
user manual, the appliance is safe to use based on
scientic evidence available today.
4

5 Press in the centre of the knob to conrm the
4 Press the on/off button.
minutes.
ENGLISH
• The display lights up.
6 The display shows the set clock time.
5 Press the strength select button.
The coffeemaker is ready for use.
4.2Flushingtheappliance
You need to ush the coffeemaker once before
rst use.
1 Open the water reservoir lid. Fill the water
reservoir with fresh cold water up to the
8-cup indication.
6 Turn the knob to choose the pre-ground
coffee setting.
D
Note:
Do not put coffee beans or ground coffee in
the appliance.
2 Close the water reservoir lid.
3 Put the jug in the appliance.
• The pre-ground coffee icon lights up.
5
Оглавление
- 1 Introduction
- 4 Beforerstuse
- 5 Using the appliance
- 6 Cleaning and maintenance
- 7 Ordering accessories 10 Troubleshooting
- 1 Introduktion
- 4 Førapparatettages
- 5 Sådan bruges apparatet
- 6 Rengøringog
- 8 Miljøhensyn
- 1 Einführung 3 Wichtig
- 4 Vor dem ersten Gebrauch
- 5 Das Gerät benutzen
- 6 Reinigung und
- 7 Zubehör bestellen
- 8 Umwelt
- 1 Johdanto
- 4 Käyttöönotto
- 5 Käyttö
- 6 Puhdistusjahoito
- 9 Takuujatuki
- 1 Introduction
- 4 Avantlapremière
- 5 Utilisation de l’appareil
- 6 Nettoyageet
- 7 Commande d’accessoires
- 9 Garantie et
- 1 Introduzione
- 4 Primo utilizzo
- 5 Modalitàd’uso
- 6 Pulizia e manutenzione
- 7 Ordinazione degli 10 Risoluzione dei accessori problemi
- 1 Кіріспе
- 4 Алғашқолданар
- 5 Құрылғыны пайдалану
- 6 Тазалаужәне күтіпұстау
- 9 Кепілдікжәне
- 1 소개
- 4 처음사용전
- 5 제품사용
- 6 청소및유지관리
- 9 보증및지원
- 1 Introductie 3 Belangrijk
- 4 Voor het eerste
- 5 Het apparaat gebruiken
- 6 Reiniging en
- 7 Accessoires bestellen
- 9 Garantie en
- 1 Innledning
- 4 Førførstegangs
- 5 Bruke apparatet
- 6 Rengjøringog vedlikehold
- 7 Bestilletilbehør
- 8 Miljø
- 1 Введение 3 Важная
- 4 Передпервым использованием
- 5 Использование прибора
- 6 Очисткаиуход
- 7 Заказаксессуаров
- 8 Защита
- 1 Introduktion
- 4 Föreförsta
- 5 Användaapparaten
- 6 Rengöring och
- 7 Beställa tillbehör
- 10Felsökning
- 1 Вступ 3 Важлива
- 4 Передпершим
- 5 Застосування пристрою
- 6 Чищеннятадогляд
- 7 Замовлення приладь
- 8 Навколишнє
- 1 简介
- 4 首次使用之前
- 5 使用本产品
- 6 清洁和保养
- 7 订购附件
- 10故障种类和处理方法
